I mentioned in my last post that we recently celebrated Russell’s birthday with a night out on the town with friends. We did dinner, drinks and merriment over the weekend, but his actual birthday was on a Monday so that night we stayed in and made dinner. Later in the evening we invited a friend over to help us eat some cake and drink champagne.

Russell loves all things 80s. The tackier and more out-there, the better. He appreciates 80s music, pop culture, art, celebrities, you name it, so for his birthday I wanted to go all out and bring that era back for him. I went crazy with hot pink animal print wrapping paper, black satin ribbon, expensive champagne, and hot pink candles. Of course I had to have a cake to put those candles into, and there’s something about Devil’s Food Cake that just screams 80s to me. To be honest, I’m not even really sure why. I was 7 years old when the 80s came to a close, so I don’t really remember all that much of it, but the 80s were all about excess and Devils’s Food Cake is certainly a more-is-more kind of cake.

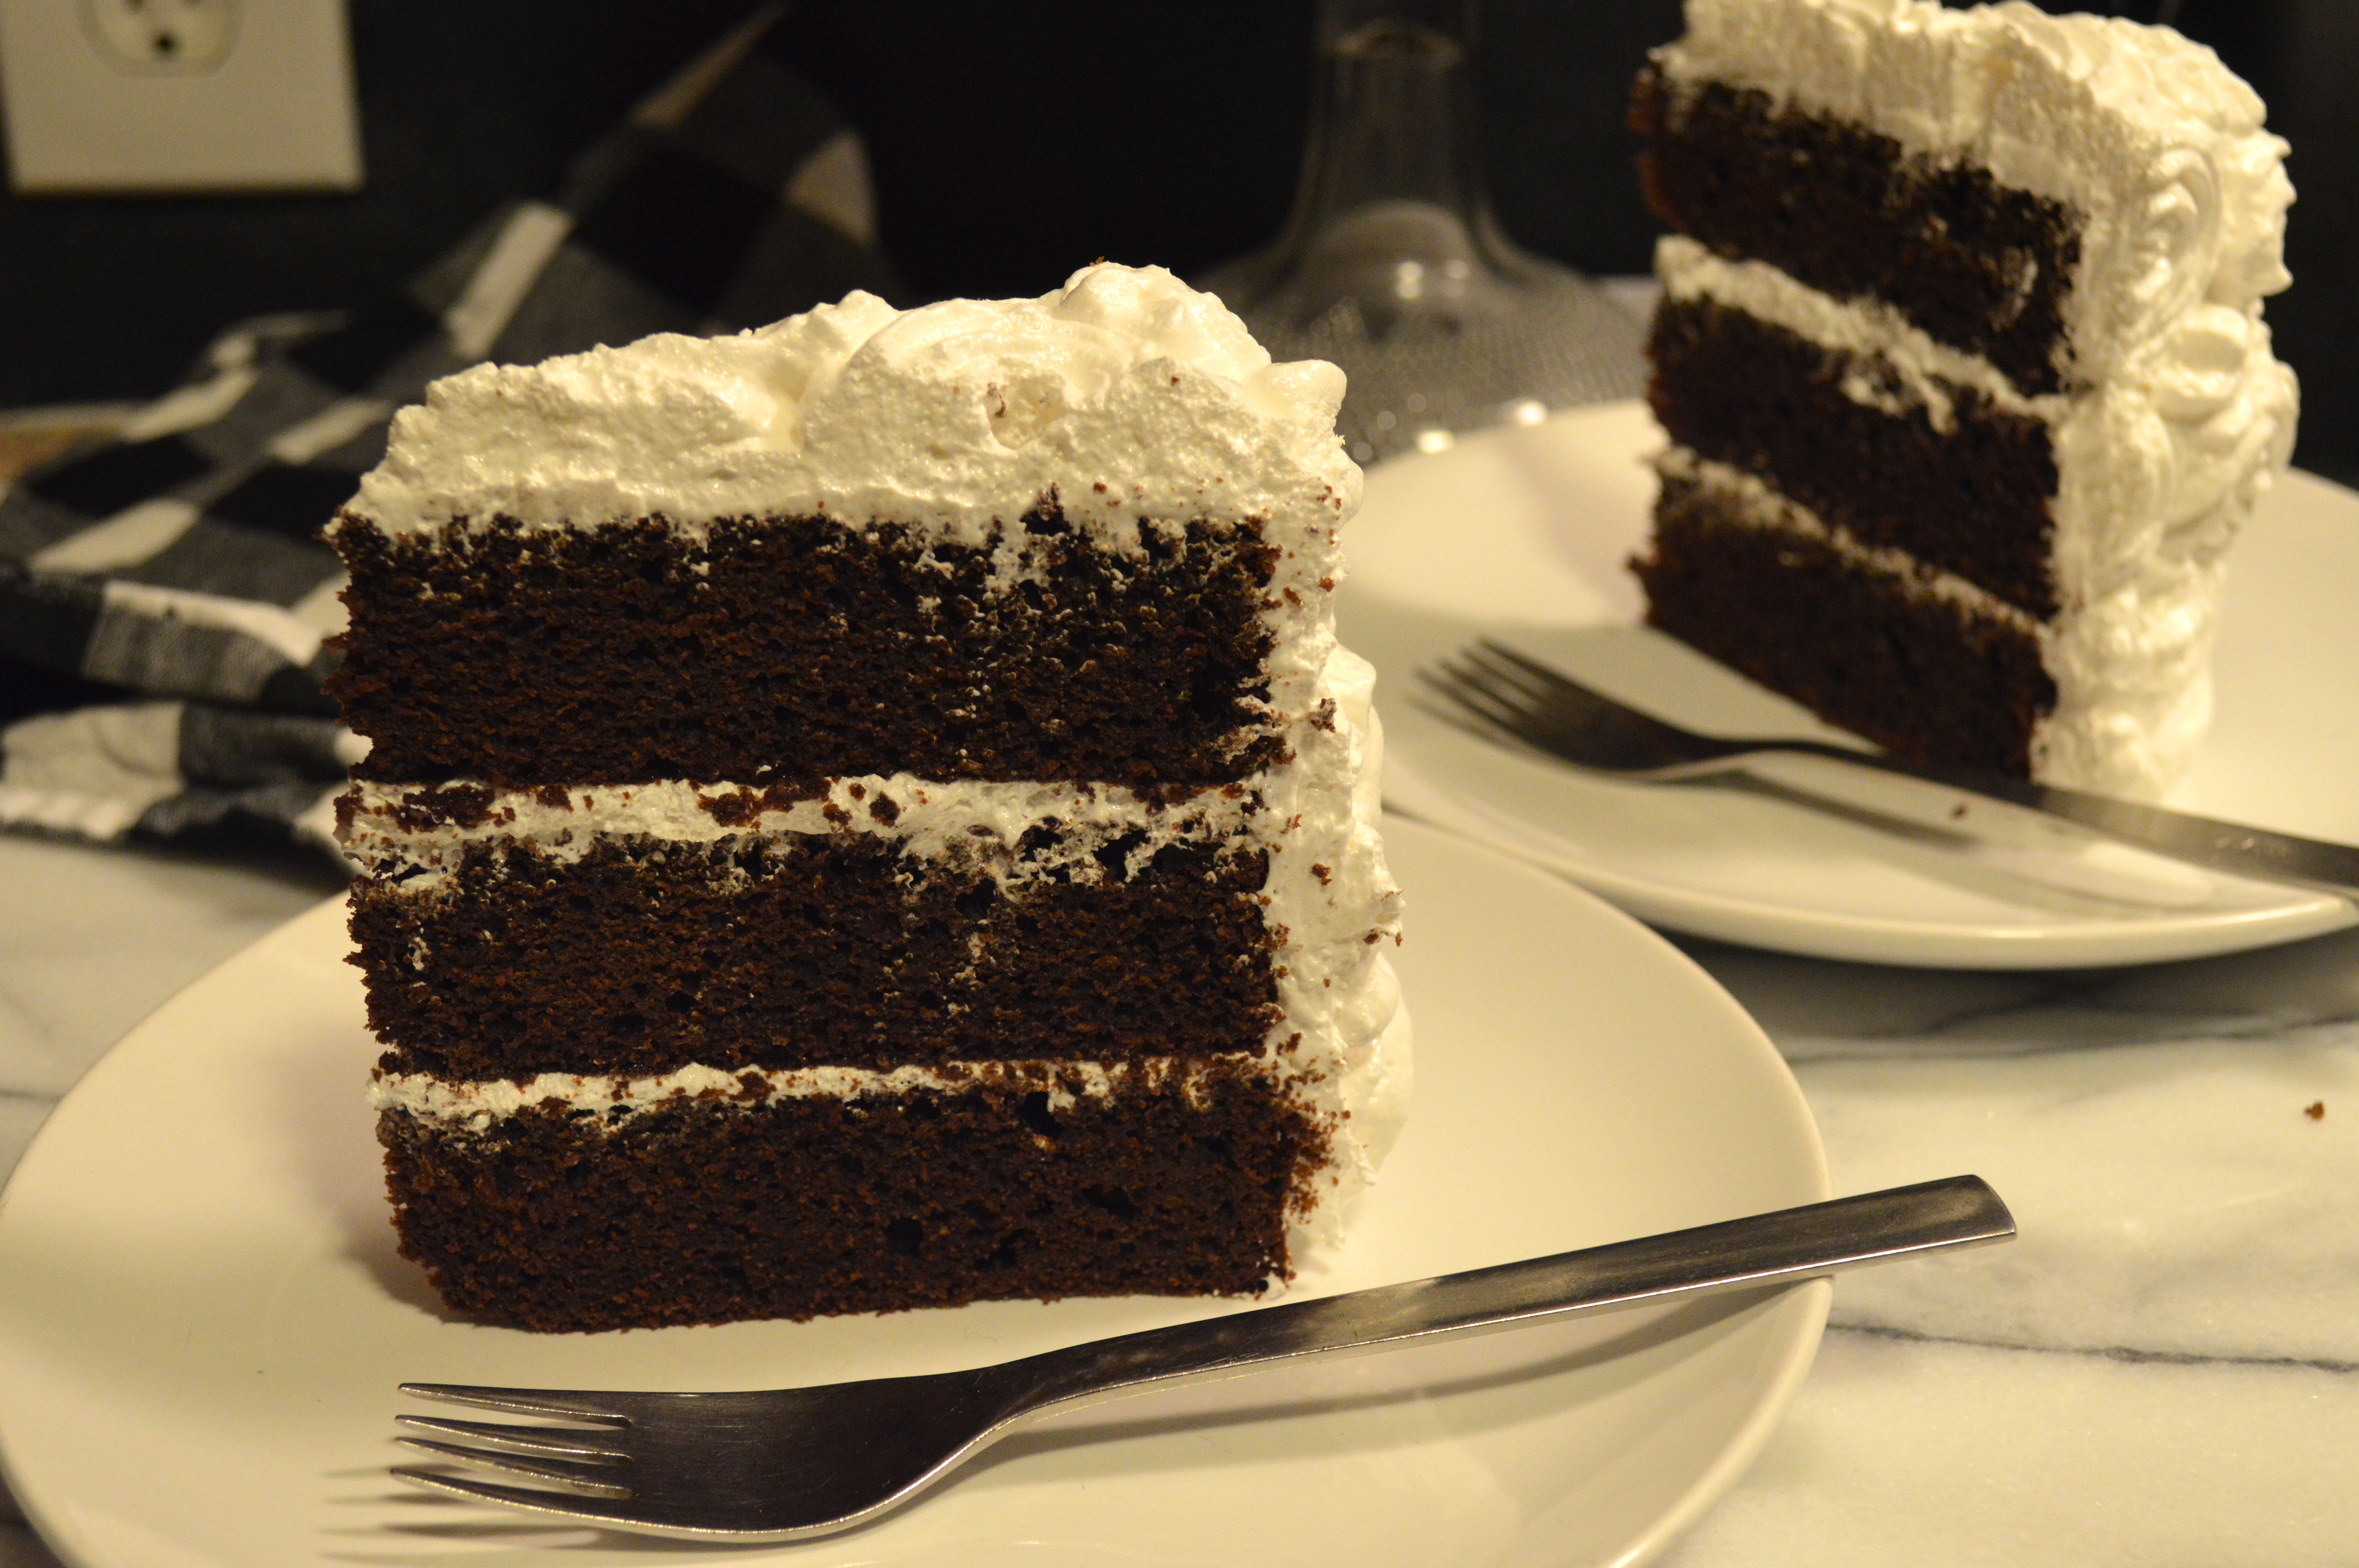
This cake calls for natural cocoa instead of dutch process. Dutch process cocoa has a deep dark intensely chocolatey flavor, but natural cocoa has a subtler, warmer taste that reads more “cocoa” than chocolate. I don’t know if that makes sense, but try to think of the difference between a dark chocolate bar or flourless chocolate cake and the taste of hot cocoa or plain chocolate ice cream. So, while this type of cocoa is warmer and less in-your-face, a full cup and a half of it goes into the mix to make sure this cake is supremely chocolatey and really screams “Devil’s Food Cake!”
Much like the red velvet cake I made a while ago, this recipe also calls for cake flour to ensure a light and tender crumb, and uses buttermilk to help add moisture and give the cake a very subtle tanginess that really helps the cocoa feel richer and more complex. There’s also a bit of brown sugar that helps the cake keep moist and adds just a bit of dark caramel-y depth. Yum.

I decided to pair this cake with a fluffy marshmallow icing, which was not only delicious, but also absolutely gorgeous. This beautiful tall cake covered in white marshmallowy roses was a real stunner. It was just as impressive when sliced with the perfect white icing in sharp contrast against the dark interior of the cake. The recipe provided below will make enough icing to fill the cake and cover it with a generous layer of icing, but if you want to decorate it in the rosette design I used, you’ll need to multiply the recipe by 1.5. I used an Ateco 824 tip, but any large open star tip will work. If you are using a stiffer icing, you could also use a closed star tip.
I am absolutely no pro when it comes to working with piping bags and tips, but this design was quite easy to do. I have shaky hands so small delicate piping is difficult for me, but this design is little more than large swirls repeated over and over. After filling and crumb coating the cake, I basically started with one swirl in the center of the top of the cake, with two rows of swirls wrapping around the one in the center. Any small spaces that weren’t covered by the swirls were filled by a dab with the piping bag. The top of the cake is easier to do than the sides, so I think starting there lets you get the hang of it before you try to do the design vertically. On the sides I did three rows, starting at the top and working my way down. Having a lazy susan or turntable really makes this job a gazillion times easier.

I’ve already said this, but this cake has such a great chocolatey cocoa flavor. It’s spongy and light and airy and moist and amazing. I’m gushing. Traditionally Devil’s Food Cake is paired with a rich chocolate buttercream, but I really think that the cake is already so chocolatey that chocolate icing would be overkill. This marshmallow icing is perfectly light and fluffy and not at all heavy and it pairs perfectly with this cake. Instead of competing with the cake or weighing it down and making it too rich, it lets the cake take center stage. Since it’s made with little more than egg whites and sugar, the icing is also fat-free, so you know, bonus.
I will admit that the icing is a bit fussy to make but I think it is totally worth it. I wouldn’t recommend trying this without a stand mixer, I think a hand-held mixer would make a mess. I also think a candy thermometer would help a lot, but I actually didn’t use one.
If you don’t want all the fuss of the marshmallow icing, but don’t want chocolate on chocolate overkill, I’d suggest a nice traditional vanilla buttercream.
Now, go butter those cake pans and preheat that oven!
Devil's Food Cake with Heavenly Marshmallow Icing
makes three 8-inch layers
butter and flour for pans
1 1/2 cups unsweetened natural cocoa powder
1 1/2 cups hot water
3 1/4 cups cake flour
1 1/4 teaspoons coarse salt
1 teaspoon baking powder
1 teaspoon baking soda
2 cups peanut oil or vegetable oil
1 cup granulated sugar
1 1/4 cup packed brown sugar
4 large eggs
4 teaspoons vanilla extract
1 cup buttermilk
Preheat oven to 350 degrees. Butter three 8 inch round cake pans, line bottoms with parchment paper, butter paper, and dust pans with flour. Whisk together cocoa powder and hot water until smooth.
Sift together flour, salt, baking powder, and baking soda; set aside. Beat oil and sugars together on medium-low speed until combined.
Add eggs, one at a time, beating after each addition. Beat in vanilla and cocoa mixture. Reduce speed to low. Add flour mixture in two batches, alternating with buttermilk and beginning and ending with flour. Beat until just combined.
Divide batter between pans, and bake until a cake tester inserted into centers comes out clean, 40 to 45 minutes. Transfer pans to a wire rack to cool for 15 minutes. Invert cakes onto rack, peel off parchment, and let cool completely.
Heavenly Marshmallow Icing:
recipe from Cake Duchess
1 cup of granulated sugar (not confectioners sugar)
4 egg whites, room temperature
1/3 cup of water
1/2 teaspoon cream of tartar
1 teaspoon vanilla

Oh COME ON!!! Are you kidding me with the cakes that I can’t have a piece of!
LikeLike
Hello :) This looks lovely! Do you know how long the cake keeps, after all it’s using raw egg whites? Can I freeze it? Thanks!
LikeLiked by 1 person
Good question! This icing is best eaten within a few hours of being made, but if you need to make it the night before a party, or if you want to save any leftovers, it should keep in the refrigerator for a day or two. Just be sure to let it come back to room temperature before serving or the cake will taste dry.
As for the egg whites- the hot sugar mixture effectively cooks them when you mix it in. That’s why you need to pour it in so slowly- or you’ll end up with scrambled egg whites!
I like to use the freshest local eggs I can find for this, but if you’re concerned about food safety you can try to find pasteurized egg whites at the grocery store.
I’ve never tried freezing it so I honestly can’t say one way or another. I’m not sure that I’d recommend it though.
The best option would be to make the cakes ahead, wrap each one in plastic warp and refrigerate them, and then make the frosting, assemble and frost the cake the day you plan to serve it.
I hope that helps!
LikeLike
That all makes sense, thank you! I’ll try it :)
LikeLiked by 1 person
Hello there – I just wanted to thank you for this wonderful recipe! I tried it today for the first time, and it is so indulgent. If you ever have a bad day, this will sort you out!
I don’t have a stand mixer but managed fine, although I think maybe the bottom bit of the icing didn’t get stirred well enough or it got too warm by the time I got to the part with making the rose design, by then it kind of collapsed a bit (not majorly). Do you put the icing in the fridge for a bit before using it?
I haven’t got exactly your size forms so I ended up with 1.5 cakes and plenty of icing – nice :)
The top of my cakes puffed up really rounded and cracked, I decided to cut just underneath the curve to make a layer there and cover the whole thing with icing. My cake is now not flat on top but still tasty :) But out of curiosity, do you have any idea why that happened or if it’s normal?
Thanks again, my friends love it, too!
LikeLiked by 1 person
I’m so happy to hear that you and your friends liked it!
If you have trouble with your icing warming up I do think refrigerating for a bit would probably help. It whips up so fast with a stand mixer that it wasn’t a problem for me and I didn’t have to – but it definitely couldn’t hurt and probably is a good idea to keep it cool while icing.
As for the cakes puffing up – I’m not really sure. It is normal for that to happen to a certain extent, which is why I recommend leveling the layers, but they REALLY puffed up in the center it may be due to thin pans (the reason the cake puffs up in the center and not the edges is that the edges cook before they have a chance to rise) or it may also be due to overmixing the batter (i doubt that was the reason though).
They do sell these cake pan insulating strips that prevent the uneven rising. You soak the strip in water, wrap it tightly around the pan, and pin it in place. The damp strip insulates the edges so everything rises at the same time (in theory) I believe they’re called “bake even strips” if you want to look for them!
Thanks again for writing back!
LikeLike