sides

garlicy lemony creamy classic hummus

When I was a teenager hummus was a unknown and totally exotic foreign food.

garlicy lemony creamy classic hummus | Brooklyn Homemaker

Those years were recent enough that I probably should have know what hummus was, but I grew up far enough upstate as to be rather isolated from the food trends and cultural open-mindedness of the big city.

garlicy lemony creamy classic hummus | Brooklyn Homemaker

In the 90s in Auburn, NY, the closest most people ever got to experiencing foods from other cultures was Chinese take out or one of the many MANY old school Italian restaurants.

Or maybe Taco Bell.

garlicy lemony creamy classic hummus | Brooklyn Homemaker

When I entered high school I met a whole new group of friends; among them were the punks, hippies, goths, skate boarders, hacky sackers, vegetarians, and vegans of the alterna-teen umbrella. Falling in with a different crowd meant hearing new music, having new adventures, and experiencing new foods.

Sushi! Indian! Falafel! So new! So Exciting!

garlicy lemony creamy classic hummus | Brooklyn Homemaker

One of my favorite discoveries was hummus.

Growing up with staunchly American cuisine and lots of convenience foods, Hummus was completely foreign and exotic to me. It was simply bursting with unfamiliar spices and bold flavors that I’d never encountered before my teen years. Even the texture was new to me, and I couldn’t get enough of the stuff.

I still remember the first time I tried to get my mom to buy some for me in the grocery store and she had no idea what the heck it was or why in the world I’d want to eat it.

garlicy lemony creamy classic hummus | Brooklyn Homemaker

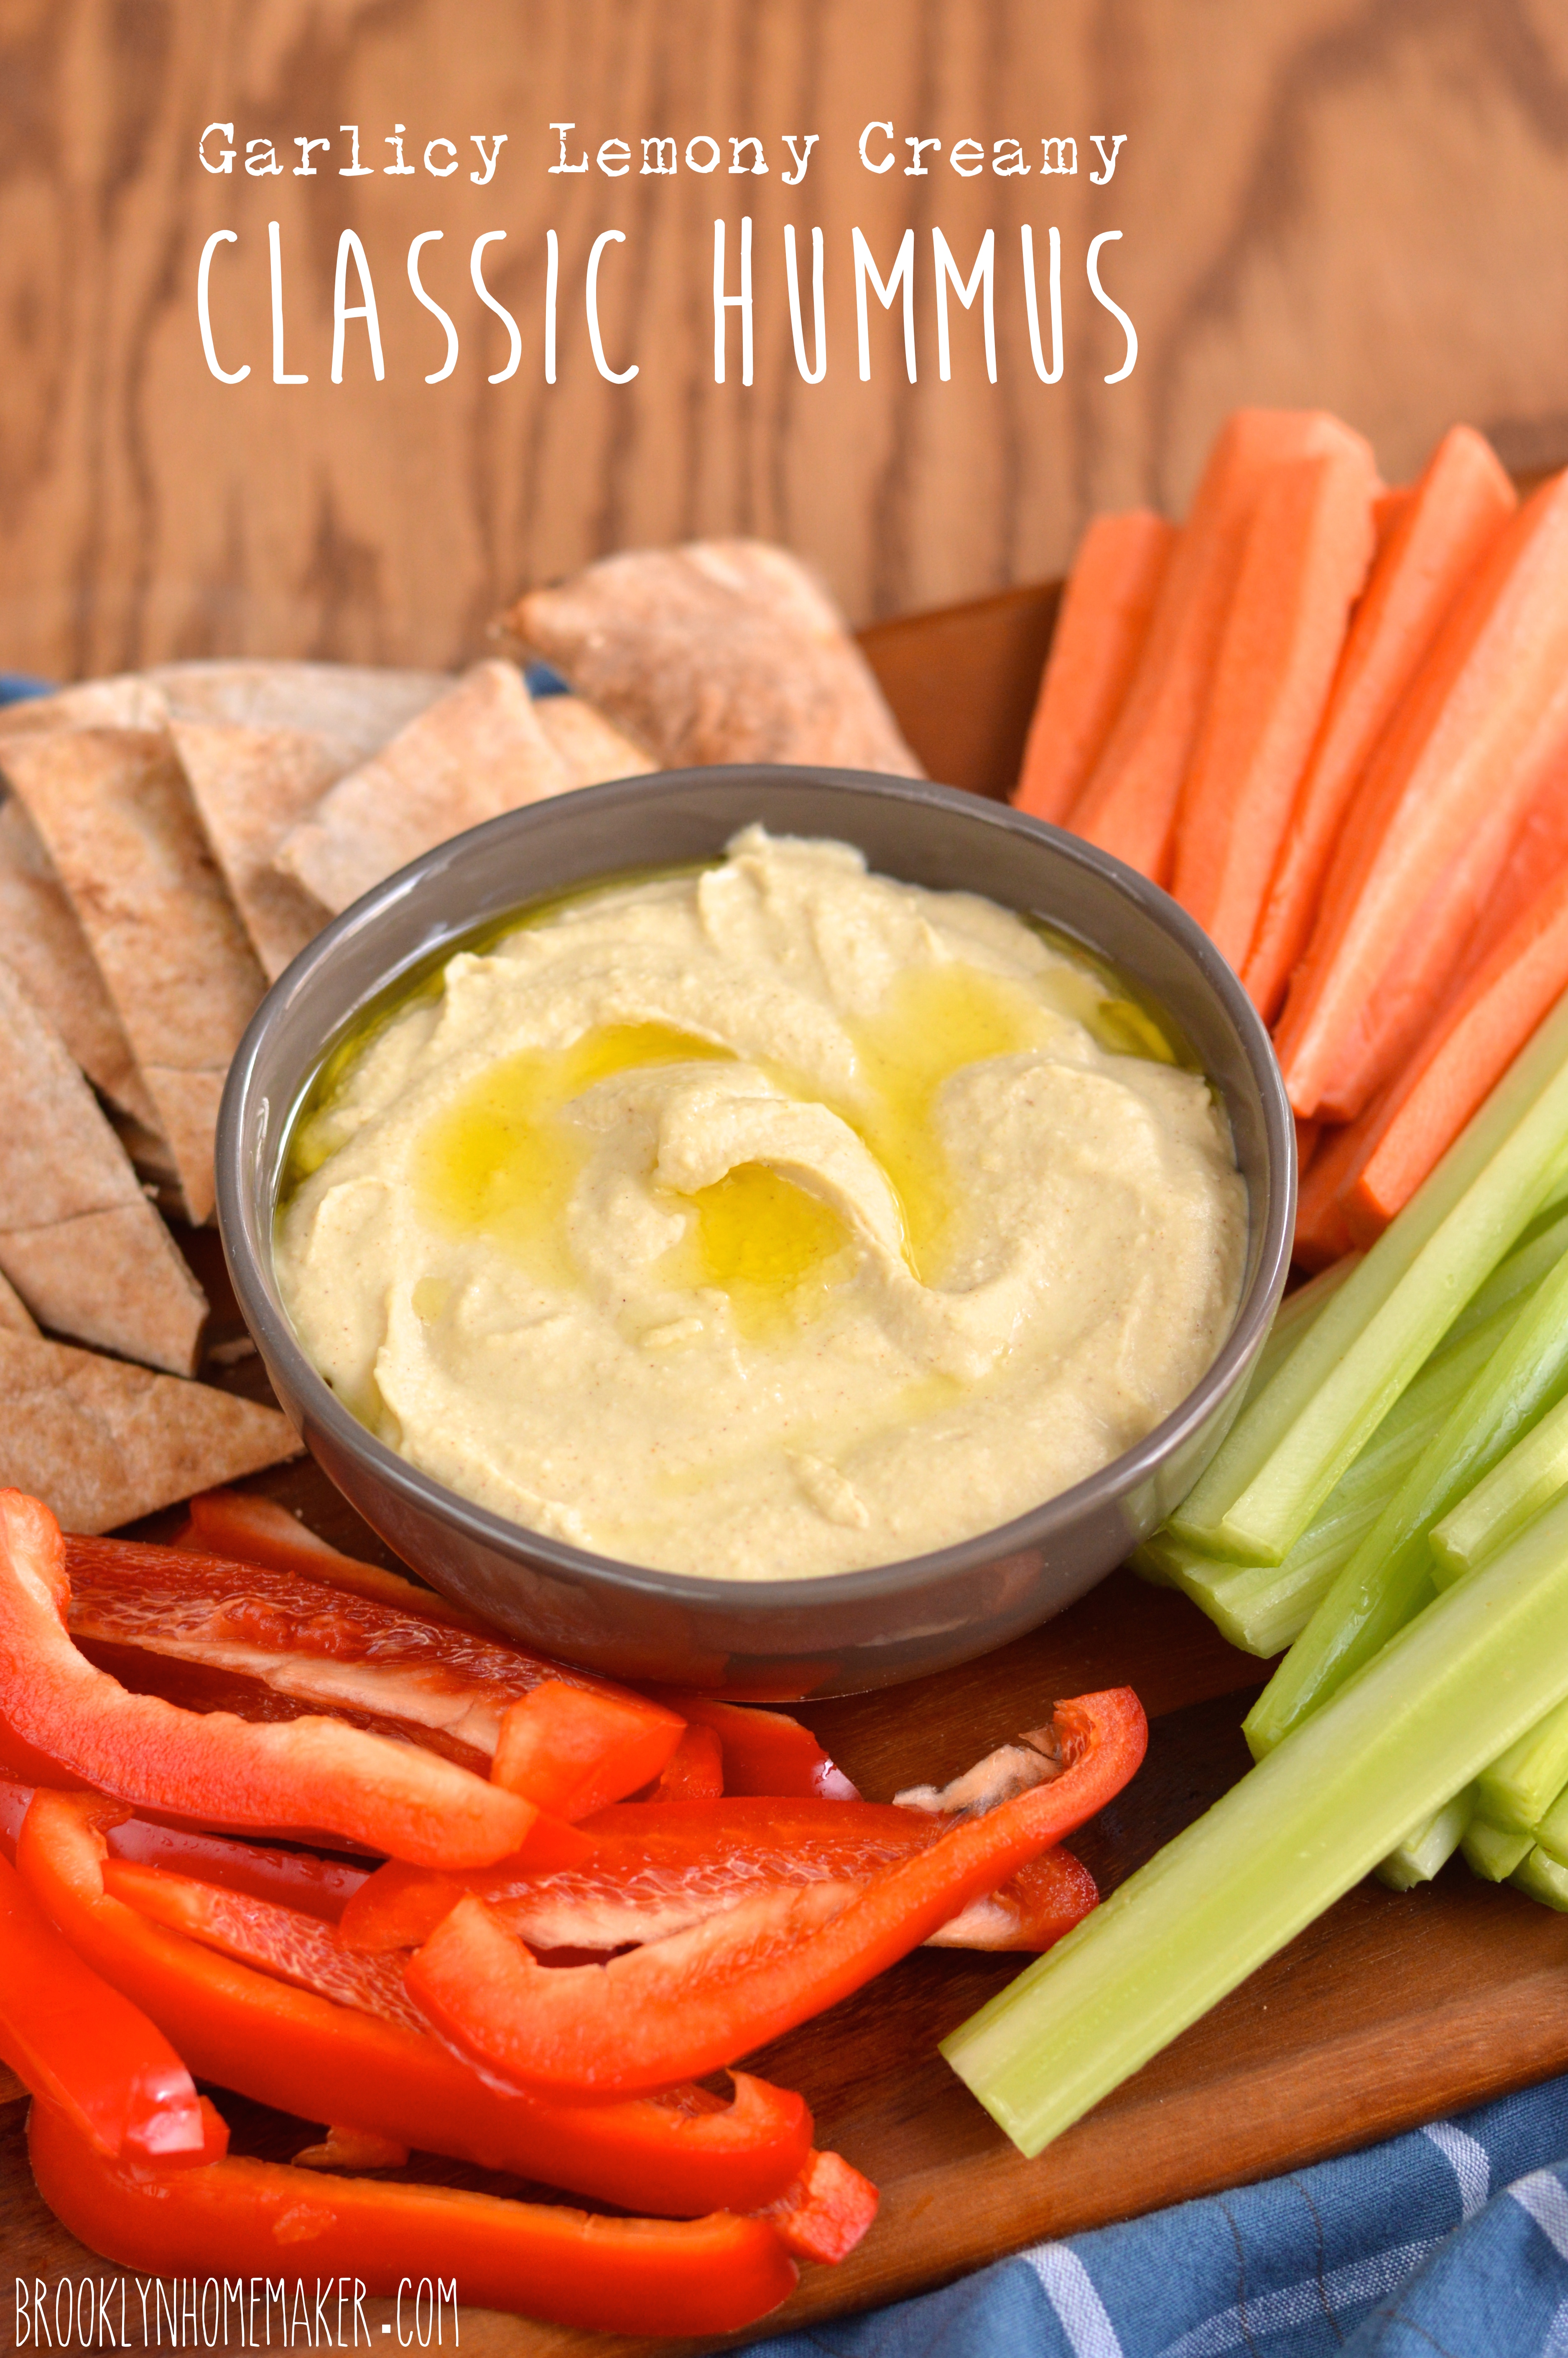
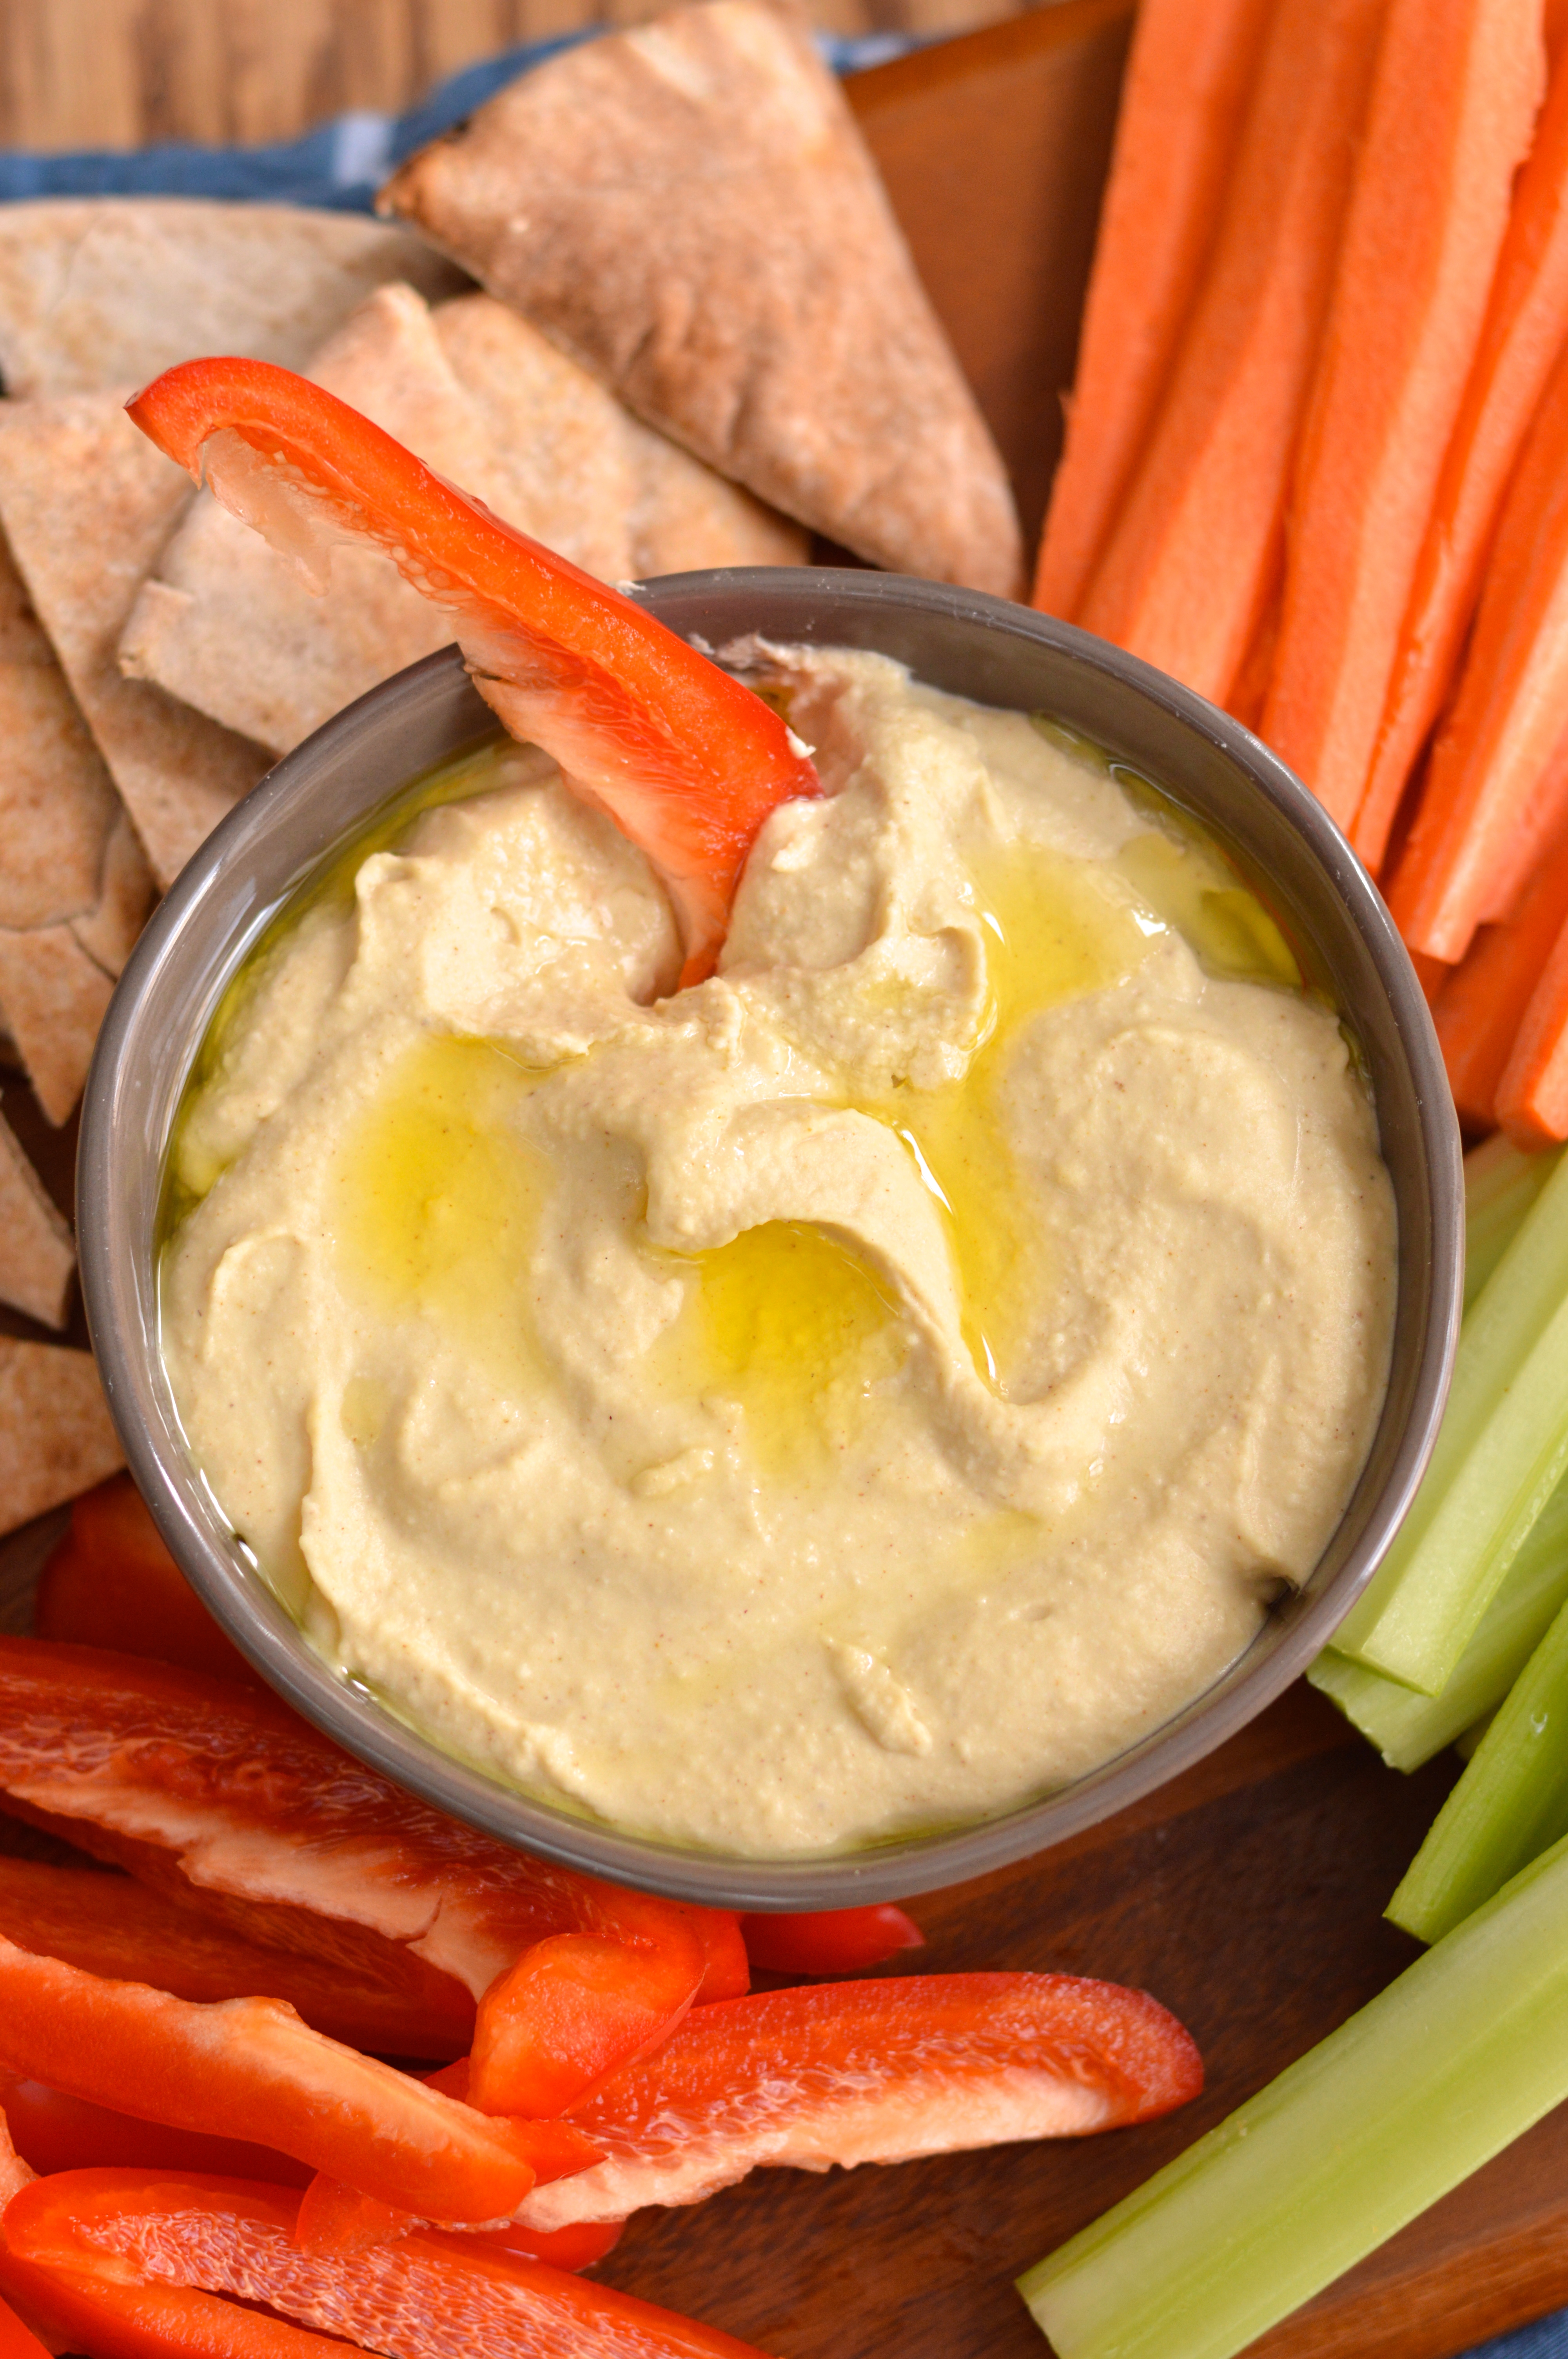
One of my favorite things about hummus even today is how versatile it can be. It makes a great dip at parties, a delicious spread on a sandwich, and even works as a side dish or major part of a meal. One of our favorite things to do when we make our own hummus is to thinly slice, marinate, and broil some chicken breast and serve it alongside some sliced cucumbers, grilled pita wedges, and giant bowl of hummus for dipping.

garlicy lemony creamy classic hummus | Brooklyn Homemaker

There are many different ways to make hummus and just as many flavors you can blend into it. Personally, I prefer a classic approach with lemon, garlic, and cumin. I also like to take the extra step of soaking and boiling dried chickpeas rather than using canned. I think dried chickpeas have a slightly cleaner flavor and make it much easier to control the amount salt you add.

This recipe can be made thick and chunky, or creamy and smooth, depending on how long you process everything. I myself like to let the food processor whir and whir until the hummus is unbelievably smooth and silky. While it’s really traditional to serve hummus with a drizzle of olive oil, I like to add some extra in while it’s pureed for even more velvety creaminess.

While the flavors in this recipe are very traditional, I like to turn up the volume and add a little bit extra lemon and garlic to make sure they really shine through. If you’re not as big a fan of raw garlic, feel free to skip one or two of the cloves.

garlicy lemony creamy classic hummus | Brooklyn Homemaker

Classic Creamy Hummus

  • Servings: makes about 3 or 4 cups
  • Print
1 cup dried chickpeas
1 tablespoon plus 1/4 teaspoon baking soda
1/2 cup tahini
juice of 2 to 3 lemons
3 to 4 cloves of garlic (less if preferred)
1 teaspoon cumin
1 teaspoon salt
1 tablespoon olive oil, plus more for serving

Wash the chickpeas three or four times, or until they don’t cloud the water when submerged. Check for stones and other non-chickpea debris.

Soak the chickpeas in clean water with 1 tablespoon of baking soda for at least 8 hours or overnight. Wash and drain them, and soak again in new clean water for a two or three more hours. The grains should be almost double their original size.

Wash and drain the chickpeas once more and put them in a large pot. Cover with water and add remaining baking soda and NO salt. Bring to a boil, reduce heat to a gentle simmer, and cook until the grains are tender enough to be easily smooshed between two fingers. It should take about an hour to an hour and a half. As they cook some foam may form on the water and skins may rise to the top. Try your best to skim off as much of the foam and as many of the skins as possible. The fewer skins you have the creamier and smoother your hummus will be. Once finished, drain them and reserve some of the cooking liquid.

Let the chickpeas cool for a bit before adding to a food processor. Pulse them a few times before adding the remaining ingredients and processing until you get the desired texture. I like mine super smooth and creamy so I just let it go for a bit, but if you like yours chunkier just pulse it until it comes together in a thick chunky paste. If the Humus is too thick, add some of the cooking water or some more lemon juice or olive oil. Try to get it a bit thinner than the consistency you desire, as it will thicken a bit once it’s refrigerated. Check for seasoning, and if you’re happy with the levels of salt, cumin, garlic, and lemon, you’re done!

Serve with a drizzle of good olive oil and some chopped parsley if desired.

This recipe recipe doubles very easily, but you do not need to double the amount of baking soda used for either soaking or cooking.

Advertisement

pickled beet and arugula salad with goat cheese and balsamic vinaigrette

I love beets. There’s just something about that sweet and earthy flavor, al dente firm yet tender bite, and intense color that I just can’t get enough of.

Growing up beets were never on the menu, and I’m not sure that I knew what a beet even was until I went off to college. My grandparents were always big gardeners, so you might think that beets would have been part of my childhood experience, but for whatever reason, they weren’t.

pickled beet and arugula salad with goat cheese and balsamic vinaigrette | Brooklyn Homemaker

I don’t really remember the first time I ever ate one, or whether or not I liked it at the time, but eventually I realized that they’re amazing. Oddly enough, part of that beet love may have had something to do with my favorite author. I was in college the first time I heard of Tom Robbins. I was sitting at the bar after a long night waiting tables, sipping on my shift drink and shooting the shit with one of my coworkers about whatever I was reading at the time. Someone a few seats down at the bar overheard us and chimed in, “Have you ever read any Tom Robbins?” I hadn’t, but at the time I wasn’t convinced and didn’t take any steps to change that.

pickled beet and arugula salad with goat cheese and balsamic vinaigrette | Brooklyn Homemaker

A month or so later I noticed a Tom Robbins book on a shelf in a friends apartment, and curiosity finally got the better of me. I asked if I could borrow it, and was instantly hooked. At this point I’ve read almost everything he’s ever written. A few titles I’ve read over and over to the point that my paperback copies are covered in masking tape and would probably disintegrate if I tried to give them another go. The first title I read still remains my favorite, and Jitterbug Perfume is definitely the one title I’ve read more than any other.

It’s also the title that I’ve recommended most, and every time anyone has actually taken my advice and read it, they’ve come back to tell me that they LOVED it with a capital LOVE!

pickled beet and arugula salad with goat cheese and balsamic vinaigrette | Brooklyn Homemaker

I won’t spoil it for you, because I urge you to give it a read yourself if you haven’t already, but I will say that the subject matter is a bit more “fantastic” than I usually go for. I’m not someone who normally enjoys reading fantasy, but Tom Robbins’ fantasy is somehow more about the fantastic and less about the unbelievable or childish. He writes so intelligently and poetically and passionately that I’m completely sucked into Jitterbug Perfume‘s tales of time travel and immortality and individuality and old pagan religions and magic and sex and… perfume.

pickled beet and arugula salad with goat cheese and balsamic vinaigrette | Brooklyn Homemaker

One craggy old root vegetable (the beet) plays an oddly important role in the story. After reading the book for the second (or may it was the third) time, I briefly contemplated getting a beetroot tattoo. I’m sure my mother will back my story up, as she was equally confused and horrified by the idea.

Robbins waxes so poetic about the humble beet that I was immediately, deeply, passionately in love with them. Even if I’d hated them (I didn’t) I’d still have been in love with the idea of the beet. It’s funny. He doesn’t really point out any profound detail about their history, or their nutritional value, it’s just that he uses beautifully vivid language to romanticize them and use them for a metaphor for something bigger. Nothing changed about the reality of beets, but the way I picture them was forever altered.

pickled beet and arugula salad with goat cheese and balsamic vinaigrette | Brooklyn Homemaker

“The beet is the most intense of vegetables. The radish, admittedly, is more feverish, but the fire of the radish is a cold fire, the fire of discontent not of passion. Tomatoes are lusty enough, yet there runs through tomatoes an undercurrent of frivolity. Beets are deadly serious.
Slavic peoples get their physical characteristics from potatoes, their smoldering inquietude from radishes, their seriousness from beets.
The beet is the melancholy vegetable, the one most willing to suffer. You can’t squeeze blood out of a turnip…
The beet is the murderer returned to the scene of the crime. The beet is what happens when the cherry finishes with the carrot. The beet is the ancient ancestor of the autumn moon, bearded, buried, all but fossilized; the dark green sails of the grounded moon-boat stitched with veins of primordial plasma; the kite string that once connected the moon to the Earth now a muddy whisker drilling desperately for rubies.
The beet was Rasputin’s favorite vegetable. You could see it in his eyes.” ― Tom Robbins, Jitterbug Perfume

pickled beet and arugula salad with goat cheese and balsamic vinaigrette | Brooklyn Homemaker

Perhaps one of my favorite ways to prepare (and preserve) beets, is to pickle them. There’s something about adding vinegary acidity to their earthy sweetness that just elevates them.
You can pickle your own easily enough, but pickled beets are increasingly easy to find at the grocery store these days too. My own stash from this summer has already run dry, so for this recipe I bought some locally produced beets pickled with fennel.

One of my favorite ways to enjoy pickled beets is to pair them with other sweet, earthy, robust flavors in a bright filling salad. If you want to make this salad feel even more substantial, just top it with some thinly sliced grilled steak or seared chicken breast.

There’s nothing about this salad that isn’t amazing. Peppery fresh arugula, acidic sweet and earthy pickled beets, creamy earthy crumbled goat cheese, bright juicy pomegranate seeds, crunchy buttery cashews, and pungent yet delicate sliced shallot; all tied together with a quick and easy homemade balsamic vinaigrette. It doesn’t get any better than this y’all.

pickled beet and arugula salad with goat cheese and balsamic vinaigrette | Brooklyn Homemaker

Pickled Beet and Arugula Salad with Goat Cheese and Balsamic Vinaigrette

  • Servings: 2 dinner salads, or 4 side salads
  • Print
5 oz (about 4 or 5 cups) arugula
3/4 cup pickled beets (cut into bite-size pieces if not already packed that way)
Seeds of 1/2 a fresh pomegranate (about 1/2 cup) *see note
1 cup toasted cashews
1 small shallot, thinly sliced
2.5 oz crumbled goat cheese (about 1/3 cup)

Dressing:
1/4 cup olive oil
2 tablespoons balsamic vinegar
2 teaspoons Dijon mustard
1 teaspoon honey
salt and pepper to taste

To make the dressing, combine all ingredients in a dressing shaker or small bowl and shake or whisk vigorously until well combined. Set aside.

Combine all salad ingredients in a large bowl and gently toss with about half the dressing. Try not to completely mix in the goat cheese or it’ll kind of just disappear. If you’re happy with the amount of dressing, you’re done. Otherwise, add a bit more until you’re satisfied, and gently toss again. Divide between serving bowls or plates and enjoy.

Any extra salad dressing should last several weeks tightly covered in the refrigerator.

*cook’s note:
My favorite way to get the seeds out of a pomegranate is to cut one in half, firmly grasp one half cut side down over a large bowl in one hand, while firmly whacking the skin side of the pomegranate with a wooden spoon held in the other hand. It may take a few good whacks to loosen the seeds, but they’ll eventually start falling out with each coming whack. You’ll need to rotate the pomegranate as you go so all sides get their fair share of abuse, and once all the seeds are removed you’ll want to pick through them to remove any stray yellow membrane that fell out with the seeds.

apple walnut dressing with sausage and caramelized leeks

I tend to go a little crazy around Thanksgiving every year.

apple walnut dressing with sausage and caramelized leeks | Brooklyn Homemaker

Not only is it one of my favorite holidays, one that I take VERY seriously, but it’s also the beginning of the busiest season of the year where I work.

apple walnut dressing with sausage and caramelized leeks | Brooklyn Homemaker

No matter how much planning and thinking ahead I do to make things easy on myself, the chaos at work and the perfection pressure I put on myself always starts to overwhelm me in the week or so before the day of the big bird.

apple walnut dressing with sausage and caramelized leeks | Brooklyn Homemaker

This year I’ve been poking around the internet for tips and ideas on the best way to host a stress-free Thanksgiving; and make sure every aspect of the day, from the shopping and prep work to the serving and cleaning up, goes as smoothly as possible.

apple walnut dressing with sausage and caramelized leeks | Brooklyn Homemaker

This ain’t my first time at the rodeo, so a lot of the information I found wasn’t entirely new to me. One tip that I realized would actually make a big difference though, is not testing out any new-to-me recipes when I have a million other things going on in the kitchen.

Sometimes those unfamiliar recipes on Pinterest may look perfectly delicious on the screen but can actually turn out to be a big fat flop in reality. You don’t need to add that flop possibility, or any extra time figuring out a new recipe, to the already lengthy list of chores and worries you have when people are on their way for the biggest meal of the year.

apple walnut dressing with sausage and caramelized leeks | Brooklyn Homemaker

Even when the tips I’ve found haven’t been entirely new to me, I’ve tried to do my best to share them with you on facebook and pinterest. I hope you’ve been learning (and making your lives easier) right a long with me.

If you don’t follow me on social media, you totally should. Not only does it make me feel warm and fuzzy to get new “likes” and “follows”, but you might learn something too! I try to share as much information as I can right here on the blog, but I can only do (and write) so much. When I find something interesting or helpful on the internet that I don’t have the time or expertise to blog about, I try my best to the share the wealth on social media so you don’t feel left out.

apple walnut dressing with sausage and caramelized leeks | Brooklyn Homemaker

This Thanksgiving I’ll be making the same (life-changing) turkey recipe that I made last year, along with some pies that I’m completely comfortable with.

In the name of not testing new recipes with so many other projects in play, I’ve been working on a few things ahead of time to make sure I know what to expect and don’t need to work out any kinks. Last week a good friend was visiting from out of town so I used her as a guinea pig for my new sweet potato gratin recipe and this here apple walnut dressing (or stuffing, if you prefer, though technically it’s not stuffing unless it’s actually stuffed in something).

apple walnut dressing with sausage and caramelized leeks | Brooklyn Homemaker

This recipe has everything I want to see in my dressing. Yeasty artisan bread made tender with rich stock on the inside with a crispy craggy buttery golden top. The variety of flavors and textures going on here are the perfect compliment to any roasted poultry (or pork), no matter what the occasion. Tender sweet apples, crunchy bitter walnuts, chewy savory sausage, and rich caramelized leeks all brought together with plenty of autumnal herbs and a mixture of chicken stock and apple cider. I seriously cannot get enough of these flavor combinations this time of year, and I think you and your friends and family won’t be able to either.

This can easily be made vegetarian by leaving out the sausage and swapping vegetable stock for chicken. There are more than enough other elements and flavors at play here that the dressing will still be amazing, and truth be told, it looks like I’ll be leaving the sausage out myself to accommodate my guests.

apple walnut dressing with sausage and caramelized leeks | Brooklyn Homemaker

Apple Walnut Dressing with Sausage and Caramelized Leeks

Inspired by thekitchn

One 1 1/2 to 2 pound loaf artisan bread
1 cup walnuts, roughly chopped
1/2 pound sweet Italian sausage (spicy works too)
2 cups thinly sliced leeks or 1 cup finely diced onion
3 celery stalks, diced (about 1 cup)
2 tablespoons fresh sage leaves, finely chopped
2 teaspoons fresh thyme, finely chopped
1 large firm apple, diced (I used Braeburn)
3 large eggs
1 to 1 1/2 teaspoon salt
1 cup apple cider
2 cups chicken or turkey stock
2 tablespoons butter

Heat the oven to 350°F. Slice the bread into small cubes, removing the crusts if desired, and spread the cubes in a single layer on two baking sheets. Toast for ten minutes, stir up, and add the chopped nuts. Continue toasting until the bread is completely dry and the walnuts are toasted, approximately another 8-10 minutes. Remove from the oven and let cool. If you like to think way ahead, you can toast your bread and store it up to a week before moving on with the next step.

To prepare your leeks, slice the white and tender green parts in thin disks, and slice each disk in half. Discard the deep green leaves. Place all the sliced leeks into a bowl and top with cold water. Leeks are very sandy so this is important. scoop the leeks out being careful not to disturb the sand at the bottom of the bowl. Repeat twice, and set aside to drain dry.

Brown the sausage with a sprinkle of salt over medium heat, breaking it up into crumbles as you cook, about 10 minutes. Transfer the cooked sausage to a bowl and drain off all but a few teaspoons of the fat.

In the same pan over medium heat, cook the leeks with a sprinkle of salt until softened and beginning to brown, about 5 or 10 minutes. Add the celery and continue cooking until the celery is softened, another 5 minutes. Add the apples and the fresh herbs. Cook until the apples are just starting to soften, another 1-3 minutes. Taste and adjust seasonings as needed. Remove the pan from heat.

Increase the oven temperature to 400°F.

Combine the sausage, vegetables, apples, bread cubes, and nuts in a large mixing bowl. In a medium bowl or large measuring cup, lightly beat the eggs, and add in the salt, cider and chicken stock. Whisk to combine and pour over the stuffing. Gently fold or stir until all the ingredients are evenly coated, being careful not to mash down or squish the bread cubes.

Pour the dressing into the baking dish and try to even it out. If you have a bit too much you can mound it a bit in the center, or bake some separately in ramekins (or you can make it into stuffing by filling it into the hollow cavity of a turkey). Dot the top with butter and cover the dish with aluminum foil. If you’re trying to make things a day ahead, you could stop here and refrigerate the whole shebang to be baked the next day. Just make sure you take the dish out about an hour before baking so you don’t crack your baking dish by putting a cold dish into a hot oven.

Bake at 400°F for 30 minutes. Uncover and continue baking until the top is crispy and golden, another 15-20 minutes. Let cool briefly before serving.

sweet potato gratin

Sweet potatoes are seriously the best.

sweet potato gratin with caramelized onions & Jarlsberg | Brooklyn Homemaker

Though they’re not technically in the same family, a sweet potato can do almost anything a regular potato can, and can probably do it better. They can be french fried, mashed, baked, roasted, you name it. You can even turn these puppies into dessert! Take that, potatoes!

Sweet potatoes have more flavor and are (obviously) sweeter, but what you might not consider is that they’re also packed with beta-carotene and calcium, and have almost 300% of the vitamin A you need in a day. Now that’s what I call a superfood.

sweet potato gratin with caramelized onions & Jarlsberg | Brooklyn Homemaker

One thing I’m not crazy about when it comes to sweet potatoes though, is the tendency to make them even sweeter while serving them with dinner. I mean, if you want to make a dessert, go ahead and make a dessert. There’s nothing better than a good sweet potato pie. But if you’re serving sweet potatoes as a side dish I really don’t get the desire to cover them in marshmallows. I guess its just not for me. You wouldn’t cover a radish or a green bean in brown sugar and marshmallows would you? Well, I don’t know, maybe you would. I wouldn’t though!

I know some people really dig candied sweet potatoes at Thanksgiving, but it’s just not for me. Sorry.

sweet potato gratin with caramelized onions & Jarlsberg | Brooklyn Homemaker

Anyway, because I’m a lunatic forward-thinker, I’m already planning my Thanksgiving menu. You already know this, but I take this holiday pretty seriously. I really want to highlight sweet potatoes on my table this year, but I’ll be damned if a marshmallow comes anywhere near my little orange beauties. I love mashing them just like potatoes, with lots of butter, but this year I want to do something special.

sweet potato gratin with caramelized onions & Jarlsberg | Brooklyn Homemaker

It didn’t take me long to decide on some type of layered casserole. A gratin is the perfect solution. Rich and satisfying, with a touch of cream and cheese to gussy things up.

sweet potato gratin with caramelized onions & Jarlsberg | Brooklyn Homemaker

Most gratin recipes call for a salty hard cheese like parmesan, but I thought the sweet potatoes called for something a bit creamier and nuttier, so I opted for Jarlsberg. If you’re not familiar, Jarlsberg is a mild cow’s milk cheese from Norway. It has large holes like swiss, but it’s more buttery and nutty. If you can’t find it I think Gruyere would work really well too.

sweet potato gratin with caramelized onions & Jarlsberg | Brooklyn Homemaker

I wanted to pack as much savory flavor into this gratin as possible, so I poked around the internet until I found a recipe that sandwiched a layer of caramelized onions between the sliced sweet potatoes. Yes please. To take the flavor even further I went and added a few thing; some thyme and parsley along with the sage in the original recipe, as well as a bit of dijon mustard, some ground cayenne pepper for kick, and some smoked paprika for a nice hint of smoky depth.

This is not only the perfect side dish for Thanksgiving, but really any large gathering or dinner party. On top of being crazy delicious, I think it’ll travel really well too, and could easily be prepared ahead and reheated.

sweet potato gratin with caramelized onions & Jarlsberg | Brooklyn Homemaker

As soon as I took my first bite, I knew I’d reached sweet potato perfection.

If you want to know how good it tastes, let me just say this. Russell is spoiled by my cooking. While he absolutely loves and appreciates everything I make, most of my cooking gets little more than a “thank you” or “yummy”. This though, he couldn’t shut up about. He went on and on about how delicious and perfect it was. He ran out of words. And frankly, I don’t think there are enough words in the English language to properly describe this gratin. A few that come to mind though are creamy, savory, spicy, smoky, cheesy, buttery, tender, rich, delicious, satisfying, hearty, flavorful, heavenly and amazing… Oh yeah, and Bow-chicka-wow-wow.

sweet potato gratin with caramelized onions & Jarlsberg | Brooklyn Homemaker

Sweet Potato Gratin

  • Servings: 8 to 12-ish (depending on serving size)
  • Print
adapted from the kitchn

2 tablespoons unsalted butter (plus more for pan)
2 medium onions, sliced into thin half circles
3 pounds sweet potatoes or yams (3 to 4 large)
Kosher salt and fresh ground pepper
2 tablespoons fresh sage leaves, finely chopped
1 tablespoon fresh parsley, finely chopped
1 teaspoon fresh thyme leaves
1 teaspoon dijon mustard
1/2 teaspoon smoked paprika
1/4 teaspoon cayenne pepper powder (optional)
1 1/4 cups heavy cream

Topping:
2 tablespoons unsalted butter
3/4 cup panko breadcrumbs (or plain, unseasoned bread crumbs)
3/4 cup grated Jarlsberg cheese (or Gruyere)
3 tablespoons fresh parsley, finesly chopped

Heat the oven to 350°F and butter a 9×13 casserole or gratin dish. In a heavy skillet heat 2 tablespoons of butter to a foam and add the sliced onions. Season them with a bit of salt and slowly caramelize them over medium-low heat, stirring frequently. To get them nice and brown (but not burned) should take about 20 or 30 minutes.

While the onions sizzle away, peel your sweet potatoes and slice them into 1/4-inch thick disks. Getting thin and even slices will be easiest with a mandolin, but is totally possible with a sharp knife and a steady hand. Layer half of the slices in the buttered dish, overlapping them in tight rows or spirals. Season the layer with salt and pepper.

Once the onions are soft and caramelized to your liking, add the sage, parsley, thyme, dijon mustard, paprika, cayenne pepper, and cream. Bring to a simmer, stir well, and cook until the cream is thick and bubbly, about 2 minutes. Remove from the heat.

Do your best to remove the onions from the cream with a slotted spoon. Spread the onions evenly over the first layer of sweet potatoes. Layer the remaining sweet potatoes on top, in the same rows or spirals as before. Season with kosher salt and black pepper, and evenly pour or spread the cream over the top. The cream will not cover the potatoes completely or fill the dish and you will think there’s isn’t enough. Don’t add more! Too much will make the sweet potatoes mushy.

Cover the dish with foil and bake for 15 minutes. Remove the foil and bake for 10 or 15 minutes more, or until the potatoes are just tender. (Note: If your sweet potato slices are thicker than 1/4 inch- baking time is likely going to take longer.)

While the sweet potatoes are in the oven, melt 2 tablespoons of butter and let cool a bit. In a small bowl, pour the butter over the bread crumbs, grated Jarlsberg and chopped parsley, and toss well to combine. Sprinkle evenly over the top of the gratin and return to the oven (uncovered) for about 15 minutes or until brown and crispy. Let cool for at least 15 minutes before serving.