chicken

braised chicken thighs with white wine, lemon, & capers

I may or may not have already said this, but this weather is starting to get me a little down. It’s hard to maintain a happy attitude and healthy energy level when it’s always cold and windy and slushy and wet and disgusting outside.

braised chicken thighs with white wine, lemon, & capers | Brooklyn Homemaker

I also may or may not have already said this, but I’ve totally been craving citrus like crazy lately. I normally like to at least attempt to eat seasonally, eating tomatoes at the end of the summer, apples in the fall, and asparagus in the spring, and generally avoiding the stuff shipped in from Peru for the rest of the year. I am certainly not fanatical about it, but most produce honestly just tastes better when it’s fresh and local instead of traveling from across the country or across the world. At this point in winter though, all those good intentions go straight out the window. When I can smell spring coming around the corner I can’t take it anymore and want nothing more than fresh bright summery foods, especially the tropical-ish flavors of citrus. So, you’ll have to forgive me (or maybe thank me) for doing another citrus recipe, this one with lemon, after just doing a soup with a healthy dose of lime.

braised chicken thighs with white wine, lemon, & capers | Brooklyn Homemaker

We recently got the unfortunate news that one of our close friends is moving away to London, so we wanted to have her for dinner to say farewell. I knew I wanted to make something really special, so I thought a rich hearty braised chicken dish was just the ticket. Although I totally love spending my day off braising a roast or stew, sometimes you just need something to come together a little faster. Chicken thighs are a really great way to make it seem like you slaved over a hot stove for half the day, when in reality you threw it together in just over an hour. Chicken thighs are also really inexpensive, packed with amazing flavor, and almost always come out juicy and tender.  This meal browns for about 15 minutes on the stove and then spends another 45 minutes in the oven. Including prep time, the whole shebang can be on your plate and in your mouth in 90 minutes or less.

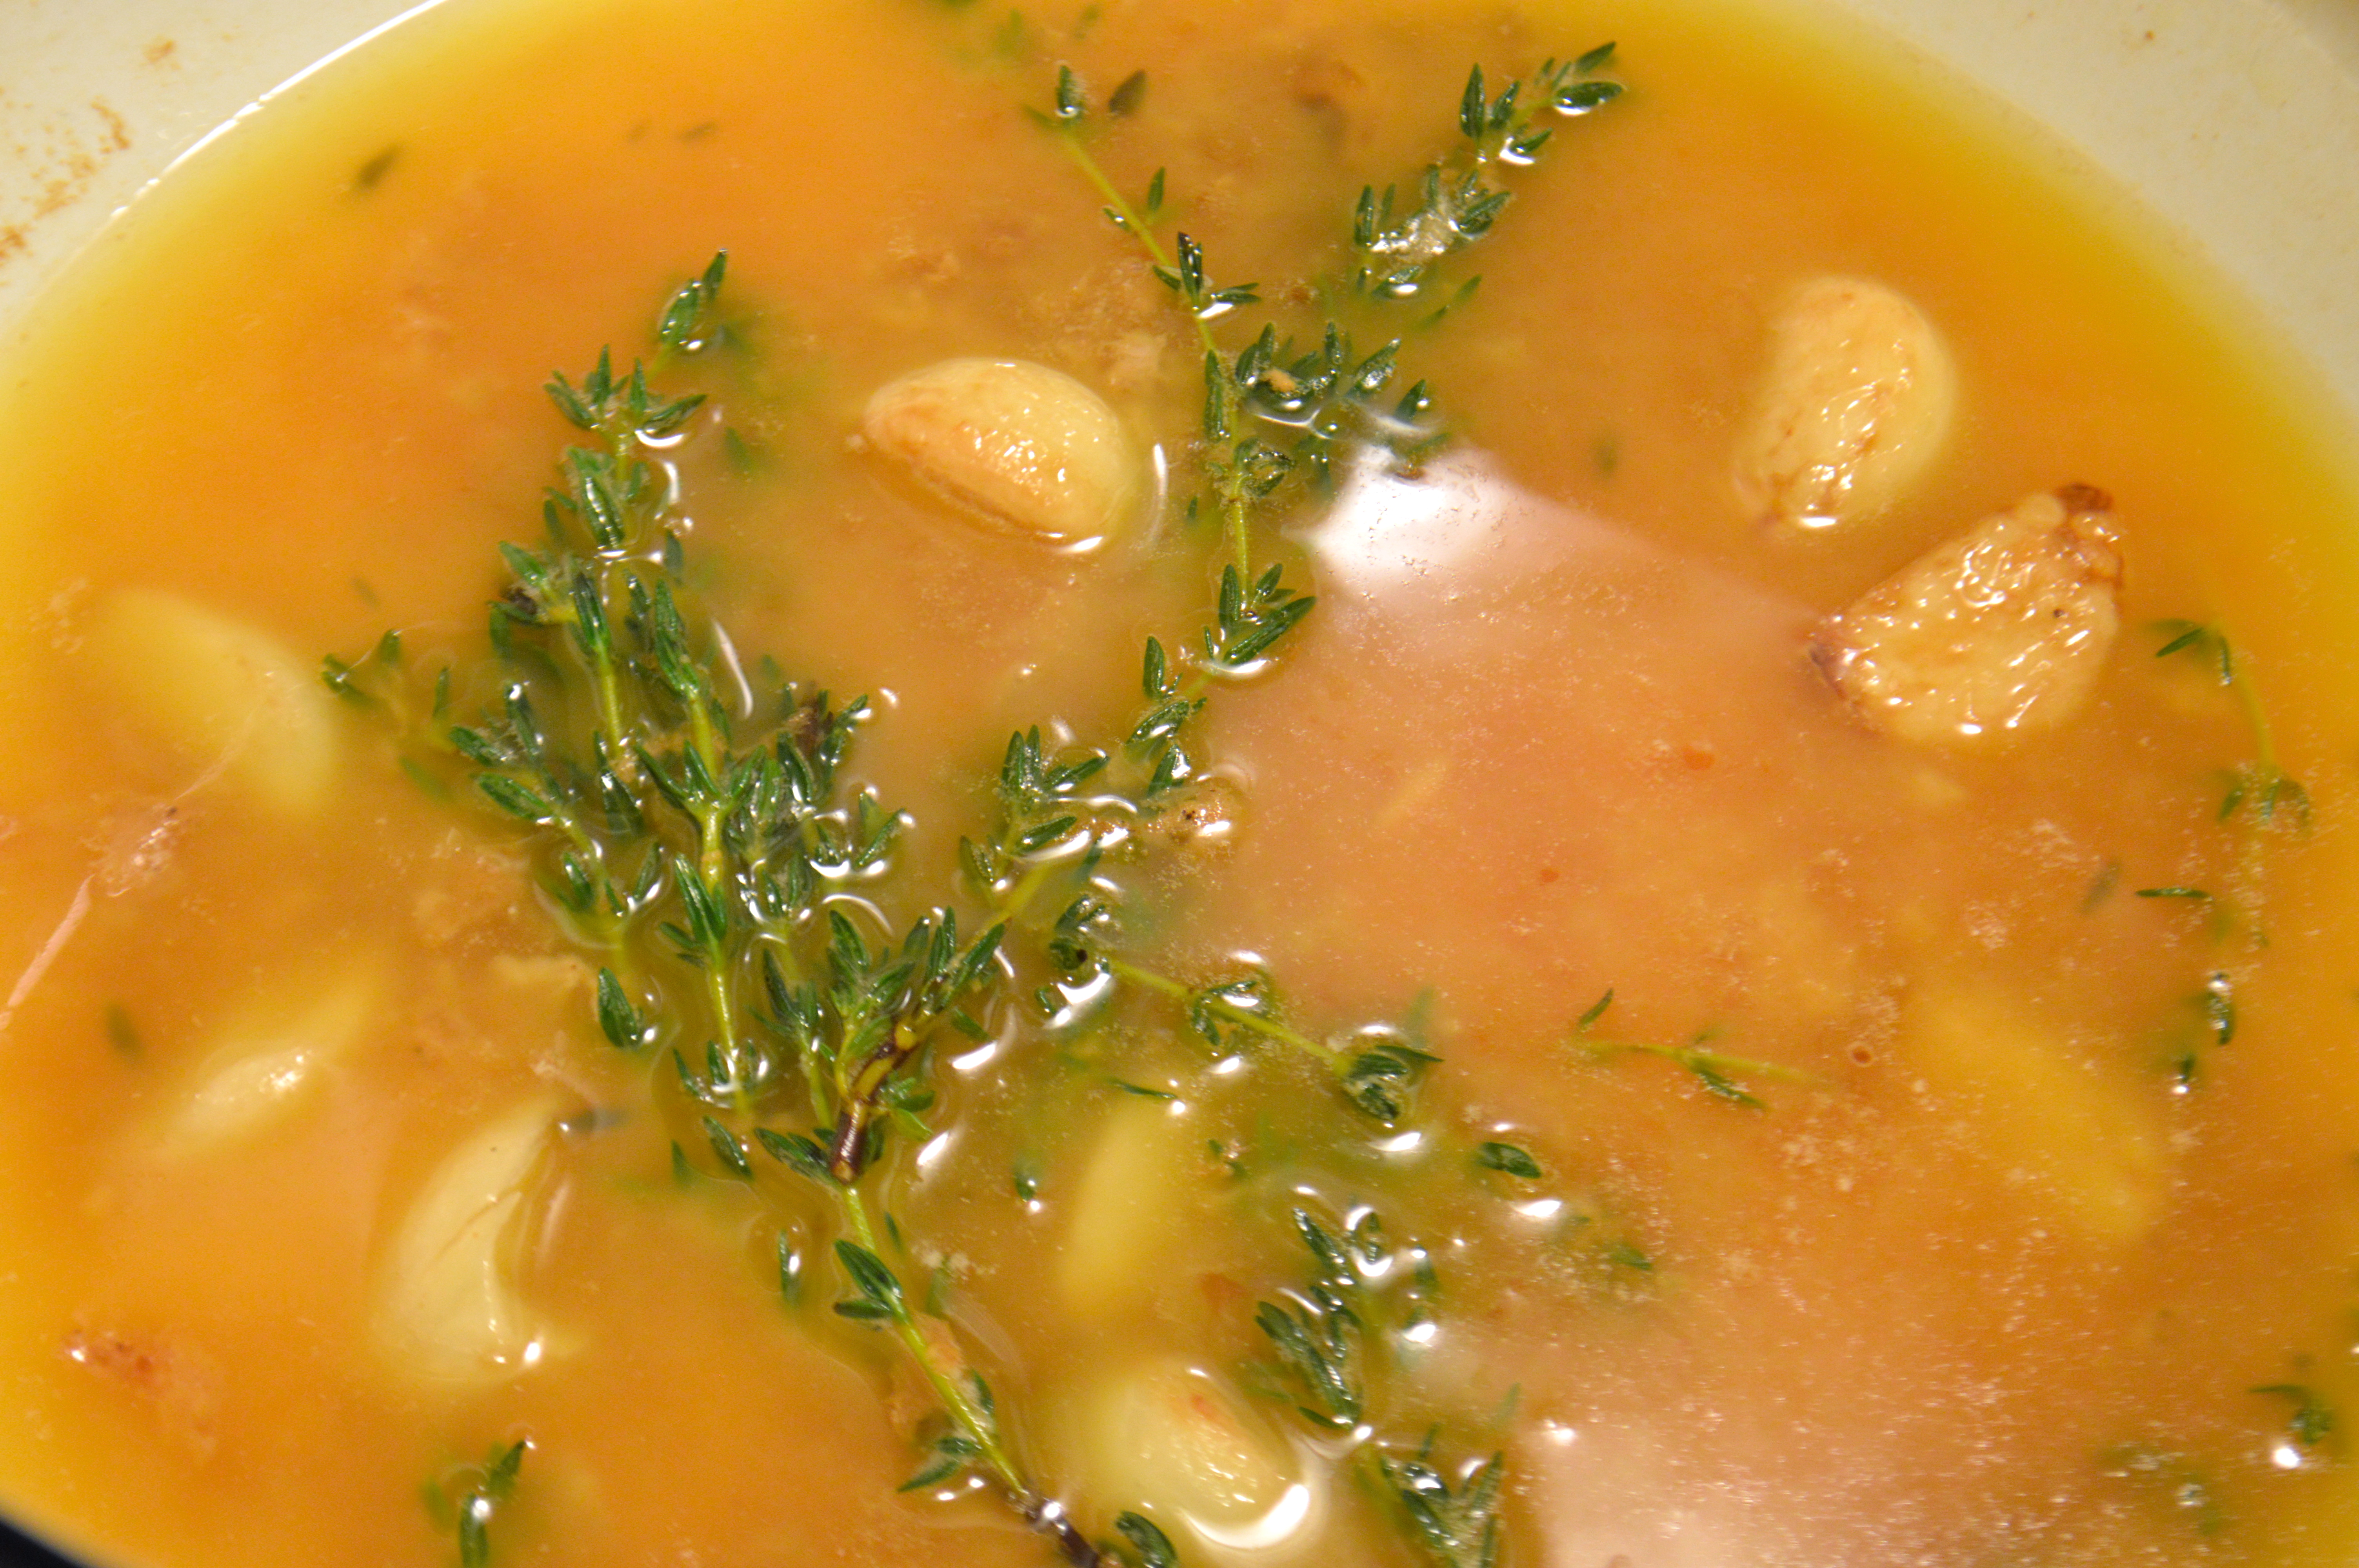
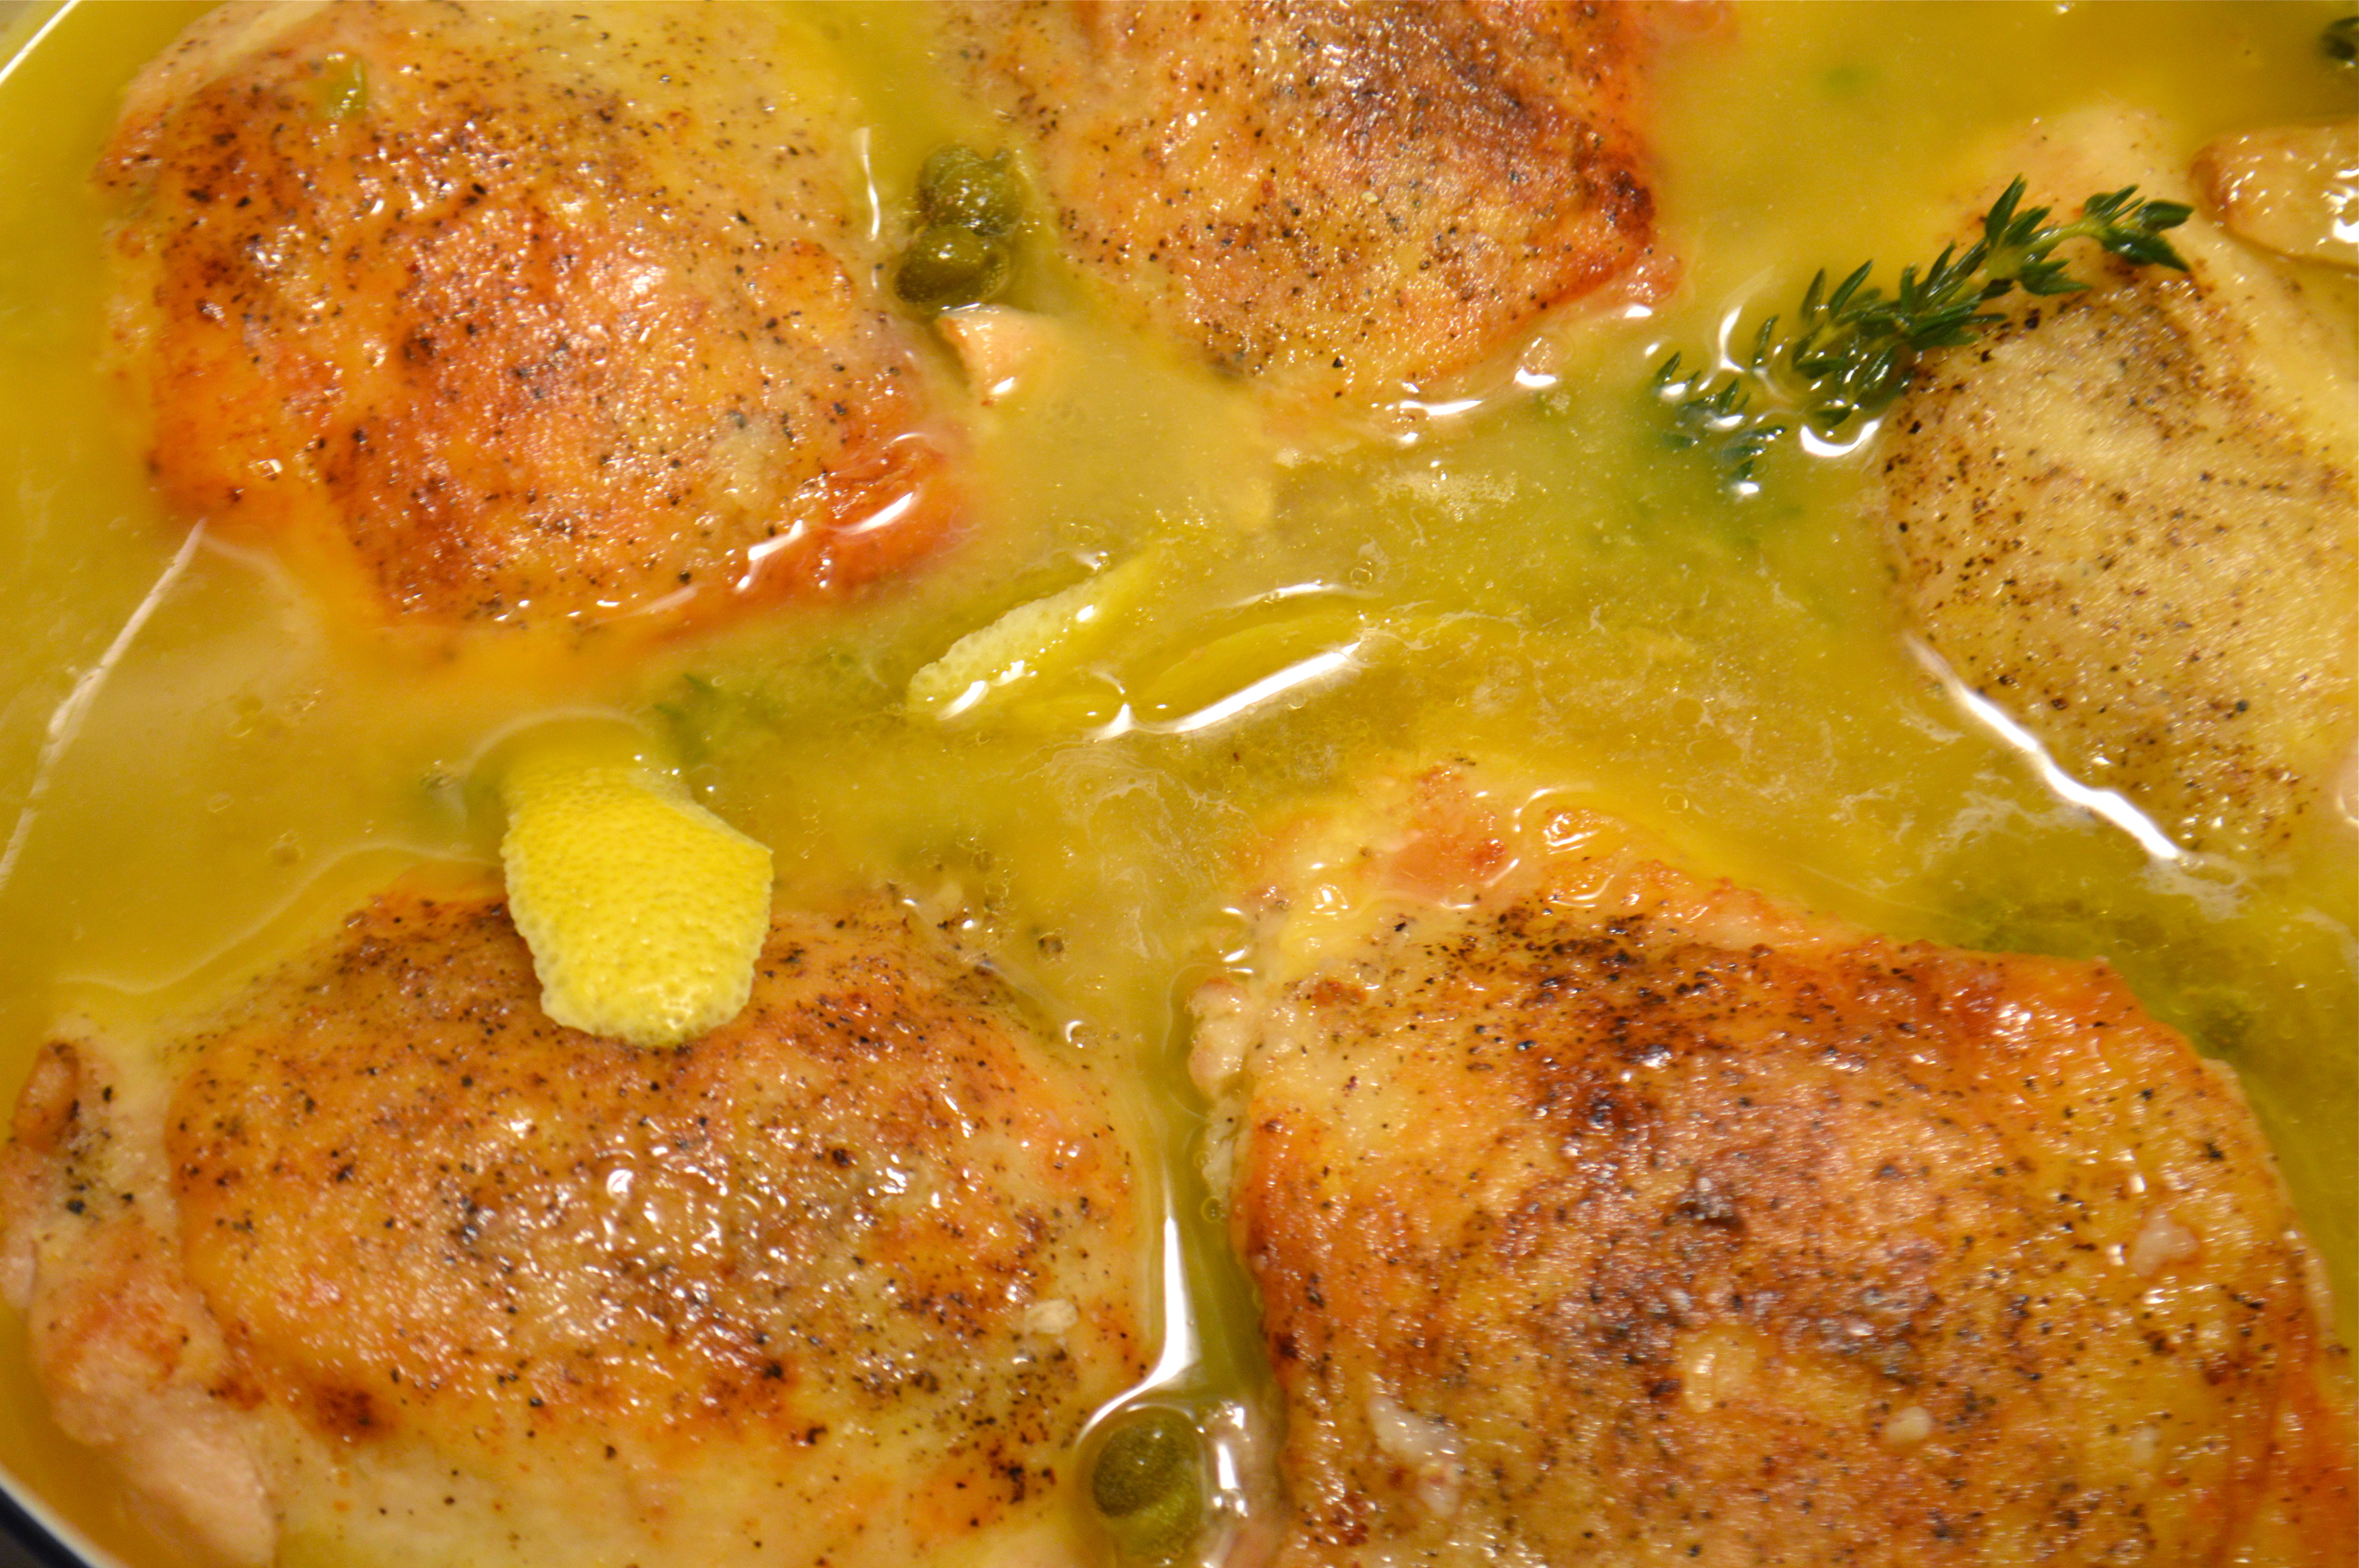
Another little trick to make a meal feel like it cooked all day is to use really bold flavors. I thought the combination of fresh thyme, whole cloves of garlic, and salty capers would be perfect here. To cut the briney saltiness of the capers and the fattiness of the chicken, a healthy dose of crisp white wine and the zest of a whole lemon help make this dish taste really special. I think that the bright citrus-y notes of Sauvignon Blanc work really well, but you can use whatever  you like to drink or whatever you already have in the house.

braised chicken thighs with white wine, lemon, & capers | Brooklyn Homemaker braised chicken thighs with white wine, lemon, & capers | Brooklyn Homemaker braised chicken thighs with white wine, lemon, & capers | Brooklyn Homemaker

I adapted this recipe from one I found in Food & Wine, and while the recipe was amazing and I made only a few small changes, there was something about it that I found a bit strange. The original recipe said to use a large cast iron skillet to cook the entire meal. While the size and shape of a large skillet would lend well to this dish, I would never recommend slow cooking acidic meals in seasoned cast iron. Since this only cooks for an hour it’s not the end of the world, but acidic ingredients like wine and lemon can eat away at the seasoning in cast iron, which can not only negatively affect the function of your pan, but can also give your meal a slight metallic taste. The best option for this dish would be a large enameled skillet or enameled dutch oven without the lid. If you don’t have enameled cookware, you can also use a high-walled heavy stainless steel skillet, or any non-reactive, oven-safe and stovetop-safe pan that’s large enough.

Whatever you choose to cook this dish, you’ll be so glad that you made it. It has such a wonderfully rich and robust flavor. The wine adds a subtle sweetness and, along with the lemon, a bright fruitiness. The garlic, capers, and thyme add an earthy richness and a depth that tastes like it took several hours to build. After only an hour of cooking, the chicken thighs are tender, moist, and practically slide off the bone. Is your mouth watering yet?

braised chicken thighs with white wine, lemon, & capers | Brooklyn Homemaker

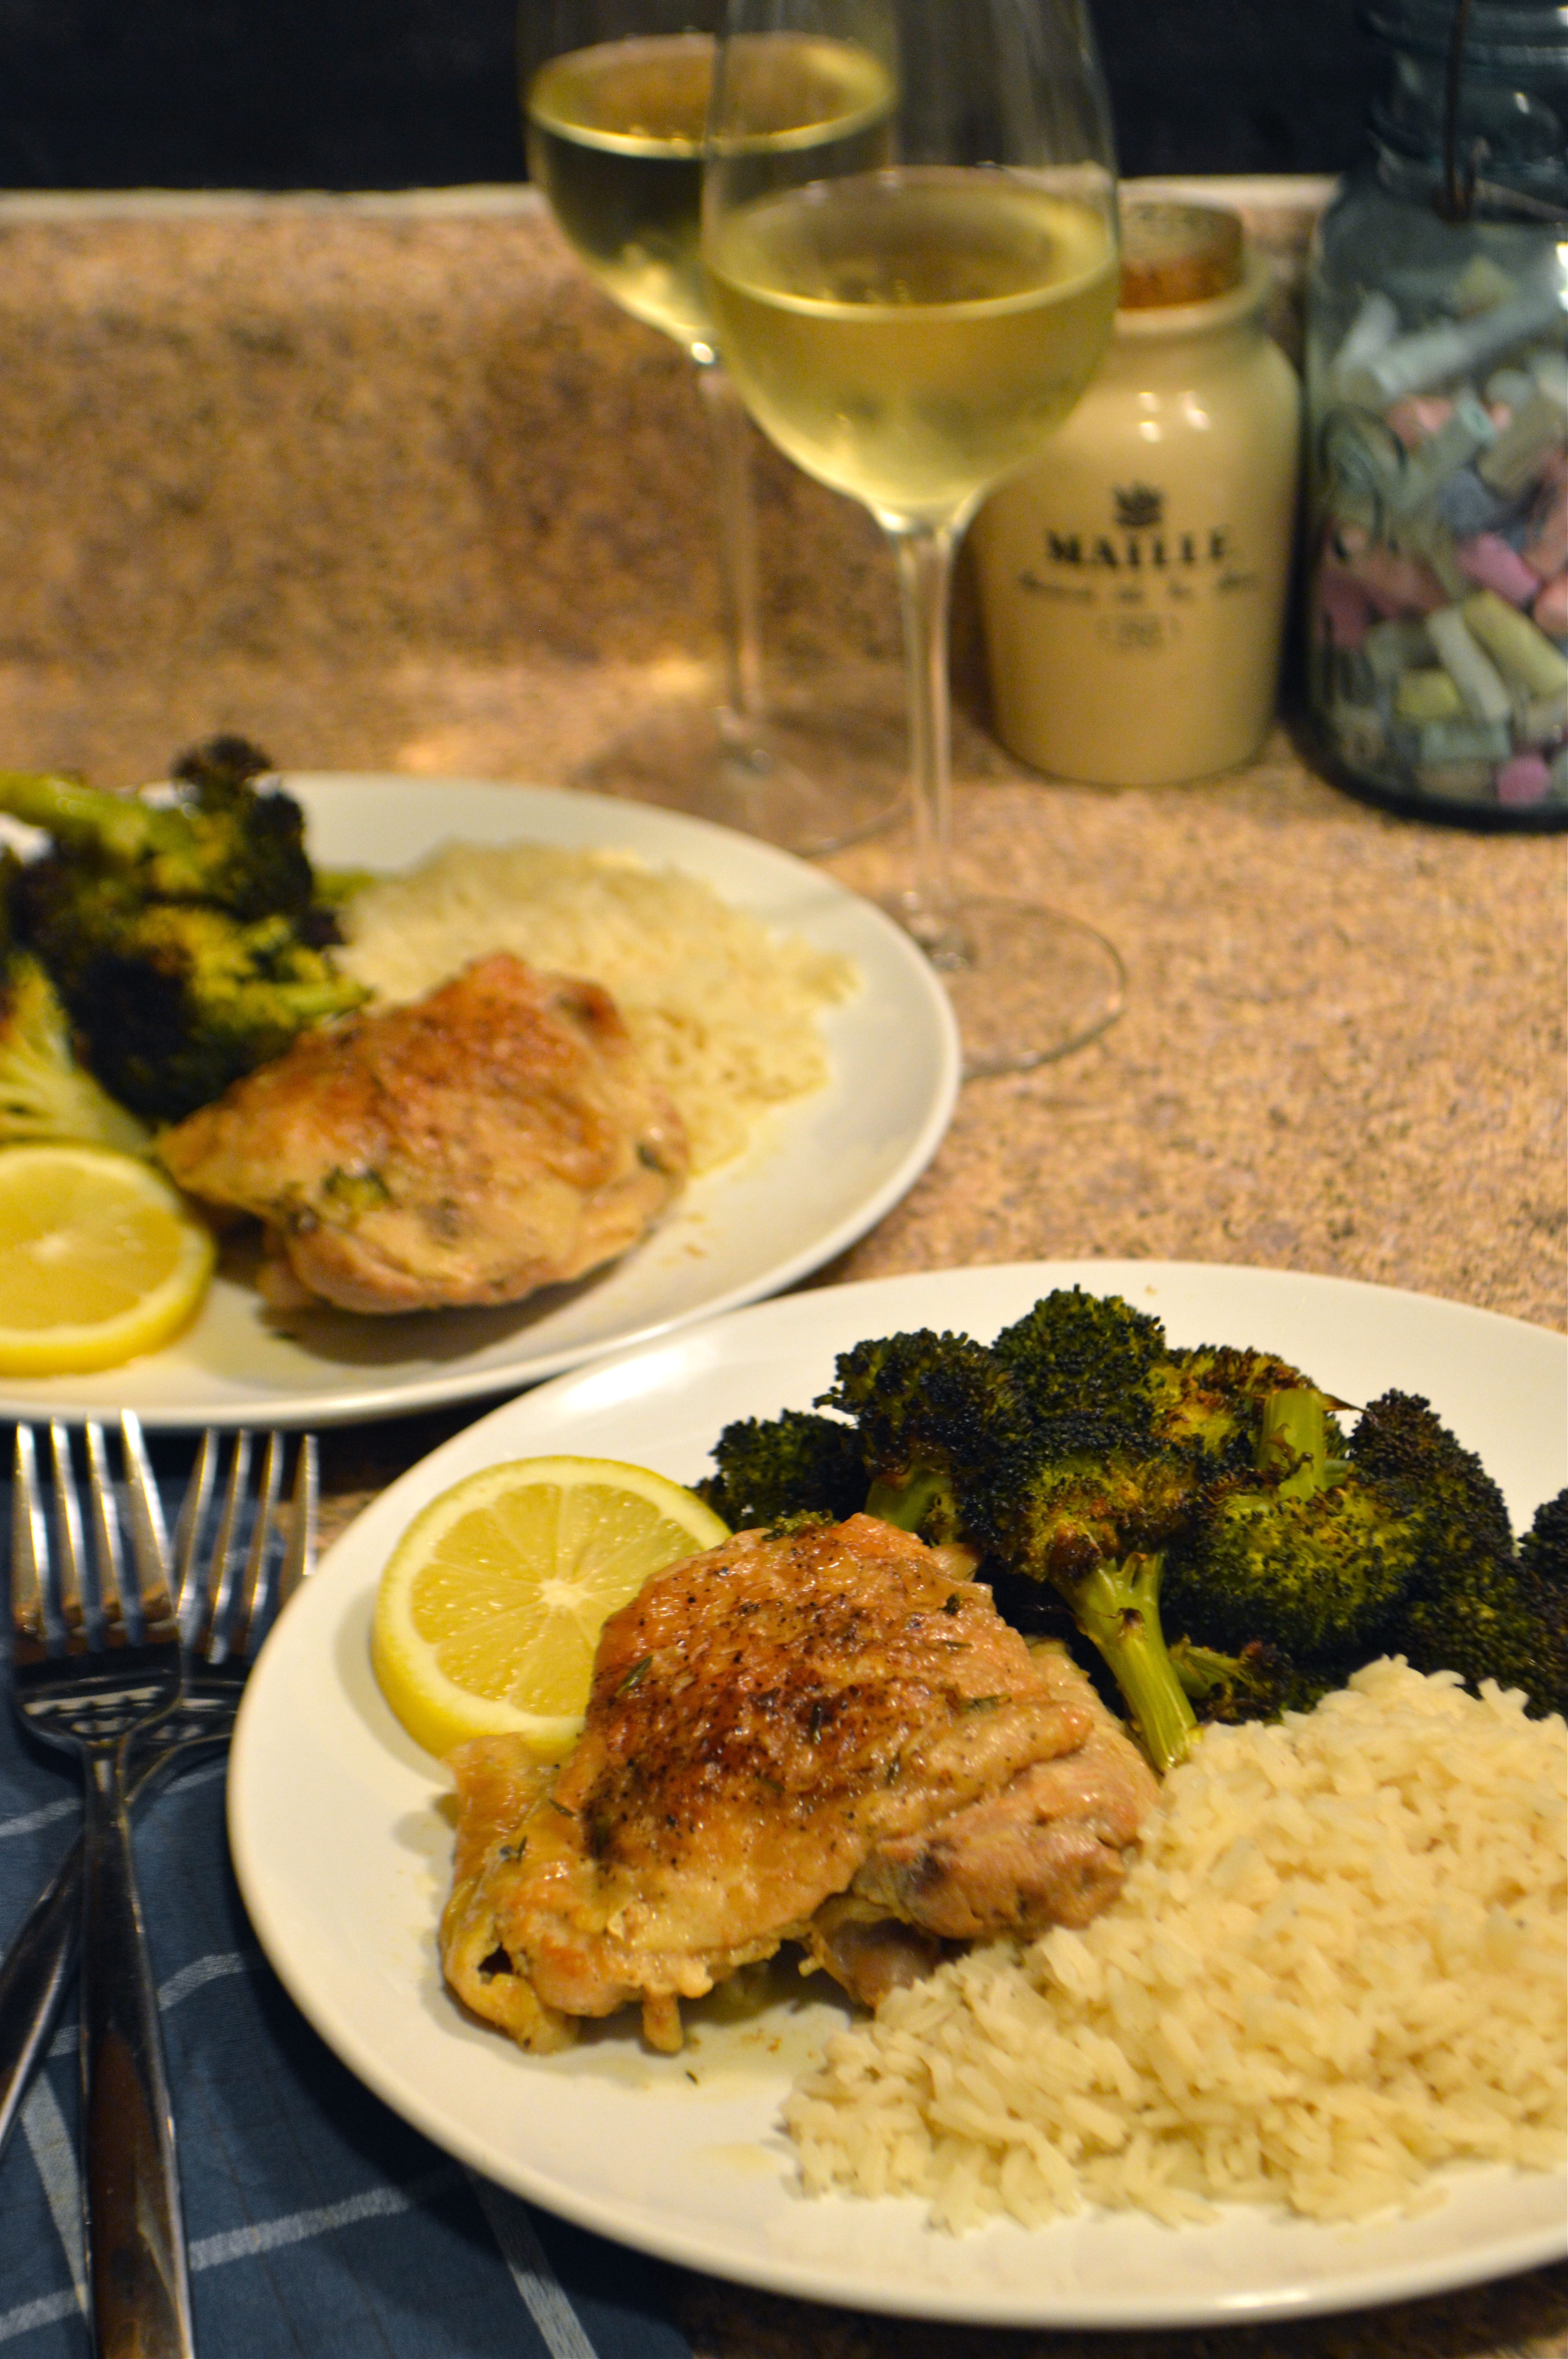
Depending on how many you’re feeding and the size of your chicken pieces, you can use between 4 and 8 thighs. Larger thighs should be plenty for one person, but if your thighs are small you might want to serve two pieces per person. Either way, the remaining ingredients can be left in the same amounts. You’ll just have a little extra sauce if you make fewer pieces. The sauce is amazing, so I promise it won’t go to waste. You can serve this with whatever you like, but I thought it paired perfectly with Basmati rice and roasted broccoli, with a little slice of fresh lemon and a glass (or bottle) of white wine. I just tossed the broccoli with olive oil, lemon, and salt and pepper, and roasted it on a parchment lined sheet pan at the same time that the chicken braised.

braised chicken thighs with white wine, lemon, & capers | Brooklyn Homemaker

Braised Chicken Thighs with White Wine, Lemon, & Capers

  • Servings: 4+ depending on size and number of thighs
  • Print
adapted from Food & Wine

4-8 bone-in chicken thighs with skin (depending on how many you’re feeding)
Salt and pepper to taste
3-4 tablespoons flour
2 tablespoons unsalted butter
6 or 7 peeled garlic cloves
1 1/2 cups dry white wine (I used Sauvignon Blanc)
1 1/2 cups chicken stock, preferably homemade
1 lemon
5-6 sprigs of fresh thyme
1 tablespoon capers, drained
1 bay leaf

Preheat the oven to 375°. Season the chicken with salt and pepper and dust with flour. In a large dutch oven or ovenproof skillet (not raw cast iron), melt the butter. Add the chicken, skin side down first, and cook over high heat until browned, turning over once, for a total of 12 to 14 minutes. Transfer the chicken to a plate, add the garlic cloves and cook over low heat until softened, about 5 minutes.  Add the wine and thyme, turn heat up to high, and boil until reduced by half, about 5 minutes.  Peel the zest (avoiding the white pith) of the lemon using a vegetable peeler. Try to pull the largest strips possible. Add the lemon zest, stock, capers and bay leaf and bring back up to a boil. Return the chicken to the pan, skin side up. Transfer the pan, uncovered, to the oven and braise for 45 minutes, or until the meat is fork tender.
Remove the pan from the oven, transfer the chicken to a plate, and tent with foil. Transfer the pan to the stovetop and boil over high heat until the sauce is slightly reduced, about 5 minutes. Discard the thyme, bay leaf and lemon zest, and spoon the sauce over the chicken to serve.

Mixed Green Salad with Seared Chicken & Orange Vinaigrette

After the red velvet cake post last week I thought I should attempt to share something healthy-ish. You know, something that doesn’t call for 2 cups of oil and multiple sticks of butter. If you based any ideas of what my diet might look like on my blog posts, you’d probably think 75% of what I ate was cake. Well. I really like cake. What can I say? No, really though, I promise I eat real food sometimes too.

mixed green salad with pears, snap peas, seared chicken & orange vinaigrette | Brooklyn Homemaker

If I’ve had a busy day at work, or have very little time to get dinner together, I think a nice big salad with a bunch of stuff it is a really good way to go. You can buy pre-washed greens, and even bottled dressing if you like. Then just cook off some protein, usually steak or chicken in my house, while you prepare all your veggies. Now, I’m really not into the idea of eating a salad, or any meal for that matter, just because it’s healthy. I could definitely stand to lose a few pounds, but I think as long as I eat fresh homemade food, and balance the sweets with plenty of vegetables, I’ll be just fine. I don’t want to go to all the trouble of making a something if it doesn’t taste like anything. I like my food to be full flavor, so when it comes to salads I tend to go all out and load them up with all kinds of good things.

mixed green salad with pears, snap peas, seared chicken & orange vinaigrette | Brooklyn Homemaker

A hearty filling salad can be really easy to make with a wide variety of vegetables, and I usually like to throw in some fruit for sweetness. I generally like to do a few laps through the produce department and see if anything calls out to me. For this salad, I really had no preconceived ideas of what I wanted when I walked into the grocery store, but before I knew it I had something taking shape. I grabbed some chicken breast, a beautiful red bell pepper, a half pound of sugar snap peas, and some nice ripe bosc pears and I was almost finished. I thought a light citrusy dressing would tie everything together so I picked up a big naval orange, and I figured the salad could use something rich with a little crunch so I grabbed a shallot to fry up. All that was left was some organic spring mix and I was good to go.

If I’m eating a salad as my dinner I like it to have a lot going on to make it feel like a substantial meal.  I try to follow a very loose formula of a few different veggies or fruit mixed into some greens with a protein. I usually like to add some richness to my salads with something just a bit fatty and salty. This can be some crispy bacon bits or chewy lardons, a bit of crumbled or shredded cheese, a handful of toasted nuts or seeds, or even just a creamy dressing. A little bit of fat goes a long way to make a salad feel more filling and complete. For this salad I decided some fried shallots would serve my needs just fine.

mixed green salad with pears, snap peas, seared chicken & orange vinaigrette | Brooklyn Homemaker

When I got home I washed all my produce and set to work. I made up a sweet & slightly spicy vinaigrette with the zest and juice from my orange and a tiny bit of cayenne pepper. Then I sliced my pepper and pear into thin strips and cut the stem ends off of my snap peas. I thought a carrot would be a welcome addition and I had plenty at home so I decided to go for it. Grated carrots are great in salads, but I love to have super long, super thin strips of carrots. A few months ago I picked up a julienne peeler and now it’s seriously my new favorite kitchen tool. The one I use is made by Kuhn Rikon and is available here. It makes light easy work of cutting carrots into long, thin, even strips. This can be done on a mandolin cutter, but sometimes carrots and other harder vegetables can be tough to get through the teeth and blade on a mandolin with your fingers in tact. If you have the skills to pay the bills, you can also do this with a knife, but I think it’s much faster and easier with the julienne peeler.

mixed green salad with pears, snap peas, seared chicken & orange vinaigrette | Brooklyn Homemaker

After I had my veggies ready to go I set to work pan frying my shallot. I sliced it into very thin discs, separated those with my fingers and dredged them in generously seasoned flour. Then, in a cast iron skillet, I fried them in a few tablespoons of olive oil until they were nice and brown and crunchy. I’m sure that thinly sliced shallots would be great in the salad raw, or you could skip them all together, but fried they add just a touch of saltiness and caramelized crunchiness to an otherwise super light meal. When they were done I transferred them to a paper towel lined plate, and in the same skillet I seared my chicken breasts until well browned and cooked through.

When searing your chicken, or searing anything for that matter, it’s best not to use a non-stick pan. Non-stick pans are not designed to withstand long periods of high heat, no matter what material they’re made of. Teflon, nano-ceramic, it don’t matter. If you want a good pan you can sear in I’d recommend a cast iron skillet or a stainless steel saute pan. Of course, you’ll need to use a bit more butter or oil to cook in these pans, but you can get them screaming hot and not worry about negatively affecting the utility.

Many people tell me they’re intimidated by having to care for and maintain a cast iron skillet, but I promise you it’s not difficult. Most cast iron skillets sold today come pre-seasoned and ready to use, and maintaining the seasoning is pretty simple. There is tons of information on the internet about cast iron care, and it becomes second nature once you get the hang of it.

mixed green salad with pears, snap peas, seared chicken & orange vinaigrette | Brooklyn Homemaker

It would be really easy to change this salad to fit your taste by swapping some ingredients out for others. I think it was pretty damned tasty as is though. While fresh, light and healthy, this salad was totally satisfying. Along with the bitterness of the mixed greens, you have a few layers of flavor all tossed together and complimenting each other. There’s sweetness from pepper, peas, carrots & pears. Then there’s the sweet and tangy spice of the vinaigrette, the rich salty crunch of the shallots, and the hearty meatiness of the sliced chicken breast. While this salad might not be something you can throw together in 5 minutes- it is something that can easily be assembled and ready to eat in well under an hour, and I think it makes a great weeknight supper.

mixed green salad with pears, snap peas, seared chicken & orange vinaigrette | Brooklyn Homemaker

Mixed Green Salad with Pears, Snap Peas, Seared Chicken & Orange Vinaigrette


1/4 cup extra virgin olive oil, plus 3 tablespoons divided
2 teaspoon cider vinegar
1 teaspoon honey
1 clove garlic
1 large orange
1/8 teaspoon ground cayenne pepper (optional)
salt and pepper
1 shallot
2 tablespoons of flour
4 small skinless boneless chicken breasts
1/2 lb sugar snap peas
1 red bell pepper
1 ripe bosc pear
1 large carrot
5 oz package spring mix

To make the vinaigrette measure out 1/4 cup olive oil, vinegar & honey into a small bowl. Finely zest orange and grate garlic (you can use your zester) and add to bowl. Juice the orange into the bowl, add cayenne pepper and whisk together. Taste and season with salt and pepper. Taste again.

Heat 3 tablespoons olive oil in a heavy cast iron or stainless steel pan over medium high heat. Slice shallot into thin disks and separate rings with your fingers. In a small tupperware with a lid (or ziploc bag) season flour with salt and pepper. Add shallots and shake until well coated. Distribute shallots over pan evenly and, stirring every so often, fry them until they’re brown and crunchy but not burnt. Remove with a spoon and drain on a paper towel lined plate.

Turn the pan up to high and get it super hot. The remaining oil will smoke a bit. Season both sides of chicken breasts with salt and pepper, and add to pan. Cook on high for 5-7 minutes per side, or until fully cooked and nicely browned. Remove from pan and let rest for 5 minutes before slicing into thin strips.

While chicken is cooking, remove stem ends from snap peas, and slice bell pepper into thin strips. Cut the ends off your pear, slice in half, and scoop out center and seeds with a spoon. Slice into thin strips. Using a julienne peeler, mandolin, knife or grater, cut carrot into very thin long strips. In a large bowl add spring mix, peas, pepper, pear & carrots, and toss well with vinaigrette. Divide between plates and top with fried shallots and sliced chicken breast.

My Favorite Way to Roast Chicken

When I was in college I had to take a few introductory culinary classes as part of my curriculum, but at the time I was a vegetarian. I didn’t pay attention during the meat classes because I thought I’d never need to know how to cook the stuff, and I’ve always regretted that. During my veg phase I also interned abroad, working as a back waiter in Burgundy for a few months. I did eat fish while I was there because I was afraid I’d waste away to nothing in France, where bacon is considered a vegetable. In Paris I ate like a king, but 10 years ago in rural burgundy, some people had never even heard of someone not eating meat for non-religious reasons. I ate a ton of amazing food, especially river trout that were kept and caught daily from a creek behind the restaurant where I interned, but I can’t even begin to explain how much I regret politely declining the foods I turned down and missed out on. Boudin Noir sauteed in normandy butter with apples, rabbits raised in a garage by a little old lady that lived behind our dorm, fresh fois gras from a humane farm we visited one weekend. I’ll forever be kicking myself for that.  Shortly after I returned I broke and went back to eating meat. I’m a real chump.

simple roast chicken in cast iron | Brooklyn Homemaker

I always assumed that roasting a chicken was a delicate art that I could have learned if only I’d paid attention, but would never be able to master on my own. It’s no Boudin Noir with apples and butter, but a well roasted chicken is a beautiful thing. So, a few years ago I decided it was time to put on my big boy pants and roast my first chicken. All that time I wasted afraid that I couldn’t do it. When I finally drummed up the courage to do it and looked up a recipe, I thought it was wrong. It couldn’t be that simple. Could it?

Simple Roasted Chicken in Cast Iron | Brooklyn Homemaker

It could.

Roasting a chicken is pretty damned simple if you have a few hours before you need to eat. There are a million ways to do it. Some of them are harder than others, but most of them are pretty darn good. I think simplicity is best when it comes to simple foods, so I’ve perfected my favorite way of roasting a chicken to be as simple, and as versatile, as possible.

I used to roast in pyrex, at first laying flat on the bottom, then up on a roasting rack, but things changed when I read about roasting in cast iron and I’ve never gone back. Cast iron heats up more slowly but more evenly than roasting pans or pyrex, and they maintain an even heat for a nice long time. Since it doesn’t overheat as quickly, your chicken’s juices don’t burn off and you can make your gravy or sauce right in the same pan. I like to roast on a bed of vegetables or potatoes to keep the bird from sticking, and then the juices run over and help cook your vegetables.
Simple Roasted Chicken in Cast Iron | Brooklyn Homemaker
This is a really loose recipe, easily tweaked and changed to suit your taste. I like to wash, dry and season my chicken well before roasting and let it sit uncovered in the fridge for a few hours. If you don’t have time for this you can skip it, I just think it makes for a crispier skin. I usually toss some onions and cubed potatoes in the pan under the chicken, but the other day I swapped the potatoes for brussels sprouts and cubed butternut squash and it was truly amazing. You just want to make sure you choose veggies that benefit from low slow roasting, parsnips, carrots, sweet potatoes, apples, you name it. When the chicken is done I take it out and let it rest, tented with aluminum foil, then transfer the veggies to a serving bowl, leaving the juices in the pan for gravy.

Simple Roasted Chicken in Cast Iron | Brooklyn Homemaker

Thickening with a roux is the easiest and quickest way, but if you want to let your chicken rest a little longer you can make a reduction by cooking down your juices and maybe a little white wine, or maybe add some cream or butter for texture.

Give it a shot. It’s not as scary as you might think.

Simple Roasted Chicken in Cast Iron | Brooklyn Homemaker

Simple Ol' Roast Chicken

3 or 4 lb roasting chicken
coarse kosher salt and ground pepper
cubed or bite size veggies such as onions, brussels sprouts, potatoes, winter squash, root vegetables, etc.
herbs, garlic, or quartered lemons or onions for stuffing
olive oil or butter

If making a gravy with roux:
4 tablespoons butter
6 tablespoons flour

Rinse your chicken in cold water and pat it dry with paper towels. Be sure to dry the inside as well as the out. Remove any “extras” that might be inside and discard or freeze for making stock. Wash your hands really well both before and after this. Place your dried chicken on a plate and season all sides with salt and pepper. If you have time, place your chicken uncovered in the refrigerator for two or three hours. If you don’t, set it aside and prepare your pan.

Preheat your oven to 450°F.
Arrange your vegetables in an even layer the bottom of the pan and drizzle with a little olive oil or melted butter and season with salt and pepper. Go easy on the salt if you’re making a reduced sauce so it’s not too salty when it cooks down.
If you like a darker color to your skin you can rub the chicken with olive oil or butter before roasting but I usually skip it.
You can stuff the inside of the chicken with whatever you want. Overstuffing can slow the roasting down so leave some space for air in the cavity.
Place your chicken breast-side-up over your vegetables and roast the chicken for 15 minutes and then reduce the oven temperature to 375°F.
Continue to roast for one hour. A three or three and a half pound chicken should be done by now. For a four pounder you can go another 15 minutes.  If you’re new to this or worried about doneness, check by inserting an instant-read thermometer into the meatiest part of its thigh. You want it to be at least 165°F, but if you’re under you can put it back in for another 5 to 10 minutes and check it again.
Transfer your chicken to a plate and let it rest, tented with aluminum foil, for 15 minutes. Transfer your vegetables to a bowl or dish and make your gravy or sauce. If making gravy, make a roux by melting butter in a separate pan and whisking in flour. Cook over medium heat for 3 or 4 minutes. The amount of juice from you chicken can vary, so gradually whisk a little roux at a time into the liquid, simmer for a bit before adding more, until you reach the desired thickness.


Enjoy kiddos!

Chicken Pot Pie with Buttermilk Biscuit Crust

Updated with new photos and a slightly revised recipe on 9/29/2014 here.

This is not your standard chicken pot pie. There is only top crust here, just resting on top of the filling; and this is no standard pastry crust, but a thick island of tender buttermilk biscuit. If you wanted to complicate things, this could be called a chicken and biscuits pie, or maybe a southern style chicken pot pie. To me, this is what chicken pot pie is supposed to be. This is chicken pot pie the way my grandmother made it, and this was the meal of choice for me and my sisters on birthdays and special occasions.

chicken pot pie with buttermilk biscuit crust | Brooklyn Homemaker

This was a staple of my childhood and making it is an exercise in nostalgia. When Grandma made it she would boil chicken breasts in bouillon, thicken with a flour & water slurry, add some canned peas and carrots, and top it with Bisquick. When I was learning to cook this was one of the first recipes I tried to master, and as I became a better cook the recipe started to change.

chicken pot pie with buttermilk biscuit crust | Brooklyn Homemaker

The recipe I’m sharing with you is very different from the one Grandma used to make, but the end result is just as homey and comforting. This is not a quick weeknight dinner, but more of an all-Sunday-in-your-PJs kind of meal. Making fresh chicken stock is probably the biggest change between Grandma’s recipe and mine. I like to start late in the morning, browning the chicken, adding some aromatics, and letting it simmer slow and low for a couple of hours while I go about my day.

For this recipe I used a whole chicken that came cut up and wrapped from my grocery store, but you can use whatever chicken you like. I think a whole chicken or a mix of breasts and thighs will give you the most flavorful end product, but if you or your family only like breast meat, use all breasts. If you’re like me and roast a lot of chickens at home, odds are that you might have some bones or gizzards lying around in the freezer. That’s not weird is it? Anyway, if you do, toss them in too.

chicken pot pie with buttermilk biscuit crust | Brooklyn Homemaker

Next I go for fresh veggies, cut rough and rustic, and brown them in the same pan that was used for stock. This is by no means a one dish meal, but unless you want to transfer it to a pretty oven safe bowl for baking and serving, this whole meal from start to finish can be cooked in one pot. After the veggies are cooked I thicken the stock with a roux, add everything back to the pan along with some frozen peas, and top the whole thing with one giant buttermilk biscuit. I think that the gravy should be super thick to work well as a pot pie, so a roux is a perfect solution. With the amount of flour needed to thicken this recipe, you’d be able to taste the raw flour if you used the flour and water method.

chicken pot pie with buttermilk biscuit crust | Brooklyn Homemaker

Don’t be afraid to make your own biscuits from scratch. If you mess them up, they’re usually still pretty good; and once you master them, you’ll wonder what you were doing with your life before. If you don’t have a pastry blender you can use a food processor, or a fork, or even your hands. If you don’t have cream of tartar, don’t freak. It helps the biscuits rise and get super fluffy, but they’ll still be great without it. The buttermilk however is a must. Trust me.

chicken pot pie with buttermilk biscuit crust | Brooklyn Homemaker

By the way, this recipe is also PERFECT for leftover turkey. I have a hunch you might have some soon. Pull the meat off first and make your stock with the bones and any extra bits and pieces. Tada!

chicken pot pie with buttermilk biscuit crust | Brooklyn Homemaker

Chicken Pot Pie with Buttermilk Biscuit Crust

filling:
4-5 lbs of chicken pieces, skin-on, bone-in. *see note
salt & pepper
2 tablespoon olive oil, divided
1 bay leaf
2 onions, 1 large, 1 small
3 carrots
3 celery stalks
1 1/2 cups frozen peas
10 tablespoons butter
1 cup flour

biscuit crust:
3 cups flour
4 teaspoons baking powder
1 teaspoon salt
1 tablespoon sugar
3/4 teaspoon cream of tartar
12 tablespoons (1 1/2 sticks) butter
1 1/4 cups buttermilk

Make the filling:
Generously season your chicken with salt and pepper. In a large (at least 6 qt) heavy stockpot or dutch oven, heat 1 tablespoon olive oil over medium high heat. Add your chicken parts and brown them for about 5 minutes on each side. This doesn’t have to be perfect, it’s just to add flavor, but you can do this in stages if everything won’t fit. Roughly chop 1 small onion (skin on), 1 carrot, & 1 celery stalk (leaves on), and add to pot along with one bay leaf. Top with 8 cups of water, and cover the pot. Turn the heat down to medium and bring to a boil. Once the pot reaches a boil, turn the heat down again and let the pot simmer for at least an hour. If you have the time, another hour at a low simmer will only help build the flavor of your stock.

Remove pot from heat and let cool for 10 minutes or until you’re comfortable handling it. Using a large colander fitted inside a larger bowl, strain out the stock. You can use a strainer or sieve to skim the stock for anything that got through the colander. Measure out 6 cups of stock and keep any remaining for another use. Cover and set aside.

Let the chicken pieces cool for about 30 minutes or until you can handle them. You can use this time to chop the remaining vegetables for the next step. Remove the bones and skin from the chicken and discard along with boiled veggies & bay leaf. Pull the chicken into bite sized pieces and be careful to find and remove any small remaining bones. Place your cooked chicken in a bowl, cover and set aside.

Wipe your pot clean. You don’t have to wash it, just make sure there’s nothing in there you don’t want in the finished product. Dice the large onion, and cut your remaining carrots and celery into small pieces.  Heat remaining tablespoon of oil over medium high heat and add your chopped vegetables. Season with salt & pepper and cook until onions and celery are translucent and carrots are completely tender. Transfer to the bowl with the pulled chicken.

Back in your pot, melt the butter (you could also use some chicken fat skimmed from your stock) and whisk in flour. Cook until the flour just barely starts to brown. Slowly whisk in about half a cup of your stock, making sure there are no lumps of roux. Repeat twice more and then add remaining stock.  Whisk out any lumps and bring to a boil, whisking regularly. When the gravy is well thickened, remove from heat, taste and adjust your seasoning if necessary. Add the chicken, cooked vegetables & frozen peas.  Set aside.  If your pot is oven safe you can bake your pie in it, or you can transfer to an oven safe bowl for a nicer presentation.

Make the biscuit crust:
Preheat oven to 450 degrees.
In a large bowl sift together flour, baking powder, sugar, salt & cream of tartar. Using a pastry blender, cut the butter into the flour until it resembles coarse pea-sized crumbs. Form a well in the center of the bowl and in buttermilk. Use a fork to stir until just moistened. Do not over mix.

Turn the dough out onto a floured work surface and knead lightly 5 or 6 times, or until it just holds together. Pat or lightly roll dough out to 1/2 of an inch. Form a circle about the size of a your pot or bowl.  If you have any remaining dough you can cut it into biscuits and bake separately. You can double the biscuit recipe if you definitely want more on the side. Carefully transfer your biscuit round to the top of your filling and score it with an X in the center using a sharp knife. Bake for 25-30 minutes or until the crust is golden and the filling is bubbling. Any extra biscuits should be rolled to 3/4 of an inch and baked on a sheet pan for 10 to 12 minutes or until golden.

Remove from oven and allow it to cool for 15 minutes before serving. Serve with a nice chunk of crust.

*You can use whatever parts you like best, but I think an entire chicken, cut up into pieces, is perfect. If you like all white meat, use all breasts. If you can’t find an entire chicken cut up and don’t want to get into butchering, I think a mix of breasts and thighs has the best flavor.