veg

roasted cauliflower and cheddar soup

Spring is finally in full swing and the dogs and I are over the freaking moon.

roasted cauliflower and cheddar soup | Brooklyn Homemaker

While the trees are bursting with buds and daffodils are blooming like it’s their job, local produce hasn’t seemed to catch up just yet. New York’s farmers markets boast plenty of local meat and dairy, and tables overflowing with brightly colored annual flowers, but sweet juicy berries and bright green vegetables still need a few weeks to soak up the warm sunshine.

roasted cauliflower and cheddar soup | Brooklyn Homemaker

True to form, this spring has been toying with me and my frail emotions. Temperatures one day are soaring into the 70s, and the next they’re dipping back into the 40s. One day we have ample sunshine, the next it’s pouring rain.

roasted cauliflower and cheddar soup | Brooklyn Homemaker

On one of the cold and rainy days I was craving soup, as one does. With no local produce to choose from, I was off to the grocery store to try to find something fresh-ish and hopefully organic that I could turn into a warm satisfying soup. I also had a healthy stash of amazing Irish cheddar that was leftover after a book signing event at work, so I wanted to try to incorporate some of that cheesy goodness.

roasted cauliflower and cheddar soup | Brooklyn Homemaker

It didn’t take me long in the produce aisle to come up with a plan. What better vegetable for a thick warm filling soup than cauliflower? It’s available year round, goes great with cheddar and warm flavors, and is perfect for a rich and roasty soup.

roasted cauliflower and cheddar soup | Brooklyn Homemaker

This soup is really simple to make and definitely hits the spot on a rainy day, no matter what time of year. The fresh woodsy thyme adds a touch of green herbal freshness, and the white wine adds a crisp brightness that feels very appropriate for spring or summer. Roasting the cauliflower before pureeing it deepens and concentrates its earthy flavor, and the sharp cheddar adds a nice zippy tang without feeling heavy or overwhelming.

Pull up a bowl, tear into a nice crusty loaf of bread, and park yourself in front of the window and watch the rain come down.

roasted cauliflower and cheddar soup | Brooklyn Homemaker

Roasted Cauliflower and Cheddar Soup

  • Servings: 6 to 8 -ish
  • Print
2 heads of cauliflower
2 tablespoons olive oil
salt and pepper, to taste
2 tablespoons butter
1 medium to large onion, chopped
1/8 teaspoon cayenne pepper (optional)
1/8 teaspoon smoked paprika
5 to 6 sprigs of fresh thyme
1 cup dry white wine
6 cups low sodium chicken stock
8 oz sharp cheddar, grated

Preheat oven to 400. Chop cauliflower into rough large florets. Toss in olive oil, season with salt and pepper, and arrange in a single layer on a parchment lined baking sheet. Roast until brown and golden, about 30 or 40 minutes.

Preheat a stockpot over medium high heat and bring butter to a sizzle. Add onion, cayenne, paprika, thyme, and salt and pepper to taste. Sauté until tender and translucent, 5 to 10 minutes. Add white wine and reduce by at least half. Add chicken stock and bring to a boil. Add roasted cauliflower, bring back to a boil, and cook for 10 minutes. Remove from heat and remove thyme sprigs. Add cheddar and puree until silky smooth, using either an immersion blender or working in batches in a standing blender. Taste and adjust seasoning if necessary.

Serve with a drizzle of olive oil, a small handful of grated cheddar, and a big hunk of crusty bread.

orecchiette with sausage and broccoli rabe

So according to the name up at the top of the page, I do most of my cooking, baking, home improvement projects, and general homemaking in a little known town called Brooklyn.

You’ve heard of it maybe?

orecchiette with sausage and broccoli rabe | Brooklyn Homemaker

I’m not sure how familiar most of you are with the different neighborhoods in Brooklyn, but the area where I live is called Bushwick. Bushwick is pretty much as far north as you can get before accidentally crossing over into Queens, and by subway it’s only a few stops away from it’s bigger, wealthier, more popular sister neighborhood Williamsburg.

orecchiette with sausage and broccoli rabe | Brooklyn Homemaker

When I first moved to Brooklyn in 2007, Williamsburg was still a growing artist community and Bushwick was an industrial no mans land that hadn’t yet been invaded by more than a handful of hipsters. In those days Williamsburg was still (almost) affordable, and was still home to art galleries, dive bars and record stores, but a good friend of mine had a place in Bushwick and let me crash until I got on my feet, so I landed in Bushwick and never left.

orecchiette with sausage and broccoli rabe | Brooklyn Homemaker

In the years since, Williamsburg has become a playland for the rich and famous and one of New York’s biggest tourist destinations. Thanks to rising rents forcing young people further out, Bushwick was recently named one of the hippest neighborhoods in the world by Vogue Magazine. In 2007 Bushwick was a very different place. It was one of the most affordable neighborhoods in Brooklyn, which I why I stuck around, but it was also dirty and dangerous and filled with just as many junkies as it was rats.
We’ve gone from dead rats and pepper spray to baby strollers and art galleries. Abandoned buildings and needle exchanges to luxury condos and organic food co-ops.

If I hadn’t found a rent stabilized apartment a few years back I probably couldn’t even afford to live here anymore.

orecchiette with sausage and broccoli rabe | Brooklyn Homemaker

Bushwick has always been a neighborhood in transition, since the very beginning. Originally a farming community, in the 1800s Bushwick grew into a beer brewing hub filled with German immigrants, their breweries, and their huge mansions lining Bushwick Avenue. Prohibition eventually shuddered most of the breweries though, and by the 1950s Bushwick had become one of New York’s largest Italian neighborhoods.
Big changes came again as post war white families flocked to the suburbs and were replaced largely by Puerto Ricans immigrants and African Americans. According to US Census records, in just one decade Bushwick’s caucasian population dropped from over 90% in 1960 to less than 40% in 1970.

Thanks to the energy crisis of the 1970s and the closures of most of Bushwick’s industry, the neighborhood was quickly overrun with crime, drugs, abandoned buildings, and urban decay. Bushwick was one of the neighborhoods hardest hit by riots and looting during the New York blackout of 1977, forcing even more businesses out of the area. Things didn’t improve any during the 1980s and 90s, but by the late 2000s things finally started to turn around as Williamsburg artists flocked in to take advantage of the neighborhood’s low rents and large loft spaces. I’ve been here for about 8 years and I’ve seen things change so quickly and completely it makes my head spin. I can’t even begin to imagine what this neighborhood will look like in another 10 years.

orecchiette with sausage and broccoli rabe | Brooklyn Homemaker

One of the easiest places to visualize all this transition first hand is Graham Avenue. Cultures literally clash as streets signs on Graham Ave declare “Avenue of Puerto Rico” south of Metropolitan Ave, but suddenly change to “Via Vespucci” north on up to the BQE. Avenue of Puerto Rico is populated with cheap clothing stores, Iglesias, and Puerto Rican beauty supply shops; but cross Metropolitan Ave and it feels like a whole different neighborhood dotted with Italian restaurants, pizzerias, and wine shops.

orecchiette with sausage and broccoli rabe | Brooklyn Homemaker

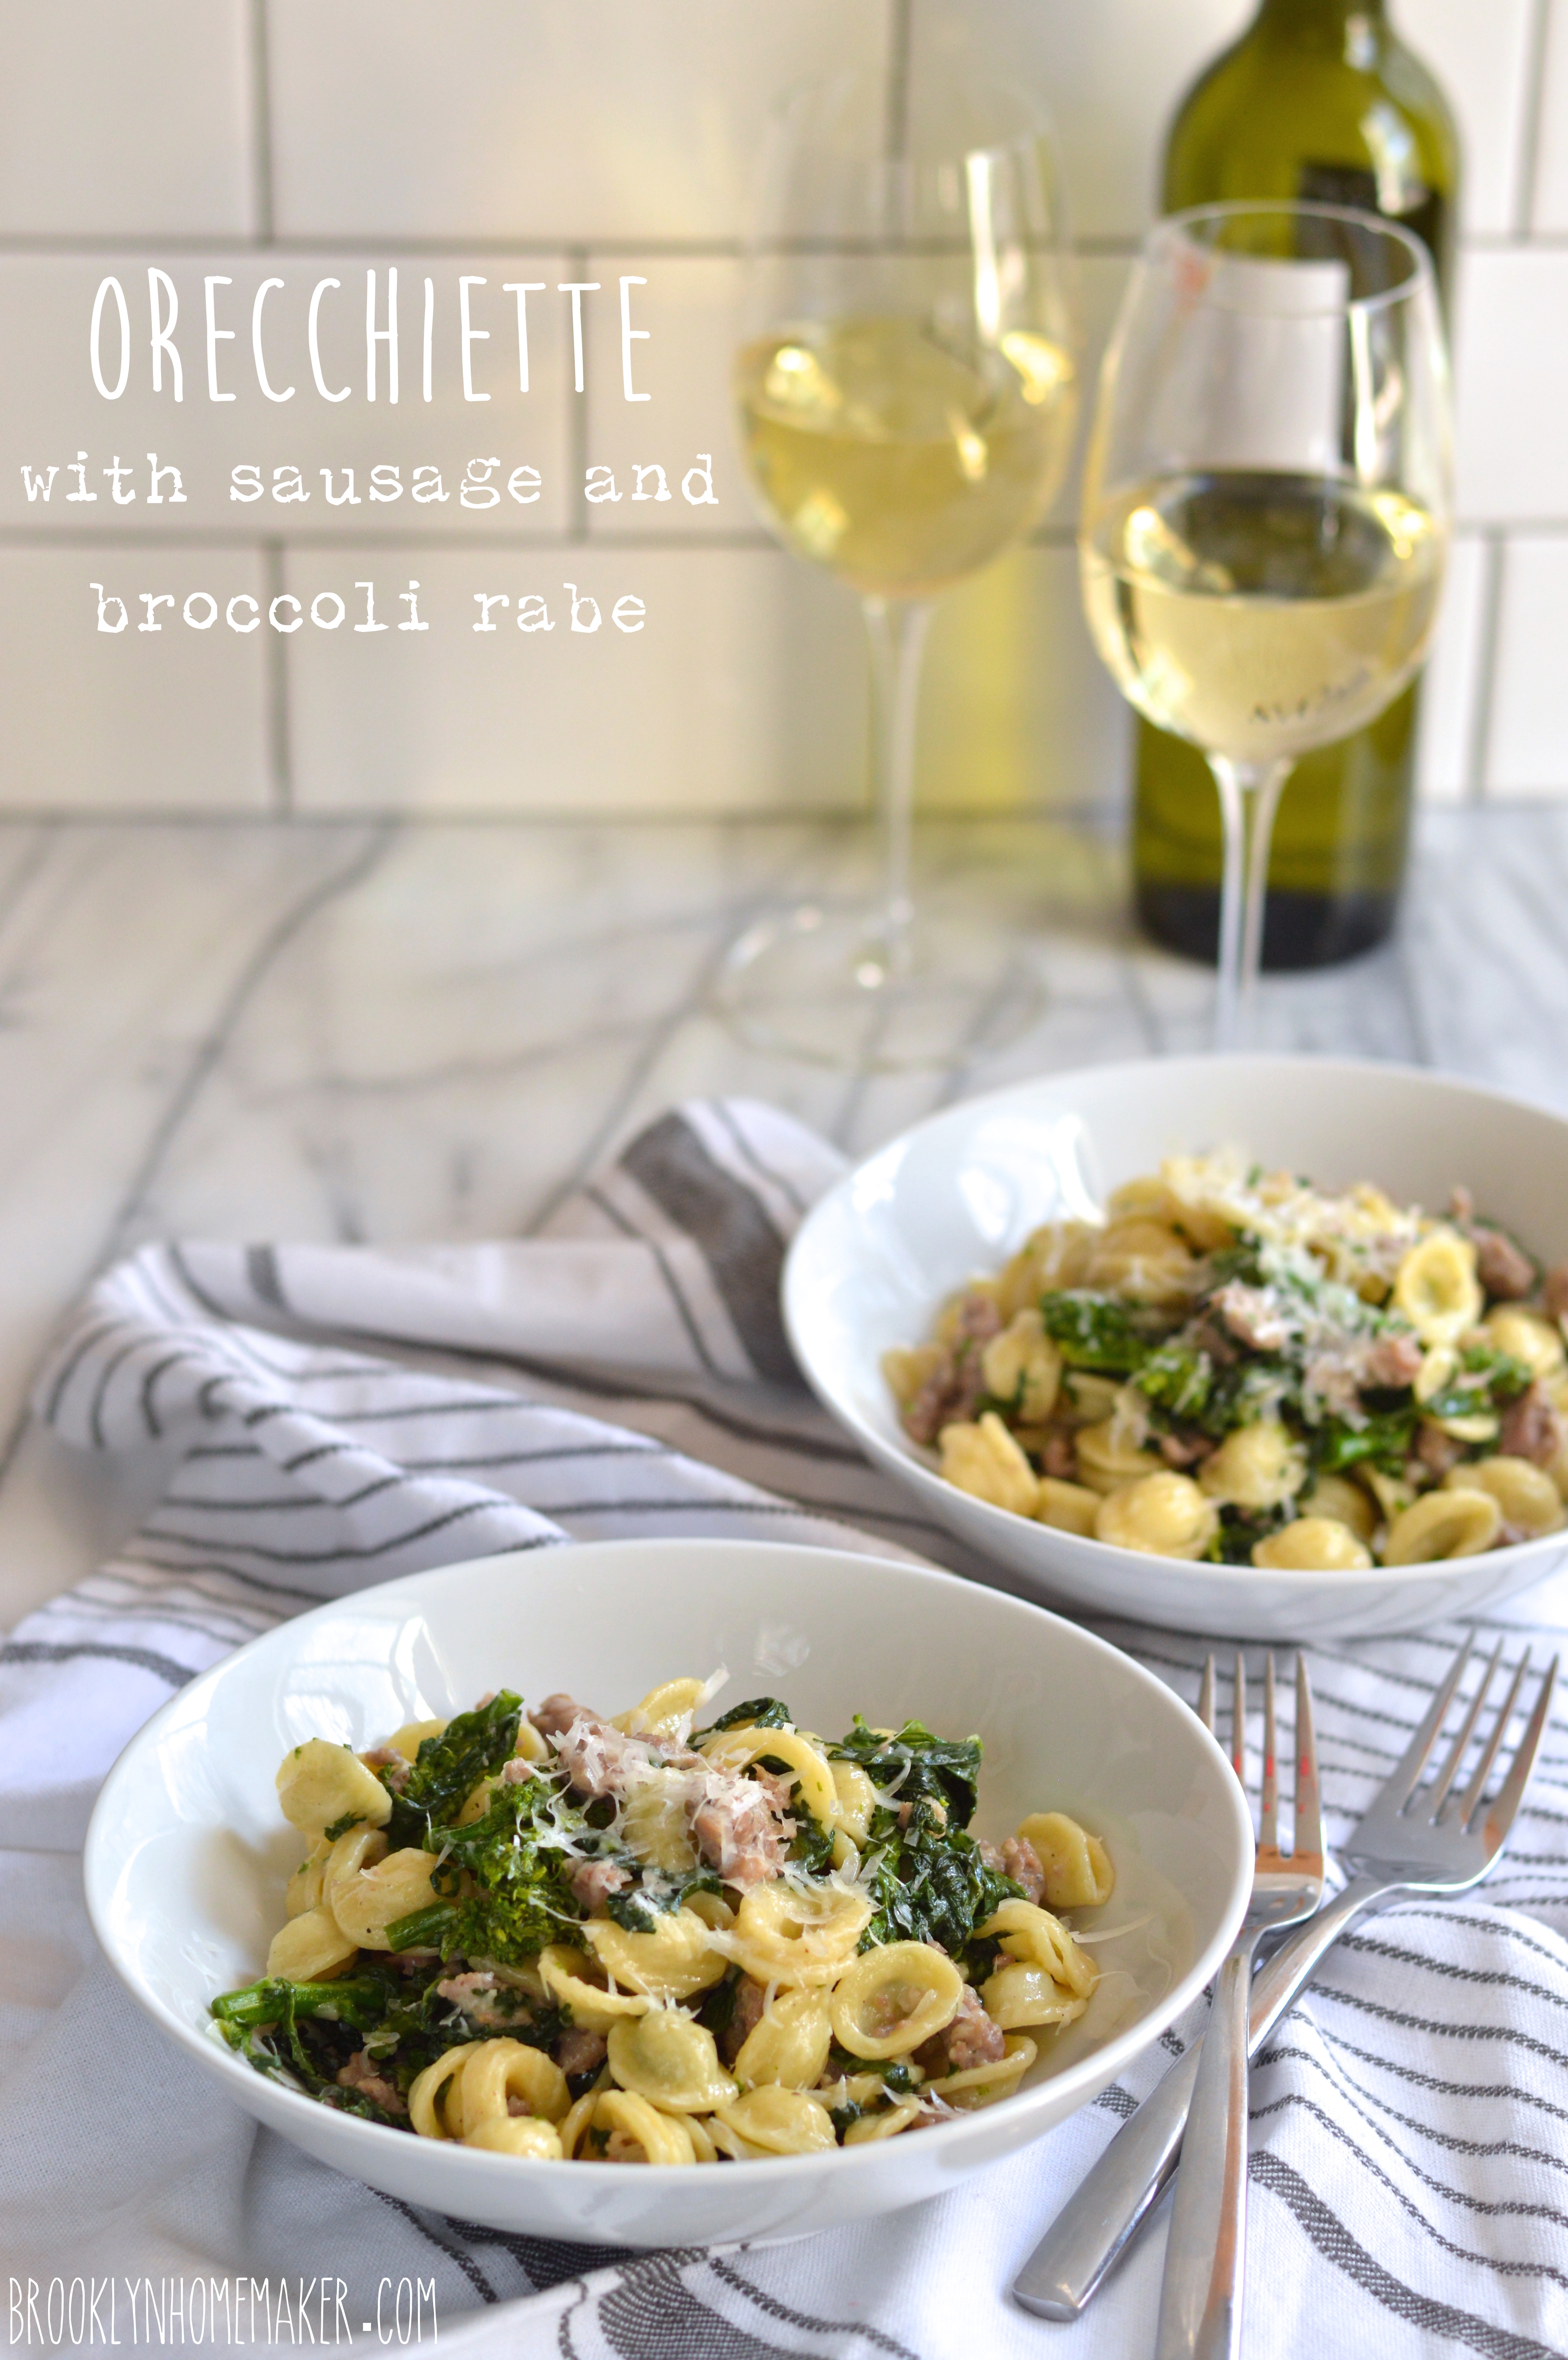
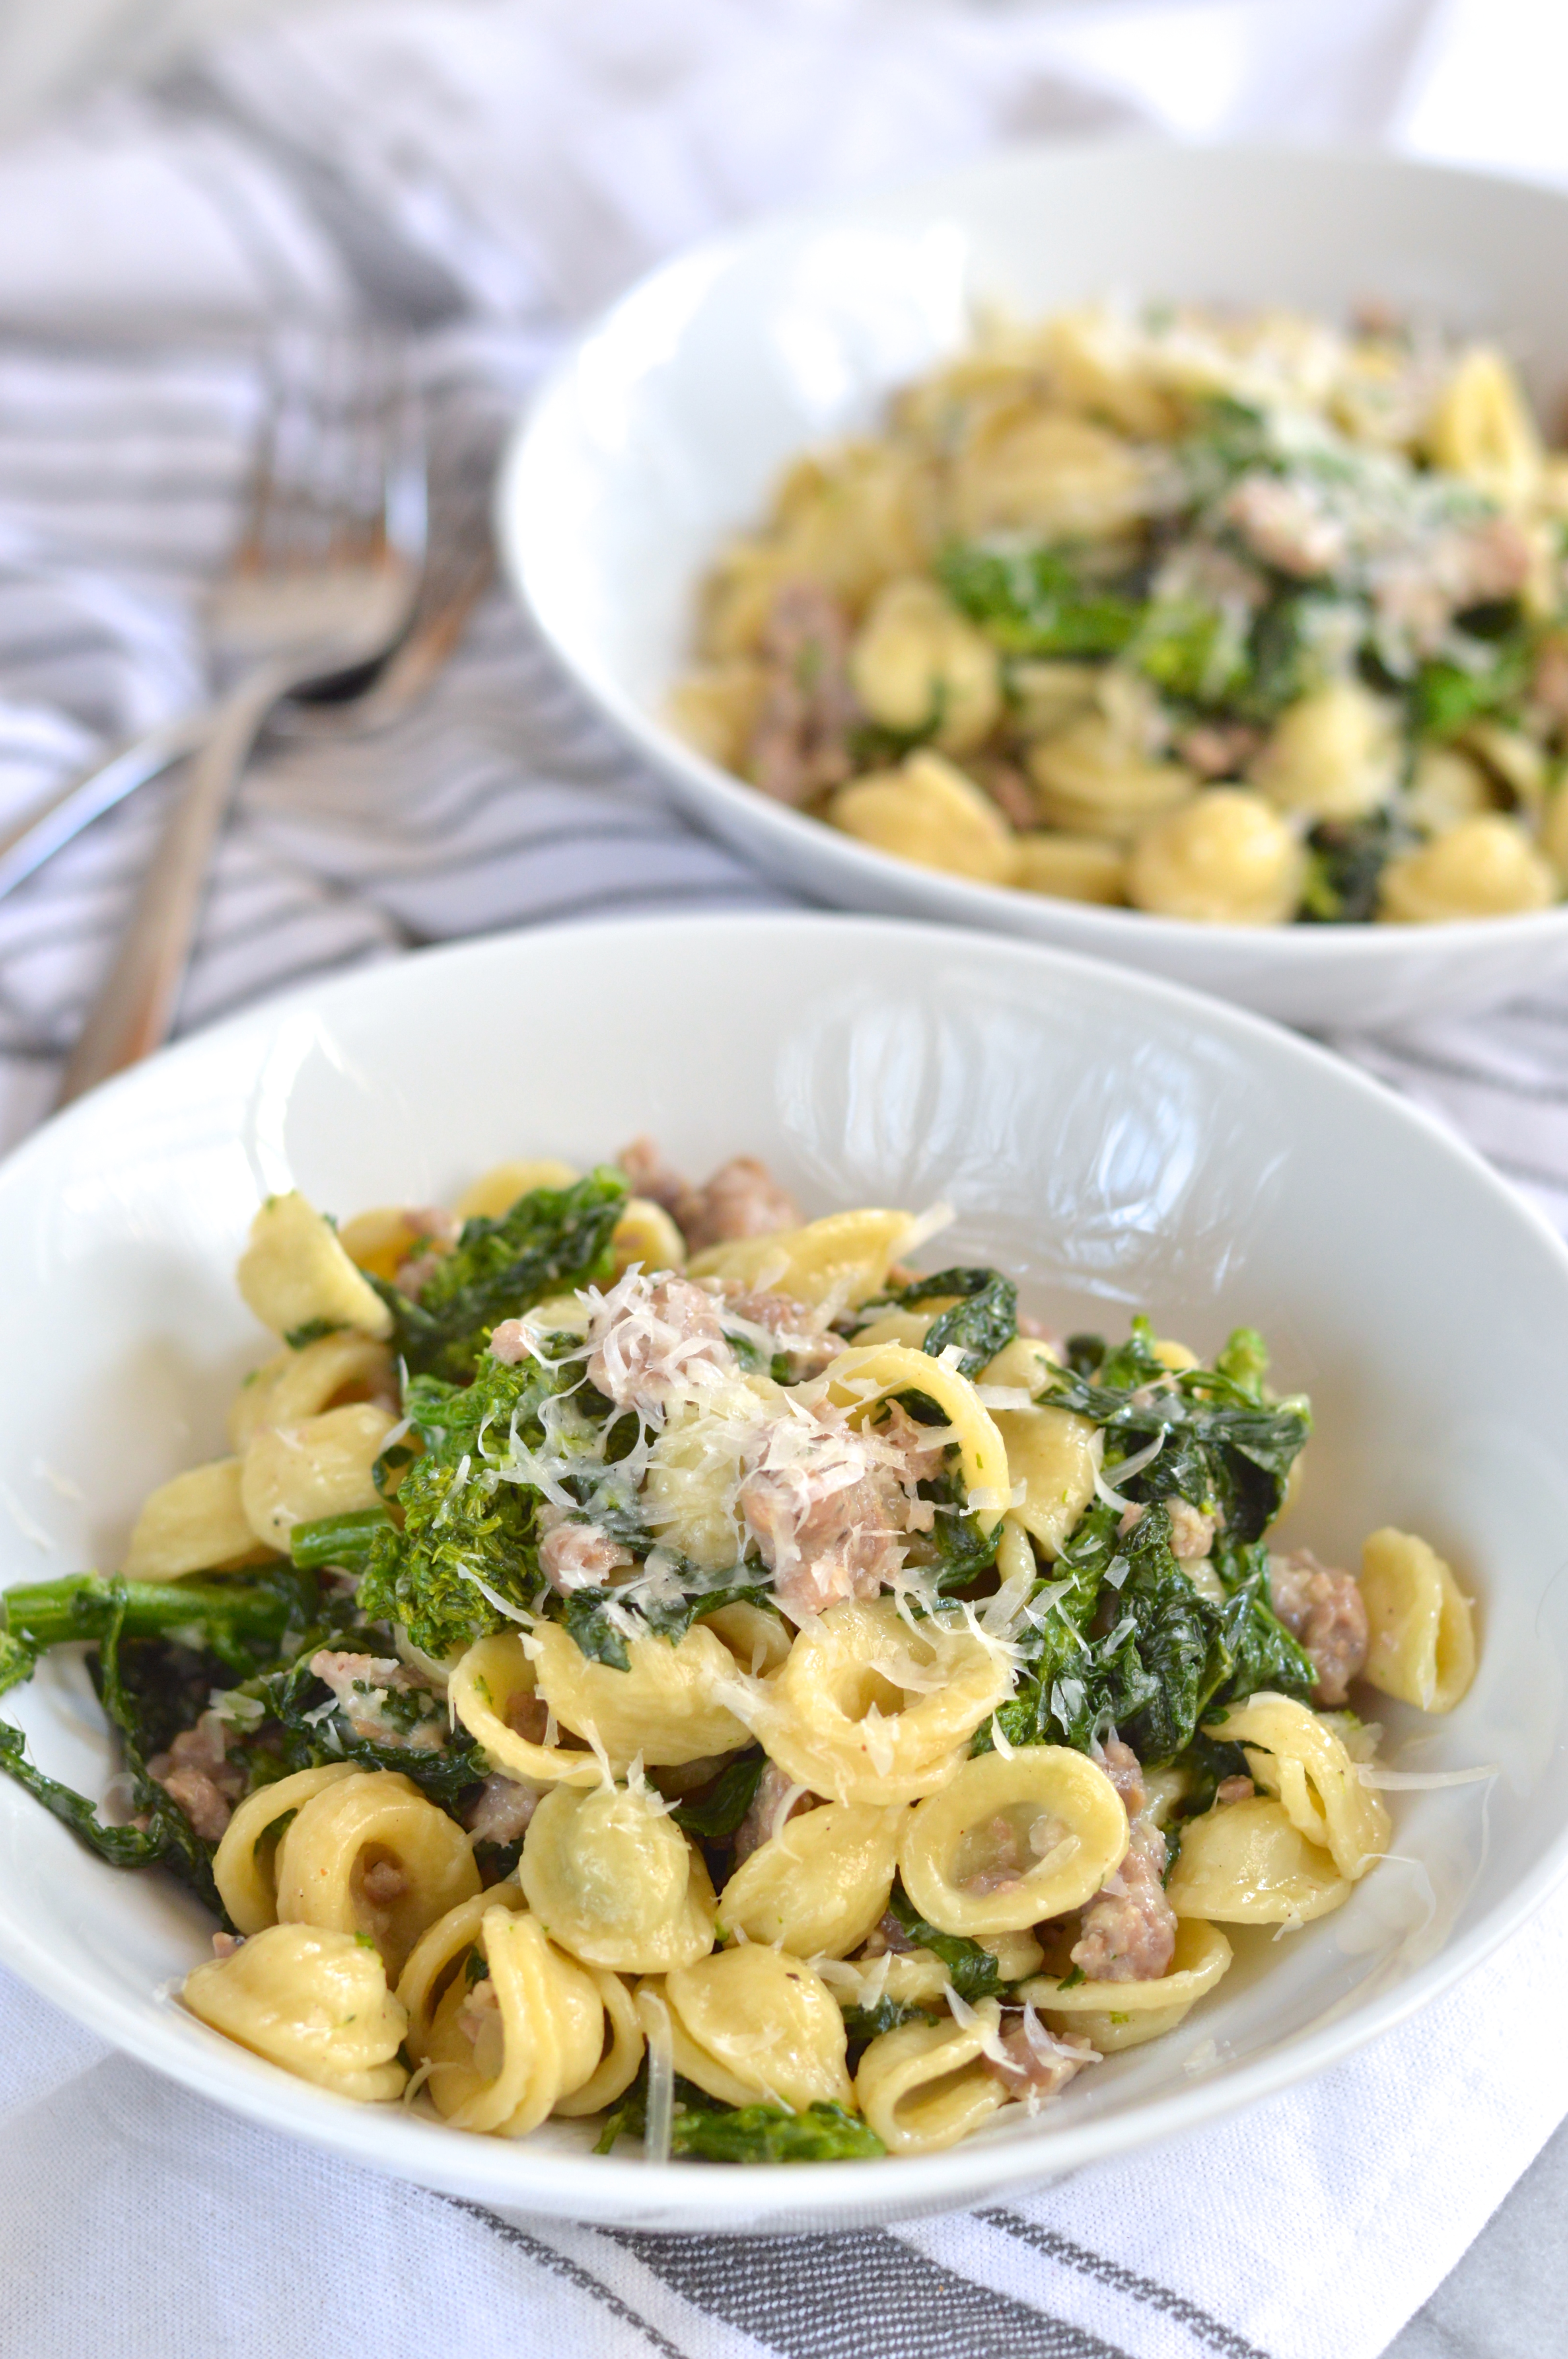
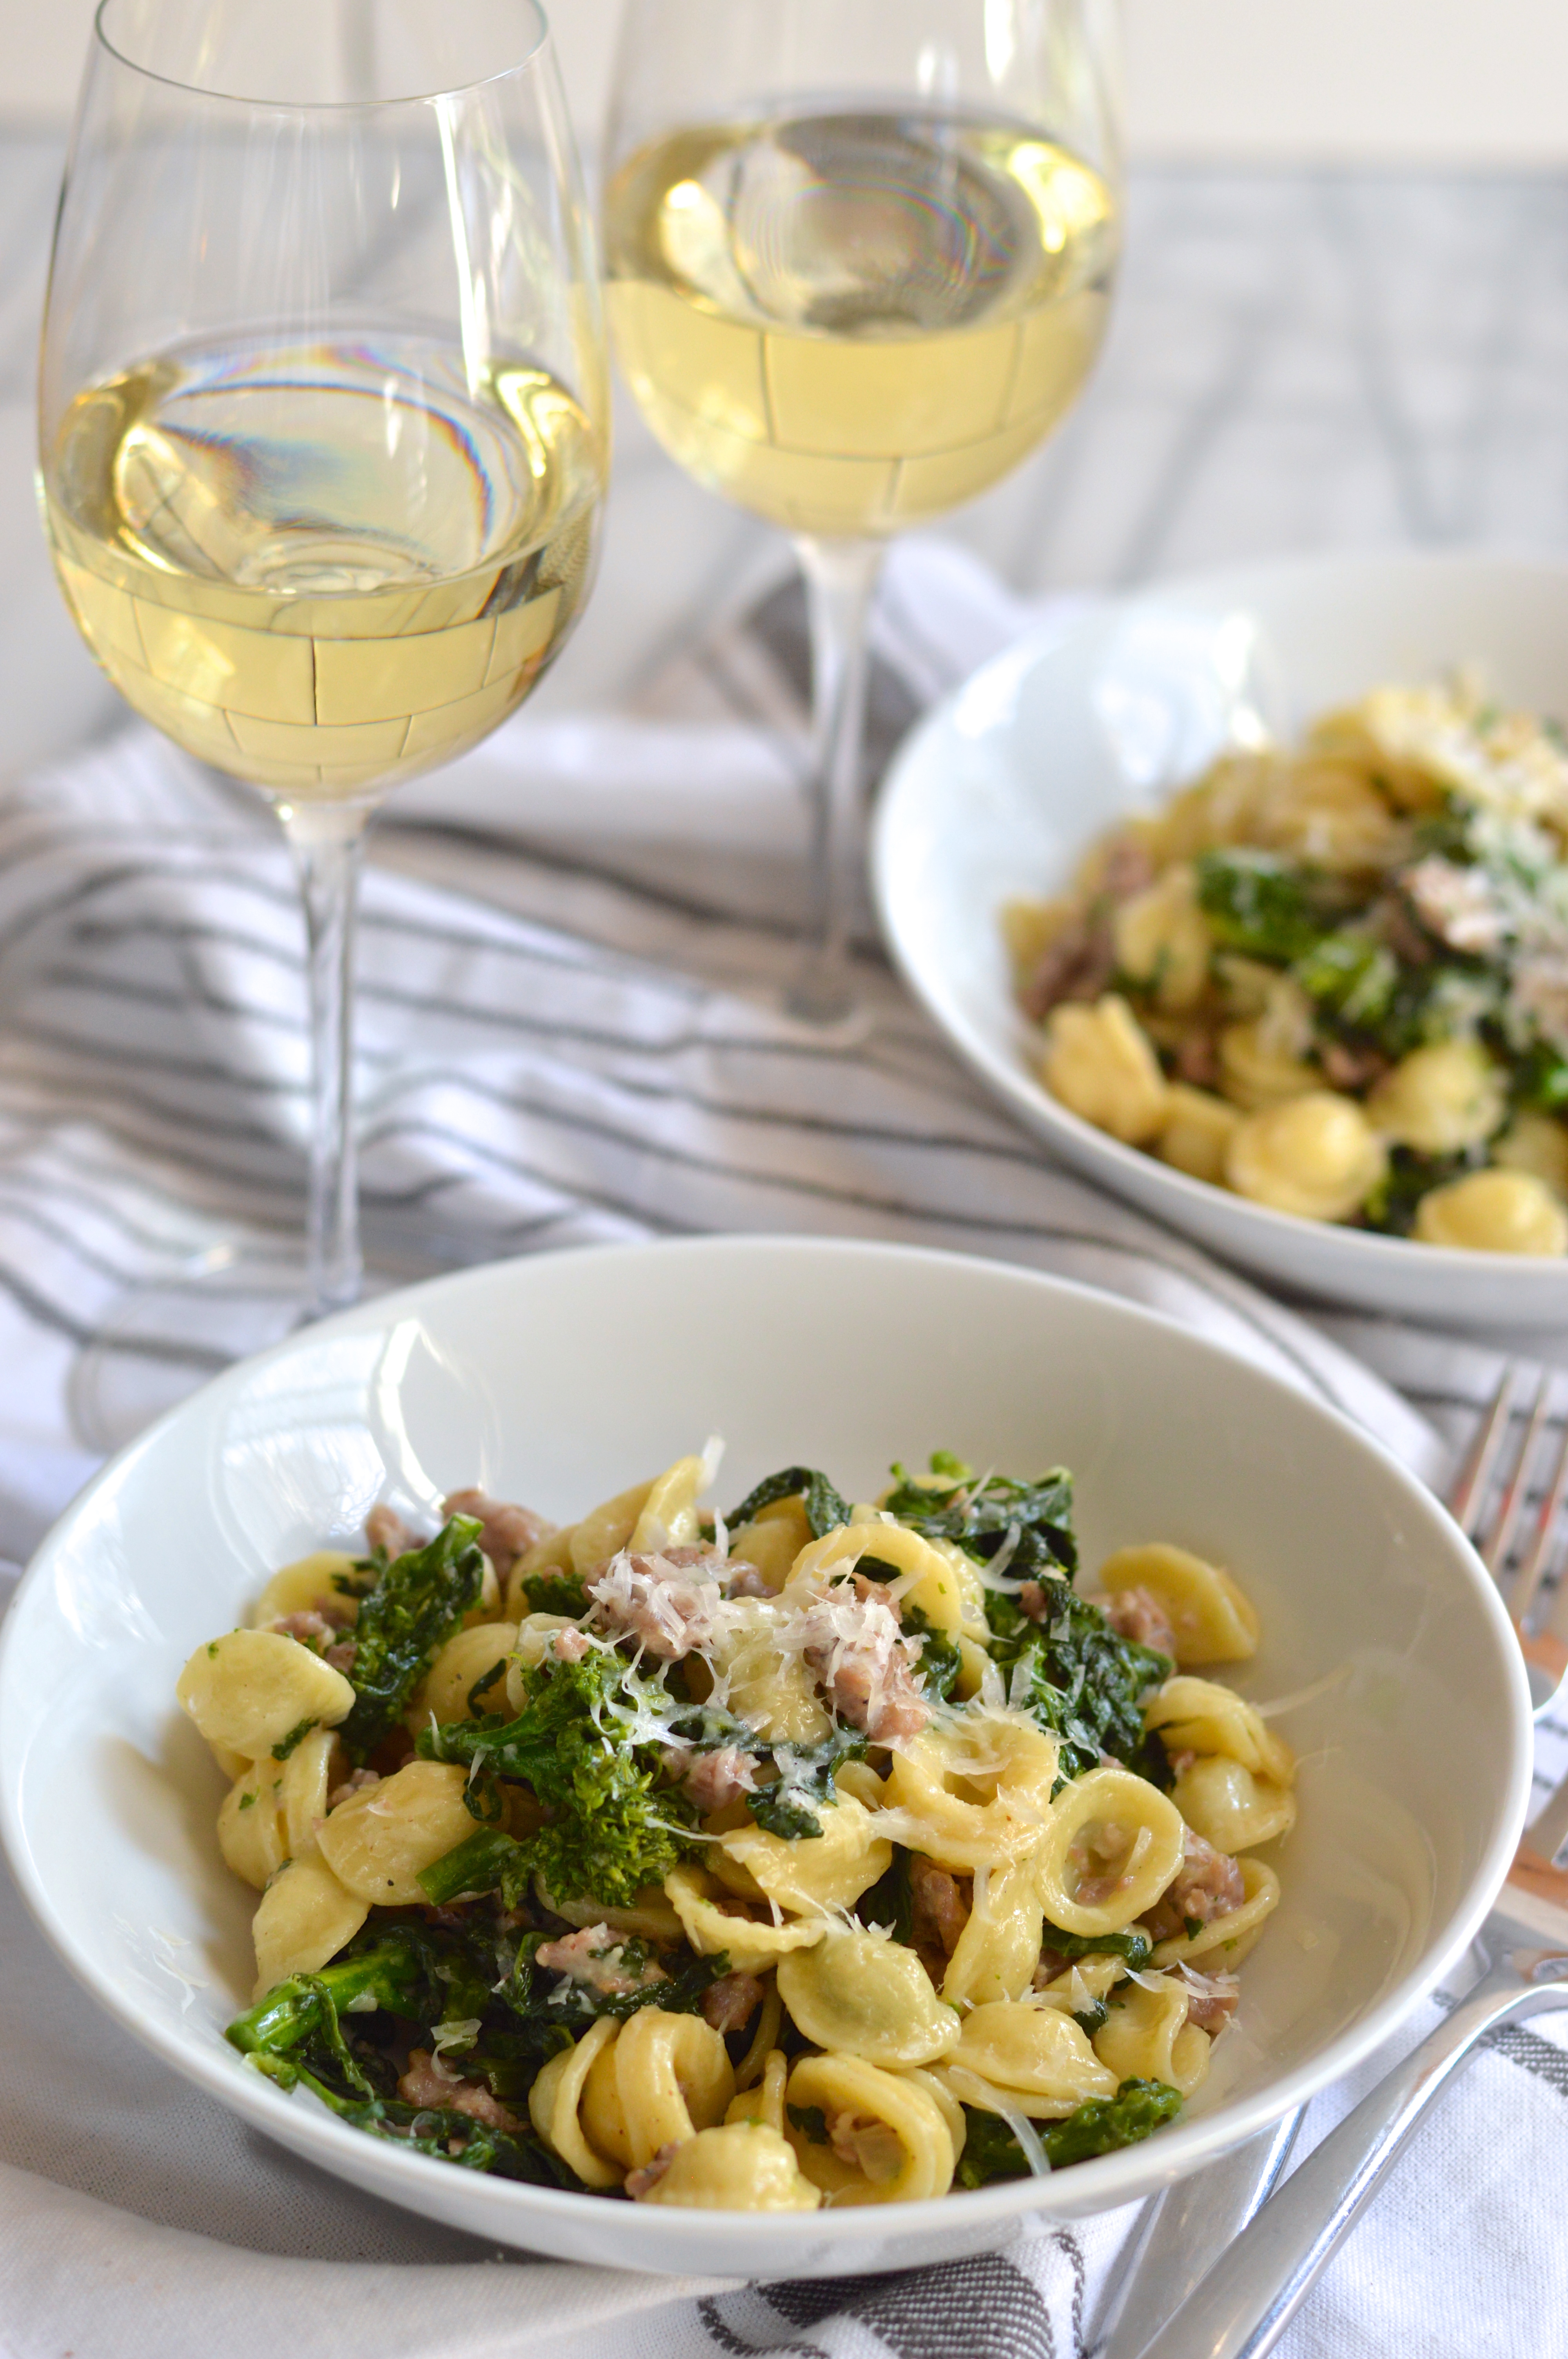
Russell recently heard about an old Italian butcher shop on the Via Vespucci side of Graham Ave called, appropriately enough, The Pork Store. He paid them a visit on his day off and brought home some of the best Italian sausage I’ve ever tasted, along with a gorgeous bag of imported Orecchiette. I knew I wanted to make something amazing to put his Bushwick bounty to good use, but knew I had to keep it simple enough to let these superior ingredients shine.

orecchiette with sausage and broccoli rabe | Brooklyn Homemaker

All I needed was a big bunch of broccoli rabe, sometimes called rapini, and a bit of nice dry white wine. Broccoli rabe has a grassy bitterness that stands up really well to the unctuous richness of sausage and cream. White wine adds just a touch of sweetness to counteract the bitterness of the rapini, and al dente Orecchiette is nice and thick and adds great texture and happens to be the perfect bite size. A bit of cream gives the reduced white wine a bit of saucy body, and a handful of salty grated parmesan cheese brings everything together.

If you don’t have access to a local Italian butcher shop, just get the freshest and best Italian sausage you can find. If you can’t find orecchiette, any bite sized thick cut pasta, something like penne or bow ties, will do just fine.

This dish is simple, delicious, and perfectly satisfying. The best part though, is how quickly and easily it comes together if you start cooking at the same time you bring the pasta water to a boil. Everything else should be done just in time to drain the pasta and all you have to do is toss it all together and dig in!

orecchiette with sausage and broccoli rabe | Brooklyn Homemaker

Orecchiette with Sausage and Broccoli Rabe

1 medium onion, diced
1 tablespoon olive oil
1 lb mild italian sausage, casings removed
1 lb broccoli rabe
1 lb orecchiette pasta
1 cup white wine
1 /2 cup heavy cream
1/2 cup finely grated parmesan cheese
salt and pepper to taste, if needed

Bring a large pot of salted water to a boil on one burner while you prepare the rest of the meal on another.

Heat olive oil in a large skillet. Sauté onion until soft and translucent, about 5 minutes. Add sausage and break up with a spatula or spoon as it cooks. Once the sausage is fully cooked, add half of the white wine and reduce until almost completely dry. Once reduced add the remaining wine and reduce until almost dry again.

Remove thick woody stems from broccoli rabe and discard. Roughly chop or tear the leaves and heads into large bite sized pieces.

Cook pasta to al dente according to package directions. Meanwhile, add heavy cream and broccoli rabe to the sausage and onion mixture and cook until dark green and wilted through, about 3 or 4 minutes. Add about a half cup ladle of pasta water and reduce for about 5 minutes more. Taste and see if seasoning needs to be adjusted. (I didn’t need to add any salt because my sausage was salty enough for the whole dish.) Drain cooked orecchiette and combine with sausage and broccoli rabe mixture. Add grated parmesan and toss toss toss until well combined.

Serve with an additional shaving of parmesan if desired.

garlicy lemony creamy classic hummus

When I was a teenager hummus was a unknown and totally exotic foreign food.

garlicy lemony creamy classic hummus | Brooklyn Homemaker

Those years were recent enough that I probably should have know what hummus was, but I grew up far enough upstate as to be rather isolated from the food trends and cultural open-mindedness of the big city.

garlicy lemony creamy classic hummus | Brooklyn Homemaker

In the 90s in Auburn, NY, the closest most people ever got to experiencing foods from other cultures was Chinese take out or one of the many MANY old school Italian restaurants.

Or maybe Taco Bell.

garlicy lemony creamy classic hummus | Brooklyn Homemaker

When I entered high school I met a whole new group of friends; among them were the punks, hippies, goths, skate boarders, hacky sackers, vegetarians, and vegans of the alterna-teen umbrella. Falling in with a different crowd meant hearing new music, having new adventures, and experiencing new foods.

Sushi! Indian! Falafel! So new! So Exciting!

garlicy lemony creamy classic hummus | Brooklyn Homemaker

One of my favorite discoveries was hummus.

Growing up with staunchly American cuisine and lots of convenience foods, Hummus was completely foreign and exotic to me. It was simply bursting with unfamiliar spices and bold flavors that I’d never encountered before my teen years. Even the texture was new to me, and I couldn’t get enough of the stuff.

I still remember the first time I tried to get my mom to buy some for me in the grocery store and she had no idea what the heck it was or why in the world I’d want to eat it.

garlicy lemony creamy classic hummus | Brooklyn Homemaker

One of my favorite things about hummus even today is how versatile it can be. It makes a great dip at parties, a delicious spread on a sandwich, and even works as a side dish or major part of a meal. One of our favorite things to do when we make our own hummus is to thinly slice, marinate, and broil some chicken breast and serve it alongside some sliced cucumbers, grilled pita wedges, and giant bowl of hummus for dipping.

garlicy lemony creamy classic hummus | Brooklyn Homemaker

There are many different ways to make hummus and just as many flavors you can blend into it. Personally, I prefer a classic approach with lemon, garlic, and cumin. I also like to take the extra step of soaking and boiling dried chickpeas rather than using canned. I think dried chickpeas have a slightly cleaner flavor and make it much easier to control the amount salt you add.

This recipe can be made thick and chunky, or creamy and smooth, depending on how long you process everything. I myself like to let the food processor whir and whir until the hummus is unbelievably smooth and silky. While it’s really traditional to serve hummus with a drizzle of olive oil, I like to add some extra in while it’s pureed for even more velvety creaminess.

While the flavors in this recipe are very traditional, I like to turn up the volume and add a little bit extra lemon and garlic to make sure they really shine through. If you’re not as big a fan of raw garlic, feel free to skip one or two of the cloves.

garlicy lemony creamy classic hummus | Brooklyn Homemaker

Classic Creamy Hummus

  • Servings: makes about 3 or 4 cups
  • Print
1 cup dried chickpeas
1 tablespoon plus 1/4 teaspoon baking soda
1/2 cup tahini
juice of 2 to 3 lemons
3 to 4 cloves of garlic (less if preferred)
1 teaspoon cumin
1 teaspoon salt
1 tablespoon olive oil, plus more for serving

Wash the chickpeas three or four times, or until they don’t cloud the water when submerged. Check for stones and other non-chickpea debris.

Soak the chickpeas in clean water with 1 tablespoon of baking soda for at least 8 hours or overnight. Wash and drain them, and soak again in new clean water for a two or three more hours. The grains should be almost double their original size.

Wash and drain the chickpeas once more and put them in a large pot. Cover with water and add remaining baking soda and NO salt. Bring to a boil, reduce heat to a gentle simmer, and cook until the grains are tender enough to be easily smooshed between two fingers. It should take about an hour to an hour and a half. As they cook some foam may form on the water and skins may rise to the top. Try your best to skim off as much of the foam and as many of the skins as possible. The fewer skins you have the creamier and smoother your hummus will be. Once finished, drain them and reserve some of the cooking liquid.

Let the chickpeas cool for a bit before adding to a food processor. Pulse them a few times before adding the remaining ingredients and processing until you get the desired texture. I like mine super smooth and creamy so I just let it go for a bit, but if you like yours chunkier just pulse it until it comes together in a thick chunky paste. If the Humus is too thick, add some of the cooking water or some more lemon juice or olive oil. Try to get it a bit thinner than the consistency you desire, as it will thicken a bit once it’s refrigerated. Check for seasoning, and if you’re happy with the levels of salt, cumin, garlic, and lemon, you’re done!

Serve with a drizzle of good olive oil and some chopped parsley if desired.

This recipe recipe doubles very easily, but you do not need to double the amount of baking soda used for either soaking or cooking.

a healthier cream of mushroom soup

I’ve been craving some good old fashioned cream of mushroom soup for weeks.

 a healthier cream of mushroom soup | Brooklyn Homemaker

When I was growing up I had two working parents, so a lot of my afternoons were spent at my grandmother’s house out in the country in upstate New York. We always ate really well (too well, probably) at Grandma’s house, and lunch was always a big deal. Soup and sandwiches was a pretty popular lunch time menu, but I hated tomatoes when I was young so mushroom soup (from a can of course) was how I rolled.

I don’t know what kid likes mushrooms but not tomatoes, but what can I say. I was a weird kid I guess.

a healthier cream of mushroom soup | Brooklyn Homemaker

When I think of all the gorgeous tomatoes that I missed out on, grown in the bright sunshine of my grandfather’s garden, it makes my heart ache. What was wrong with me? What a sad boring life I led.

One of my great grandmother’s favorite lunches in the summer was a thick-sliced fresh tomato sandwich on white bread with a little mayonnaise and a generous sprinkle of salt. I, however, usually opted for velveeta grilled cheese (baked, not fried) with a bowl of cream of mushroom soup.

Mushroom soup has always felt like a perfect comfort food ever since.

a healthier cream of mushroom soup | Brooklyn Homemaker

I recently dug around for recipes to satisfy my mushroom soup cravings, but I was stopped dead in my tracks by how heavy most of them sounded. I’m sure you know by now that I’m not shy about using real butter and cream, but Jeez Louise! One recipe, from my best-friend-in-my-head Ina Garten, called for a whole stick of butter, a cup of half and half, and a cup of heavy cream!

I knew there had to be a way to make a silky, creamy, rich & hearty cream of mushroom soup without using that much dairy and fat, but was having a hard time figuring it out. Then a friend at work reminded me that I already know the perfect secret ingredient!

a healthier cream of mushroom soup | Brooklyn Homemaker

Aaaaaaaaawwwwwhhhhh! Look at how that beauty glows! Can you hear the angels singing?

a healthier cream of mushroom soup | Brooklyn Homemaker

I’ve already used this trick before, when making corn chowder this summer, and I guess I somehow just forgot about it. When I was whining about how heavy and fattening homemade cream of mushroom soup was, my friend was like, why don’t you just do that roasted cauliflower trick?

Duh!

Roasting cauliflower in the oven, rather than boiling it with the rest of the soup, keeps it from tasting cabbage-y, and once pureed super smooth, it adds an unbelievably silky texture that you’d truly never guess didn’t come from cream thickened with a roux. I don’t even understand how or why this works so well, but it really does.

a healthier cream of mushroom soup | Brooklyn Homemaker

I wasn’t intending to make a vegetarian or vegan cream of mushroom soup, just a lighter version, so I went ahead and kept the chicken stock and (some of) the butter. I also intended to add in just a bit of milk or cream at the end, but once the roasted cauliflower was pureed in, I realized I didn’t even need to. With that in mind, I now realize that it would be really easy to make this soup vegan if you want to. Just substitute olive oil or coconut oil for the butter, and vegetable (preferably mushroom) stock for the chicken stock. Since cauliflower is the only thickening agent, this soup also happens to be totally gluten free!

a healthier cream of mushroom soup | Brooklyn Homemaker

This soup is just what the doctor ordered. It’s so earthy and rich and… mushroomy. Using three varieties of flavorful mushrooms makes sure that every bit packs a serious punch. White wine adds a luxe floral note, fresh thyme compliments the woodsy earthiness of the mushrooms, and fresh parsley finishes the soup with bright green herbal flavor. While this recipe is healthier than most, I would never call it a “diet” or “light” recipe because it tastes way too good to be “health food”, and because it does still call for a good bit of butter and olive oil.

Thanks to the pureed roasted cauliflower, this soup feels every bit as rich and satisfying as you could hope. Some of the mushrooms are pureed too, but I like to reserve a few so you get some meaty bites of them every so often. You can use an immersion blender or a standing blender to puree the soup, but I will say that a standing blender seems to get the soup just a bit more smooth and silky. I used an immersion blender though, because it works almost as well and just seems safer, easier, and less messy.

a healthier cream of mushroom soup | Brooklyn Homemaker

A Healthier Cream of Mushroom Soup

2 Tbsp olive oil (divided)
1 small head of cauliflower
salt and pepper to taste
3 Tbsp butter (or coconut or olive oil if desired)
2 1/2 pounds mixed mushrooms (I used cremini, portabello, & shiitake)
1 large onion, finely chopped
3 cloves garlic, minced
1 tablespoon fresh thyme leaves
1 cup dry white wine
4 cups chicken stock  (or vegetable or mushroom stock)
1/4 cup finely chopped fresh parsley

Preheat oven to 400 F. Roughly chop cauliflower into large florets. Toss in 1 tablespoon of olive oil, season with salt and pepper, and arrange in an even layer on a parchment lined baking sheet. Roast for 30 minutes and set aside to cool.

Meanwhile, roughly chop your mushrooms, removing and discarding any thick woody stems (especially the stems of portabello and shiitake). Heat butter and remaining 1 tablespoon olive oil over medium high heat in a large thick-bottomed pot. Once the butter is sizzling, add the mushrooms and thyme, lightly season with salt and pepper, and stir to coat. Cook the mushrooms until they have released most of their liquid. Remove two cups of the cooked mushrooms, letting liquid drain back into pot, and set aside.
Add the onions and the garlic, and cook for about a minute. Add the white wine, chicken stock, and half of the chopped parsley. Bring to a simmer and cook, uncovered, for 15 minutes. Remove from heat and add the roasted cauliflower.
Using an immersion blender or working in batches with a standing blender, purée the soup until completely smooth and silky. Return the pot to the stove, add the reserved cooked mushrooms and remaining chopped fresh parsley. If the soup is too thick, add a bit more stock to thin to the desired thickness. Taste and adjust seasoning if necessary and bring back up to a simmer before serving.