brown butter praline bundt cake with salted caramel drizzle #bundtbakers

I’m not sure if I’ve mentioned this before or not, but I love a bundt cake.

brown butter praline bundt cake with salted caramel drizzle | Brooklyn Homemaker

(I’ve definitely mentioned it before)

brown butter praline bundt cake with salted caramel drizzle | Brooklyn Homemaker

When I first started blogging I used to say that the reason I loved bundt cakes so much is that they remind me of my grandmother. While that may be true, I think there might be a little more to it than that.

To this day, every time I visit my grandmother she has some kind of homemade sweet in the house, whether she knows I’m coming or not. This has always been true, and when I was a kid I used to spend a lot of time at grandma’s house. There were always any number of store-bought cookies and donuts and candies in the pantry and some kind of homemade cake or pie was usually kicking around somewhere too.  This may or may not (definitely does) have something to do with my love of baking and sweet things, along with my perpetual and permanent state of being a bit overweight.

brown butter praline bundt cake with salted caramel drizzle | Brooklyn Homemaker

Grandma has always been known for her pies, and for her special pineapple cheesecake she makes with a vanilla cake mix crust. She used to make a lot of coffee cakes too, and every once in a while she’d make a bundt cake.
She doesn’t really make them anymore, and even when I was a kid they weren’t something she made very frequently, but they have always been something that I thought of as very very special.

Maybe it was their rarity that made them feel so impressive to me. Maybe it was the fact that Grandma was the only person (at the time) I’d ever known to make them. Or, maybe it had something to do with their unique shape. Something about their shape makes them feel really dramatic and fancy, even though most bundt cakes also manage to feel sort of rustic and unfussy at the same time.

brown butter praline bundt cake with salted caramel drizzle | Brooklyn Homemaker

Whatever the reasons, bundt cakes have always held a very special place in my heart, and I imagine they always will.
When I stumbled across a blog some six months ago that mentioned an entire group of other bloggers who loved bundt cakes as much as I did, I couldn’t wait to join in the fun.

brown butter praline bundt cake with salted caramel drizzle | Brooklyn Homemaker

I could not be more thrilled to have found these bundt loving bloggers. At first I was worried that making a bundt cake each and every month was going to be too much for me, or that I wouldn’t have the time to keep up with it, but as the months have gone on I’ve found myself more and more excited about each new theme. Ideas for some have proved to be a challenge, while others have come to me right away, but each and every cake I’ve baked has maintained that special meaning for me.

brown butter praline bundt cake with salted caramel drizzle | Brooklyn Homemaker

This months theme, chosen by the amazing Lauren of Sew You Think You Can Cook, is caramel. Lauren, you may not know this, but yours was the first blog I saw mentioning #bundtbakers, and you’re part of the reason I’m here. I can’t thank you enough.

Caramel is such a perfect choice for this time of year. It pairs so perfectly with the warm homey flavors of October, and I couldn’t have chosen a better theme if I’d tried. Make sure you scroll down past the recipe to see all the delicious caramel themed cakes that everyone came up with this month. I decided to translate the sweet buttery nutty flavors of pecan pralines into a bundt cake with toasted pecans, brown sugar, and brown butter. To reinforce that caramel candy flavor, I topped everything with a homemade salted caramel drizzle and even more toasted pecans. This cake is rich and moist and warm and golden. The brown sugar adds that rich caramel flavor, and the brown butter adds some depth and intensifies the toasty nuttiness of the pecans. If you’re a fan of caramel, and of pecans, this recipe is definitely a keeper.

brown butter praline bundt cake with salted caramel drizzle | Brooklyn Homemaker

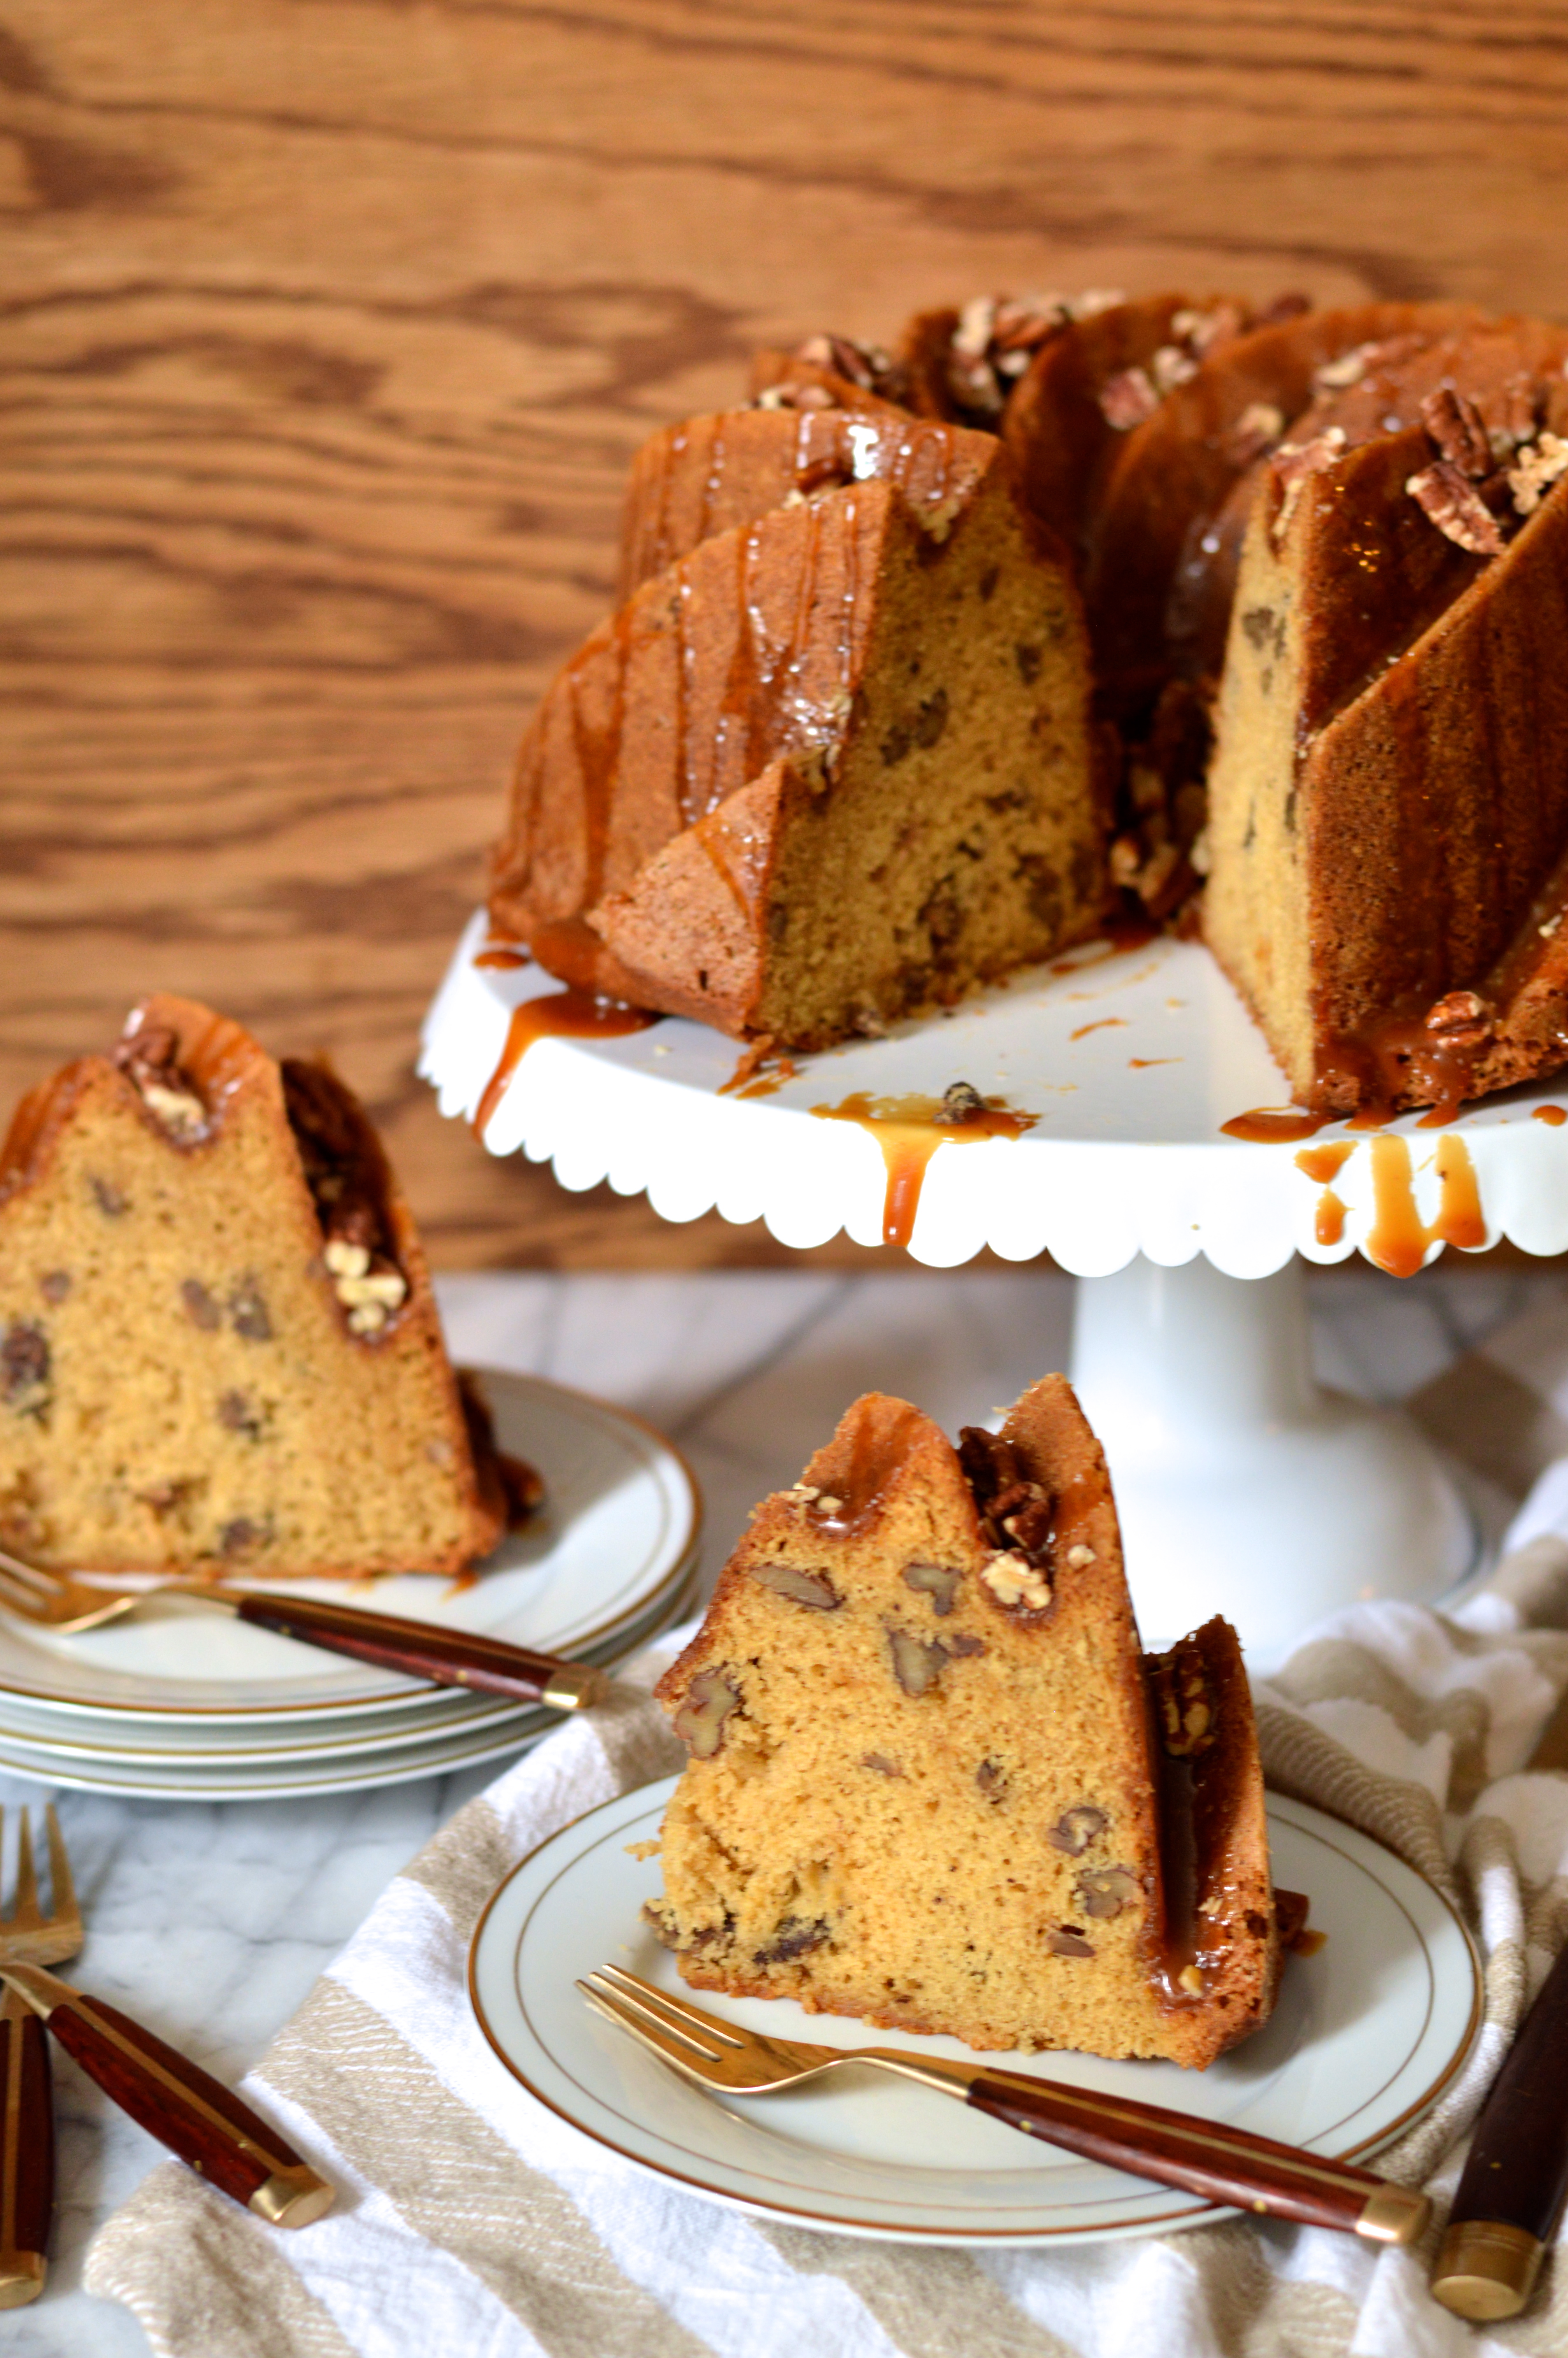
Brown Butter Praline Bundt Cake with Salted Caramel Drizzle

  • Servings: 12 to 16-ish
  • Print

Brown Butter Praline Bundt Cake:
butter and flour for pan
1 1/4 cups unsalted butter (2 1/2 sticks)
2 cups chopped pecans
3 cups flour
2 teaspoons baking powder
1 teaspoon baking soda
1/2 teaspoon salt
3/4 cup granulated sugar
1 cup dark brown sugar
4 large eggs
2 teaspoons vanilla extract
1 cup buttermilk

Salted Caramel Sauce:
(adapted from Brown Eyed Baker)
1/2 cup granulated sugar
3 tablespoons unsalted butter, at room temperature, cut into pieces
3 tablespoons heavy cream, at room temperature
1/2 (heaping) teaspoon fleur de sel (or any flaky sea salt)

Make the cake:
Preheat oven to 350. Butter and flour a 10+ cup bundt pan and set aside. In a medium saucepan, brown butter over medium high heat until it’s golden brown and smells intensely nutty. Should take about 10 minutes or so, but watch it closely so it doesn’t burn. Set aside to cool.

On a sheet pan, arrange pecans in a single layer. Toast at 350 for about 10 minutes, or until they smell like nutty heaven.

In a medium bowl, whisk together flour, baking powder, baking soda, & salt. Set aside. In the bowl of a stand mixer, combined cool brown butter, granulated sugar, & brown sugar. Beat until well combined, about 1 minute. Add eggs, one at a time, beating well after each addition. Add vanilla and mix to combine. On low speed, beat in the flour mixture and buttermilk in 3 alternating batches, starting and ending with the dry ingredients. Mix each addition until just combined, do not over-mix, and scrape down the sides of the bowl after each addition. Finally, stir in 1 1/2 cups of toasted pecans on low speed until well distributed. Reserve remaining 1/2 cup of pecans for decorating the finished cake.

Spoon batter into prepared bundt pan and smooth the top. WARNING: At this point the batter will look and taste like butter pecan ice cream, but if you eat it all, you won’t have any left for your cake. Bake at 350 for 50 to 55 minutes, or until a toothpick or cake tester inserted into the middle of the cake comes out clean. Let cool on a wire rack for about 20 minutes before inverting the pan to release the cake onto the rack. Let cool completely before adding drizzle.

Make the caramel sauce:
Add the sugar in an even layer to the bottom of a medium-sized heavy saucepan. Heat over medium-high heat, whisking regularly as it melts. The sugar will begin to clump together, and it may stick to your whisk, but it’s okay. Once the sugar has melted completely, stop whisking and instead swirl the pan occasionally while the sugar continues to cook.

Cook to a deep amber color. It should look almost a reddish-brown, and have a slightly toasty aroma. Keep a close eye on things at this point, things can go from perfect to burnt in under a minute. If you want to use an instant-read thermometer, cook the sugar until it reaches 350 degrees F.

As soon as the caramel reaches the right color (or 350 degrees), add all the butter. The caramel will bubble up so be careful. Whisk until the butter is completely melted. Remove the pan from the heat and slowly pour the cream into the caramel. Again, be careful because the mixture will bubble a lot. Whisk until everything is well incorporated and you have a smooth sauce. Add the fleur de sel and whisk to incorporate.

Let the sauce cool in the pan for 10 to 15 minutes and then pour into a heat proof container to let cool to room temperature. If you have any left, you can refrigerate the sauce for up to 2 weeks.

Drizzle the cooled caramel sauce over the cooled cake, and top with remaining 1/2 cup of toasted pecans. Slice. Serve. Enjoy.

brown butter praline bundt cake with salted caramel drizzle | Brooklyn Homemaker

Check out all the mouthwatering cakes this talented group of bakers has come up with this month:

BundtBakers

Interested in learning more about us? #BundtBakers is a group of Bundt loving bakers who get together once a month to bake Bundts with a common ingredient or theme. We take turns hosting each month and choosing the theme/ingredient. You can see all our of lovely Bundts by following our Pinterest board right here. Links are also updated after each event on the BundtBaker home page here.

If you are a food blogger and would like to join us, just send an email with your blog URL to foodlustpeoplelove@gmail.com. If you are just a lover of Bundt baking, you can find all of our recipe links by clicking our badge above or on our group Pinterest board.

roasted chicken and wild rice soup

So I mentioned this last week, but I recently came down with a nasty case of the flu.

roasted chicken and wild rice soup | Brooklyn Homemaker

Work has been really crazy lately with all kinds of things in transition and I’ve been feeling a little run down. We just hired two new people, and on their first day I woke up feeling pretty terrible. I thought it was just my allergies so I took a Zyrtec and went about my day, but few hours in I knew that it was worse than that. Being in the midst of training new staff I didn’t have any other option than to stick it out and hope things would turn around, so I just tried to power through. I ended up leaving work early anyway though, and I didn’t return for several days.

roasted chicken and wild rice soup | Brooklyn Homemaker

As soon as I got home I knew I was in real trouble. Up until that point I assumed I’d just caught a cold and that all I needed was to take it easy and get a good night’s sleep. When I got home though, I hit the couch like a ton of bricks, and didn’t move for hours. When I tried to pull myself up to get some water, I could barely walk. Every muscle in my body felt sore, painful and weak, and I felt as if my legs might give out on my way to the kitchen. I went back to the couch and pretty much remained there for the next few days.

When I say pretty much though, I mean that I did get up a few times to cook myself some food and maybe do some cleaning.

roasted chicken and wild rice soup | Brooklyn Homemaker

Even with my head in a total fog, I make a terrible sick person. I’m very easily distracted and can’t sit still for very long. I find it virtually impossible to nap, sick or not, and even though I was well aware that rest and sleep were the best things for me, I spent most of my time watching old movies and finding things to keep my mind off of being sick. You already know about the brownies, but there was also some seriously tasty chicken soup.

roasted chicken and wild rice soup | Brooklyn Homemaker

Part of me thinks that there’s something kind of depressing about making your own chicken soup when you’re sick, but Russell was at work, and I was bored out of my mind. A man can only watch Steel Magnolias on Netflix so many times before he needs to get up and do something, drippy nose and jelly muscles or not. Having something to do helped me take my mind off of how horrible I felt, and when I was done I had something to eat that made me feel a little bit better.

roasted chicken and wild rice soup | Brooklyn Homemaker

Being sick, I instantly craved chicken soup. There’s a lot of debate on whether chicken soup is actually good for you when you’re sick, or if it’s just an old wive’s tale. If you really look into the research though, it appears that chicken soup is called Jewish Penicillin for good reason.

Any hot liquid will help open up nasal passages and soothe a sore throat, while also hydrating people in need of plenty of fluids, but there are other benefits specific to chicken soup that you can’t get from tea or hot water. Homemade chicken stock is packed with vitamins, minerals, and nutrients that are great for the immune system. It’s also packed with gelatin which does wonders for your body, and lots of schmaltz (chicken fat) that has great immune boosting powers and is packed with much needed energy to help fight illness. There are even studies that say eating chicken soup helps encourage white blood cells to stay where they need to be to fight infection.

roasted chicken and wild rice soup | Brooklyn Homemaker

Whether my soup actually helped me get over the flu or not, it certainly hit the spot. Roasting the chicken and the vegetables before making the stock gives the soup a really rich and concentrated flavor. Once the chicken is roasted, the bones and skin can be used to make the stock, and the meat can be refrigerated and added back in once the stock is finished simmering. This ensures that the meat has a great texture, and that it’s super tasty since the flavor isn’t pulled out in the stock making process. Add in tender fresh vegetables, wild rice with a just a hint of bite, and freshly torn dill for some bright summery freshness, and you’ve got a soup that will make anyone feel great, whether they’re sick or not!

roasted chicken and wild rice soup | Brooklyn Homemaker

Roasted Chicken and Wild Rice Soup

3 to 4 pounds of chicken, bone-in & skin-on *see note
3 medium onions
4 carrots
2 parsnips, optional (I just like the earthy flavor it gives the stock)
2 tablespoons olive oil, divided
salt & pepper, to taste
4 stalks of celery
2 bay leaves
1/8 teaspoon celery seeds (optional)
generous fist-full of parsley
1 cup wild rice or wild rice & brown rice medley
2 or 3 tablespoons finely chopped fresh dill

Preheat oven to 450 degrees and line a baking sheet with aluminum foil or parchment. Generously season the chicken pieces with salt and pepper and arrange on the baking sheet, leaving some room for vegetables. Chop two whole onions (skin on) into quarters and place in a medium bowl. Roughly chop 2 parsnips and 2 carrots and add to the bowl with the onions, along with 1 tablespoon olive oil and a generous sprinkle of salt and pepper. Toss to coat and spread evenly on baking sheet with chicken pieces.
Roast chicken and vegetables until well browned and crispy looking, about 40 minutes, being careful nothing burns. Let cool, at least until you can handle the chicken without burning yourself.

Transfer vegetables to a large (at least 6 quarts) heavy bottom stockpot. Remove skin from chicken and add to pot (resist the urge to eat it all). Pull meat from bones and chop or tear into bite-size pieces; place in a bowl, cover and refrigerate. Add chicken bones to stockpot along with parsley, bay leaves, & celery seed. Roughly chop 2 celery stalks (with leaves on), add to the pot, and cover everything with 12 cups of water. Place over high heat, bring to a low boil, and turn heat down to a simmer. Cover pot and let simmer low and slow for at least 2 hours.

Meanwhile, dice remaining onion and celery stalks, and slice carrots into small bite-sized disks. Strain finished stock into a large bowl with a fine mesh strainer or a colander layered with cheesecloth, discarding boiled chicken bones and vegetables. Wipe out stockpot, add remaining tablespoon of olive oil, and heat over medium high heat. Add chopped onion, celery, & carrot, and sautée until translucent and beginning to brown, stirring regularly, about 5 minutes. Add wild rice or rice medley, stir, and cook for 2 minutes more. Add strained stock, bring to a boil, and reduce heat to a simmer. Simmer until rice is about 10 minutes from being cooked, about 30 minutes. See your rice’s cooking instructions for how long this should take. Add chicken meat to pot along with half of the chopped dill and simmer for 10 minutes more.

Taste and adjust seasoning if necessary. Stir in remaining dill and serve immediately.

*cooks note: I find that dark meat pieces will give your stock the best flavor, but white meat is the nicest meat for the soup, so I like to use a whole chicken cut up into pieces. If you can’t find a broken down whole chicken and don’t want to do it yourself, you can use a mix of thighs and breasts, legs and breasts, or whatever you like.

easy fudgy cocoa skillet brownies

I’ve made, and eaten, a lot of brownies in my day.

easy fudgy cocoa skillet brownies | Brooklyn Homemaker

I’ve tried countless recipes, and most of them were pretty good, but none have really made enough of an impression to make it into my recipe collection. I mean, they were brownies, sure, so naturally they were delicious and chocolatey and decadent, but none of them have felt special enough for me to make them a second time. Every time I’ve gotten the itch to make a pan of brownies I’ve searched my cookbooks (or google) and found a new recipe to try.

easy fudgy cocoa skillet brownies | Brooklyn Homemaker

Some have been cake-y, some have been fudgy, some have been light and milky, some deep and dark. Some have been thick and dry, others thin and gooey, some have had nuts, some have had icing, some have had crackled sugary tops.

easy fudgy cocoa skillet brownies | Brooklyn Homemaker

To be perfectly honest, I’m not a much of a fan of cakey brownies, and I definitely don’t like brownies with icing. (If I wanted chocolate cake, that’s what I’d be making.) Nuts I can take or leave, but the one thing I always look for in a brownie is the fudgy factor.

When you search recipes for “fudgy brownies”, most of the recipes you’ll find call for melted unsweetened baking chocolate. I’ve always thought that melted chocolate was essential to make a really rich fudgy brownie, but I don’t usually keep it in the house. If I do have it, it’s probably left over from the last time I made brownies, but the leftovers never seems to be in the right amount to make them again.

easy fudgy cocoa skillet brownies | Brooklyn Homemaker

I’ve also seen quite a few recipes out there that go out of their way to try to recreate the look, texture, and flavor of boxed brownies. Deeply chocolatey with a fudgy (but not-too-gooey) texture and a craggy crackly sugary top. I’ve seen recipes with combinations of oil and butter, brown sugar and white, cocoa and melted chocolate, all in the name of recreating that nostalgic iconic boxed brownie flavor.

The one thing I’ve always found odd though, is that there’s no melted chocolate in boxed brownies. There’s no boxed mix that calls for a combination of butter and oil either. So why must it be so difficult and complicated to recreate something so easy and simple? Why?

easy fudgy cocoa skillet brownies | Brooklyn Homemaker

Last week I came down with the flu and was out of work for a few days. I’m really bad at being sick, and find it nearly impossible to just sleep and nap and lay around all day even though I know full well that I should be resting and recovering. I ended up spending most of my time laying on the couch watching old movies and eating chicken soup, but one day I got a powerful craving for brownies, so I started looking for a recipe that wouldn’t require too much effort and could be made with ingredients I already had in the house. While I was fidgety enough to want to get up and make brownies, I was decidedly not well enough for a trip to the grocery store just for a bar of unsweetened chocolate.

easy fudgy cocoa skillet brownies | Brooklyn Homemaker

I typed “easy cocoa brownies” into the googler, and when a recipe from Bon Appetit came up I figured it was worth a shot. The only real changes I made were to use dutch process cocoa (I didn’t have any natural cocoa), and to bake the brownies in the same skillet used to melt the butter (because I was feeling too lazy to wash a skillet and a baking pan).

Well, guess what. This recipe has definitely made it into my recipe collection. If I must be honest, I’ve already made it again too. Maybe twice more…

Maybe.

easy fudgy cocoa skillet brownies | Brooklyn Homemaker

These brownies are deeply, darkly & decadently chocolatey thanks to the dutch process cocoa, and every bit as fudgy as I hoped they’d be. They’re crazy delicious, super buttery, and have a perfect hint of pleasant saltiness. They’re a little dense and gooey, but I’m totally into that! They even have that iconic crackled crusty sugar top, as well as a really wonderful chewy edge thanks to the heavy cast iron they’re baked in.  Since they’re baked in a round skillet you can cut them into wedges, and that way every slice has a little bit of gooey center and chewy edge.

My favorite part of this recipe though, might have to be how crazy easy they are to make!

easy fudgy cocoa skillet brownies | Brooklyn Homemaker

easy fudgy cocoa skillet brownies

  • Servings: 8 - 16 depending on size
  • Print
adapted from Bon Appetit

1/2 cup (1 stick) unsalted butter
1 1/4 cups sugar
3/4 cup unsweetened dutch-process cocoa powder
1/2 teaspoon coarse kosher salt
1 teaspoon vanilla extract
2 large eggs
1/3 cup all-purpose flour
2 tablespoons confectioners (powdered) sugar, optional

Preheat oven to 325°F.

Over medium heat, melt butter in an 8 or 9 inch cast iron skillet. Let cool slightly.

Whisk sugar, cocoa, and salt in a medium bowl to combine. Pour butter in a steady stream into dry ingredients, leaving a light coating of butter in the skillet. Whisk to combine, then whisk in vanilla and eggs, one at a time. With a wooden spoon or rubber spatula, add flour and stir until just combined (do not over-mix). Scrape batter into buttered skillet and smooth the top. (If you don’t have a skillet, you can substitute a parchment lined and buttered 8×8 square baking dish)

Bake until edges look craggy, center rises but doesn’t wobble much, and a toothpick inserted into the center comes out with just a few moist crumbs attached, 30-35 minutes.

Transfer skillet to a wire rack to cool completely. If desired, dust lightly with confectioners sugar. Cut into 8 to 16 wedges depending on how much you want. They’re so rich you probably should cut them into 16 wedges, but they’re so good you’ll want to cut them into 8.

homemade chicken pot pie with buttermilk biscuit crust, revisited

Sooooo… This recipe may look strangely familiar.

homemade chicken pot pie with buttermilk biscuit crust | Brooklyn Homemaker

Back when I first started blogging and didn’t yet have a camera, I was using my iPhone to capture images of the meals and treats I was creating. At the time, I was doing my best to take “artistic” and “attractive” photos, but truth be told I’d never used a real camera and didn’t have a freaking clue what I was doing.

Looking back, those photos were pretty terrible.

homemade chicken pot pie with buttermilk biscuit crust | Brooklyn Homemaker

I mean, everyone’s gotta start somewhere, and I think it’s actually really nice to have a reference to show how far I’ve come in such a short time. It wasn’t until late November that I got my Nikon DSLR, and even then I was completely clueless for the first few months. I know that I still have a lot to learn, but I can confidently say that in less than a year I’ve already taught myself a lot about lighting and white balance and shutter speeds and aperture and fixed lenses. I won’t even get into food styling skills and my growing hoard collection of props and surfaces and backdrops.

homemade chicken pot pie with buttermilk biscuit crust | Brooklyn Homemaker

Anyway, I’m glad that I started blogging before I got my camera, because it gave me a chance to find my voice when it comes to my writing, and to figure out what direction I wanted to take things. I have no plans to remove any of those first few posts, but there are a few recipes from the beginning that I’d like to revisit. Some of them are too important to me to leave them in the past, represented only by embarrassing photos and awkward writing.

homemade chicken pot pie with buttermilk biscuit crust | Brooklyn Homemaker

This is one of those recipes. If you’re interested, you can find the original post here.

homemade chicken pot pie with buttermilk biscuit crust | Brooklyn Homemaker

When I was growing up we ate dinner at my grandmother’s house a lot, and much of my taste in food and cooking comes from her. Of all the amazing meals she has in her repertoire, this has always been my favorite. Her biscuit-topped chicken pot pie was so frequently requested by myself and my sister in our youth that it had to be reserved for birthdays and special occasions.

When I was old enough to start cooking my own meals, this was one of the first recipes I was determined to master. Later in life I started experimenting and toying with Grandma’s recipe, and the way I make it today is actually quite different from the way she does. Chicken bouillon cubes have been replaced with homemade chicken stock, canned vegetables scrapped and swapped for fresh, and real buttermilk biscuits take the place of Grandma’s biscuick topping. I believe her recipe originally came from a woman’s magazine with a focus on convenience food, but times and tastes change, and I prefer this fresher, less processed, more modern interpretation.

homemade chicken pot pie with buttermilk biscuit crust | Brooklyn Homemaker

In any event, this pot pie is every bit as warm and homey as Grandma’s version. This is comfort food at its finest. Tender shredded chicken and fresh vegetables in a thick creamy gravy made from homemade stock with plenty of herbs, all topped with a pillowy island of tender buttermilk biscuit and baked until bubbly and golden. If it weren’t such an event to prepare, I would probably eat this several times a week. I guess it’ll still have to be reserved for special occasions, and that’s probably a good thing.

homemade chicken pot pie with buttermilk biscuit crust | Brooklyn Homemaker

Chicken Pot Pie with Buttermilk Biscuit Crust

filling:
4-5 lbs of chicken pieces, skin-on, bone-in. *see note
salt & pepper to taste
2 tablespoon olive oil, divided
2 bay leaves
Generous handful of poultry herbs like parsley, sage, & thyme (optional) **see note
2 onions, 1 small, 1 large
4 carrots
4 celery stalks
8 tablespoons butter (1 stick)
3/4 cup flour
1 1/2 cups frozen peas
1/4 cup finely chopped parsely

biscuit crust:
1 1/2 cups flour
2 teaspoons baking powder
1/2 teaspoon salt
2 teaspoons sugar
1/2 teaspoon cream of tartar
6 tablespoons butter, cubed
1/2 cup + 2 tablespoons buttermilk

Make the filling:
Generously season your chicken with salt and pepper. In a large (at least 6 qt) heavy stockpot or dutch oven, heat 1 tablespoon olive oil over medium high heat. Add your chicken pieces and brown for about 5 minutes on each side. This doesn’t have to be perfect, it’s just to add flavor, but you can do this in stages if everything won’t fit. Roughly chop 1 small onion (skin on), 2 carrots, & 2 celery stalks (leaves on). Add to pot along with bay leaves and poultry herbs, stems and all (if using). Top with 8 cups of water, and cover the pot. Turn the heat down to medium and bring to a boil. Once the pot reaches a boil, turn the heat down to a low simmer and let it bubble slow and low for an hour to an hour and a half.

Remove pot from heat and let cool for 20 minutes or until you’re comfortable handling it. Using a large colander fitted inside a larger bowl, strain out the stock. If necessary, you can use a strainer or sieve to skim the stock for anything that got through the colander. Measure out 6 cups of stock and keep any remaining for another use. Cover and set aside.

Let the chicken pieces cool for about 30 minutes or until you can handle them. Remove the bones and skin from the chicken and discard along with boiled veggies & herbs. Pull the chicken meat into bite sized shreds and be careful to find and remove any remaining small bones. Place the pulled chicken in a bowl, cover and set aside.

Wipe your pot clean. You don’t have to wash it, just make sure there’s nothing in there you don’t want in the finished meal. Dice the large onion, and cut your remaining carrots and celery into small pieces.  Heat the remaining tablespoon of oil over medium high heat and add your chopped vegetables. Season with salt & pepper and cook until onions and celery are translucent and carrots are completely tender. Transfer to the bowl with the pulled chicken.

Back in your pot, melt the butter (you could also use some chicken fat skimmed from your stock) and whisk in flour. Cook until the flour just barely starts to brown. Slowly whisk in about half a cup of stock, making sure there are no lumps of roux. Repeat two or three times more before adding remaining stock.  Whisk out any lumps and bring to a boil, whisking regularly. When the gravy is well thickened, remove from heat, taste and adjust your seasoning if necessary. Add the chicken, cooked vegetables, frozen peas, & chopped parsley. Set aside. If the pot you’re using is oven safe you can bake your pot pie in it, or you can transfer to an oven safe bowl for a nicer presentation.

Make the biscuit crust:
Preheat oven to 450 degrees.
If you want to serve extra biscuits on the side, double (or triple) this biscuit recipe.
In a large bowl sift together flour, baking powder, sugar, salt & cream of tartar. Using a pastry blender, cut the butter into the flour until it resembles coarse pea-sized crumbs. Form a well in the center of the bowl and in buttermilk. Use a fork to stir until just moistened. Do not over mix.

Turn the dough out onto a floured work surface and knead lightly 5 or 6 times, or until it just holds together. Pat or lightly roll dough out to 1/2 of an inch. Form a circle about the size of a your pot or bowl.  If you want to make extra dough, roll that out and cut biscuits using a water glass or biscuit cutter. Carefully transfer your biscuit round to the top of your filling and score it with an X in the center using a sharp knife. Bake for 25-30 minutes or until the crust is golden and the filling is bubbling. Extra biscuits should be rolled to 3/4 of an inch and baked on a parchment-lined sheet pan for 10 to 12 minutes or until golden.

Remove from oven and allow it to cool for 15 minutes before serving. Serve with a nice chunk of crust.

Notes:

*You can use whatever parts you like best, but I think an entire chicken, cut up into pieces, is perfect. If you like all white meat, use all breasts. If you can’t find an entire chicken cut up and don’t want to get into butchering, I think a mix of breasts and thighs has the best flavor.

**I used a variety of herbs because I had them in my garden, but you could just use one or two types or skip them altogether.