chicken

grilled lemon herb chicken thighs

So, in case you haven’t already noticed, it’s starting to warm up outside and things are starting to turn green. I’m so into it.

grilled lemon herb chicken thighs | Brooklyn Homemaker

On Sunday we decided it was warm enough to have our first cookout of the year. It wasn’t really, but we were drinking so no one seemed to notice. We gathered some friends, fed them some cocktails, and cooked up a bunch of food over an open flame. We also tried to overlook the fact that I was standing over the grill with a camera while everyone else was enjoying the outdoors for the first time since 2013. In case you were wondering, photographing a grill while smoke pours out can be an awkward task, especially when the wind can’t decide which direction it wants to blow.

grilled lemon herb chicken thighs | Brooklyn Homemaker

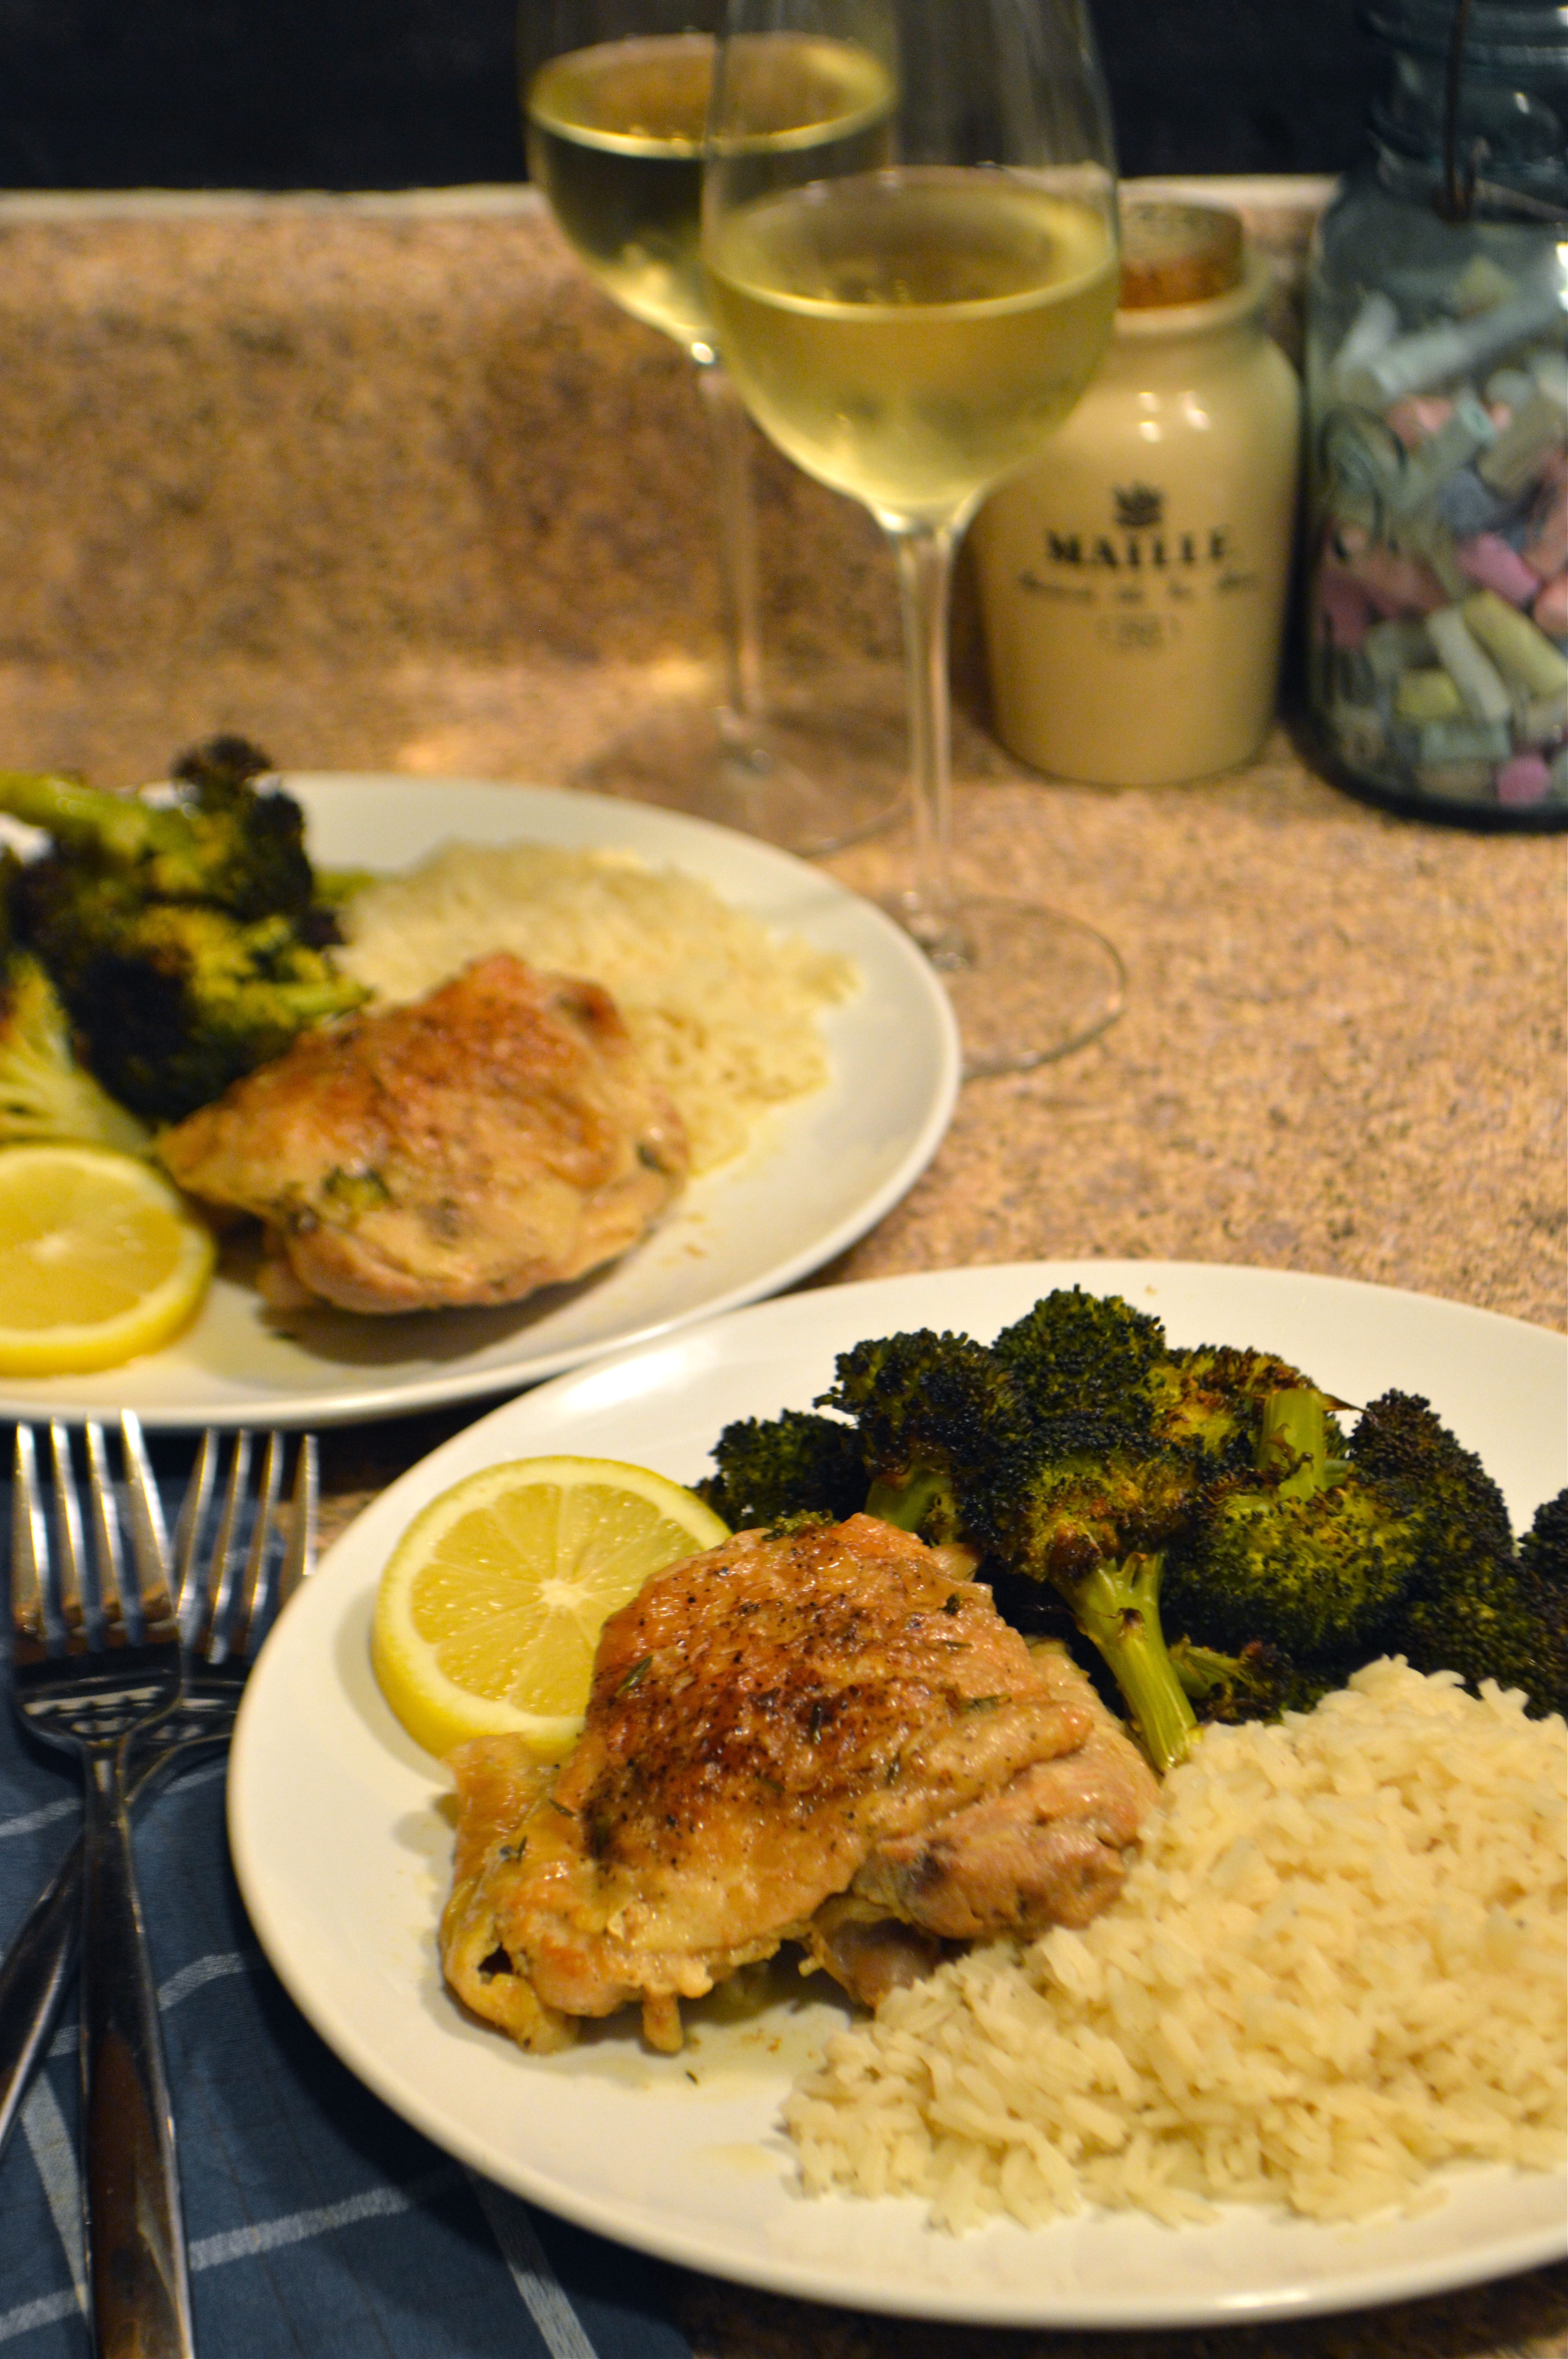
I thought the perfect thing for a warm(ish) spring day would be some lemony grilled chicken thighs with plenty of fresh green herbs. I know, chicken thighs again. I’ve already said this, but beyond being affordable, chicken thighs are also really juicy, tender, and flavorful. They also happen to lend themselves perfectly to grilling. I love white meat too, but I sometimes find that breast meat can dry out on the grill if you’re not a really experience griller. Chicken thighs are much more forgiving if you forget them while you’re sipping your drink and accidentally leave them on just a bit too long, or if you’re afraid of undercooking and intentionally leave them on just a bit too long. Either way, they’re going to come out moist and delicious and all your friends will tell you how skilled you are at cooking with fire.

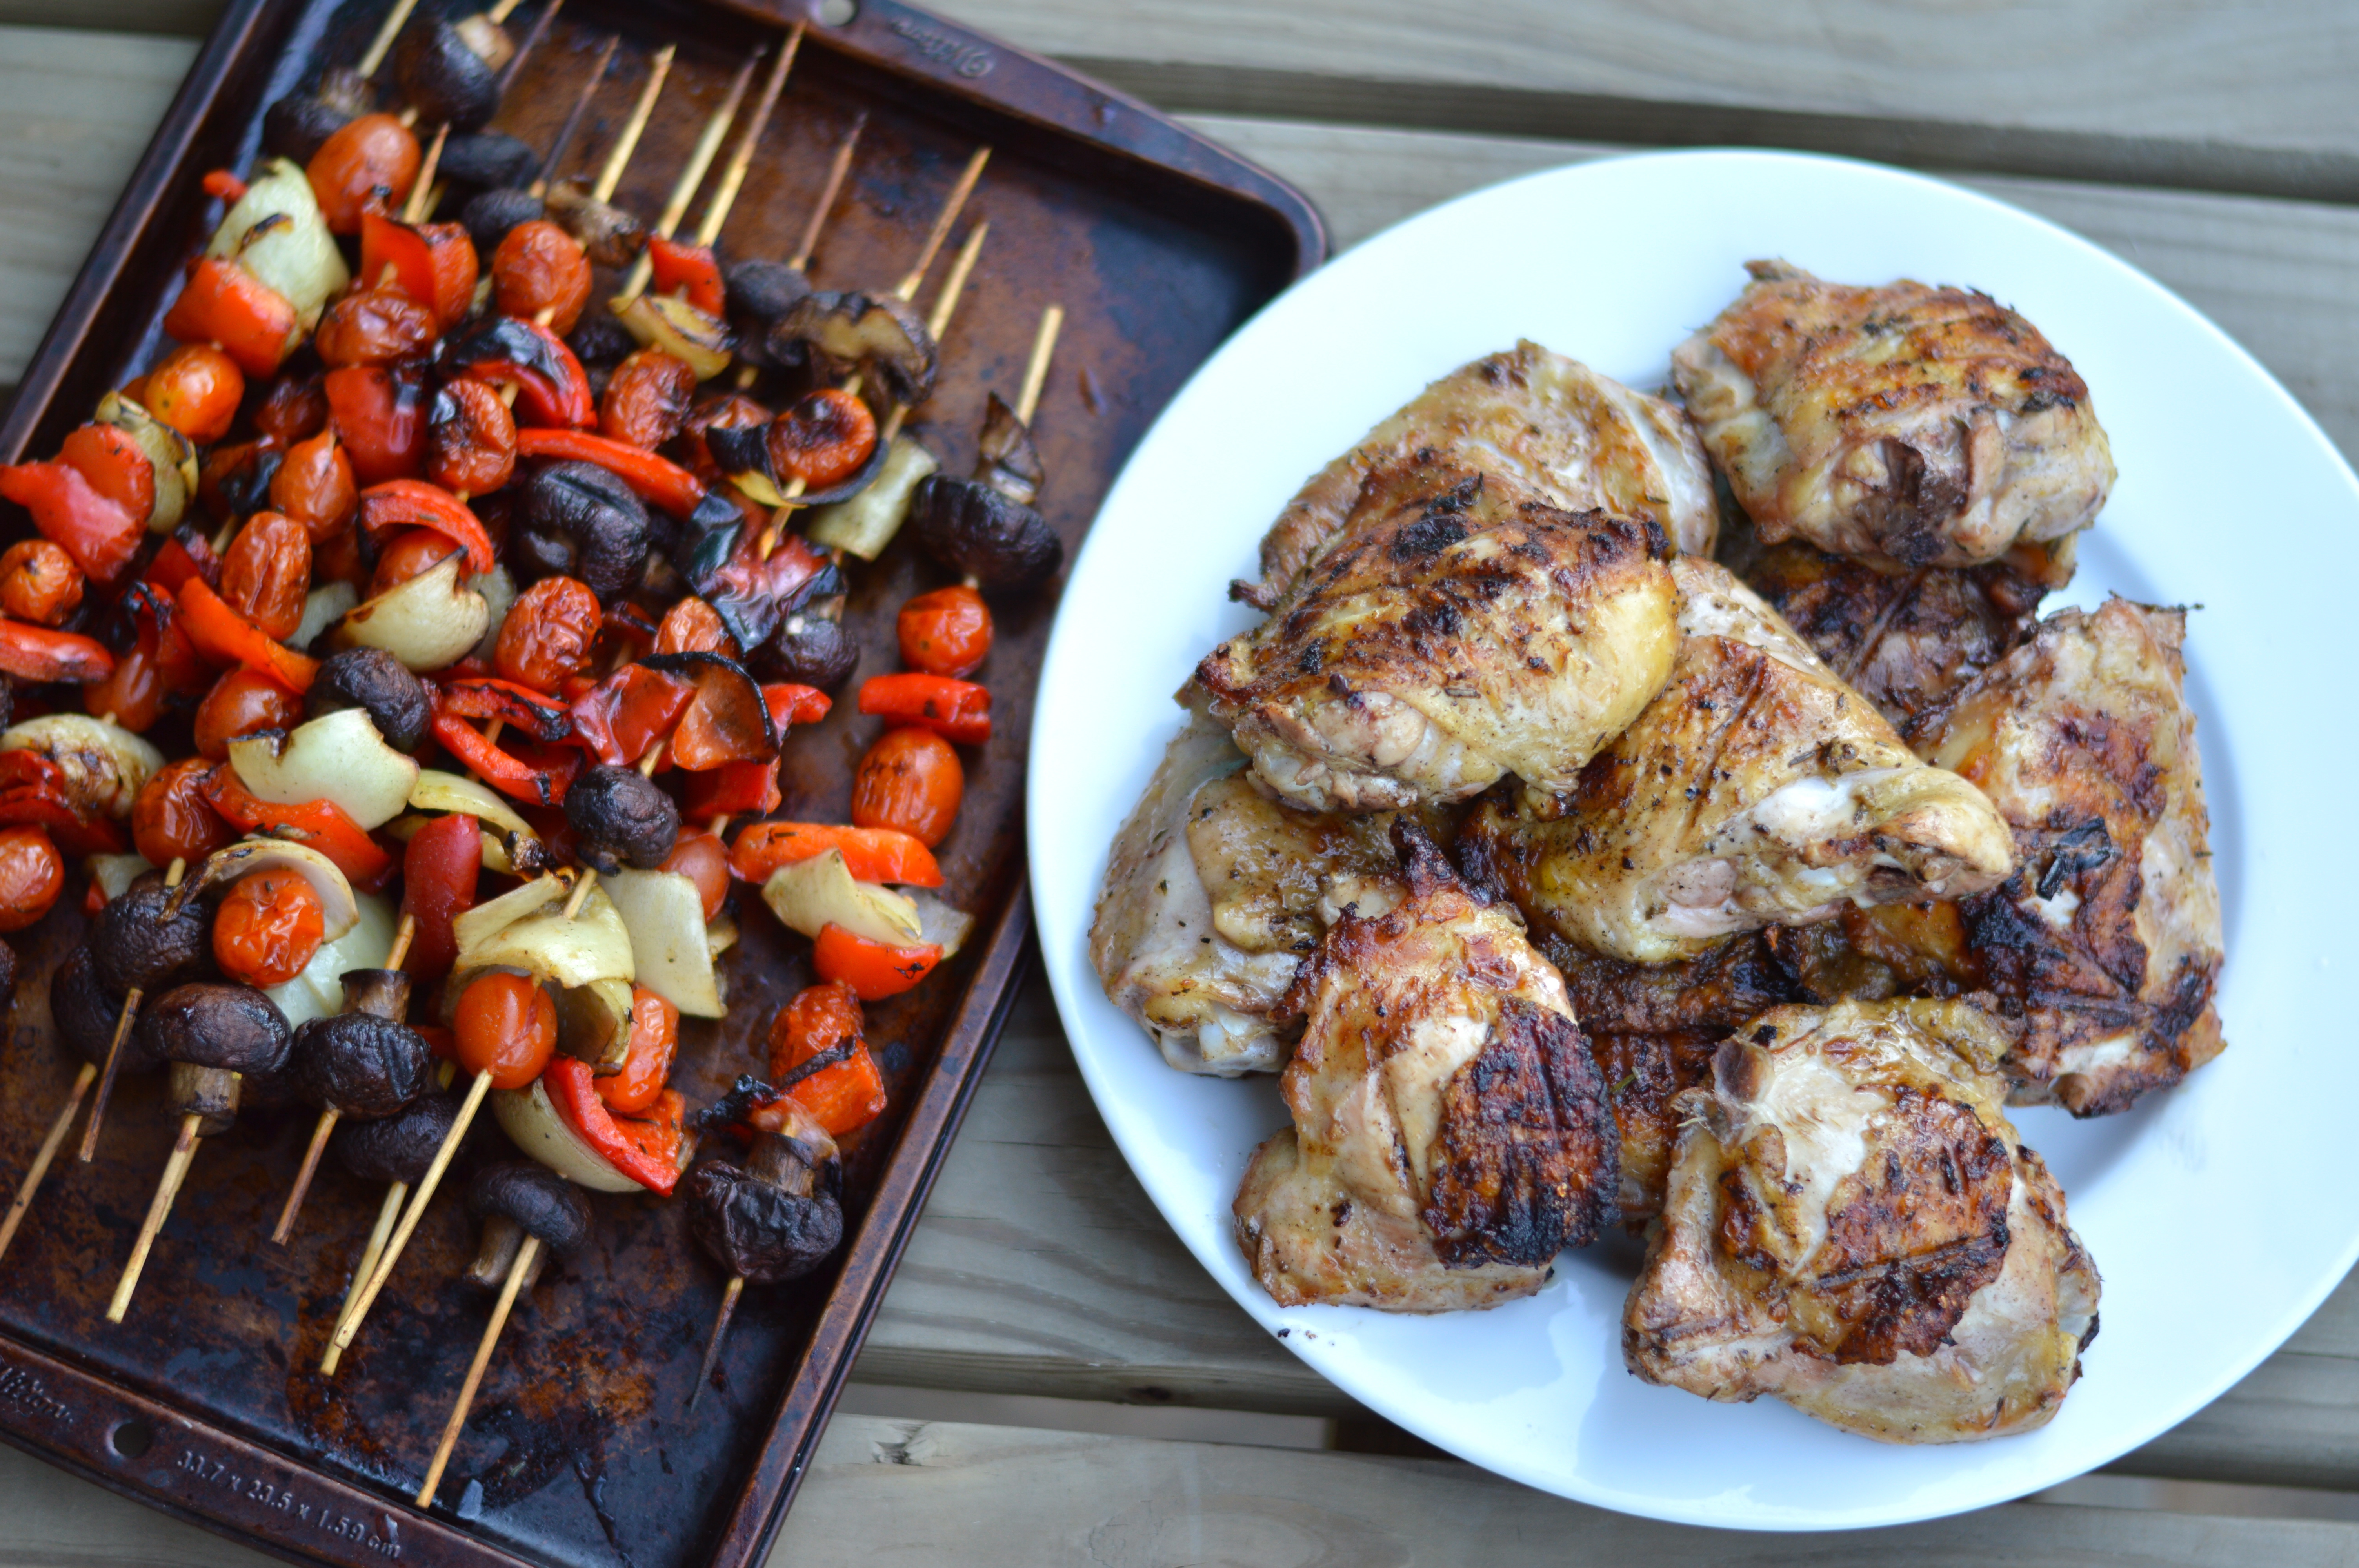
To go along with our chicken, I also grilled some marinated veggie kabobs. A nice mix of grape tomatoes, onions, bell peppers, and mushrooms was just what the doctor ordered. I LOVE the way grape tomatoes get all hot and juicy and just barely hold their shape when you grill them. You can definitely play with other veggies too, but it’s important to keep in mind that they’ll all cook for the same amount of time. Simply cut up your veggies into bite sized chunks (l left my mushrooms and tomatoes whole), marinate for an hour or two, arrange on skewers, and cover until you’re ready to grill. If you’re using wooden skewers you should soak them in water while your veggies marinate so they don’t burn on the grill. As for marinades, I think vinaigrettes work really well for grilled vegetables, but you can really use whatever you like. In this case, I just made a little extra lemon herb marinade and used that.

grilled lemon herb chicken thighs | Brooklyn Homemaker

When it comes to cooking outdoors, I’m a firm believer that charcoal grills give your food MUCH more flavor. Gas grills cook your food, and you’ll be standing outside while it happens, but you’re really not going to get any of that smokey “grilled” flavor. If you have a gas grill at home and want to try to get that smokiness, I’d suggest trying some hardwood smoking chips. Smoking chips usually come in a few different flavors like hickory or applewood, and can be found online or at many grocery or hardware stores. Before using them you need to soak the chips in water so they don’t just burn up. To contain the ash and prevent them from burning too quickly, you can make a pouch for your chips out of aluminum foil, or get one of these handy smoke boxes.

grilled lemon herb chicken thighs | Brooklyn Homemaker

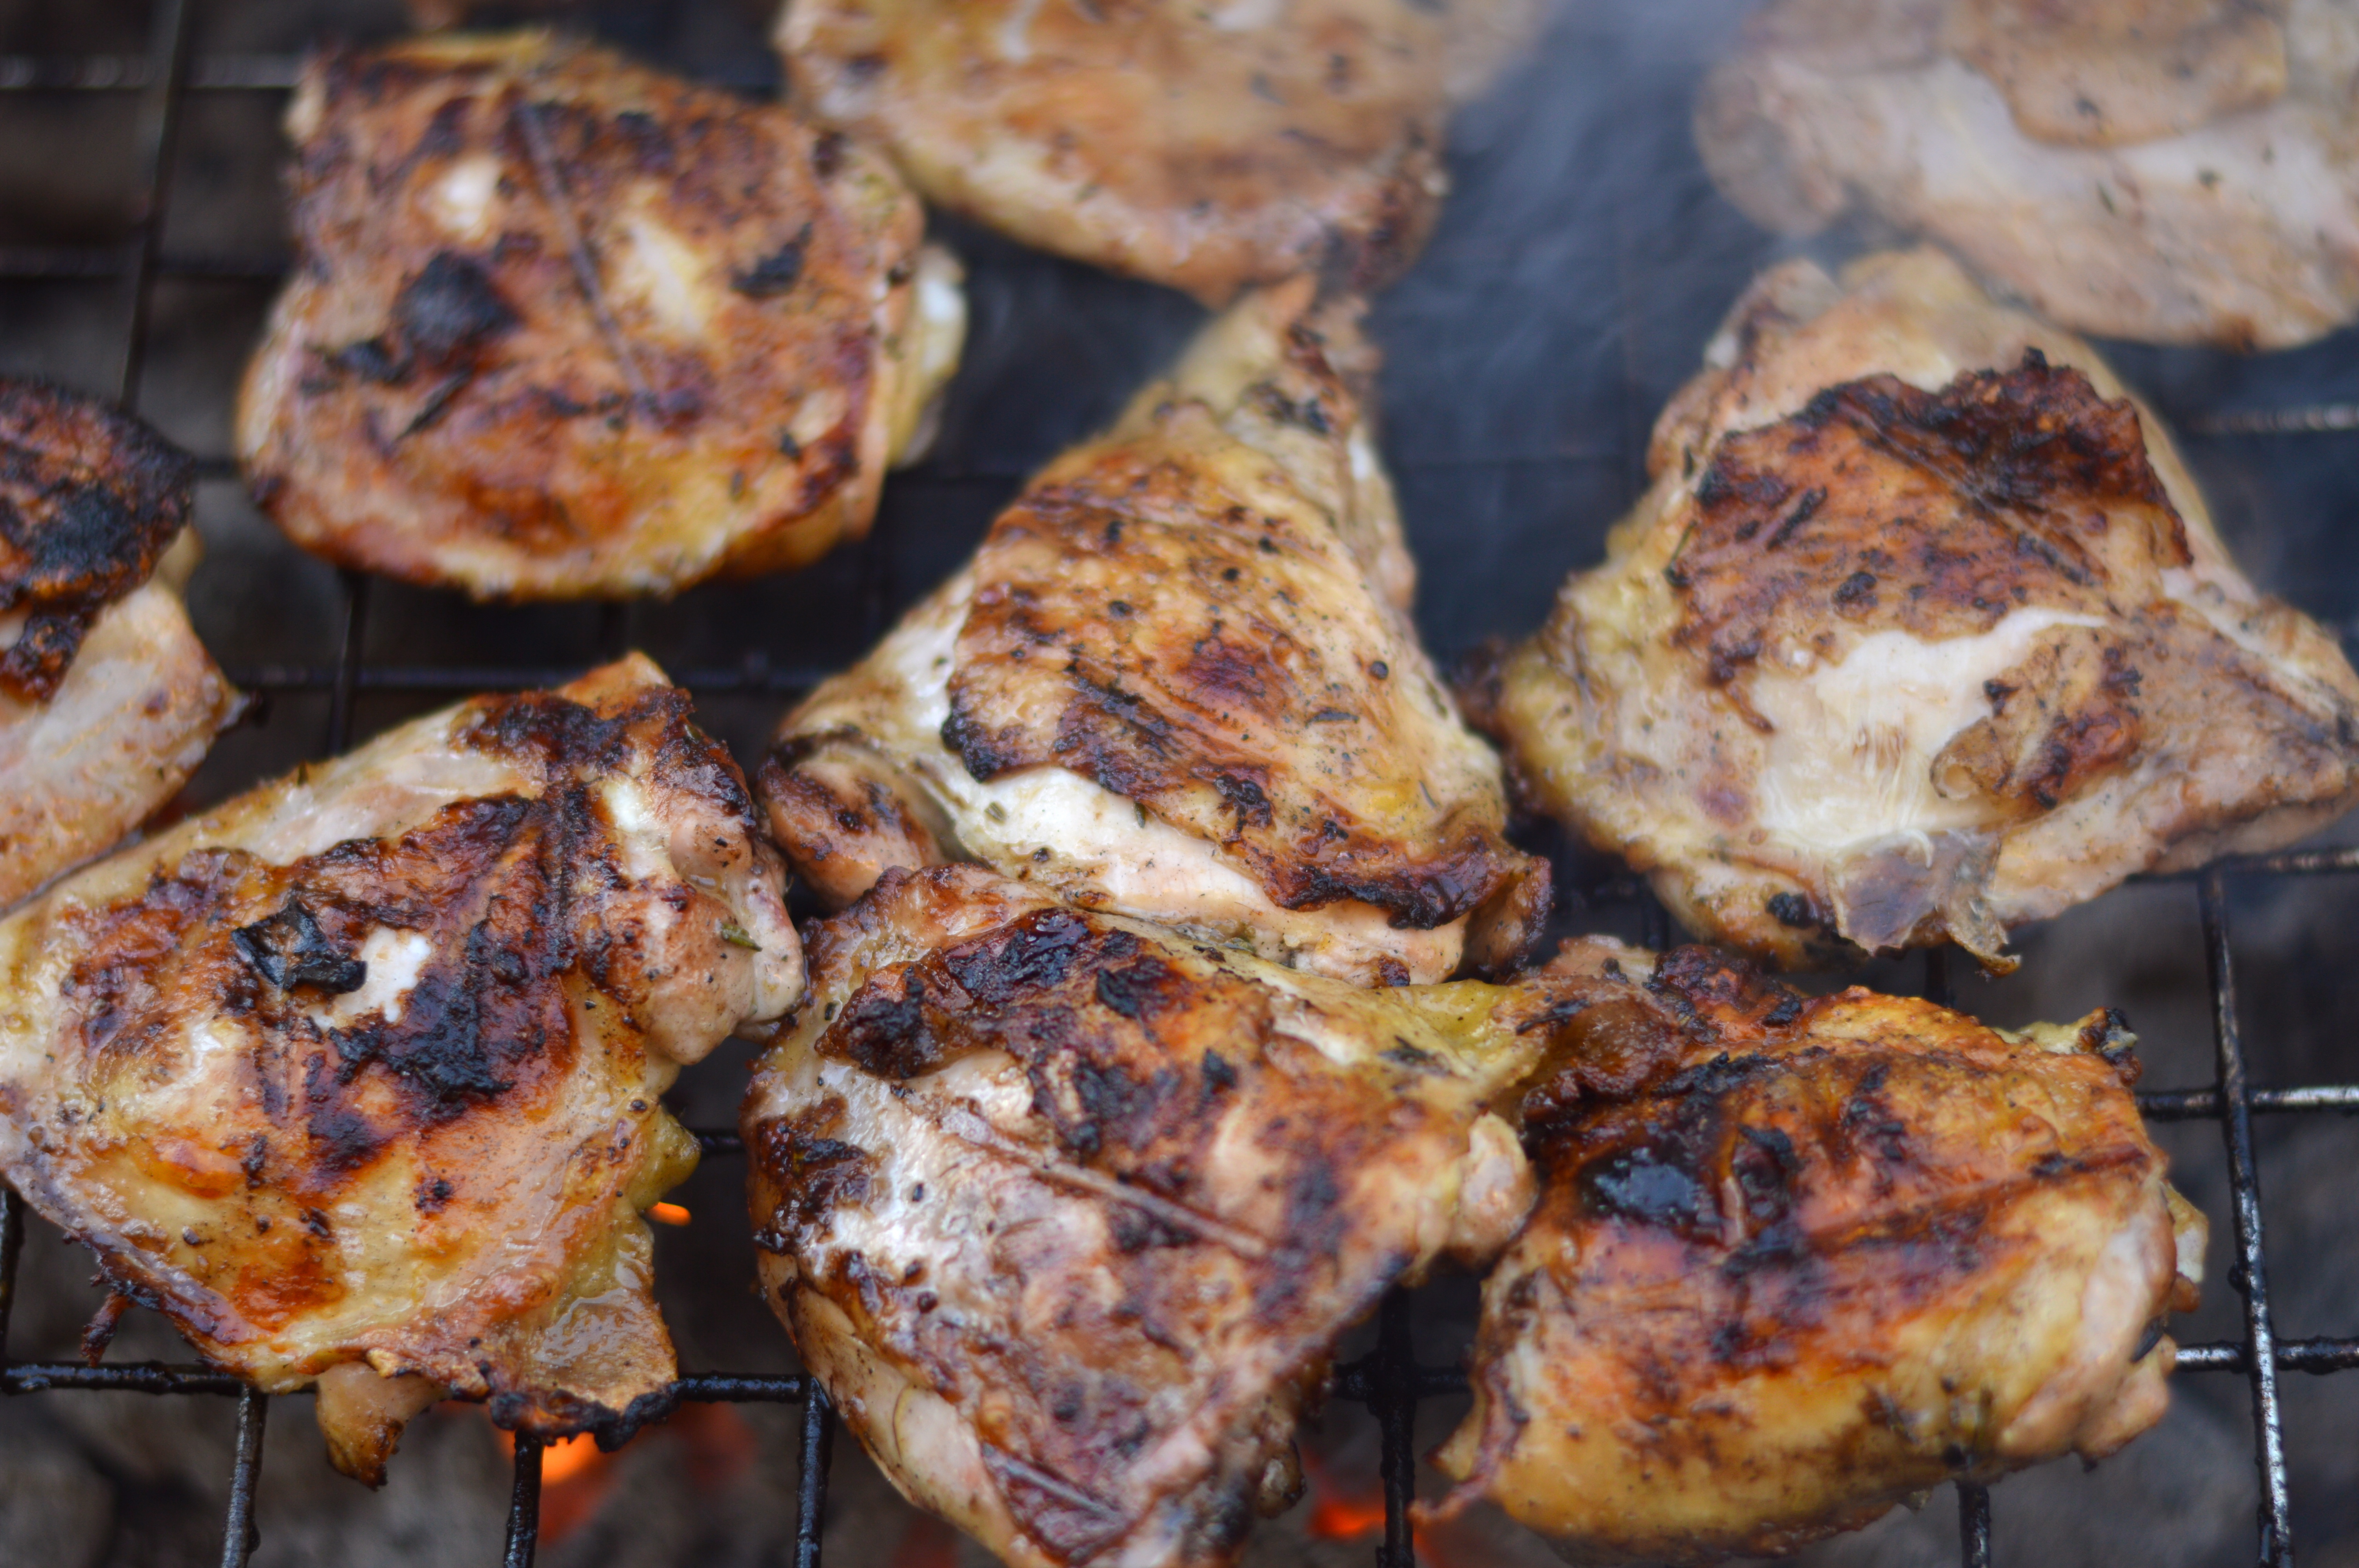
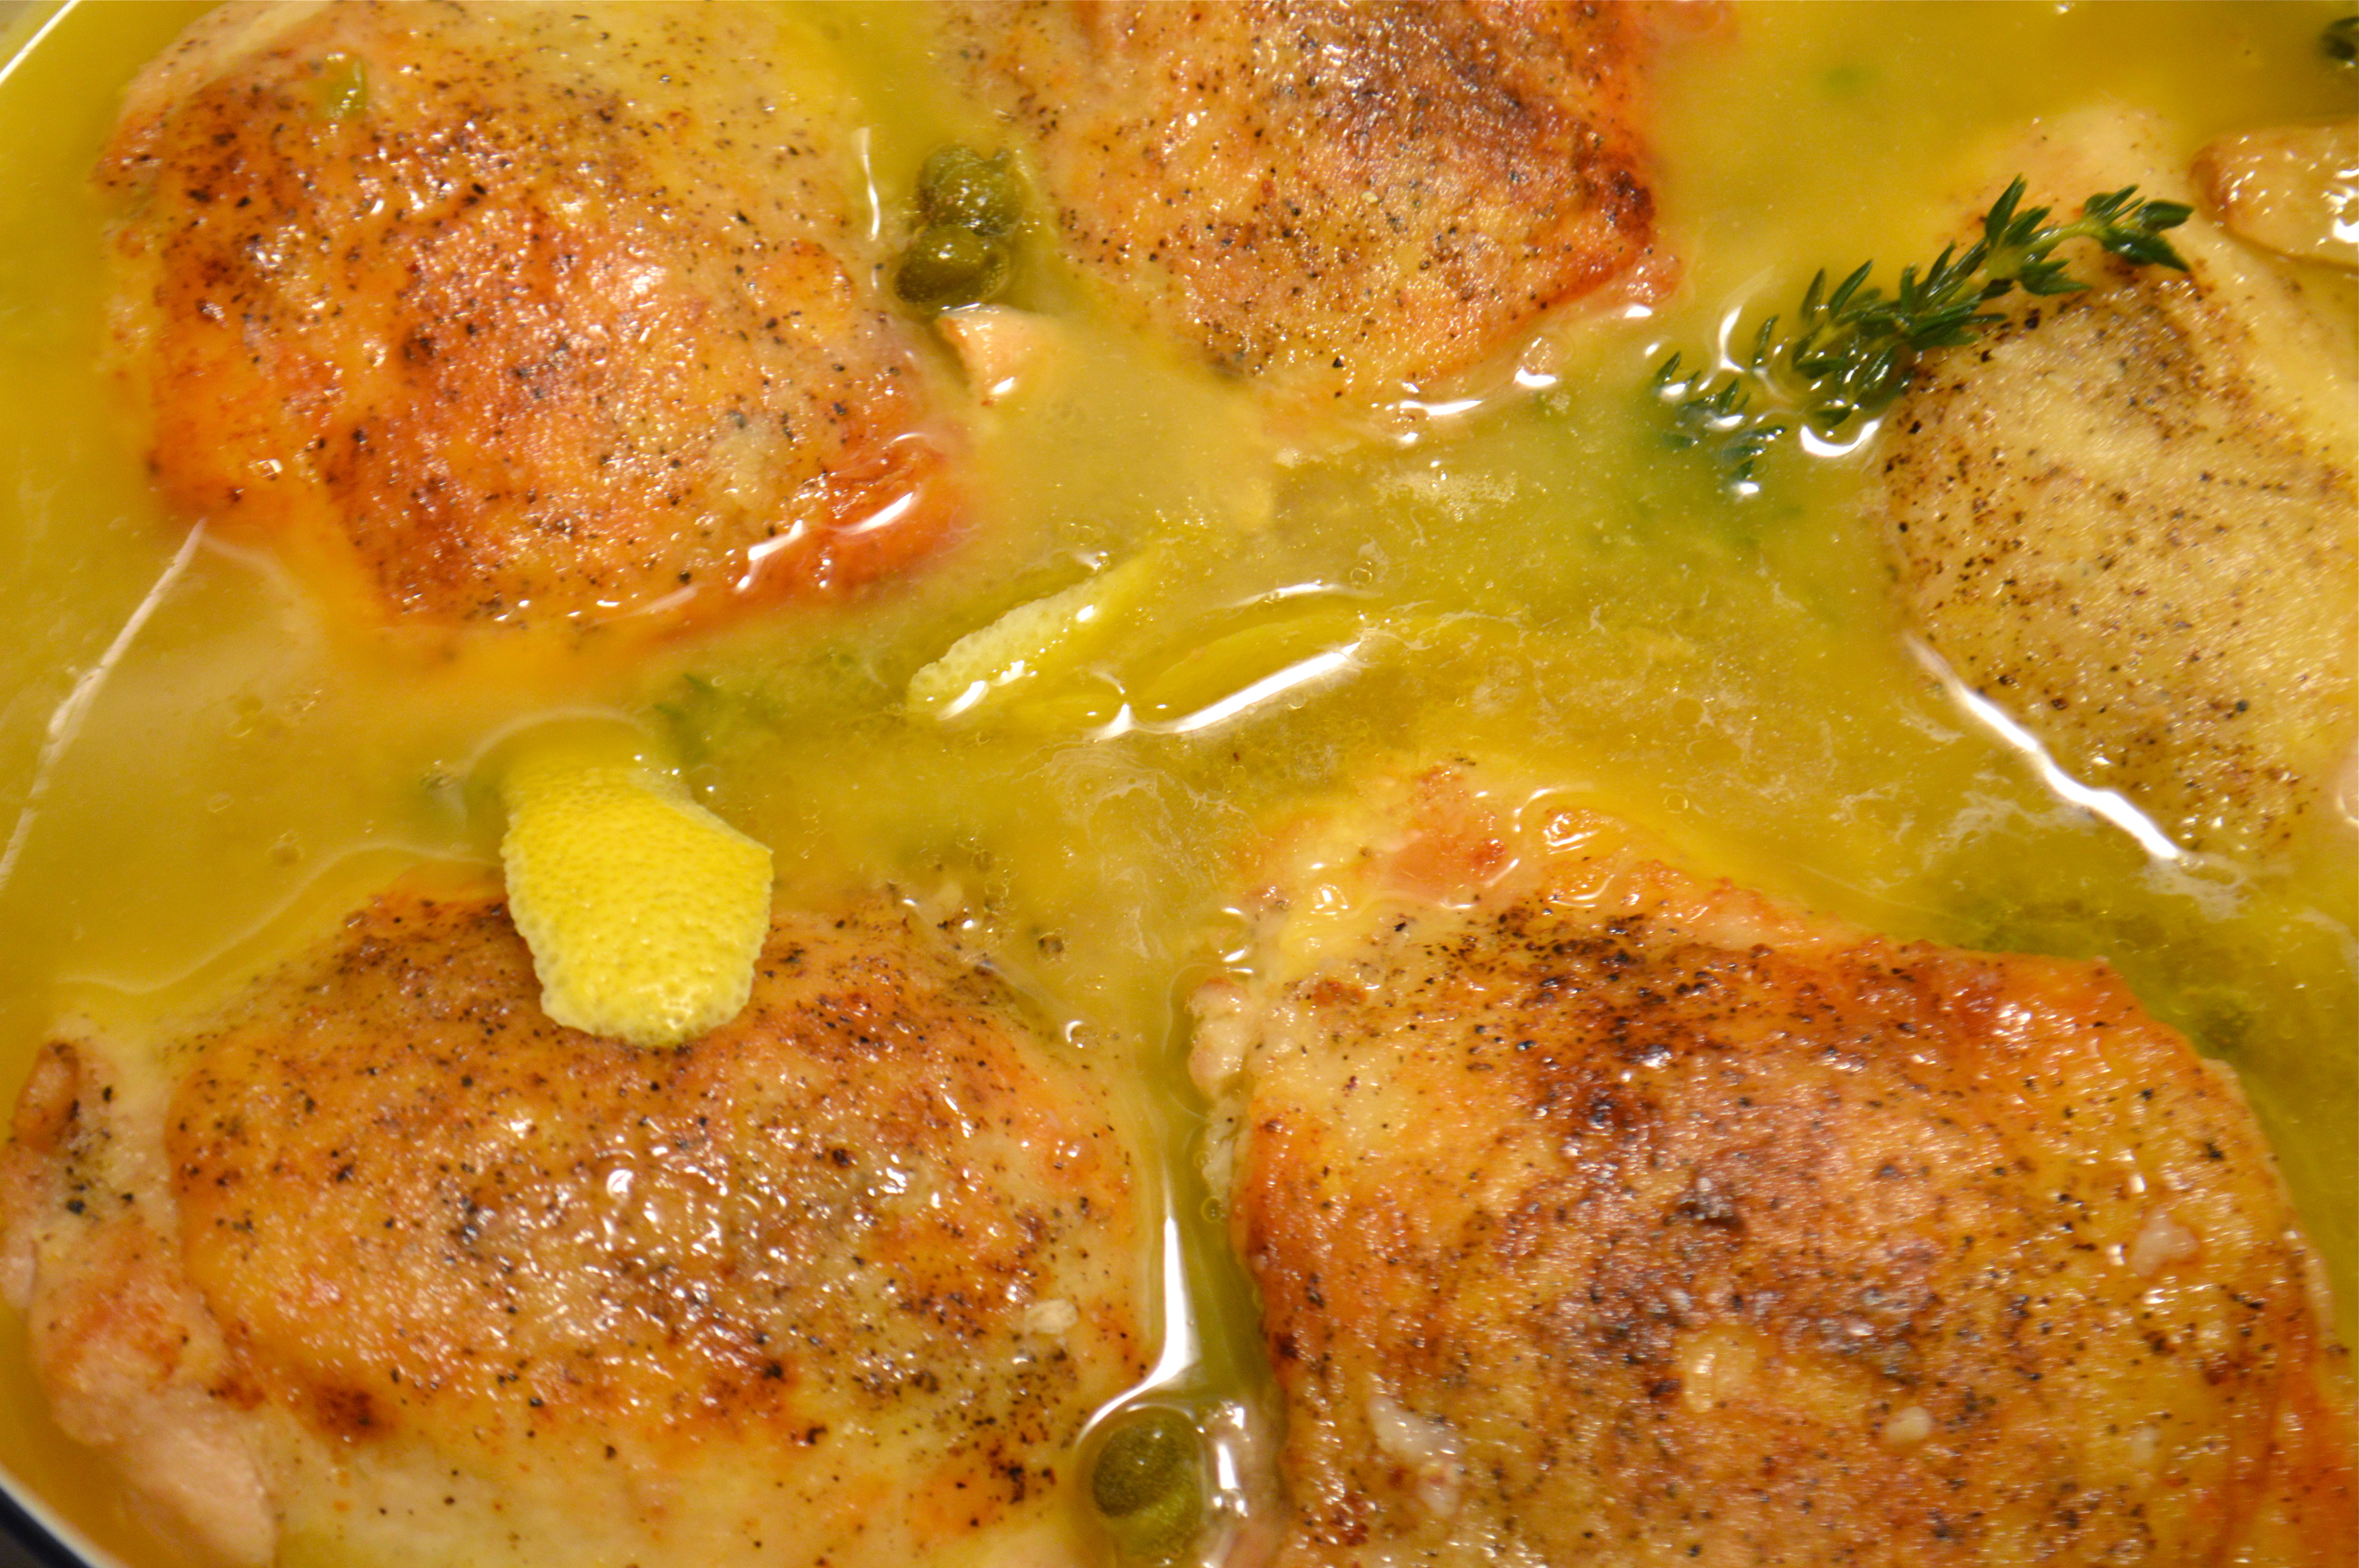
This chicken is seriously phenomenal. So good in fact, that one of our friends who usually doesn’t eat meat went back in for seconds. The skin gets all crispy and golden brown, while the meat stays moist and full of flavor. The marinade completely permeates the meat without being overpowering. It’s savory, aromatic, and earthy thanks to two fresh herbs and a healthy dose of garlic, and the olive oil and lemon juice make it tangy, sweet and bright. These fresh clean flavors are an ideal pairing with the smokiness that comes from cooking with charcoal or hardwood chips. You might not see another grilling recipe for the rest of year, because I’m just going to make this over and over and over. Just kidding! I promise!

grilled lemon herb chicken thighs | Brooklyn Homemaker

Grilled Lemon Herb Chicken Thighs
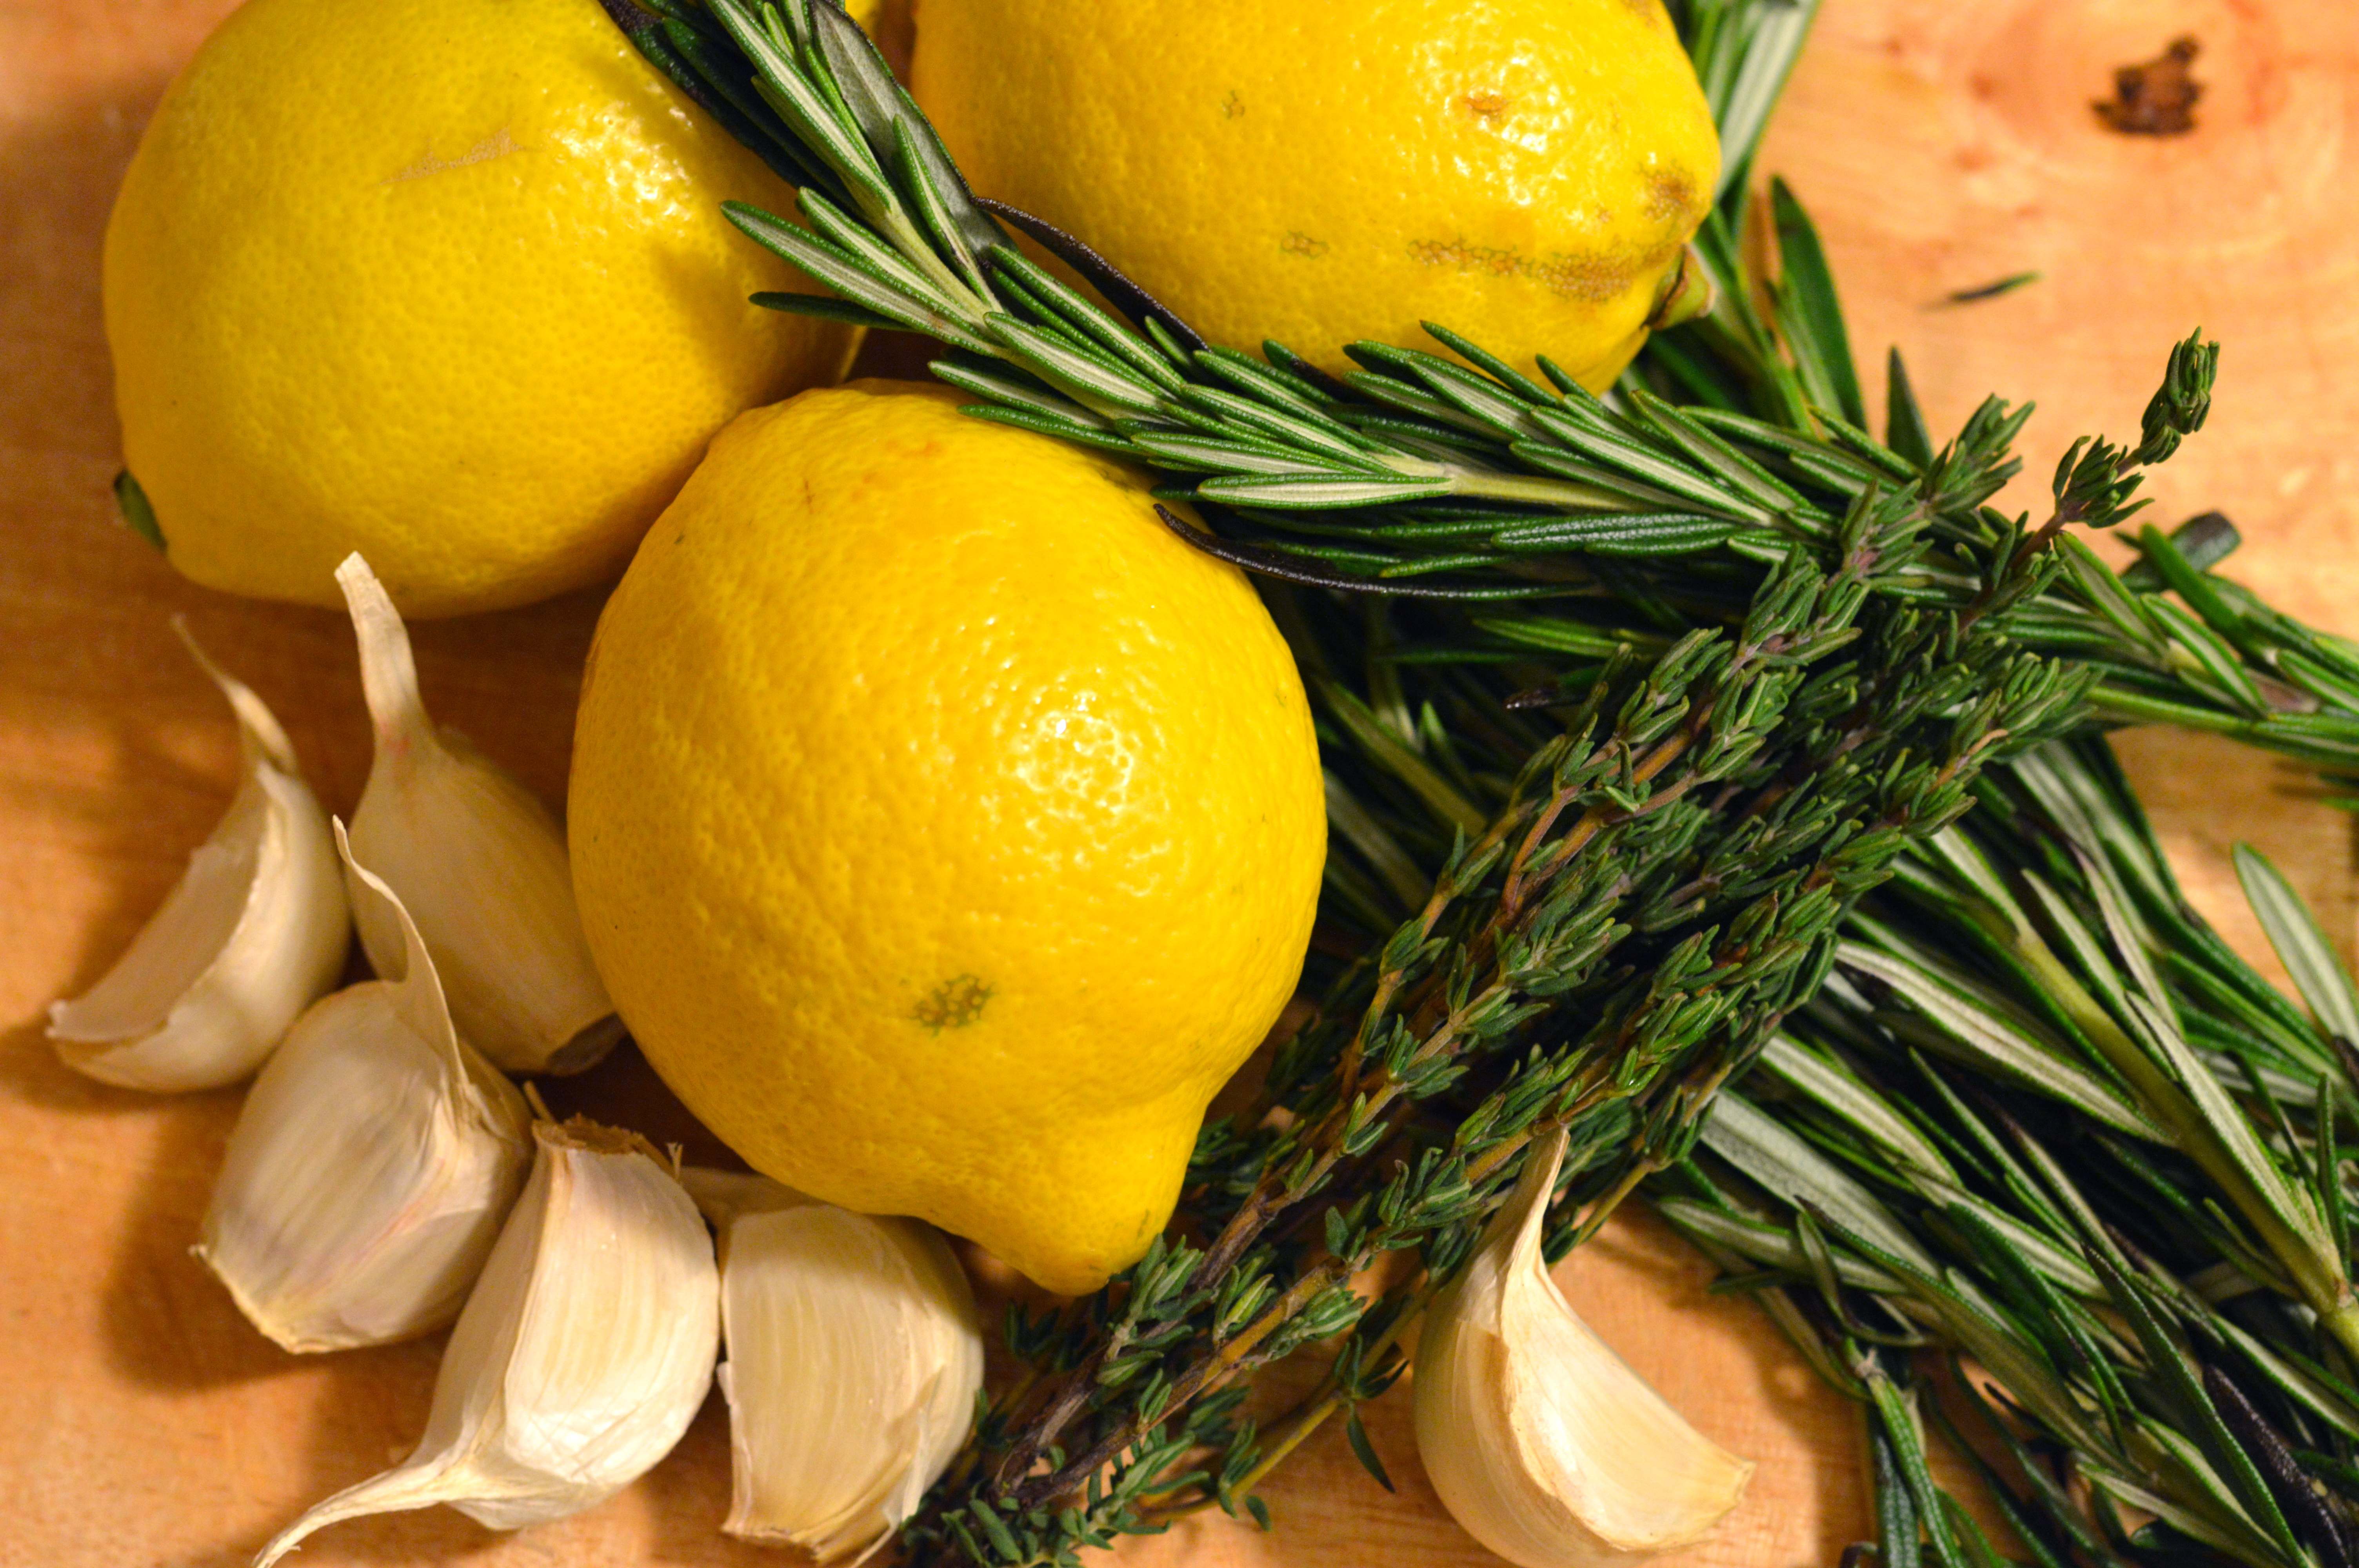
  • Servings: 5-10ish *see cook's note
  • Print

8-10 chicken thighs
1/2 cup olive oil
1/2 cup lemon juice
zest of 3 lemons
4-5 garlic cloves, crushed
1 tablespoon rosemary (finely chopped)
2 teaspoons thyme (finely chopped)
1 1/2 teaspoons coarse Kosher salt
1 1/2 teaspoons ground black pepper

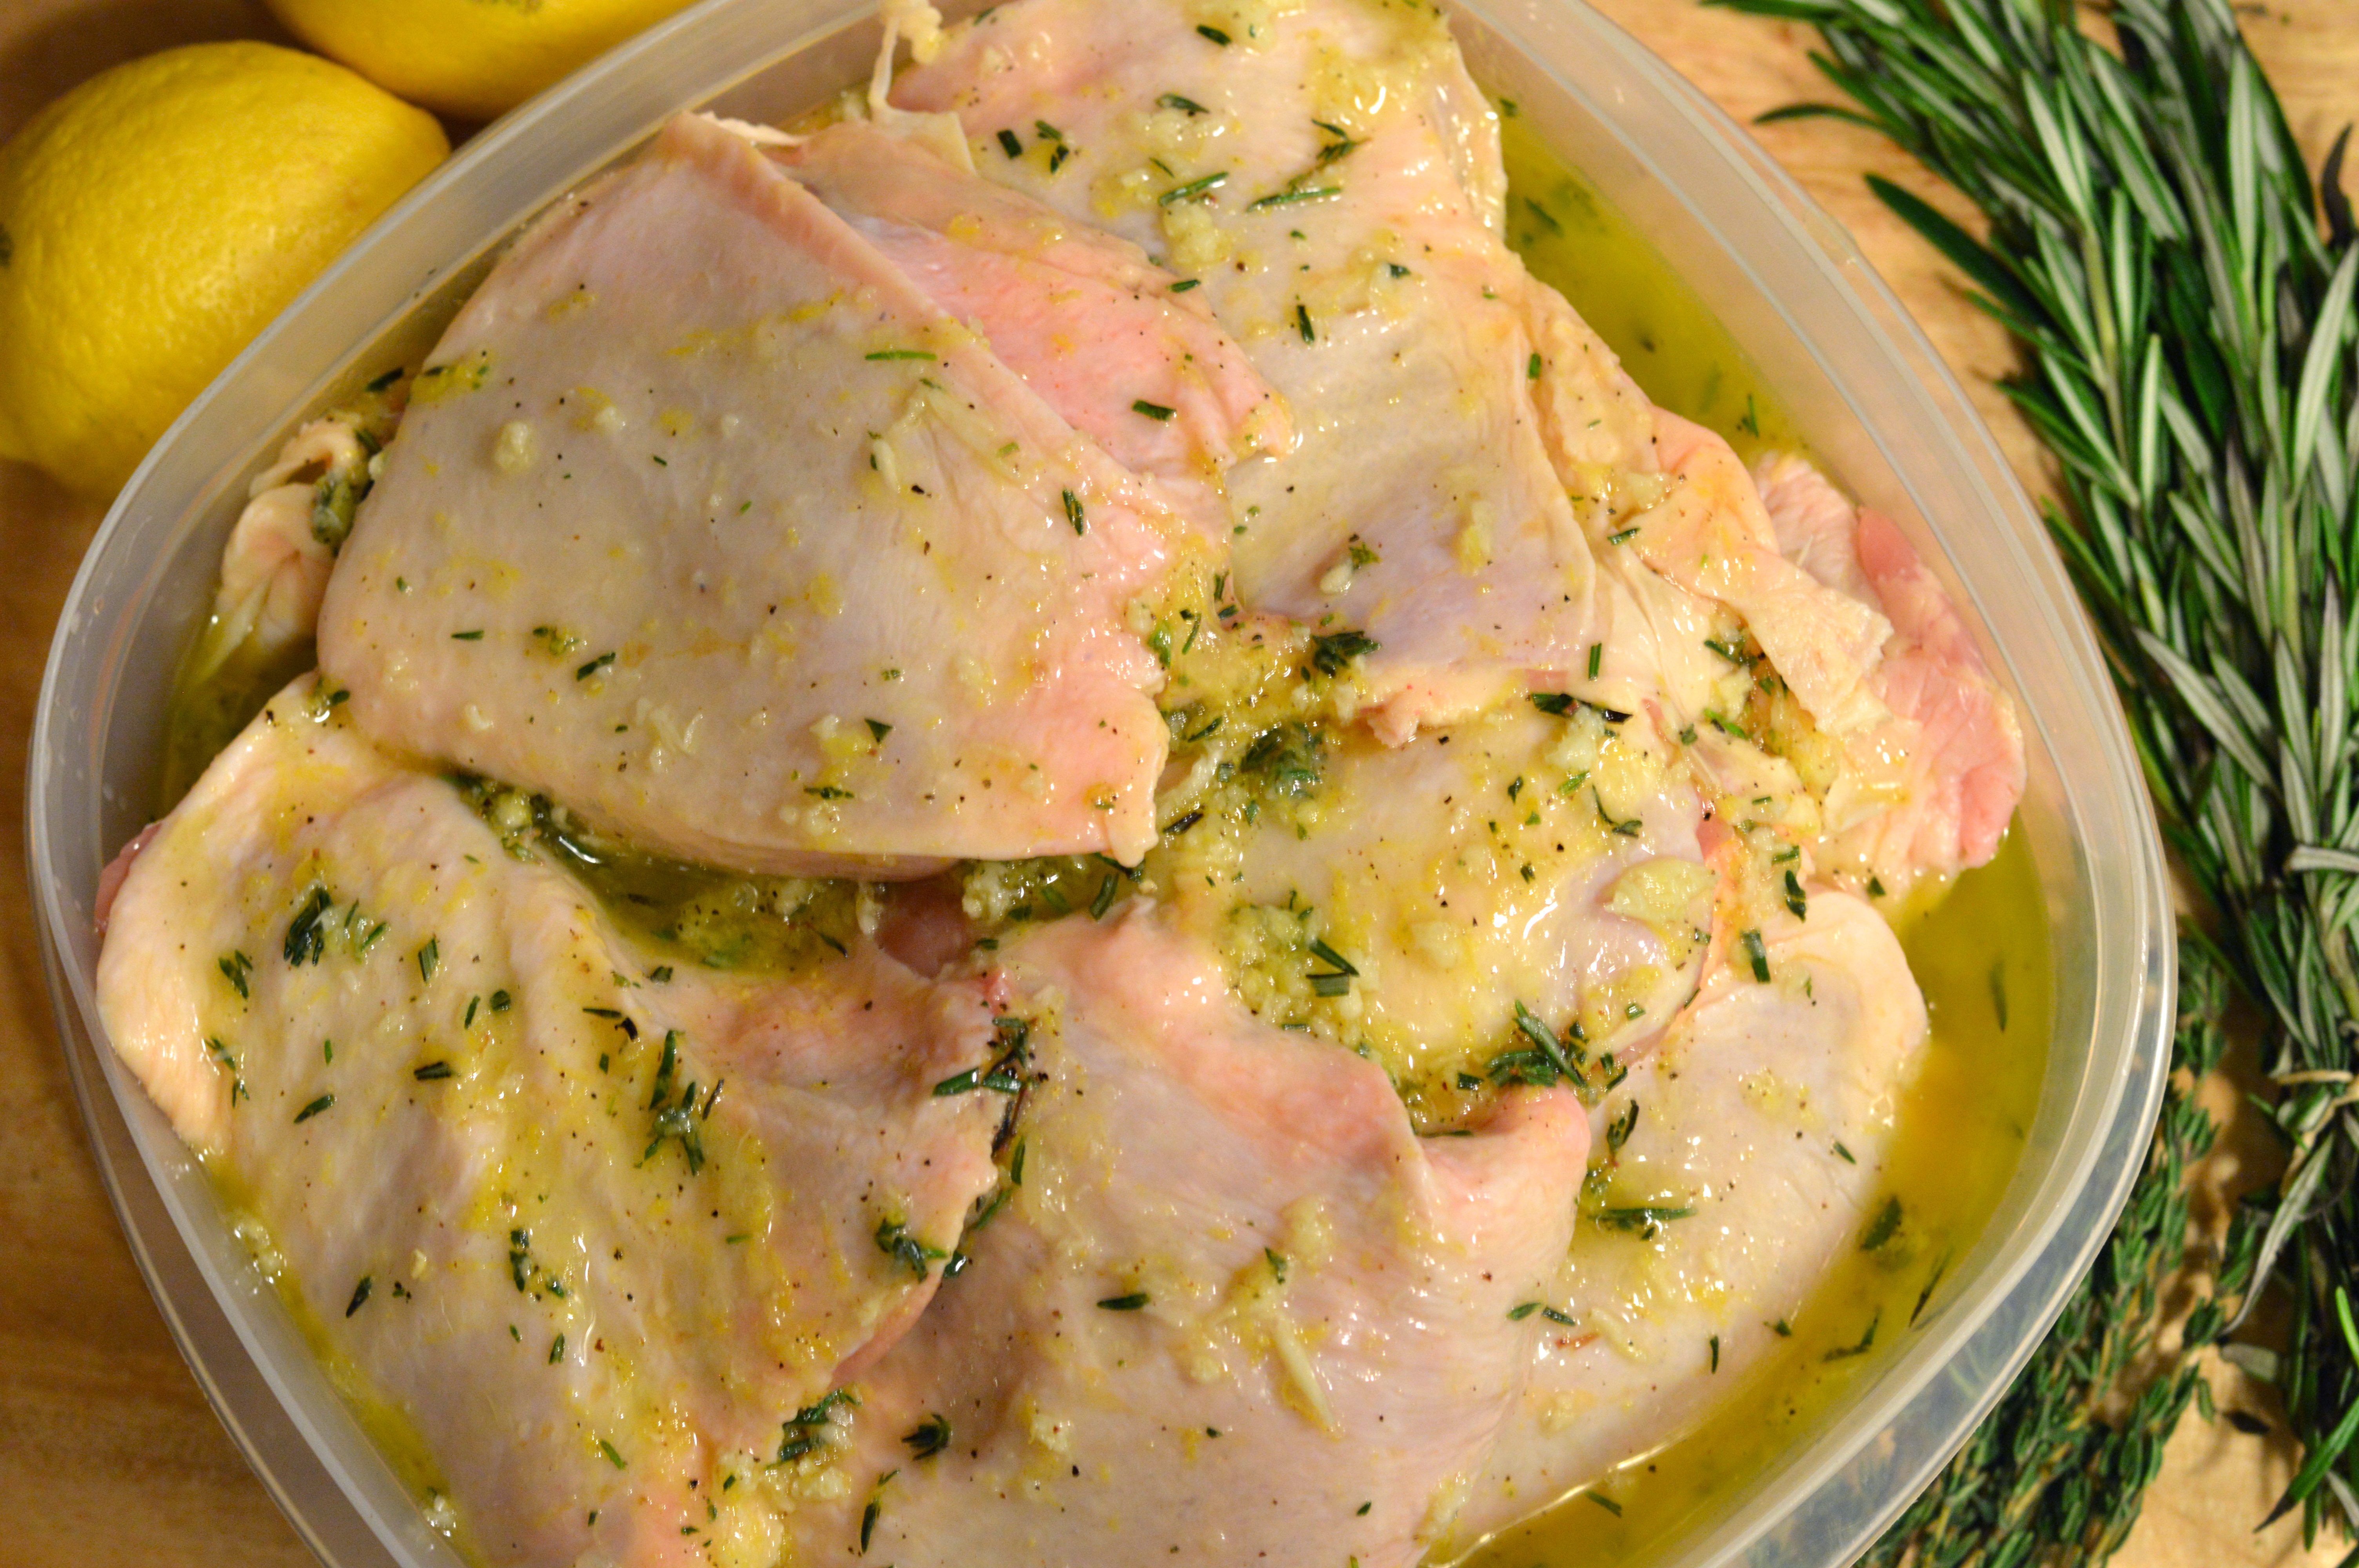
Wash and dry chicken thighs and place in a shallow dish. Combine all remaining ingredients, mix well, and pour over the chicken thighs. Turn the pieces over and over until they’re all well coated in marinade. Press the chicken down into the dish so it’s as submerged as possible. Cover the dish with plastic wrap and refrigerate for 4-8 hours, turning the chicken a few times so it’s all well coated.

Once marinated, prepare your grill. A gas grill should be on low heat, or a charcoal grill should be prepared so one side has fewer coals than the other. Place the chicken on the cooler side of the grill, skin side up, and cook for 10 to 12 minutes, until the underside is golden brown. Resist the urge to pour the marinade over the chicken. Turn each piece over once, cooking for another 10 to 12 minutes, or until the skin is golden brown and the chicken is cooked through. Remove from the grill and let rest, covered with foil, for 5 minutes before serving.

*cook’s note:
You can definitely increase (or decrease) this recipe to accommodate the number of guests you’re cooking for. I’d recommend one to two pieces per person, depending on the size of your thighs, what else you’re serving, and how hungry you think your guests might be.

braised chicken thighs with creamy greens and beans

So, as much as everyone in New York is trying to convince themselves otherwise, it’s still winter… UGH.

braised chicken thighs with creamy greens and beans | Brooklyn Homemaker

It’s a strange thing to be able to literally smell spring around the corner, but to have it still remain painfully out of reach. After this long hard winter, people want to bust out the short shorts and tank tops the minute the sun comes out and temperatures rise above freezing. Unfortunately, mother nature has other plans for us poor ol’ city folk. One day birds are chirping, the sun is shining, and temperatures are soaring (SOARING!!!) into low sixties, but it’s just lady nature messing with our heads, and the next day the wind is reaching gail force and the temperatures barely reach the high teens. One day I’m dreaming of barbecues and watermelon margaritas, and the next day the heat’s cranking and I’m back in front of the stove trying to trick myself with citrus, garlic and greens.

braised chicken thighs with creamy greens and beans | Brooklyn Homemaker

Hopefully I’ll be out in the garden planting annuals and watching the crocus’ bloom very soon, but for now I’m back in the kitchen braising chicken thighs again. This recipe is kind of similar to the last braised chicken recipe I posted, but with some pretty major changes. I guess I’m a creature of habit. What can I say? I used chicken thighs again because, like I said before, they’re a great way to make a meal taste like it cooked all day when it really took about an hour and a half. I also used thyme, lemon, and white wine again, because, well… because those flavors are killer together with braised chicken thighs. Deal with it.
After that though, things went in a very different, very delicious direction.

braised chicken thighs with creamy greens and beans | Brooklyn Homemaker  braised chicken thighs with creamy greens and beans | Brooklyn Homemaker

The sauce for this is so rich and creamy and garlicy and wonderful. After the chicken gets all cozy and relaxed in the oven, it comes out and rests a bit while the sauce reduces and some fresh greens and white beans go in to soak up all that deliciousness. I chose to make this with red chard, but if you’d prefer spinach or something similar, knock yourself out. If you’d like to try this with kale or another braising green, I’d suggest cooking the greens for an extra five or ten minutes, and waiting to add the beans until the greens are almost fully cooked. I think the chard was the perfect choice though, and it adds a bit of bitterness and bite while still being fresh and green and tender. The beans add a bit of texture and interest, along with just enough starch to make this feel like a complete meal.

braised chicken thighs with creamy greens and beans | Brooklyn Homemaker

This dish came out better than I ever imagined. Like sooooooooo good. First of all, thyme and chicken are amazing together. Definitely one of my favorite combinations. Then when you add white wine, cream, and garlic, and just let it all get happy together in the oven… Heaven. The chicken is perfectly rich and falling off the bone, and the tender wilted greens and soft starchy beans make this meal one perfect wonderful dish. After one bite Russell was planning dinner parties and deciding which of our friends should have the privilege of tasting this. If it wasn’t amazing enough already, on top of everything this meal is also really simple to make and is all made in the same pot! I mean. Can it get any better? Actually, yes it can. With a glass of white wine and a big thick slice of nice crusty bread to sop up the sauce. You’re welcome.

braised chicken thighs with creamy greens and beans | Brooklyn Homemaker

Braised Chicken Thighs with Creamy Greens and Beans

  • Servings: 4-8 (depending on the size of your chicken thighs)
  • Print

8 chicken thighs (skin-on & bone-in)
salt and pepper for seasoning
3 tablespoons flour
2 tablespoons olive oil
2 shallots, chopped
7 or 8 garlic cloves, peeled
1 cup dry white wine
2 cups chicken stock
1 cup heavy cream
zest of 1 lemon (peeled in strips with a vegetable peeler, avoiding the white pith)
6 or 7 fresh thyme sprigs
1 (28 oz) can cannellini beans
1 or 2 bunches of swiss chard, washed and torn into bite sized shreds *see note

Preheat your oven to 375.
Season your chicken thighs with salt and pepper and dust with flour, on both sides. Heat olive oil in a dutch oven or braising pan (not raw cast iron) and add chicken skin side down. Brown for 5 to 8 minutes on each side. Remove the chicken to a plate, leaving the remaining oil. Saute the shallots and garlic for 5 minutes until the shallots are tender and translucent. Add the wine and thyme, turn the heat up to high, and boil until reduced by half, about 5 minutes. Stir frequently with a wooden spoon or silicone spatula, scraping the bottom of the pan to loosen up any browned bits. Add the lemon, stock, and cream to the pan, bring back to a boil, and add the chicken skin side up.  Transfer the pan, uncovered, to the oven to braise for 45 minutes or until meat is fork tender.

Remove the pan from the oven, transfer the chicken to a plate, and tent with foil. Move the pan back to the stovetop and boil over high heat until the sauce is slightly reduced, for about 10 minutes. Remove and discard the thyme and lemon zest. Add the chard and beans, and cook on high for 5 minutes more, or until the greens are completely wilted. Adjust seasoning with salt and pepper if necessary, and serve the chicken over a bed of the beans and greens.

*cook’s note- if you have large chicken thighs or want to serve a lot of greens use 2 bunches, otherwise one is fine. It cooks down A LOT, so 2 bunches will be perfect if you’re serving more than 4 people, or if you really like chard!

braised chicken thighs with white wine, lemon, & capers

I may or may not have already said this, but this weather is starting to get me a little down. It’s hard to maintain a happy attitude and healthy energy level when it’s always cold and windy and slushy and wet and disgusting outside.

braised chicken thighs with white wine, lemon, & capers | Brooklyn Homemaker

I also may or may not have already said this, but I’ve totally been craving citrus like crazy lately. I normally like to at least attempt to eat seasonally, eating tomatoes at the end of the summer, apples in the fall, and asparagus in the spring, and generally avoiding the stuff shipped in from Peru for the rest of the year. I am certainly not fanatical about it, but most produce honestly just tastes better when it’s fresh and local instead of traveling from across the country or across the world. At this point in winter though, all those good intentions go straight out the window. When I can smell spring coming around the corner I can’t take it anymore and want nothing more than fresh bright summery foods, especially the tropical-ish flavors of citrus. So, you’ll have to forgive me (or maybe thank me) for doing another citrus recipe, this one with lemon, after just doing a soup with a healthy dose of lime.

braised chicken thighs with white wine, lemon, & capers | Brooklyn Homemaker

We recently got the unfortunate news that one of our close friends is moving away to London, so we wanted to have her for dinner to say farewell. I knew I wanted to make something really special, so I thought a rich hearty braised chicken dish was just the ticket. Although I totally love spending my day off braising a roast or stew, sometimes you just need something to come together a little faster. Chicken thighs are a really great way to make it seem like you slaved over a hot stove for half the day, when in reality you threw it together in just over an hour. Chicken thighs are also really inexpensive, packed with amazing flavor, and almost always come out juicy and tender.  This meal browns for about 15 minutes on the stove and then spends another 45 minutes in the oven. Including prep time, the whole shebang can be on your plate and in your mouth in 90 minutes or less.

Another little trick to make a meal feel like it cooked all day is to use really bold flavors. I thought the combination of fresh thyme, whole cloves of garlic, and salty capers would be perfect here. To cut the briney saltiness of the capers and the fattiness of the chicken, a healthy dose of crisp white wine and the zest of a whole lemon help make this dish taste really special. I think that the bright citrus-y notes of Sauvignon Blanc work really well, but you can use whatever  you like to drink or whatever you already have in the house.

braised chicken thighs with white wine, lemon, & capers | Brooklyn Homemaker braised chicken thighs with white wine, lemon, & capers | Brooklyn Homemaker braised chicken thighs with white wine, lemon, & capers | Brooklyn Homemaker

I adapted this recipe from one I found in Food & Wine, and while the recipe was amazing and I made only a few small changes, there was something about it that I found a bit strange. The original recipe said to use a large cast iron skillet to cook the entire meal. While the size and shape of a large skillet would lend well to this dish, I would never recommend slow cooking acidic meals in seasoned cast iron. Since this only cooks for an hour it’s not the end of the world, but acidic ingredients like wine and lemon can eat away at the seasoning in cast iron, which can not only negatively affect the function of your pan, but can also give your meal a slight metallic taste. The best option for this dish would be a large enameled skillet or enameled dutch oven without the lid. If you don’t have enameled cookware, you can also use a high-walled heavy stainless steel skillet, or any non-reactive, oven-safe and stovetop-safe pan that’s large enough.

Whatever you choose to cook this dish, you’ll be so glad that you made it. It has such a wonderfully rich and robust flavor. The wine adds a subtle sweetness and, along with the lemon, a bright fruitiness. The garlic, capers, and thyme add an earthy richness and a depth that tastes like it took several hours to build. After only an hour of cooking, the chicken thighs are tender, moist, and practically slide off the bone. Is your mouth watering yet?

braised chicken thighs with white wine, lemon, & capers | Brooklyn Homemaker

Depending on how many you’re feeding and the size of your chicken pieces, you can use between 4 and 8 thighs. Larger thighs should be plenty for one person, but if your thighs are small you might want to serve two pieces per person. Either way, the remaining ingredients can be left in the same amounts. You’ll just have a little extra sauce if you make fewer pieces. The sauce is amazing, so I promise it won’t go to waste. You can serve this with whatever you like, but I thought it paired perfectly with Basmati rice and roasted broccoli, with a little slice of fresh lemon and a glass (or bottle) of white wine. I just tossed the broccoli with olive oil, lemon, and salt and pepper, and roasted it on a parchment lined sheet pan at the same time that the chicken braised.

braised chicken thighs with white wine, lemon, & capers | Brooklyn Homemaker

Braised Chicken Thighs with White Wine, Lemon, & Capers

  • Servings: 4+ depending on size and number of thighs
  • Print
adapted from Food & Wine

4-8 bone-in chicken thighs with skin (depending on how many you’re feeding)
Salt and pepper to taste
3-4 tablespoons flour
2 tablespoons unsalted butter
6 or 7 peeled garlic cloves
1 1/2 cups dry white wine (I used Sauvignon Blanc)
1 1/2 cups chicken stock, preferably homemade
1 lemon
5-6 sprigs of fresh thyme
1 tablespoon capers, drained
1 bay leaf

Preheat the oven to 375°. Season the chicken with salt and pepper and dust with flour. In a large dutch oven or ovenproof skillet (not raw cast iron), melt the butter. Add the chicken, skin side down first, and cook over high heat until browned, turning over once, for a total of 12 to 14 minutes. Transfer the chicken to a plate, add the garlic cloves and cook over low heat until softened, about 5 minutes.  Add the wine and thyme, turn heat up to high, and boil until reduced by half, about 5 minutes.  Peel the zest (avoiding the white pith) of the lemon using a vegetable peeler. Try to pull the largest strips possible. Add the lemon zest, stock, capers and bay leaf and bring back up to a boil. Return the chicken to the pan, skin side up. Transfer the pan, uncovered, to the oven and braise for 45 minutes, or until the meat is fork tender.
Remove the pan from the oven, transfer the chicken to a plate, and tent with foil. Transfer the pan to the stovetop and boil over high heat until the sauce is slightly reduced, about 5 minutes. Discard the thyme, bay leaf and lemon zest, and spoon the sauce over the chicken to serve.

Mixed Green Salad with Seared Chicken & Orange Vinaigrette

After the red velvet cake post last week I thought I should attempt to share something healthy-ish. You know, something that doesn’t call for 2 cups of oil and multiple sticks of butter. If you based any ideas of what my diet might look like on my blog posts, you’d probably think 75% of what I ate was cake. Well. I really like cake. What can I say? No, really though, I promise I eat real food sometimes too.

mixed green salad with pears, snap peas, seared chicken & orange vinaigrette | Brooklyn Homemaker

If I’ve had a busy day at work, or have very little time to get dinner together, I think a nice big salad with a bunch of stuff it is a really good way to go. You can buy pre-washed greens, and even bottled dressing if you like. Then just cook off some protein, usually steak or chicken in my house, while you prepare all your veggies. Now, I’m really not into the idea of eating a salad, or any meal for that matter, just because it’s healthy. I could definitely stand to lose a few pounds, but I think as long as I eat fresh homemade food, and balance the sweets with plenty of vegetables, I’ll be just fine. I don’t want to go to all the trouble of making a something if it doesn’t taste like anything. I like my food to be full flavor, so when it comes to salads I tend to go all out and load them up with all kinds of good things.

mixed green salad with pears, snap peas, seared chicken & orange vinaigrette | Brooklyn Homemaker

A hearty filling salad can be really easy to make with a wide variety of vegetables, and I usually like to throw in some fruit for sweetness. I generally like to do a few laps through the produce department and see if anything calls out to me. For this salad, I really had no preconceived ideas of what I wanted when I walked into the grocery store, but before I knew it I had something taking shape. I grabbed some chicken breast, a beautiful red bell pepper, a half pound of sugar snap peas, and some nice ripe bosc pears and I was almost finished. I thought a light citrusy dressing would tie everything together so I picked up a big naval orange, and I figured the salad could use something rich with a little crunch so I grabbed a shallot to fry up. All that was left was some organic spring mix and I was good to go.

If I’m eating a salad as my dinner I like it to have a lot going on to make it feel like a substantial meal.  I try to follow a very loose formula of a few different veggies or fruit mixed into some greens with a protein. I usually like to add some richness to my salads with something just a bit fatty and salty. This can be some crispy bacon bits or chewy lardons, a bit of crumbled or shredded cheese, a handful of toasted nuts or seeds, or even just a creamy dressing. A little bit of fat goes a long way to make a salad feel more filling and complete. For this salad I decided some fried shallots would serve my needs just fine.

mixed green salad with pears, snap peas, seared chicken & orange vinaigrette | Brooklyn Homemaker

When I got home I washed all my produce and set to work. I made up a sweet & slightly spicy vinaigrette with the zest and juice from my orange and a tiny bit of cayenne pepper. Then I sliced my pepper and pear into thin strips and cut the stem ends off of my snap peas. I thought a carrot would be a welcome addition and I had plenty at home so I decided to go for it. Grated carrots are great in salads, but I love to have super long, super thin strips of carrots. A few months ago I picked up a julienne peeler and now it’s seriously my new favorite kitchen tool. The one I use is made by Kuhn Rikon and is available here. It makes light easy work of cutting carrots into long, thin, even strips. This can be done on a mandolin cutter, but sometimes carrots and other harder vegetables can be tough to get through the teeth and blade on a mandolin with your fingers in tact. If you have the skills to pay the bills, you can also do this with a knife, but I think it’s much faster and easier with the julienne peeler.

mixed green salad with pears, snap peas, seared chicken & orange vinaigrette | Brooklyn Homemaker

After I had my veggies ready to go I set to work pan frying my shallot. I sliced it into very thin discs, separated those with my fingers and dredged them in generously seasoned flour. Then, in a cast iron skillet, I fried them in a few tablespoons of olive oil until they were nice and brown and crunchy. I’m sure that thinly sliced shallots would be great in the salad raw, or you could skip them all together, but fried they add just a touch of saltiness and caramelized crunchiness to an otherwise super light meal. When they were done I transferred them to a paper towel lined plate, and in the same skillet I seared my chicken breasts until well browned and cooked through.

When searing your chicken, or searing anything for that matter, it’s best not to use a non-stick pan. Non-stick pans are not designed to withstand long periods of high heat, no matter what material they’re made of. Teflon, nano-ceramic, it don’t matter. If you want a good pan you can sear in I’d recommend a cast iron skillet or a stainless steel saute pan. Of course, you’ll need to use a bit more butter or oil to cook in these pans, but you can get them screaming hot and not worry about negatively affecting the utility.

Many people tell me they’re intimidated by having to care for and maintain a cast iron skillet, but I promise you it’s not difficult. Most cast iron skillets sold today come pre-seasoned and ready to use, and maintaining the seasoning is pretty simple. There is tons of information on the internet about cast iron care, and it becomes second nature once you get the hang of it.

mixed green salad with pears, snap peas, seared chicken & orange vinaigrette | Brooklyn Homemaker

It would be really easy to change this salad to fit your taste by swapping some ingredients out for others. I think it was pretty damned tasty as is though. While fresh, light and healthy, this salad was totally satisfying. Along with the bitterness of the mixed greens, you have a few layers of flavor all tossed together and complimenting each other. There’s sweetness from pepper, peas, carrots & pears. Then there’s the sweet and tangy spice of the vinaigrette, the rich salty crunch of the shallots, and the hearty meatiness of the sliced chicken breast. While this salad might not be something you can throw together in 5 minutes- it is something that can easily be assembled and ready to eat in well under an hour, and I think it makes a great weeknight supper.

mixed green salad with pears, snap peas, seared chicken & orange vinaigrette | Brooklyn Homemaker

Mixed Green Salad with Pears, Snap Peas, Seared Chicken & Orange Vinaigrette


1/4 cup extra virgin olive oil, plus 3 tablespoons divided
2 teaspoon cider vinegar
1 teaspoon honey
1 clove garlic
1 large orange
1/8 teaspoon ground cayenne pepper (optional)
salt and pepper
1 shallot
2 tablespoons of flour
4 small skinless boneless chicken breasts
1/2 lb sugar snap peas
1 red bell pepper
1 ripe bosc pear
1 large carrot
5 oz package spring mix

To make the vinaigrette measure out 1/4 cup olive oil, vinegar & honey into a small bowl. Finely zest orange and grate garlic (you can use your zester) and add to bowl. Juice the orange into the bowl, add cayenne pepper and whisk together. Taste and season with salt and pepper. Taste again.

Heat 3 tablespoons olive oil in a heavy cast iron or stainless steel pan over medium high heat. Slice shallot into thin disks and separate rings with your fingers. In a small tupperware with a lid (or ziploc bag) season flour with salt and pepper. Add shallots and shake until well coated. Distribute shallots over pan evenly and, stirring every so often, fry them until they’re brown and crunchy but not burnt. Remove with a spoon and drain on a paper towel lined plate.

Turn the pan up to high and get it super hot. The remaining oil will smoke a bit. Season both sides of chicken breasts with salt and pepper, and add to pan. Cook on high for 5-7 minutes per side, or until fully cooked and nicely browned. Remove from pan and let rest for 5 minutes before slicing into thin strips.

While chicken is cooking, remove stem ends from snap peas, and slice bell pepper into thin strips. Cut the ends off your pear, slice in half, and scoop out center and seeds with a spoon. Slice into thin strips. Using a julienne peeler, mandolin, knife or grater, cut carrot into very thin long strips. In a large bowl add spring mix, peas, pepper, pear & carrots, and toss well with vinaigrette. Divide between plates and top with fried shallots and sliced chicken breast.