seasonal

herb and cheddar corn pudding

OMG you guys. It’s November! Do you know what that means?

herb and cheddar corn pudding | Brooklyn Homemaker

Thanksgiving is almost here!!!!

Well, less than a month anyway. I guess you could say that’s “almost” right?
I’m gonna go with yes, and I’m gonna get excited about it.

herb and cheddar corn pudding | Brooklyn Homemaker

If you’ve been following me for a while you probably know that I take Thanksgiving very seriously. I have big recipe plans this year, and I’m so excited to get to share them with you. I’ve been thinking and planning and prepping and testing since early this summer, and for the next few weeks I’ll be sharing all the fruits of my labor. So much labor.

This will be my third Thanksgiving with Brooklyn Homemaker, and this time around I finally realized that I needed to get the ball rolling early if I was going to be able to share my whole meal plan with you guys. So, you’re welcome.

herb and cheddar corn pudding | Brooklyn Homemaker

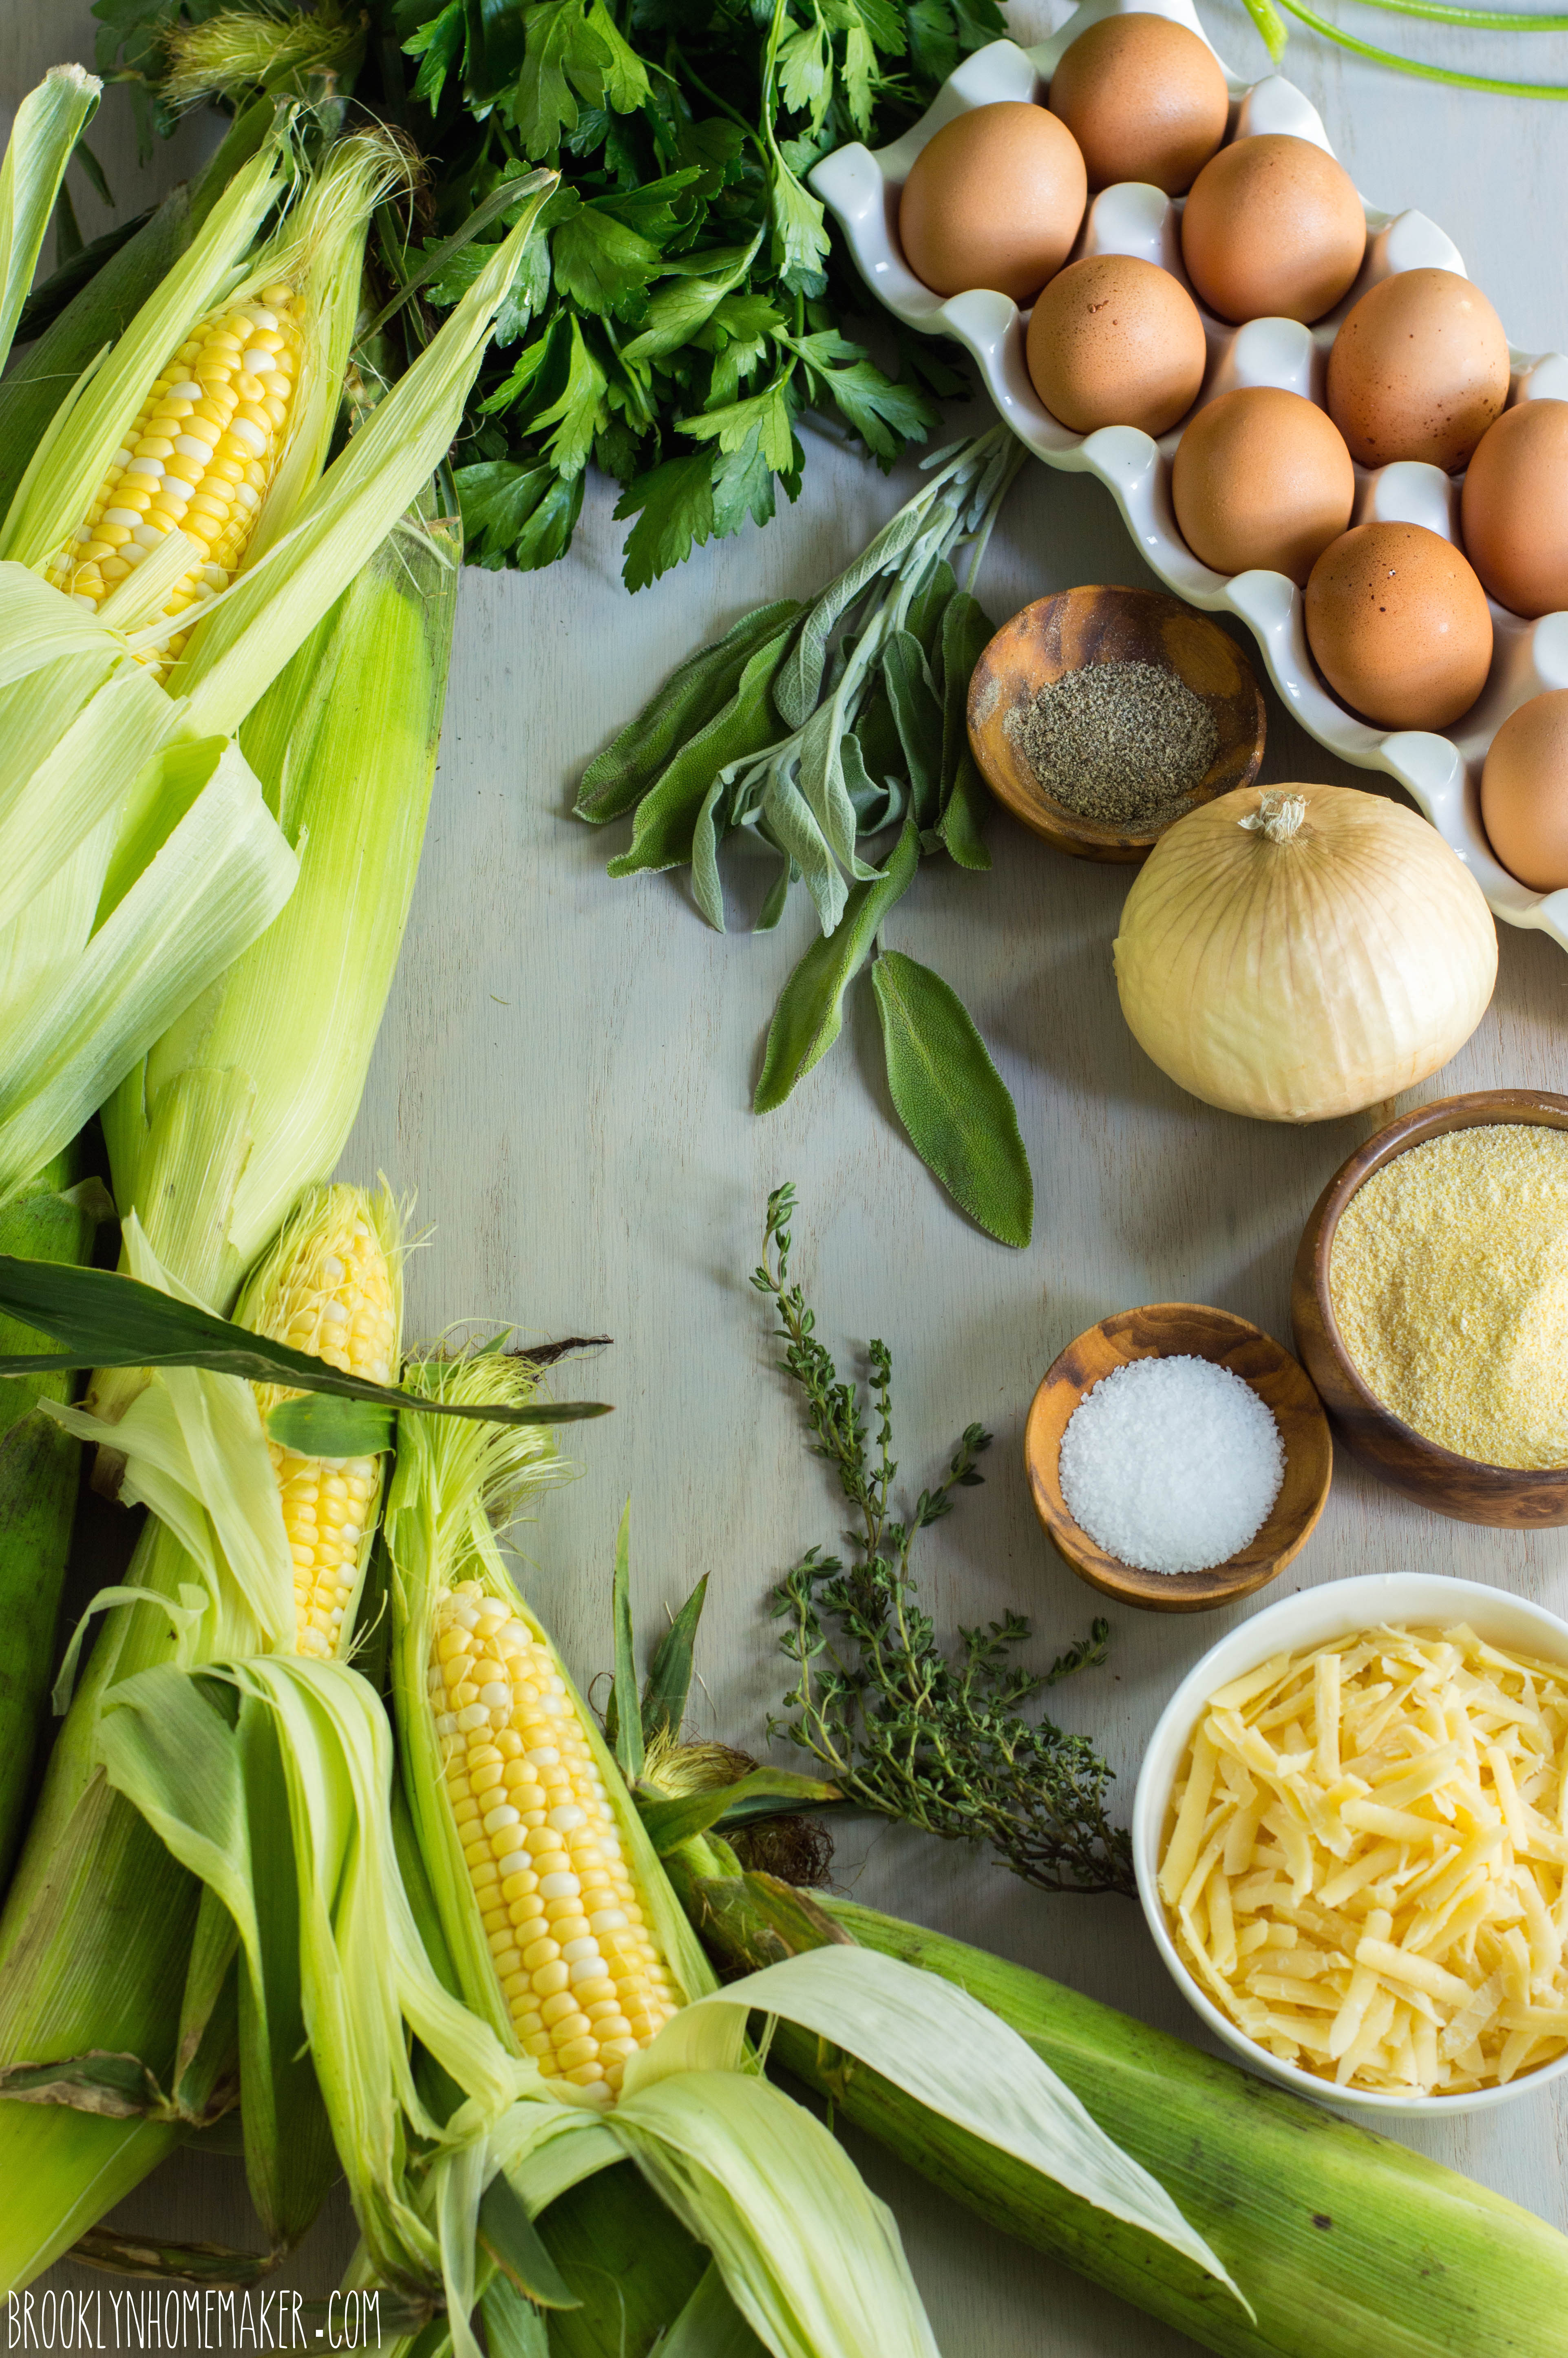
Now, when I was testing out (and photographing) this particular recipe, it was basically the height of corn season here in New York so the corn I used was bright and crisp and fresh from the green market.

In many parts of the country fresh sweet corn is still available at Thanksgiving, so if you can find it, great, use that. I realize however, that it may be difficult for many of you to find it this time of year. Fear not my friends, frozen corn will work totally fine.

My only advice is that you should skip the cheap-o bag of grocery store brand corn, and go for the good stuff. The sweet crunchy kernels are the stars of the show here, so you want to try to get the freshest, crunchiest frozen corn you can find. I love frozen corn and always have a bag (or two) of it in the freezer, but not all frozen corn is created equal. The cheap stuff can sometimes have a bland boring flavor and is often mealy and mushy, so using crumby corn in this recipe will most likely result in a crumby corn pudding.

herb and cheddar corn pudding | Brooklyn Homemaker

Corn pudding isn’t super traditional in every region of the U.S., and I’d actually never even tasted it until making it myself this year. In the South however, it’s totally synonomous with Thanksgiving, and from what I’ve heard it’s served at most large family gatherings and celebrations. In the North, and on the West coast, many people haven’t even heard of it and have no clue what it is. When I told Russell I was thinking of giving it a try this Thanksgiving he had no clue what I was talking about and wasn’t really sold on the idea when I tried to explain it.

herb and cheddar corn pudding | Brooklyn Homemaker

While I may not have grown up eating corn pudding, but I did grow up eating lots of corn. Sweet corn is a kind of a big deal in New York State, and I was raised with a deep love and respect for fresh corn.

When I was young we used to spend a lot of time at my grandparent’s house. Grandma always served corn (although she was fond of canned corn over fresh) and mashed potatoes with almost every meal. My sister and I used to make the craziest concoction with our corn and potatoes. We were kids, and had wild imaginations and strange pallets, and we would take a big scoop of potatoes, make a little well in the center that we’d fill with corn, and then we’d top the whole thing with applesauce. We called it a volcano. I don’t know where we got the initial idea to do this, but it was a nightly ritual at grandma’s dinner table. These days it sounds pretty gross to me, but when I was young it was a delicacy. As weird as it sounds now, I guess it’s pretty cool that my family let me do weird things with food so I would grow up with an adventurous culinary spirit.

herb and cheddar corn pudding | Brooklyn Homemaker

Given my deep seated love of sweet corn, I’ve been lusting after this recipe for years. I can’t remember where I first saw it, maybe Pinterest, or maybe Food Network; but either way I’ve wanted to try it ever since. For the past two or three years I’ve wanted to make it for my Thanksgiving buffet but just never got around to it. Until now.

I don’t know how traditional this recipe is. I adapted it from Ina Garten, a woman who’s decidedly un-Southern but entirely capable in the kitchen. She may not be an authority on Southern home cooking, but she’s one of my greatest culinary idols so I figured her recipe had to be worth a shot.

herb and cheddar corn pudding | Brooklyn Homemaker

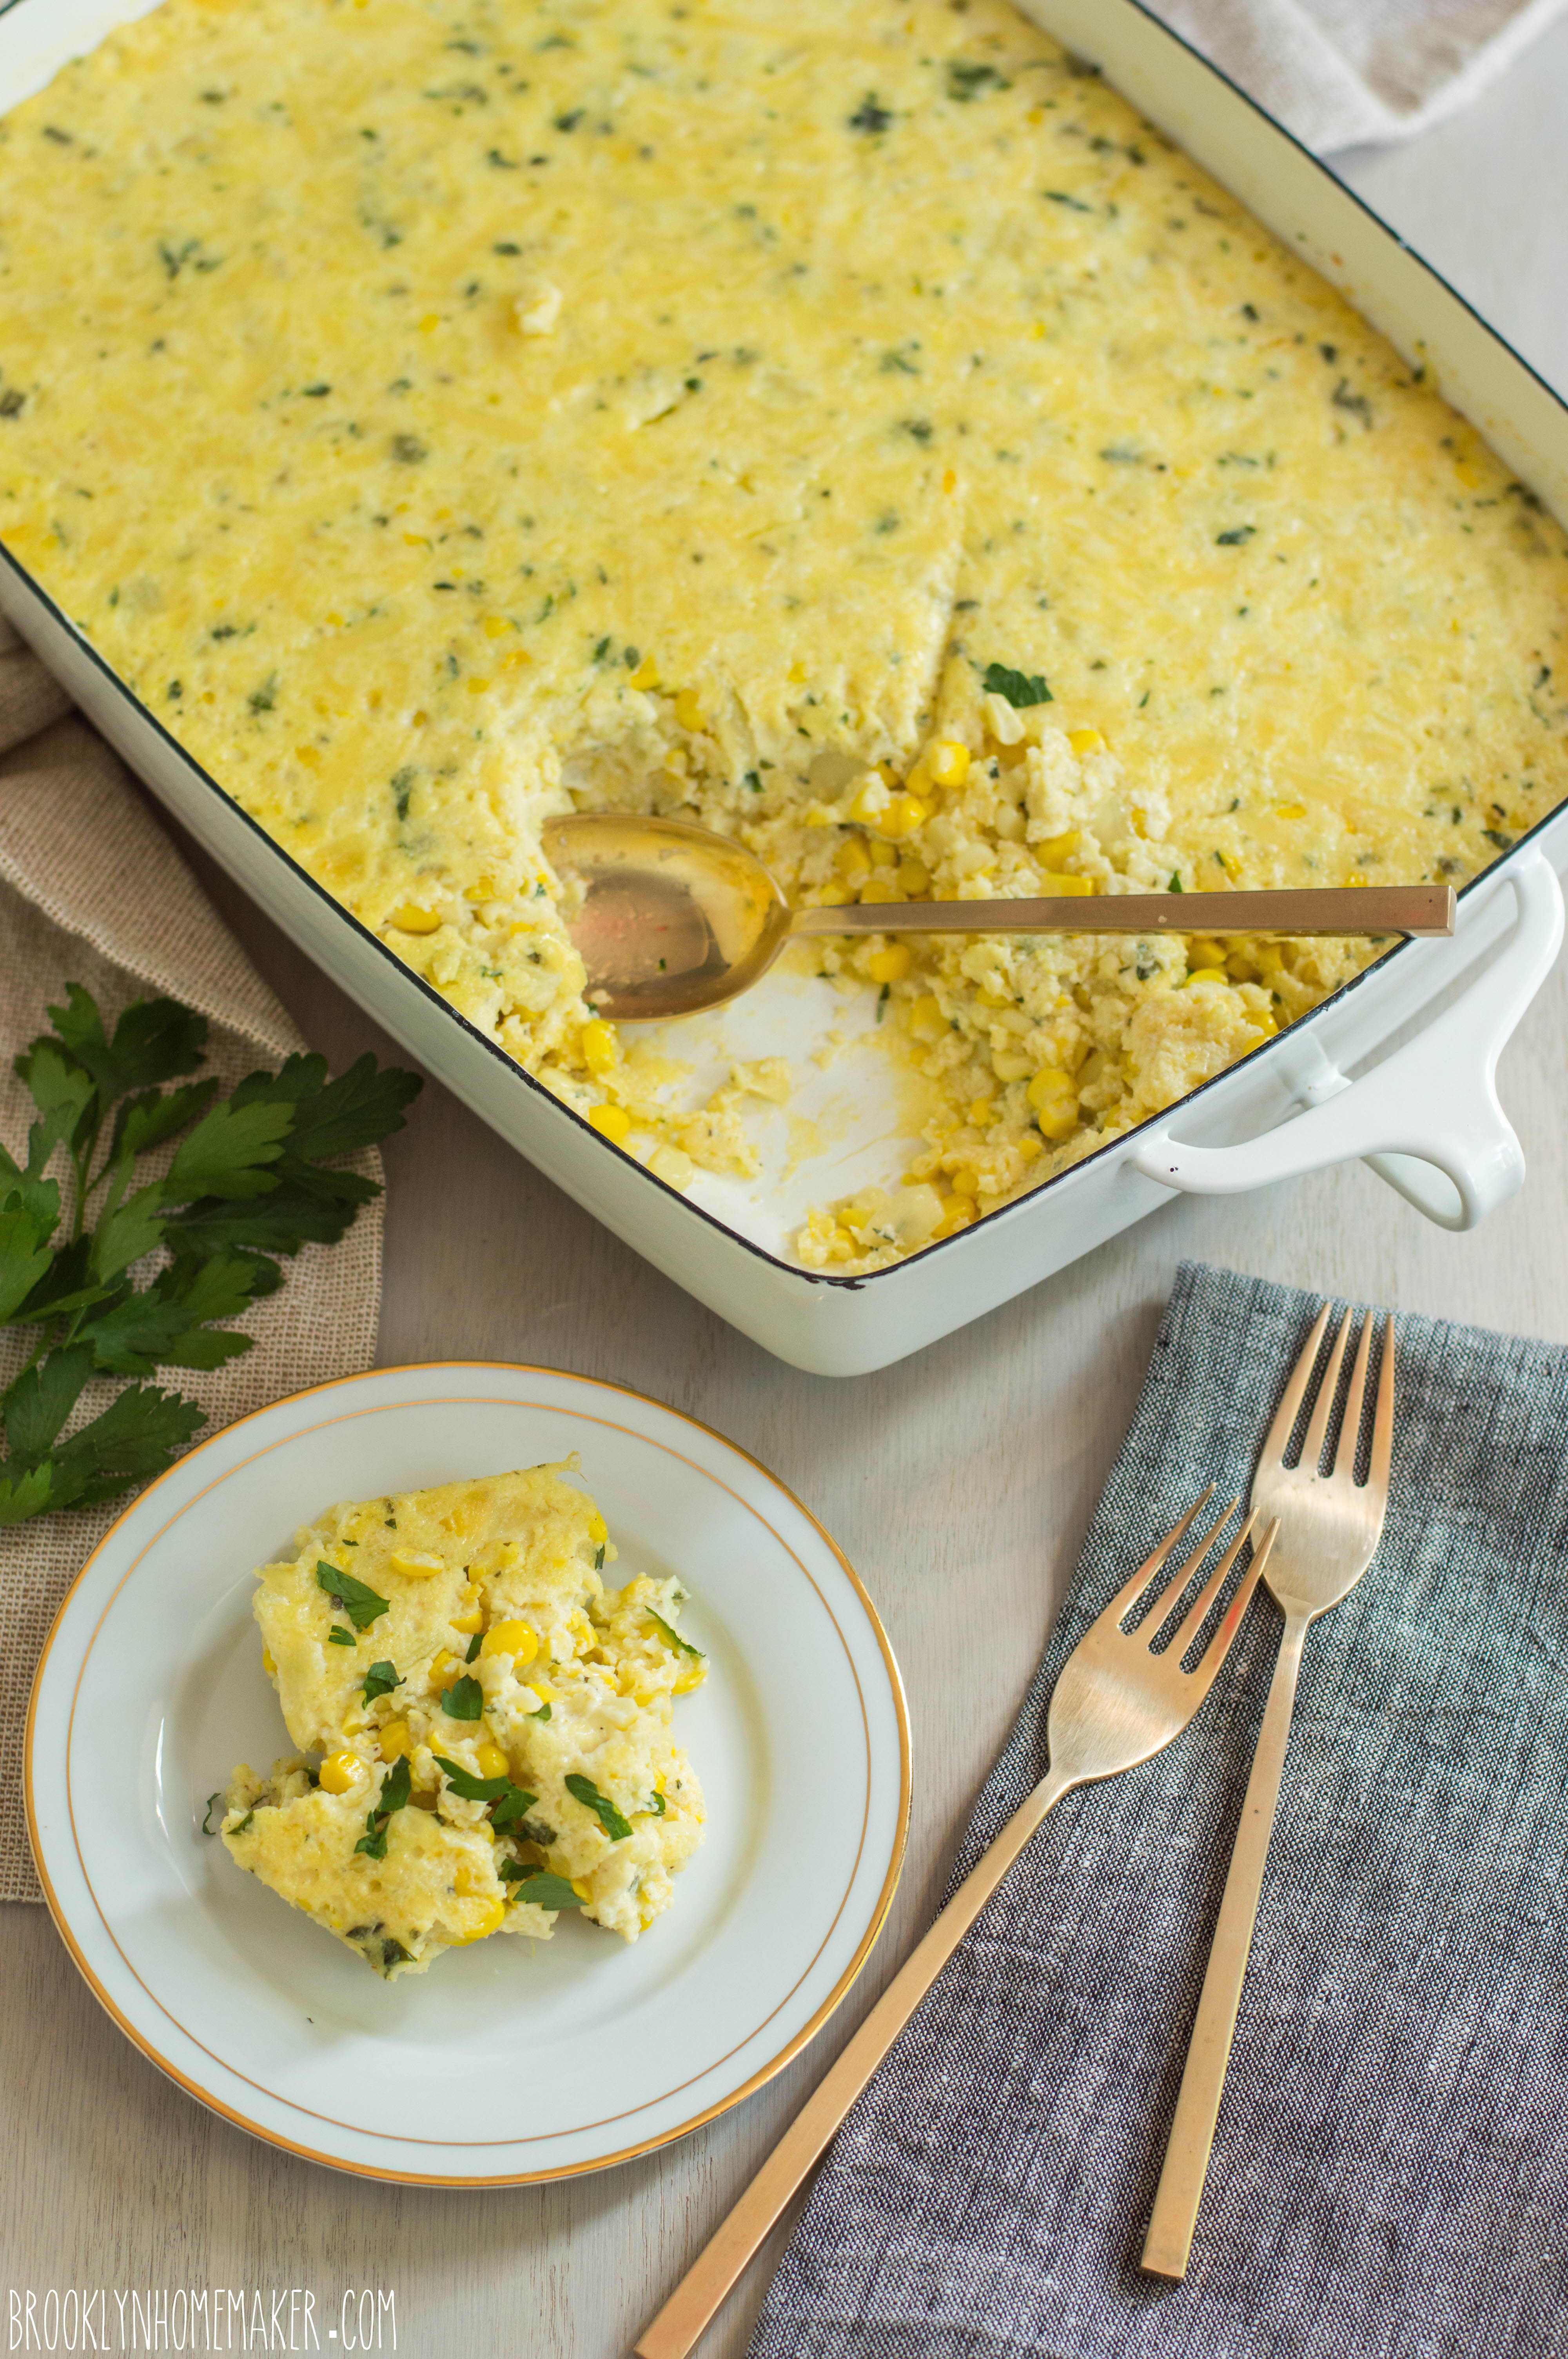
This corn pudding has a soft, tender, fluffy, almost soufflé like texture, studded with crunchy bursting little golden kernels of sweet corn. Beyond being slightly sweet from the corn and rich with cream, butter, and eggs; it’s also packed with flavor from the fresh green herbs and sharp nutty cheddar cheese. The flavor and texture is sort of similar to spoon bread (another Southern classic) or maybe something like a cross between cornbread and a soufflé. It’s super rich and decadent, so you probably won’t really want huge servings, especially when served along with an already heavy and bountiful meal like Thanksgiving dinner. Because the serving size is small, this recipe makes enough to feed a crowd.

My one word of warning is be careful not to overcook it. It should be tender and light and delicate and it can lose those qualities and become hard and rubbery if it’s overcooked. So, resist the urge to try to get a brown golden crust on the top. A little browning is fine, but you don’t want it crispy looking.

herb and cheddar corn pudding | Brooklyn Homemaker

Herb and Cheddar Corn Pudding

Adapted from Ina Garten for Food Network

6 tablespoons unsalted butter
1 cup chopped yellow onion (1 medium onion)
5 cups fresh or frozen sweet corn kernels (about 6 or 7 ears of fresh corn)
3 tablespoons chopped fresh parsley
2 teaspoons finely chopped fresh sage
2 teaspoons finely chopped fresh thyme leaves
5 large eggs
1 1/2 cups milk
1/2 cup heavy cream
1 cup yellow cornmeal
1 cup ricotta cheese
1 tablespoon sugar
1 tablespoon kosher salt
1 teaspoon freshly ground black pepper
1 1/2 cups grated sharp aged cheddar, divided

Preheat the oven to 375 degrees F. Grease the inside of a 8×12 or 9×13 baking dish. Try to find a dish that will easily fit inside another, larger, pan. (a high sided sheet pan works well)

Melt the butter in a very large saute pan and saute the onion over medium-high heat for 2 to 3e minutes. Add corn and saute for 4 minutes more. Add parsley, sage, and thyme and toss to coat. If using fresh corn use the butt end of your knife to scrape the “milk” from the corn cobs and add to pan. Remove from heat and cool slightly.

Whisk the eggs, milk, and cream together in a large bowl. Slowly whisk in the cornmeal and ricotta, then the sugar, salt, and pepper. Add the cooked corn mixture and 1 cup of the grated cheddar, and then pour into the baking dish. Sprinkle the top with the remaining 1/2 cup of grated cheddar.

Place your baking dish in a larger pan and transfer to the center shelf of the oven. Use a measuring cup with a spout to fill the pan 1/2 way up the sides of the dish with hot tap water. Bake the pudding for 40 to 45 minutes until the top begins to brown and a knife inserted in the center comes out clean. Serve warm.

apple cider doughnut cake

You guys. Break out the streamers and balloons.

Brooklyn Homemaker turns two today!

apple cider doughnut cake with mascarpone icing & cider caramel sauce | Brooklyn Homemaker

It has been exactly two years since I started this whole adventure, and I gotta say that I’m really proud of myself and my humble little blog. I think a celebration is in order.

When Brooklyn Homemaker was born I had no idea how far I would come, or could come, or how much I’d learn, or grow, or how many friends I’d make, how many people’s lives I’d touch, or how many people’s lives would touch my own. Day by day, post by post, little by little; I’ve forged new relationships, met new people, tried new things, experimented with new recipes and ingredients, grown as a photographer and recipe developer, and slowly developed a dessert plate hoarding problem that’s beginning to concern my husband. I’ve also learned that while the blogging world is competitive place, it’s also a warm and welcoming place with a strong sense of community. It’s filled with genuinely lovely, charitable, supportive individuals who love to help each other out whenever and however they can.

Over the past two years I’ve also learned a lot about myself and what I want for and from Brooklyn Homemaker. I’ve learned to accept that what I like and what I don’t like is more important to me than what the blogging powers-that-be tell me is important. Lately I’m trying to take a quality over quantity approach when it comes to my posting schedule, and focus on what makes me happy rather than what I’m told will get me more re-pins and likes. I gotta be me. What else can I be?

apple cider doughnut cake with mascarpone icing and cider caramel sauce | Brooklyn Homemaker

When my first anniversary rolled around last year I decided to recreate the cake that started it all, the cake that launched 1,000 posts (well, 142 and counting), the incomparable Aunt Sassy cake. While this pistachio dream cake is seriously amazing, I couldn’t do it again because, well you know, been there done that. Twice.

This year I was looking for the perfect way to represent myself and my blog, in big fancy cake form. I wanted something both festive and elegant at the same time. Something refined and adult, but with a bit of fun and nostalgia thrown in for good measure. Being that it’s Fall and all, and being that Fall is the best season ever invented, I also wanted to do something seasonally appropriate. Something with apples…

apple cider doughnut cake with mascarpone icing & cider caramel sauce | Brooklyn Homemaker

Is there any better way to add fun and nostalgia to a dessert than to base it on something we ate as kids? I don’t think so. Luckily when I was growing up there were plenty of harvest festivals and county fairs for me to get nostalgic about. Upstate New York is just lousy with them this time of year! There’s the Lafayette Apple Festival, Tomatofest (hosted in my own hometown), the Jordan Fall Festival, countless county fairs, and the great New York State Fair (dat butter sculpture doe), just to name a few several…

Of course the best part of these fairs and festivals is always the food! There’s the staples like fried dough, funnel cakes, and corn dogs; but upstate we have our own regional specialties like salt potatoes, chicken spiedies, and steaming cups of fresh pressed warm apple cider. When it comes to fall festival foods though, my all time favorite is and always will be sweet little apple cider doughnuts fresh and warm from the fryer, sparkling with sugar and cinnamon.

As soon as those chubby little doughnuts crossed my mind I KNEW I had my idea.

apple cider doughnut cake with mascarpone icing & cider caramel sauce | Brooklyn Homemaker

Now, you may think that to really translate the essence of a doughnut into cake form it should be round, like a bundt cake. While I’d normally agree with you, I do plenty of bundt cakes around here. This occasion called for a true celebration cake. Something with layers. Something tall.

apple cider doughnut cake with mascarpone icing & cider caramel sauce | Brooklyn Homemaker

I’m not usually a huge fan of naked cakes. They can feel a little too hip and trendy for me, but I guess I live in Brooklyn so I should probably just get over that. I also feel like the whole point of icing a cake is to seal it under a thick delicious layer of sugar and fat to keep it from drying out or going stale. This time around though, I had this whole big bright idea to coat the cake layers in cinnamon and sugar rather than icing to really drive home the cider doughnut point.

We all make mistakes.

Even me. Even after two years of blogging.

apple cider doughnut cake with mascarpone icing & cider caramel sauce | Brooklyn Homemaker

I was really stuck on this idea of coating the cake layers in sparkly cinnamon sugar, so I brushed each one with some melted butter and pressed the sugar into it. Then I stacked away and sandwiched a thick blanket of icing between each layer. The icing squeezed out the sides a little as I stacked, and at first looked imperfect and rustic in a charming sort of way. Once I went ahead with the caramel drizzle though, I had a disaster on my hands.

Rather than drizzling evenly and elegantly down the sides of the cake, as soon as the caramel reached the icing it pooled and dripped and ran all over the place. I did my best to control the way I drizzled and poured to get the look I wanted, but to no avail. You’ll just have to trust me when I say that it looked really terrible. Even Russell, who generally knows to bite his tongue when I’m in the kitchen, had to admit that it wasn’t my best work. I mean, it’d still taste great but it certainly wasn’t going to photograph well, and this is a special occasion!

As fate would have it, Russell had friends visiting from LA and of course they rang the buzzer almost at the exact moment that I realized things weren’t going my way. I was already getting frustrated, and with guests coming through the kitchen with suitcases I started to get really embarrassed too. I try to project an image of domestic perfection through my blog, so when things don’t turn out perfectly I feel like it reflects poorly on me and my abilities as a baker and blogger. I was so upset and embarrassed by my cake that I actually just stood in front of it as our guests were coming in, trying to block it from view as they were getting settled. I knew I was being ridiculous, but that just made me feel even worse and I could feel my temper getting away from me. Rather than risk a blowout in front of people I barely knew, I put the cake in the fridge for a few minutes and went to sit and chat with our guests. Once I’d calmed down a little I felt brave enough to take the cake back out of the fridge and see what I could do with it. Luckily I had a bit of icing and caramel left over, so I scraped the mess off the sides and set to work with an icing spatula. Once the sides were nice and smooth, the caramel poured down the cake like a dream!
Phew! Crisis (and tantrum) averted.

apple cider doughnut cake with mascarpone icing & cider caramel sauce | Brooklyn Homemaker

This cake. Oh boy. This cake.
What can I say?

This cake is out of control. It’s a true celebration cake in every sense.
The cake itself is unbelievably moist and tender and springy, just like a fresh apple cider doughnut. It’s rich, subtly spiced, and just sweet enough; and just like an apple cider doughnut it has a delicate yet distinct apple-y flavor.
To add an adult, elegant touch I opted for a mascarpone cream icing rather than whipped cream or cream cheese. This was a new recipe to me, which can sometimes be risky, but in this case the risk really paid off. I think this might seriously be my new favorite icing, and it’s the absolute perfect compliment to this cake. Thick, creamy, rich, and just sweet enough. It has a texture almost like whipped cream, but somehow richer and thicker and more decadent (and certainly more stable at room temperature)
Then of course, there’s the caramel sauce. I don’t have words for just how good this stuff is. It’s insane, like eating a caramel apple, in sweet buttery sauce form. It’s made by reducing and reducing and reducing apple cider until thick and syrupy; then adding butter, cream, brown sugar, a bit of spice, and a touch of salt. I should have guessed this, but with this sauce the lost cinnamon sugar coating wasn’t even missed.
The sugary chubby little doughnuts on top aren’t absolutely necessary, but they sure are cute, and I really think they make this cake sing.

I couldn’t have asked for a better cake to celebrate my second anniversary. Here’s to many more to come, and here’s to you guys! Thanks for reading, and commenting, and thanks for coming along for the ride!

apple cider doughnut cake with mascarpone icing & cider caramel sauce | Brooklyn Homemaker

Apple Cider Doughnut Layer Cake with Spiced Mascarpone Icing and Apple Cider Caramel Drizzle

Apple Cider Doughnut Cake:
(adapted from Serious Eats)
12 tablespoons unsalted butter (1 1/2 sticks), at room temperature (plus more for pans)
2 medium cooking apples like Cortland or MacIntosh, peeled, cored, and roughly chopped
2 cups apple cider
3/4 cup buttermilk, at room temperature
2 teaspoons pure vanilla extract
3 3/4 cups all-purpose flour (plus more for pans)
2 teaspoons baking powder
1 teaspoon baking soda
1 teaspoon salt
1/4 teaspoon ground nutmeg
1/2 teaspoon ground cinnamon
1 1/4 cup sugar
3/4 cup packed light brown sugar
5 large eggs, at room temperature
1/3 cup vegetable oil

Additional for assembly:
3 fresh apple cider doughnuts (optional)

For the Cake:
Adjust oven rack to middle position and preheat oven to 350°F. Brush the bottoms of 3 eight inch cake pans with butter. Place 8″ circles of parchment in the pans, and generously brush pans all over with butter and coat with flour, tapping out any excess.

In medium saucepan, bring chopped apple and cider to boil over medium-high heat. As apple begins to fall apart, stir and whisk with a fork to try to mash and break it up as much as possible. Reduce heat slightly and simmer and reduce, stirring frequently, until mixture measures exactly 1 1/2 cups, about 20 minutes or so. Cool at least 5 minutes in a large measuring cup before mixing in buttermilk and vanilla. Set aside.

In medium bowl, whisk together flour, baking powder, baking soda, salt, nutmeg, and cinnamon; set aside.

In the bowl of an electric mixer, beat the butter, sugar, and brown sugar on medium speed until light and fluffy, about 3 minutes. Add eggs, one at a time, beating well after each addition. Add oil and beat until incorporated, about 1 minute.

Decrease mixer speed to low and add flour mixture in three batches, alternating with apple mixture, scraping down sides and bottom of bowl with rubber spatula as needed. Increase speed to medium and beat mixture just until combined, about 30 seconds.

Evenly divide batter between prepared pans. Bake until cake tester inserted in cake comes out clean, rotating cakes halfway through baking, about 30 to 40 minutes. Transfer cakes to cooling rack for about 20 or 30 minutes, before carefully removing the cakes from the pans to cool the rest of the way.

Cool completely, about 1 hour, before assembly. Just before assembly, remove parchment if still stuck to the cakes.

Apple Cider Caramel Sauce: 
(adapted from Café Sucre Farine)
2 cups apple cider
½ cup butter (1 stick)
1 cup dark brown sugar, packed
¾ cup heavy cream
¼ teaspoon nutmeg
½ teaspoon cinnamon
½ teaspoon sea salt
2 teaspoons vanilla extract

Place apple cider in a medium heavy-bottomed pot. Bring to a boil, reduce to a high simmer, and cook until cider is reduced to ¼ cup. It should get a bit thick and syrupy. The thicker it gets the closer you need to watch it to be sure it doesn’t dry out or burn.
Add butter to the pan and heat until melted. Add the sugar, cream, salt and spices and whisk to combine. Bring to a gentle boil and cook for 7 minutes, stirring frequently.
Remove from heat and add vanilla extract, stirring to combine.

Mixture will thicken as it cools.

You’ll likely have more sauce than you need for this cake. Any extra should be kept in the refrigerator to be eaten with a spoon at midnight.

Spiced Mascarpone Cream Icing:
(adapted from Fine Cooking)
1 1/2 cups cold heavy cream
1 lb. (16 oz) mascarpone cheese, at room temperature
2/3 cup granulated sugar
2 teaspoons pure vanilla extract
1/2 teaspoon cinnamon
1/8 teaspoon nutmeg
1/8 teaspoon salt

In the bowl of an electric mixer fitted with the whisk attachment, whip the heavy cream until it begins to thicken and form soft peaks. In a separate bowl, stir together the mascarpone, sugar, vanilla, spices, and salt until smooth and well combined. Transfer mascarpone mixture to bowl with thickened cream and beat on low speed until almost smooth, 30 to 60 seconds. Scrape down the sides and fold to incorporate. Increase the speed to medium high and beat until the mixture is thick and holds firm peaks, another 30 to 60 seconds. Do NOT overbeat or the frosting will become grainy.

Assemble Cake:
Place the first cake layer on an 8″ cardboard cake round, serving plate, or cake stand. If necessary, trim the top with a cake leveler or sharp serrated knife to create a flat surface. Top with about 1/3 of the mascarpone cream icing and evenly smooth out with an icing spatula. Add the next layer, trim and ice with the same amount of icing, then add the third layer and trim flat as necessary. Top the third layer with about half of the remaining icing, and smooth it out as flat as possible. Spread the remaining icing in a very thin smooth layer over the sides of the cake, and put it in the refrigerator to firm up for about 30 minutes.

Top the cake with about 3/4 to 1 cup of the cooled caramel sauce, carefully and evenly drizzling some down the sides.

If desired, top the finished cake with 3 small fresh apple cider doughnuts.

This cake will keep well in a cake saver at room temperature for up to 3 days, if the weather is not too hot or humid. Otherwise, wrap tightly and store in the refrigerator for up to 3 days. Bring to room temperature for at least an hour before serving.

classic pot roast with sweet potato parsnip mash

Being raised by a single parent meant that my sister and I shared in a lot of the household responsibilities.

classic pot roast with sweet potato parsnip mash | Brooklyn Homemaker

It was a different time, we lived in a safe neighborhood, and my grandma lived next door. When we’d get home from school mom would still be at work and we’d have the house to ourselves. Every day we’d be met at the door with a long list of chores taped to the newel post at the foot of the stairs. The list changed daily and was usually pretty substantial, at least long enough to keep us out of trouble until mom got home. Chores didn’t just include vacuuming or washing the dishes either, we were in charge of serious cleaning jobs like vacuuming out heating vents and scrubbing the bathroom tile surround.

At the time, I don’t think it would have been humanly possible (if you consider pre-teens human) for us to hate our chores any more than we did, but looking back on it I’m incredibly grateful. After living with countless roommates through college and until meeting Russell, I now realize that beyond keeping a tidy house, mom was also teaching us valuable life skills that many of my friends and neighbors weren’t learning. I know all sorts of things about not living like a slob that many of my peers don’t, like how to wash dishes and actually get them clean. I can remember the specific moment in college when I realized I no longer wanted to fight with my roommate about who’s turn it was to do the dishes, because whenever she did them I’d end up wanting to wash them again anyway.

classic pot roast with sweet potato parsnip mash | Brooklyn Homemaker

Another item that was usually on the list was making dinner. Working later in the day meant mom wouldn’t always have time to get dinner on the table after she got home, so she taught me a few simple recipes I could make on my own. Cooking dinner was one of the chores that I actually enjoyed doing and as time went on I started teaching myself new dishes all the time.

Pot roast was one of my old standbys, but back then I didn’t really know the “rules” when it came to braising and roasting, so to be honest my roasts weren’t very good. At the time I don’t think I even realized it, and mom never complained, but I hold myself to much higher standards nowadays. I was probably using the wrong cuts of meat, or cooking them at too high a temperature too quickly. I may have even been undercooking them, or at least not cooking them long enough to melt the collagen and make them tender. Either way, they were often as rubbery as shoe leather and flavored with little more than dried onion flakes, so as I got older I decided I didn’t really like pot roast.

classic pot roast with sweet potato parsnip mash | Brooklyn Homemaker

Unfortunately I was a vegetarian in college, so even though I took several culinary courses, at the time I didn’t really feel the need to pay much attention during the meat classes.

If I could turn back time…
If I could find a way…

classic pot roast with sweet potato parsnip mash | Brooklyn Homemaker

It was only a few years ago that I finally decided to give pot roast another go around, and that’s when I looked to the internet to show me the way. I tried a few recipes that came out okay; certainly better than what I made when I was 12, but not really good enough to make me want to bookmark any of them to make again.

Then, one day, I discovered the Cook’s Illustrated pot roast recipe.

Game-changing. Mind-blowing. Life-altering.
Etc.

classic pot roast with sweet potato parsnip mash | Brooklyn Homemaker

Seriously. Their method makes, hands down, the best pot roast I’ve ever tasted in my entire life.

It is a little more work than some of the other recipes I’ve tried, but it is WELL worth it. It’s important to find the right cut of meat, and to speed up the collagen melting you’ll need to do some butchering of your own. You’ll also need to tie the meat up with cooking twine so it doesn’t fall apart in the pot, and to promote even cooking you have to flip it half way through cooking. Then the sauce for the meat is made by pureeing the vegetables from the roasting pan with broth and red wine for texture and flavor. This makes it a bit more involved than the set-it-and-forget-it style recipes prominent on Pinterest, but you guys, I swear. You’ll never want to make pot roast any other way.

classic pot roast with sweet potato parsnip mash | Brooklyn Homemaker

Because I don’t know how to leave well enough alone, I did go ahead and make a few changes to their recipe to make it my own. The cooking method is exactly the same though, and produces the same mouthwatering, fork tender, practically falling apart results. Beyond the traditional red wine, the sauce benefits from a bit of acid and the original recipe calls for balsamic vinegar to be added at the end. Instead, I added apple cider (and a bit of chopped apple) to the cooking liquid. I thought this could be a fun seasonal twist and would add a subtle sweetness. It really works and makes this roast the perfect dish for welcoming fall weather.

Instead of roasting large chunks of potatoes and carrots to serve with the roast, I decided that I wanted to serve it over a bed of mashed sweet potatoes and parsnips. I think the slight sweetness and bright color pairs perfectly with the subtle apple flavor in the sauce.

classic pot roast with sweet potato parsnip mash | Brooklyn Homemaker

I know I already said this, but hello fall flavors. You couldn’t ask for a more perfect dish to celebrate the change of seasons. A word of warning though, the house will smell unbelievable for up to four hours and your mouth will be watering constantly.

The flavor of this meat is just so…. meaty, and you won’t believe how tender it comes out. No knife required.
The pureed veggies in the sauce add a great rich and roasty flavor, and gives the sauce a nice thickness without having to make a roux for gravy.
Adding parsnips to the mashed sweet potatoes really helps balance their sweetness and adds a depth of flavor. Taking the time to brown the butter gives them an extra richness, and helps them feel well paired with the roasted meat.

Go make this.
Now.

classic pot roast with sweet potato parsnip mash | Brooklyn Homemaker

Classic Pot Roast with Sweet Potato Parsnip Mash

Adapted from Cook’s Illustrated

3 1/2- to 4-pound boneless beef chuck-eye roast
Kosher salt
2 tablespoons unsalted butter
2 medium (or 1 large) onions, halved and sliced thin (about 2 cups)
1 large carrot, chopped medium (about 1 cup)
1 parsnip, peeled and chopped medium (about 3/4 cup)
2 celery ribs, chopped medium (about 3/4 cup)
1/2 firm tart apple (I used Braeburn), peeled cored and chopped medium (about 1/2 cup)
2 medium garlic cloves, minced or crushed (about 2 teaspoons)
1 cup beef broth, plus more for sauce
1/2 cup dry red wine, plus another 1/4 cup for sauce
1/2 cup fresh apple cider
1 tablespoon tomato paste
1 bay leaf
1 large sprig plus 1/4 teaspoon chopped fresh thyme leaves
Ground black pepper
chopped fresh parsley for garnish, if desired

Sweet Potato Parsnip Mash:
3/4 pound parsnips, peeled and cut into 2-inch pieces
2 pounds sweet potatoes, peeled and quartered
6 tablespoons butter
1 to 1 1/2 cups milk
1/4 teaspoon grated nutmeg
salt and pepper to taste

Pull your chuck roast into two pieces at the natural seam, and trim off any large layers and knobs of fat. Sprinkle both pieces of meat with 1 tablespoon salt (1½ teaspoons if using table salt), place on wire rack set in rimmed baking sheet, and let stand at room temperature 1 hour.

Adjust your oven rack to the lower-middle position and preheat oven to 300 degrees.

Heat butter in heavy-bottomed Dutch oven over medium heat. When foaming subsides, add onions and cook, stirring occasionally, until softened and beginning to brown, about 10 minutes. Add carrot, parsnip, celery, and apple; and continue to cook, stirring occasionally, for 5 minutes more. Add garlic and cook until fragrant, about one minute. Stir in 1 cup of broth, ½ cup wine, apple cider, tomato paste, bay leaf, and thyme sprig; and bring to simmer.

Pat the roasts dry with paper towels and generously season on all sides with pepper. Use kitchen twine to tie each piece of meat into a loaf shape for even cooking and prevent it from falling apart.

Nestle the meat on top of the vegetables. Cover pot with a tight fitting lid and transfer to the oven. Cook beef for three hours, flipping halfway through. Check and, if necessary, continue cooking until beef is completely tender and sharp knife easily slips in and out, about 30 minutes to 1 hour. This extra time is best used to start your sweet potato parsnip mash, recipe below.

Once fully cooked, transfer roasts to cutting board and loosely tent with foil. Strain liquid through mesh strainer into a large liquid measuring cup. Discard bay leaf and thyme sprig. Transfer cooked vegetables to blender jar. Allow liquid to settle 5 minutes, then skim any fat off surface. Add beef broth as necessary to bring liquid amount to 3 cups. Place liquid in blender with vegetables and blend until completely smooth, about 2 minutes. Transfer sauce to medium saucepan, add remaining wine and chopped thyme, and bring to simmer over medium heat. If sauce is too thick it can be thinned out with more beef stock. If too thin let it reduce to the desired consistency. Once reduced taste and adjust seasoning if necessary.

While sauce heats and reduces, remove twine from roast and slice against grain into ½-inch-thick slices.

Sweet Potato Parsnip Mash: 
Place sweet potatoes and parsnips in a large stockpot, cover with salted water, and bring to a boil. The parsnips can take longer to cook than the sweet potatoes, so it’s important that they’re in smaller pieces. Once the pot comes to a boil reduce the heat to medium and cook until vegetables are fork tender. This should take about 15 or 20 minutes, but can vary depending on the size of the pieces.

Once tender, transfer sweet potatoes and parsnips to a colander to drain. In the same pot heat the butter over medium heat just until it begins to brown. Stir occasionally and watch it closely or it can burn. Remove from heat. You can either push the drained sweet potatoes and parsnips through a potato ricer or food mill and add them back into the pot, or add them to the pot first and mash them with a potato masher. Stir in milk, a little at a time, until you reach your desired consistency. Add nutmeg, and salt and pepper to taste. Taste for seasoning and adjust if necessary.

Serve the meat on top of the mash and top with sauce and a sprinkle of chopped parsley.

chicken tortilla soup

When I was in college my mom sent me a DVD of a movie called Tortilla Soup, and to this day I still don’t really know why.

chicken tortilla soup from scratch | Brooklyn Homemaker

I was really into cooking even then, and I was taking a few culinary courses for my degree, but as far as I understand it my love of cooking was reason enough for Mom to think I’d LOVE a movie about soup. She’d apparently rented it, liked it, and since it was about cooking, thought I’d like it too. Rather than telling me to rent it for myself though, she bought a copy and mailed it to me.

chicken tortilla soup from scratch | Brooklyn Homemaker

I’d never heard of the film, and having lived a pretty culturally sheltered life, I’d never heard of the soup either. It took me a while to get around to actually watching it, and when I did I found it pretty unremarkable. I liked it okay, and I told mom so, but I never watched it again and today I have little memory of what it was even about (besides soup).

chicken tortilla soup from scratch | Brooklyn Homemaker

A few years ago, when I started my first recipe based pinterest board, I started seeing recipes pop up for this soup that I’d largely forgotten all about. Suddenly my interest in the soup (but not the film) was sparked anew. The only problem was that whenever I clicked on any of the recipes, most of them called for loads of canned ingredients and seasoning packets and other fun concoctions loaded with sodium. While the idea of the soup sounded good, the recipes I was seeing never looked good enough to bother.

Then, earlier this summer the siren song of New York’s Green Markets got the better of me and I suddenly found myself wanting to put sweet corn and tomatoes and peppers in everything. It seemed like the time was just right and I needed to finally make it happen. I searched the internets for tortilla soup FROM SCATCH (I don’t know why it never occurred to me to do this before) and finally found one that sounded great.

chicken tortilla soup from scratch | Brooklyn Homemaker

The first recipe I tried was overflowing with tons of vegetables and only called for one canned ingredient: crushed tomatoes. I know it’s tomato season right now but I really hate peeling them so I’ll save the fresh ones for tomato sandwiches and reach for the can when it comes to soups.

Anyway, this soup was absolutely delicious but the torn corn tortillas used for thickening didn’t break down enough for me and just seemed kind soggy and weird. I mentioned this to a friend who, unbeknownst to me, turned out to be a tortilla soup connoisseur. She told me that she’d recently learned the trick to making what was now her favorite “authentic” tortilla soup. I assumed this would be some time tested family recipe handed down through generations and just passed on to her by her great aunt, but when I asked for the recipe instead of a stained and faded recipe card she sent me an email with a link. A link to a recipe from ABC’s “The Chew”.
Say what?

The main difference here is that rather than just tearing and tossing the tortillas in to the soup to break down and thicken, they’re ground up in a blender with some stock and onions. That would definitely solve the soggy tortilla chunk issue, and would probably make for a thicker soup, so I decided to give it a go. If it was good enough for my friend, it was good enough for me.

Rather than just using the recipe as is though, I decided to just steal the thickening technique and use it along with all the fresh veggies from my first recipe.

chicken tortilla soup from scratch | Brooklyn Homemaker

Oh boy oh boy. This recipe sure is a keeper. I definitely see why someone might want to make this in the slow cooker in the dead of winter using a bunch of canned goods and salt, but you’ll never beat how amazing this soup can be when made with super fresh ingredients in the height of summer. By the way, this is a perfect way to put some of your end-of-summer produce to good use.

The soup itself is rich, hearty, and loaded with fresh vegetables. The broth is thick and tomatoey, with just a touch of heat from the jalapeño. A squeeze of fresh lime juice and sprinkle of chopped cilantro really add a wonderful brightness to everything.

I know most people like to finish tortilla soup with grated cheese and sour cream, but I think a few slices of ripe creamy avocado are all that’s needed to make this soup feel rich and decadent. Of course, the crunch of a few crispy tortilla strips can’t hurt either.

chicken tortilla soup from scratch | Brooklyn Homemaker

Chicken Tortilla Soup

Adapted from “The Chew”

olive oil
2 to 3 ears of sweet corn, kernels removed with a sharp knife
2 medium bell peppers, seeded and diced
3 stalks of celery, diced
4 carrots, sliced into thin disks
Salt and pepper
1 large yellow onion, diced
4 cloves of garlic, minced
2 jalapenos, seeded and diced
2 teaspoons of ground cumin
1/2 cup of fresh cilantro, divided
9 to 10 corn tortillas, divided
6 cups of chicken stock
one 28oz can of crushed tomatoes
2 to 3 cups of pulled or cubed cooked chicken
lime wedges
avocado

Heat 2 tablespoons of olive oil a large heavy bottom stock pot or dutch oven. Add corn kernels, celery, carrot, and bell pepper. Season with salt and pepper and sauté for about 10 minutes. or until vegetables are beginning to soften and get some color in the pan. Transfer to a bowl and set aside, scraping everything out of the pan.

Heat 2 more tablespoons of olive oil in the same pan and add onion, garlic, jalapeño, & cumin. Season with salt and pepper and sauté for about 5 minutes. Add 1/4 cup of cilantro leaves and sauté for 5 minutes more, or until onions are soft and translucent.

Scrape onion mixture into the pitcher of a powerful blender and add about 1 cup of chicken stock and 3 to 4 torn up corn tortillas (depending on how thick you want the soup). Purée the mixture until well blended and free of lumps. Transfer back to the pan and heat until it bubbles and just begins to thicken. Add crushed tomato, chicken stock, and cooked vegetables from before. Bring to a boil, reduce the heat, and simmer for 10 minutes. Add cooked chicken and cook for 10 minutes more.

While soup simmers you can make your tortilla strips by slicing 6 remaining tortillas into strips and crisping in a cast iron skillet over high heat with 2 to 3 tablespoons of olive oil. Stir very frequently and try to promote even browning. Once well browned and crisp transfer to a paper towel and sprinkle with salt. Alternatively, you could just crunch up a few tortilla chips.

Serve the soup with a squeeze of fresh lime juice, a sprinkle of torn cilantro leaves, a few cubes or slices or avocado, and a few tortilla strips.