layer cake

strawberry lemonade layer cake

And just like that, it was the end of August.

strawberry lemonade layer cake | Brooklyn Homemaker

I can’t believe it’s been so long since I posted, but I guess that’s just the kind of blogger I am now. The kind who can’t (and won’t) let go, but also can’t get their shit together enough to post more than once or twice a year.

strawberry lemonade layer cake | Brooklyn Homemaker

Looks like this is a two post year though, so I’m going to go ahead and give myself a nice little pat on the back.

strawberry lemonade layer cake | Brooklyn Homemaker

Anyway, one of my best friends in the whole wide world (who just happens to be my podcast co-host) just celebrated her birthday and I decided it was time to pull out the big guns. The big cake guns.

strawberry lemonade layer cake | Brooklyn Homemaker

Usually we just go to brunch, or to a nice dinner to celebrate our birthdays, but hers is at the end of August and I believe this is what the French call the “Dog days of Summer” so we decided a bbq was in order.

I decorated the back yard like an old school kid’s party with streamers and pennant bunting and the whole works. Even cute little party hats!

We grilled burgers, had potato salad, and a bartender friend of ours mixed an incredible citrusy spicy whiskey punch. In other words, we did it up right and proper.

strawberry lemonade layer cake | Brooklyn Homemaker

Since I’m telling you the whole story here, you’ve probably guessed by now that I also made a fancy pants birthday cake for her too. She loves all things lemon, so my first instinct was to go all out lemon on lemon on lemon. Then one night I was inspired and decided to throw some strawberries in the mix too, cuz why not? Since the party was going to be totally over the top, I figured the cake should be too, right?

I don’t usually go for frilly pink and girly decorations on my cakes, but if ever there was a time to go that direction, I figured this was it.

strawberry lemonade layer cake | Brooklyn Homemaker

Not only did this cake turn out to be a real show stopper, but it’s pretty damn tasty too!

All the elements totally come together in perfect pretty-in-pink, strawberry lemonade harmony. The homemade lemon curd is tart and sweet and super lemony. The frosting is rich and velvety with a gorgeous strawberry flavor (and color!), and the cake is delicate and fluffy and perfectly sweet without being too much. I hate it when a cake is super pretty and then just tastes like a cloying sugar bomb, you know?

strawberry lemonade layer cake | Brooklyn Homemaker

There’s only one small thing that I don’t think was as successful as I would have hoped. I adapted a lemon cake recipe I use all the time and added powdered freeze dried strawberries for a bright, fresh strawberry flavor without all the liquid of fresh berries that can sometimes make cakes dense and gummy. I decided to shoot for an ombre effect with the different layers of cake, so I added progressively more and more strawberry powder to each layer. I hoped there would be a beautiful gradient of different shades of pink when the cake was sliced, but looking back I realize I should have added a touch of food coloring too. The problem was that I’ve never used freeze dried strawberries in a cake like this before, and while the batter was a pretty pastel pink, it tuned a bit of a brownish hue when baked.

Womp womp. It tasted great so who cares.

Thankfully, you get to learn from my mistakes! I’d say that you should either A) skip the ombre gradient altogether and just add the strawberry powder to the batter all at once, B) leave it out entirely and just do lemon cake with strawberry icing, or, C) if you really want to go for the pink ombre effect, add a touch of red food coloring to the batters to make sure you keep that pretty pink color once the layers are baked.

strawberry lemonade layer cake | Brooklyn Homemaker

The recipe below is super lengthy and probably looks a bit daunting, but I’m including recipes for the cake, the lemon curd filling, the icing, and the yellow candy melt drip on top. Then I include tips on how to do the pink gradient in the cake layers, how to assemble the cake, and even decorating instructions! So yeah, this recipe is basically the War and Peace of cake recipes.

You can totally scale back the decorations, forget the ombre layers, skip the candy drip, and use store bought lemon curd if you want to simplify things a little. I certainly couldn’t blame you!

Either way, no matter how you slice it, this cake is sure to be a hit for the lemon lovers in your life!

strawberry lemonade layer cake | Brooklyn Homemaker

Strawberry Lemonade Layer Cake

  • Servings: 16 to 20-ish
  • Print
Lemon Curd:
Adapted from Life, Love, & Sugar
(You may also use store bought)

1/2 cup fresh lemon juice (about 3-4 lemons)
4 teaspoons finely grated lemon zest
2/3 cups sugar
1/4 teaspoon salt
8 egg yolks (reserve whites for icing)
6 tbsp unsalted butter

Combine all the ingredients in a double boiler (or in a non-reactive sauce pan with a heavy bottom). Heat over medium/low heat (or a light simmer in a double boiler). Whisk constantly until mixture thickens and reaches 170 degrees on a thermometer, or looks thick and pudding-like. Do not let it boil!
Strain curd through a fine mesh strainer into a heat proof bowl. Cover with plastic wrap pressed directly onto the the top of the curd to avoid a skin forming. Refrigerate until completely cold.
Any leftover curd is best when kept well covered and consumed within 1-2 weeks.

……..

Strawberry Lemon Cake
makes three 8-inch layers

3 1/3 cups all purpose flour
2 1/2 teaspoons baking powder
1/2 teaspoon baking soda
1 1/4 teaspoons salt
2 1/4 cup granulated sugar
2 tablespoons finely grated lemon zest (from about 3 to 4 lemons)
1/2 cup (1 stick) unsalted butter, room temperature
3/4 cup peanut oil or vegetable oil
4 large eggs
2 teaspoons vanilla extract
1 cup buttermilk
1/4 lemon juice
3/4 cups (approximately) powdered freeze-dried strawberries (optional) *see note
pink or red food color (if desired)

Preheat oven to 350 degrees.
Line the bottoms of three 8″ cake pans with parchment paper. No need to butter and flour the sides pans. **see note
In a medium bowl, whisk flour, baking powder, soda, and salt until well combined.
In the bowl of a stand mixer with the paddle attachment, combine lemon zest and sugar and mix for 30 seconds or so. Add butter to sugar mixture and cream them together on high for about 3 minutes, or until pale and fluffy. Reduce speed and add oil, then the eggs, one at a time, fully incorporating after each addition. Add vanilla until just combined.
Combine lemon juice and buttermilk in a small bowl or measuring cup.
Alternate adding flour mixture and buttermilk mixture, beginning and ending with flour (3 additions of flour and 2 of milk), fully incorporating after each addition.

At this point, if you’re using it, you can either add the strawberry powder all at once and mix just until combined, or if you want to, you can try to go for an ombre effect as follows:
Mix about 1/4 cup of the powdered strawberry into the batter and mix to combine. Pour out 1/3 of the batter into one of the prepared pans. Add another 1/4 cup of strawberry powder to the remaining batter, mix, and fill one more pan. Add remaining strawberry to remaining batter, mix again, and fill the the last pan.
For a nicer, brighter pink, you may want to add a few small drops of food color with each addition of strawberry, because the powder tends to brown a bit when baked.

Bake for 30-35 minutes or until a toothpick or cake tester inserted into the center comes out clean.
If using bake-even strips, they will likely need a few additional minutes.

Transfer pans to a wire rack to cool for 30 minutes.
Invert cakes onto rack, peel off parchment, and let cool completely.
If the cakes domed in the oven, you’ll want to slice the very tops of the cakes off to make each layer completely flat and level for a more professional look. You can do this using a very sharp bread knife, or a cake leveler.
If you’re not assembling cakes right away, individually wrap each layer tightly in plastic wrap to prevent drying. Layers can be stored in the refrigerator for a day or two, or frozen (wrapped in plastic wrap first, then aluminum foil) for up to two weeks. You may want to consider brushing the layers with simple syrup if you’re freezing them.

Baker’s notes:
* I used 2x (1.2 oz) bags of freeze dried strawberries from the grocery store and pulverized them in the food processor, but you can also buy pre-powdered freeze dried fruit and skip the extra work. If you wanted to just go for a lemon flavor cake, you could leave this out.
** Not buttering or flouring your cake pans actually helps the cakes keep their shape better when cooling and helps prevent the outer edges of the cakes from overcooking. The parchment will allow the bottoms to release from the pans easily, but you will need to run a knife or a toothpick around the outside edge before turning out of the pans.

……..

Strawberry Swiss Meringue Buttercream Icing:
Adapted from “Layered” by Tessa Huff

1 1/4 cup fresh egg whites (not pasteurized egg whites)
2 1/2 cups sugar
1/4 teaspoon salt
3 cups (6 sticks) unsalted butter, at room temperature (cut into 1 tablespoon slices)
4 teaspoons pure vanilla extract
3/4 cups (approximately) powdered freeze-dried strawberries *see note

Place the egg whites, sugar, & salt in a very clean bowl of a stand mixer and whisk them together by hand to combine. Fill a medium saucepan with an inch or two of water and bring to a simmer over medium to medium-high heat. Place the mixer bowl over the saucepan to create a double boiler. Be sure that the bottom of the bowl doesn’t directly touch the water, and that the water doesn’t reach a full boil.
Heat the egg whites until they register 160F on a candy thermometer, whisking regularly to avoid cooking the whites. As soon as they’re at the correct temperature, carefully attach the mixer bowl to the stand mixer and add the whisk attachment.
Beat the egg whites on high speed for 8 to 10 minutes until they hold stiff peaks and the outside of the bowl is cooled to room temperature. Stop the mixer and swap the whisk attachment for the paddle.
On low speed, add the butter, a few tablespoons at a time, waiting for it to incorporate before adding more. Once all the butter is mixed in, add the vanilla extract and strawberry powder and mix in to incorporate. Turn the mixer up to medium-high and beat until the buttercream is smooth and silky, about 3 to 5 minutes.
If the mixture starts to look curdled, just keep beating. It’ll come together.
If the whites were still too warm when the butter was added and the buttercream is too thin and soupy, refrigerate the bowl in 10 or 15 minute bursts until it’s cool (but not cold) and beat again until smooth.

* Baker’s note: I used 2x (1.2 oz) bags of freeze dried strawberries from the grocery store and pulverized them in the food processor, but you can also buy pre-powdered freeze dried fruit and skip the extra work.

……..

Assemble cake:
Place the first cake layer on an 8″ cardboard cake round, serving plate, or cake stand. Using a cake round will make it easier to ice and decorate, especially if you have a revolving turntable for decorating (I use a lazy suzan, but you can also just spin your plate or cake stand while you work).

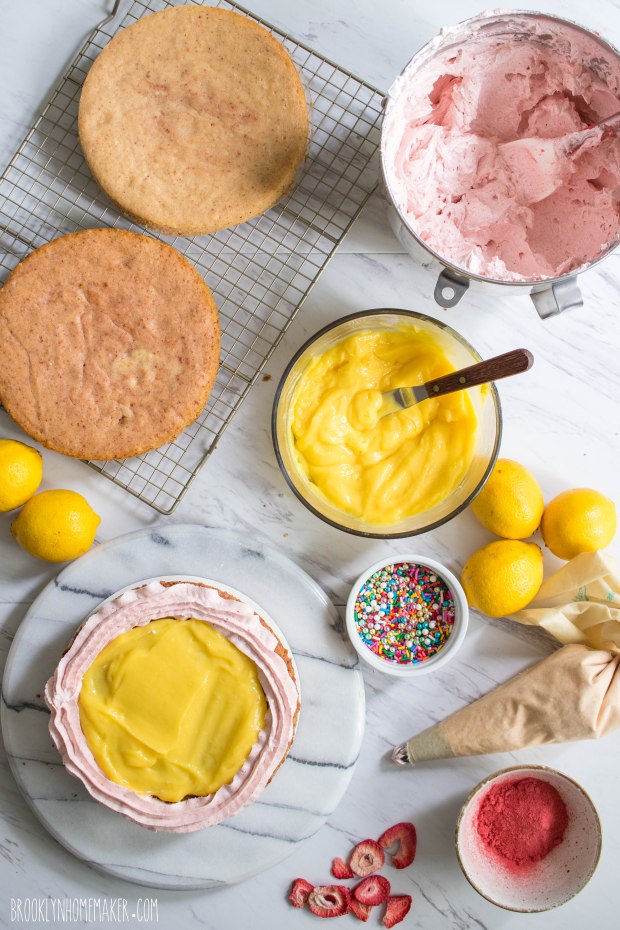
Fit a piping bag with a large star tip and fill with a two or three cups of the Strawberry Buttercream. Pipe a thick dam of icing around the outside of the cake to contain the curd filling. This will ensure that the filling stays in place and doesn’t squish out when the layers are stacked.

Place about 3/4 to 1 cup or so of the curd in the center of the cake and spread it smooth and even using an icing spatula. Add the next layer of cake, looking from directly over the top and from eye level at the cake to make sure each layer is directly one above the other, rotating the cake to be certain. Repeat the same procedure with the buttercream dam and another cup of the curd, then add the third and final layer of cake and check for straightness again. Reserve about a cup or so of icing in the piping bag for additional decorations later.

Using about a third or so of the remaining icing, crumb coat your cake. Starting with the top of the cake, spread the icing thin and work some of it down the sides of the cake to completely cover the whole thing in a thin, smooth, even coat of icing. This first layer of icing seals the cake and keeps crumbs from being visible in the outer layer of icing. It may seem like unnecessary trouble, but it really is worth it to get a smooth professional finish on the icing.

Place the cake in the refrigerator for about 30 minutes to an hour to help set the icing and firm up the cake.
Spread another layer of the remaining buttercream over the whole cake the same way you did the crumb coat. Start by smoothing the top and slowly working the icing down the sides to cover the cake completely. Try to get the icing as completely smooth as possible with straight sides and a flat, level top. I use a long offset icing spatula and an icing smoother.

You may have a little icing left over but I thought it was better to have a bit more than you need to use for decorations just in case.

……..

Decoration:
(optional)
rainbow sprinkles
multicolor dragees
lemon head candies (small)

Candy Drip: 
6 oz yellow candy melts (or white with a few drops of yellow candy color)
1 to 2 tablespoons heavy cream

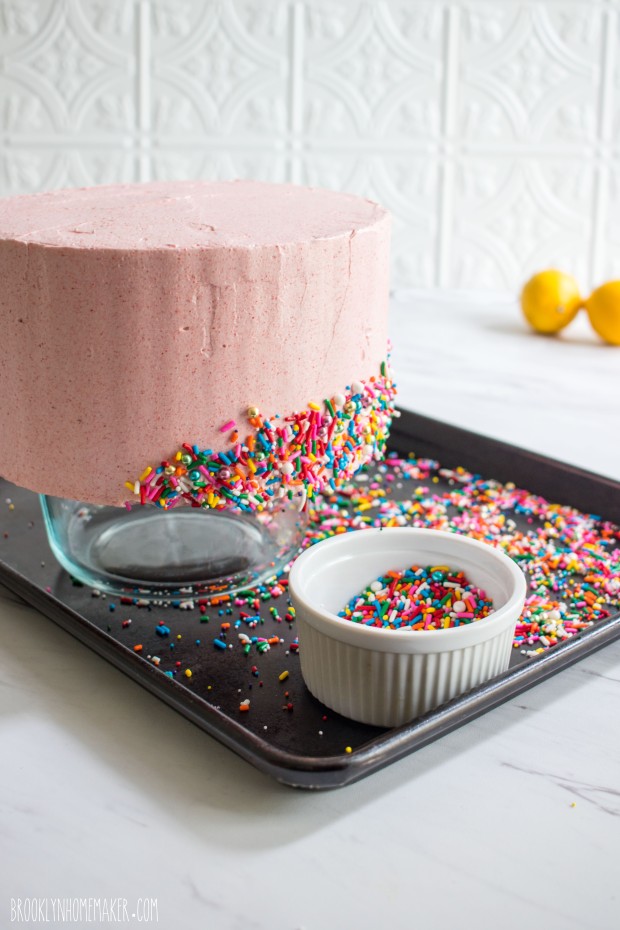
If desired you can add sprinkles to the lower half of the cake. Carefully lift the cake up and place the cake board on a bowl or container that is slightly smaller than the width of the cake, and then place the bowl on a rimmed baking sheet to collect falling sprinkles. Using clean hands, grab small handfuls of sprinkles and decorations and gently press into the icing on the lower half of the cake.

Refrigerate the cake again for at least another 30 minutes to set and chill the icing before adding the yellow candy drip. Once the cake is chilled, make the candy drip by microwaving the candy melts in a heat safe bowl or measuring cup in 30 second bursts until melted. Stir in heavy cream, a few teaspoons at a time, just until the drip is thin enough to pour from a spoon in a thin even stream, but don’t add too much or the drips won’t stay put and will pour right off the cake. It’s better to need to keep adding a little more, because you can’t take it out if you thin the drip out too much.

Starting at the outer edge of the top of the cake, start adding one drip at a time, rotating the cake until you’ve gone all the way around. I used a small squeeze bottle for extra control, but you can use a spoon as well. Once you’ve added drips all the way around the cake, fill in the center and smooth with a small spatula. Return the cake to the fridge for another 20 to 30 minutes to set the drips before proceeding.

Finish by piping small swirls of icing around the top of the cake, and top each swirl with a lemon head candy.

Cake will keep well covered in the refrigerator for up to 3 days.

If refrigerating, bring cake to room temperature at least two hours before serving.

butter pecan layer cake

I can’t even believe it friends.

Brooklyn Homemaker turns three years old this weekend!

butter pecan layer cake | Brooklyn Homemaker

They grow up so fast!
Sniff.

butter pecan layer cake | Brooklyn Homemaker

This year has been sort of crazy with the whole Maxwell’s thing and all the time I’ve had to spend away from Brooklyn Homemaker, and I’m so thrilled to finally be getting back into the swing of things just in time to celebrate my anniversary!

butter pecan layer cake | Brooklyn Homemaker

I probably said this last year too, but I never would have believed you if you’d told me three years ago that I would have started doing this and kept with it for three whole years.
When I first started I didn’t even have a real camera, and for the first few months I shot all of my photos on my iPhone in my dimly lit kitchen at weird, unflattering angles. If you’d told me three years ago that I would not only get a real camera, but also get pretty good at figuring out how to use it, I definitely would have had my doubts.
If you’d have told me that some of my photos would be even half as good as the ones I spent hours drooling over on Pinterest, or that people would actually want to pin my photos and recipes for themselves, I probably would have laughed in your face!
If you’d have told me that people would actually want to cook my recipes, and would enjoy them enough to share with their friends and families, I’d have been absolutely floored!
Naaahhhhhh! No friggin’ way!!!

I still wake up sometimes and want to pinch myself.

butter pecan layer cake | Brooklyn Homemaker

It seems like I start having these thoughts around the same time every year, as my blog anniversary approaches, about all the things I’ve accomplished and how far I’ve come. The friendships and bonds I’ve built, the skills I’ve gained, and how my goals and priorities have changed over these past few years.

butter pecan layer cake | Brooklyn Homemaker

This is definitely a time to for reflection, a time for appreciation, and a time to be grateful. Perhaps most importantly though, it’s a time for cake!

butter pecan layer cake | Brooklyn Homemaker

The idea of this cake was a bit of a throw back to the very first cake that inspired this whole blogging adventure, the Aunt Sassy Cake from Baked.

I knew I wanted to make another big ass fancy celebration cake filled with nuts and covered in a velvety icing, but I didn’t want to just make the same cake all over again.
I did that already! haha!

I thought that a play on the Aunt Sassy Cake with a fun, autumnal twist would be a great way to pay homage to the cake that started it all, while also making it feel little more seasonally appropriate this time of year.

butter pecan layer cake | Brooklyn Homemaker

I played with a few ideas in my head, but the inspiration really came when I was flipping through the channels one day and happened to catch a few minutes of Jeopardy.

When my sister and I were little, we used to spend a lot of time at our grandmother’s house. If we’d stay after dinner, we’d sit next to grandma on the couch and watch Wheel of Fortune and Jeopardy, and if we were good, grandma would fix us a bowl of ice cream.

Thing is, at the time I hated the ice cream flavors she tended to keep in the house. All I wanted was chocolate, or maybe mint chocolate chip, but grandma usually only had maple walnut or butter pecan. Garbage ice creams in the eyes of a child, and ones that i lovingly referred to as old lady flavors in my teen years.
As I got a little older I finally learned to appreciate those “old lady” flavors, and eventually I even learned to love them.
These days I can’t get enough of them, and even get into trouble with Russell when I come home from the store with a pint of butter pecan, when he’d have preferred chocolate, or maybe mint chocolate chip!

butter pecan layer cake | Brooklyn Homemaker

With butter pecan in mind, I decided to go for a tender pecan layer cake, and I opted to brown the butter to amp up the nutty flavor. Browning butter only takes about 10 minutes with some stirring and a watchful eye, and it adds an incredibly rich, earthy, nutty flavor to regular everyday unsalted butter. It has such an amazing flavor that I decided to brown a little extra to mix into some silky Swiss Meringue Buttercream I wanted to use to ice the cake.

To make things even richer, and fancier, and prettier, I went ahead and drizzled the whole kit and kaboodle in some heavenly homemade caramel with a splash of (optional) bourbon.

This cake is the freakin bomb. Perfect for fall. It could even work as an elegant alternative to pecan pie at Thanksgiving!

butter pecan layer cake | Brooklyn Homemaker

It’s been a wild ride so far, and hopefully this is just the beginning.

I’m so honored and grateful for all of you guys out there. I’m so so luck to have so many amazing friends out there in the world who have been so encouraging and engaging through everything that I’ve done so far. I’m looking forward to many more recipes and posts and years ahead, and I hope you’ll all be along for the ride too!

Love you guys! Thanks for everything!

butter pecan layer cake | Brooklyn Homemaker

Butter Pecan Layer Cake with Brown Butter Swiss Meringue Buttercream and Bourbon Caramel Sauce

Brown Butter
(Make ahead if possible)

4 sticks of unsalted butter

Melt butter in a large stainless steel (or light colored) sauce pan over low to medium heat. As the water cooks out, the butter will sizzle a lot. Stir frequently with a silicone spatula.

Once the butter starts to foam, usually about 5 minutes in, you want to watch it very carefully so it doesn’t burn. You’ll also want to use your spatula to scrape the sides and bottom of the pan often. This will promote even browning and help prevent the milk solids from sticking to the pan as they brown. They’re delicious so you want them in your finished butter, and if they do stick they’ll be a pain in the butt to clean.

The foam may make it hard to see, but as you stir you’ll begin to see the milk solids in the butter begin to turn brown. Once the milk solids are brown and the butter smells toasty and nutty, you’re done! Immediately pour the butter, milk solids & all, into a heatproof dish to prevent it from further cooking. The milk solids can go from nutty and golden to black and burnt in less than a minute!

For the recipes below, you want the butter to be soft, but you don’t want to use the butter while it’s still hot and melted. Refrigerate the butter until solid, then let it soften at room temperature. If you want to make it ahead, it’ll keep for a long time if stored in an airtight container.
Butter contains a good amount of water which cooks off when you brown it, so after browning your 4 sticks of butter won’t measure 2 cups. Since the cake and the icing require the same amount of butter, I just say 1/2 the brown butter in each recipe for simplicities sake.


Brown Butter Pecan Cake
Adapted from Cooking Classy

3 Tbsp unsalted butter
2 cups finely chopped pecans
1/3 cup whole pecan pieces for decorating (optional)
3 cups all-purpose flour
2 tsp baking powder
1/2 tsp baking soda
1 tsp salt
1/2 of the brown butter (will be a bit shy of 1 cup), softened
1/4 cup peanut oil (or canola or vegetable oil)
1 cup granulated sugar
1 cup brown sugar, firmly packed
3 large eggs
2 large egg yolks (reserve whites for icing)
2 tsp vanilla extract
1 1/4 cup buttermilk

Preheat oven to 350 degrees.

Melt 3 Tbsp butter in a skillet over medium heat. Add pecans, toss to coat, and cook until slightly browned and fragrant, stirring frequently, about 5 minutes. Transfer to a bowl or dish to stop cooking and set aside to cool. If using whole pieces for decorating, separate them from the chopped pecans and reserve for later.

Butter 3 8-inch round cake pans and line with parchment paper, butter parchment paper and then lightly dust pans with flour shaking out excess. Set pans aside.
Whisk together flour, baking powder, baking soda and salt in a medium bowl and set aside.
In the bowl of an electric stand mixer fitted with the paddle attachment, beat butter, oil, and sugars together until very pale and fluffy, about 5 minutes. Mix in eggs and egg yolks, one at a time, adding in vanilla with the last egg.
Add 1/3 of the flour mixture to the butter mixture and mix on low speed just until combined, then add in 1/2 of the buttermilk and mix just until combined. Repeat alternating flour and buttermilk, ending with the final 1/3 of the flour. Remove the bowl from your mixer and fold in pecans until they’re evenly distributed. Divide batter evenly among the 3 prepared baking pans, using a kitchen scale for accuracy if desired.
Bake in preheated oven 25 – 30 minutes, or until a cake tester or toothpick inserted into the center of the cakes comes out clean.
Remove from oven and cool for 10 to 15 minutes on a wire rack, then run a knife around edges of the pans to ensure the cakes are loosened, and invert them onto the racks to cool completely.


Bourbon Caramel Sauce
Adapted from Minimalist Baker

1 cup sugar
1/4 cup water
1/4 cup unsalted butter (4 tablespoons, or 1/2 stick)
1/4 cup heavy cream
1 Tbsp bourbon (optional)
pinch of salt

Place sugar and water in a large saucepan over medium heat, gently swirling the pan (not stirring) to combine. Simmer (not stirring) for about 15 minutes or until a rich amber color is reached. It should look almost a reddish-brown, and have a slightly toasty aroma. Once the sugar starts to go from clear to golden, watch it very closely as it can go from perfect to burnt in under a minute. If you want to use a thermometer, cook until the sugar reaches 350 degrees.
Remove the pan from heat and slowly stir or whisk in the butter. It will bubble up a lot so be careful. Once the butter is combined, repeat the process with the cream. Then add the bourbon and salt stir or whisk to combine.
Place the pan back over the heat and simmer for another minute or two while stirring continuously.
Remove from heat and let it cool for about 15 minutes before pouring into a heat-safe dish or jar to cool to the touch. Then close or cover the container and transfer it to the refrigerator to cool completely before use. Any leftover caramel (I didn’t have much) can be stored in the fridge in an airtight container for several weeks.


Brown Butter Swiss Meringue Buttercream
Adapted from Martha Stewart 

6 large egg whites
1 cup granulated sugar
1 cup packed dark-brown sugar
1/2 teaspoon salt
2 sticks (1 cup) unsalted butter, room temperature
remaining 1/2 of the brown butter (will be a bit shy of 1 cup), softened
1 teaspoon vanilla extract

Wipe the bowl of an electric mixer with paper towel and a small amount lemon juice or vinegar to remove any trace of fat or grease. Make a double boiler by placing the mixer bowl over a saucepan of gently simmering water, making sure the bowl doesn’t touch the water.

Place egg whites, sugars, and salt into the bowl and whisk gently but continuously until the sugar is completely dissolved and the egg whites reach between 150 and 160 degrees F.
Attach the bowl to your mixer and use the whisk attachment to whip the egg whites on high speed until thick, glossy peaks form and the bowl no longer feels warm to the touch, about 7 to 10 minutes.
Switch to the paddle attachment and reduce speed to medium-low. Add butter, about 2 tablespoons at a time, beating after each addition. The meringue will deflate slightly as butter is added, don’t worry. Once all the butter is added, beat until the icing is smooth and silky, usually about 3 to 5 minutes.
Add the vanilla and beat on low just until combined.

If the buttercream curdles, don’t worry! Just keep mixing and it will come back to smooth.
If the buttercream is too thin and runny, refrigerate the bowl for about 15 or 20 minutes before mixing again with the paddle attachment until it comes together.


Assemble cake:

Remove parchment from each layer, and trim the domed tops off with a cake leveler or sharp bread knife if necessary. Flat layers will definitely result in a much prettier & more professional looking finished cake. My cakes didn’t dome much, so you may not need to do this step. Make sure the layers are completely cool (or cold) before you proceed.

If you’re not serving the cake the same day it’s baked, I recommend you brush each layer of cake with two or three tablespoons of simple syrup before assembly to keep it nice and moist for days. Just heat 1/3 cup sugar and 1/3 cup water together until the sugar is completely dissolved.

Place first layer on a cake stand, serving platter, or cardboard cake round. Top with roughly 1/4 of your icing (about one generous cup), and spread the icing out with an offset icing spatula, in as even and level a layer as possible. Place the next layer on top and check from above and from multiple angles to make sure it’s stacked perfectly centered with the layer below, and that it’s flat and level. Adjust if necessary.
Add another 1/4 of the icing, smooth it out, add the top layer, and check and adjust if necessary.

Using another 1/4 of your icing, spread a thin layer of icing over top and sides of cake with an icing spatula. I like to start at the top and slowly work my way down the sides. Be sure to fill in any gaps between layers and make the sides and top is as smooth and flat as possible. This thin layer of icing is referred to as the “crumb coat” and is meant to seal in any crumbs so they’re not seen in your final layer of icing. Refrigerate the cake for 30 minutes to an hour to set the icing before you proceed.
Spread the remaining icing evenly over top and sides of cake, trying to get as smooth a surface as possible.

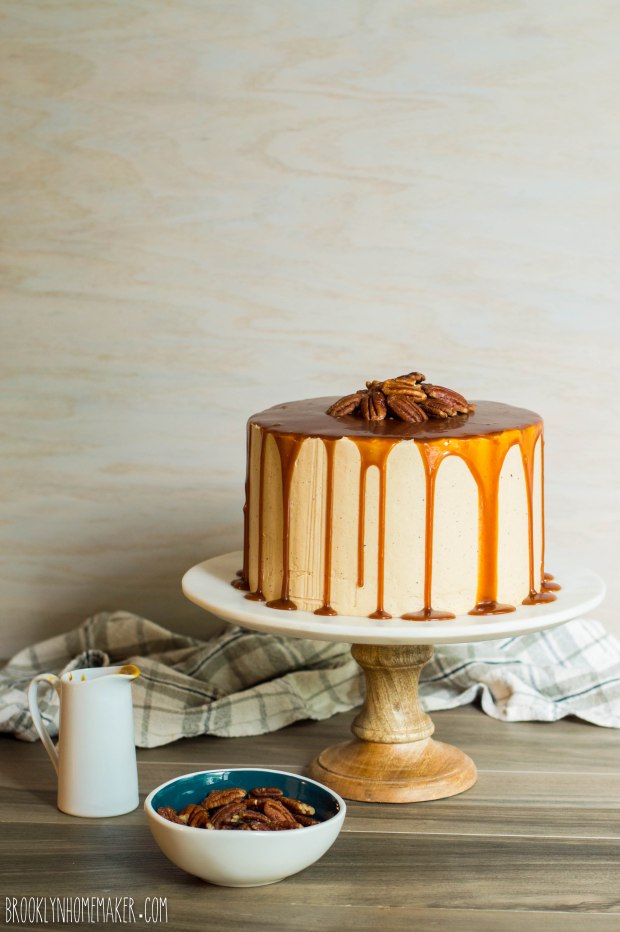
Top the cake with about 3/4 to 1 cup of the cooled caramel sauce, carefully and evenly drizzling some down the sides.
If desired, top the finished cake with the optional 1/3 cup of toasted whole pecans from above.

This cake is best the day it’s baked, but will keep well in a cake saver at room temperature for up to 2 days, if the weather is not too hot or humid. Otherwise, wrap tightly and store in the refrigerator for up to 3 days. If refrigerated, you’ll need to let it come up to room temperature for at least an hour before serving.

nectarines and cream icebox cake

Why hello there friends! Remember me???

nectarines and cream icebox cake | Brooklyn Homemaker

Yes it’s me! Tux!

I’m back! (well, sort of.)

nectarines and cream icebox cake | Brooklyn Homemaker

Russell and I are still plugging away at the project I mentioned in my last post, and while we’re (hopefully) nearing the finish line, we’ve still got plenty of work to do so I’m not exactly back for good. I just happened to get a little down time recently and I couldn’t bare to stay away from you for one more second!

I’ve missed you guys SO MUCH that I jumped at the opportunity to get back in the kitchen when I finally had a moment to myself. We’ve been so completely consumed with our project in the past few months that my poor kitchen has felt almost as neglected as all of you probably have.

nectarines and cream icebox cake | Brooklyn Homemaker

As it turns out though, my little bit of down time just happened to fall smack dab in the middle of our SECOND heat wave in the past couple months. For almost two weeks the daily weather forecast included “Excessive Heat Warnings”, and the city even set up “cooling stations” for the sick and elderly without air conditioning to be able to escape (and survive) the oppressive daytime temperatures.

To make matters even worse, unlike my brown-lawned family upstate, we’ve also had plenty of rain (and thunder and lightning) here in Brooklyn so along with the heat we’ve also had plenty of soupy, steamy, thick, and swampy humidity. In other words, we’ve just been sweating our butts off here in Brooklyn!

nectarines and cream icebox cake | Brooklyn Homemaker

As you can imagine, that meant that turning the oven on to bake a cake has been sort of out of the question.

nectarines and cream icebox cake | Brooklyn Homemaker

With actual baking off the table, my first thought was to make some kind of ice cream or frozen something-or-other to help cool us off and keep me as far as possible from the oven. It didn’t take me long to realize though, that I hadn’t thought far enough ahead and my ice cream maker bowl requires overnight freezing before I could even get started.
I briefly considered popsicles but I couldn’t seem to get inspired. What I really wanted to do was bakeor at least make something that felt as homey and satisfying as something fresh from the oven. I’d been out of the kitchen and away from my oven for so long that my head kept going back to the idea of a fruity crisp or crumble or skillet cake.

Then it suddenly hit me!

Icebox cake!

nectarines and cream icebox cake | Brooklyn Homemaker

If you’re not familiar with an icebox cake, the concept is fairly simple. You layer thin crisp cookies with whipped cream and let the whole thing set up in the refrigerator (or icebox as it were). While the cake sets up, moisture is pulled from the whipped cream, softening the cookies and firming the cream until the whole thing is transformed into a dreamy, wonderful, lick-the-plate-clean dessert with a perfectly cake-like sliceable texture.

The original recipe has been around since the first world war and was most likely inspired by similar desserts like the Charlotte or the Trifle. The first icebox cakes were made with thin chocolate wafer cookies that are increasingly difficult to find (Smitten Kitchen has a recipe if you want to make your own), but these days you can basically make them with any thin, crisp cookies you like.
The filling options these days are just as limitless as the cookies, so I knew I’d find a way to make something bright and summery and satisfying.

nectarines and cream icebox cake | Brooklyn Homemaker

I wish I had some sepia-colored story about the nostalgic icebox cakes my grandmother used to make me as a boy growing up in the countryside in 1764, but the truth is that I’d never even tasted icebox cake until I made one with gingersnaps and maple cream this past December.

Even though I didn’t grow up with them, they feel every bit as homey and comforting as the bundt cakes that I actually did grow up eating in grandma’s kitchen in the country. While they’re relatively new to me, I would bet that a few more icebox cakes will turn up on the pages of Brooklyn Homemaker in the years to come. They just have that folksy days-of-yore feeling that lets me wistfully imagine joyful, touching family moments that never actually happened.

Not to mention they’re also freakin’ delicious, and crazy simple to put together.
If you can whip cream and open a box of cookies, you can make an icebox cake. They’re actually much simpler than I myself would normally go for, and the last time I made one I went the extra mile and made my own gingersnaps as the base of the cake. (You know I’m a glutton for punishment.)

This time around though, I wanted to take it easy, keep it simple, and highlight the other ingredients I wanted to feature in this simple summery creation.

nectarines and cream icebox cake | Brooklyn Homemaker

Russell and I signed up for a CSA from Local Roots earlier this summer, but of course that was before we knew how busy we were about to get. We’ve been loving every ounce of fresh, local, seasonal produce, but it can sometimes be a challenge to find uses for everything without letting anything go to waste.

We’ve been getting pounds and pounds of white nectarines in the past few weeks, so I really wanted to do something special with them. What could be better than giving them the peaches and cream treatment with vanilla wafer cookies and mascarpone thickened whipped cream?

Nectarines and peaches are so similar in flavor and texture that you could substitute peaches without affecting the flavor of the recipe much at all. The white nectarines we had from our CSA though had a crisper, slightly more acidic zing to them than a standard peach, which I thought was a nice compliment to the richness of the cream. Honestly though, you could swap them out for strawberries or cherries and this cake would still be a little summery slice of heaven.

nectarines and cream icebox cake | Brooklyn Homemaker

Nectarines and Cream Icebox Cake

2 lbs nectarines (or peaches), peeled, pitted, and roughly chopped
3/4 cup sugar
pinch of salt
2 tablespoons orange liqueur, such as Cointreau (optional) *see note
2 1/2 cups cold heavy cream
8 oz mascarpone at room temperature
Two 11 oz packages of vanilla wafer cookies, such as Nilla Wafers

Combine roughly chopped nectarines with sugar, salt, and orange liqueur in a medium bowl. Stir to combine and macerate for at least 15 to 20 minutes.

Meanwhile, in the bowl of an electric mixer fitted with the whisk attachment, whip the heavy cream on high just until it begins to thicken and form soft peaks. Add the mascarpone and beat on low speed until almost smooth, about 30 seconds. Scrape down the sides and fold to incorporate. Add the macerated chopped nectarines and beat on low for 30 to 60 seconds and scrape down the sides and fold again. Increase the speed to medium high and beat until the mixture is thick and holds firm peaks, another 30 to 60 seconds. Do NOT over-beat or the cream can become waxy and the mascarpone can become grainy.

On an 8″ cake board, or a cake stand or serving plate, arrange a layer of vanilla wafer cookies into three tight circles. I used 19 cookies per layer, with 1 cookie in the center, then one circle of 6 cookies and another circle of 12, but that’ll depend on the size of the cookie you use. Once you’ve arranged your first layer of cookies, place about a cup of cream over them and smooth it out with an offset icing spatula. Spread the cream almost to the outer edge, leaving just a small edge of cookies showing. Arrange another layer of cookies, trying to alternate the layers so they appear staggered above one another. Repeat another layer of cream and then another layer of cookies, again and again until you have as many layers as you desire or until you run out of cookies or cream. Finish the top of the cake with a final layer of cream. My cake was 8 layers tall, but again, this may depend on the size of the cookies you use.

If you have a cookie or two left over, garnish the cake by crumbling them in the center of the top if desired.

Try to delicately tent the cake with plastic wrap or cover with a large inverted bowl or cake dome before transferring to the refrigerator to set up.
Place cake to refrigerator for an absolute minimum of 6 hours (but ideally 12 to 24 hours) before serving. This cake will continue to improve the longer you can wait. As it sets, the cream will get firmer as the cookies get softer, and the flavors will distribute more evenly. Patience is a virtue!

Once set, the cake can be sliced and served much like a regular cake. If possible, it’s best to use a sharp serrated knife with a gentle sawing motion to avoid smooshing the cake and to get the best looking slices possible. Really though, you could dish it into bowls with a spoon if you wanted, and everyone would love it just as much.
Cake can be stored in the fridge in an airtight container for 3 or 4 days.

*Note:
Peach schnapps would be great too if you have it, or you could also substitute rum or bourbon for a bit of extra warmth.
If you’d prefer to keep it completely non-alcoholic, a teaspoon or two of orange blossom water or rose water would be a lovely substitution. That stuff is potent though so start with just a little and taste to see if you’d like to add more.

apple cider doughnut cake

You guys. Break out the streamers and balloons.

Brooklyn Homemaker turns two today!

apple cider doughnut cake with mascarpone icing & cider caramel sauce | Brooklyn Homemaker

It has been exactly two years since I started this whole adventure, and I gotta say that I’m really proud of myself and my humble little blog. I think a celebration is in order.

When Brooklyn Homemaker was born I had no idea how far I would come, or could come, or how much I’d learn, or grow, or how many friends I’d make, how many people’s lives I’d touch, or how many people’s lives would touch my own. Day by day, post by post, little by little; I’ve forged new relationships, met new people, tried new things, experimented with new recipes and ingredients, grown as a photographer and recipe developer, and slowly developed a dessert plate hoarding problem that’s beginning to concern my husband. I’ve also learned that while the blogging world is competitive place, it’s also a warm and welcoming place with a strong sense of community. It’s filled with genuinely lovely, charitable, supportive individuals who love to help each other out whenever and however they can.

Over the past two years I’ve also learned a lot about myself and what I want for and from Brooklyn Homemaker. I’ve learned to accept that what I like and what I don’t like is more important to me than what the blogging powers-that-be tell me is important. Lately I’m trying to take a quality over quantity approach when it comes to my posting schedule, and focus on what makes me happy rather than what I’m told will get me more re-pins and likes. I gotta be me. What else can I be?

apple cider doughnut cake with mascarpone icing and cider caramel sauce | Brooklyn Homemaker

When my first anniversary rolled around last year I decided to recreate the cake that started it all, the cake that launched 1,000 posts (well, 142 and counting), the incomparable Aunt Sassy cake. While this pistachio dream cake is seriously amazing, I couldn’t do it again because, well you know, been there done that. Twice.

This year I was looking for the perfect way to represent myself and my blog, in big fancy cake form. I wanted something both festive and elegant at the same time. Something refined and adult, but with a bit of fun and nostalgia thrown in for good measure. Being that it’s Fall and all, and being that Fall is the best season ever invented, I also wanted to do something seasonally appropriate. Something with apples…

apple cider doughnut cake with mascarpone icing & cider caramel sauce | Brooklyn Homemaker

Is there any better way to add fun and nostalgia to a dessert than to base it on something we ate as kids? I don’t think so. Luckily when I was growing up there were plenty of harvest festivals and county fairs for me to get nostalgic about. Upstate New York is just lousy with them this time of year! There’s the Lafayette Apple Festival, Tomatofest (hosted in my own hometown), the Jordan Fall Festival, countless county fairs, and the great New York State Fair (dat butter sculpture doe), just to name a few several…

Of course the best part of these fairs and festivals is always the food! There’s the staples like fried dough, funnel cakes, and corn dogs; but upstate we have our own regional specialties like salt potatoes, chicken spiedies, and steaming cups of fresh pressed warm apple cider. When it comes to fall festival foods though, my all time favorite is and always will be sweet little apple cider doughnuts fresh and warm from the fryer, sparkling with sugar and cinnamon.

As soon as those chubby little doughnuts crossed my mind I KNEW I had my idea.

apple cider doughnut cake with mascarpone icing & cider caramel sauce | Brooklyn Homemaker

Now, you may think that to really translate the essence of a doughnut into cake form it should be round, like a bundt cake. While I’d normally agree with you, I do plenty of bundt cakes around here. This occasion called for a true celebration cake. Something with layers. Something tall.

apple cider doughnut cake with mascarpone icing & cider caramel sauce | Brooklyn Homemaker

I’m not usually a huge fan of naked cakes. They can feel a little too hip and trendy for me, but I guess I live in Brooklyn so I should probably just get over that. I also feel like the whole point of icing a cake is to seal it under a thick delicious layer of sugar and fat to keep it from drying out or going stale. This time around though, I had this whole big bright idea to coat the cake layers in cinnamon and sugar rather than icing to really drive home the cider doughnut point.

We all make mistakes.

Even me. Even after two years of blogging.
apple cider doughnut cake with mascarpone icing & cider caramel sauce | Brooklyn Homemaker

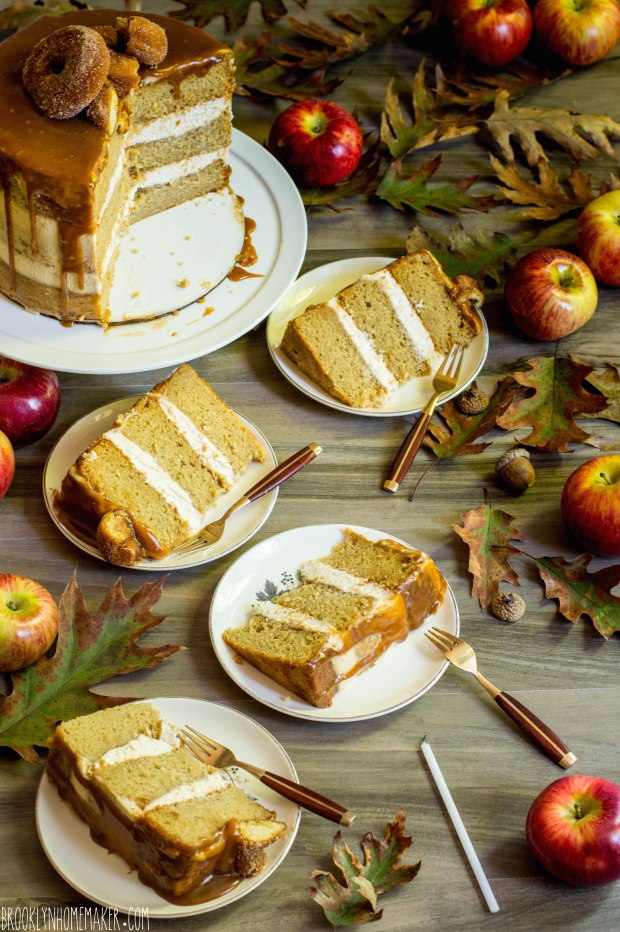
I was really stuck on this idea of coating the cake layers in sparkly cinnamon sugar, so I brushed each one with some melted butter and pressed the sugar into it. Then I stacked away and sandwiched a thick blanket of icing between each layer. The icing squeezed out the sides a little as I stacked, and at first looked imperfect and rustic in a charming sort of way. Once I went ahead with the caramel drizzle though, I had a disaster on my hands.

Rather than drizzling evenly and elegantly down the sides of the cake, as soon as the caramel reached the icing it pooled and dripped and ran all over the place. I did my best to control the way I drizzled and poured to get the look I wanted, but to no avail. You’ll just have to trust me when I say that it looked really terrible. Even Russell, who generally knows to bite his tongue when I’m in the kitchen, had to admit that it wasn’t my best work. I mean, it’d still taste great but it certainly wasn’t going to photograph well, and this is a special occasion!

As fate would have it, Russell had friends visiting from LA and of course they rang the buzzer almost at the exact moment that I realized things weren’t going my way. I was already getting frustrated, and with guests coming through the kitchen with suitcases I started to get really embarrassed too. I try to project an image of domestic perfection through my blog, so when things don’t turn out perfectly I feel like it reflects poorly on me and my abilities as a baker and blogger. I was so upset and embarrassed by my cake that I actually just stood in front of it as our guests were coming in, trying to block it from view as they were getting settled. I knew I was being ridiculous, but that just made me feel even worse and I could feel my temper getting away from me. Rather than risk a blowout in front of people I barely knew, I put the cake in the fridge for a few minutes and went to sit and chat with our guests. Once I’d calmed down a little I felt brave enough to take the cake back out of the fridge and see what I could do with it. Luckily I had a bit of icing and caramel left over, so I scraped the mess off the sides and set to work with an icing spatula. Once the sides were nice and smooth, the caramel poured down the cake like a dream!
Phew! Crisis (and tantrum) averted.

apple cider doughnut cake with mascarpone icing & cider caramel sauce | Brooklyn Homemaker

This cake. Oh boy. This cake.
What can I say?

This cake is out of control. It’s a true celebration cake in every sense.
The cake itself is unbelievably moist and tender and springy, just like a fresh apple cider doughnut. It’s rich, subtly spiced, and just sweet enough; and just like an apple cider doughnut it has a delicate yet distinct apple-y flavor.
To add an adult, elegant touch I opted for a mascarpone cream icing rather than whipped cream or cream cheese. This was a new recipe to me, which can sometimes be risky, but in this case the risk really paid off. I think this might seriously be my new favorite icing, and it’s the absolute perfect compliment to this cake. Thick, creamy, rich, and just sweet enough. It has a texture almost like whipped cream, but somehow richer and thicker and more decadent (and certainly more stable at room temperature)
Then of course, there’s the caramel sauce. I don’t have words for just how good this stuff is. It’s insane, like eating a caramel apple, in sweet buttery sauce form. It’s made by reducing and reducing and reducing apple cider until thick and syrupy; then adding butter, cream, brown sugar, a bit of spice, and a touch of salt. I should have guessed this, but with this sauce the lost cinnamon sugar coating wasn’t even missed.
The sugary chubby little doughnuts on top aren’t absolutely necessary, but they sure are cute, and I really think they make this cake sing.

I couldn’t have asked for a better cake to celebrate my second anniversary. Here’s to many more to come, and here’s to you guys! Thanks for reading, and commenting, and thanks for coming along for the ride!

apple cider doughnut cake with mascarpone icing & cider caramel sauce | Brooklyn Homemaker

Apple Cider Doughnut Layer Cake with Spiced Mascarpone Icing and Apple Cider Caramel Drizzle

Apple Cider Doughnut Cake:
(adapted from Serious Eats)
12 tablespoons unsalted butter (1 1/2 sticks), at room temperature (plus more for pans)
2 medium cooking apples like Cortland or MacIntosh, peeled, cored, and roughly chopped
2 cups apple cider
3/4 cup buttermilk, at room temperature
2 teaspoons pure vanilla extract
3 3/4 cups all-purpose flour (plus more for pans)
2 teaspoons baking powder
1 teaspoon baking soda
1 teaspoon salt
1/4 teaspoon ground nutmeg
1/2 teaspoon ground cinnamon
1 1/4 cup sugar
3/4 cup packed light brown sugar
5 large eggs, at room temperature
1/3 cup vegetable oil

Additional for assembly:
3 fresh apple cider doughnuts (optional)

For the Cake:
Adjust oven rack to middle position and preheat oven to 350°F. Brush the bottoms of 3 eight inch cake pans with butter. Place 8″ circles of parchment in the pans, and generously brush pans all over with butter and coat with flour, tapping out any excess.

In medium saucepan, bring chopped apple and cider to boil over medium-high heat. As apple begins to fall apart, stir and whisk with a fork to try to mash and break it up as much as possible. Reduce heat slightly and simmer and reduce, stirring frequently, until mixture measures exactly 1 1/2 cups, about 20 minutes or so. Cool at least 5 minutes in a large measuring cup before mixing in buttermilk and vanilla. Set aside.

In medium bowl, whisk together flour, baking powder, baking soda, salt, nutmeg, and cinnamon; set aside.

In the bowl of an electric mixer, beat the butter, sugar, and brown sugar on medium speed until light and fluffy, about 3 minutes. Add eggs, one at a time, beating well after each addition. Add oil and beat until incorporated, about 1 minute.

Decrease mixer speed to low and add flour mixture in three batches, alternating with apple mixture, scraping down sides and bottom of bowl with rubber spatula as needed. Increase speed to medium and beat mixture just until combined, about 30 seconds.

Evenly divide batter between prepared pans. Bake until cake tester inserted in cake comes out clean, rotating cakes halfway through baking, about 30 to 40 minutes. Transfer cakes to cooling rack for about 20 or 30 minutes, before carefully removing the cakes from the pans to cool the rest of the way.

Cool completely, about 1 hour, before assembly. Just before assembly, remove parchment if still stuck to the cakes.

Apple Cider Caramel Sauce: 
(adapted from Café Sucre Farine)
2 cups apple cider
½ cup butter (1 stick)
1 cup dark brown sugar, packed
¾ cup heavy cream
¼ teaspoon nutmeg
½ teaspoon cinnamon
½ teaspoon sea salt
2 teaspoons vanilla extract

Place apple cider in a medium heavy-bottomed pot. Bring to a boil, reduce to a high simmer, and cook until cider is reduced to ¼ cup. It should get a bit thick and syrupy. The thicker it gets the closer you need to watch it to be sure it doesn’t dry out or burn.
Add butter to the pan and heat until melted. Add the sugar, cream, salt and spices and whisk to combine. Bring to a gentle boil and cook for 7 minutes, stirring frequently.
Remove from heat and add vanilla extract, stirring to combine.

Mixture will thicken as it cools.

You’ll likely have more sauce than you need for this cake. Any extra should be kept in the refrigerator to be eaten with a spoon at midnight.

Spiced Mascarpone Cream Icing:
(adapted from Fine Cooking)
1 1/2 cups cold heavy cream
1 lb. (16 oz) mascarpone cheese, at room temperature
2/3 cup granulated sugar
2 teaspoons pure vanilla extract
1/2 teaspoon cinnamon
1/8 teaspoon nutmeg
1/8 teaspoon salt

In the bowl of an electric mixer fitted with the whisk attachment, whip the heavy cream until it begins to thicken and form soft peaks. In a separate bowl, stir together the mascarpone, sugar, vanilla, spices, and salt until smooth and well combined. Transfer mascarpone mixture to bowl with thickened cream and beat on low speed until almost smooth, 30 to 60 seconds. Scrape down the sides and fold to incorporate. Increase the speed to medium high and beat until the mixture is thick and holds firm peaks, another 30 to 60 seconds. Do NOT overbeat or the frosting will become grainy.

Assemble Cake:
Place the first cake layer on an 8″ cardboard cake round, serving plate, or cake stand. If necessary, trim the top with a cake leveler or sharp serrated knife to create a flat surface. Top with about 1/3 of the mascarpone cream icing and evenly smooth out with an icing spatula. Add the next layer, trim and ice with the same amount of icing, then add the third layer and trim flat as necessary. Top the third layer with about half of the remaining icing, and smooth it out as flat as possible. Spread the remaining icing in a very thin smooth layer over the sides of the cake, and put it in the refrigerator to firm up for about 30 minutes.

Top the cake with about 3/4 to 1 cup of the cooled caramel sauce, carefully and evenly drizzling some down the sides.

If desired, top the finished cake with 3 small fresh apple cider doughnuts.

This cake will keep well in a cake saver at room temperature for up to 3 days, if the weather is not too hot or humid. Otherwise, wrap tightly and store in the refrigerator for up to 3 days. Bring to room temperature for at least an hour before serving.