summer

caramelized peach cornmeal skillet cake with bourbon whipped cream

So this was supposed to be a simple summer dessert.

caramelized peach cornmeal skillet cake with bourbon whipped cream | Brooklyn Homemaker

I’ve been seeing fresh local peaches making their way into the market, so they’ve been on my mind a lot lately. One of my favorite ways to eat a peach is to hold it in your hand and devour it. Eating a fresh ripe peach is an experience unlike that of most other fruit. When you bite into a peach it’s soft fleshy interior barely puts up a fight. You’re forced to slurp and lick between bites to catch the river of drippy golden juices trying to escape down your chin and wrist. A perfectly ripe peach is sweet and jammy and eating one is an almost vulgar exercise.

caramelized peach cornmeal skillet cake with bourbon whipped cream | Brooklyn Homemaker

As much as I can urge and encourage you to take advantage of peach season before it’s too late, I can’t very well post a recipe titled, “eat a damned peach”. I mean, I guess I could, but it would be weird.

caramelized peach cornmeal skillet cake with bourbon whipped cream | Brooklyn Homemaker

So, the plan was to come up with the perfect recipe to be a vehicle for this quintessential summer stone fruit.

At first I kept thinking of going in the bundt cake direction, but you and I both know I’ve been pumping out plenty of bundts lately. I wanted something a little simpler and more rustic. Something that would highlight and compliment the peaches. So I started brainstorming. For the next few days I was going over all the options I could think of. Cobblers and crumbles, buckles and slumps, pies and galettes, cupcakes and ice cream. Then, suddenly, it dawned on me. Skillet cake! Buttermilk skillet cake! Cornmeal buttermilk skillet cake! Brown butter cornmeal buttermilk skillet cake! Boom. Boom. Boom.

It’s funny the way the mind works. Days of thought and then POW! I had my answer, in detail, in less than 30 seconds.

caramelized peach cornmeal skillet cake with bourbon whipped cream | Brooklyn Homemaker

The recipe is actually pretty simple to make too. You need little more than a skillet, a bowl & a spatula. Oh and maybe a knife for the peaches. Making homemade whipped cream is the only part that really requires any specialty tools.

The only “extra” steps I took to build layers of flavor in this cake were caramelizing the peaches and browning the butter. If you wanted to simplify things you could certainly skip one or both of these steps, but I really think that taking the extra few minutes makes all the difference in making this cake so amazing. Both steps help build a richness and depth of flavor, and I think its worth it in the end.

caramelized peach cornmeal skillet cake with bourbon whipped cream | Brooklyn Homemaker

So like I said before, this was supposed to be an ordinary summer dessert. Something simple that would highlight the perfect peach and its perfect peachiness. Before I even started I knew that it would be good, and that the flavors here were right up my alley, but I wasn’t expecting it to be so different. So extraordinary. So perfect. I simply didn’t expect this to be so wonderful. I didn’t expect it to end up being my favorite dessert of 2014. But… It is.

caramelized peach cornmeal skillet cake with bourbon whipped cream | Brooklyn Homemaker

Before this went into the oven I thought I should probably make sure it wasn’t poison If I was going to go forward with the baking process. So, I stole a little spoonful of batter. Then, I had to have another. And maybe one more after that. Oh my god. Something about this was just soooo good.

Once it had cooled, and I’d gone ahead and photographed it, I sat down and picked up one of the slices I’d cut and staged for the photo. I took a bite.

Whoa. It was perfect. Warm and homey and simple and summery, the perfect dessert.

caramelized peach cornmeal skillet cake with bourbon whipped cream | Brooklyn Homemaker

I am a total sucker for desserts that are rustic, un-fussy, and old-fashioned. While I do sometimes love fancy over-the-top desserts, I’d take a rustic galette or a bubbling crumble over a fussy french pastry any day of the week. I think that’s why I love this cake so much. It’s everything I look for in a dessert. Comfort food at it’s finest.

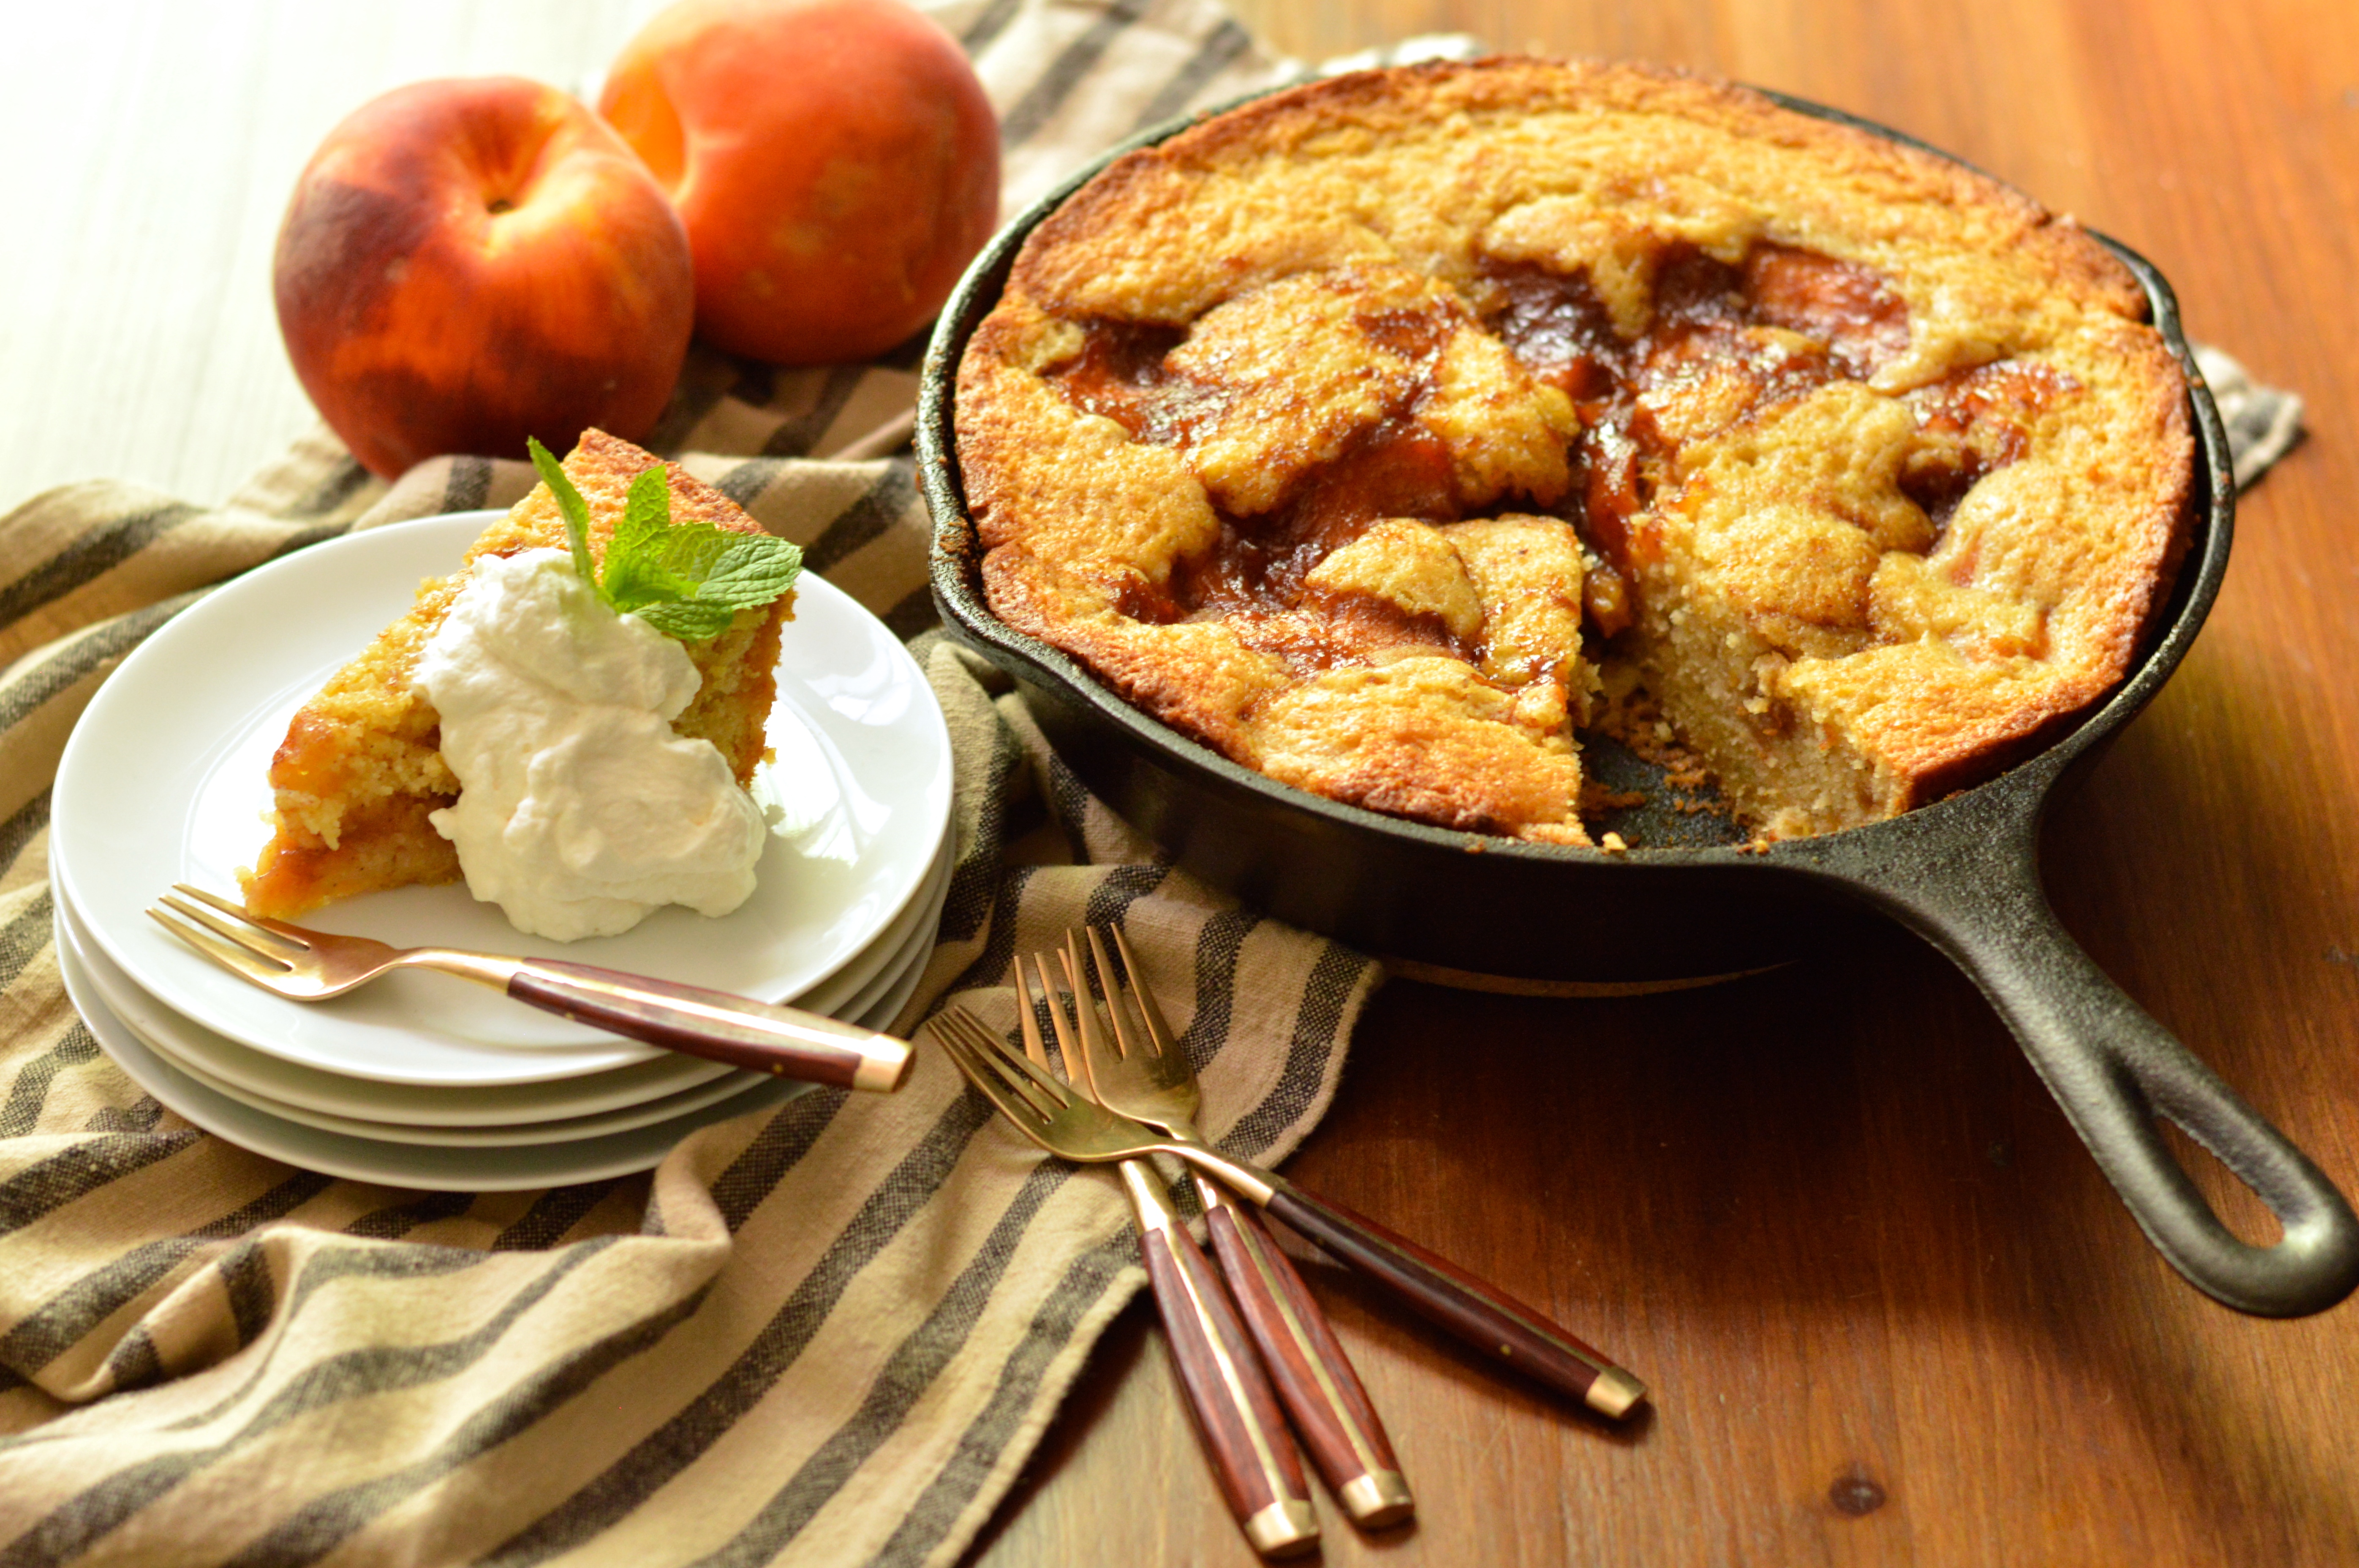
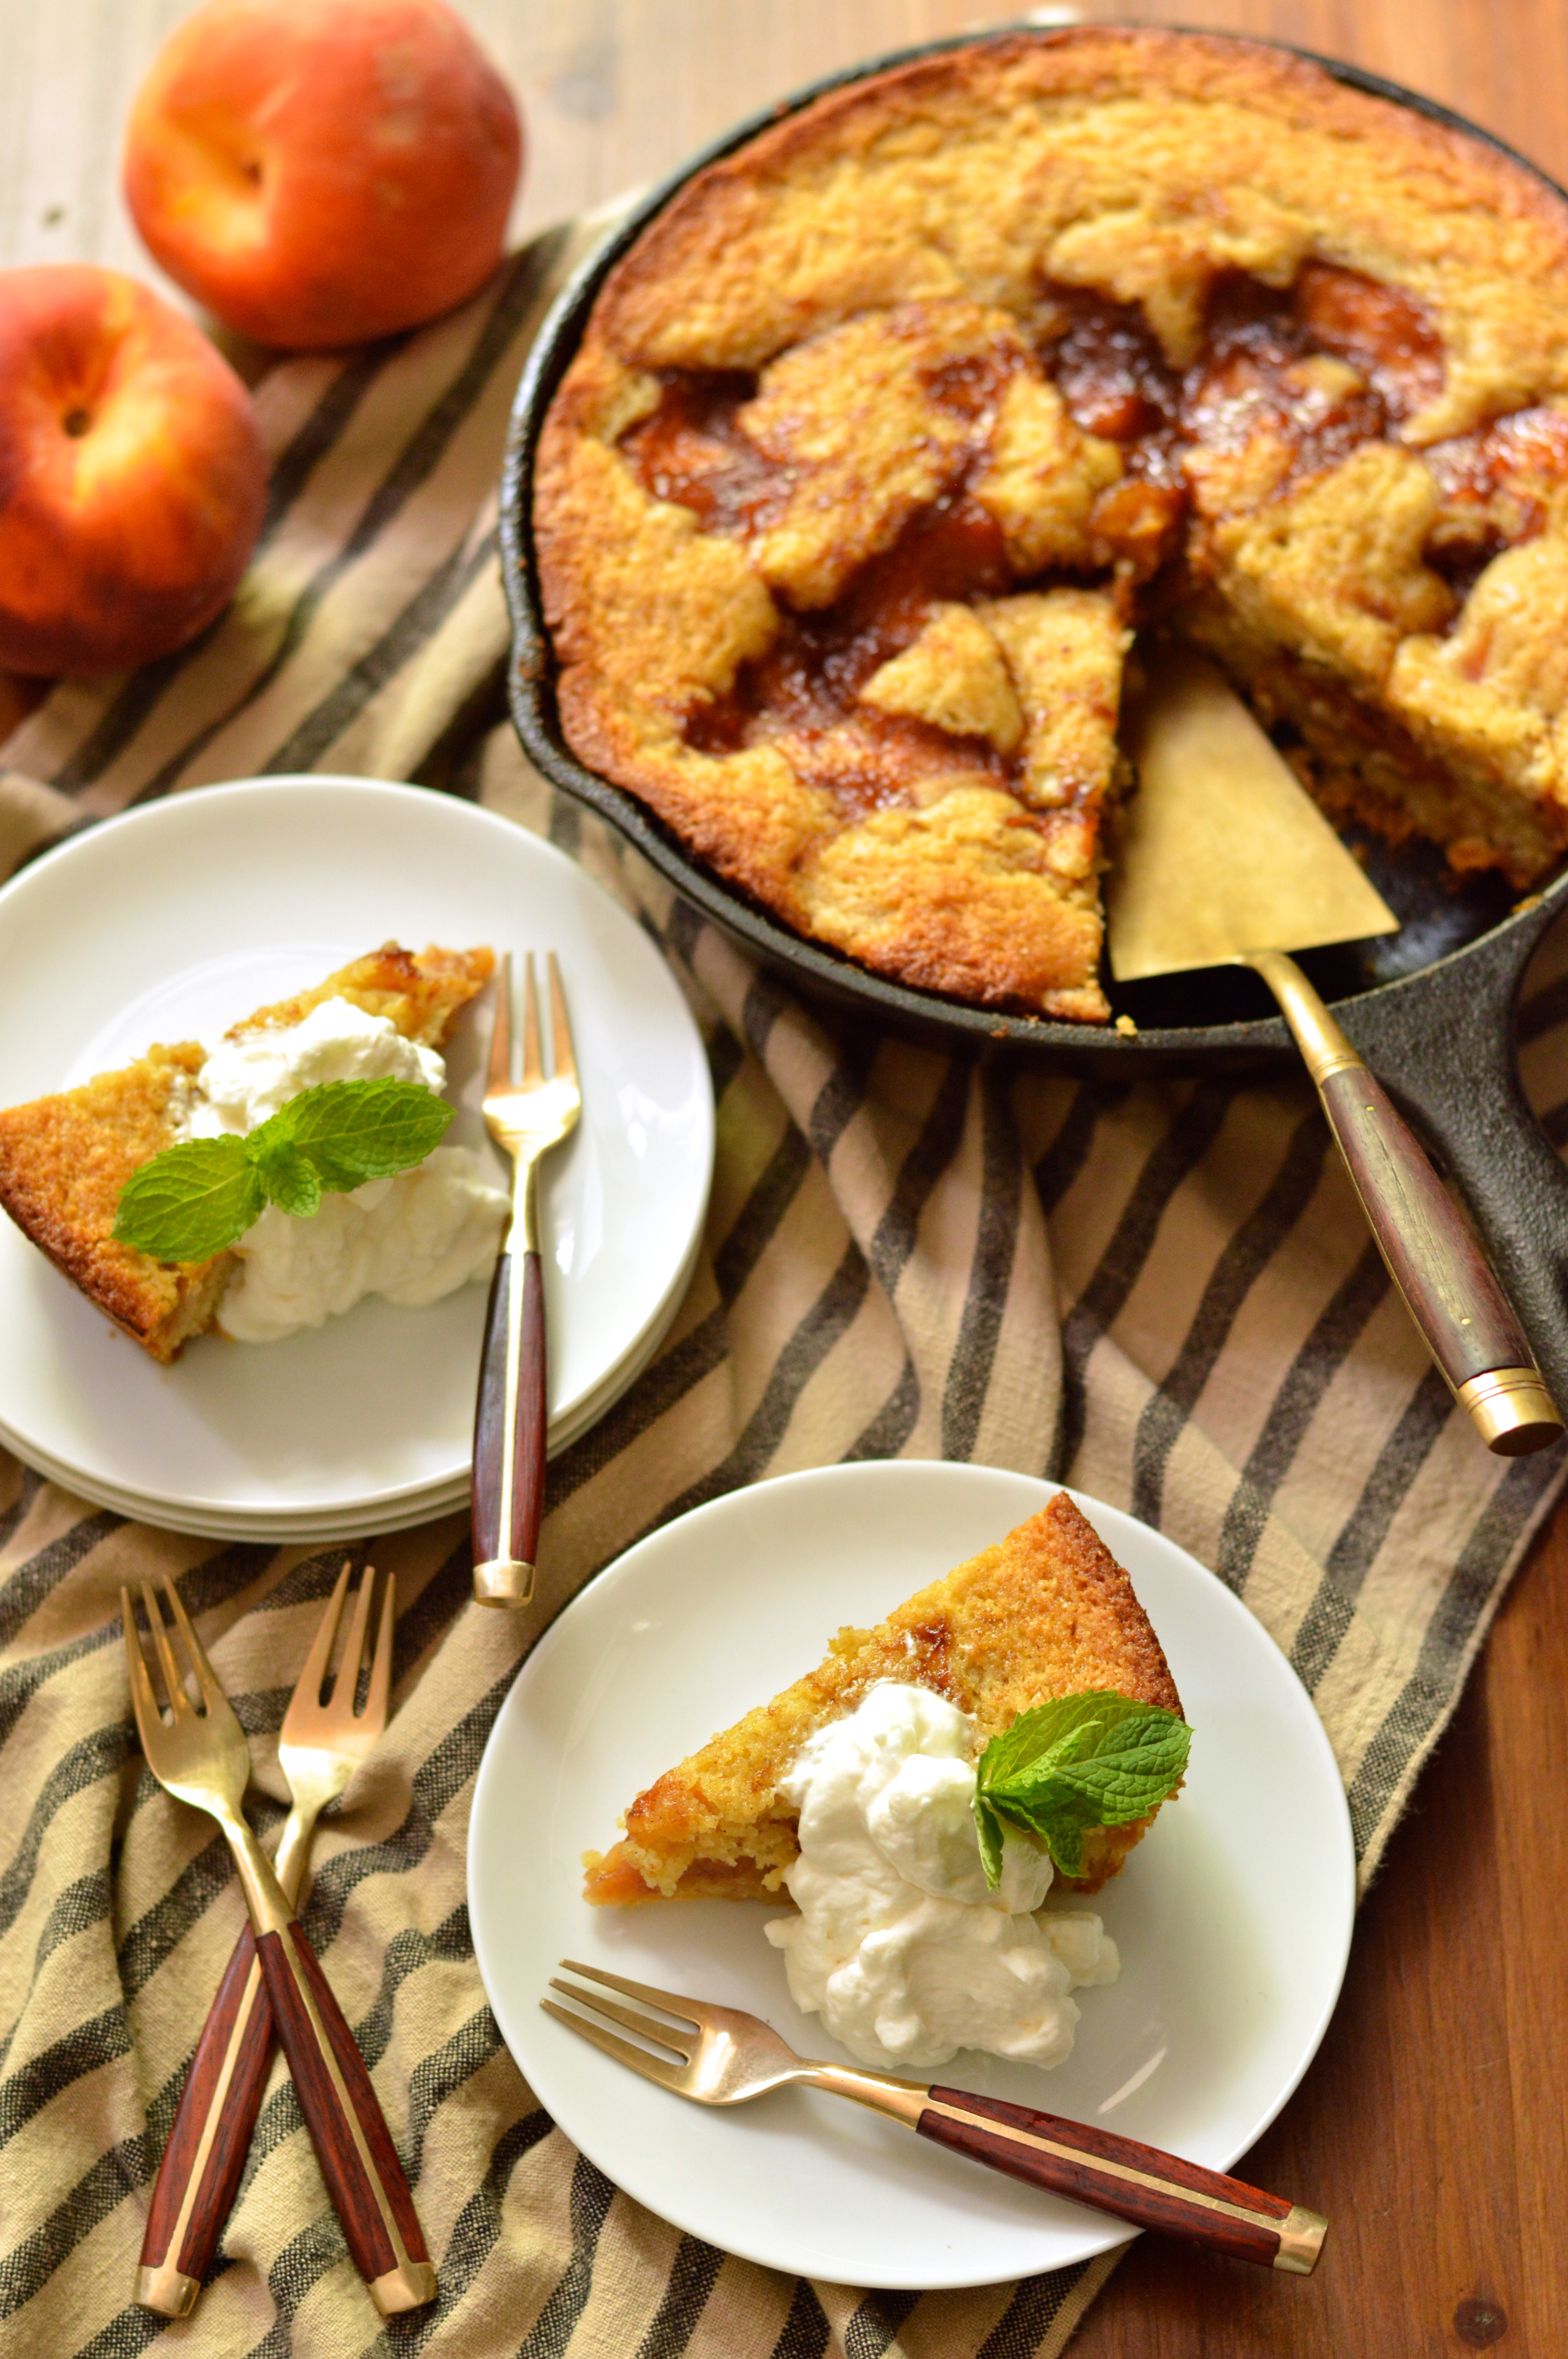
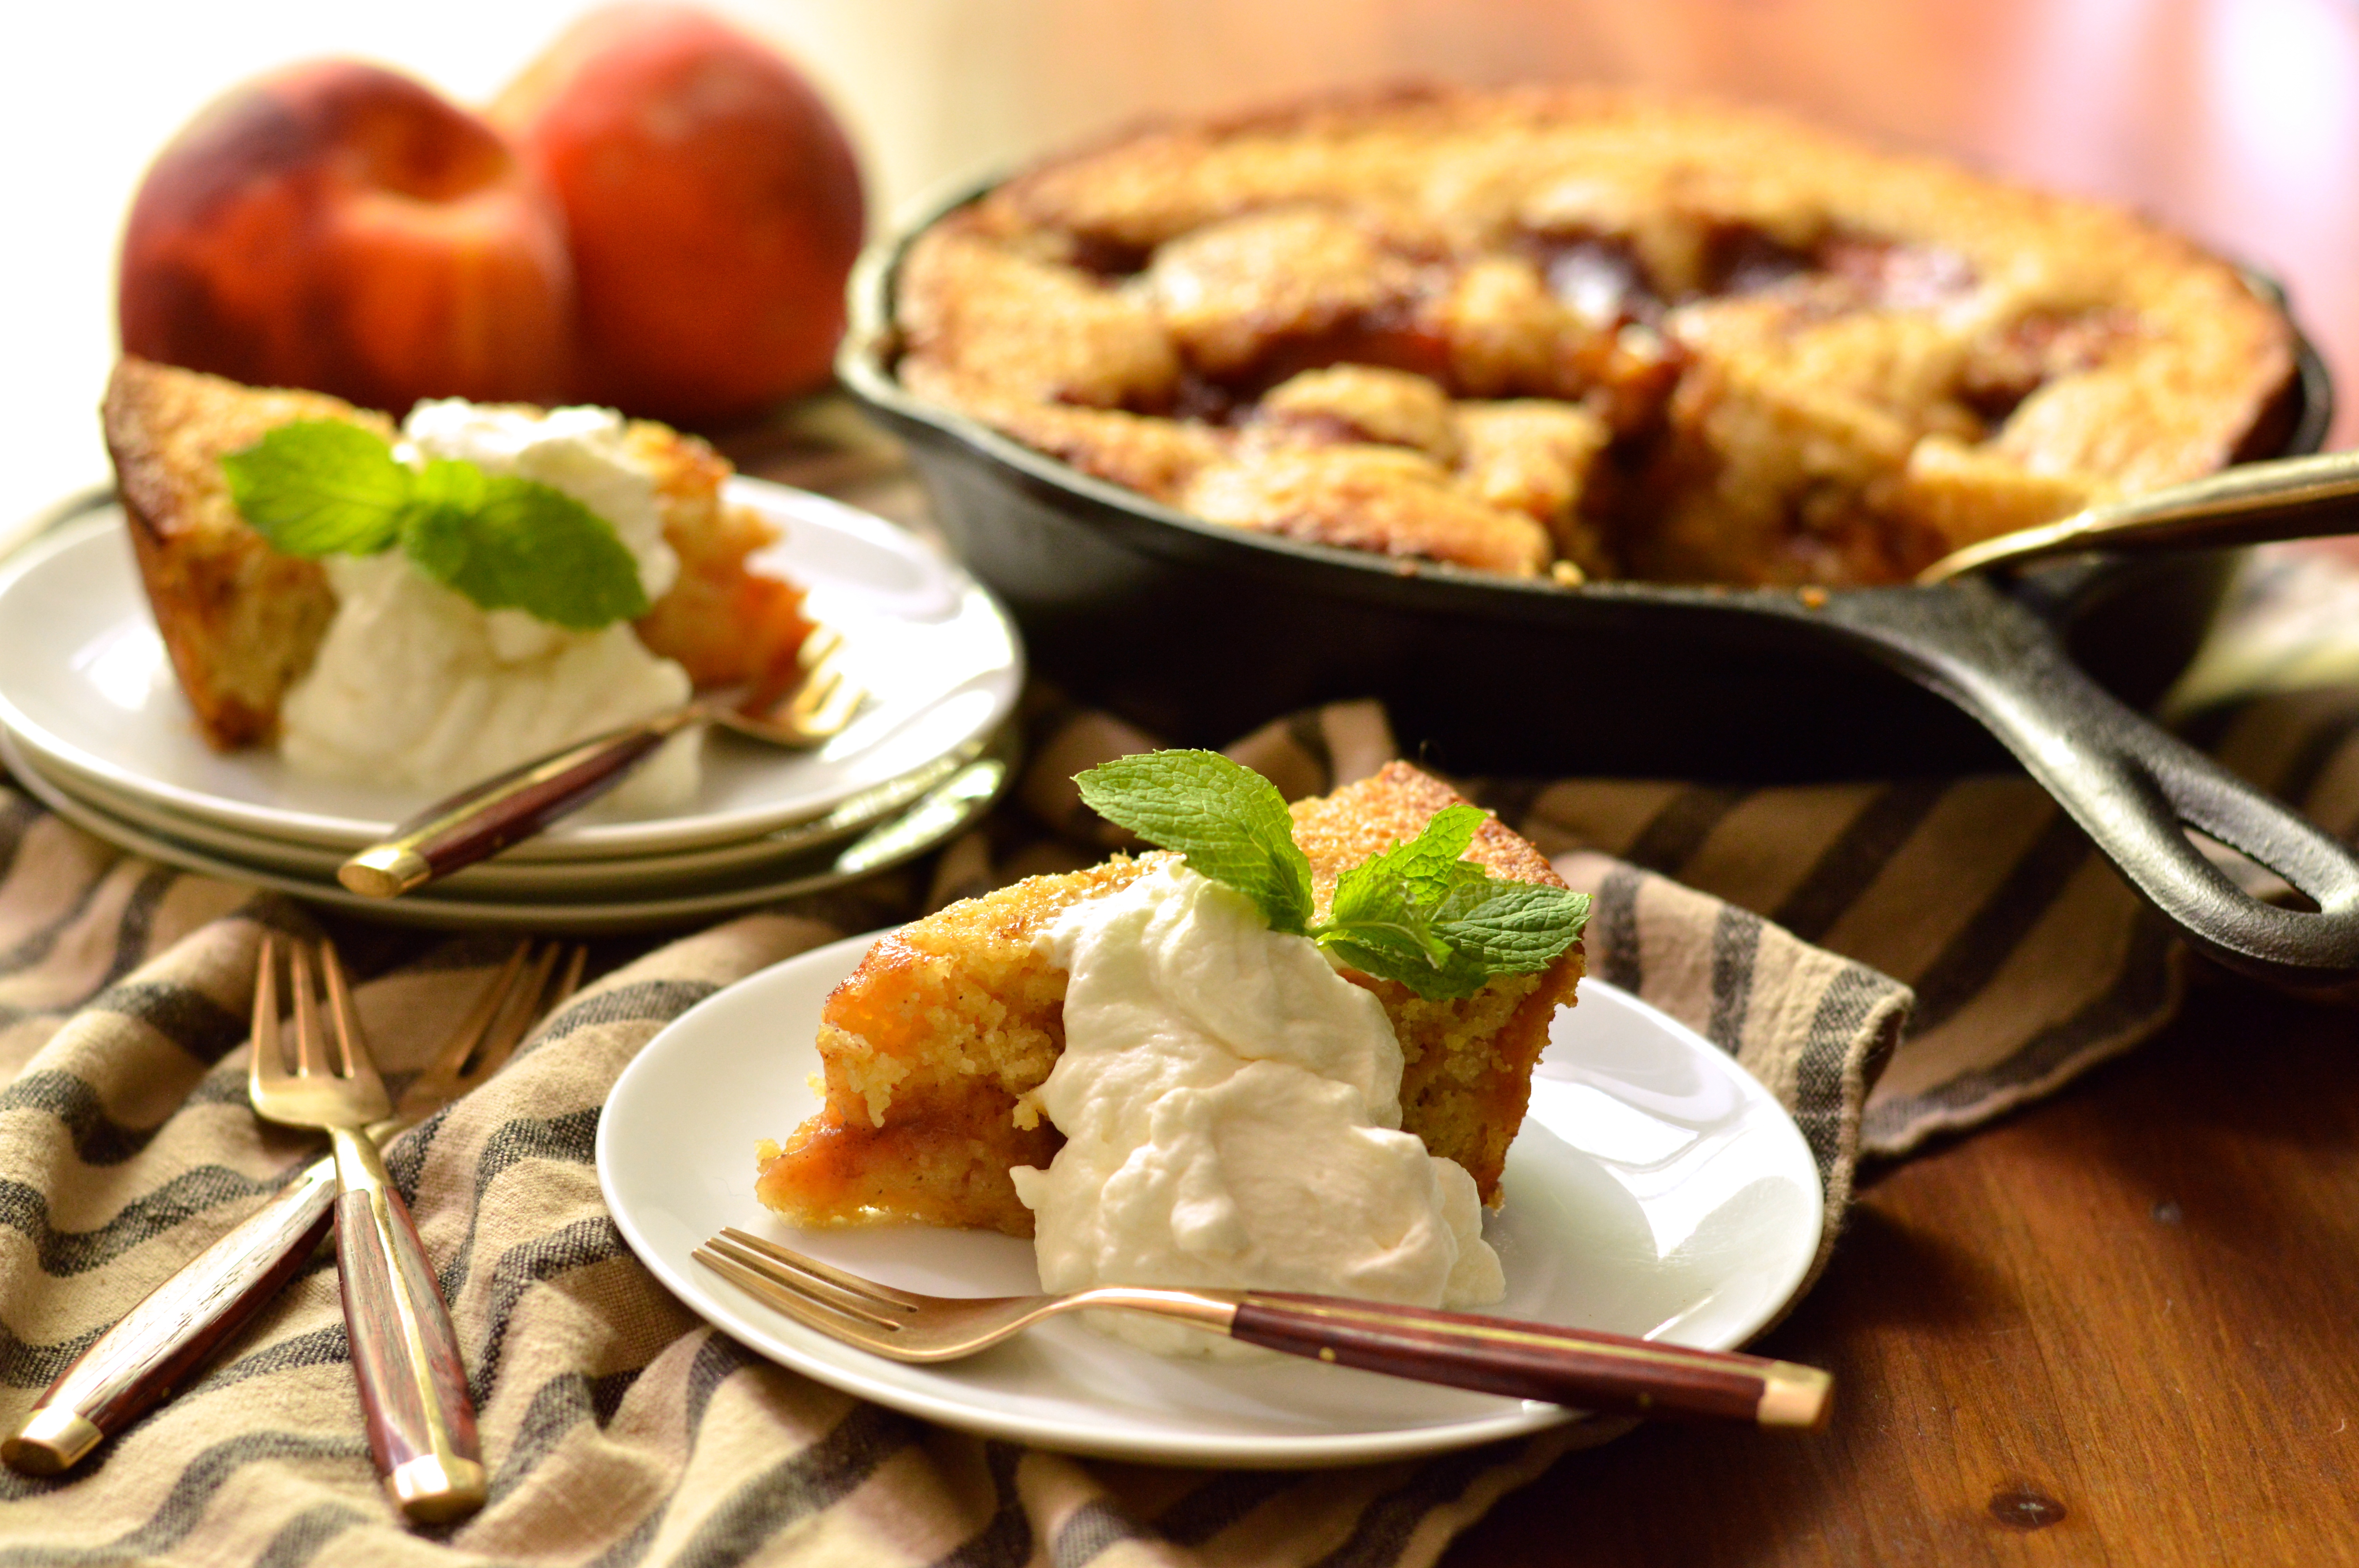
Baking this in cast iron means the outside edge has a cornbread crustiness, while the interior is soft and delicate. The cornmeal in this cake gives it a bit of texture and bite, but it’s somehow also tender and moist at the same time. The jammy caramelized peaches are soft and gooey and rich. The combination of nutty brown butter, tangy buttermilk, and earthy cornmeal, along with the caramelized sweetness and vibrant summariness of the peaches is unbelievable.

This cake is phenomenal on its own, warm out of the oven or served at room temperature. If you want to, you can serve it with a scoop of good vanilla ice cream. I think that might be overkill though, and recommend you opt for a hearty dollop of bourbon scented whipped cream.

caramelized peach cornmeal skillet cake with bourbon whipped cream | Brooklyn Homemaker

Caramelized Peach Cornmeal Skillet Cake

adapted from Martha Stewart

1 stick plus 2 tablespoons unsalted butter, divided
1 1/2 lb fresh peaches
1/4 cup brown sugar
pinch salt
1 1/4 cups all-purpose flour
1/2 cup yellow cornmeal
2 teaspoons baking powder
1 teaspoon salt
1 cup sugar
1/2 cup buttermilk
2 large eggs

Preheat oven to 375 degrees. In a 9″ or 10″ cast iron skillet (*see note), brown 1 stick unsalted butter over medium high heat. Brown until butter smells nutty and looks golden. Pour off into a medium heatproof bowl to cool.

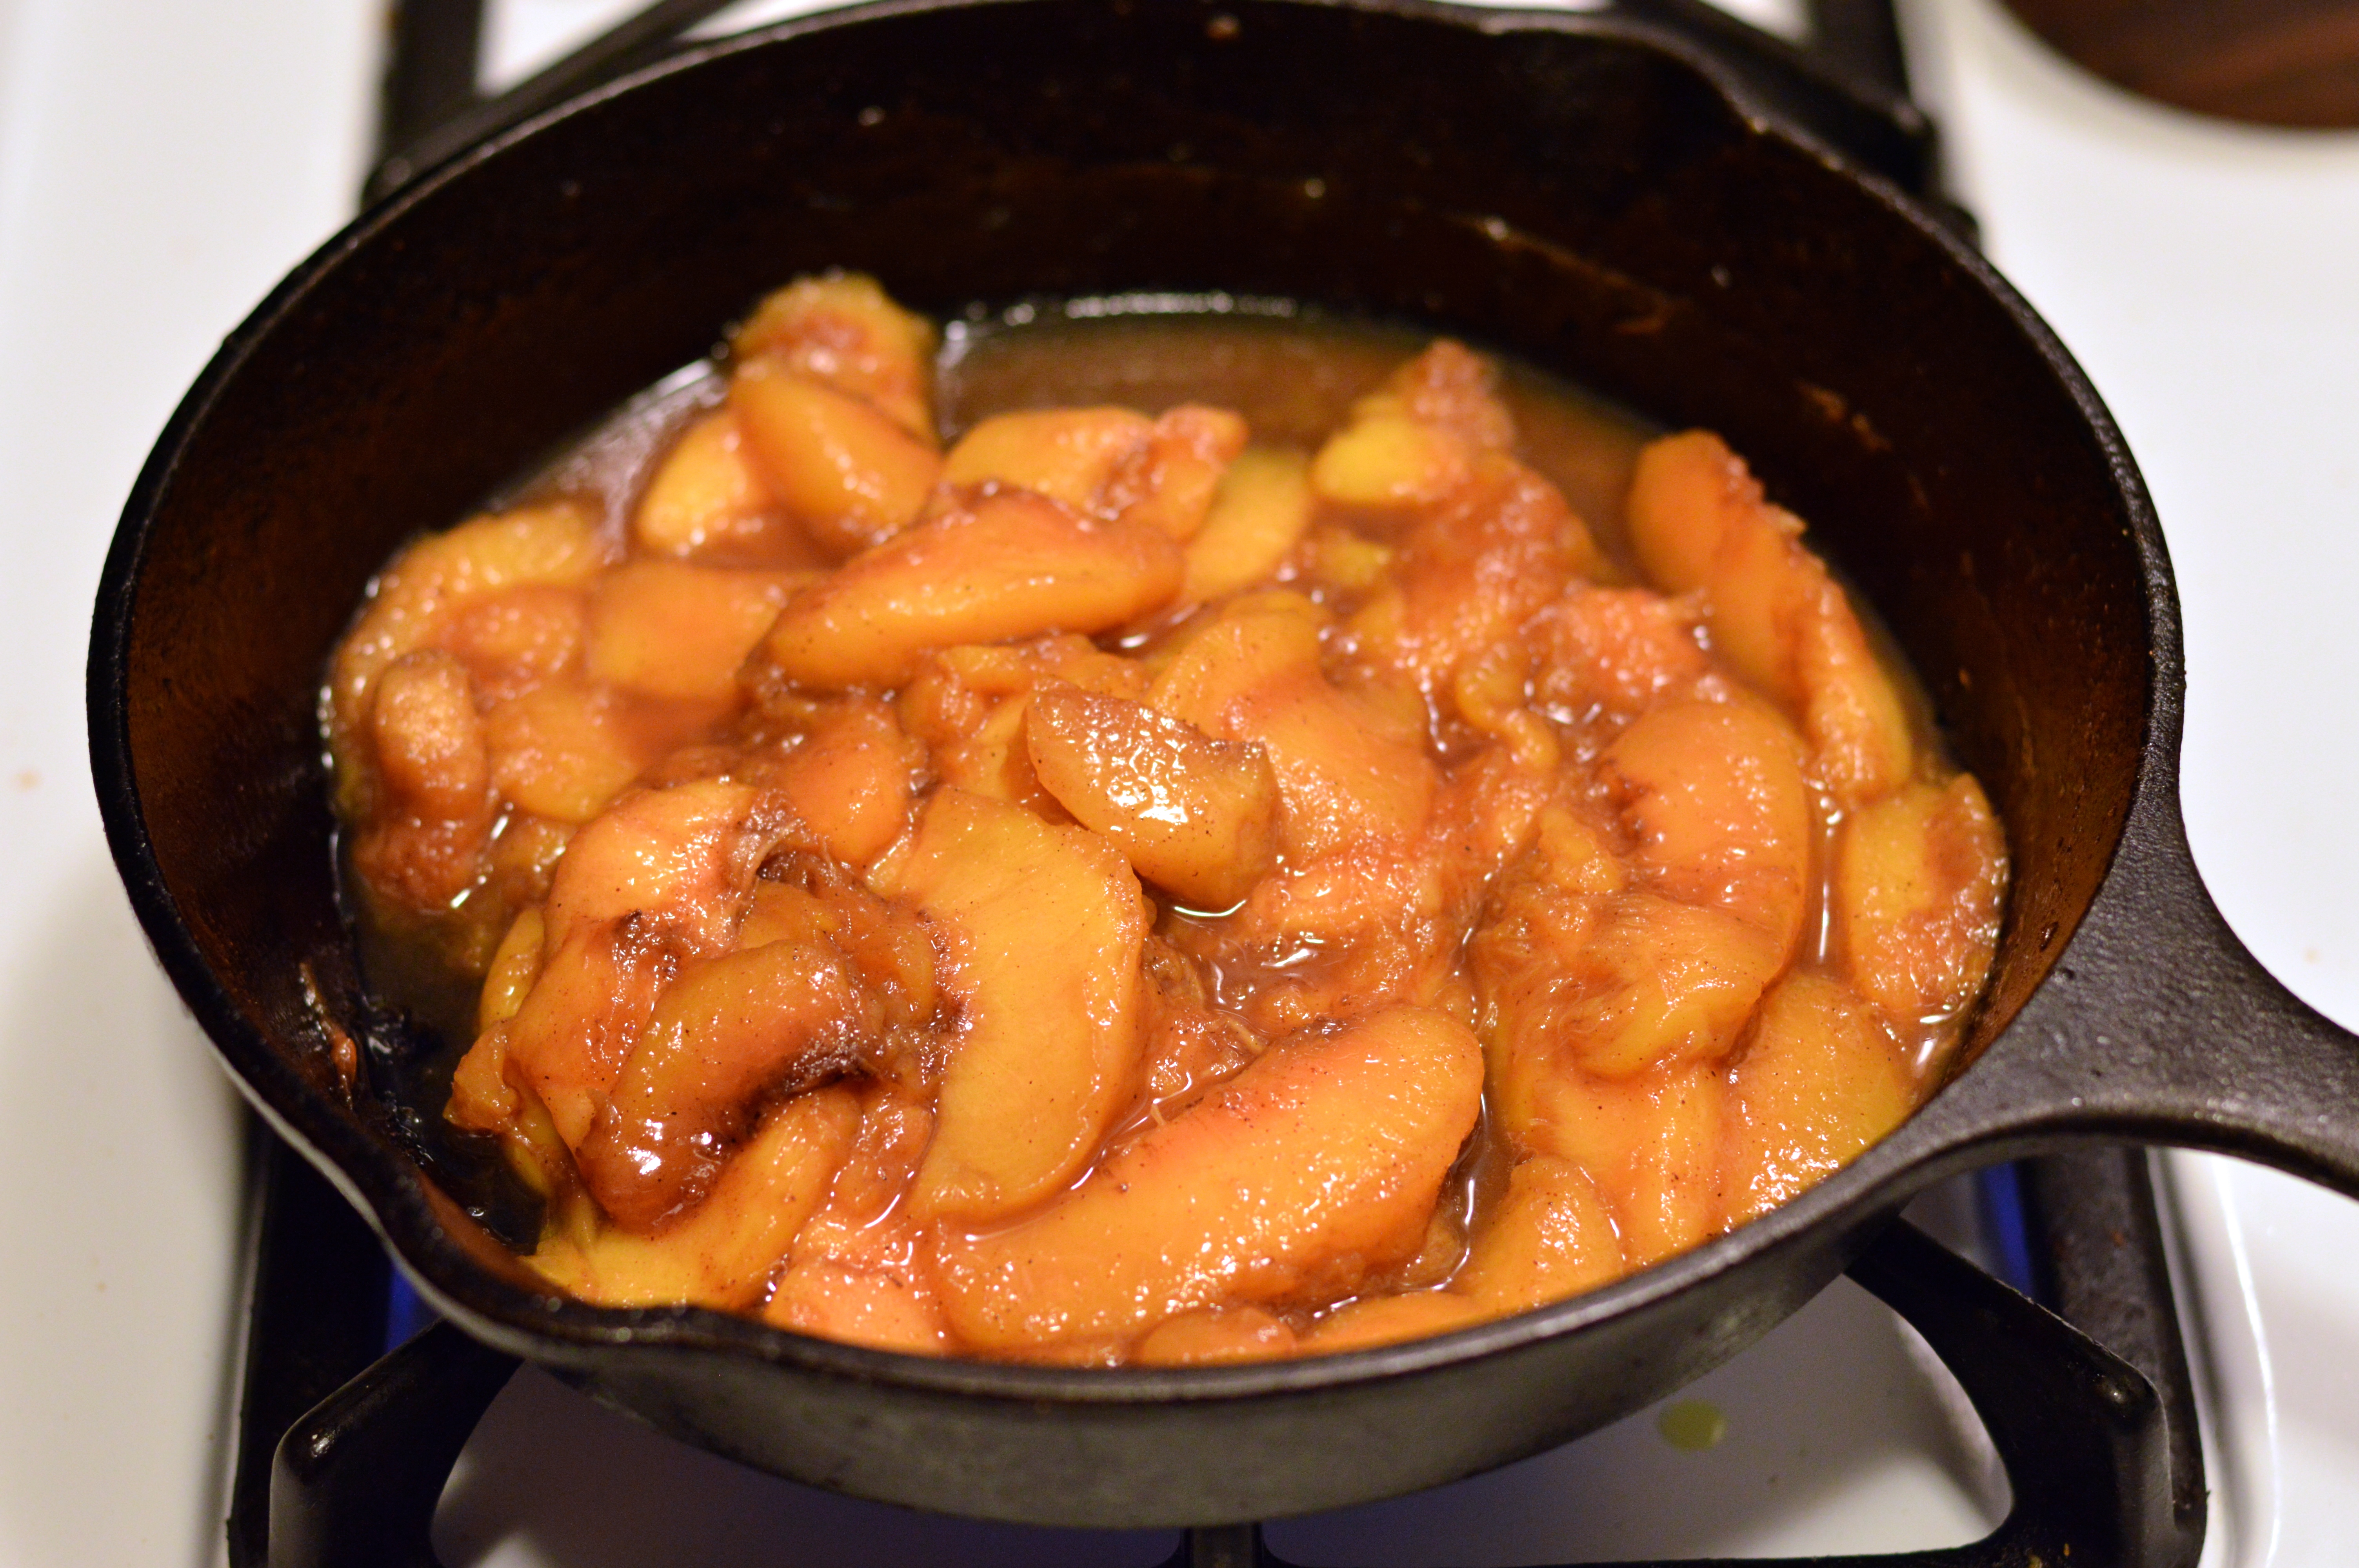
Peel peaches (**see note) and slice each into thick wedges. Melt remaining butter in skillet and add peaches, brown sugar, and a pinch of salt. Cook over medium high for about 10 minutes or until juices are bubbling and thick. If the peaches are especially ripe and juicy, you can spoon the slices out and continue reducing the juice for another 5 minutes or so. Remove to a heatproof bowl to cool. Wipe out skillet, return 1 tablespoon of browned butter, and swirl to coat.

In a large bowl, whisk together flour, cornmeal, baking powder, 1 teaspoon salt, and sugar. In bowl with remaining cooled brown butter, add buttermilk and eggs and whisk to combine. Pour wet mixture over flour mixture and mix until just combined. Gently stir in about half of the caramelized peaches and juice.
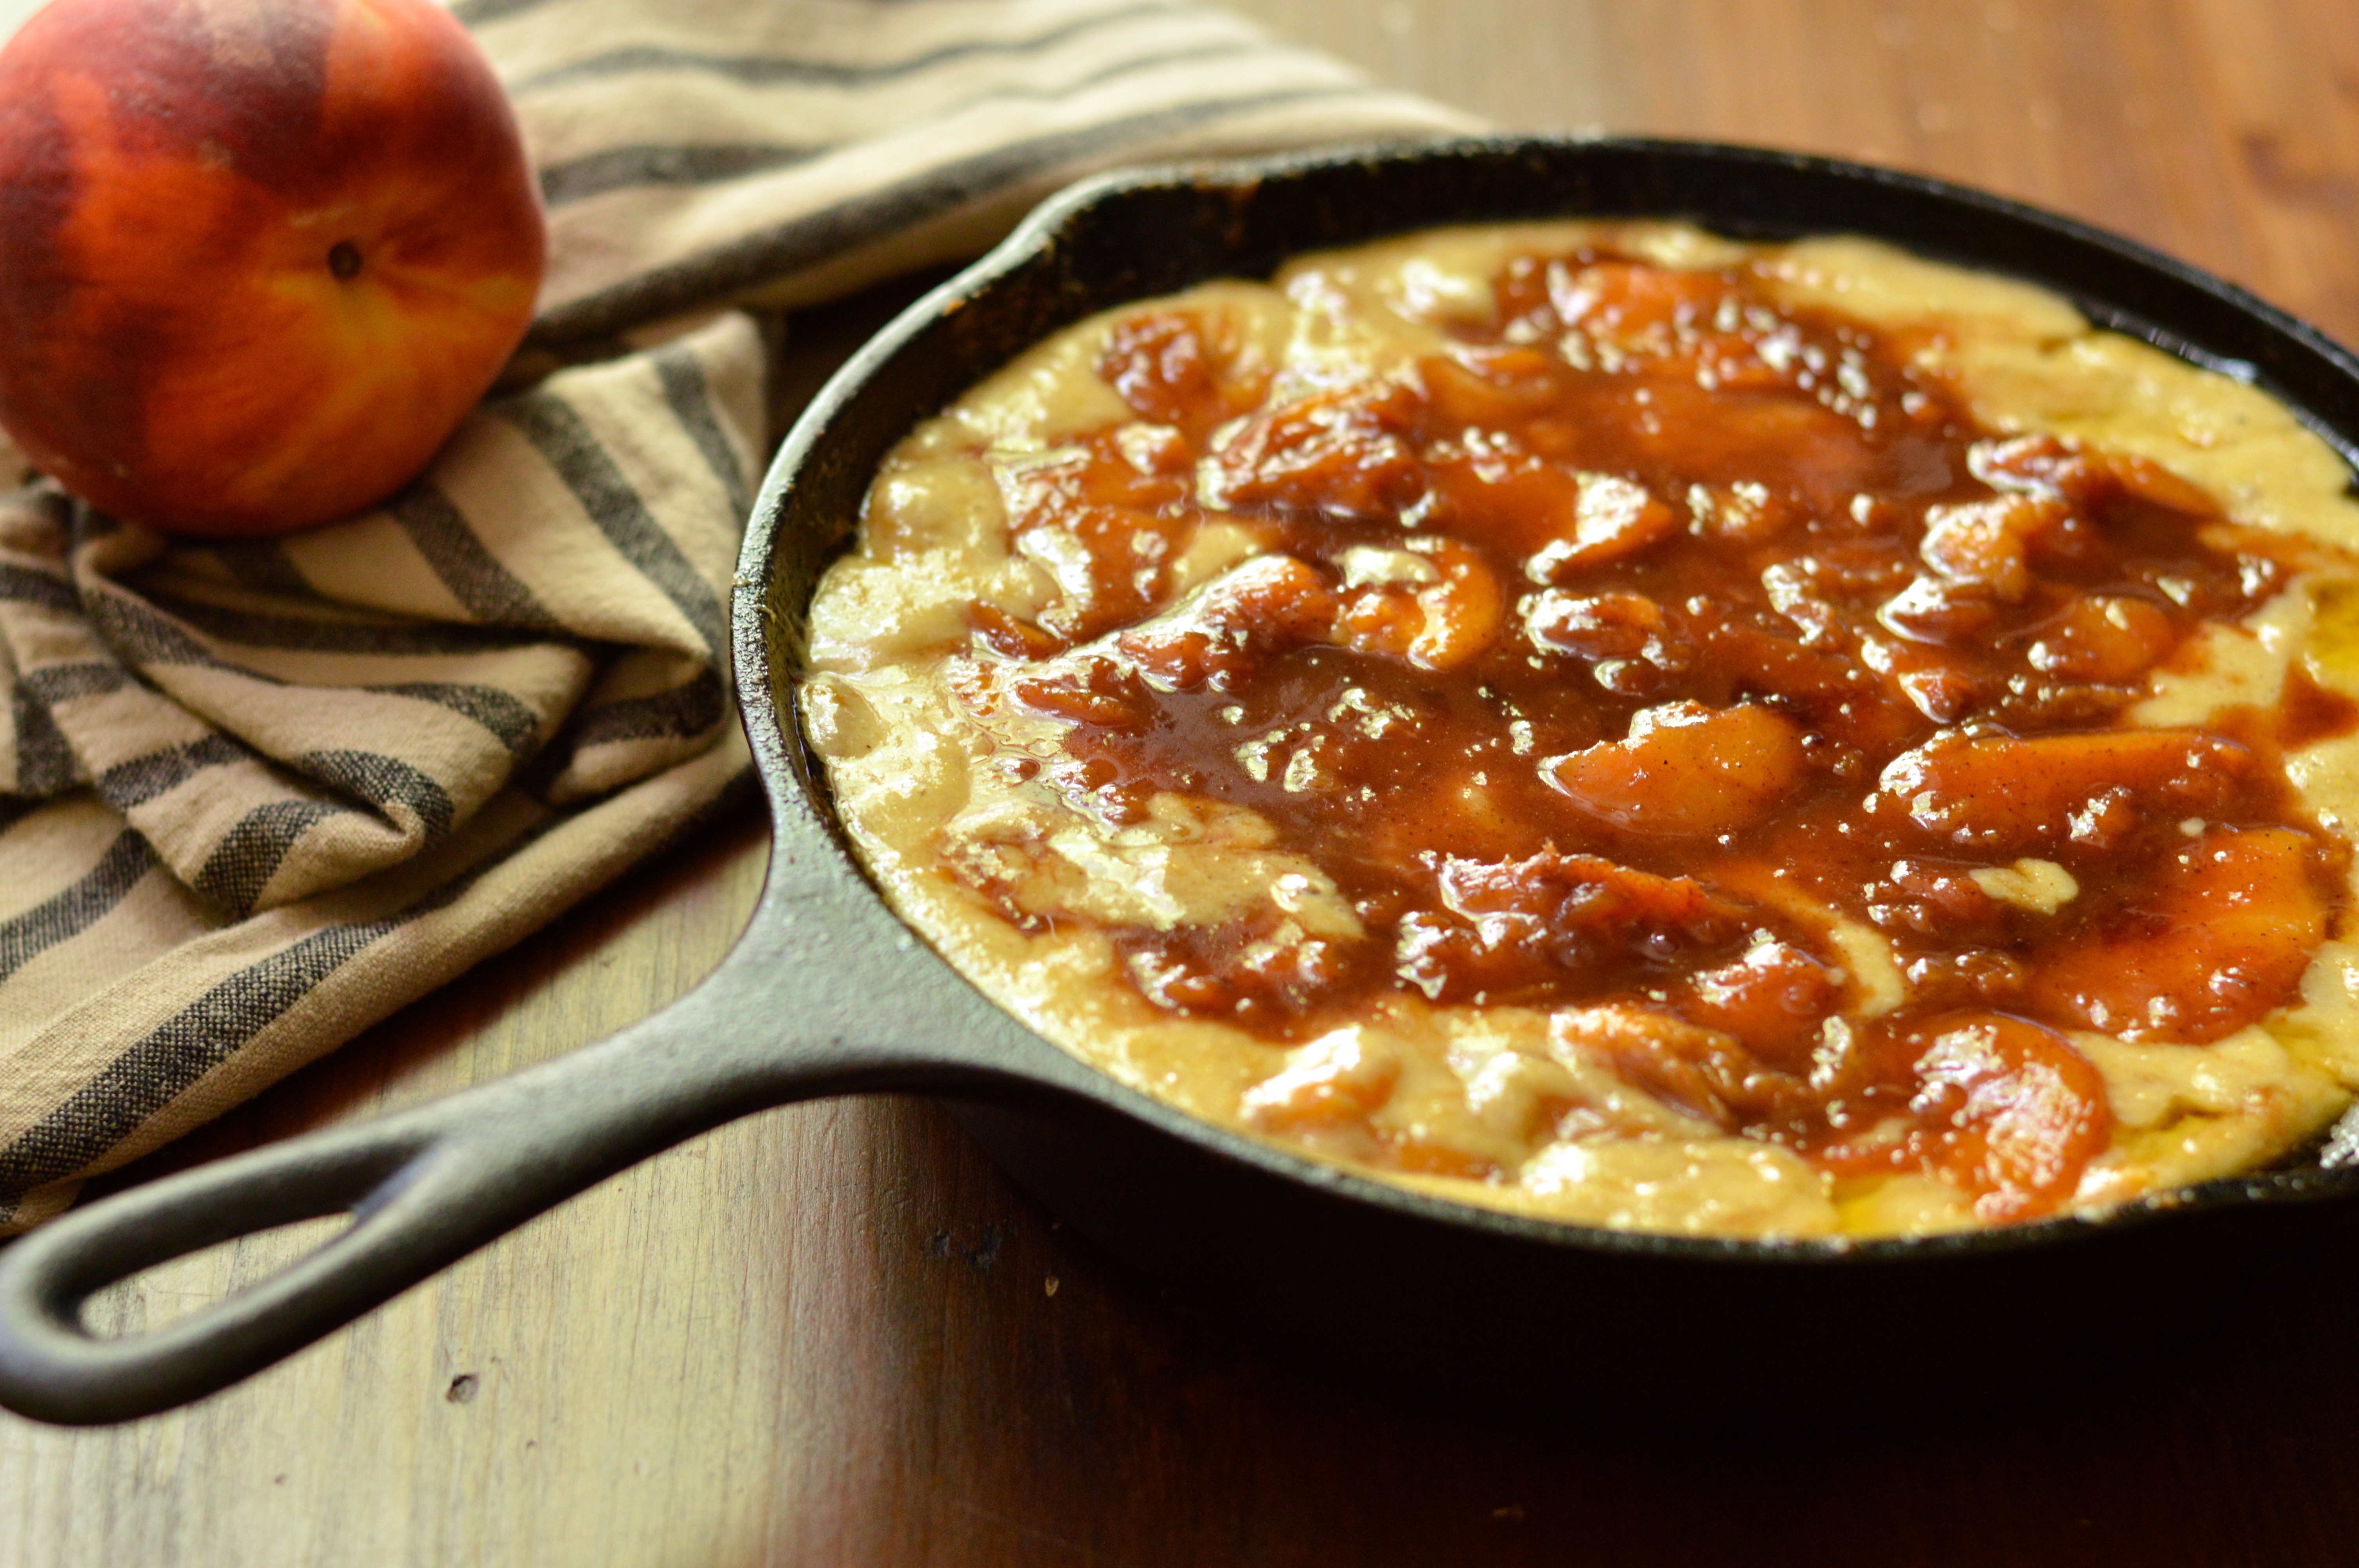
Pour batter into prepared skillet and spoon remaining peaches and juice evenly over the top.

Bake, with a baking sheet on rack below (to catch any potential drips), until top is evenly browned and a toothpick or cake tester comes out clean, 40 to 50 minutes. Let cool slightly, about 30 minutes. If necessary, run a knife around the edge to loosen. Slice into wedges and serve warm or at room temperature, with bourbon whipped cream if desired (recipe below)

Cooks notes:
*You can use another type of ovenproof skillet if you don’t have cast iron, but I think cast iron will give you the best texture. Also, the original recipe called for a 10″ skillet but I didn’t have one and used a 9″ without a single drop spilling over in the oven.
** To peel peaches you can shock them in a pot of boiling water and transfer to an ice bath. Very ripe peaches will usually peel easily without this method. You can also use a vegetable peeler.

Bourbon Whipped Cream

1 cup heavy cream
1/4 cup confectioners sugar
1 tablespoon bourbon

In a stand mixer with a whisk attachment, whip heavy cream to soft peaks. Add sugar and bourbon and whisk a minute or two more, until the cream reaches stiff peaks.

zucchini & mint soup

So we have some dirt, soil you might call it, in the back behind our apartment.

zucchini & mint soup | Brooklyn Homemaker

Many people who are lucky enough to have soil behind their homes like to grow things in said soil. Some people even try to grow edible things. I myself would love to grow edible things, but my soil has the unlucky fortune of residing beneath a big horrible mulberry tree that shades it and prevents much of anything green from ever seeing the bright rays of the sun. Hostas and Ivy do okay, but nothing edible wants to have anything to do with my crumby dirt. I have a few measly herbs in pots, but they do more in the way of surviving rather than thriving. A few years ago I put in some strawberry plants. I think that in the two summers that they were alive they produced exactly 3 berries between them. They’ve since given up and made way for weedy clumps of clover and moss.

zucchini & mint soup | Brooklyn Homemaker

It seems that the rest of you don’t have such problems. In the past few weeks I feel like everyone in the world (but me) has been whining about having too much zucchini. It would appear that your soil, and the edibles sustained within, are getting all the sunshine a patch of dirt could ask for.

“Oh look at all this zucchini!”, you say. “Whatever shall I do with all of it? Woe is me!” Oh you poor things! What a burden. I weep for you.

I should be so lucky. My soil wouldn’t spew forth a bounty of zucchini if its existence depended on it. If I want zucchini, I have to buy it at the market like a common chump. Can you even imagine?

zucchini & mint soup | Brooklyn Homemaker

My zucchini deficit doesn’t mean though, that I’m immune to the wiles of all the drool-inducing photos and recipes that have been popping up all over the internet lately. Even though I’m not actively trying to rid myself of any zucchini surplus, I’m still forced to watch as you struggle and strive to use up all of yours.  I don’t have the ill fortune of all this bounty, but thanks to all of your efforts, I now crave zucchini just the same. Thanks a lot guys.

zucchini & mint soup | Brooklyn Homemaker

I thought a nice light soup would be a great way to satiate my appetite for those big green beauties. When I started looking for inspiration though, most of the recipes I found paired the zucchini with basil. I do have a small basil plant in the back, but as if the paltry sunlight wasn’t enough, a little green caterpillar decided to add insult to injury and make swiss cheese of my poor little plant. I was a little worried that basil would be too strong a flavor to pair with mild zucchini anyway, so I tried to think of something else. It didn’t take me long to remember the mint I was given as a birthday gift, which somehow seems to be leading a happyish and healthyish existence.

zucchini & mint soup | Brooklyn Homemaker

So, zucchini and mint soup it was, and boy did it deliver. The mint and zucchini pair perfectly together, and the resulting soup is subtle, delicate, and delicious. It’s an ideal light supper for summer nights and hot weather. It’s just hearty enough to be filling, but isn’t at all heavy and definitely won’t weigh you down.

This soup is unbelievably simple and takes no time to make, but somehow manages to taste rich and complex. I’d definitely recommend using the highest quality chicken stock you can find, and if you have some homemade stock in the freezer, now would be the time to use it. Since the other ingredients are so delicate and mild, the stock really adds something. A good vegetable stock would be great here too if you want to make this vegetarian, and leaving out the yogurt would make it vegan.

zucchini & mint soup | Brooklyn Homemaker

Whether you have a stockpile to use up, or you have to pay for it like me, this is the perfect way to satisfy your passion for zucchini. This soup is packed with bright, fresh, clean zucchini flavor that’s amplified and deepened with the addition of fresh mint. It literally could not be more summery. It’s smooth and creamy, and retains just a bit of texture when pureed with an immersion blender. Adding yogurt brings a nice hint of tanginess, but if you wanted to keep it dairy free you could substitute a squeeze of fresh lemon juice instead. Served with a nice crusty loaf of white bread, this soup is a summery little bowl of heaven.

zucchini & mint soup | Brooklyn Homemaker

Zucchini & Mint Soup

adapted from Gourmet Traveler

2 tbsp extra-virgin olive oil
1 onion, finely chopped
salt and pepper to taste
4 garlic cloves, minced or crushed
1 large zucchini (about 6 cups), diced
4 cups chicken stock
½ cup fresh mint leaves, loosely packed

To serve:
greek yogurt or fresh lemon, extra-virgin olive oil, and mint leaves

Heat olive oil in a large saucepan or stockpot over medium heat. Add onion, season with salt and pepper, and stir occasionally until tender, about 5 minutes. Add garlic and zucchini and stir occasionally for another 5 minutes. Add stock, increase heat to high and bring to a boil. Add mint, reduce heat to medium, and simmer until zucchini is just tender, about another 5 minutes. Process with a hand-held blender until smooth. Alternately, pulse in a blender until smooth with no large chunks, but not completely pureed. Check seasoning and adjust to taste if necessary.
To serve, top with a dollop of greek yogurt (or a squeeze of lemon juice), a drizzle of olive oil, and a few fresh mint leaves.

sweet cherry pie

I love cherry pie.

sweet cherry pie | Brooklyn Homemaker

I mean, what’s not to love?

sweet cherry pie | Brooklyn Homemaker

Oddly enough, I’ve actually never made a cherry pie from scratch before now.  And you better believe that I’ve made a lot of pies in my day. Peach, pumpkin, sweet potato, apple, blueberry, strawberry rhubarb, lemon meringue… You get the picture.

sweet cherry pie | Brooklyn Homemaker

Pies have always been a big part of my life.

Growing up my grandmother did a lot of baking, and more than a few pies have come out of her oven. To this day, Thanksgiving is still my favorite holiday, partly because of the abundance of pie. I remember being a little kid and constantly sneaking away on Thanksgiving day to my grandmother’s sewing room just to stare at the pies and drool. The sewing room tended to be cooler than the rest of the house so she always kept them in there while the rest of the meal was cooking away. I guess she thought they wouldn’t be disturbed in there, but their sweet, fresh-baked siren song would have drawn me in no matter where they were hiding.

sweet cherry pie | Brooklyn Homemaker

It wasn’t until my teen years that I started making my own pies. During my senior year of high school I took a culinary course at a vocational school, and it was then that I learned to make homemade pie crust. Grandma tends to use store bought crust, and for some reason I was interested only in eating pie until I learned how to make the crust from scratch. After that I was a pie baking fool and developed quite a reputation for myself amongst my friends and family. I’ve made a few tiny variations to the recipe I learned in high school, mainly substituting butter for shortening, but for the most part I still use that same recipe, which I’ll share below.

sweet cherry pie | Brooklyn Homemaker

I cannot believe that this is the first pie recipe I’m sharing with you. I planned to post my favorite apple pie when I made it last Thanksgiving, but there were so many things going on that week that I just never found the time to get to it. It’s a good thing Thanksgiving comes every year!

sweet cherry pie | Brooklyn Homemaker

Ever since I’ve been thinking about when I might get around to making another, but I knew that if I just waited the opportunity would present itself. As soon as I saw fresh cherries showing up at the market this year, I knew the time had come for me to get my butt in gear and bake a pie for you. My very first cherry pie.

sweet cherry pie | Brooklyn Homemaker

I know that they say sour cherries make the best cherry pies, but so far I’ve only seen bing cherries at the store and I’m a man on a mission. Sweet cherries are so good on their own that there’s no possible way that covering them in an all butter crust and baking them in the oven could do anything but make them even more wonderful. So, sweet cherry pie it is.

sweet cherry pie | Brooklyn Homemaker

Since I’ve never made a cherry pie, I went straight to the queen of food bloggers to look for a recipe, and bingo. Smitten Kitchen‘s recipe looked amazing. I tend to prefer a really well stuffed pie, and all of my pie plates are 10 inches, so I increased and adjusted the recipe just a bit. If you don’t have a 10″ pan though, you can still use this recipe, as is, with a 9″ or 9.5″ plate and you’ll just have a generously stuffed pie. No one is going to complain about that I promise. You just might want to put a liner or some foil down on the bottom of the oven in case the syrupy filling bubbles over.

sweet cherry pie | Brooklyn Homemaker

This recipe is complete perfection. Delicious and beautiful. The total package.

The crust is buttery and flaky and tender, and the crimped outer edges are thick and wonderfully crisp. The egg wash gives the top crust a picture perfect shine and the coarse sugar adds a rustic kind of sparkle.

And the filling! The cherries soften a bit but don’t turn to mush, so they remain whole and retain some texture. The filling is sweetened just enough to bring out the cherries’ juices and highlight their flavor without overpowering them. When baked, the dark sweet bing cherries turn rich and jammy with a deeply concentrated flavor. The addition of lemon zest and juice brightens everything up and adds an almost floral quality.

sweet cherry pie | Brooklyn Homemaker

As if this pie wasn’t perfect enough already, I decided to add some vanilla ice cream. Heaven. Like, really. I’ve tasted heaven.

sweet cherry pie | Brooklyn Homemaker

Sweet Cherry Pie

Simple all-butter pie crust

makes enough for 1 double-crust or 2 single-crust pies

3 cups all purpose flour
2 tablespoons sugar
1 teaspoon coarse kosher salt
1 cup (2 sticks) unsalted butter, cold
(up to) 1 cup ice cold water

Stir or whisk together flour, sugar, & salt in a medium bowl. If you have time, toss the bowl in the freezer for a 15 or 20 minutes. Cube the butter, add it to the chilled flour, and cut it in with a pastry blender, until it looks like coarse pea sized chunks. You can also do this by pulsing in a food processor. If you took very long to cut the butter in, you can toss the bowl back in the freezer for another 15 minutes, but if the butter is still firm and cold, don’t bother.

Start mixing in the water and stirring and tossing with a fork to distribute and combine. Try starting with about 1/2 cup, mix together, and add about a tablespoon or two at a time, until it starts to come together. The less water you use the better and flakier the crust will be, but you don’t want to use so little that it won’t hold together. If you can press it together with your hands and it mostly stays in a ball, with a few little bits crumbling out, you’re good to go.

Divide the dough into to balls, and wrap each tightly in plastic wrap. Try to handle it as little as possible so as not to warm or melt the butter. Press or pat the covered balls of dough into thick disks and refrigerate for at least an hour or two (or up to a few days)

Sweet cherry pie
adapted from Smitten Kitchen
makes one 10 inch pie

3 lbs bing or other sweet dark cherries
zest and juice of 1 lemon
6 tablespoons cornstarch
3/4 cup sugar
1/8 teaspoon salt
2 tablespoons butter, cut into 5 or 6 pieces
1 egg
coarse sugar for sprinkling

Preheat oven to 400°F.

Stir together the cherries, cornstarch, sugar, salt, lemon juice and zest gently together in a large bowl.

Roll out half of chilled dough (use larger piece, if you’ve divided them unevenly) on a floured work surface to 13-inch round. Gently place it in 10-inch pie pan, either by rolling it around the rolling pin and unrolling it over the pan or by folding it into quarters and unfolding it in the pan. Trim edges to a half-inch overhang.

Pour filling into crust, and dot the filling with the bits of cold butter.

Roll out the remaining dough into a 12-inch round on a lightly floured surface. You can either drape it over the filling as is, or you can cut it into 1 inch wide strips and weave a lattice on top of the filling. If you like, follow this link for a great lattice tutorial. Either way, cut the excess dough from around the pie leaving a 1/2  to 1 inch overhang. Fold the overhang under the bottom crust, pressing the edge to seal it, and crimp the edge decoratively. Brush the egg wash over over pie crust, then sprinkle with coarse sugar. If you didn’t do a lattice, you’ll need to cut slits in the crust with a sharp knife to form steam vents.

Bake the pie in the middle of the oven for 30 minutes. Reduce the temperature to 350°F. and bake the pie for 30 to 35 minutes more, or until the crust is golden. Let the pie cool on a rack for at least 3 hours before serving.

buttermilk ricotta ice pops with lemon, thyme, & honey

Okay, so it’s Summer.

buttermilk ricotta ice pops with lemon, thyme, & honey | Brooklyn Homemaker

But I think the honeymoon’s already over. Sorry Summer.

buttermilk ricotta ice pops with lemon, thyme, & honey | Brooklyn Homemaker

I mean, don’t get me wrong. I’m still into it. There’s so much about the season to be into. Parties and picnics and barbecues and day drinking and sunshine and long days and shorts and slip-on shoes and trips to Coney Island and fresh local produce. Glorious beautiful juicy ripe produce. Unbeatable unbelievable produce.

buttermilk ricotta ice pops with lemon, thyme, & honey | Brooklyn Homemaker

I’ve been so excited about the warmer weather and all the wonderful things that come along with it though, that I forgot about the things that I’m not so into. Unfortunately, now that Summer is upon us those unpleasant things refuse to be forgotten.

buttermilk ricotta ice pops with lemon, thyme, & honey | Brooklyn Homemaker

Sunburn and mosquitos and fruit flies and humidity and sweat stains and sleepless nights in sweaty sheets and days so hot that the plants just wilt against the force of the sun. To make matters worse, there’s something especially… yucky about this time of year when you spend it in New York City. Stale air and hot concrete and nights just as hot as days and stifling subway platforms and the smell of hot garbage on a Friday night. Ugh. So gross.

buttermilk ricotta ice pops with lemon, thyme, & honey | Brooklyn Homemaker

To help cure my hot weather woes, my red hot blues, I thought a fresh batch of ice pops was in order. Since I can’t actually live in the freezer, I figured that something sweet and icy straight out of the freezer would have to do.

buttermilk ricotta ice pops with lemon, thyme, & honey | Brooklyn Homemaker

They say that necessity is the mother of invention, and it’s totally true. I invented these ice pops because it was necessary for me to not go outside in the heat for groceries. I had a tub of ricotta in the fridge that needed using up, and since lasagna isn’t exactly hot weather food, I thought I’d give ricotta ice pops a whirl. From there I thought that lemon, thyme, & honey would be the perfect complements to sweet and creamy frozen ricotta, and that buttermilk would be an ideal liquid to thin out and pair with all that yumminess.

buttermilk ricotta ice pops with lemon, thyme, & honey | Brooklyn Homemaker

These ice pops are wonderfully cool and refreshing, but beyond that, they also have an amazing unexpected flavor. I will admit that the ricotta does give them a slight sort of graininess, but I don’t find it at all unpleasant. Maybe it’s because they’re so creamy and taste so rich without feeling heavy. There’s something almost cheesecake-like about them, but they’re somehow lighter and more sophisticated. The lemon and thyme are the perfect, dare I Summery, complement to the subtle sweetness of the honey and the cultured dairy creaminess of the buttermilk and ricotta.

You better eat them fast though because they won’t be around for long in this heat!

buttermilk ricotta ice pops with lemon, thyme, & honey | Brooklyn Homemaker

Buttermilk Ricotta Ice Pops with Lemon, Thyme, & Honey

  • Servings: about 10 3-ounce pops
  • Print
1 1/2 cups whole milk ricotta
3/4 cup buttermilk
zest and juice of 2 lemons
1 tablespoon fresh thyme leaves, washed and stripped from stems
1/4 cup honey
2 tablespoons sugar
pinch of salt

place all ingredients in a blender and puree until very smooth, about 3 minutes. Scrape down sides of carafe as needed. Carefully pour mixture into ice pop molds, filling almost to the top. Place cover or foil over molds and move them to the freezer for 30 to 45 minutes. Remove, add popsicle sticks to each pop, and return to freezer. This keeps the sticks from sinking too far or moving off kilter. Freeze for at least 3 hours more, or until completely solid.

Remove from pop molds by gently running under warm water for 10 or 15 seconds per mold.