summer

The Sherry Cobbler

The Sherry cobbler is a historic recipe, and when I say historic, I mean it!

sherry cobbler | Brooklyn Homemaker

I’m all too well aware that fancy speakeasies and prohibition era cocktail lounges are all the rage right now, but this drink pre-dates even those. While those cocktails were popular in the 1920s or 30s, the Sherry Cobbler most likely came of age sometime in the 1820 or 30s and really took off in the 1840s!

sherry cobbler | Brooklyn Homemaker

They say that like champagne was to the 1920s, or the Cosmo to the 1990s, The Sherry Cobbler was a quintessential part of American life and culture in the 1800s. In fact, when Charles Dickens visited the US, it was one of his favorite things about his trip and he talks about it in his 1844 book The Life and Adventures of Martin Chuzzlewit. “Martin took the glass with an astonished look; applied his lips to the reed; and cast up his eyes once in ecstasy. He paused no more until the goblet was drained to the last drop. ‘This wonderful invention, sir,’ said Mark, tenderly patting the empty glass, ‘is called a cobbler. Sherry Cobbler when you name it long; cobbler, when you name it short.’”

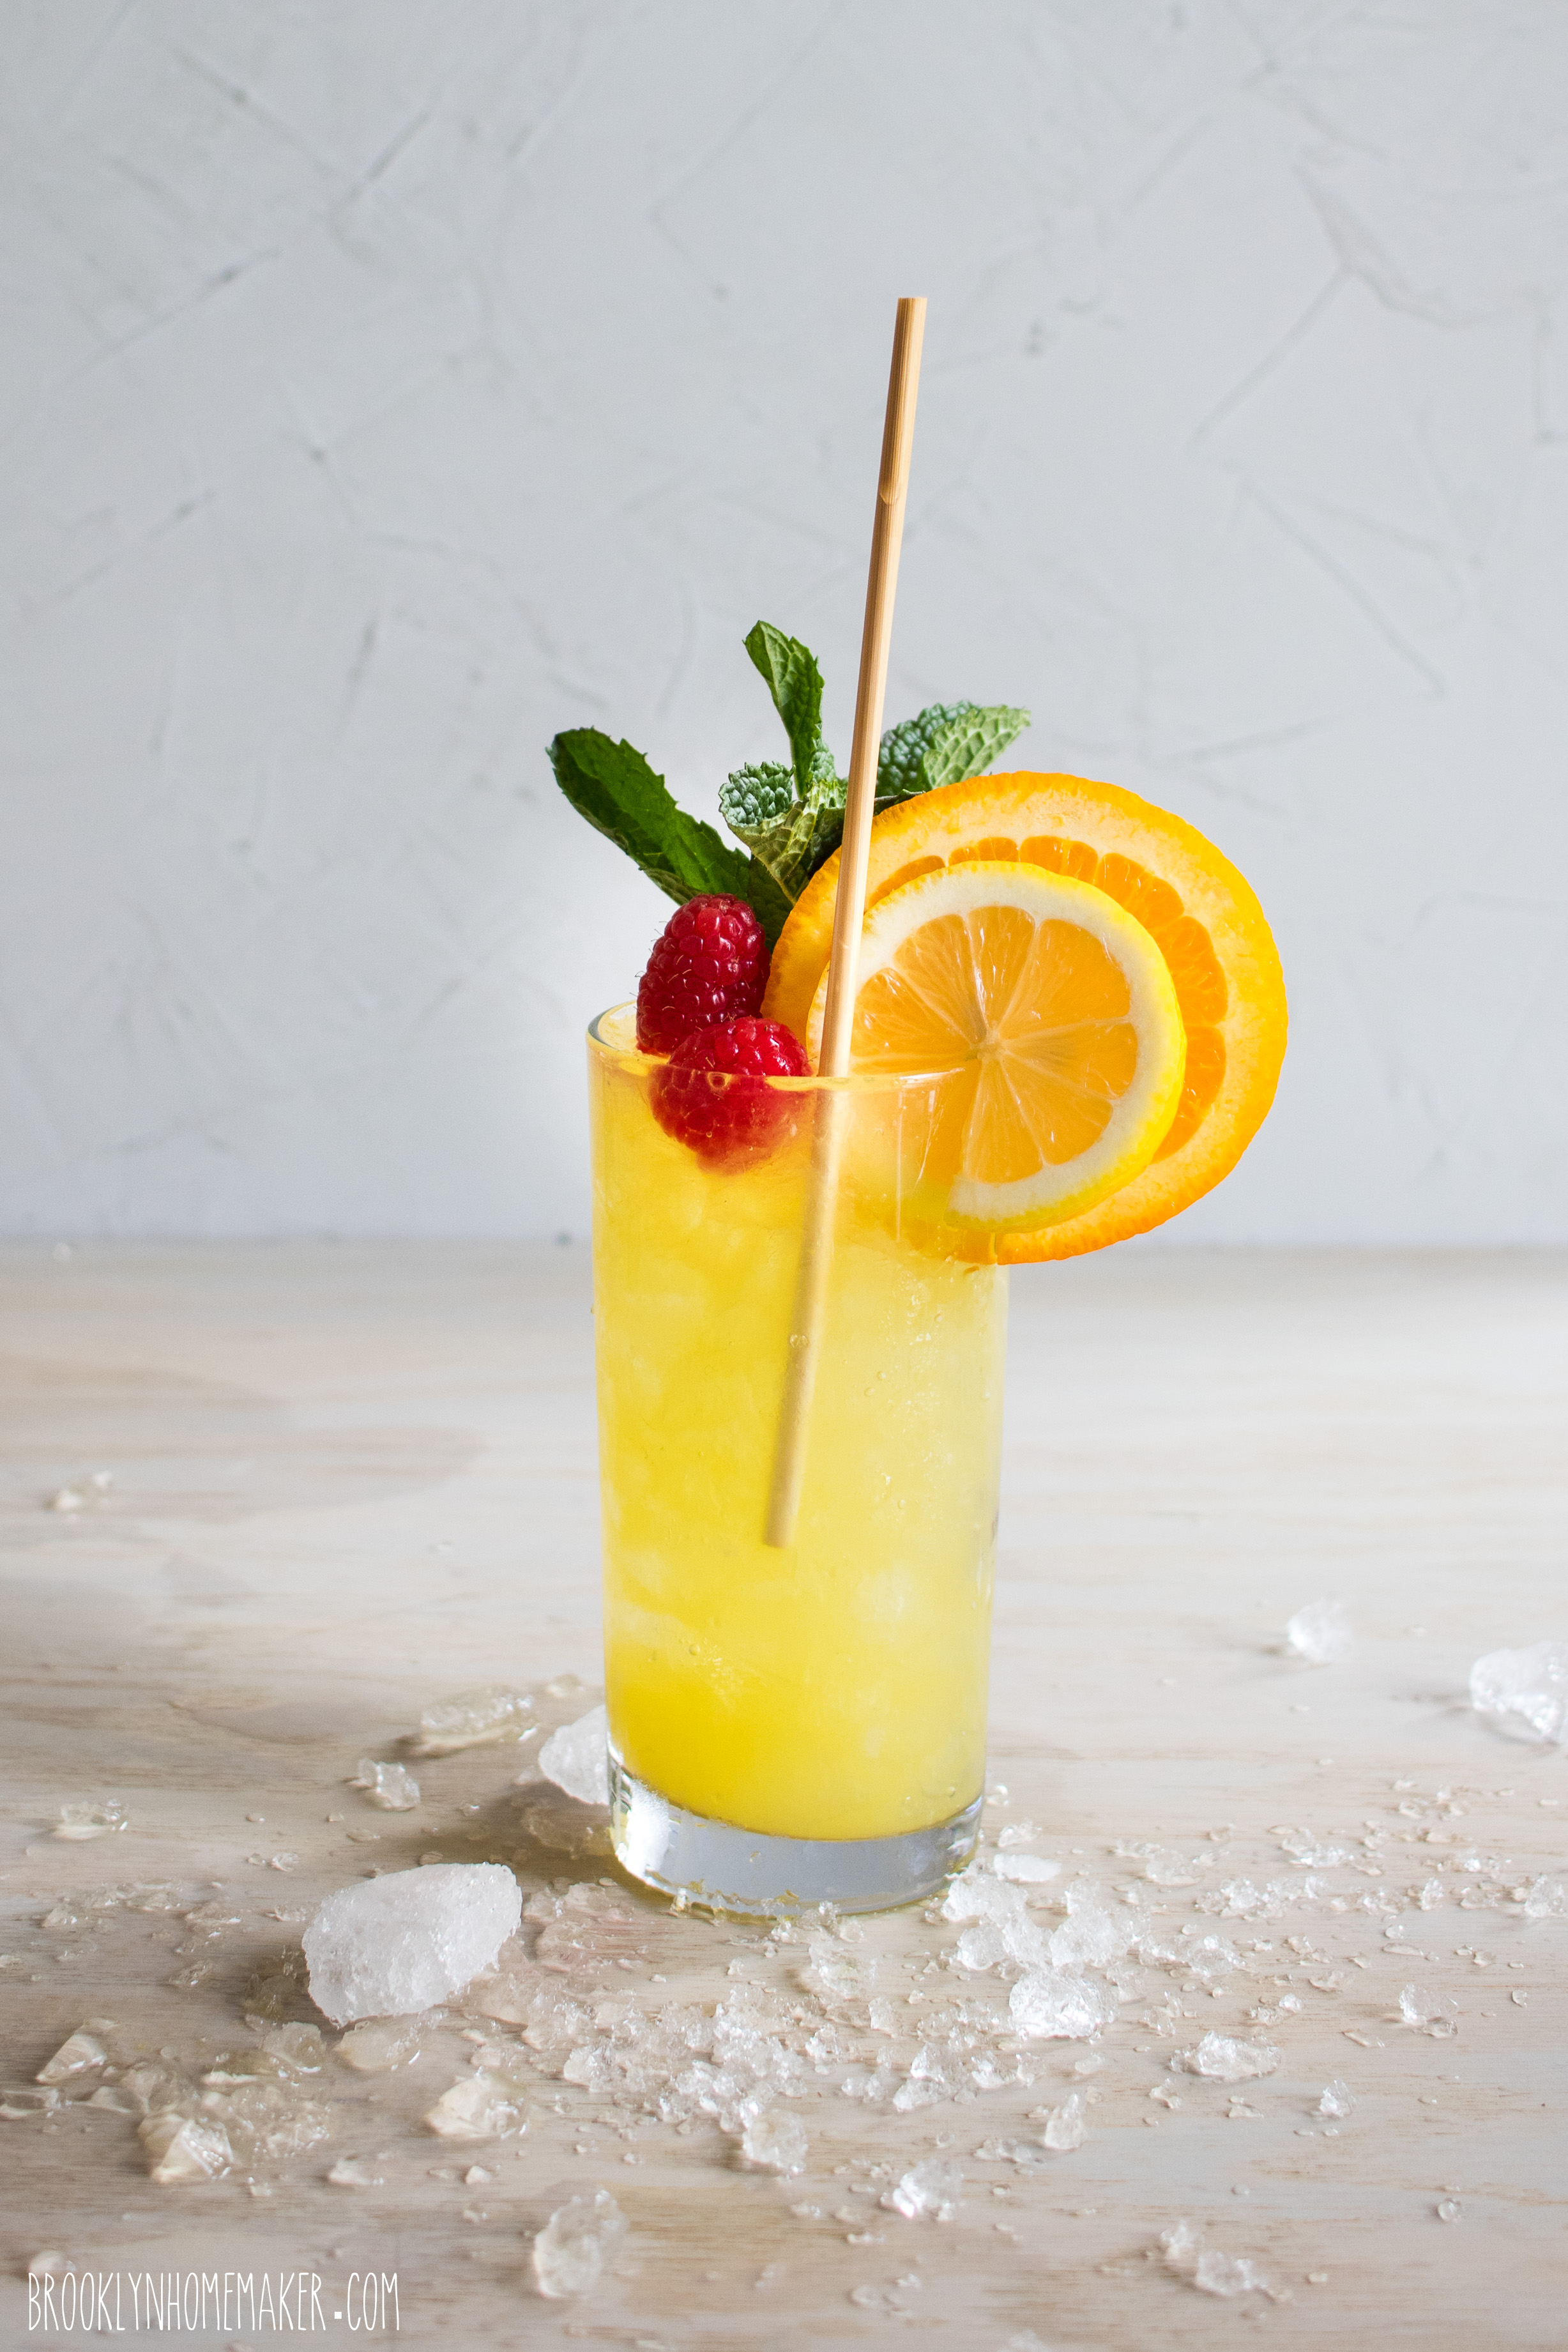
The “reed” mentioned in this passage refers to what we today call a straw. At the time this was written, a drinking straw was a total novelty, and people in bars would often need to be shown how to use one because it was so unfamiliar. The Sherry Cobbler is actually credited with introducing the straw to popular consciousness in America! These weren’t the demonized plastic straws of today though, but a rye or reed straw, a bi-product of the hay industry. Today similar straws are making a comeback as America tries to find alternatives to plastic straws, and in fact the straws you see pictured here are the very same!
I got them from a company called HAY! straws.

sherry cobbler | Brooklyn Homemaker

So- what is a Sherry Cobbler?
I’m glad you asked.
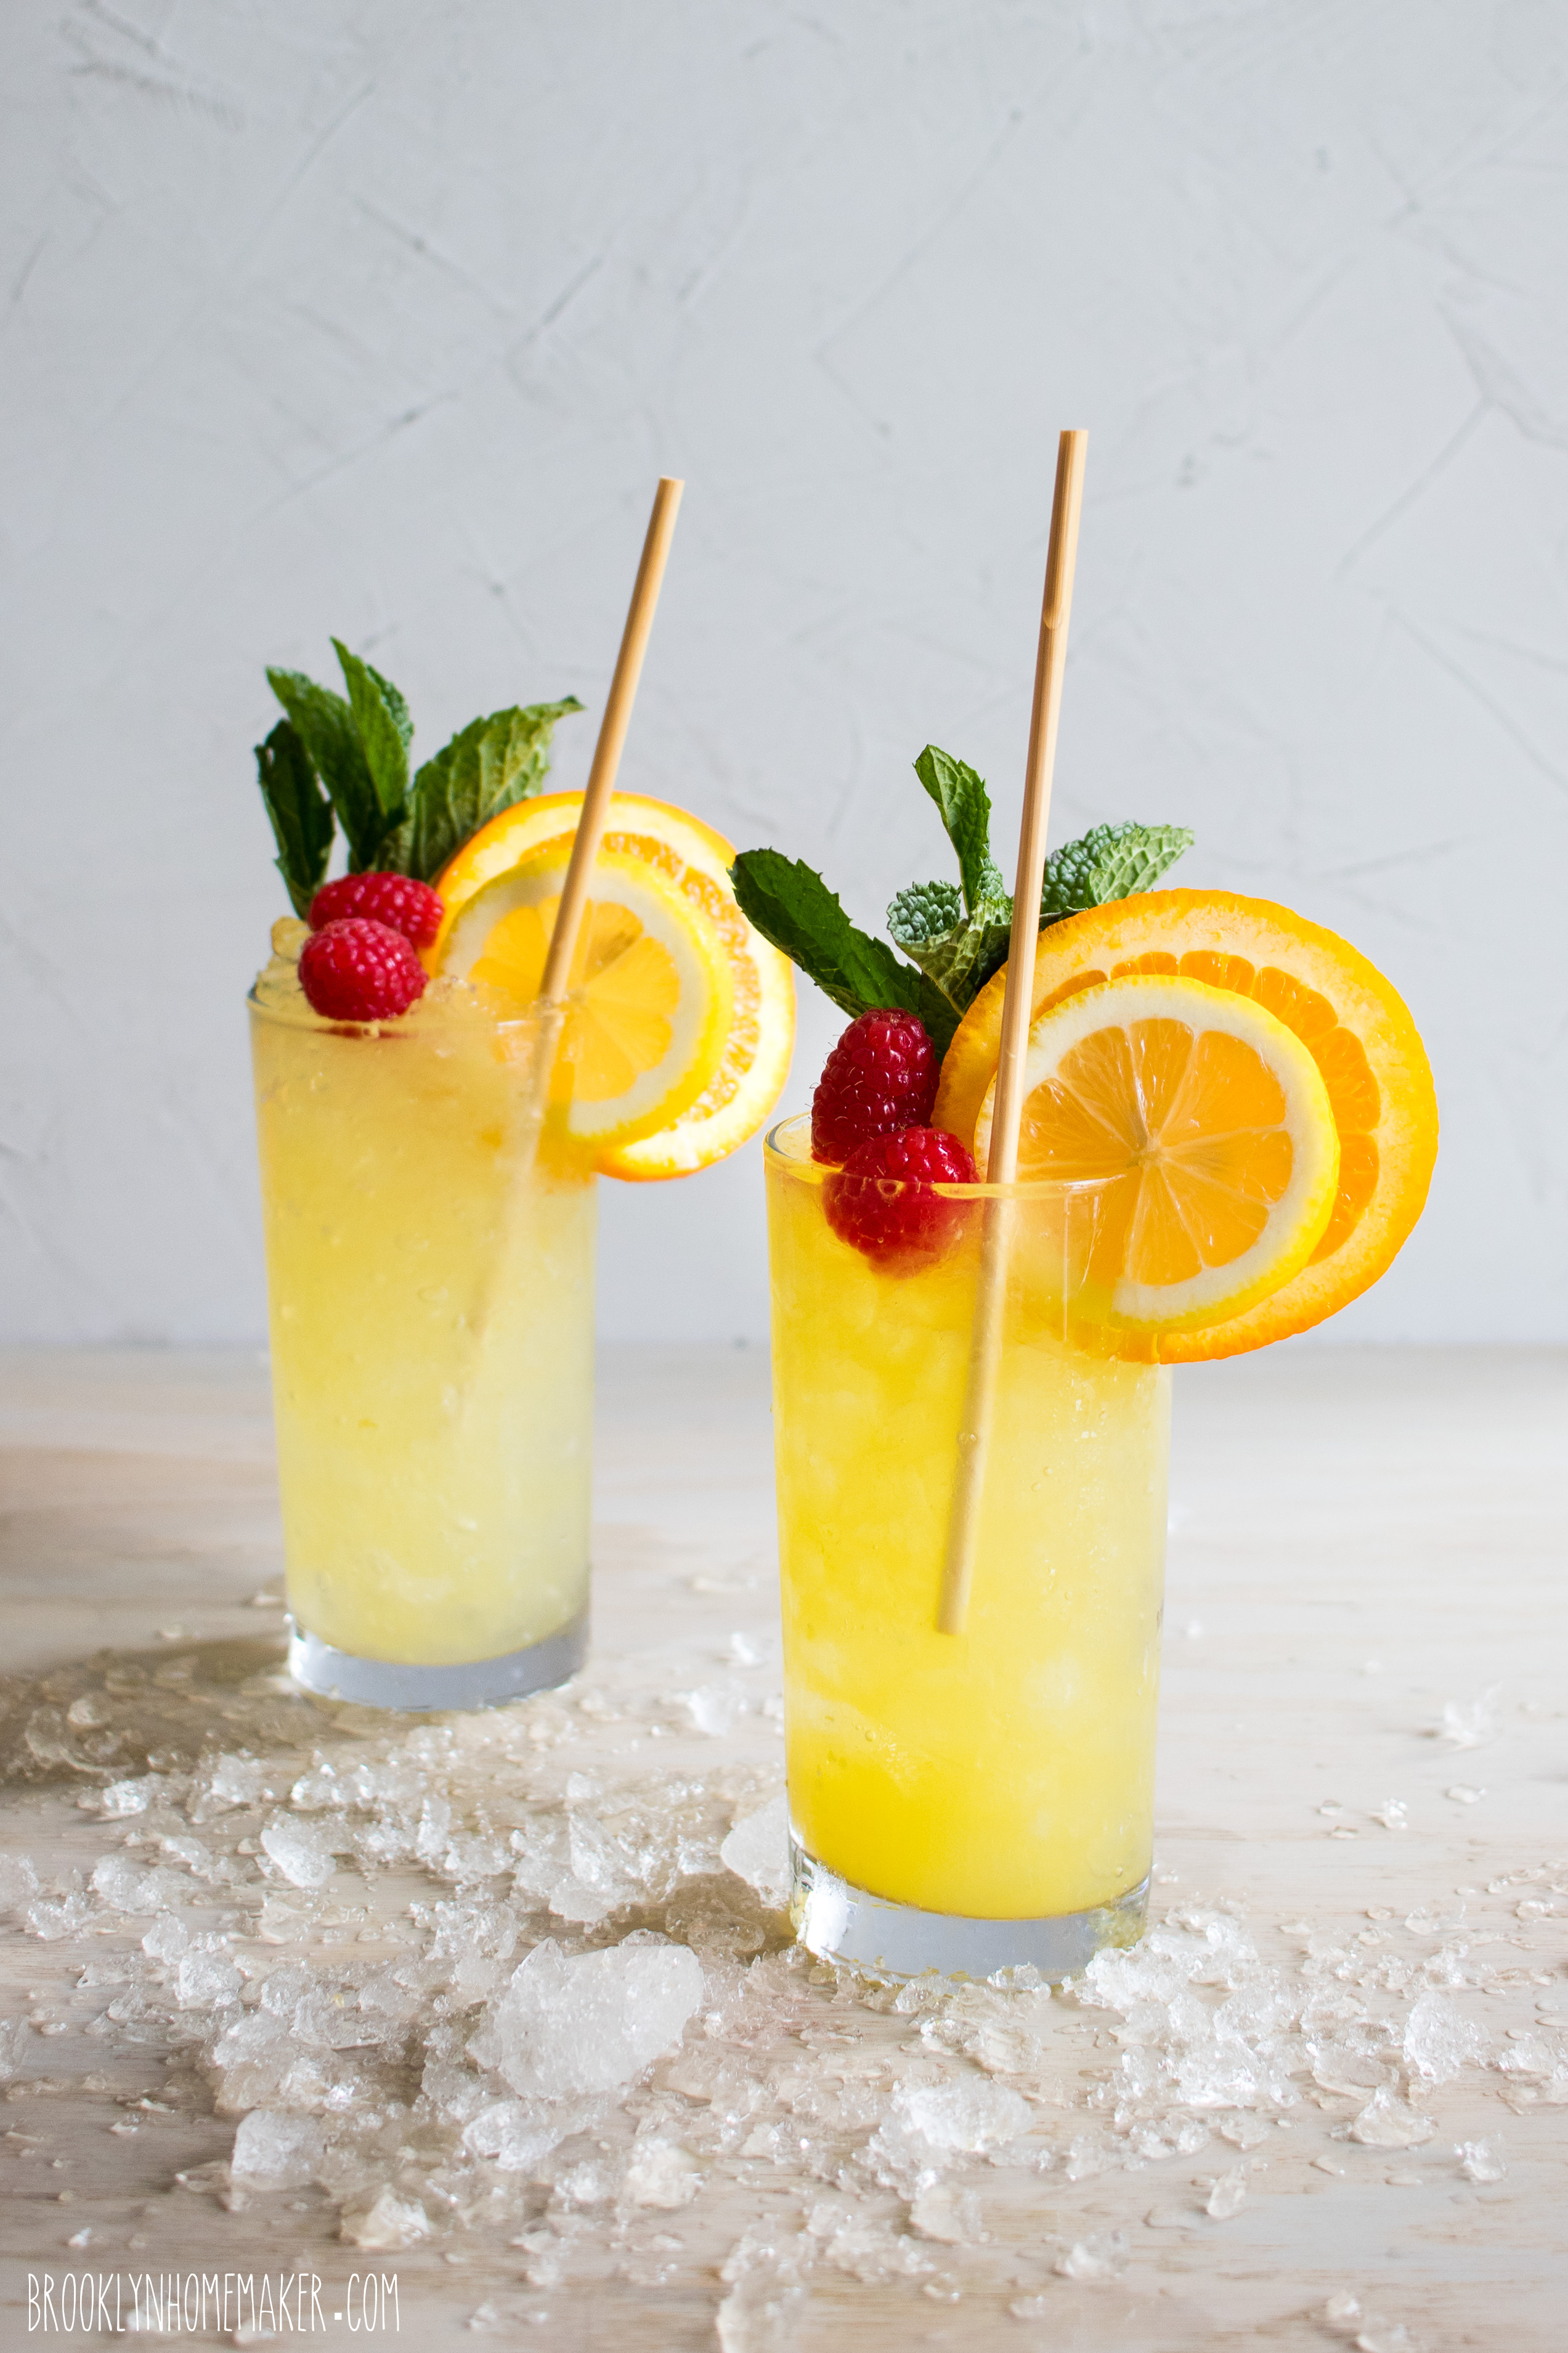
It’s essentially Sherry, shaken with muddled citrus & sugar, and strained and poured over crushed ice. It also happens to be super delicious and refreshing, especially on a hot day. It’s sweet and bright and citrusy in all the best possible ways, and not too boozy, so you can keep ’em comin’!

A few things made the popularity of the Sherry Cobbler possible at this specific time in American history.

Sherry, a fortified wine from Andalusia Spain, had recently started to find it’s way into America as trade increased and tariffs dropped. Nineteenth-century Americans saw sherry as foreign, fancy, and affordable all at once, and it became very popular.

Sugar and citrus were also making their way into American homes as trade increased and prices dropped. Suddenly even in Northern states, people were able to get fresh citrus at certain times of year when it had been extremely rare before. Cheap sugar meant that Americans developed a real sweet tooth though, so I actually scaled back the sugar in my recipe, because I found the original recipe a bit too sweet for modern tastes.

sherry cobbler | Brooklyn Homemaker

Perhaps the most important part of the drink though, was the ice! Before this point, most alcoholic beverages were served warm or hot, because ice was rare and expensive and refrigeration wasn’t yet a thing. At that point, ice had to be harvested by sawing huge blocks out of frozen lakes and storing them in ice houses. In the 1840s though, they began to industrialize the harvesting process, and suddenly ice was affordable and readily available, so it could be used on frivolous things like drinks. To me, the crushed ice in this drink makes it feel a bit like an adult snow-cone! It also means that if you tipped the glass toward your mouth, the ice would spill all over you, hence what I said before about this cocktails singlehandedly popularizing the drinking straw!
I used a canvass ice crushing bag called a Lewis Bag, along with a mallet (I used my CLEAN meat tenderizer) to get my finely crushed snowy ice!

sherry cobbler | Brooklyn Homemaker

I know this is a very summery cocktail to be sharing in October, but there’s a very good reason that I’ve waited until now to share it with you.
Over the past few months, I’ve been working on a special project with my good friend Stephanie…


We’re starting a podcast!!!

sherry cobbler | Brooklyn Homemaker

I hope this doesn’t break your hearts baking lovers, but food is not the theme of our show. There will be a cocktail featured in each episode though, if that softens the blow at all.

You already know I love history, but I also really love politics. Now, as a food blogger, discussing politics has always been a touchy subject because it’s such a personal thing and I don’t want to alienate anyone who just came here to look at bundt cakes. I’ve touched on a few specific topics over the years, when the issues at hand were incredibly important to me, but for the most part, I’ve left that part of my life out of Brooklyn Homemaker.

Don’t worry though, Stephanie and I will NOT be discussing current events on our show. There are plenty of voices out there already doing that. Our podcast will actually be about the politics of the past, specifically political scandals from American History! The show is called Beyond Reproach, because while we believe public servants should be squeaky clean upstanding citizens, history has shown us time and time again that they definitely ain’t. I know this topic may sound dull, but I promise it’s presented in a really fun way. Basically, we’ll be telling each other stories from America’s sordid past as we drink fancy cocktails, talk too much, interrupt each other, put our feet in our mouths, and go off on (sometimes totally unrelated) tangents. If cursing offends you, this probably isn’t the show for you, but I promise it’s hilarious, eye-opening, and educational all at once!

sherry cobbler | Brooklyn Homemaker

What does all this have to do with this old-timey cocktail recipe you ask?

Well, for each episode we choose a cocktail that was popular during the era of the first scandal we discuss. In our very first episode, Stephanie tells a story from the late 1800s, so this was the first cocktail we featured.
Not only that, but today also just happens to be the very day that we officially launched the show, and to celebrate I wanted to share my fun new project with all of you! Nothing would make me happier than to have you come over and check us out!
I won’t overwhelm you with all the social media and all that, but please click these links to find us on itunes, and check out our show’s website.

Please do check us out, and if you like us, don’t forget to subscribe to the show, and maybe even give us a rating or review on your favorite pod catcher!!!

Thanks y’all! I hope to see you over at Beyond Reproach!

sherry cobbler | Brooklyn Homemaker

The Sherry Cobbler

  • Servings: makes 1 cocktail
  • Print
Adapted from Bon Appetit

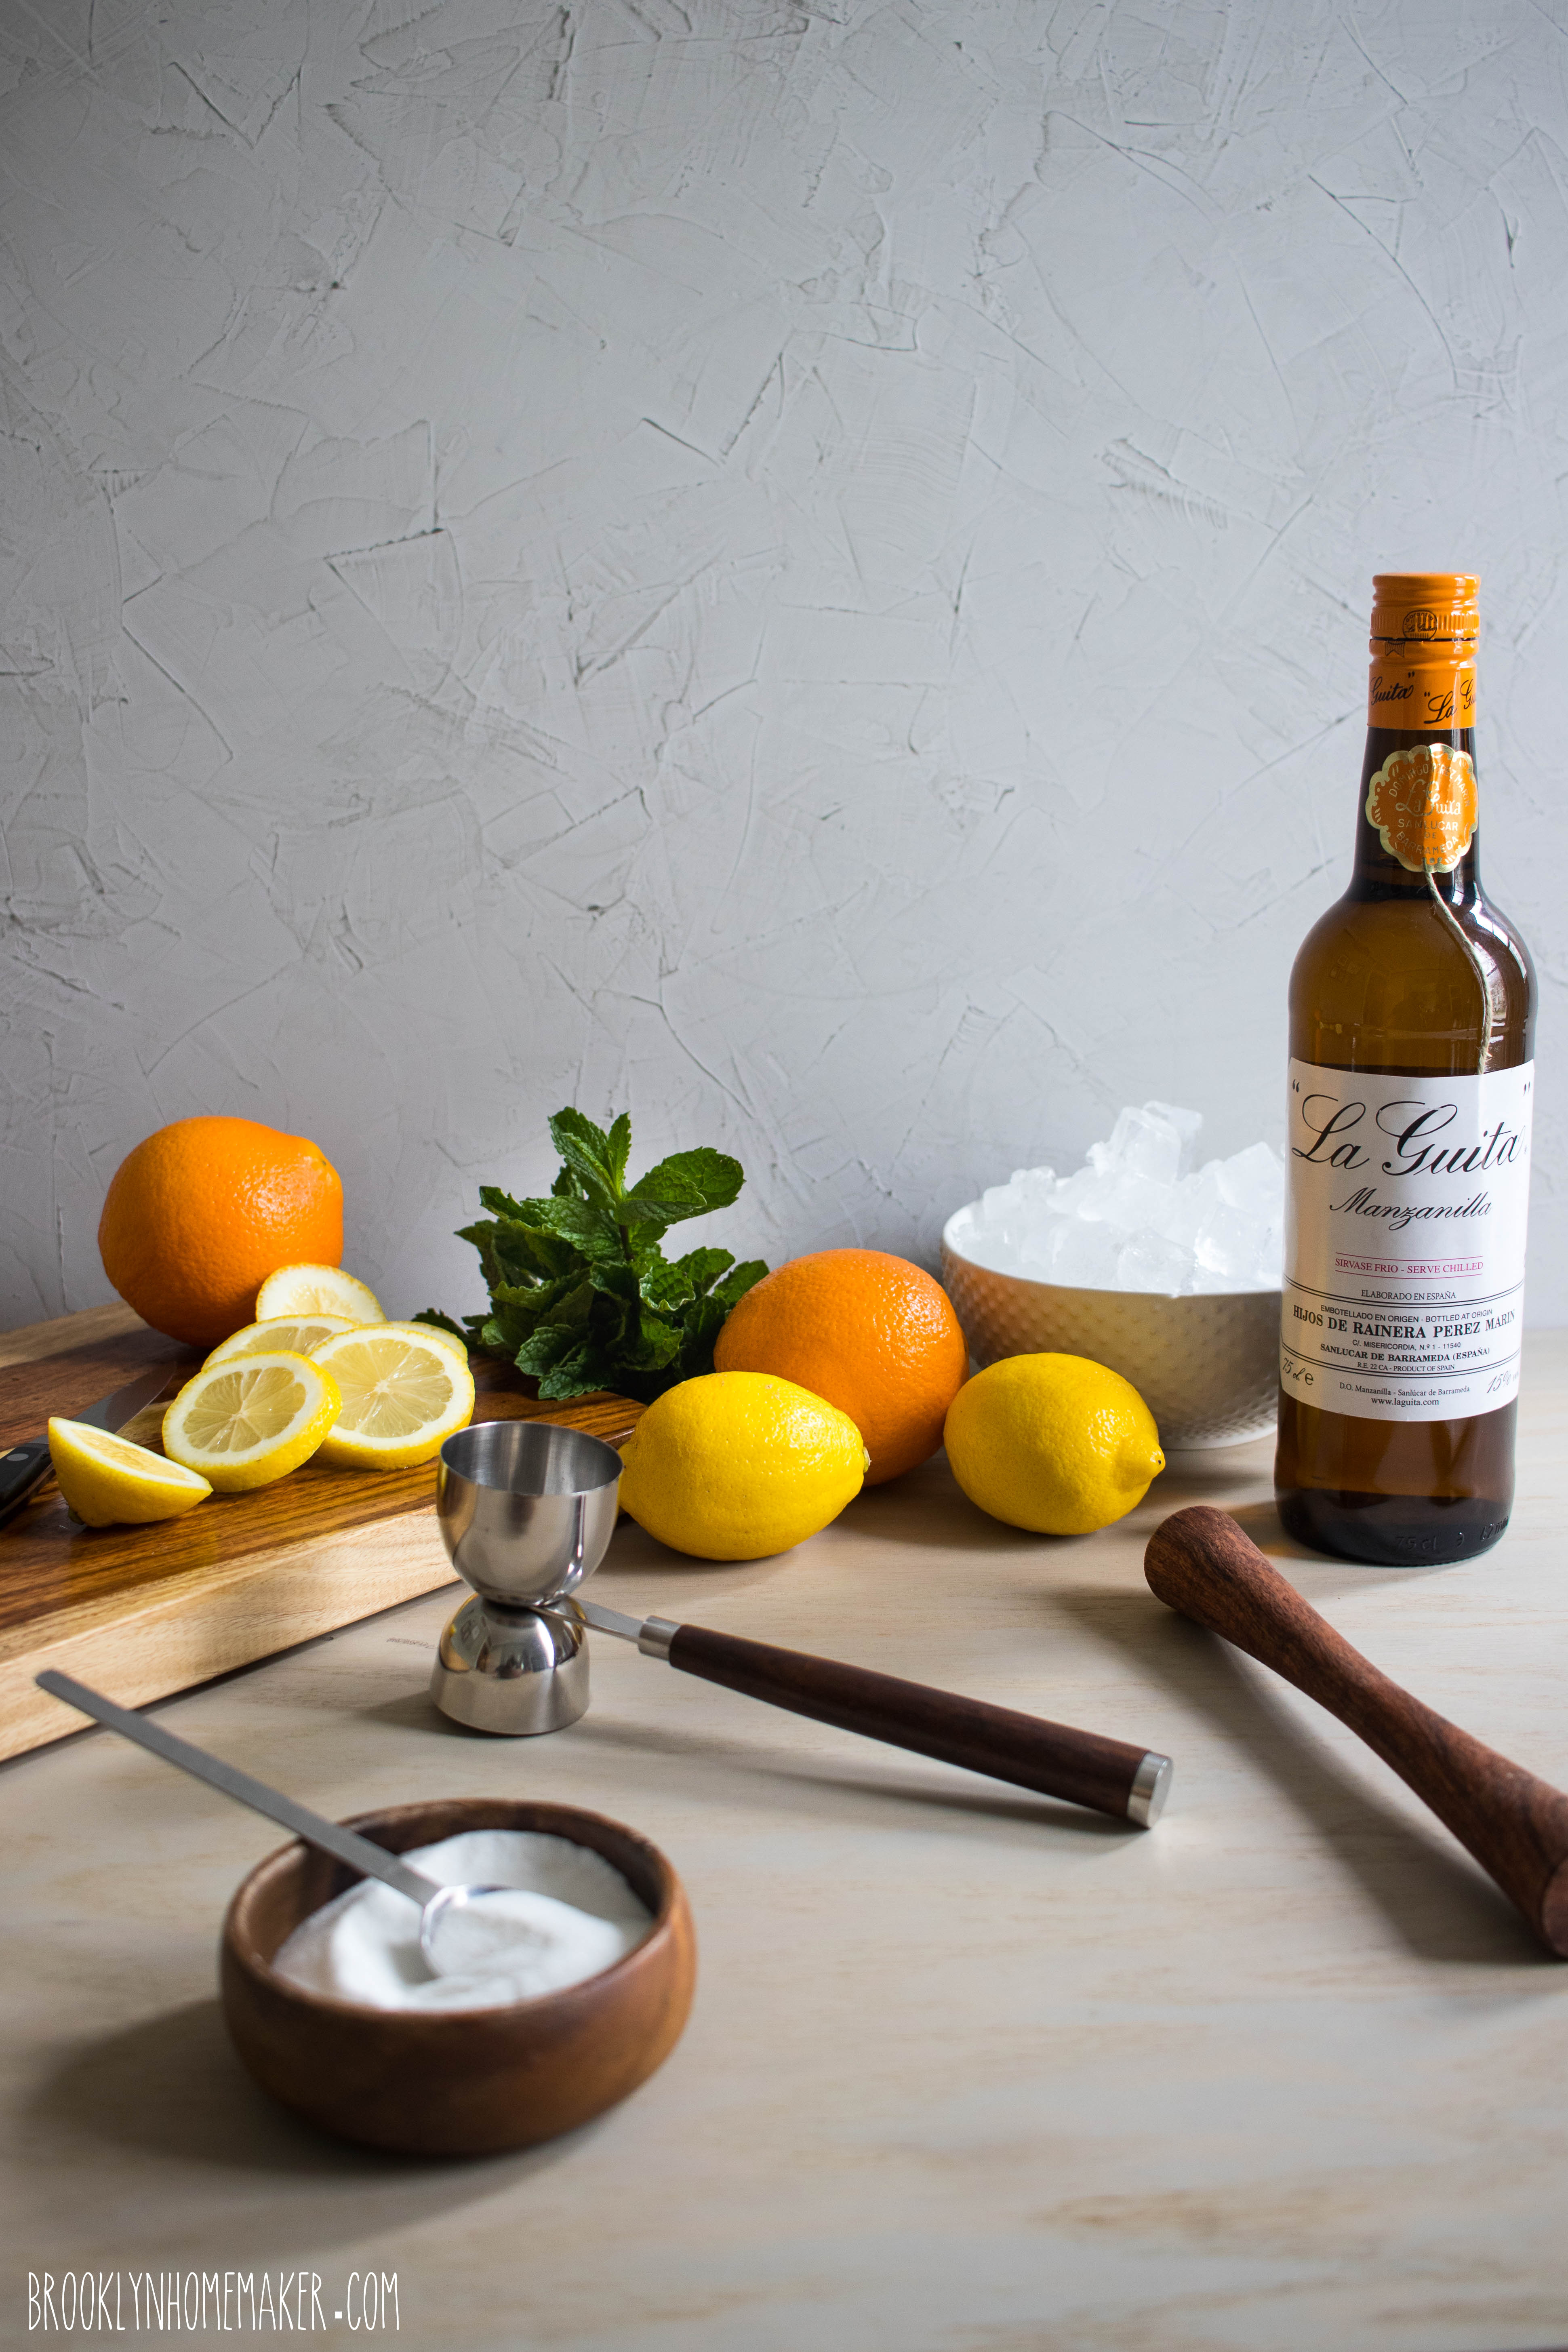
2 orange wheels (1 for garnish)
2 lemon wheels (1 for garnish)
2 teaspoons superfine sugar, (or 1/2 oz simple syrup)
3 ounces dry Sherry (amontillado or mazanilla)
mint sprig and raspberries for garnish

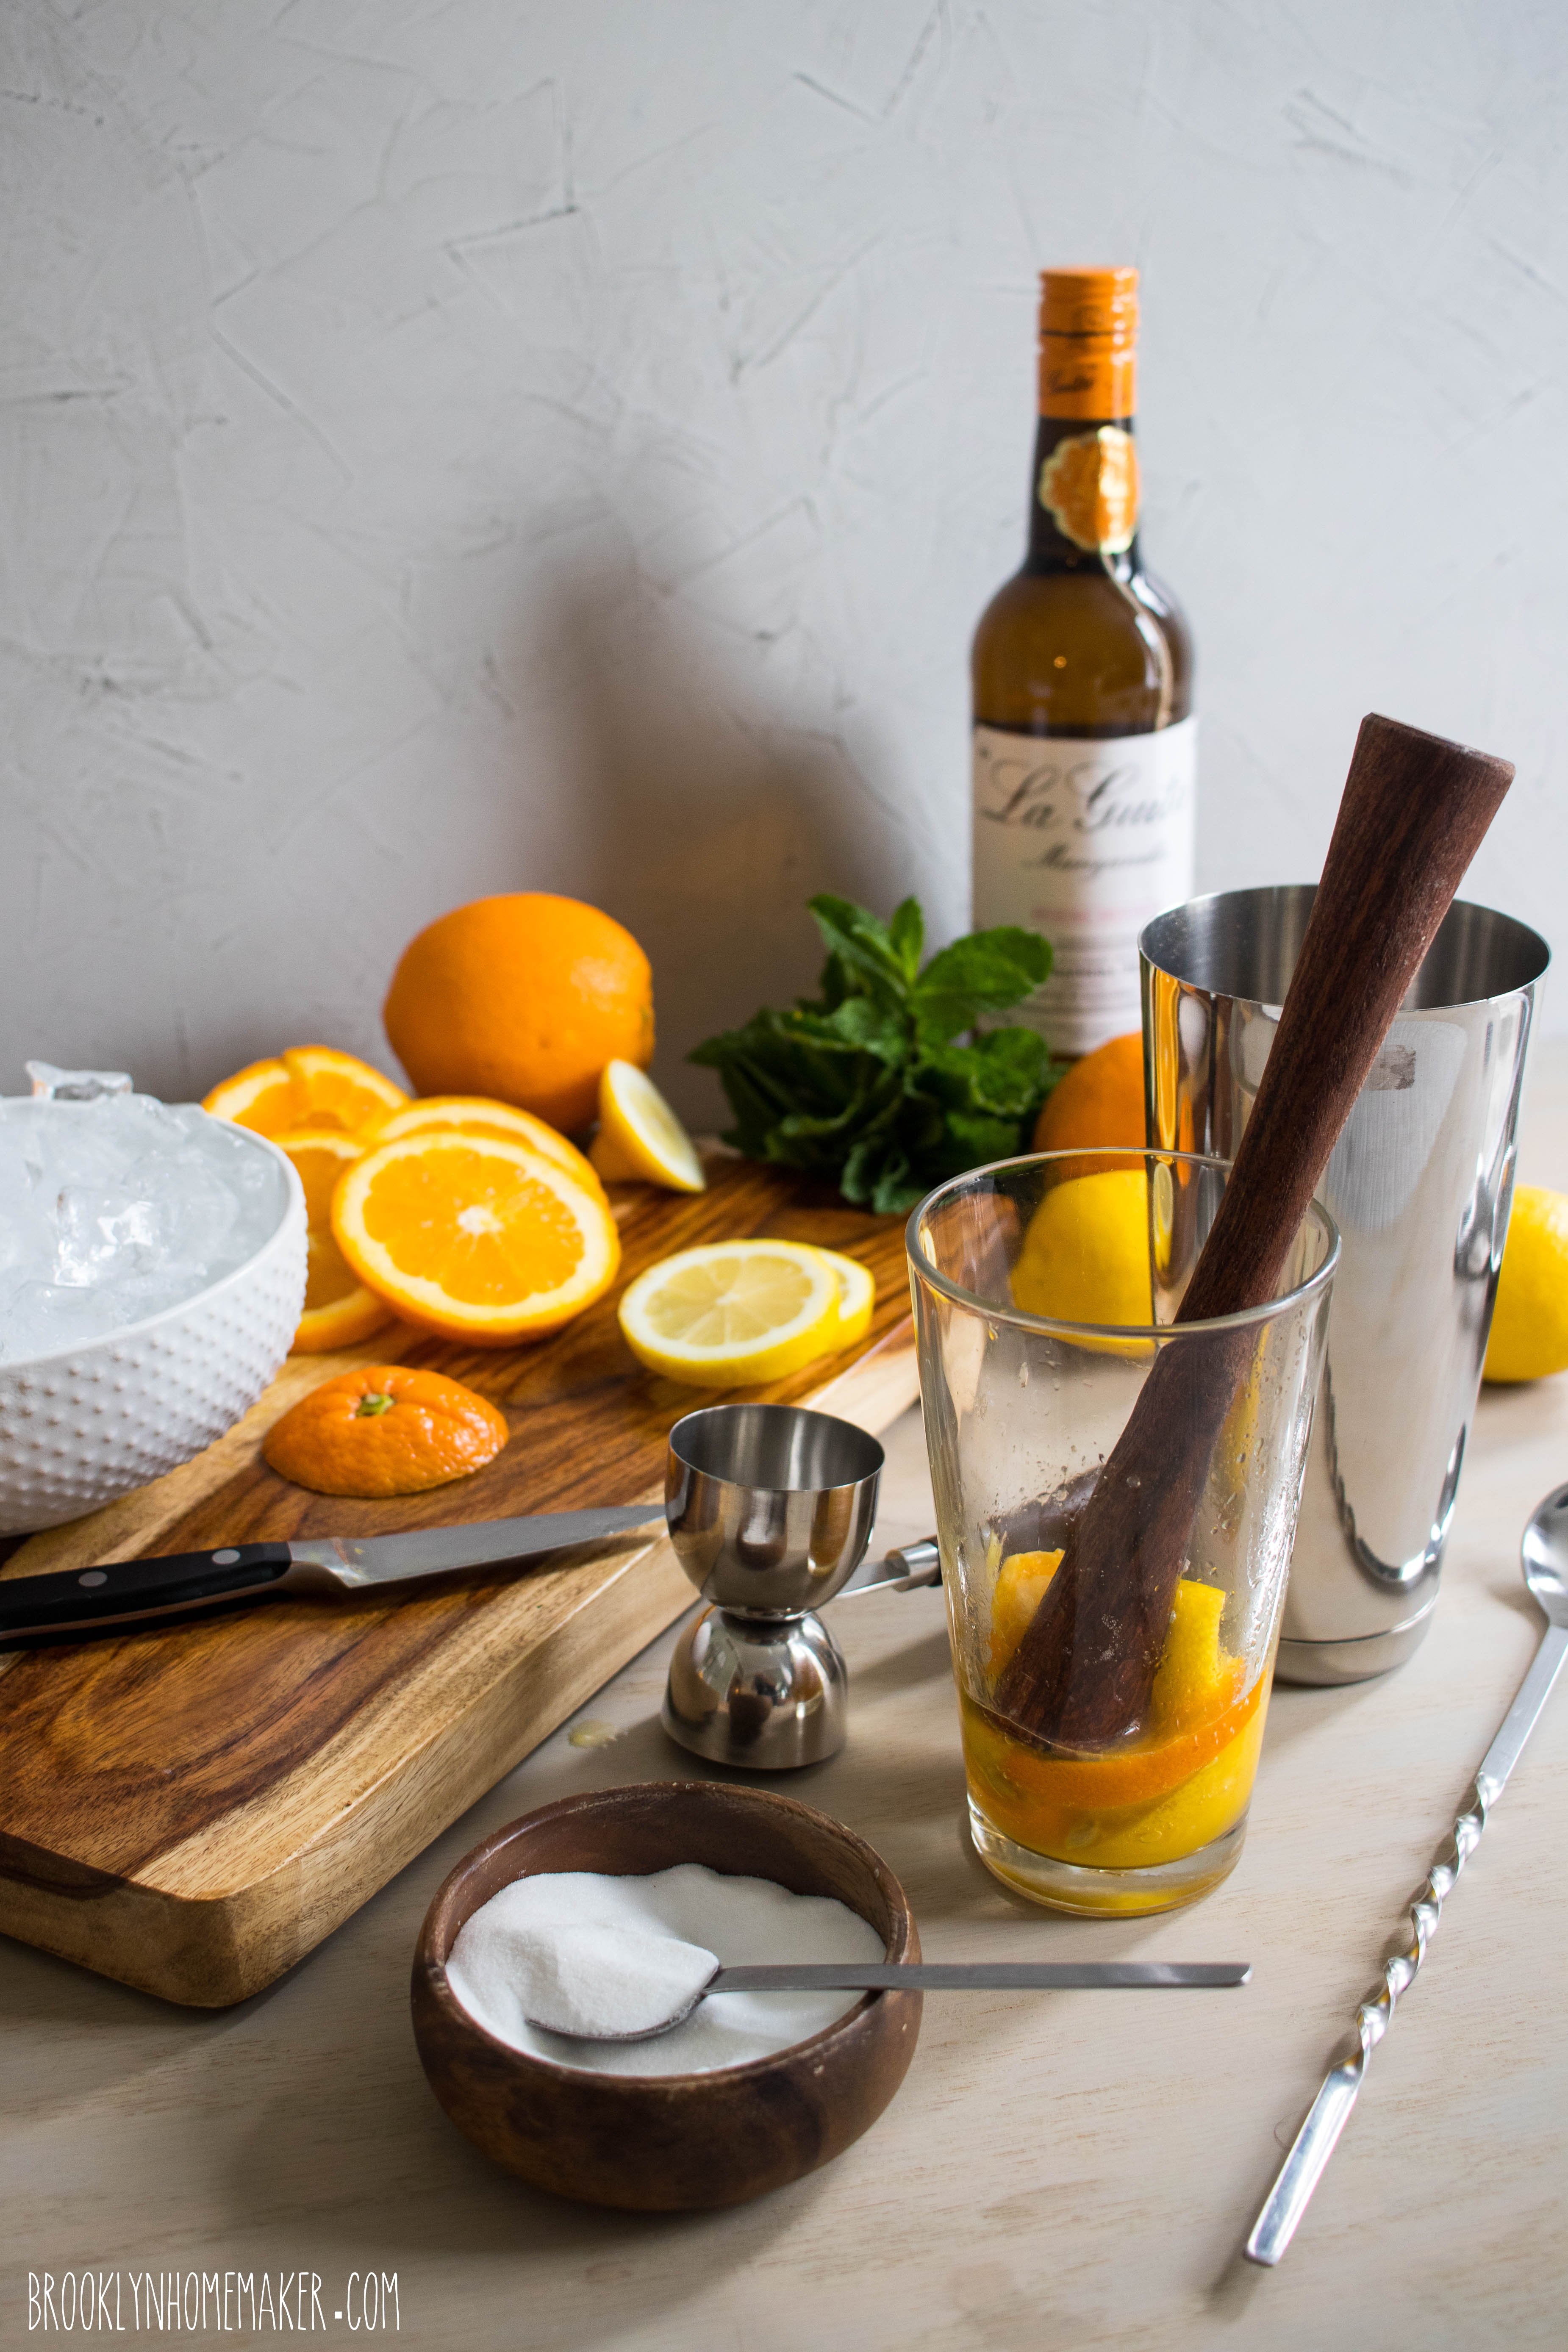
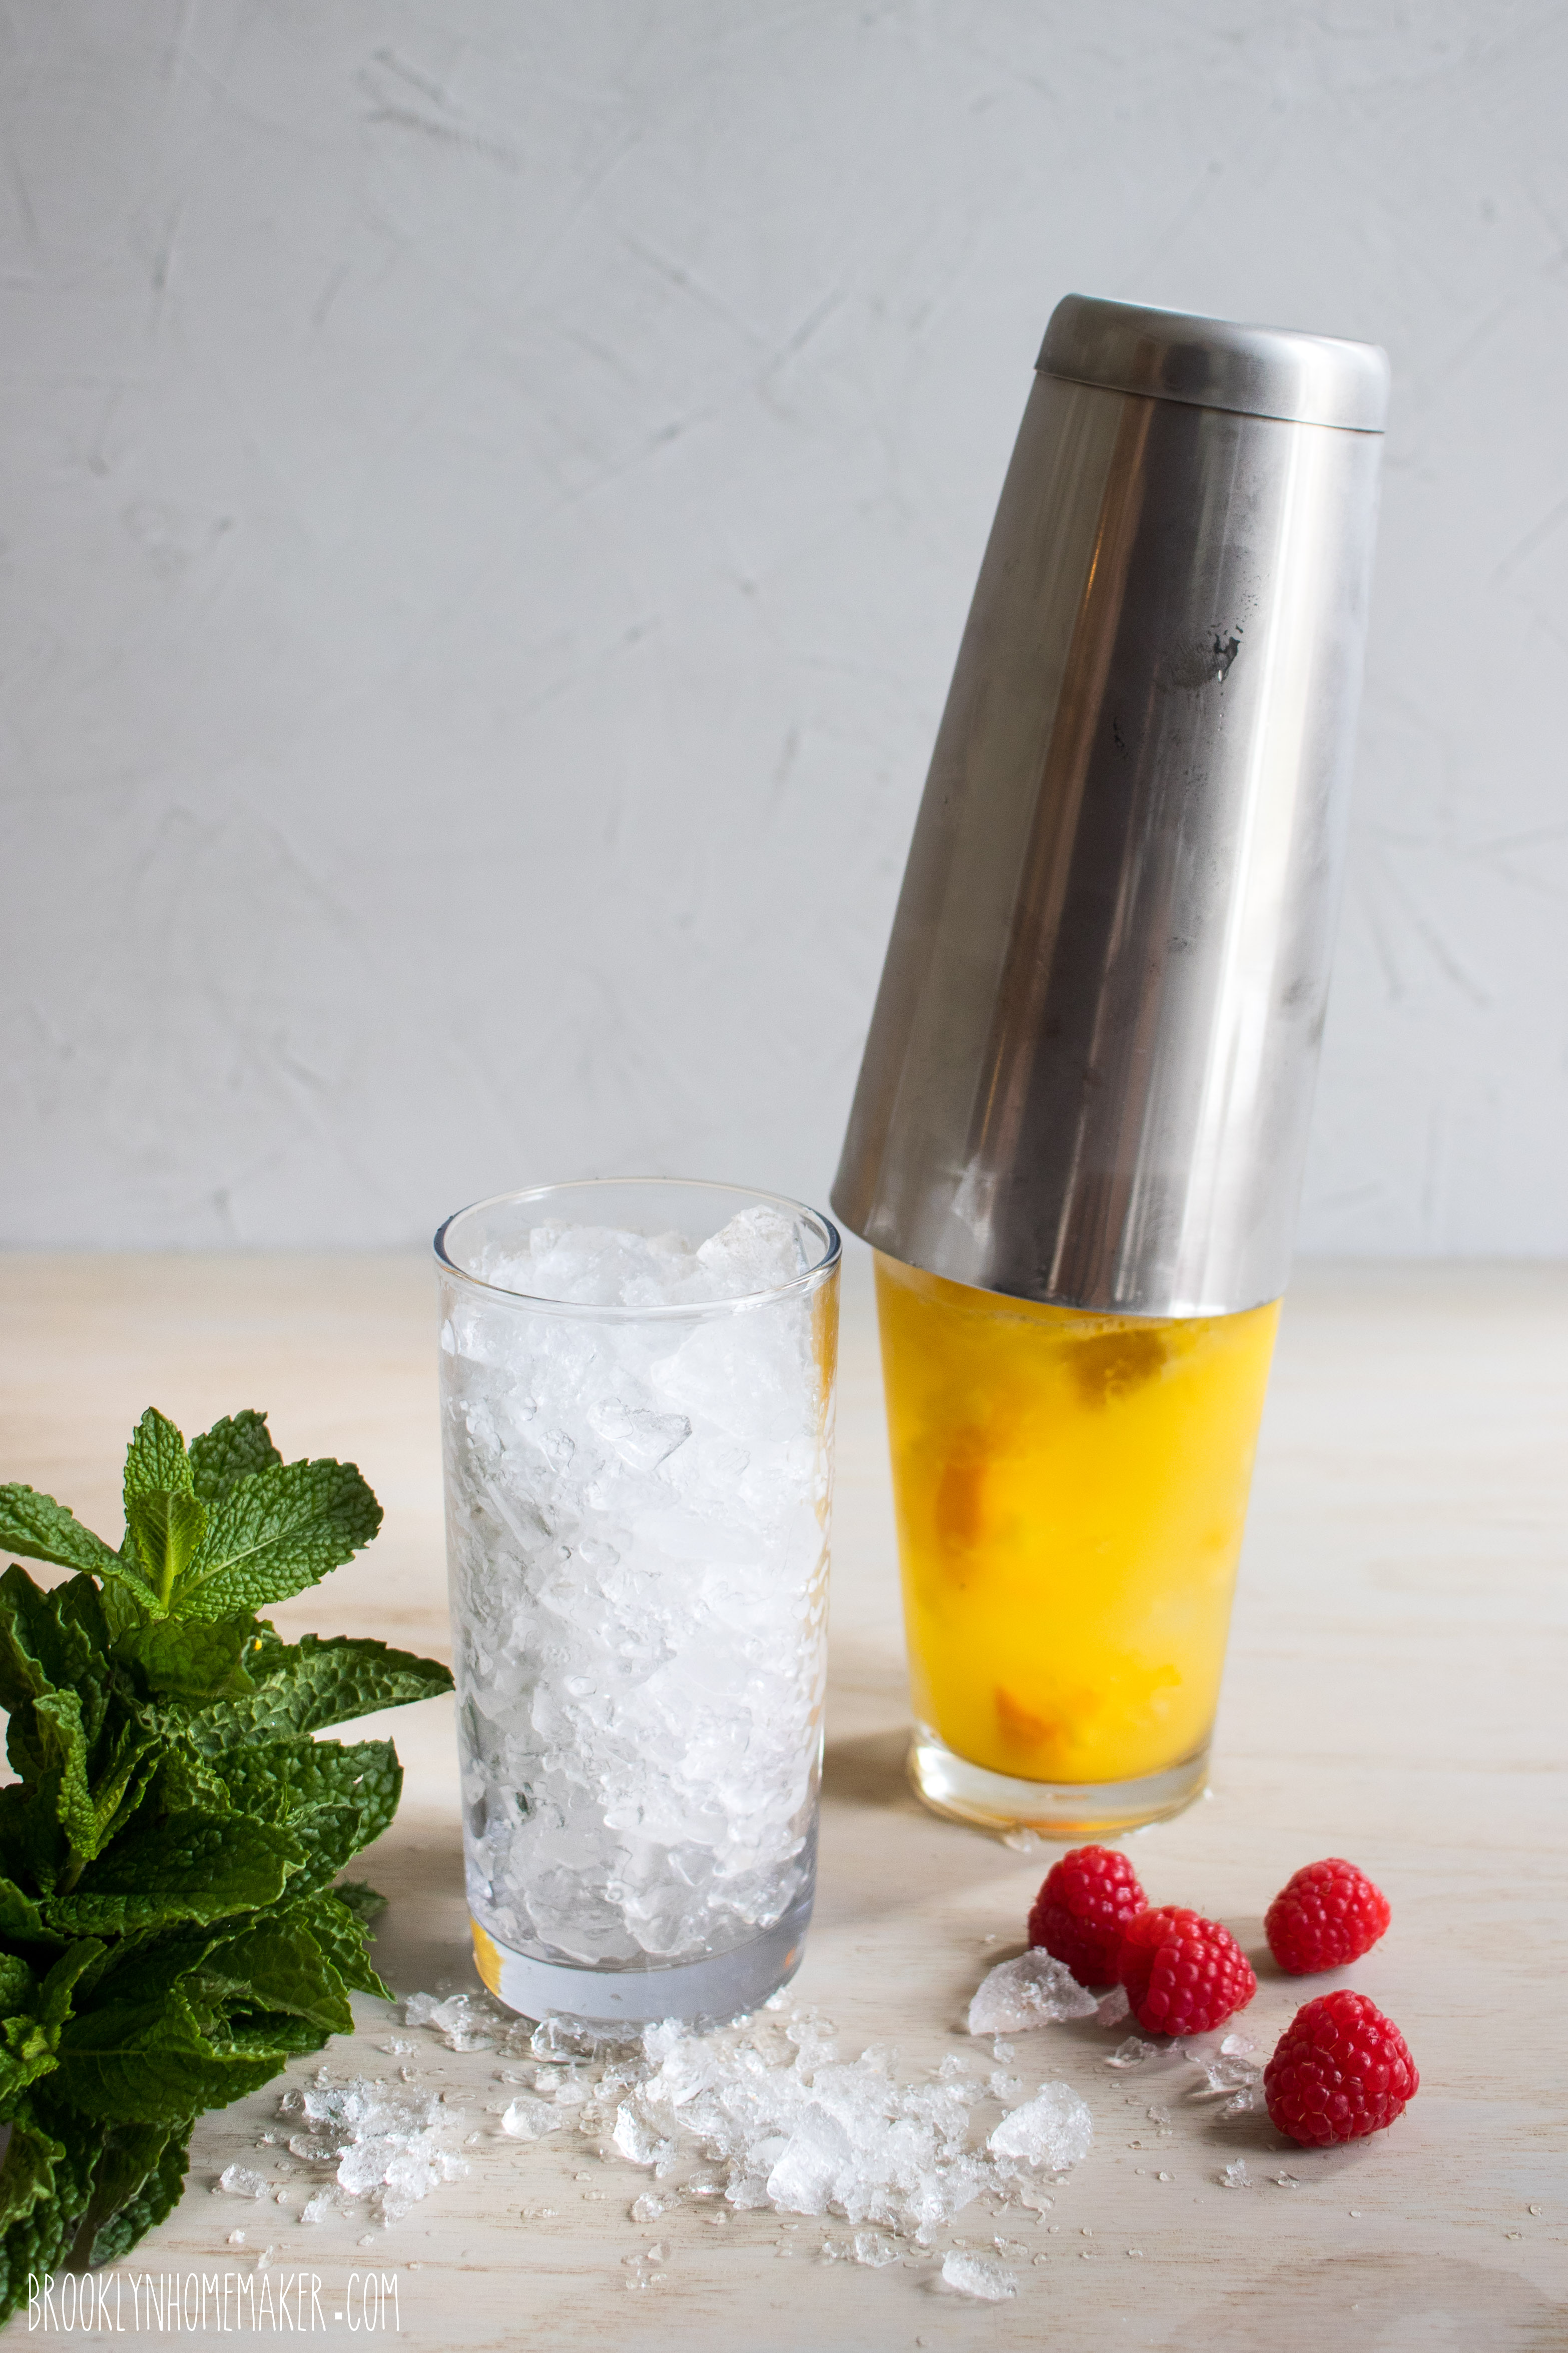
Muddle 1 orange wheel, 1 lemon wheel, and sugar or simple syrup together in a cocktail shaker. Add Sherry and plenty of ice, and shake vigorously until outside is frosty, about 30 seconds.
Strain into a collins or highball glass filled to the top with crushed ice. Add more crushed ice, packing into the glass and mounding above rim. Garnish with mint, raspberry, an orange wheel, and a lemon wheel. Drink with a straw, and enjoy!

Advertisement

nectarines and cream icebox cake

Why hello there friends! Remember me???

nectarines and cream icebox cake | Brooklyn Homemaker

Yes it’s me! Tux!

I’m back! (well, sort of.)

nectarines and cream icebox cake | Brooklyn Homemaker

Russell and I are still plugging away at the project I mentioned in my last post, and while we’re (hopefully) nearing the finish line, we’ve still got plenty of work to do so I’m not exactly back for good. I just happened to get a little down time recently and I couldn’t bare to stay away from you for one more second!

I’ve missed you guys SO MUCH that I jumped at the opportunity to get back in the kitchen when I finally had a moment to myself. We’ve been so completely consumed with our project in the past few months that my poor kitchen has felt almost as neglected as all of you probably have.

nectarines and cream icebox cake | Brooklyn Homemaker

As it turns out though, my little bit of down time just happened to fall smack dab in the middle of our SECOND heat wave in the past couple months. For almost two weeks the daily weather forecast included “Excessive Heat Warnings”, and the city even set up “cooling stations” for the sick and elderly without air conditioning to be able to escape (and survive) the oppressive daytime temperatures.

To make matters even worse, unlike my brown-lawned family upstate, we’ve also had plenty of rain (and thunder and lightning) here in Brooklyn so along with the heat we’ve also had plenty of soupy, steamy, thick, and swampy humidity. In other words, we’ve just been sweating our butts off here in Brooklyn!

nectarines and cream icebox cake | Brooklyn Homemaker

As you can imagine, that meant that turning the oven on to bake a cake has been sort of out of the question.

nectarines and cream icebox cake | Brooklyn Homemaker

With actual baking off the table, my first thought was to make some kind of ice cream or frozen something-or-other to help cool us off and keep me as far as possible from the oven. It didn’t take me long to realize though, that I hadn’t thought far enough ahead and my ice cream maker bowl requires overnight freezing before I could even get started.
I briefly considered popsicles but I couldn’t seem to get inspired. What I really wanted to do was bakeor at least make something that felt as homey and satisfying as something fresh from the oven. I’d been out of the kitchen and away from my oven for so long that my head kept going back to the idea of a fruity crisp or crumble or skillet cake.

Then it suddenly hit me!

Icebox cake!

nectarines and cream icebox cake | Brooklyn Homemaker

If you’re not familiar with an icebox cake, the concept is fairly simple. You layer thin crisp cookies with whipped cream and let the whole thing set up in the refrigerator (or icebox as it were). While the cake sets up, moisture is pulled from the whipped cream, softening the cookies and firming the cream until the whole thing is transformed into a dreamy, wonderful, lick-the-plate-clean dessert with a perfectly cake-like sliceable texture.

The original recipe has been around since the first world war and was most likely inspired by similar desserts like the Charlotte or the Trifle. The first icebox cakes were made with thin chocolate wafer cookies that are increasingly difficult to find (Smitten Kitchen has a recipe if you want to make your own), but these days you can basically make them with any thin, crisp cookies you like.
The filling options these days are just as limitless as the cookies, so I knew I’d find a way to make something bright and summery and satisfying.

nectarines and cream icebox cake | Brooklyn Homemaker

I wish I had some sepia-colored story about the nostalgic icebox cakes my grandmother used to make me as a boy growing up in the countryside in 1764, but the truth is that I’d never even tasted icebox cake until I made one with gingersnaps and maple cream this past December.

Even though I didn’t grow up with them, they feel every bit as homey and comforting as the bundt cakes that I actually did grow up eating in grandma’s kitchen in the country. While they’re relatively new to me, I would bet that a few more icebox cakes will turn up on the pages of Brooklyn Homemaker in the years to come. They just have that folksy days-of-yore feeling that lets me wistfully imagine joyful, touching family moments that never actually happened.

Not to mention they’re also freakin’ delicious, and crazy simple to put together.
If you can whip cream and open a box of cookies, you can make an icebox cake. They’re actually much simpler than I myself would normally go for, and the last time I made one I went the extra mile and made my own gingersnaps as the base of the cake. (You know I’m a glutton for punishment.)

This time around though, I wanted to take it easy, keep it simple, and highlight the other ingredients I wanted to feature in this simple summery creation.

nectarines and cream icebox cake | Brooklyn Homemaker

Russell and I signed up for a CSA from Local Roots earlier this summer, but of course that was before we knew how busy we were about to get. We’ve been loving every ounce of fresh, local, seasonal produce, but it can sometimes be a challenge to find uses for everything without letting anything go to waste.

We’ve been getting pounds and pounds of white nectarines in the past few weeks, so I really wanted to do something special with them. What could be better than giving them the peaches and cream treatment with vanilla wafer cookies and mascarpone thickened whipped cream?

Nectarines and peaches are so similar in flavor and texture that you could substitute peaches without affecting the flavor of the recipe much at all. The white nectarines we had from our CSA though had a crisper, slightly more acidic zing to them than a standard peach, which I thought was a nice compliment to the richness of the cream. Honestly though, you could swap them out for strawberries or cherries and this cake would still be a little summery slice of heaven.

nectarines and cream icebox cake | Brooklyn Homemaker

Nectarines and Cream Icebox Cake

2 lbs nectarines (or peaches), peeled, pitted, and roughly chopped
3/4 cup sugar
pinch of salt
2 tablespoons orange liqueur, such as Cointreau (optional) *see note
2 1/2 cups cold heavy cream
8 oz mascarpone at room temperature
Two 11 oz packages of vanilla wafer cookies, such as Nilla Wafers

Combine roughly chopped nectarines with sugar, salt, and orange liqueur in a medium bowl. Stir to combine and macerate for at least 15 to 20 minutes.

Meanwhile, in the bowl of an electric mixer fitted with the whisk attachment, whip the heavy cream on high just until it begins to thicken and form soft peaks. Add the mascarpone and beat on low speed until almost smooth, about 30 seconds. Scrape down the sides and fold to incorporate. Add the macerated chopped nectarines and beat on low for 30 to 60 seconds and scrape down the sides and fold again. Increase the speed to medium high and beat until the mixture is thick and holds firm peaks, another 30 to 60 seconds. Do NOT over-beat or the cream can become waxy and the mascarpone can become grainy.

On an 8″ cake board, or a cake stand or serving plate, arrange a layer of vanilla wafer cookies into three tight circles. I used 19 cookies per layer, with 1 cookie in the center, then one circle of 6 cookies and another circle of 12, but that’ll depend on the size of the cookie you use. Once you’ve arranged your first layer of cookies, place about a cup of cream over them and smooth it out with an offset icing spatula. Spread the cream almost to the outer edge, leaving just a small edge of cookies showing. Arrange another layer of cookies, trying to alternate the layers so they appear staggered above one another. Repeat another layer of cream and then another layer of cookies, again and again until you have as many layers as you desire or until you run out of cookies or cream. Finish the top of the cake with a final layer of cream. My cake was 8 layers tall, but again, this may depend on the size of the cookies you use.

If you have a cookie or two left over, garnish the cake by crumbling them in the center of the top if desired.

Try to delicately tent the cake with plastic wrap or cover with a large inverted bowl or cake dome before transferring to the refrigerator to set up.
Place cake to refrigerator for an absolute minimum of 6 hours (but ideally 12 to 24 hours) before serving. This cake will continue to improve the longer you can wait. As it sets, the cream will get firmer as the cookies get softer, and the flavors will distribute more evenly. Patience is a virtue!

Once set, the cake can be sliced and served much like a regular cake. If possible, it’s best to use a sharp serrated knife with a gentle sawing motion to avoid smooshing the cake and to get the best looking slices possible. Really though, you could dish it into bowls with a spoon if you wanted, and everyone would love it just as much.
Cake can be stored in the fridge in an airtight container for 3 or 4 days.

*Note:
Peach schnapps would be great too if you have it, or you could also substitute rum or bourbon for a bit of extra warmth.
If you’d prefer to keep it completely non-alcoholic, a teaspoon or two of orange blossom water or rose water would be a lovely substitution. That stuff is potent though so start with just a little and taste to see if you’d like to add more.

zucchini peach bread

It’s officially September you guys. I know.

zucchini peach bread | Brooklyn Homemaker

Back to school season. Pumpkin spice everything. Sweaters in store windows…

While some people lament the end of summer and others celebrate the onset of fall, for all intents and purposes, it’s actually still summer. Like SUMMER. Dog days style.

zucchini peach bread | Brooklyn Homemaker

Here in Brooklyn we’re in the midst of yet another record-breaking heat wave. My backyard looks incredibly parched, sad, and droopy; and the heat over the past few days has felt downright oppressive and just generally awful. In fact, the other day many schools in the area announced they’d be letting out early because of a heat advisory, in their first week back!

zucchini peach bread | Brooklyn Homemaker

Trying to take full advantage of the extended summery weather, Russell and I took a trip to the farmer’s market over the weekend. I’ve been really stumped about what to do and make for the ol’ blog lately, because I’m having such a hard time deciding what would be considered seasonally appropriate right now. Last week I posted a recipe for some hot and steamy soup, and then the weather decided to follow my lead and went all hot and soupy too.

zucchini peach bread | Brooklyn Homemaker

I figured I should just go and see what spoke to me, and hoped I’d be able to make a plan from there.

Wandering the stalls of the market I was met with piles of gorgeous heirloom tomatoes and bushels of ripe sweet corn, but for some reason stacks of bright green zucchini were what called out to me, along with some seriously beautiful local peaches. But, what the heck could I do with peaches and zucchini in the same dish? I thought about just making a peach crumble or something, and then using the zucchini for dinner later on. I paid up and was on my way, and by the time I got home I knew what I had to do.

zucchini peach bread | Brooklyn Homemaker

When I was little I was a big fan of banana bread, especially my grandma’s banana bread. As I got older I started to develop a “distaste” for bananas that eventually blossomed into an intense hatred for bananas and anything banana related.

I usually pride myself in my openness to any food available to me, and my willingness to try anything someone might dare me to eat, but bananas are just an absolute no-no. I don’t know why, but I really can’t stand them. The tiniest piece of banana snuck into a smoothie deems it unfit for anything but the trash bin. Even the smell of them makes me retch, and my co-workers are well aware that eating a banana anywhere near me is absolutely forbidden.

zucchini peach bread | Brooklyn Homemaker

For the past few years there has been a banana bread shaped hole in my heart, but thankfully zucchini bread has stepped in to fill that giant void in my life.

So those bright green beauties fresh from some local farm had a clear and bright future, grated and baked inside a loaf of warm nutty quick bread, along with the tastiest peaches summer had to offer. (Thankfully we recently got a new AC unit so turning on the oven didn’t turn our tiny apartment into a sweltering inferno)

zucchini peach bread | Brooklyn Homemaker

These loaves are every bit as tender and moist and delicious as you could want, with a wonderful crunchy top thanks to the addition of some demerara sugar sprinkled on just before baking. They’re really the perfect transitional food between summer and fall. The zucchini and peaches are bright and fresh and summery, but they’re paired with warm autumnal spices and crunchy bitter walnuts. I never liked walnuts in my breads when I was younger, but I’ve learned to absolutely love the contrasting texture and flavor. I think the bright sweetness from the peaches really calls for the slight bitterness of the walnuts for balance, so I really recommend you don’t skip them.

The peaches aren’t really the stars of the show here, but take a backseat to the zucchini. The flavor is very similar to a normal (albeit really delicious) zucchini bread, with an added touch of sweet peachiness. I personally love the subtle addition of summer fruitiness, but if you’re looking for something with bright peach-forward flavor, I’m not sure this is the recipe for you. I added a little bit of wheat flour to soak up some of the extra moisture, but I fear that adding too many more peaches to the recipe could render your loaves dense and soggy.

zucchini peach bread | Brooklyn Homemaker

Zucchini Peach Bread

  • Servings: 2 loaves or approximately 24 muffins
  • Print
Adapted from Smitten Kitchen

3 large eggs
1 cup vegetable oil
2 teaspoons vanilla extract
1 1/2 cups sugar
1 1/2 cups grated zucchini
1 cup finely diced peaches
2 cups all-purpose flour
1 cup whole wheat flour
1 tablespoon cinnamon
1/2 teaspoon ground ginger
1/8 teaspoon nutmeg
1 teaspoon baking soda
1/2 teaspoon baking powder
1 teaspoon  table salt
3/4 cup chopped toasted walnuts
1/4 cup demerara sugar (or other coarse sanding sugar)

Preheat oven to 350°F.

Liberally butter and flour two 8×4 inch loaf pans. Alternately, line 24 muffin cups with paper liners.

In a large bowl whisk together the eggs, oil, vanilla and sugar. Add zucchini and peaches and stir to combine.

Combine flours, cinnamon, ginger, nutmeg, baking soda, baking powder, salt, and walnuts. Whisk to combine. Make a well in the center of the flour and pour egg mixture in. Gently fold and stir just to combine. Do not over mix. Divide the batter into prepared pans and sprinkle each with demerara sugar.

Bake loaves for 60 minutes, plus or minus ten, or until a toothpick or cake tester inserted into the center comes out clean. If making muffins instead, they should bake for approximately 20 to 25 minutes. Cool on a wire rack for about 15 minutes before removing from pans, and cool for at least 30 minutes more before slicing.

grilled chicken tacos with cilantro pesto and red cabbage slaw

Growing up in Auburn, New York, my only concept of Mexican food was the drive-thru menu at Taco Bell.

grilled chicken tacos with cilantro pesto and red cabbage slaw | Brooklyn Homemaker

All through my childhood I thought “Mexican food” meant odd smelling greasy ground beef with a choice of soft or crunchy taco. If my mom ever had a hankering for something from “south of the border”, it meant she would have to make two trips; one to Taco Bell for her, and one to the Burger King across the street for my sister and myself. The only thing Taco Bell ever had to offer that I had any interest in was their sweet and greasy Cinnamon Twists, the American bastard cousin of the Churro, that I’d happily munch on while we rode across the street to get some “real” food at the BK.

Although I pride myself in being an adventurous eater now, as a kid I was anything but, and my mom was well aware that cooking tacos at home was also a no-no. My sister and I both made it perfectly clear that “Mexican food” (ground beef with seasoning packet and crunchy shells from a box) was not welcome in our home.

grilled chicken tacos with cilantro pesto and red cabbage slaw | Brooklyn Homemaker

When I went vegetarian in high school (all the cool kids were doing it) I did end up learning to love Taco Bell, and my usual order consisted of a Chalupa Supreme with refried beans instead of meat. To this day, if I ever find myself in line at the Bell, this is still my go-to order. Even though I eat meat now, I’m not a huge fan of theirs, so I’m more than happy to stick with the beans instead.

grilled chicken tacos with cilantro pesto and red cabbage slaw | Brooklyn Homemaker

Considering that I grew up only a few hours from the bright lights of the big city, I’m really not sure why my hometown was so completely devoid of any authentic Latin food or culture (or ANY food or culture other than American or Italian). I don’t think it even really occurred to me that Taco Bell wasn’t “authentic Mexican cuisine” (Or that Hong Kong Buffet wasn’t “authentic Chinese cuisine”) until I started watching the Food Network in high school and learned there was more to the world of food than was available in my little slice of the world.

grilled chicken tacos with cilantro pesto and red cabbage slaw | Brooklyn Homemaker

Of course, taking culinary courses in college opened my eyes to a whole new world of flavors and cuisines, and there were even a few mediocre Mexican restaurants near my school. It wasn’t until moving to Brooklyn though, that I was finally able to taste actual authentic Mexican food, made by REAL Mexicans! Imagine my surprise when I learned what a real chalupa looked like!

There was a small family owned tortilla factory down the street from my first apartment here, and shortly after I moved in they opened a little lunch counter with amazing tacos on fresh tortillas that could be bought for a song. Eventually the tacos caught on with the 20 year old hipster set and their lunch business blew up and turned into a full scale restaurant business. I practically lived off of those tacos for my first few years in Brooklyn.

grilled chicken tacos with cilantro pesto and red cabbage slaw | Brooklyn Homemaker

Here’s the thing about “authentic” Mexican taco recipes though… This isn’t actually one of them.
You may have already guessed this after seeing the Pfeffernusse, apfelkuchen, & kugelhopf recipes in my repertoire, but… I’m not Mexican.
If I want the real deal I need only to walk around the corner. If I’m making my own at home though, I feel like I’m allowed to take a little poetic license, especially now that I know what a real taco actually tastes like!

I will say this though; Cilantro, though not necessarily in this form, is about as traditional an ingredient for tacos as you can find. Fresh lime juice and the pungent bite of raw onion, both of which you’ll find in the red cabbage slaw, are also integral parts of authentic Mexican tacos.

grilled chicken tacos with cilantro pesto and red cabbage slaw | Brooklyn Homemaker

Grilling is an amazing way to get tons of flavor into your food without adding a ton of fat or salt or sugar. Of course, it’s also summer so I’m always looking for an excuse to cook outside. I’m a charcoal man myself, but if you have a gas grill you can add a smoking box with your choice of wood chips to help get that wonderful smokiness into your food.

If you don’t have a grill, or you’re making this recipe six months in the future when your grill is buried under six feet of snow, you can definitely skip the skewers and roast the chicken strips under your broiler. You might even be able to sear them in a heavy skillet, but the pesto may want to stick to the pan rather than the chicken.

grilled chicken tacos with cilantro pesto and red cabbage slaw | Brooklyn Homemaker

Authentic or not, it doesn’t get much better than soft white corn tortillas filled with smoky tender grilled chicken, vibrant summery cilantro pesto, creamy ripe avocado, and crunchy cabbage with biting raw onion and bright tangy lime juice.
Not bad for a gringo eh?

For the best flavor I like to make the pesto ahead and let the chicken marinate in it for a few hours. I’d recommend that you make the slaw ahead too so all the flavors have some time to hang out together and get nice and friendly.

grilled chicken tacos with cilantro pesto and red cabbage slaw | Brooklyn Homemaker

Grilled Chicken Tacos with Cilantro Pesto and Red Cabbage Slaw

1 1/4 to 1 1/2 lbs skinless boneless chicken breast
3 cloves garlic
2 cups fresh cilantro, lightly packed
1 jalapeño, sliced and seeded (2 if you like heat)
1/4 cup olive oil
juice of 2 limes, divided
1 to 2 additional limes cut into wedges
1/2 teaspoon salt
1/2 teaspoon freshly ground black pepper
1/4 shredded red cabbage (about 1 1/2 cups)
1/2 cup finely diced red onion
1 ripe avocado, sliced
12 to 16 white corn tortillas

Slice chicken breasts into thin strips with a very sharp knife. I find that putting them into the freezer for 30 to 45 minutes beforehand firms them up and makes them easier to slice.

To make the cilantro pesto combine garlic, cilantro, olive oil, juice of 1 lime, salt, & pepper in a food processor and process until completely smooth. Transfer to a large bowl with sliced chicken and toss to combine. Cover and refrigerate for at least an hour or two, or overnight if desired.

To make the red cabbage slaw, combine the shredded cabbage, diced onion, and juice of 1 lime in a medium bowl. Toss to combine and season with salt and pepper. Cover and refrigerate for at least an hour or two, or overnight if desired.

I find that skewering the chicken makes it easier to flip and keeps it from falling through the grill grates. If using wooden skewers make sure to soak them in water for an hour before use so they don’t burn up.

Thread 4 or 5 chicken strips onto each skewer and try to leave as much of the pesto on them as possible. Grill the skewers over a medium to high flame until just cooked through, flipping once. This should only take 4 or 5 minutes per side but that will depend on the heat in your grill. Since the chicken is sliced thin it will dry out if overcooked.
Warm your tortillas over the grill too, just until soft and warm, about a minute per side.

Assemble the tacos with a few chunks of chicken, a sprinkle of red cabbage slaw, a couple slices of avocado, and a squeeze of fresh lime. Serve with additional lime wedges if desired.
I recommend about 3 tacos per serving, 4 if you’re hungry.