Month: December 2014

Mexican dark hot chocolate

So, the other day, I took the subway seven stops clutching a small tree.

 Mexican dark hot chocolate | Brooklyn Homemaker

This time of year it’s not that rare to see otherwise sane looking adults dragging whole trees, minus the roots, through the streets of New York. Tourists point and stare at grown men in expensive coats struggling against the weight of the trees on their backs as they try to walk down the subway stairs. Women in heels choose trees twice their size and tip delivery men because they know better.

Mexican dark hot chocolate | Brooklyn Homemaker

When I was growing up we always had an artificial tree so, of course, I always wanted a real one. If we’d always had real trees I’d probably be sitting here writing about the joys of fluffing and shaping artificial branches.

Mexican dark hot chocolate | Brooklyn Homemaker

Every year since getting my first apartment I’ve had a real tree. This year I went for a modest 3-footer, but over the years I’ve had big ones, small ones, potted ones, cut ones, and little tiny live ones that came with teeny tiny ornaments attached. A few years ago we just decorated a house plant because we were so strapped for cash that we didn’t want to waste money on a tree. It was a 3 foot dwarf palm with string lights and blue, green, and purple bulbs. No star.

Mexican dark hot chocolate | Brooklyn Homemaker

I’d had those blue and green and purple ornaments for years, and I bought a few of them from the dollar store in Saranac Lake, New York for my very first tree in my first apartment. Last year we decided to finally put them to rest, and to simplify with a white and silver scheme instead.

When I was little I’d made craft dough Christmas ornaments with my mother and sister, so last year I adapted the idea and made “gingerbread” salt dough ornaments cut into the shapes of snowflakes and furry woodland creatures. If you want to try the project out for yourself, check out my gingerbread salt dough ornament tutorial.

Mexican dark hot chocolate | Brooklyn Homemaker

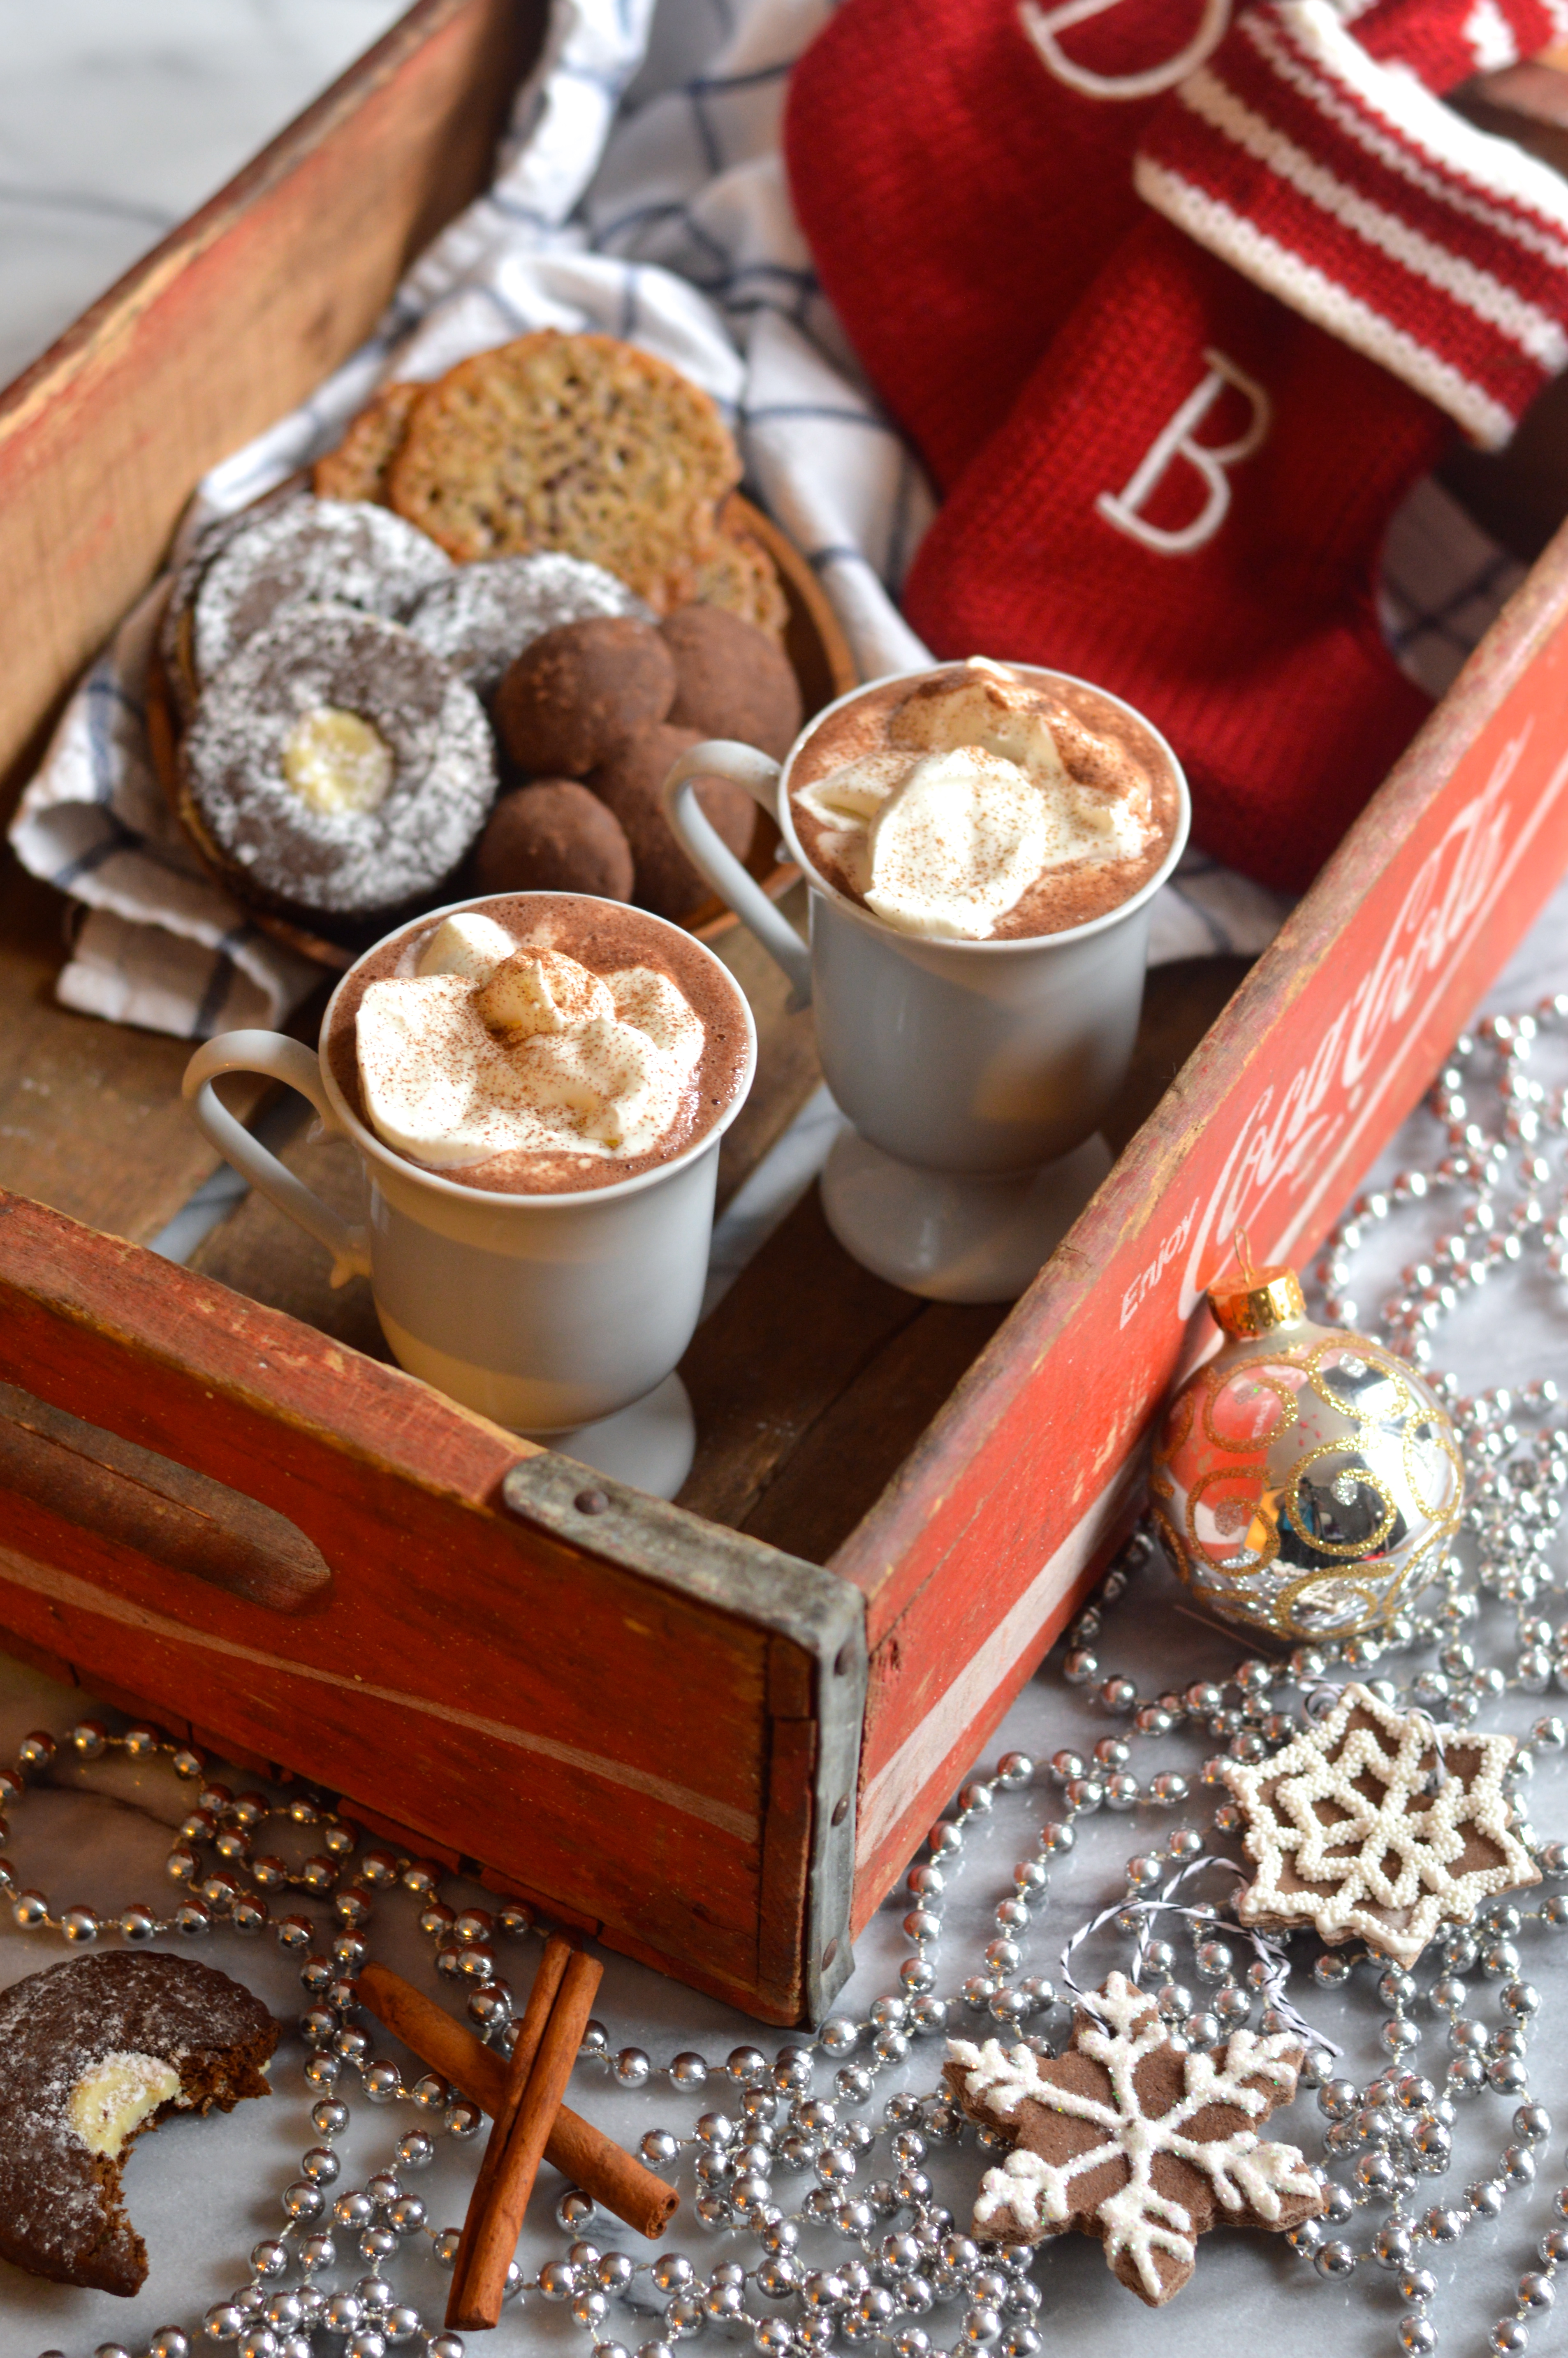
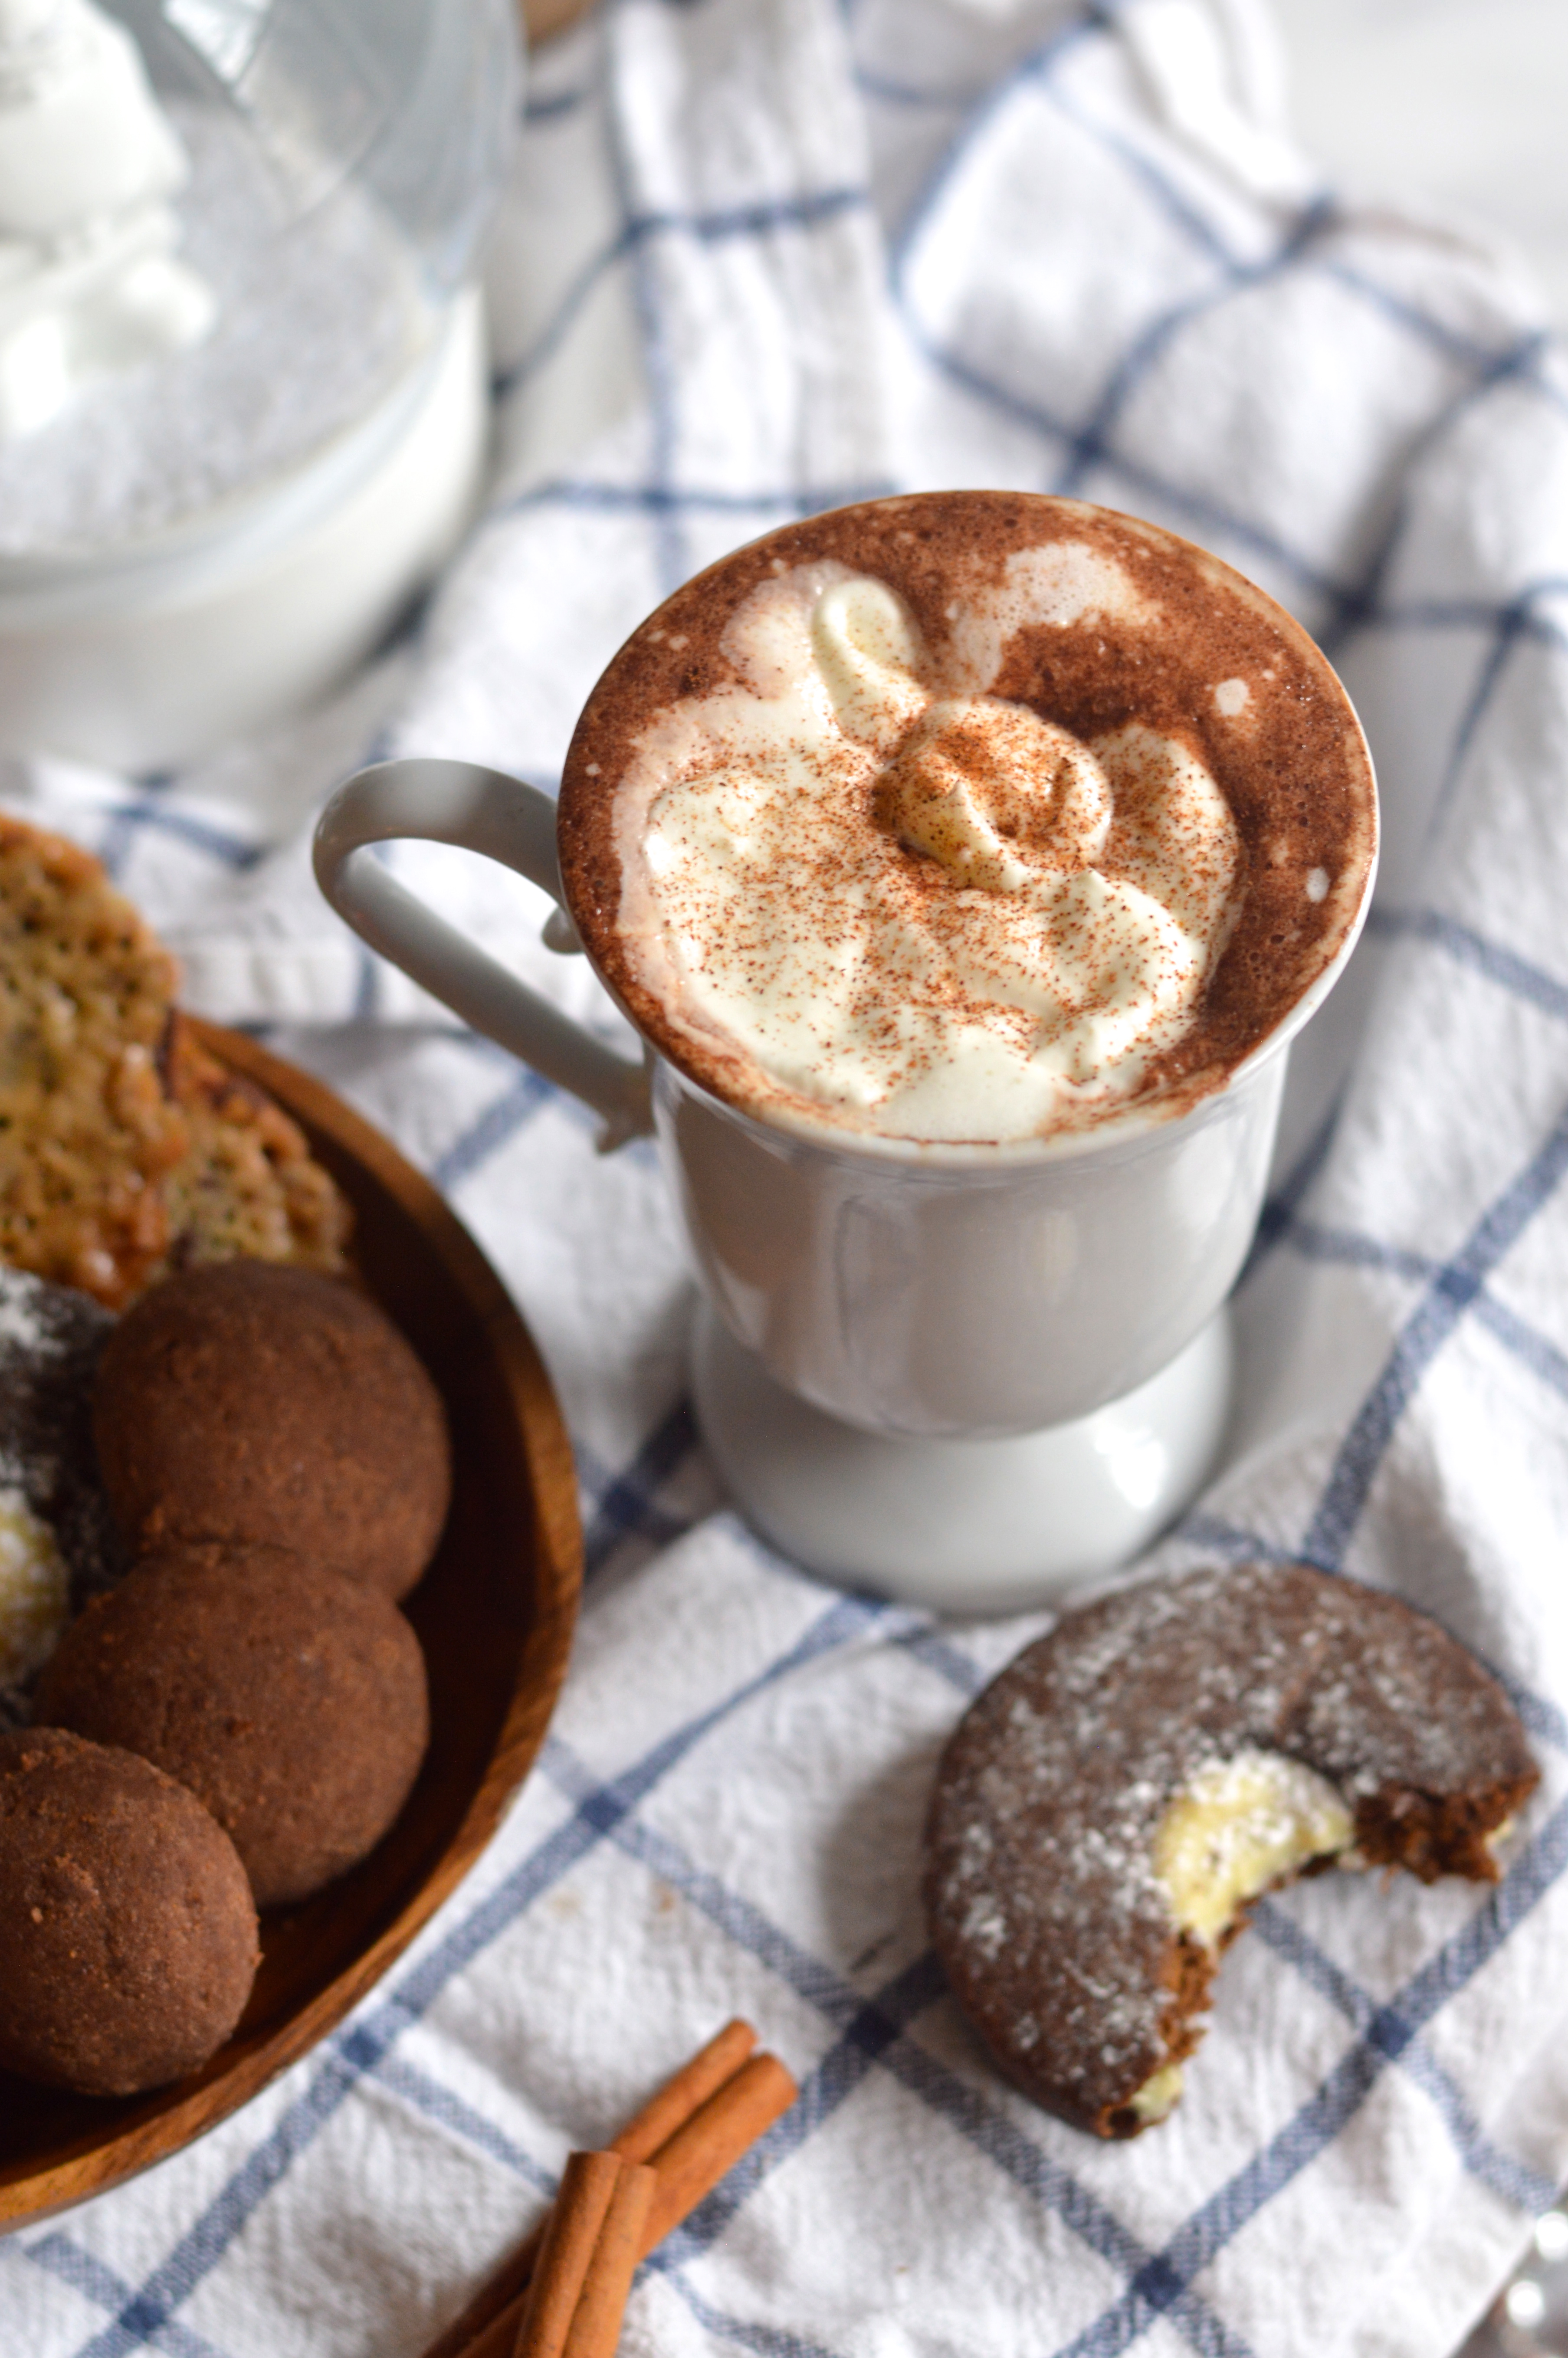
To warm us up while we decorated I made a spiced Mexican dark hot chocolate with homemade whipped cream. I recommend using the highest quality chocolate you can get for this. Use a chocolate bar that you would eat on it’s own, not something you find in the baking aisle. Since there’s little more to this than milk, a bit of spice, and the chocolate; the chocolate you choose will make a big difference in the flavor.

Mexican dark hot chocolate | Brooklyn Homemaker

This hot chocolate is rich and dark and thick and creamy. It’s got just a hint of spicy warmth, and a tiny bit of caramel-y sweetness from a touch of brown sugar. It’s just barely sweet, but is still so rich that a small serving is completely satisfying. If you don’t care for dark chocolate and want to use milk instead, I’d recommend you skip the addition of brown sugar or it may end up too sweet. If you like to get down, I’d also highly recommend adding an ounce or two of whiskey to each serving. If you don’t want to get too crazy but like a touch of the sauce, you could add a tablespoon or so to your whipped cream instead.

Mexican dark hot chocolate | Brooklyn Homemaker

Mexican Dark Hot Chocolate

adapted, just barely, from Ina Garten for Food Network

2 cups whole milk
1 tablespoon light brown sugar
4 ounces good dark chocolate (about 70%), chopped
1/2 teaspoon pure vanilla extract
1/8 teaspoon ground cinnamon
pinch cayenne pepper

1/2 cup heavy cream
2 tablespoons powdered sugar
more cinnamon, for dusting

Place the milk, brown sugar, cinnamon, and cayenne in a medium saucepan and bring to a simmer. Off the heat add the chocolate and vanilla. Let the chocolate sit and melt in the milk for a minute or two before whisking in to combine. If necessary, reheat the hot chocolate over low heat just until it simmers.

In a medium bowl, vigorously whisk together the cream and powdered sugar until the cream whips up into stiff peaks. You can use a hand mixer or stand mixer if desired, but it doesn’t take more than 5 minutes or so to do by hand, and you’re not making much.

Divide the hot chocolate between mugs and top with whipped cream. If desired, dust very lightly with cinnamon before serving.

Casa Neuhaus ceramic knife giveaway!!!

UPDATE: CONTEST HAS ENDED! Winners will be contacted by email

Have you ever worked with a ceramic knife before?

casa neuhaus ceramic knife giveaway | Brooklyn Homemaker

The ceramic material used to make ceramic knives is so hard that the blades rarely need to be sharpened, so they’re a great option for cooks who are intimidated by knife sharpening or just don’t have the time (and these days who does?)

Well – I’ve got great news! Just in time for the holidays, the amazing folks at the Greenpoint, Brooklyn-based Casa Neuhaus have offered to give away one of their ceramic knives to three readers of Brooklyn Homemaker! Can you believe it? Not one… THREE!

casa neuhaus ceramic knife giveaway | Brooklyn Homemaker

They have three knives to offer; a 3 inch paring knife, a 5 inch utility knife, and a 7 inch chef knife, and three lucky winners will win one of these three styles for free!

I’ve had a chance to use these knives myself, and I have to tell you that they’re amazing. They’re super super sharp and haven’t dulled one iota despite the abuse I put them through in my kitchen. Not only that, but they’re also really lightweight and beautifully designed. They’re gorgeous and modern looking with dark blades and stainless steel handles, and they even come with in their own really attractive gift boxes complete with sheathes that fit snugly over the blades to protect them from damage. Most ceramic knives don’t come with a sheath, but since ceramic can crack or chip if knocked around in a drawer, I think this is one of my favorite features!

casa neuhaus ceramic knife giveaway | Brooklyn Homemaker

If you have ever worked with a ceramic knife before, odds are that you’ve used white ceramic. Casa Neuhaus‘ knives have black ceramic blades made of black zirconium oxide. Unlike white ceramic blade, black zirconium oxide offers even more sharpness and durability than traditional ceramic knives. These knives even come with a three-year sharpness warranty that includes a free sharpening service (if needed)!

And hey, if you don’t win but still want one of these knives, they’re very reasonably priced and available through their webstore.

casa neuhaus ceramic knife giveaway | Brooklyn Homemaker

Want to know more?

Here are the basics, from their website:

WHY CERAMIC?

ceramic knife is a knife made out of very hard and tough ceramic, often zirconium dioxide (ZrO2); also known as zirconia. These knives are usually produced by dry pressing zirconia powder and firing them through solid-state sintering. The resultant blade is sharpened by grinding the edges with a diamond-dust-coated grinding wheel. Zirconia is 8.5 on the Mohs scale of mineral hardness, compared to 7.5 to 8 for hardened steel and 10 for diamond. This very hard edge rarely needs sharpening.

WHAT IS ZIRCONIA?

Zirconia is technically a laboratory manufactured diamond and thats what our knives are, thats why they are so sharp! We even give them a final heat treatment that makes them even stronger than other ceramic knives on the market, hence the dark color.

ANY SPECIAL CARE OR INSTRUCTIONS?

Just follow the following and your knives will last a lifetime:
– Never use them on any kind of bones or frozen stuff. Remember our knives are super sharp and strong but not unbreakable.
– Hand wash them. Don’t put them in the dishwasher. Remember that ceramic doesn’t absorb any taste or smell so just use a wet sponge to clean them.
– Don’t forget to put their cover sheet even if they are in the drying rack.
– Be careful to not drop them on a hard surface. And always use your ceramic knife with a plastic or wooden cutting board.

casa neuhaus ceramic knife giveaway | Brooklyn Homemaker

Contest rules:

Three winners will be chosen, each will win one knife.

Entries will be accepted until, and contest will end on, Monday December 15th, at 6PM EST.

To enter, please follow these links and “like” both Brooklyn Homemaker and Casa Neuhaus on facebook. Then come back and leave the comment “Gimme that knife!” on this post, and tell me what you want to cook with your new knife if you win!

Only one comment per entrant, please.  Sorry, but immediate family is excluded. The winning knives can only be shipped within the contiguous United States, so entrants must live or have a mailing address within the lower 48. Winner will be chosen, using a random number generator, from the total number of comments when the contest comes to a close. Winner will be contacted via email for shipping information.casa neuhaus ceramic knife giveaway | Brooklyn Homemaker

Good luck! And happy holidays from Brooklyn Homemaker and Casa Neuhaus!


steak topped carrot and mango salad with chili lime dressing

Okay so the holidays are fast approaching and we are all surrounded by sweets and cookies and cakes and rich hearty indulgences.

steak topped carrot and mango salad with chili lime dressing | Brooklyn Homemaker

With all the temptations at your fingertips this time of year, it’s easy to go overboard, and as much as I love to indulge, after a while your body just craves something fresh and bright and healthy. Of course, it’s also important to maintain a balance in your diet, to keep your ticker ticking and all. The thing about writing a food blog though, is that you tend to want to write about beautiful foods that make your mouth water just looking at them. While a lot of healthy foods certainly can taste great, “health food” ain’t sexy.

steak topped carrot and mango salad with chili lime dressing | Brooklyn Homemaker

We tend to eat a lot of salads at home, though from what I post here you might not know it. Most of our dinner salads are a kitchen sink of whatever produce we can find in the fridge, and while they’re usually delicious, they’re not all that photogenic or imaginative. For that reason, they don’t often make it to the pages of Brooklyn Homemaker.

steak topped carrot and mango salad with chili lime dressing | Brooklyn Homemaker

This salad though, is different. This salad isn’t just sexy, it’s seductive.

steak topped carrot and mango salad with chili lime dressing | Brooklyn Homemaker

To get those super long, super thin, super sexy julienned strips of carrot and mango, I used a julienne peeler. In a pinch you could also use a standard box grater, but the results won’t be nearly as long or thin, and if your mango isn’t super firm I fear that it might just turn to mush. I think that getting those perfect thin strands of vegetables makes salads look so much more delicious and interesting and makes you want to just dive right in. These peelers are also really really easy to use, so if you’re looking for a fun and affordable new tool for your kitchen, or a great stocking stuffer for the cook in your life, I’d highly recommend picking one up!

steak topped carrot and mango salad with chili lime dressing | Brooklyn Homemaker

To finish the salad and make it feel even more substantial and filling, I added some seared London broil, sliced ultra thin. If you’re not a steak fan though you can use whatever protein you like. I think the steak works really well with the dressing, but sliced chicken breast would be great here too. You could even go for some fresh juicy shrimp, seared salmon fillets, or even some decadent confit duck leg. Or, for that matter, skip the protein altogether. There is such a wide variety of flavors and textures going on that this salad is pretty amazing all on it’s own.

steak topped carrot and mango salad with chili lime dressing | Brooklyn Homemaker

While it certainly is good for you, the last word that comes to mind when you eat this salad is healthy. It’s bursting with so much flavor and offers such a variety of textures that you won’t be thinking about anything else. The carrots and mango are crunchy and fresh, and every bite is permeated with the sweet, bright, and spicy dressing. The crunchy cashews taste almost buttery against the sweet acidity of the rest of the salad, the cilantro is fresh and green and summery, and the sliced steak stands in soft and tender contrast to all that crispness and crunch.

steak topped carrot and mango salad with chili lime dressing | Brooklyn Homemaker

Steak Topped Carrot and Mango Salad with Chili Lime Dressing

Dressing:
zest and juice of 2 limes
3 tablespoons olive oil
1 tablespoon honey
1/2 teaspoon coarse Kosher salt
1/4 teaspoon ground black pepper
1/4 teaspoon chili powder
1/8 teaspoon ground cayenne pepper

Combine all ingredients in a dressing bottle or measuring cup and whisk or shake vigorously.

Salad:
6 medium carrots, julienned or grated (about 4 cups)
1 firm (or slightly under-ripe) mango, peeled and julienned or grated (about 2 1/2 to 3 cups)
1 small shallot, thinly sliced
1/2 cup torn cilantro leaves
1 cup unsalted roasted cashews
12 to 16 oz London Broil (or other lean boneless steak), optional
salt and pepper
1 tablespoon olive oil or butter

Julienne carrots using a julienne peeler (I LOVE this one), or grate them with a box grater. Peel the mango and julienne it, stopping where you feel the pit beneath the flesh. You can also slice the mango off the pit and grate it with a box grater. Combine the carrots, mango, sliced shallot, and chili lime dressing in a large bowl and toss well to combine.

At this point you could finish the salad and eat it as is, but I think it really benefits from at least an hour’s rest covered in the refrigerator.
So, if you have time, cover and refrigerate from 1 to 24 hours to let the flavors mingle. Just before serving, add the cashews and cilantro and toss until well combined.

Generously season the steak on both sides with salt and pepper. Preheat a large heavy bottom skillet (not non-stick) over high heat. Once the pan is good and super hot, add butter or oil, and sear the steak for 3-6 minutes on either side, flipping only once. This will depend on the thickness of the steak, but 3 minutes per side should get you to about medium rare, and 6 should get you closer to medium well. Remove steak to a cutting board and let it rest for at least 5 minutes before slicing against the grain of the meat, into super thin slices with a very sharp knife.

While steak is resting, toss the salad again to redistribute the dressing. Plate the salad and top with slices of steak.

classic coq au vin

Since Christmas is coming soon, and I’ve been a very good boy, I decided to buy myself a little present.

classic coq au vin | Brooklyn Homemaker

I went ahead and bought myself a fancy pants French braising pan. I’ve had my eye on one for years so I decided that I deserved to treat myself this year. I justified the cost (to myself) with the knowledge that I love braising, especially in cooler months, and this pan is so sturdy and solid that it should last a life time if I take care of it.

And it’s pretty.

classic coq au vin | Brooklyn Homemaker

I knew before I even got it home that I wanted Coq au Vin to be the first meal I prepared in my new favorite toy. I’ve made countless variations on chicken braised in wine, but I’ve actually never made a classic coq au vin before and I knew that that had to change.

classic coq au vin | Brooklyn Homemaker

We had a lot of red wine left over from our Thanksgiving celebration, so the timing couldn’t have been better. I really don’t know how this happened, by the way. I’m more than a little disappointed in myself and my dinner guests for not sucking down every last drop of booze that night.

classic coq au vin | Brooklyn Homemaker

I don’t own a copy of Julia Child’s Mastering the Art of French Cooking (for shame, I know), so instead I looked to the modern queen of classic cooking, Ina Garten. As it turns out, her recipe is reaaaallly similar to Julia’s anyway. I made just a few tiny tweaks to make her recipe my own, and to thicken up the sauce just a wee bit.

classic coq au vin | Brooklyn Homemaker

I’m going to channel my inner Ina and tell you that if you’re going to make this recipe, it pays to splurge on good ingredients. Use good wine, fresh thyme, and nice plump fresh mushrooms. If you can, get a nice thick whole chunk of bacon and dice it into thick lardons yourself. The size and texture just stands up better to low and slow cooking. If you can’t though, don’t let the bacon stop you. Seriously.

And, if you can, get a really really good chicken. If you can find an organic air-chilled chicken, go for it. They’re a little bit pricier but they have a much better flavor and the fat renders out of the skin better since the chicken hasn’t soaked in (and absorbed) water during processing. I won’t get into the specifics of chicken processing, but rest assured that (for many reasons) it’s worth your while to look for chicken that says “air chilled” on the package.

classic coq au vin | Brooklyn Homemaker

I was looking forward to butchering the chicken myself and showing you the process, but my market was out of whole air-chilled chickens but did have them pre-butchered for the same price. Sorry guys! Some other time.

If you don’t want to butcher your own chicken, your butcher will probably do it for you. Ask them to split the breasts. If you don’t want to use all the parts of the chicken, you can also do this with a mix of breast and thighs, or all thighs, or all breasts. It is important for flavor though, that everything is still on the bone with skin, and for even cooking you’ll need to have all the breasts cut in half.

classic coq au vin | Brooklyn Homemaker

This recipe is definitely worth all the hype. It’s rustic and homey and rich and sublimely satisfying.

I know that people always assume that all French food is fussy and stuffy and unattainable, but it’s not (always) true! French country dishes like Coq au Vin or Boeuf Bourguignon are actually really simple, comforting and filling. If you’re completely unfamiliar, Coq au Vin is a country chicken stew made with carrots, bacon, red wine, and mushrooms. It’s incredibly hearty and earthy, like some of the best comfort food you could ever want; like a warm cozy blanket made of chicken braised in red wine. The chicken is falling-off-the-bone tender and bursting with the rich bold flavors of the wine and thyme and mushrooms, and the sweet tender carrots and pearl onions balance the richness perfectly.

Just make sure you have enough wine to last you while you’re cooking and still have some left for serving!

classic coq au vin | Brooklyn Homemaker

Classic Coq Au Vin

  • Servings: 4 to 6-ish
  • Print
adapted from Ina Garten for Food Network

4 ounces thick cut bacon or pancetta, diced
1 (3 to 4-pound) chicken, cut into 8 pieces (breasts sliced in halves)
Kosher salt and freshly ground black pepper
1/2 pound carrots, cut into thick rustic pieces
1 yellow onion, sliced
1 teaspoon chopped garlic
1/4 cup Cognac
2 cups good dry red wine (preferably Burgundy)
1 cup chicken stock (homemade if possible)
10 fresh thyme sprigs
5 tablespoons unsalted butter, divided
1/4 cup all-purpose flour
1/2 pound frozen pearl onions
1/2 pound cremini mushrooms, stems removed and thickly sliced

Preheat the oven to 250 degrees F.

Pat the chicken pieces dry with paper towels and season liberally on both sides with salt and pepper.

Heat a large heavy-bottom Dutch oven or braising pan over medium heat. Add the bacon and cook for 8 to 10 minutes, until fat is rendered and bacon is crisp. Remove the bacon to a plate with a slotted spoon. If you have more than a tablespoon or two of bacon fat in the pan, pour off and reserve to use later in place of the butter.

When the bacon is removed, brown the chicken pieces in batches in a single layer for about 5 minutes, turning to brown evenly. Don’t crowd the chicken, just do two batches. Remove the chicken to the plate with the bacon and continue to brown until all the chicken is done. Set aside.

Add the carrots and sliced onions to the pan with 2 teaspoons salt and 1 teaspoon pepper and cook over medium heat for 10 to 12 minutes, stirring occasionally. Add the garlic and cook for 1 more minute. Add the Cognac and put the bacon, chicken, and any juices that collected on the plate back into the pot along with the wine, chicken stock, and thyme. Bring to a simmer on the stovetop, cover the pot with a tight fitting lid, and place in the oven for about 40 minutes, or until the chicken is just done. Remove from the oven and move back to the stovetop.

Mash 4 tablespoons of butter (or reserved bacon fat) and the flour together and stir into the stew. Add the frozen onions and bring the stew back up to a very low simmer. Add the remaining 1 tablespoon of butter (or bacon fat) to a separate medium saute pan, and cook the mushrooms over medium-low heat for 5 to 10 minutes, until browned and liquid cooks off. Stir the mushrooms into the stew and simmer for another 10 minutes. Season to taste.

Serve over mashed potatoes, rice, pasta, or cous cous.