Desserts

cherry & chocolate pudding ice pops

When I was growing up, I used to suck my thumb.

cherry & chocolate pudding ice pops | Brooklyn Homemaker

I didn’t just suck my thumb when I was, say, 3 or 4 though. I sucked my thumb clear until I was 9 years old. Thanks to the wonders of orthodontic technology, you’d never know it to look at me, but it’s true. At the age of 9, I guess I’d had enough teasing from classmates, not to mention nagging from family, and decided it was time to quit. In the same way that some people quit smoking, I quit my thumb-sucking and instantly started eating and developed an obsession with food. I mean, here we are over two decades later, and I’m sharing another recipe for something I can stuff into my face.

cherry & chocolate pudding ice pops | Brooklyn Homemaker

A few years before I gave it up, I got pine sap on my thumb. I honestly don’t remember how old I was, or even how it happened, but I think I was probably about 6 or 7 and that I must have picked up a freshly fallen pine cone or something like that.

I remember that at this age I was well aware of the fact that I was too old to still be sucking my thumb, and that I should probably try to quit, but I was a stubborn little bugger and I wasn’t ready to give it up. I guess I should have taken the sap as motivation or a sign, but nope. I liked having my thumb in my mouth and I wanted to keep it there.

cherry & chocolate pudding ice pops | Brooklyn Homemaker

The problem with trying to suck your thumb when there’s pine sap on it is that pine sap isn’t all that palatable. It’s pretty terrible in fact. Think turpentine, but sticky and stubborn. It’s acrid, pungent, and intensely bitter with a distinct hint of evil poison from hell.

The first time my thumb went into my mouth, I ran into my grandmother’s house screaming and crying that my beloved thumb was coated in horrible sticky awful. Right away, she reached into the freezer and handed me a fudgesicle to help me get the taste out of my mouth while she tried to get the sap off my skin.
My father and grandfather were in the construction and masonry business and always had a big green bar of intensely gritty heavy duty pumice soap sitting on the sink in the laundry room. We went straight back there for a rigorous scrubbing with the Lava soap, but alas, the sticky stuff had staying power. Even with the visible signs of the sap gone, the taste seemed to be permanently attached to my poor little thumb.

cherry & chocolate pudding ice pops | Brooklyn Homemaker

That didn’t seem to keep me from trying to stick my thumb in my mouth though, and it also didn’t stop me from running to Grandma for another fudgesicle. Over and over. Thumb in mouth, awful taste, run to Grandma, fudgesicle. And repeat.

cherry & chocolate pudding ice pops | Brooklyn Homemaker

By the end of the day, the sap flavor may or may not have already been thumb-sucked away, but I knew how to make the most of a bad situation. I’m sure my poor grandmother must have gone through a whole box of fudgesicles that day, though my sister probably got a few of them too.

cherry & chocolate pudding ice pops | Brooklyn Homemaker

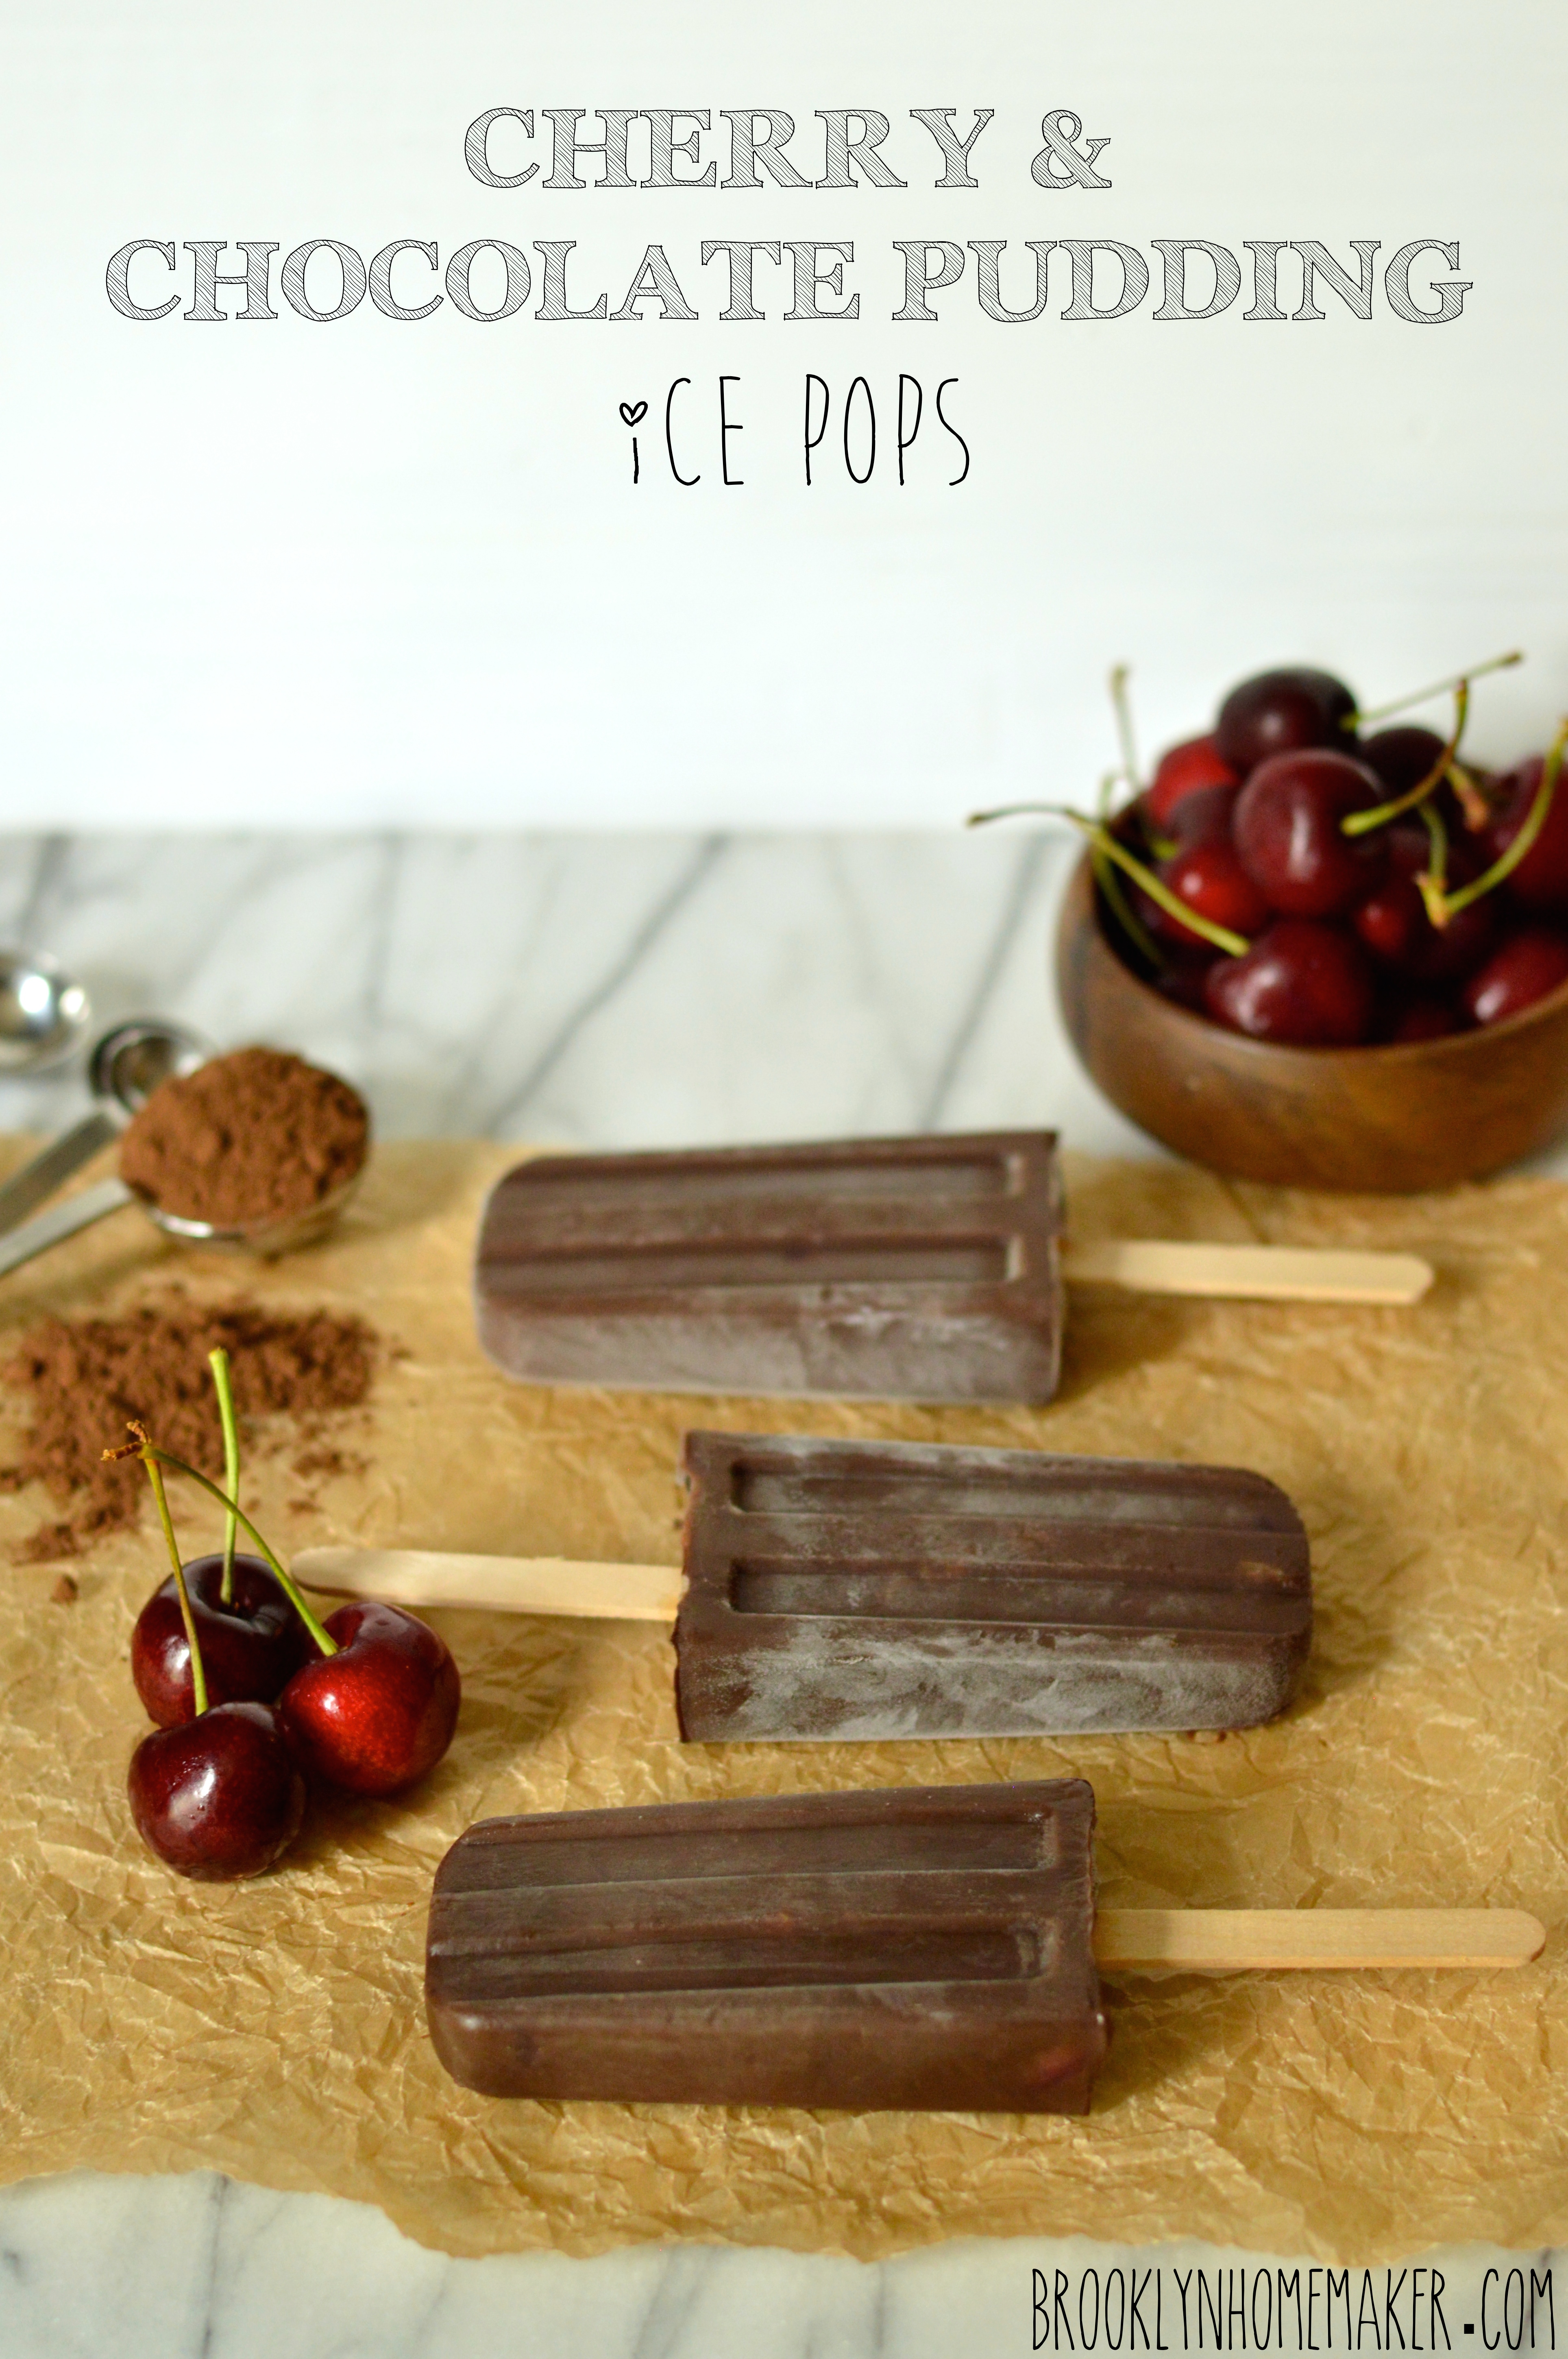
To this day, every single time I have a chocolate ice pop, I think of the sap incident. You’d think that the experience might have ruined chocolate popsicles for me, and that I might associate the flavor of pine sap with them, but lucky for me it didn’t work out that way. I guess my love of chocolate, and my love of stuffing my face, outweighed the sap-induced trauma.

cherry & chocolate pudding ice pops | Brooklyn Homemaker

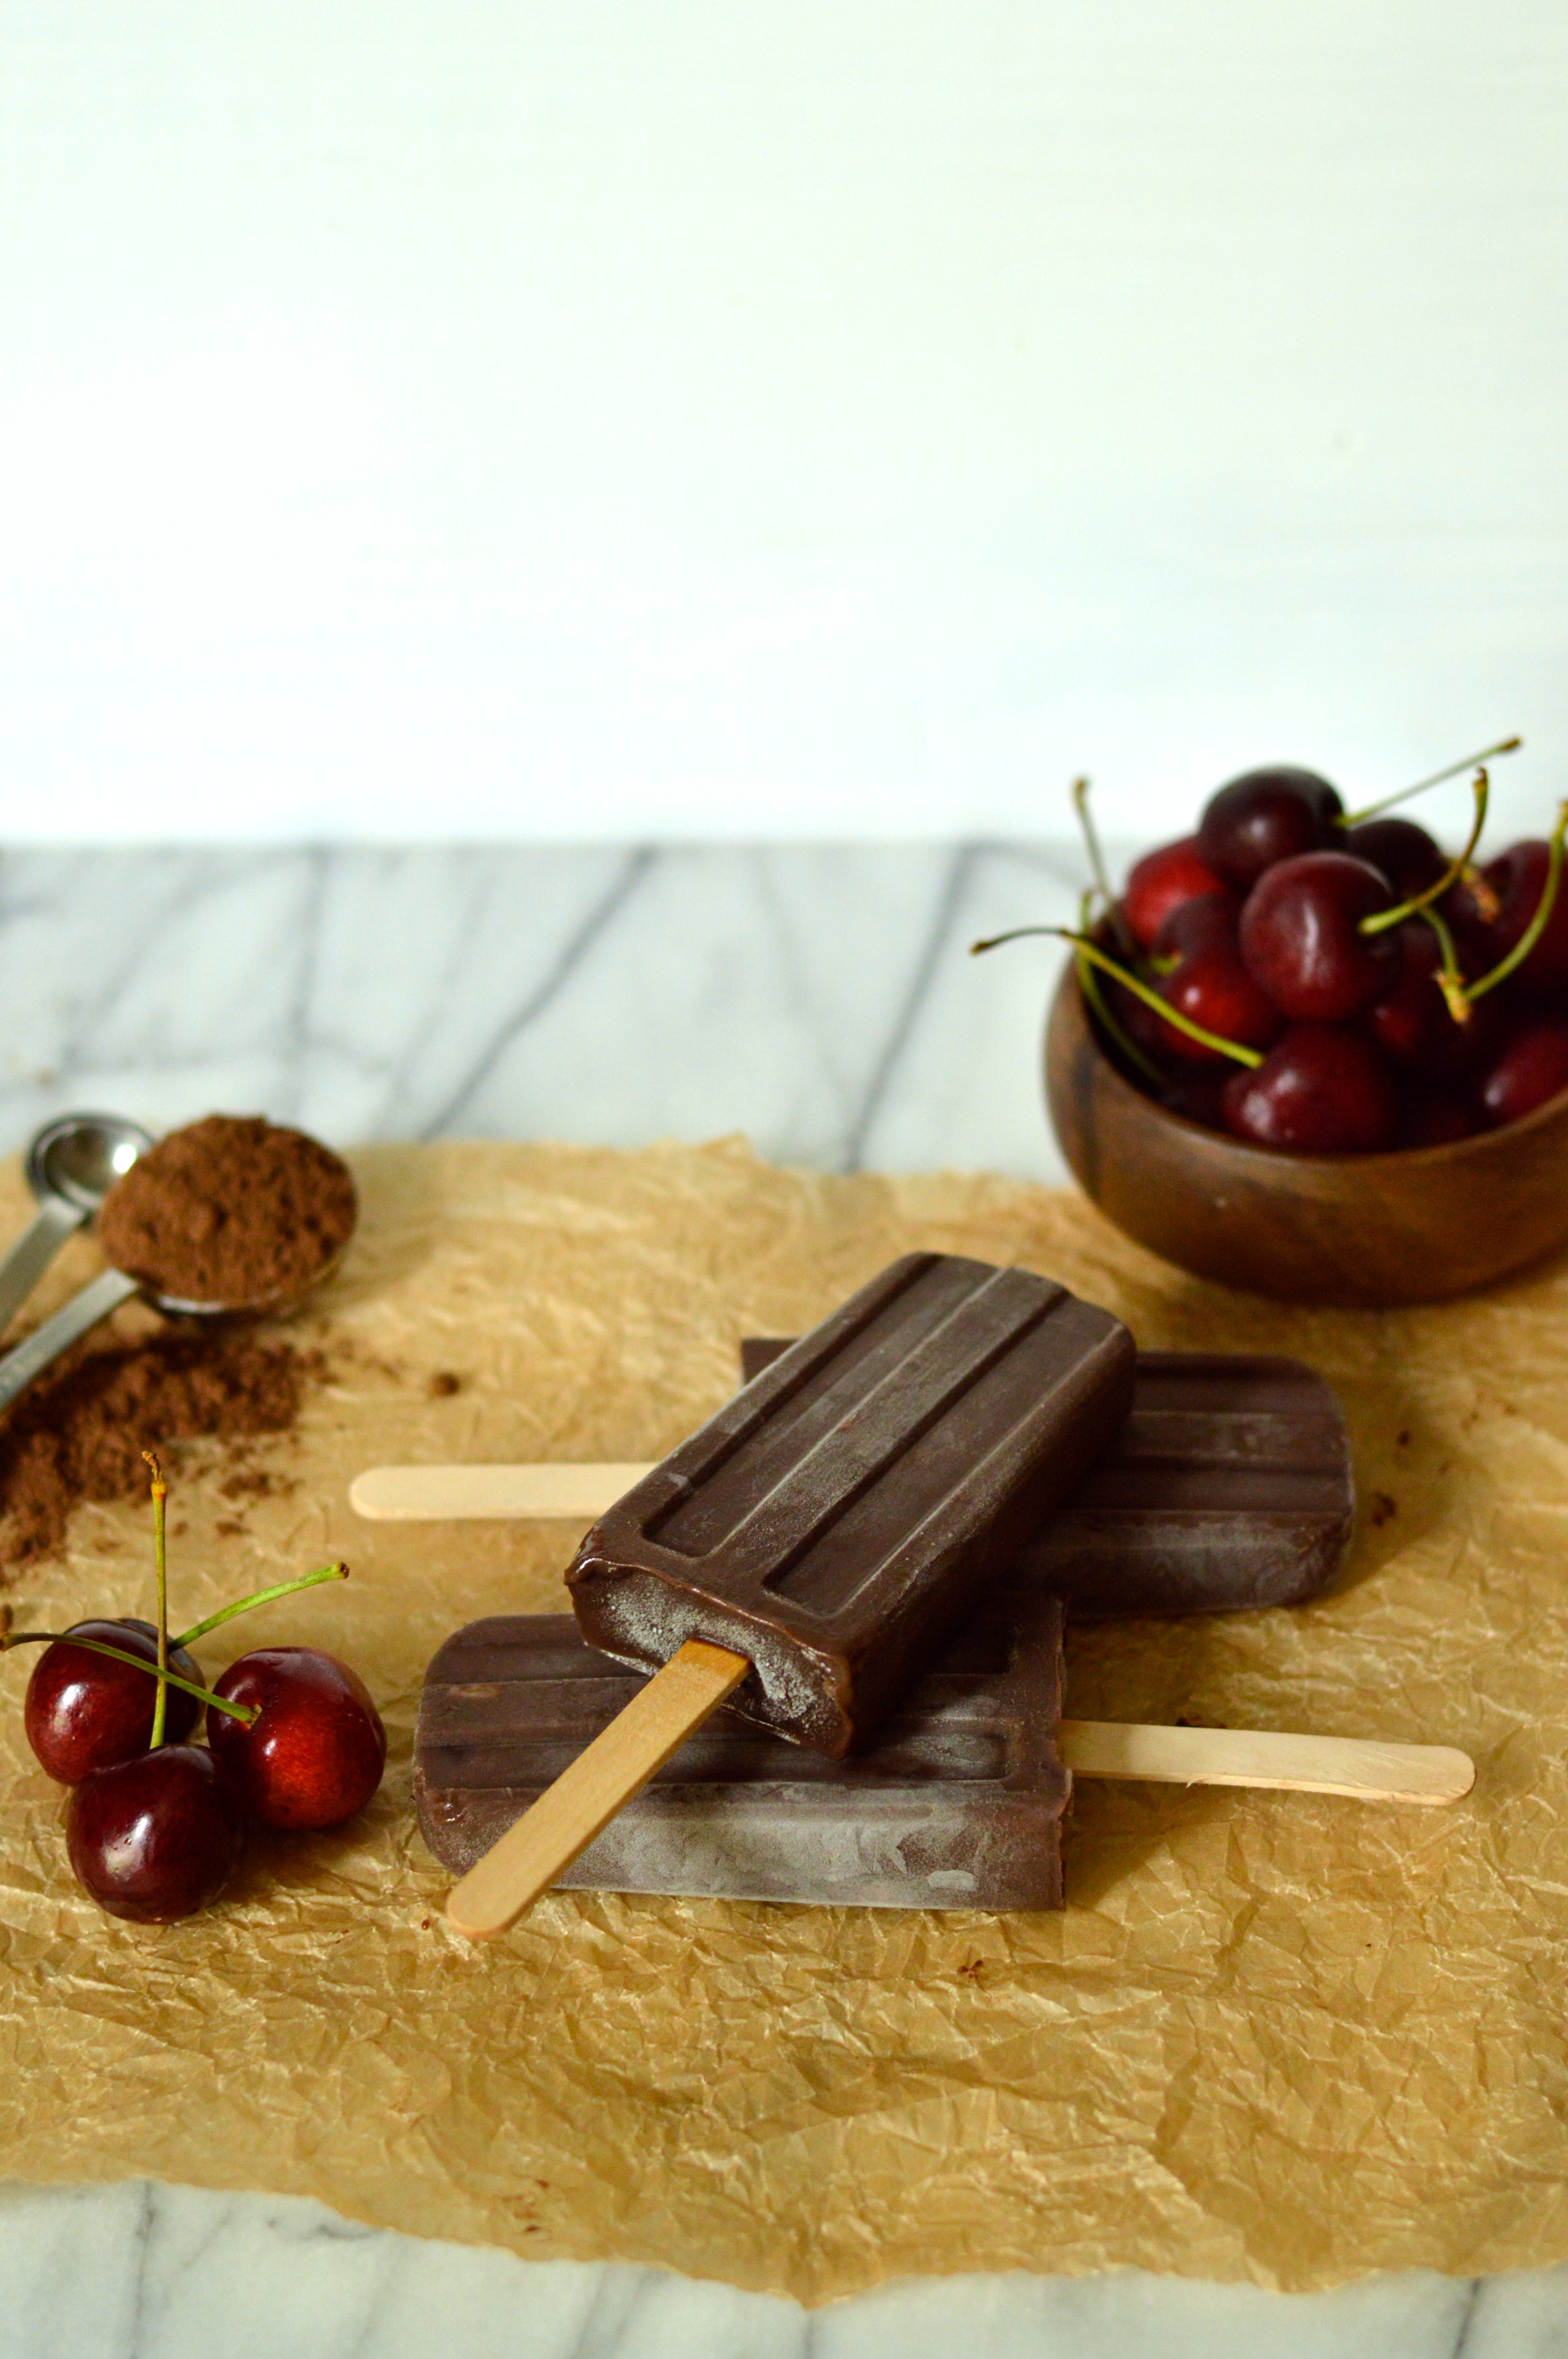
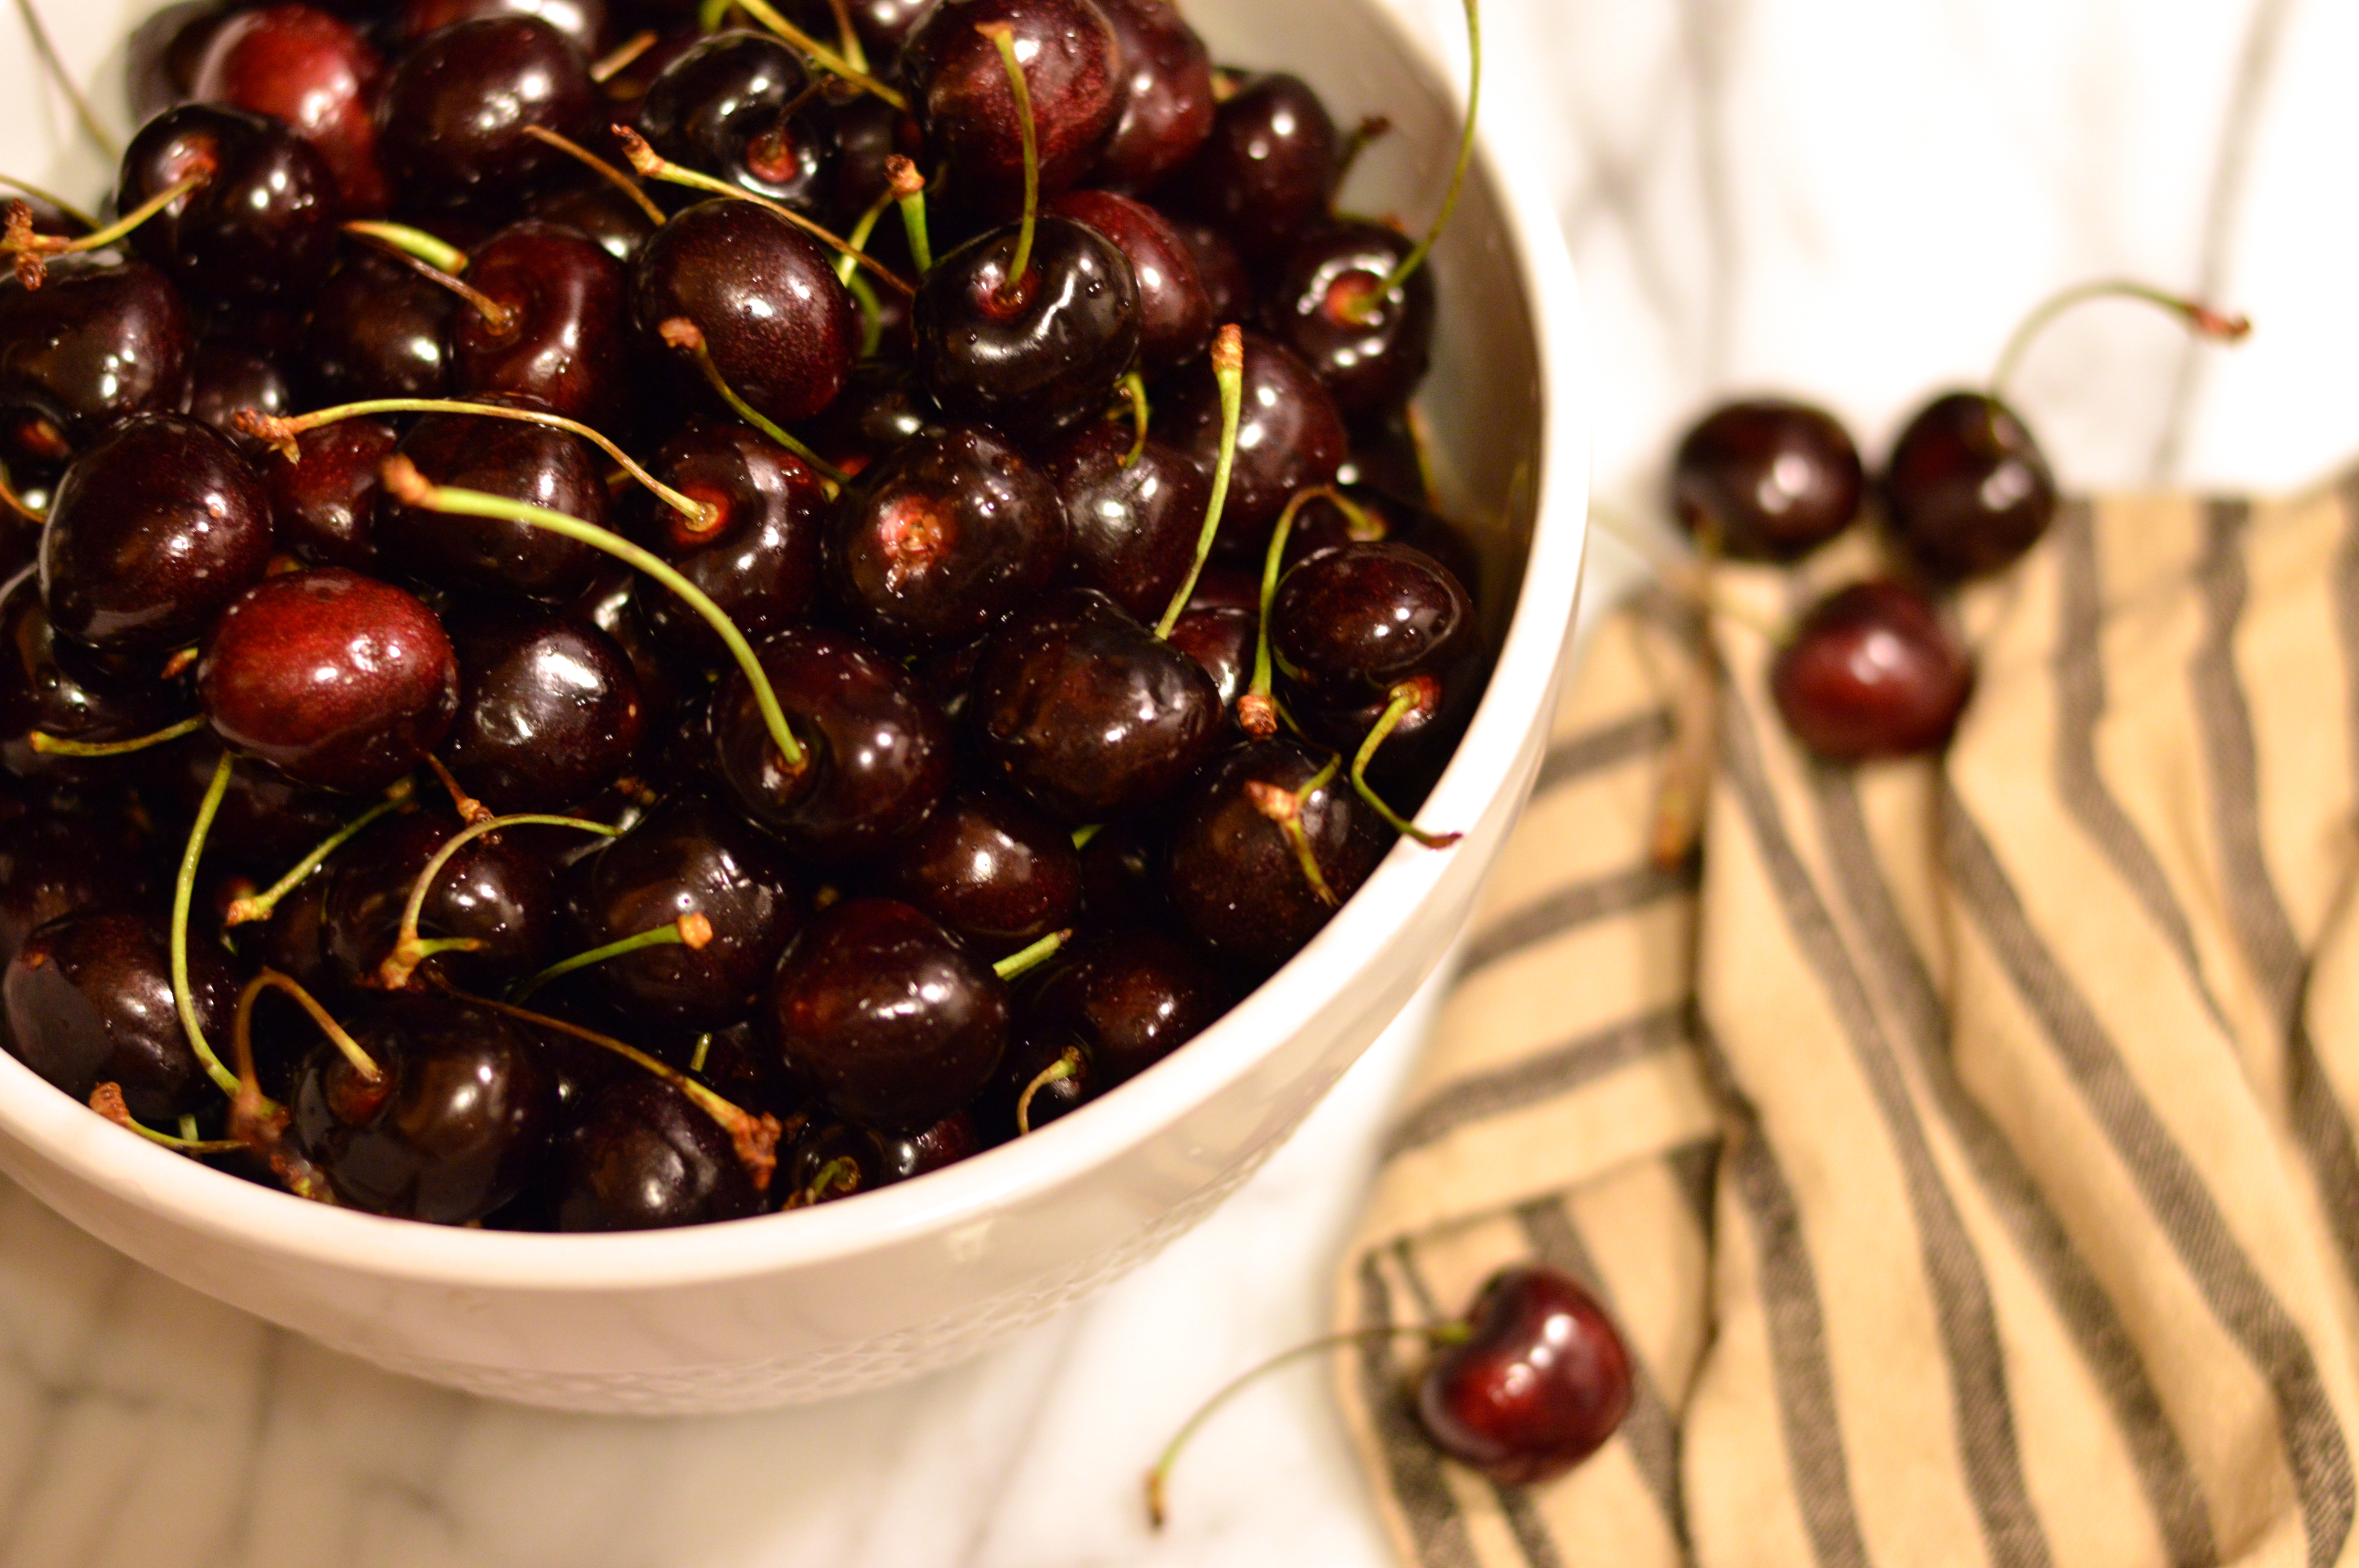
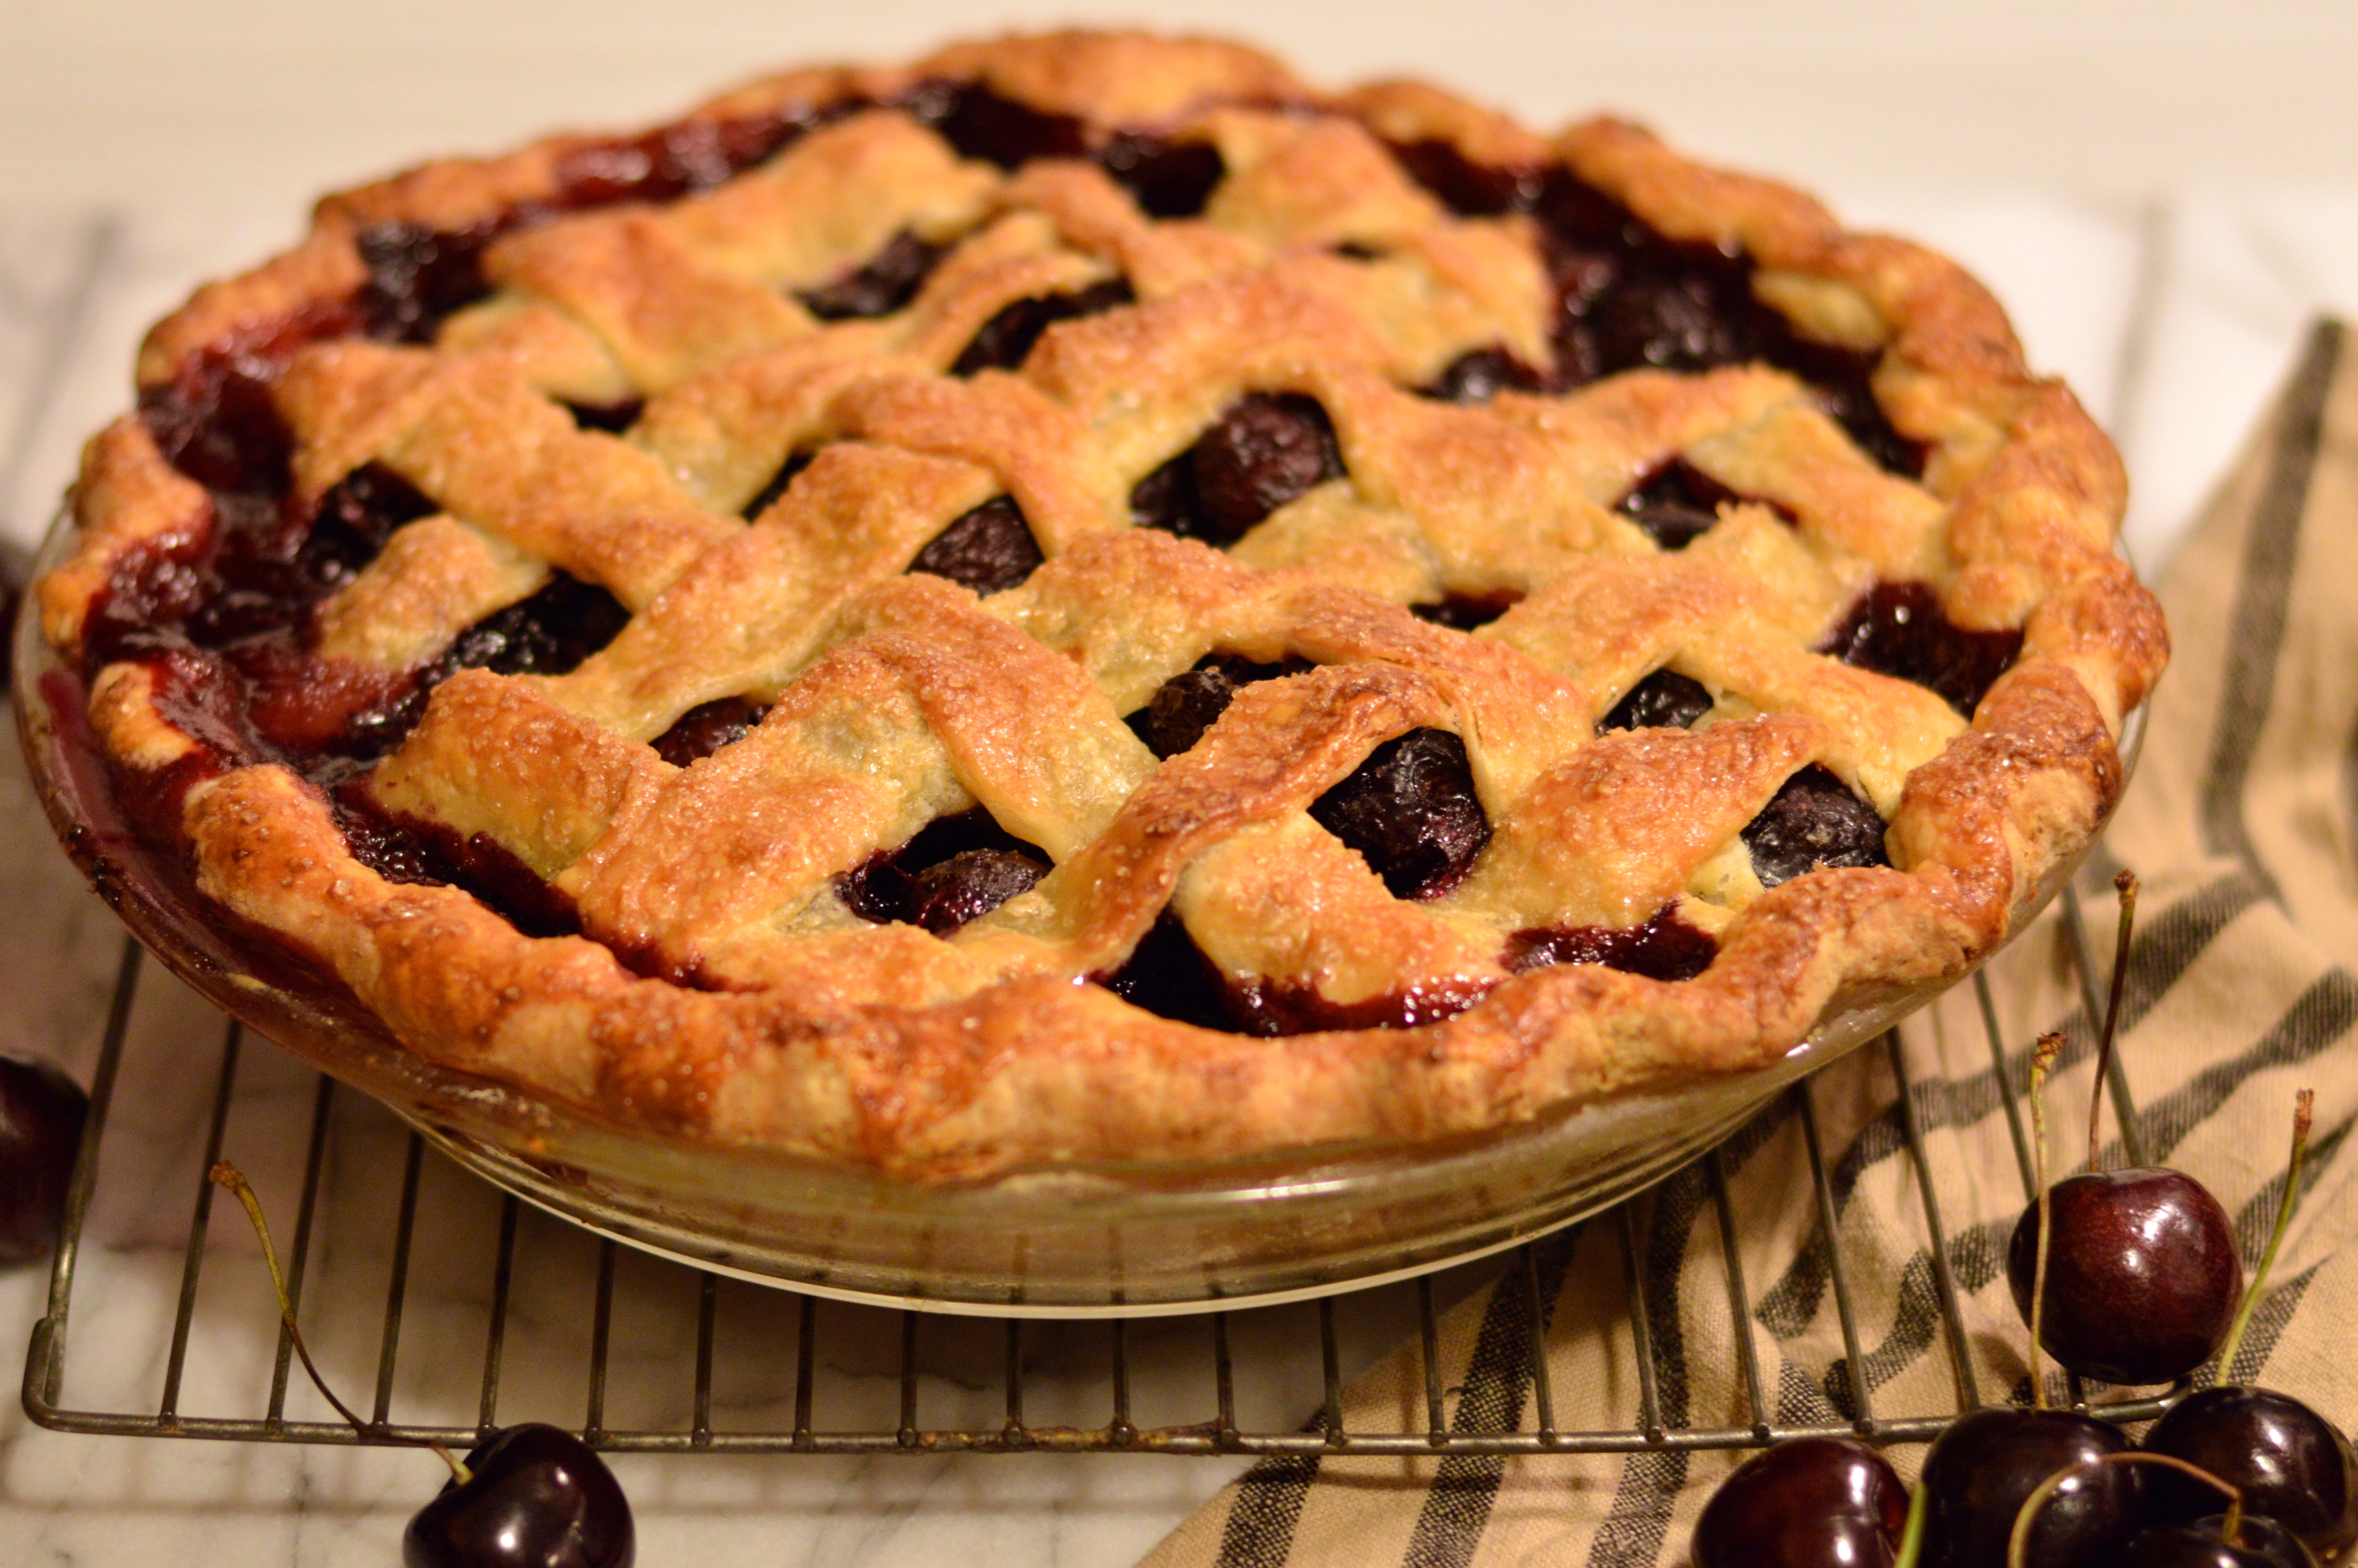
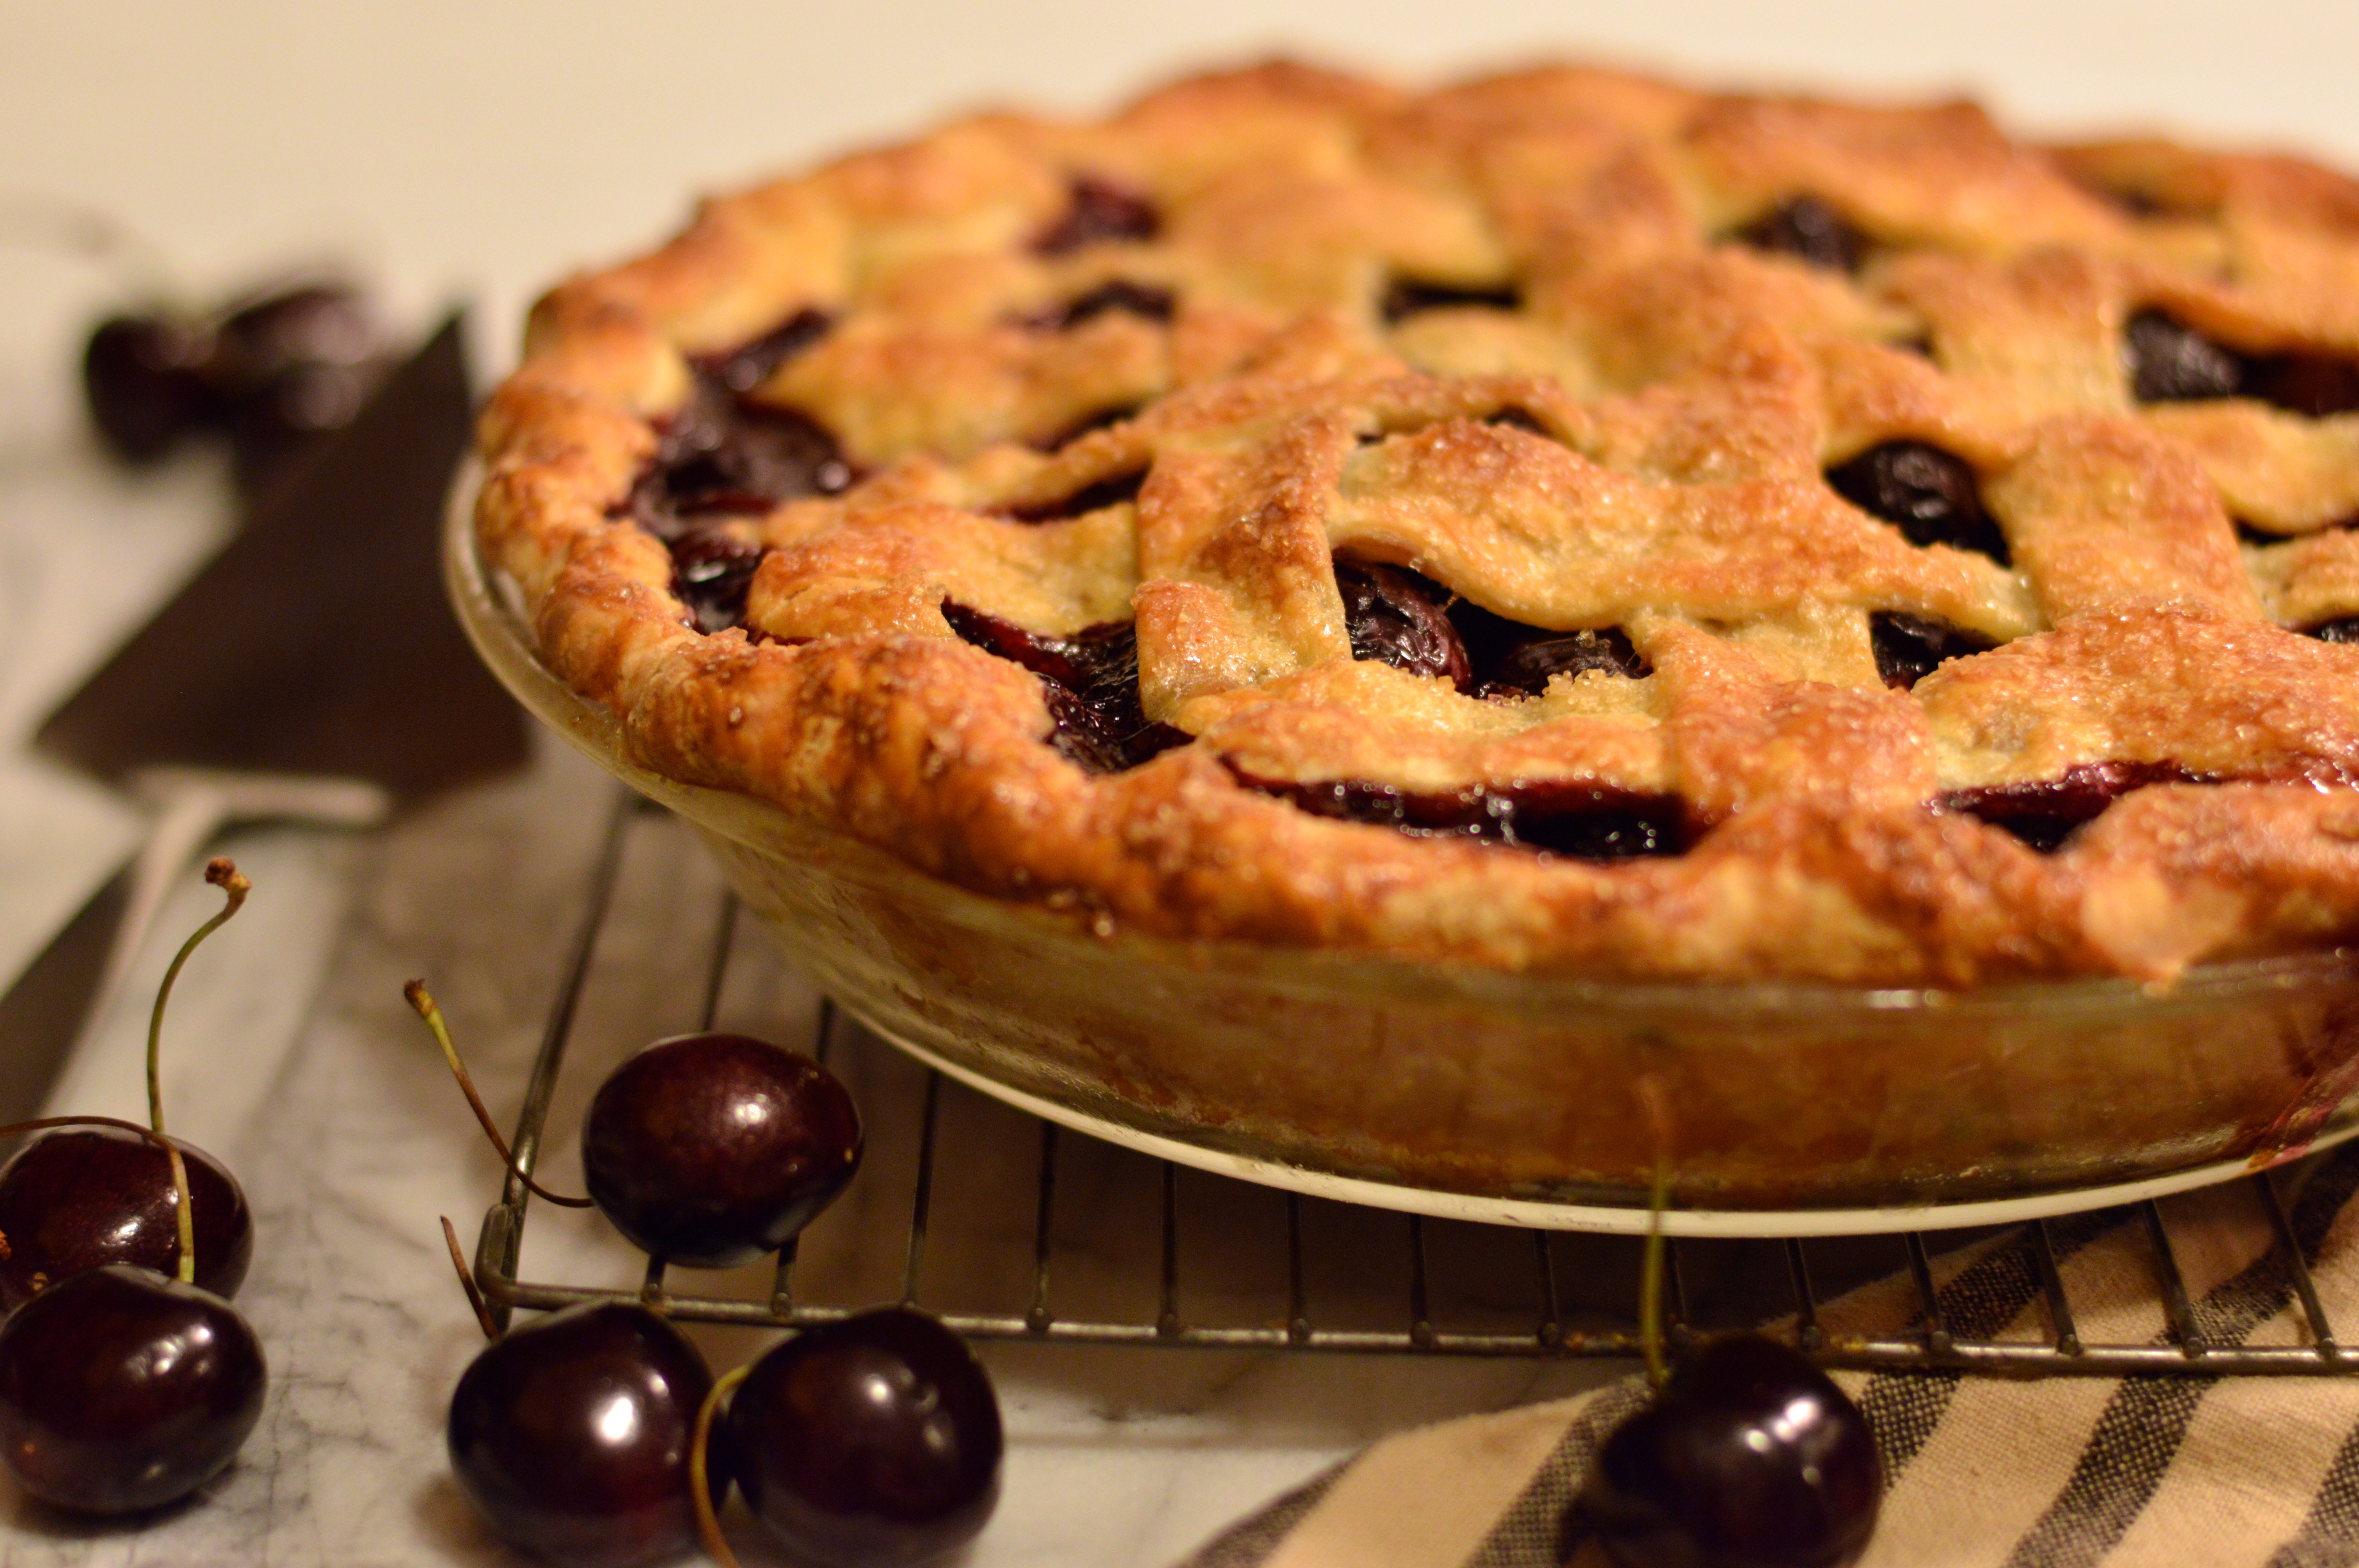
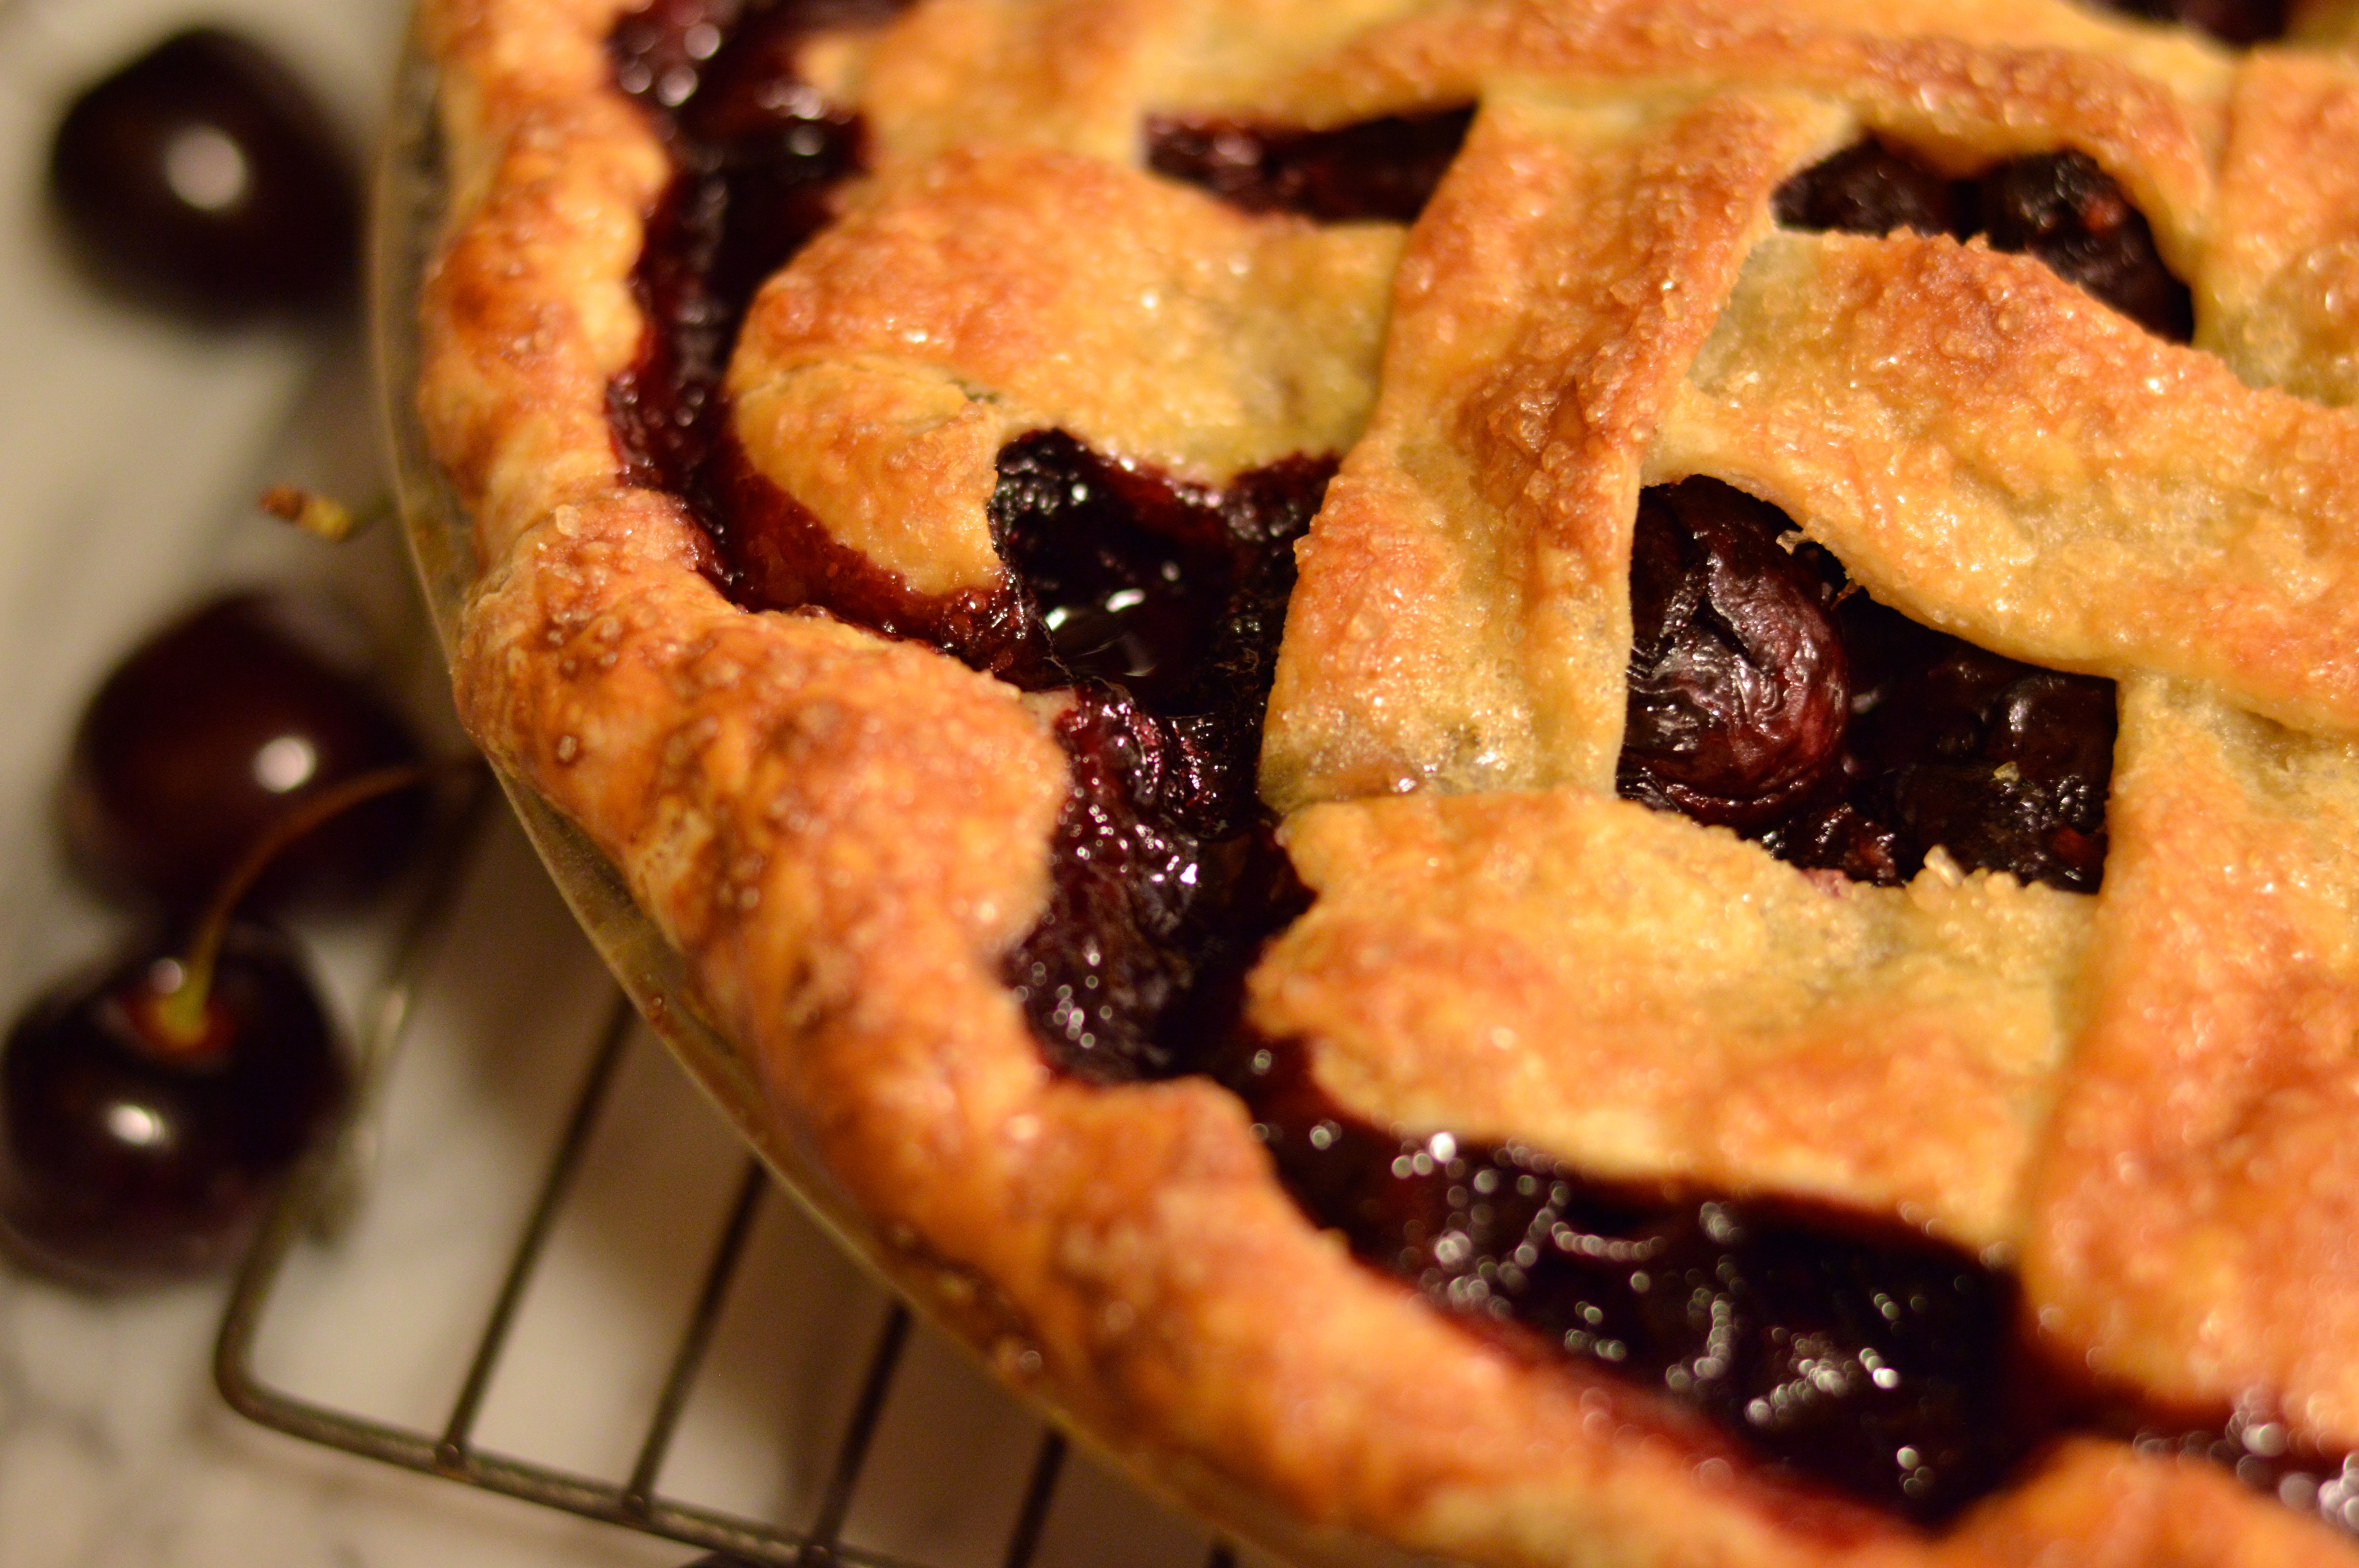
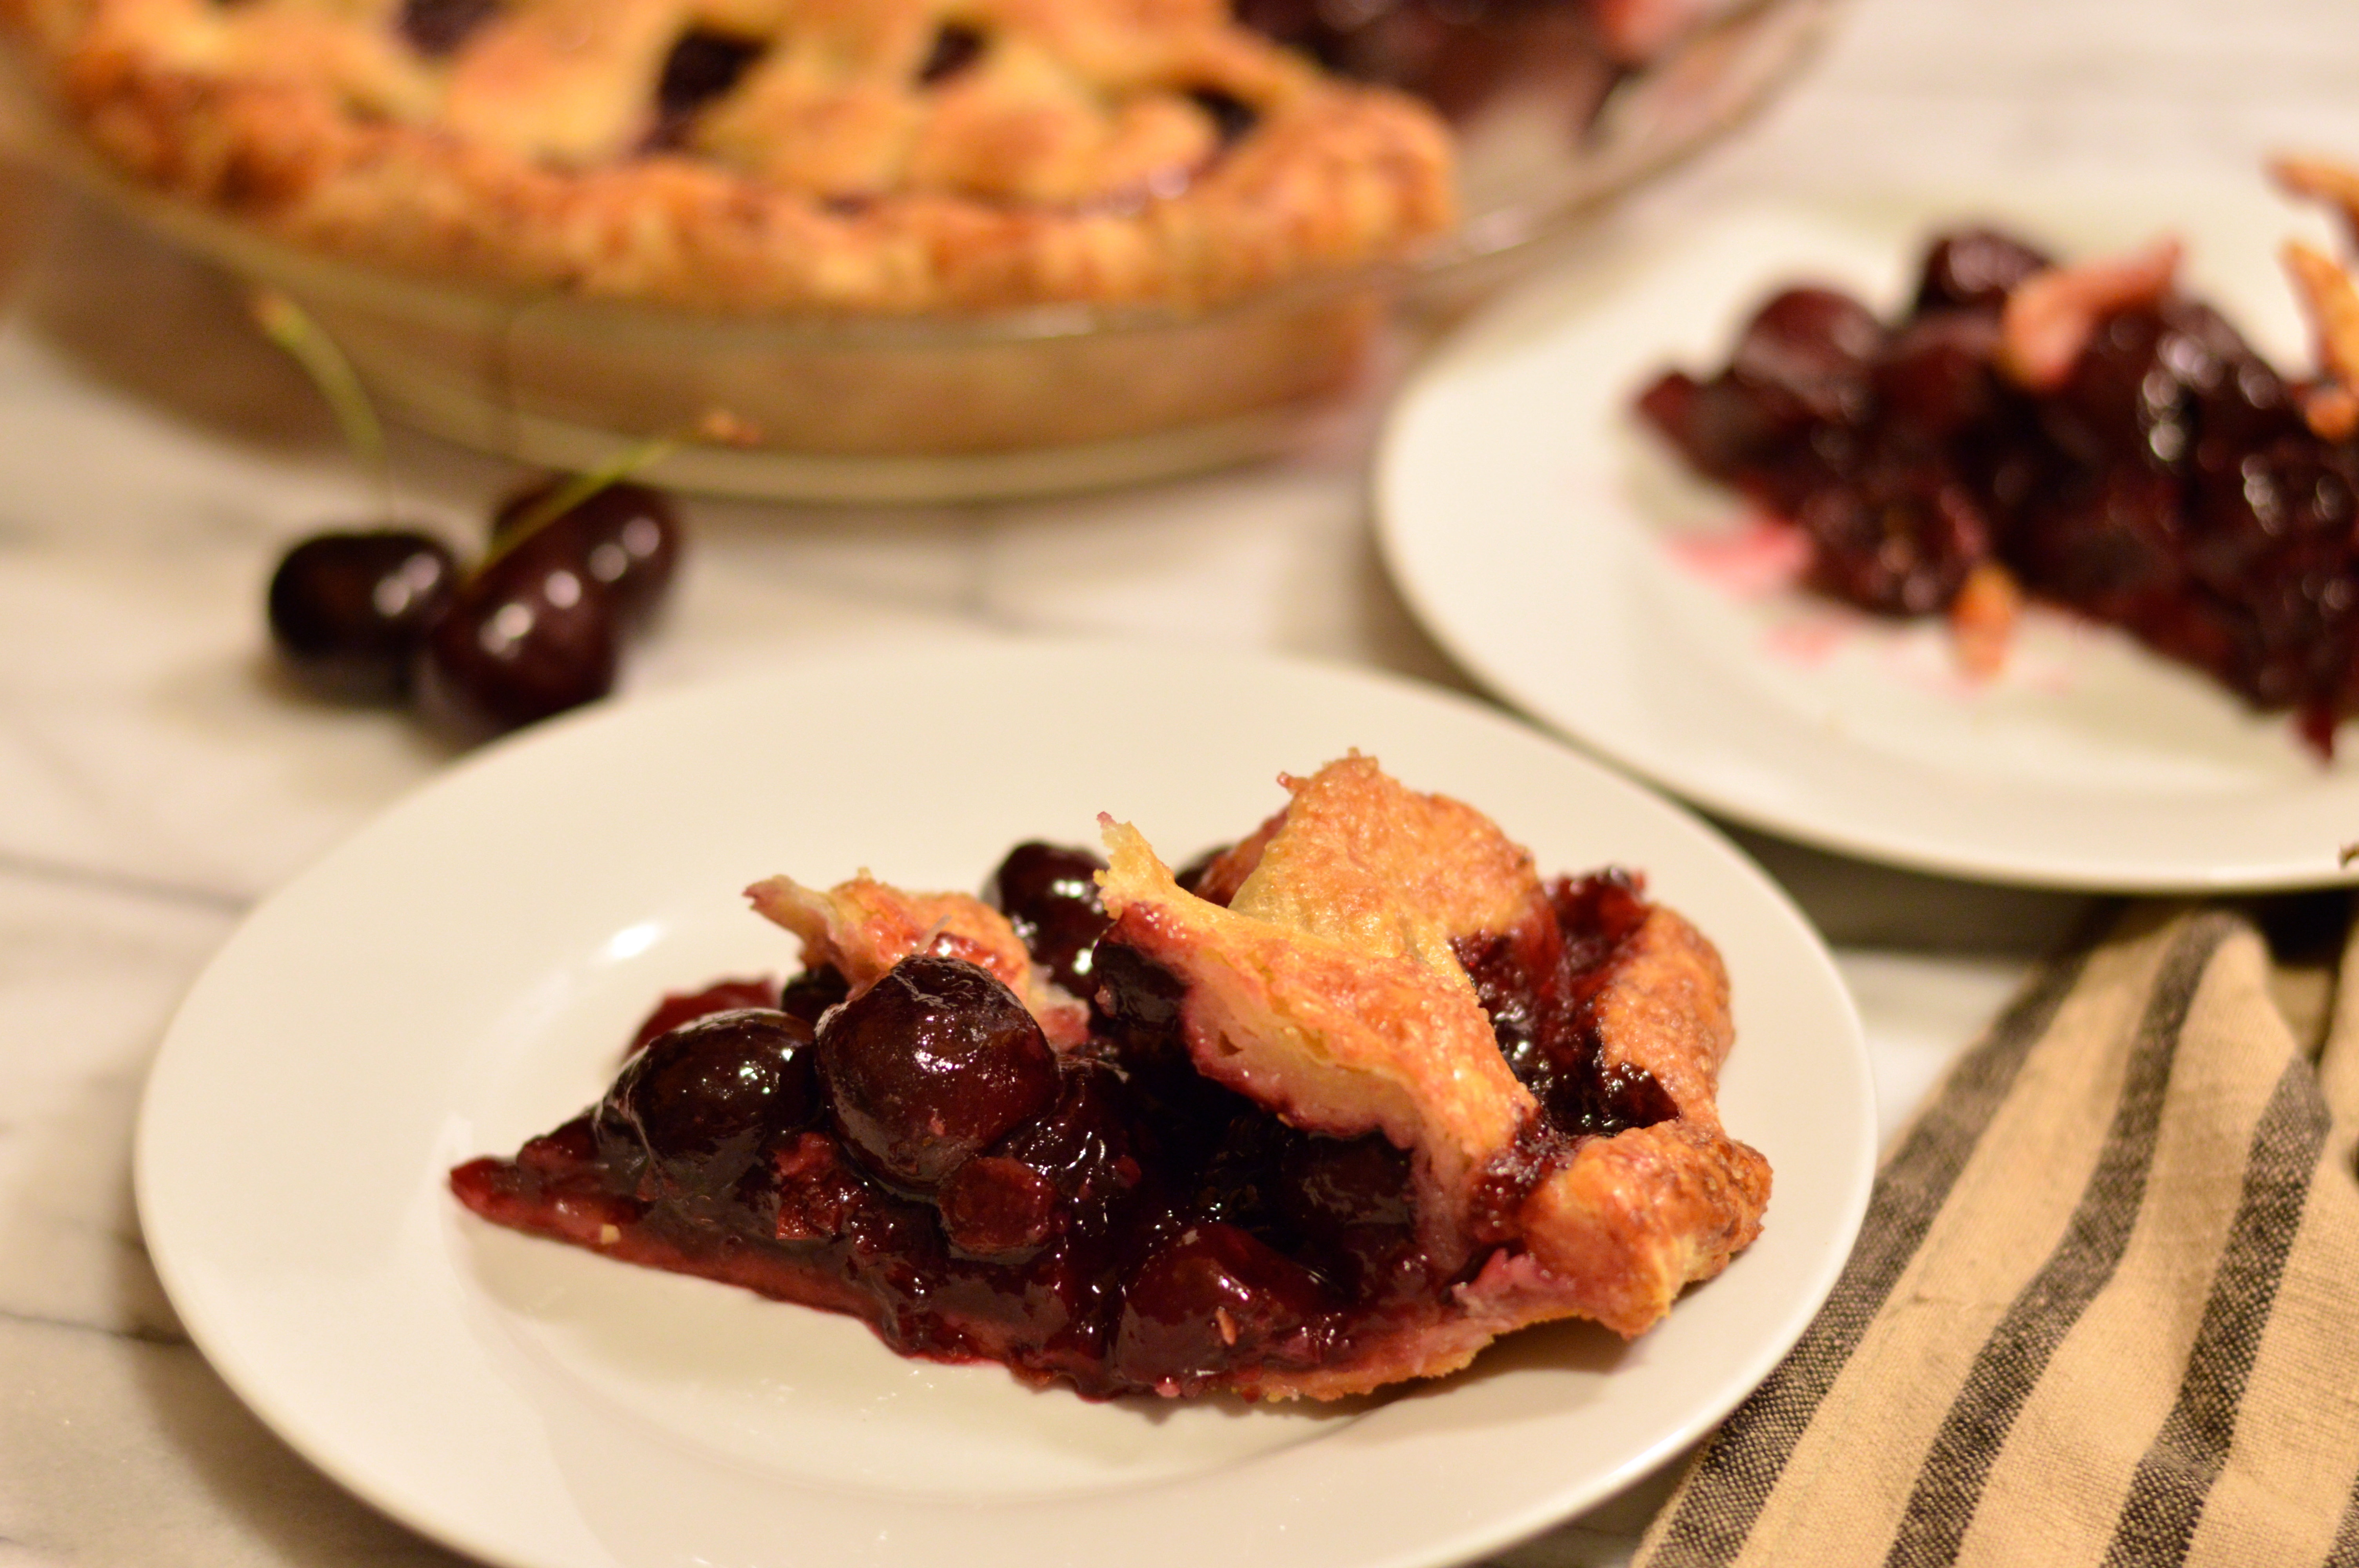
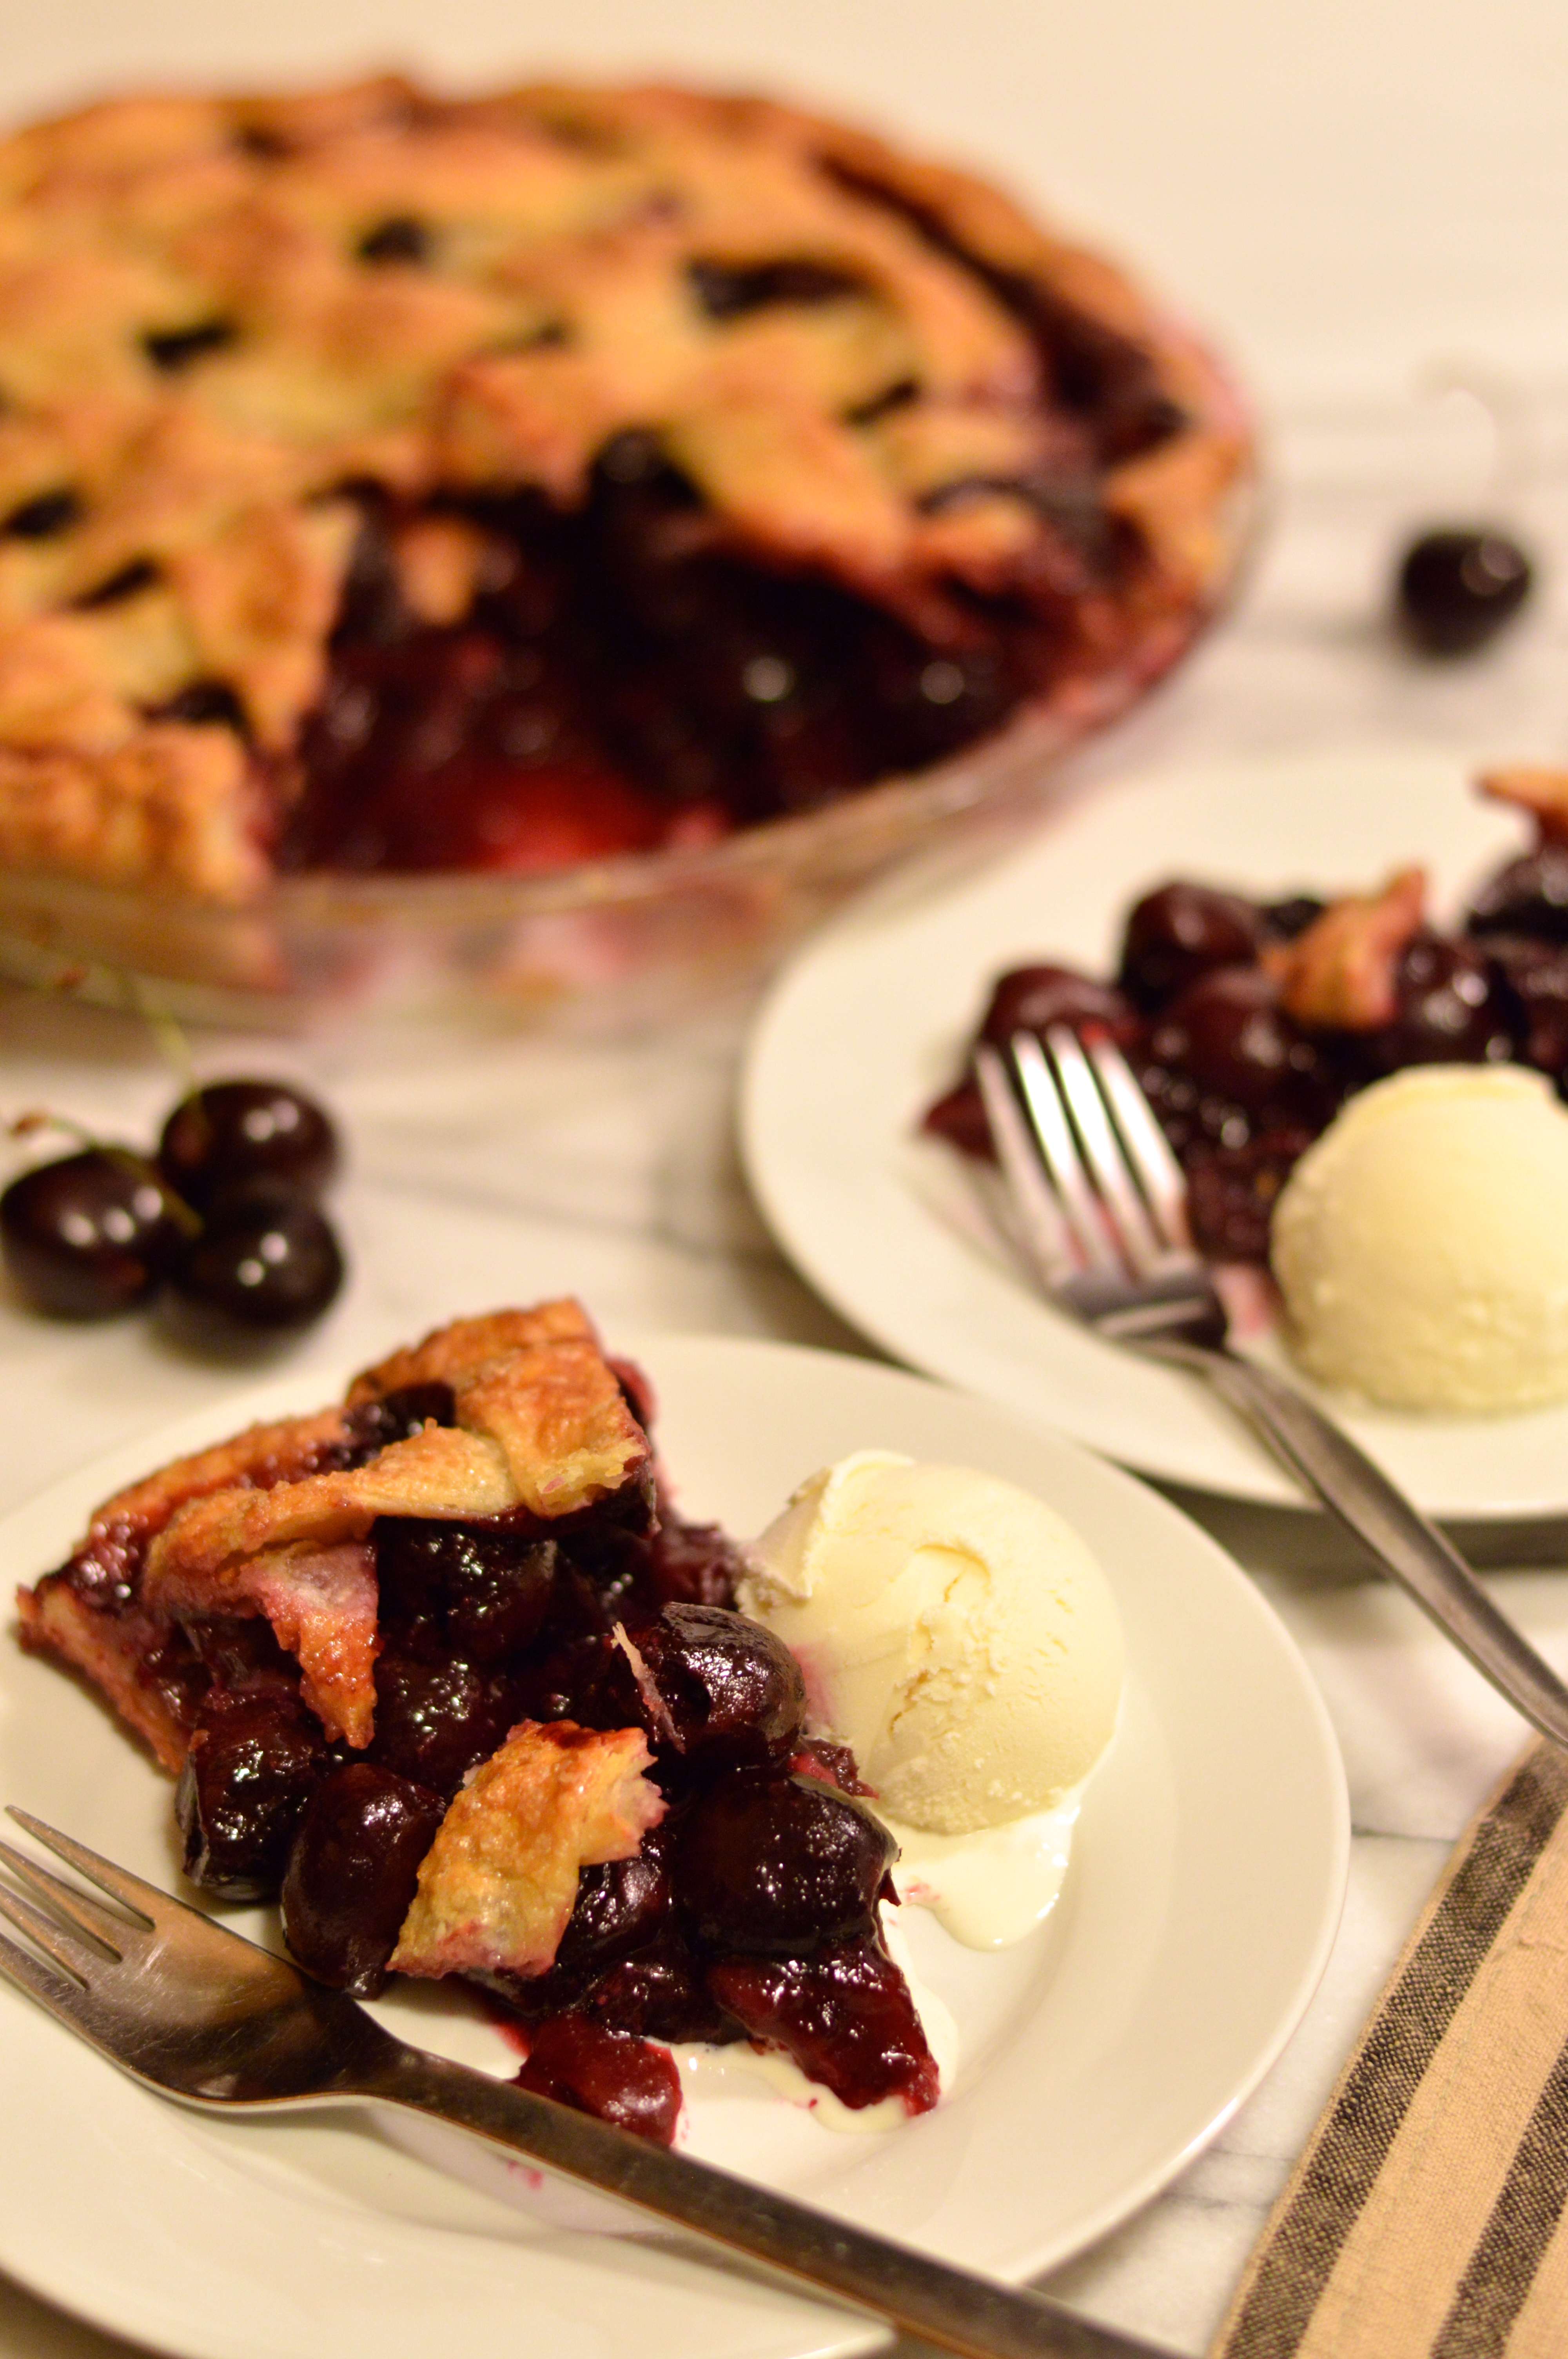
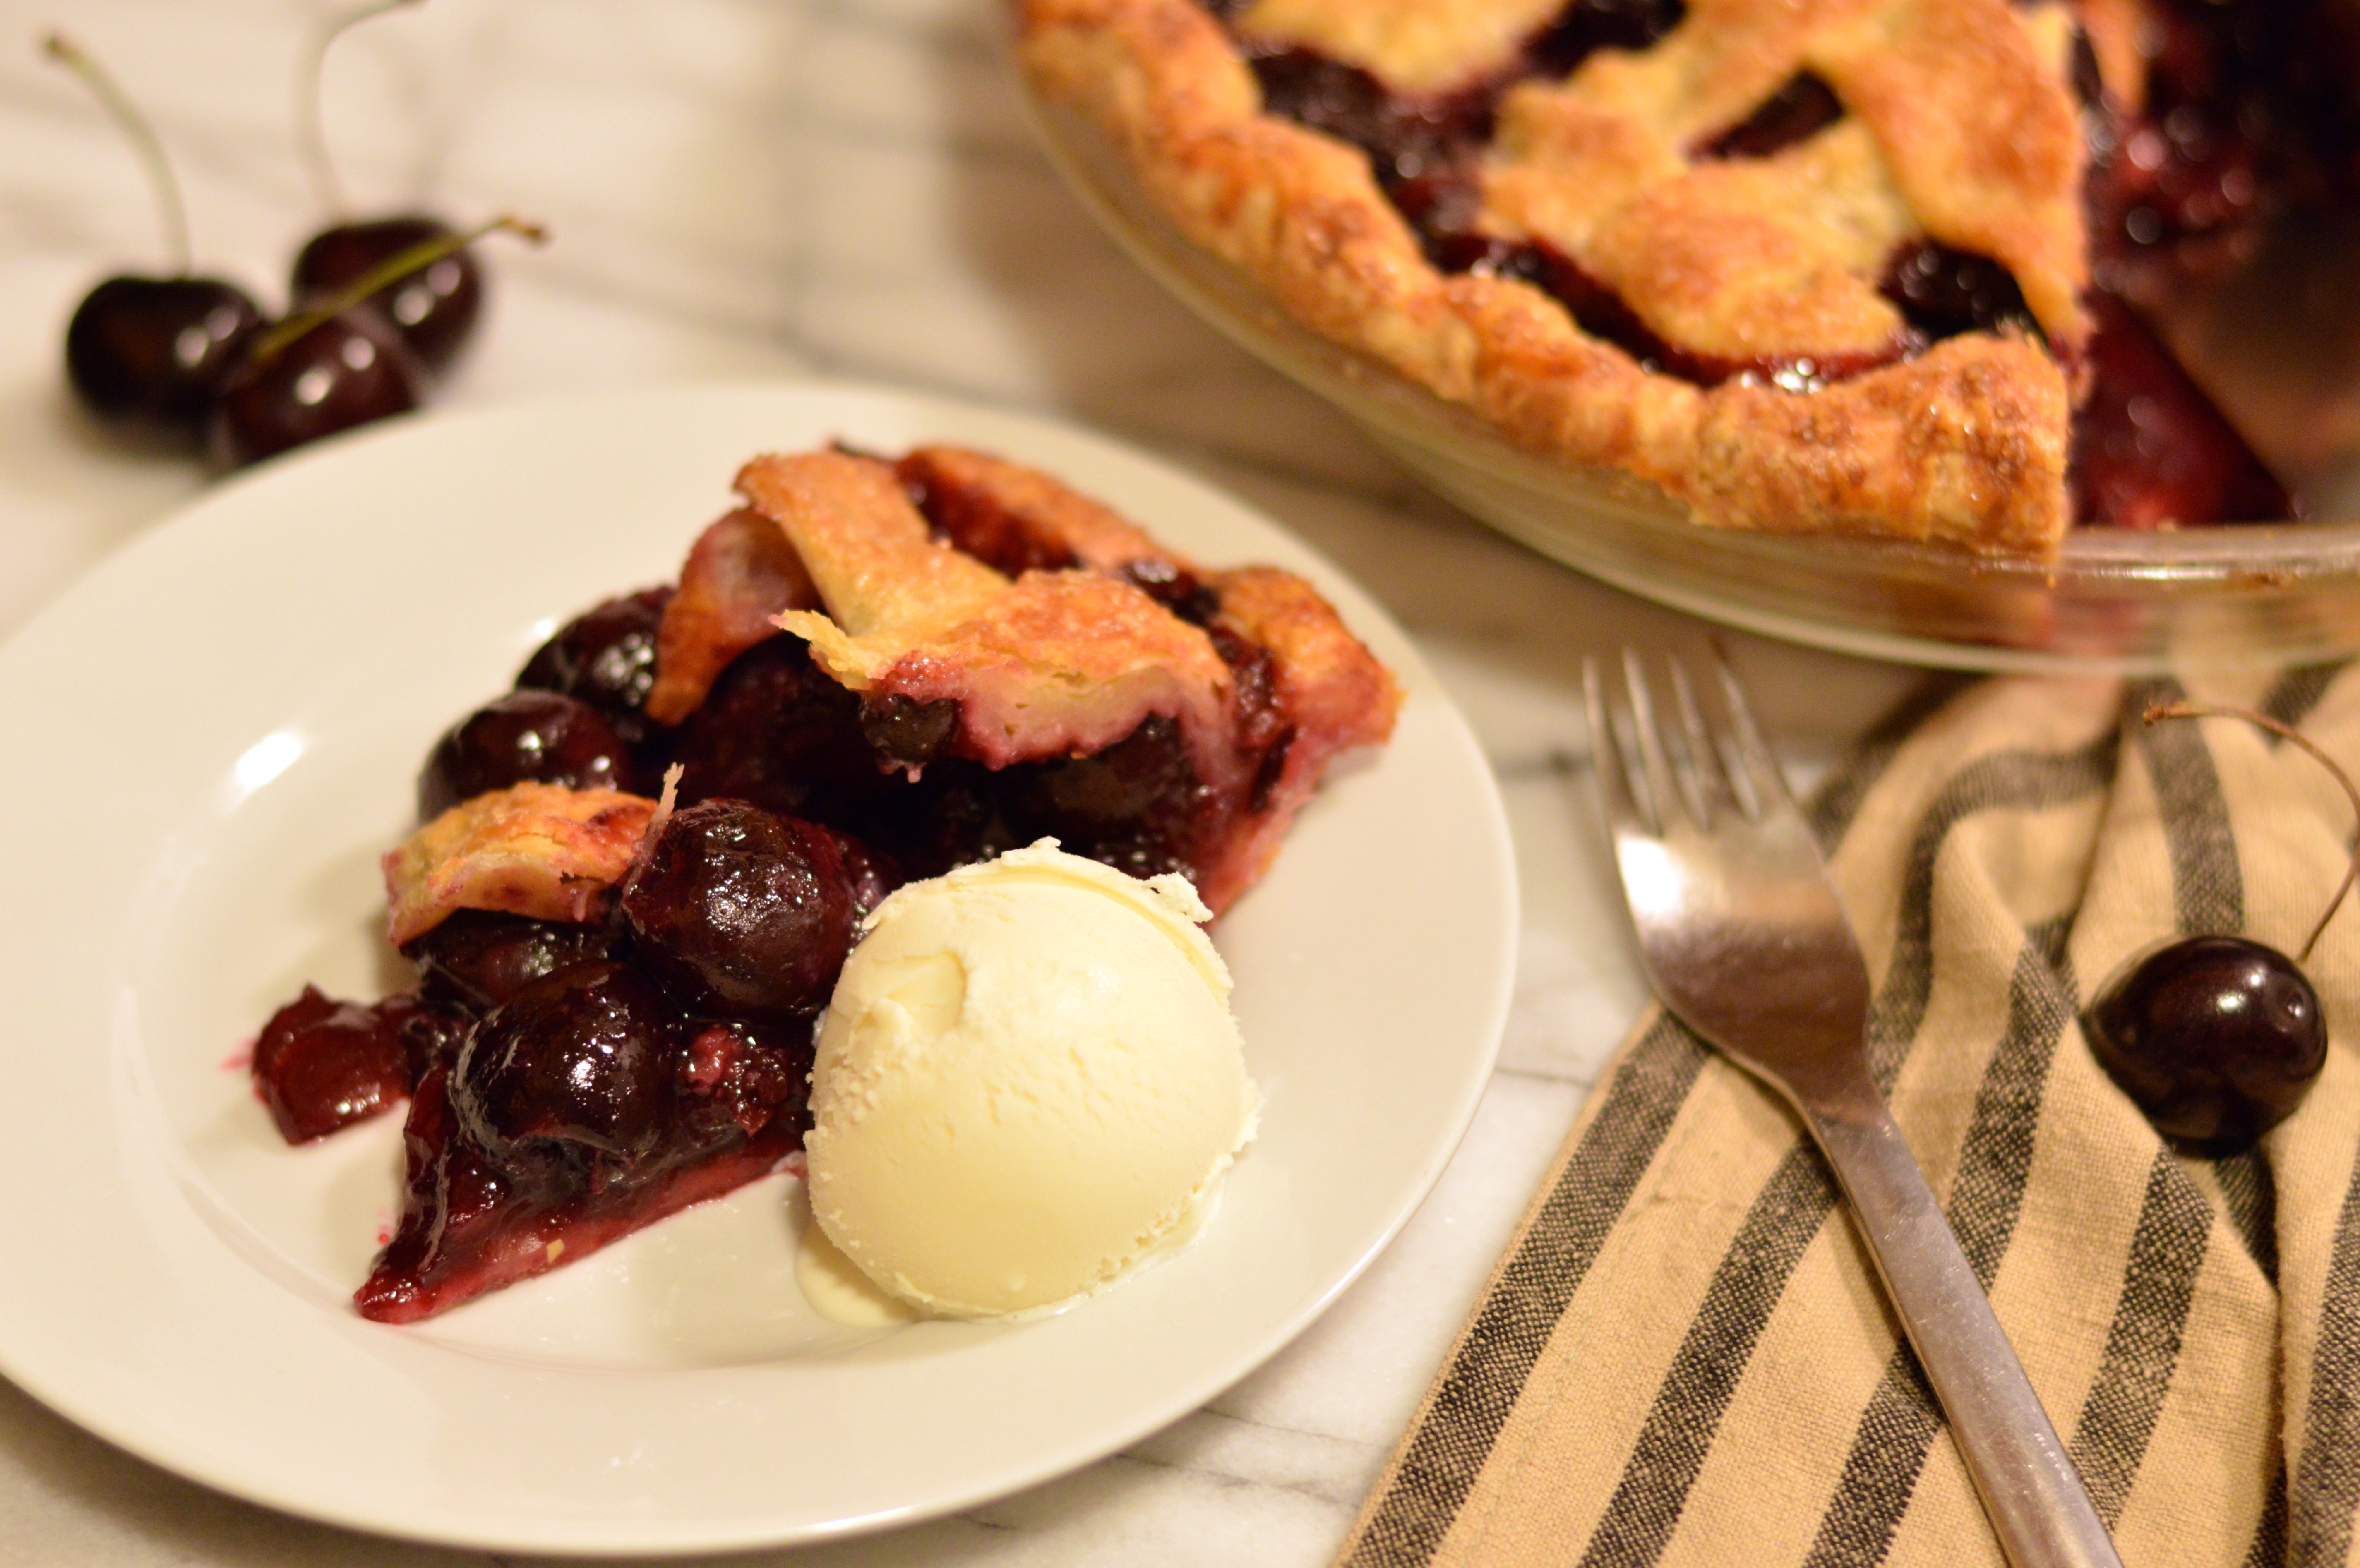
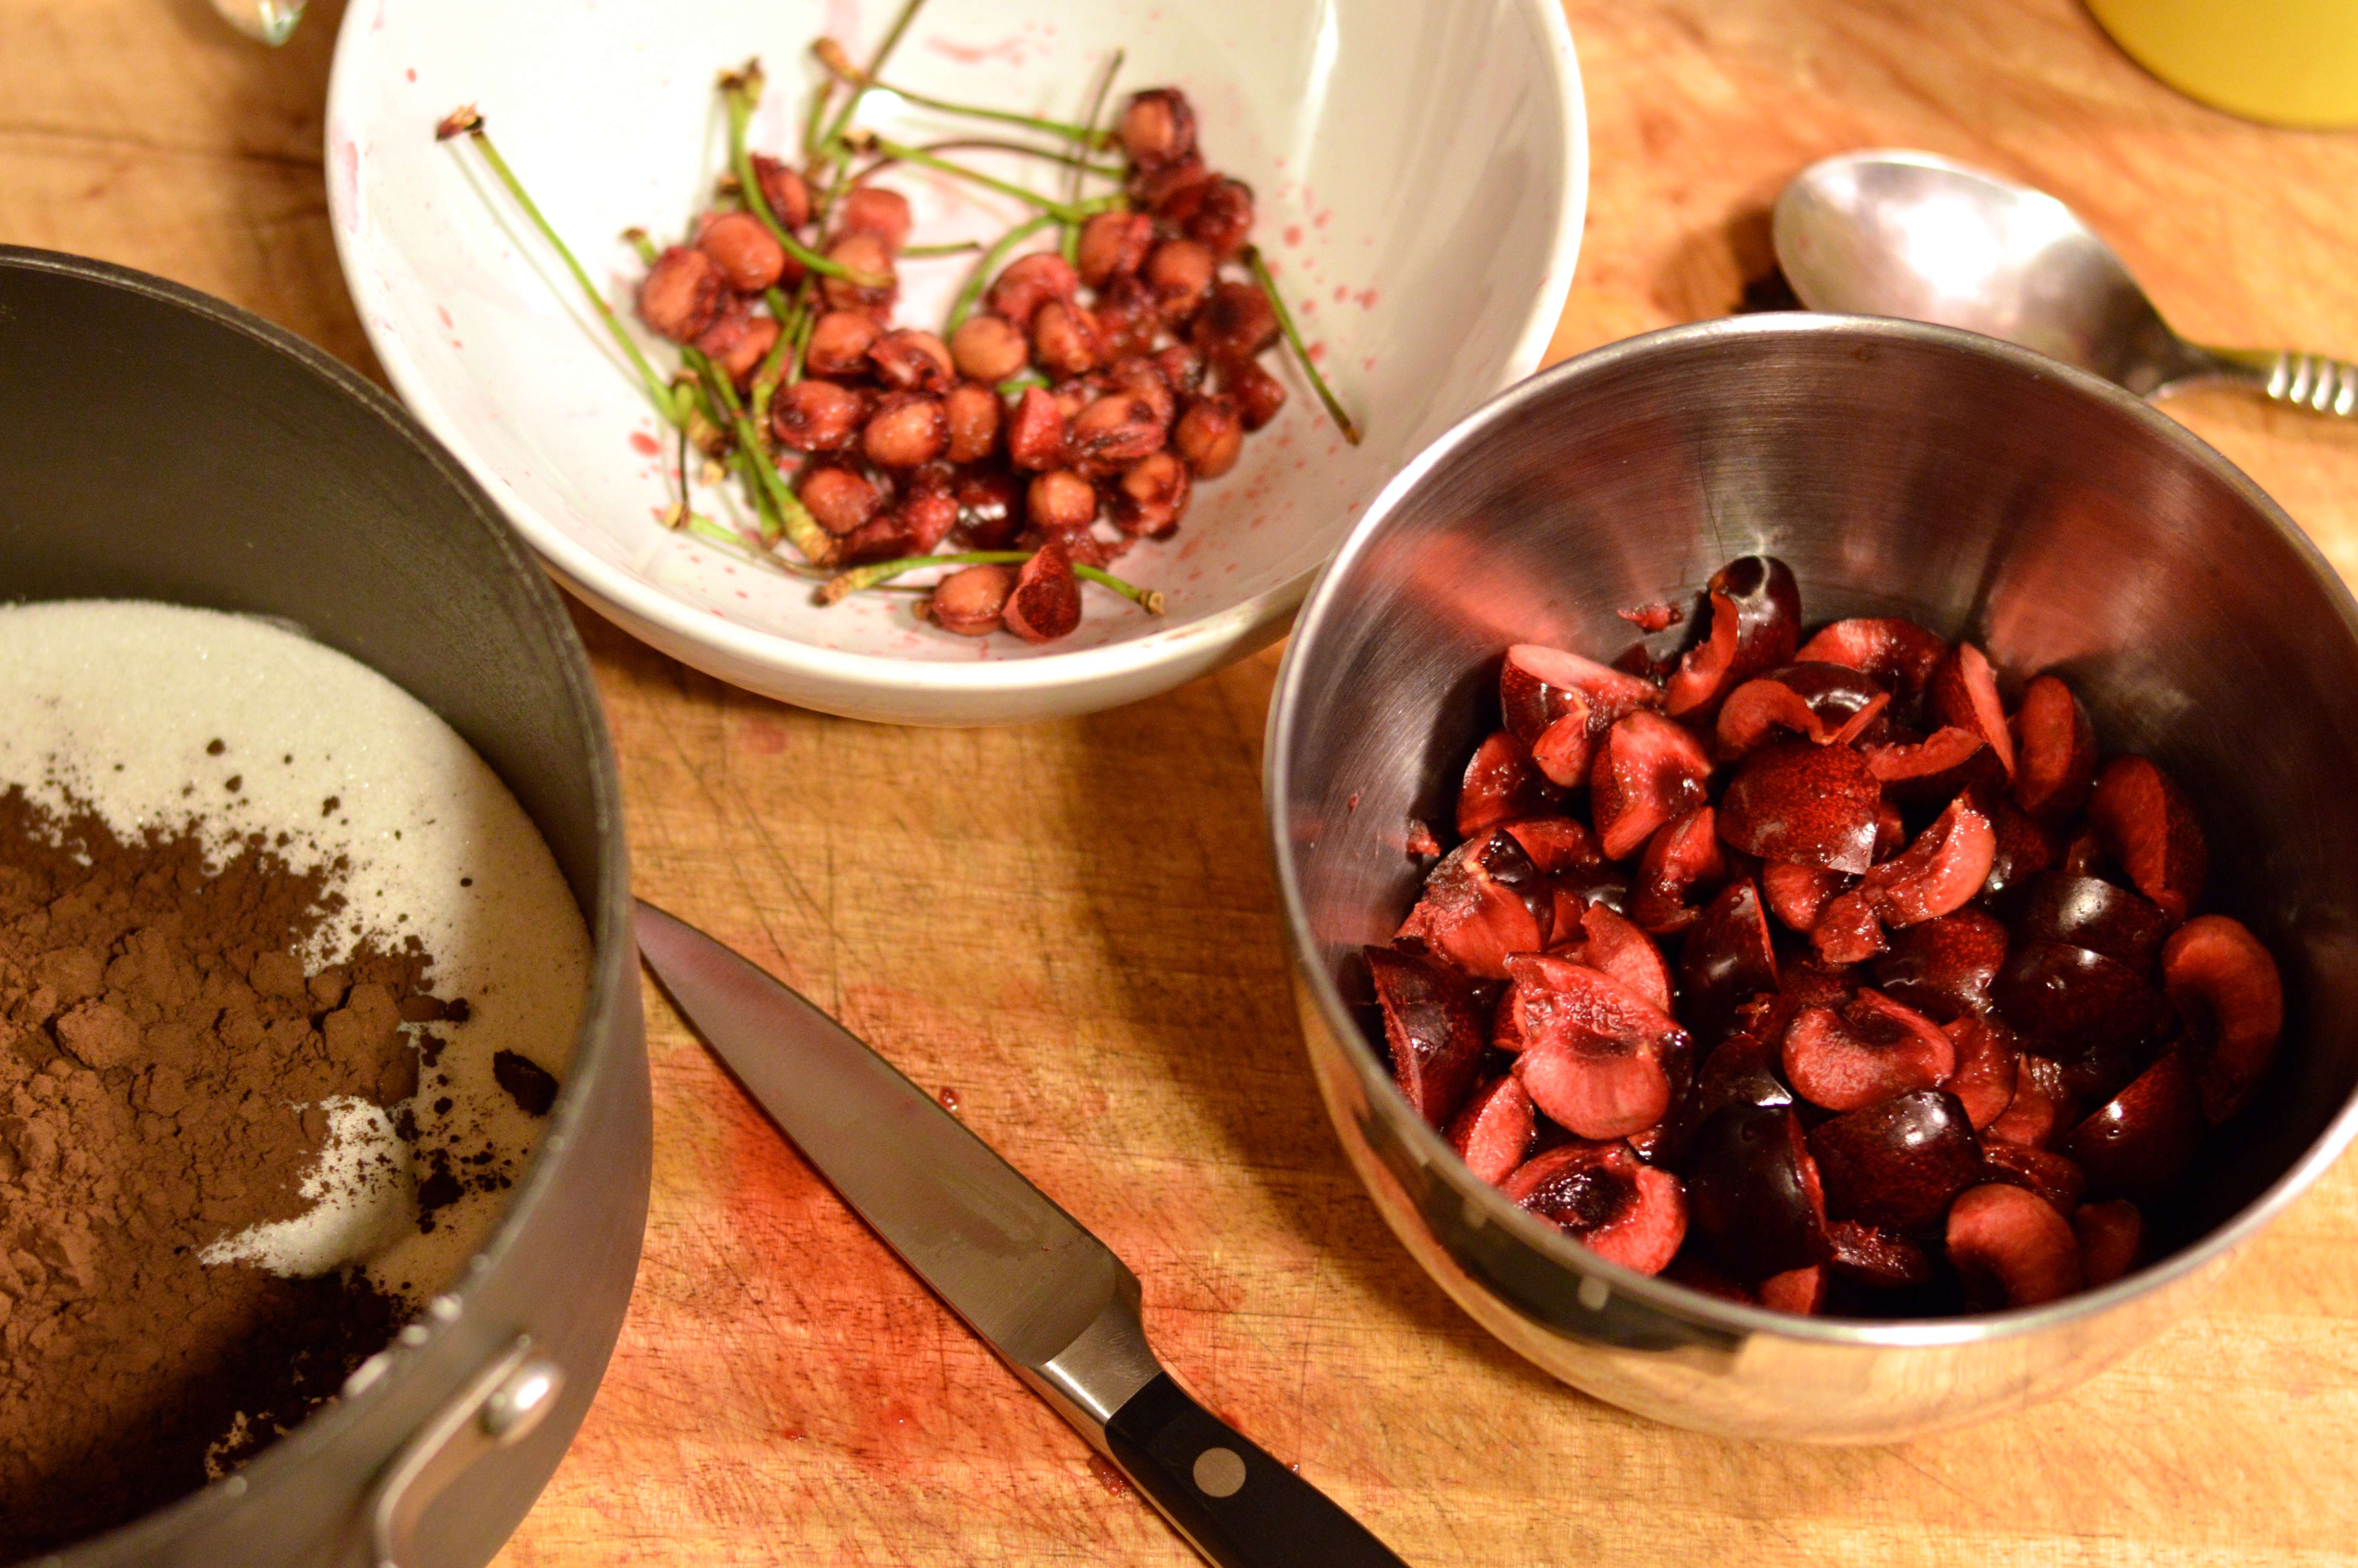
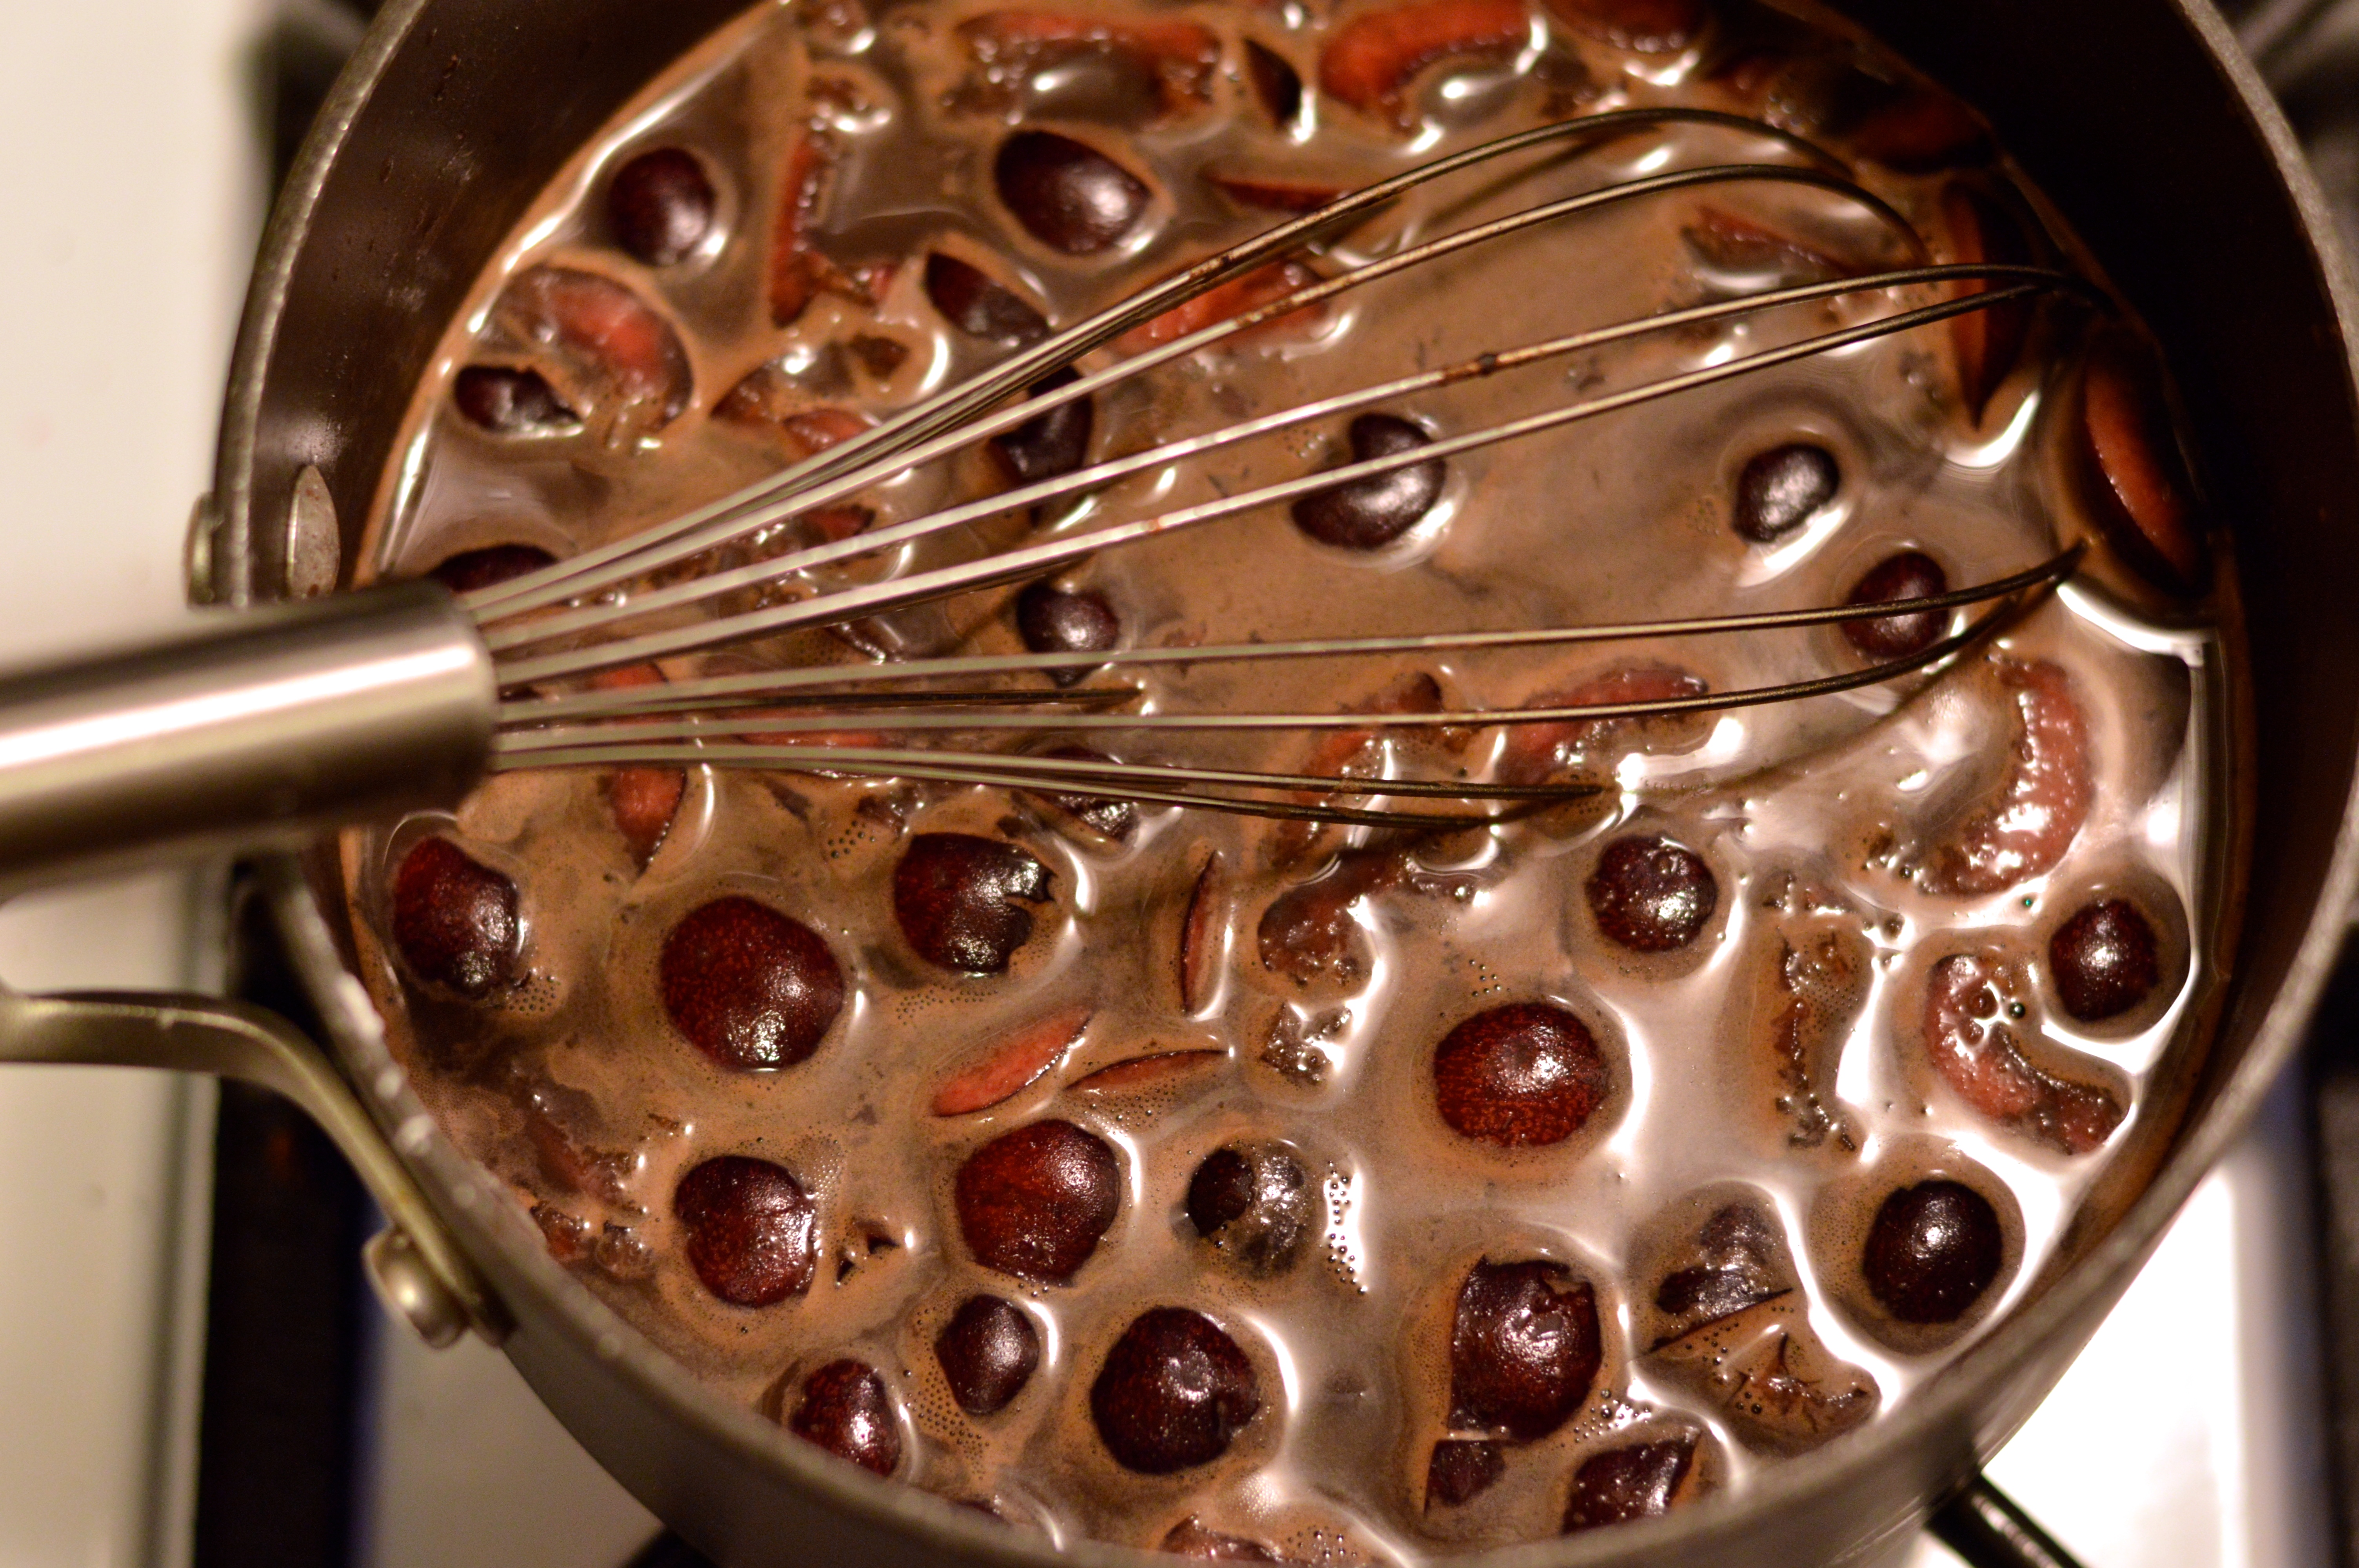
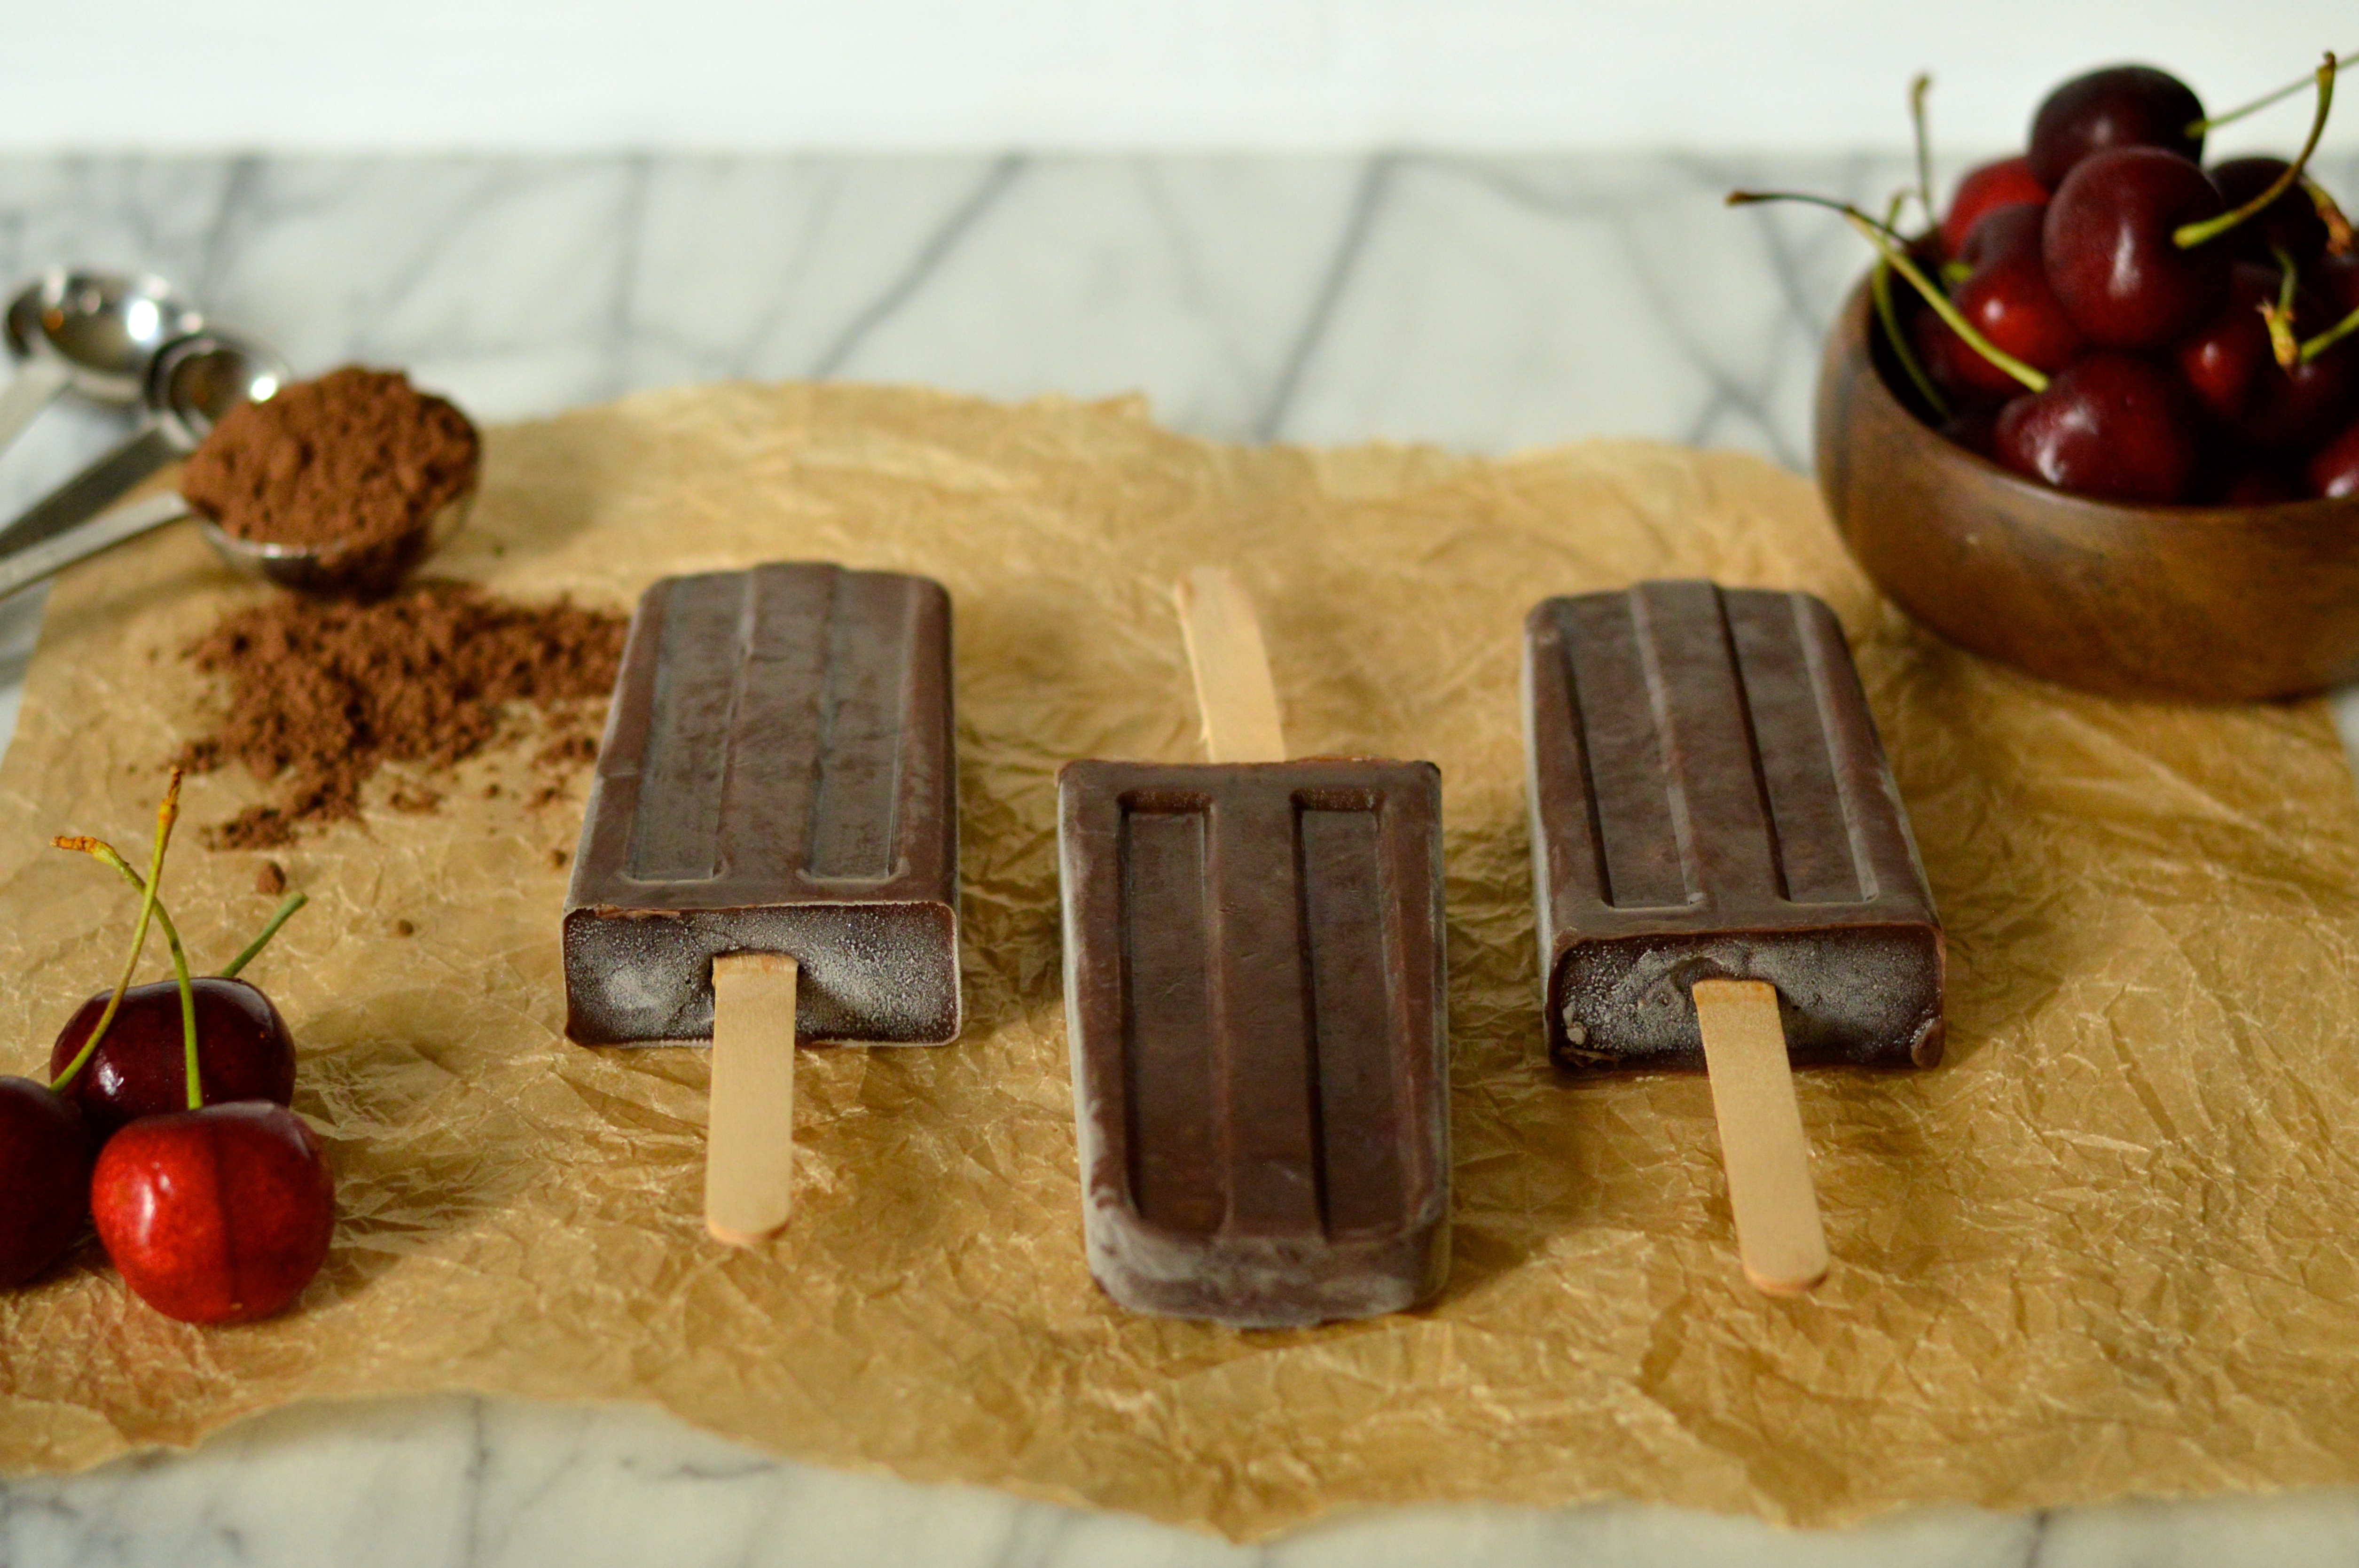
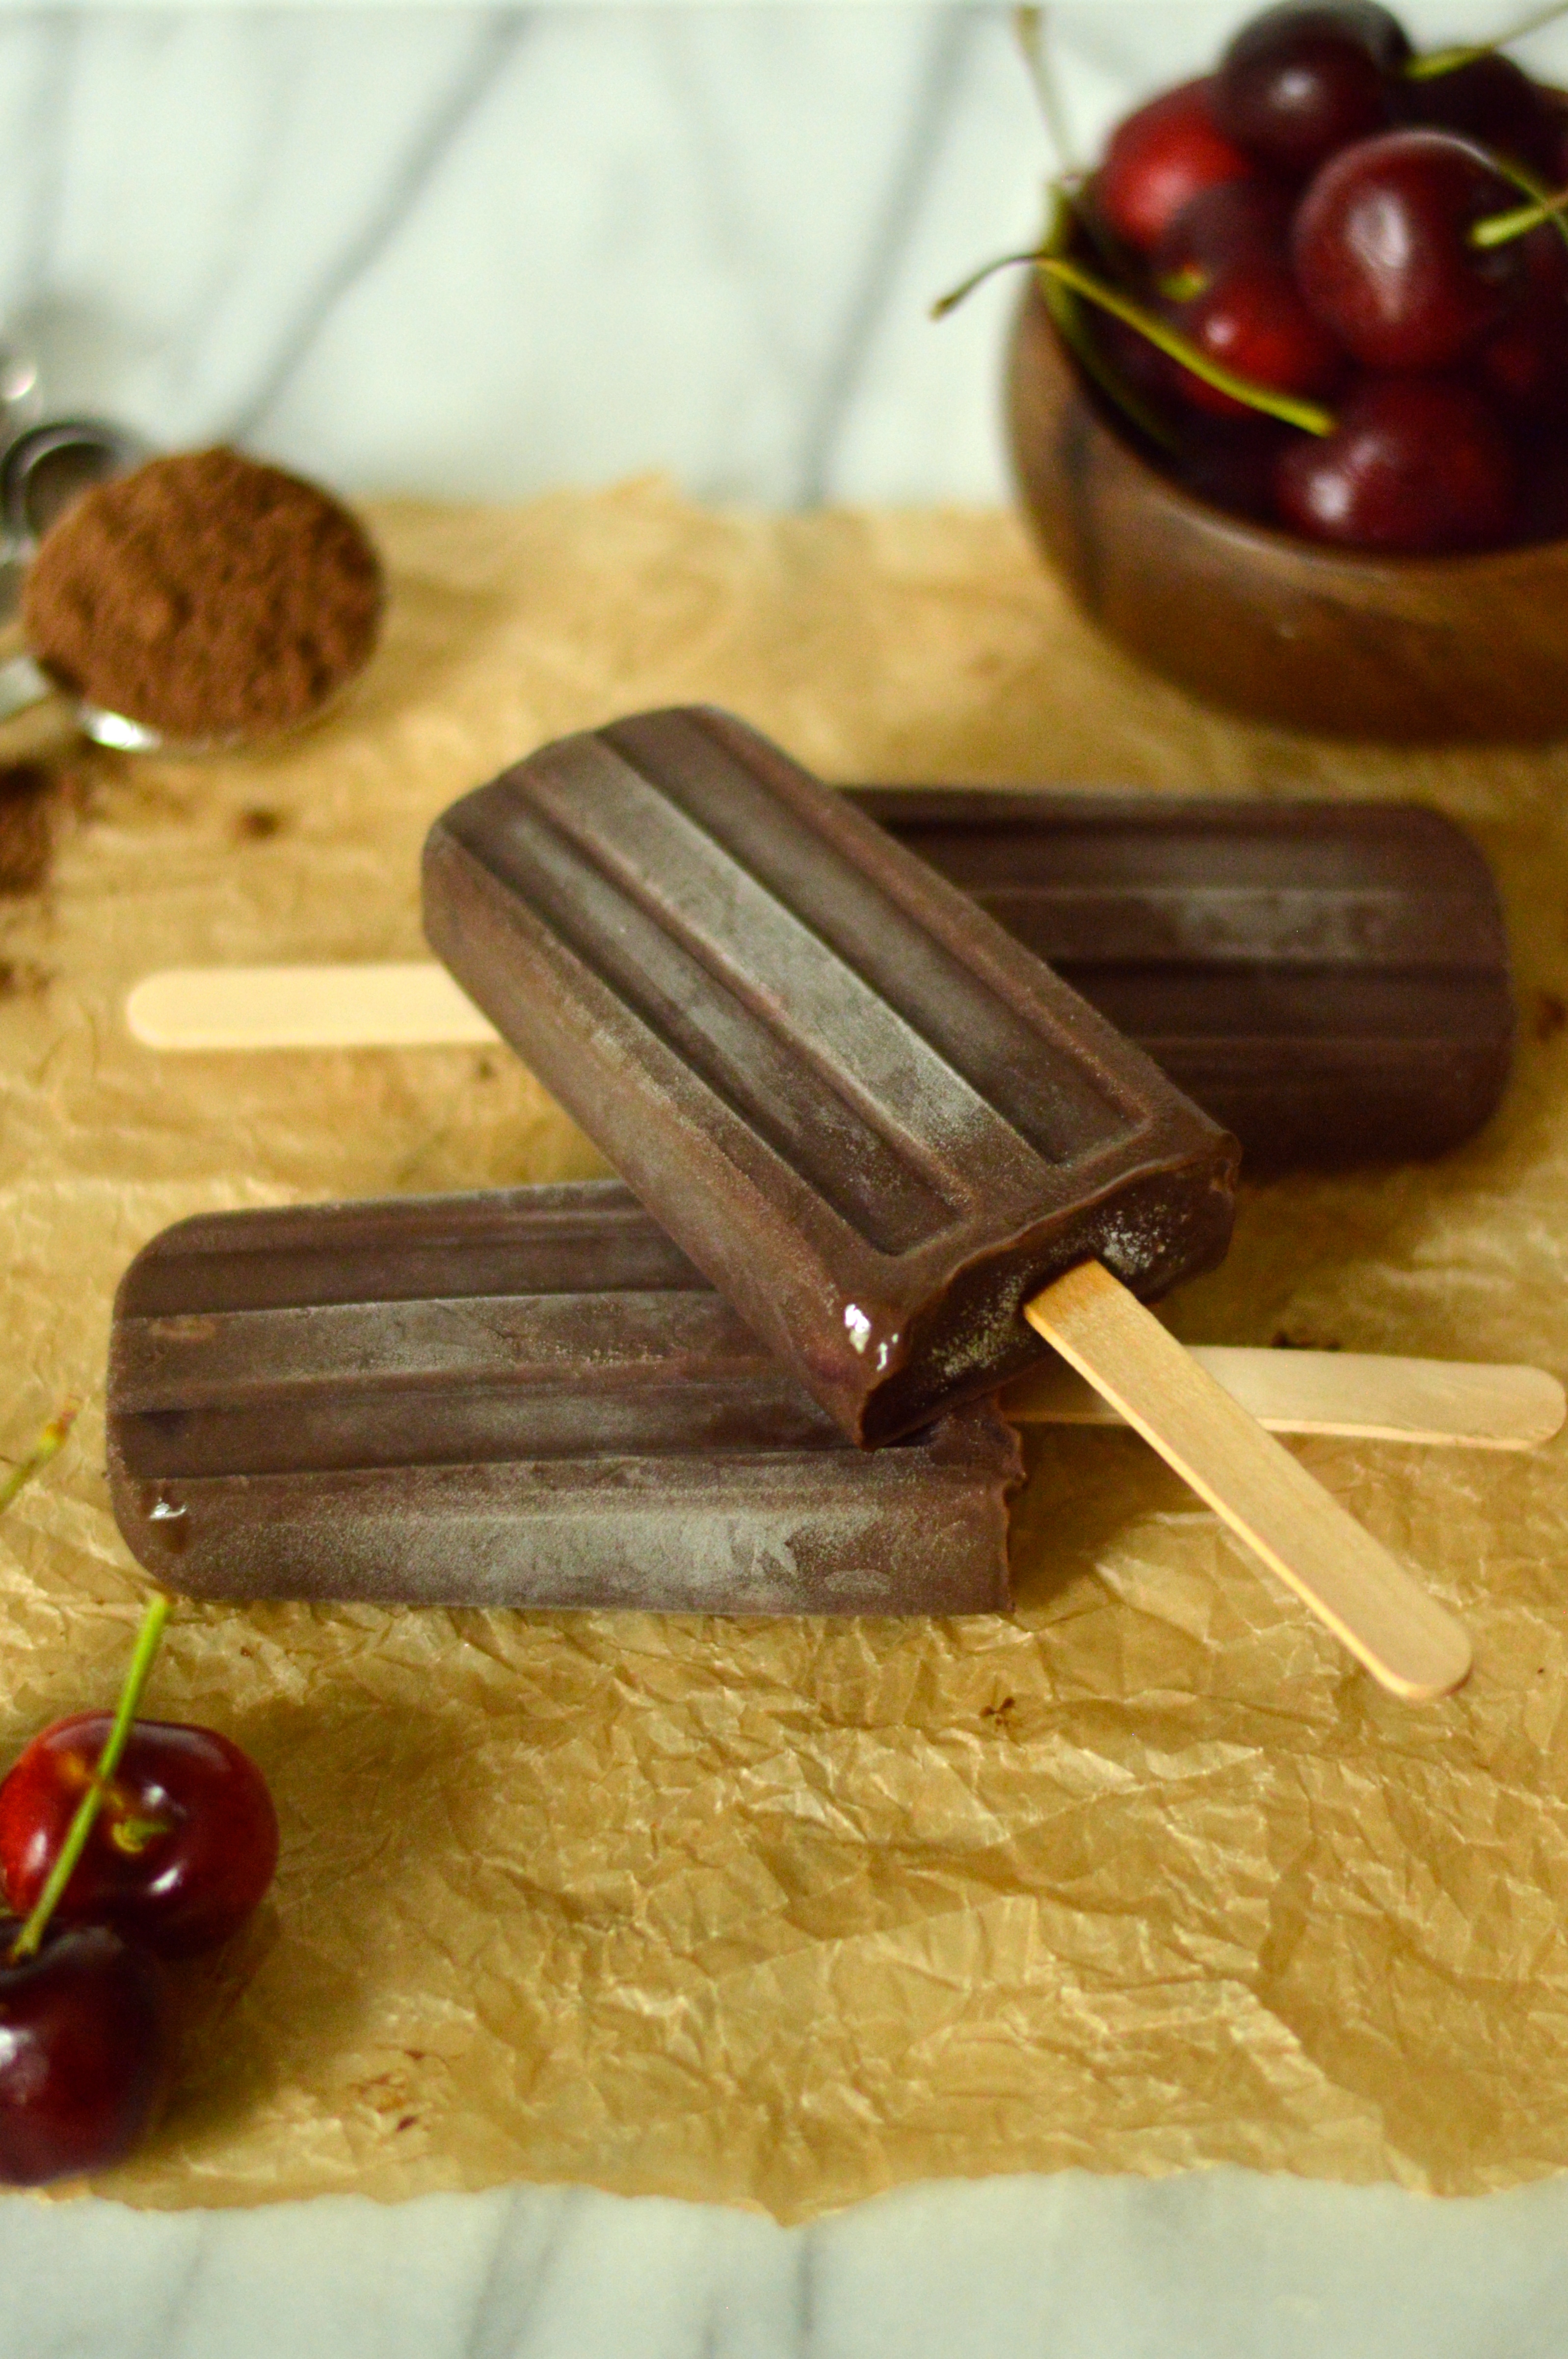
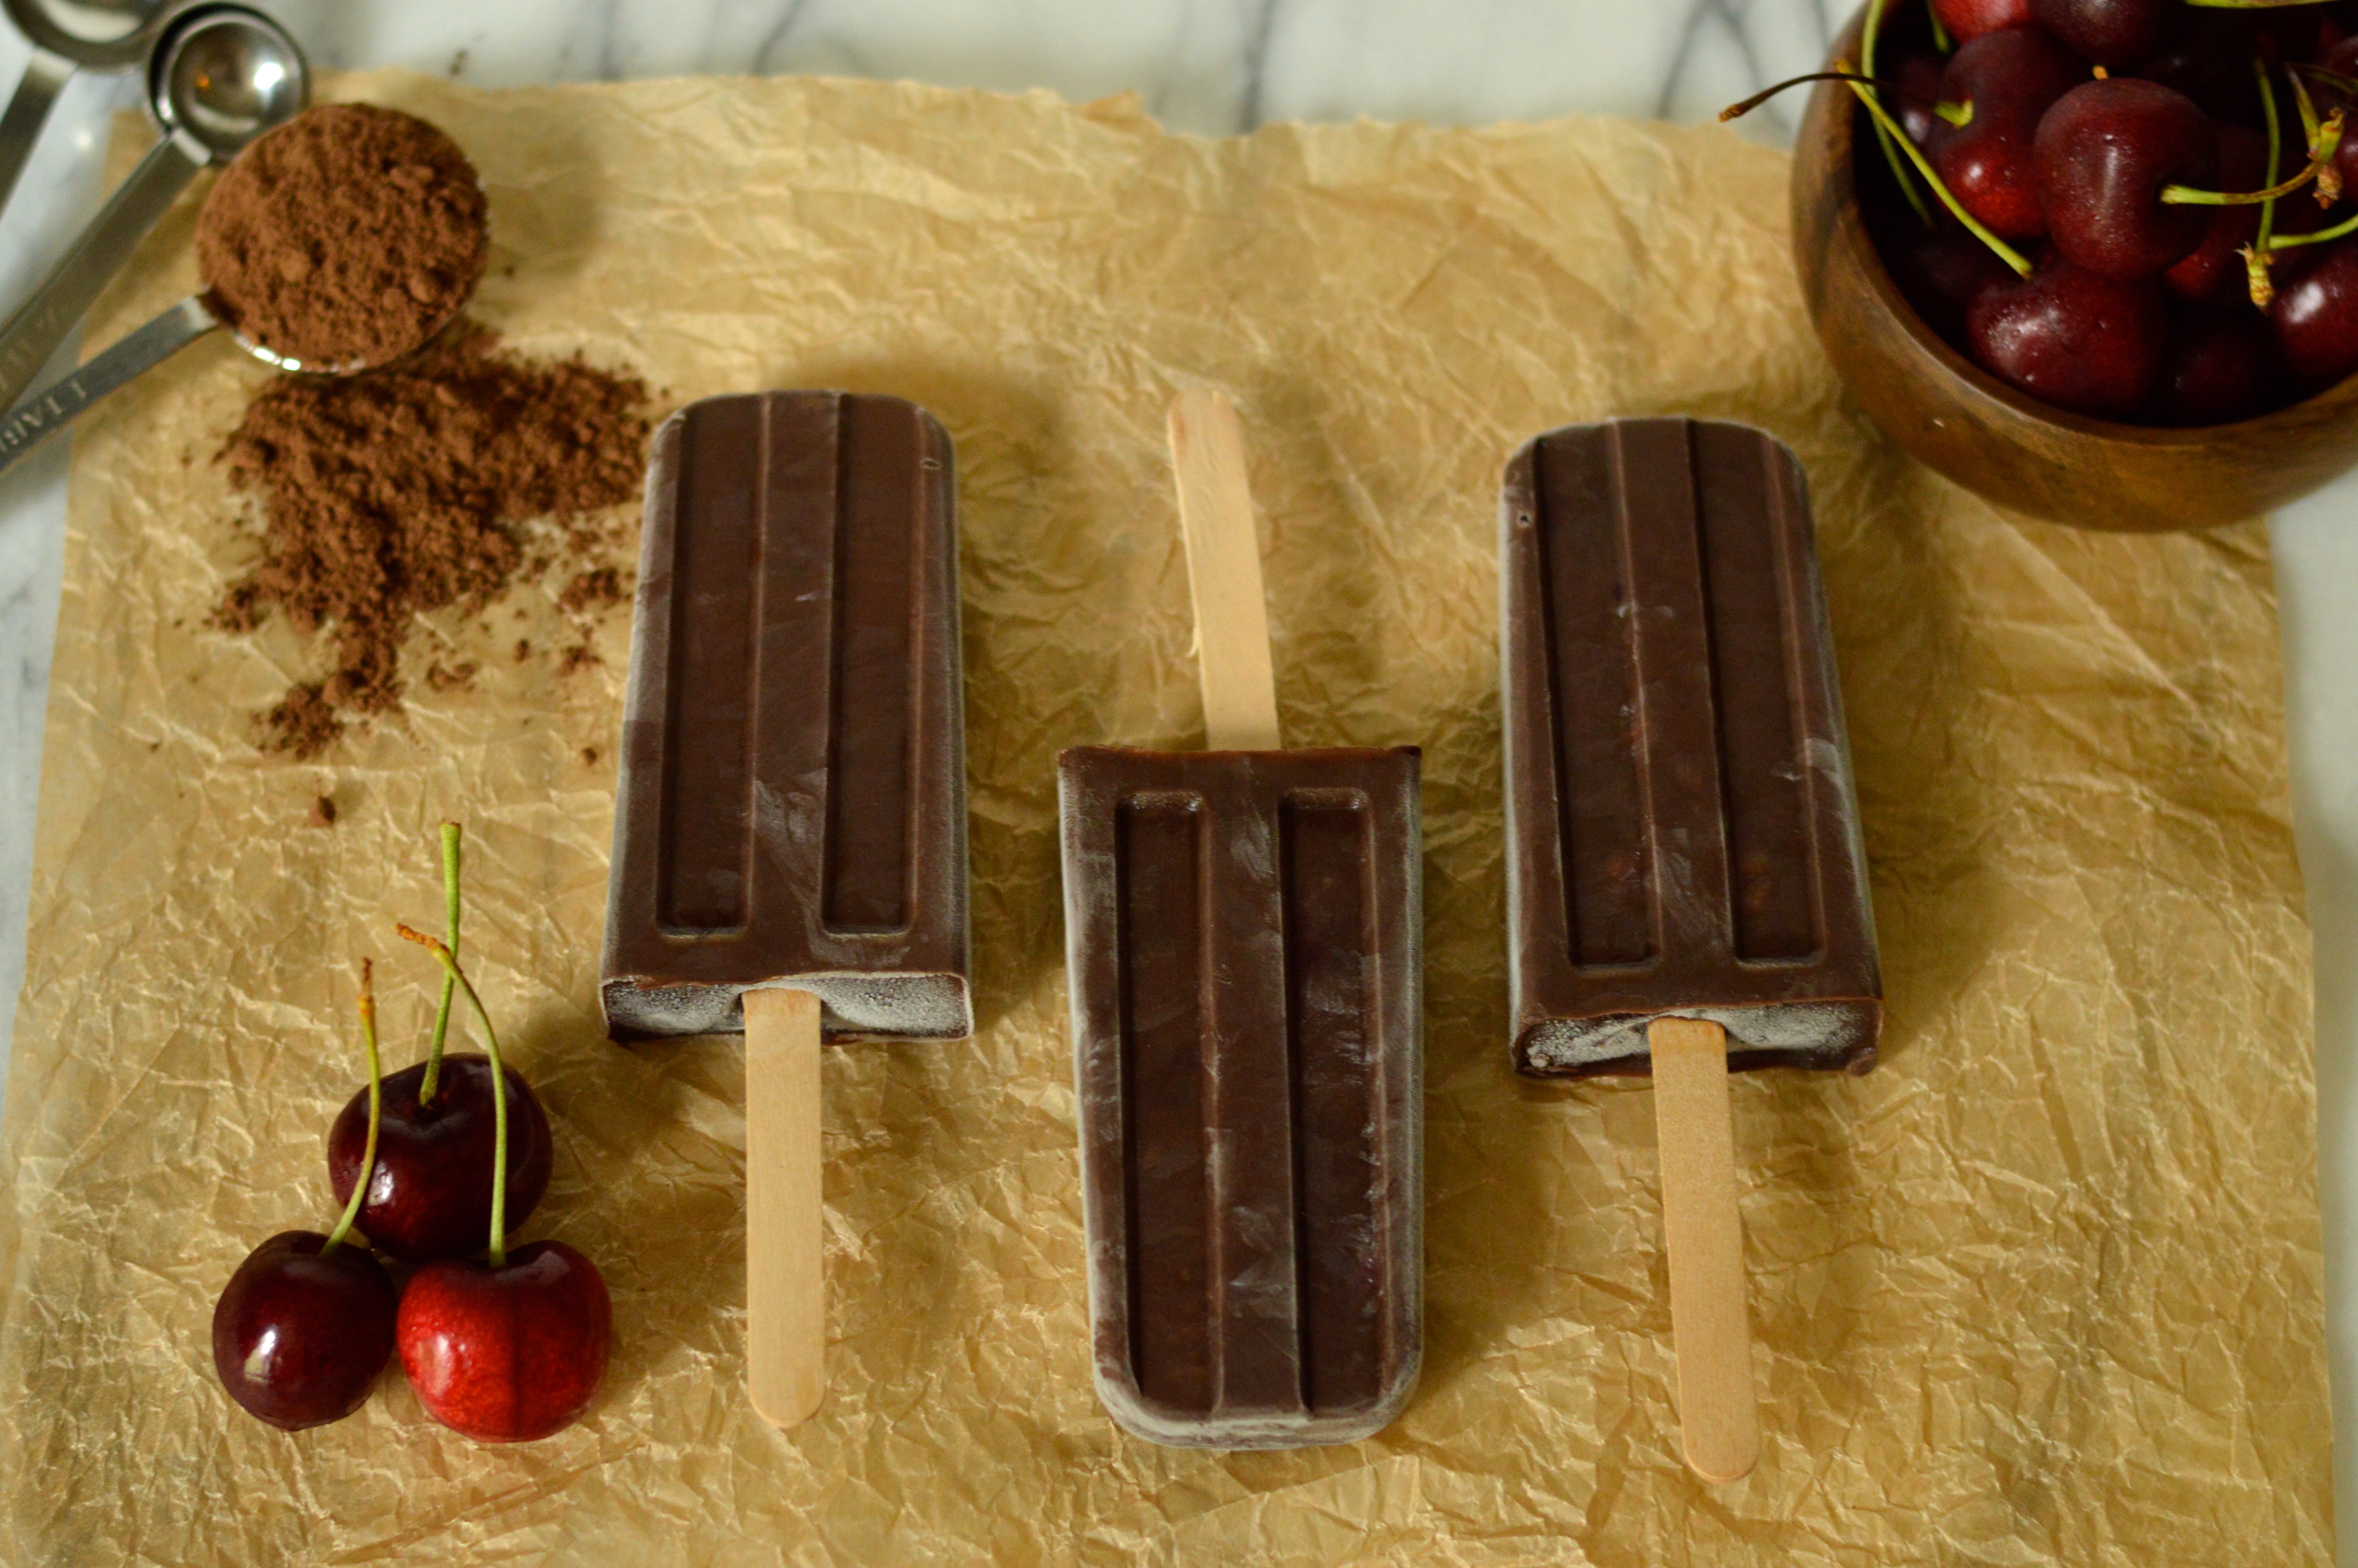
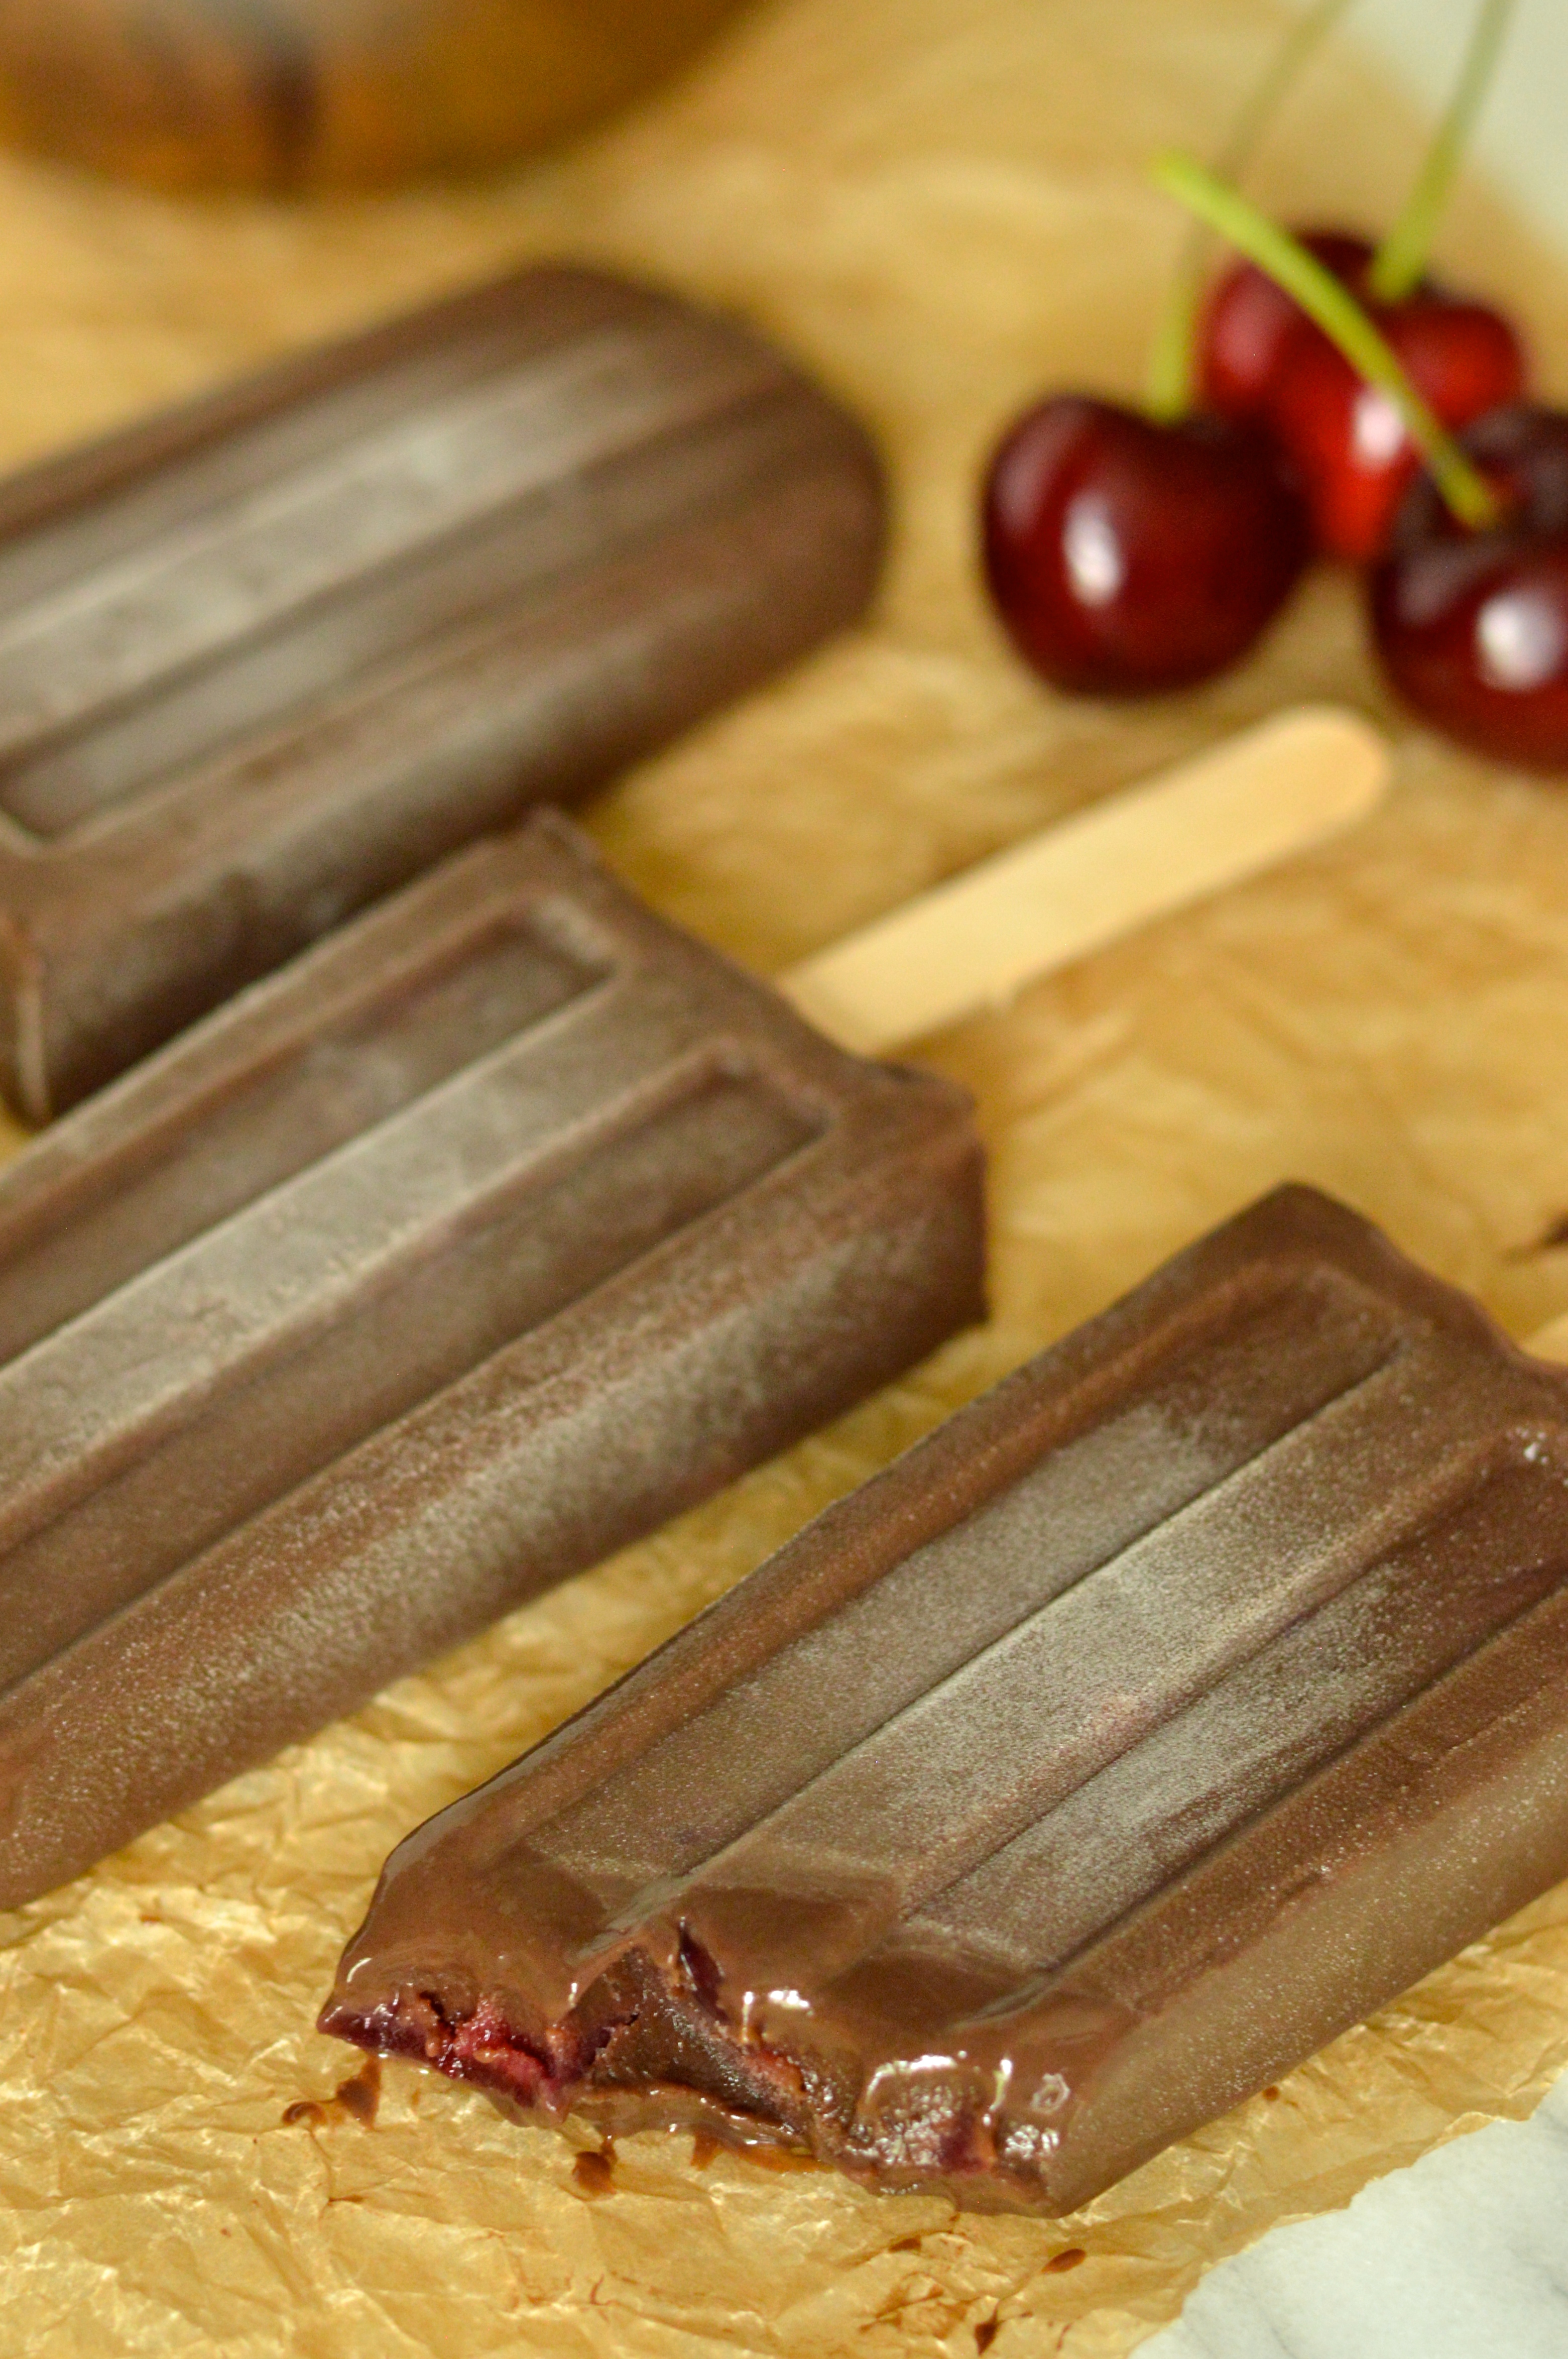
Even now, as a full grown adult human, I can’t resist a good chocolate ice pop. I think the best way to ensure a super chocolatey and creamy pop is to start with a pudding base rather than something like frozen chocolate milk. To turn up the volume, and add something seasonal and healthy-ish, I paired these pops with fresh ripe sweet cherries. Cherry season is fleeting so I want to make sure I get my fill before it’s too late. To be sure they imparted some of their flavor into the pudding, I tossed them, quartered, right into the pudding base as it cooked and thickened on the stove.

cherry & chocolate pudding ice pops | Brooklyn Homemaker

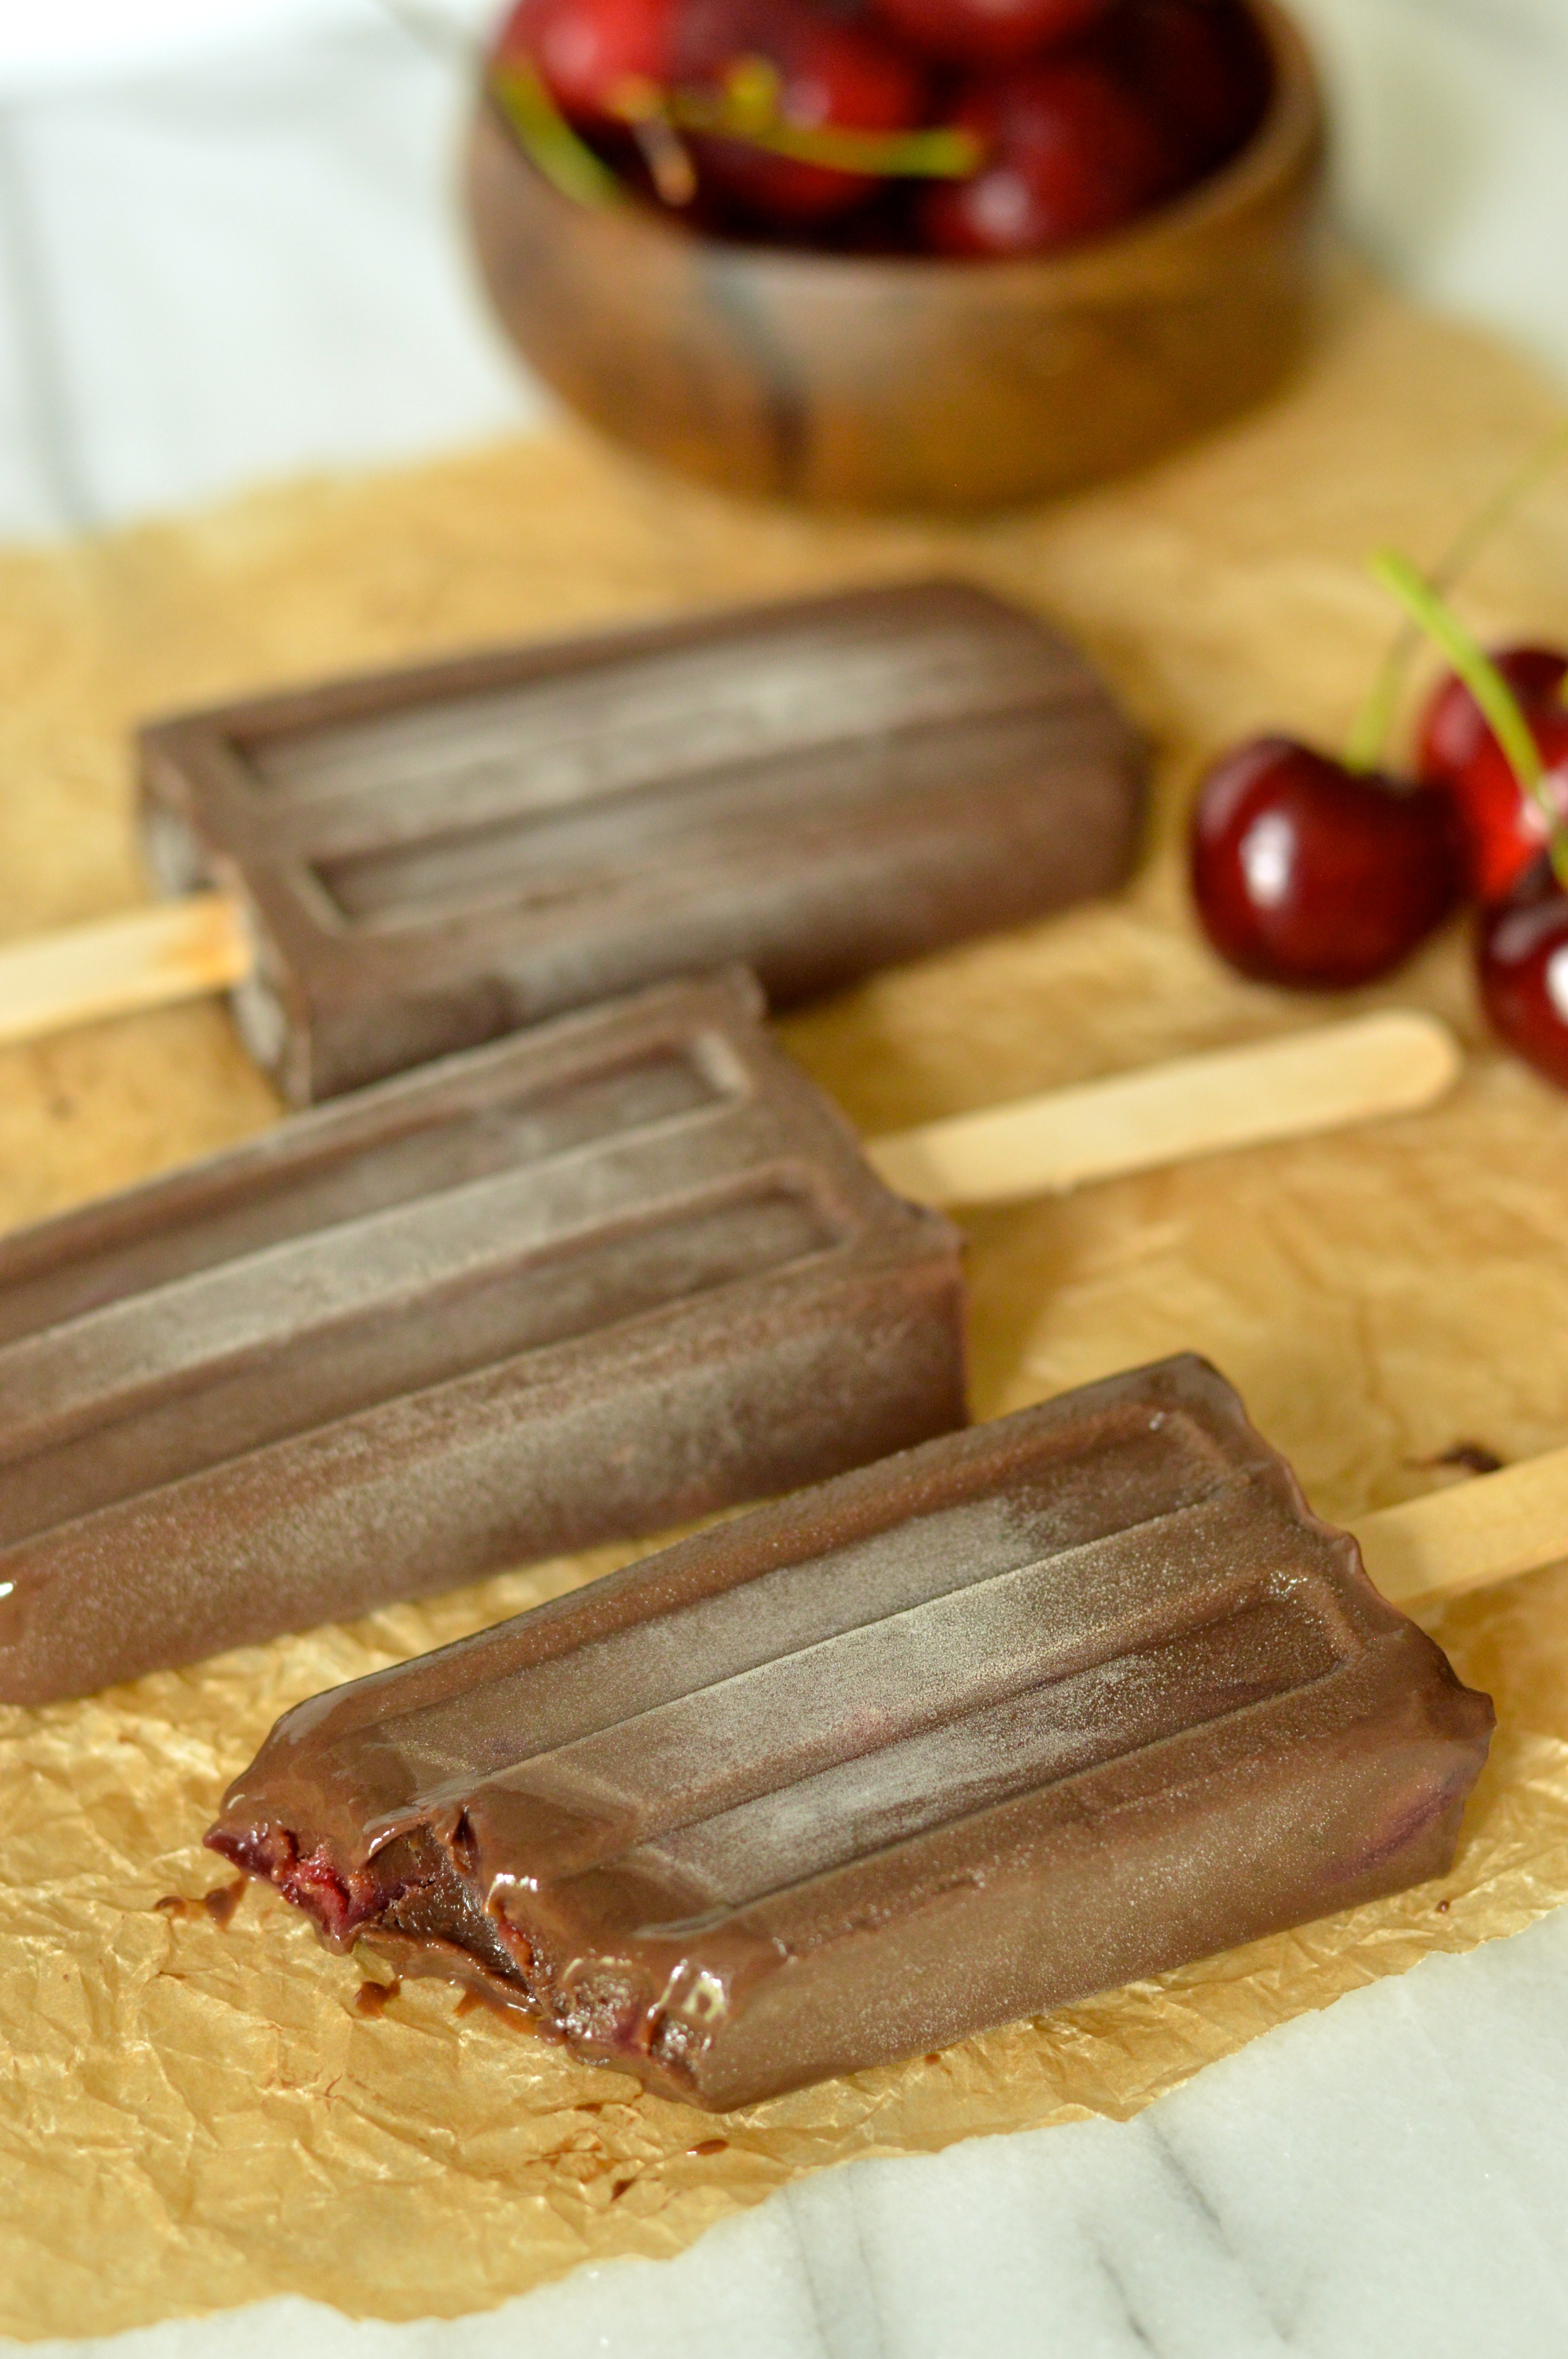
The resulting ice pops are deep, dark, & decadently chocolatey.  They’re just sweet enough, with a thick, rich, and unbelievably creamy texture. There’s a nice subtle hint of bright red cherry flavor, but the fudgey chocolate takes center stage. Hidden in every few creamy bites, or licks, or slurps, or however you choose to eat these; there are bursting little bites of fresh jammy bing cherries. These are the perfect indulgent treat on a hot day, and while there’s something evocative of childhood about chocolate ice pops, the subdued sweetness and the addition of sweet cherries give them a slightly more mature edge.

cherry & chocolate pudding ice pops | Brooklyn Homemaker

Cherry & Chocolate Pudding Ice Pops

  • Servings: makes ten 3-oz ice pops
  • Print
3/4 cups sugar
2 tablespoons cornstarch
pinch salt
1/3 cup Dutch Process cocoa powder
2 1/4 cups milk
1/2 lb sweet cherries, pitted and quartered
3 egg yolks, beaten
2 teaspoons vanilla extract

In a medium saucepan with a heavy bottom, whisk together sugar, salt, cornstarch, & cocoa. Whisk in milk, remove any lumps, and start cooking over medium heat. Add quartered cherries and cook until thickened and bubbly. Continue cooking and stirring regularly for 2 minutes. Remove from heat and gradually stir about 1 cup of milk into the beaten egg yolks. Add yolk mixture to pan, stir, and bring back to a gentile boil. Reduce heat to a simmer and cook and stir for another 2 minutes.

Remove pan from heat and stir in vanilla. Cover and cool for about 20 or 30 minutes. Evenly distribute pudding between 10 3-oz ice pop molds. Add popsicle sticks, cover, and freeze for at least 4 hours or until frozen through. Remove from molds by dipping into warm water or running under a warm tap for 15 to 20 seconds.

roasted cherry kugelhopf with cherry bourbon glaze #bundtbakers

You guys. Can you believe it’s already time for the July edition of #bundtbakers?
Time flies when you’re baking bundts.

roasted cherry kugelhopf with cherry bourbon glaze | Brooklyn Homemaker

This month’s theme is stone fruit, and I immediately knew I wanted to do something with cherries. I also thought that it might be fun to try something a little different this time around. I was recently researching the history of the bundt cake and learned that Kugelhopf is basically the bundt cake’s great-grandpappy, so I thought it would be really interesting to play with a version this old world classic.

roasted cherry kugelhopf with cherry bourbon glaze | Brooklyn Homemaker

The birth story of the bundt pan all started with some members of a Jewish women’s group called Hadassah who were looking for an alternative to expensive imported kugelhopf molds. Nowadays it’s not hard to find inexpensive metal kugelhopf pans, but they’re traditionally made in Europe from heavy, fragile terra cotta, and in the 1950s they were extremely hard to come by here in the states. Some members of the group approached a young inventor named H. David Dalquist who had recently formed a cookware company called Nordic Ware. They commissioned him to make a lighter, cheaper version of the pans they used to use in the old country. One of the ladies had a traditional mold they lent him as a prototype and he crafted a similarly shaped pan out of lightweight aluminum. Originally he called it a “Bund” pan, based on a German word that loosely translates to, “a gathering of people”. He later added the “t”, making it “bundt”, to avoid confusion with a controversial German-American social club.

roasted cherry kugelhopf with cherry bourbon glaze | Brooklyn Homemaker

Nordic Ware and their pans were moderately popular throughout the 50s with Hadassah members, but the bundt pan didn’t really take off and become the ubiquitous phenomenon we know them to be today until the late 1960s. In 1966 a woman from Texas won the Pillsbury Bake-Off with a recipe she called the “Tunnel of Fudge” that called for Nordic Ware’s patented pan. After that every housewife in America had to have a new bundt pan in their cupboard.

roasted cherry kugelhopf with cherry bourbon glaze | Brooklyn Homemaker

Being a self-proclaimed Bundt enthusiast, I found this history to be totally fascinating. It also made me really curious. I started looking into the Kugelhopf and found that depending on where you are and who you ask, it’s also known as Gugelhupf, guguluf, or kuglóf. Depending on the region, the recipe changes too. It can range from dry and bread-like, sometimes even salty or savory in some places, to fruity, dense and just barely sweet in others. Wherever you are though, this is a yeast leavened cake or loaf that’s usually studded with raisins and nuts. Since it’s not especially sweet, it’s often eaten with breakfast or as a snack, usually spread with unsalted butter.

roasted cherry kugelhopf with cherry bourbon glaze | Brooklyn Homemaker

This kugelhopf though, strays pretty far from old-world heritage. I based it on a traditional Austrian/German recipe, but took a few liberties to make it fit my purpose.  I don’t really care for raisins in baking, and usually prefer to use dried cranberries or cherries in their place. In this case I decided to go for fresh cherries that I oven-roasted to concentrate their flavor. I was also hoping for something a bit more bundt-like than bread-like so I made a few changes to make the recipe just a bit sweeter and richer. I went ahead and added a splash or two of bourbon too, because, why not? Traditionally kugelhopfs are just dusted with powdered sugar, but to make sure it wouldn’t need to be spread with butter, I topped mine off with a very non-traditional cherry bourbon glaze.

roasted cherry kugelhopf with cherry bourbon glaze | Brooklyn Homemaker

To ensure the kugelhopf is nice and moist, I think it benefits from a soak. For this, you could make a plain old simple syrup, or add some sort of flavoring or extract to a syrup. After roasting the cherries I was left with some of their syrupy juices and thought I’d use that for my soak along with some butter and maybe another splash of bourbon.

I also think that this recipe improves with a day’s rest.  I mean, don’t get me wrong, this was pretty damned great on the first day, but seemed to be the teeeeeniest bit dry to me. For some reason, the second day this was no longer an issue. I’m not sure if it was the cherries, the soak, or the glaze but somehow the bread-y body of this cake was borrowing moisture for some other component. The crumb seemed more moist, the flavors better developed, and the whole concept better realized on the day after baking. So, if you have the time and the foresight to make this a day ahead, do that. Just cover it tightly and hide it away somewhere at a cool room temperature.

roasted cherry kugelhopf with cherry bourbon glaze | Brooklyn Homemaker

In the end all my efforts really paid off. Using oven-roasted fresh cherries in place of raisins was nothing short of genius. (That’s right, I just called myself a genius). The cherries are soft yet chewy and bursting with a bright deeply-concentrated fruity flavor, and adding bourbon while they roast adds a rich warmth and depth. Of course, if you wanted to use dried cherries instead, I think that they’d work really well too, especially if you reconstitute them in bourbon first. The roasted cherry juice and the egg yolks gives the cake a rich soft crumb, and the sliced almonds add a really nice soft bite. All these flavors in combination are so totally warm and homey with a perfect old-world feeling.

The kugelhopf itself is a bit sweeter than traditional ones, but it’s still a restrained just-barely-sweet sweetness. The texture is somehow softer than bread, but chewier and doughier than cake. It’s almost similar to the texture of a cinnamon roll, if that makes any sense.

roasted cherry kugelhopf with cherry bourbon glaze | Brooklyn Homemaker

Since this still remains relatively bread-y, this kugelhopf would be perfect served at a breakfast get together or a brunch. Of course, it still feels very much like dessert, so feel free to serve it as you would any other cake. No matter how or when you eat it, you’re going to want to go back in for seconds.

If you love summer produce and cherries and all kinds of stone fruit, please be sure to scroll down past the recipe and check out all the other mouthwatering stone fruit themed bundt cakes. They all look unbelievable and I wish I could have a slice of each and every one of them. Thank you so much to our hosts, Felice of All That’s Left Are The Crumbs and Stacy of Food Lust People Love, for choosing this months theme and organizing our efforts.

roasted cherry kugelhopf with cherry bourbon glaze | Brooklyn Homemaker

Roasted Cherry Kugelhopf with Cherry Bourbon Glaze

Adapted from David Lebovitz

Roasted Cherries
1 1/2 lb sweet cherries
1/4 cup sugar
1/8 teaspoon salt
1 tablespoon bourbon

Preheat the oven to 400. Wash, pit and quarter your cherries. Toss the quartered cherries in the sugar, salt, and bourbon to coat. Spread evenly over a parchment lined baking sheet, and roast for 20 to 25 minutes. Toward the end, watch that the cherry juices don’t burn.
Fit a fine mesh strainer into a bowl, and scrape or pour the cherries into to the strainer. Leave the cherries in the strainer for a few minutes to allow the juices to drip and collect in the bowl. Reserve the juice and the drained cherries in separate bowls.

Sponge
½ cup milk
2 ½ teaspoons active dry yeast (not instant)
2/3 cup all-purpose flour

Dough
6 tablespoons unsalted butter, at room temperature
1/2 cup sugar
½ teaspoon salt
2 teaspoons orange zest
1 teaspoon vanilla extract
1 teaspoon bourbon
2 teaspoons reserved cherry juice
3 large egg yolks
1 1/2 cup all-purpose flour
1 1/4 cup sliced almonds, divided
One 6- to 9-cup kugelhof pan (or you can use a bundt pan)

Make the sponge by warming the milk over low heat in a small saucepan until it’s tepid. Pour into a bowl, and mix in the yeast then the flour. Cover with plastic wrap and let rise until bubbly, about 20 minutes.

In a standing electric mixer with a paddle attachment, beat the butter with sugar and salt until soft and light, about 3 minutes. Mix in the orange zest, vanilla, 2 teaspoons cherry juice, and 1 teaspoon of bourbon. Next, add the egg yolks and beat until smooth. Scrape down the sides of the bowl, add the sponge, then beat another minute.
Add the flour and mix on low speed for 2 minutes and let rest for 10 minutes.
Beat on medium speed until smooth and elastic, about 2 minutes.
Slowly beat in the cherries and 1/2 cup of the almonds. Scrape the dough into a buttered bowl and turn it so the top is buttered. Cover with plastic wrap and let rise for 20 to 30 minutes.

Butter the kugelhof mold well, and the scatter another 1/2 cup of sliced almonds over the inside of the mold, turning to coat it evenly. Scrape the dough into the kugelhof mold and cover with a towel or buttered plastic wrap. Let rise until doubled, about an hour or maybe a bit longer.

About 15 minutes before the dough is fully risen, preheat the oven to 375 degrees. Bake the kugelhof until it’s a deep golden brown, about 40-45 minutes. Cool for 10 minutes, then unmold onto a wire rack.

Soak and Glaze:
5 tablespoons unsalted butter, melted
5 tablespoons bourbon
remaining reserved cherry juice
2 cups powdered sugar, divided

To make the soak; combine butter, bourbon, & cherry juice in a small bowl. Add 1/2 cup of powdered sugar and whisk to combine. Measure out 1/2 cup of the mixture for the soak and set aside. Add remaining sugar to the liquid to make the glaze, and whisk to combine. Add more sugar, a few tablespoons at a time, if you want a thicker glaze. After kugelhopf is removed to a wire rack, brush the soak all over the top and sides. Let it cool at least 30 minutes before drizzling or pouring the glaze evenly over the top. While glaze is still wet, sprinkle remaining 1/4 cup of almonds over the top.

If possible, allow the kugelhopf to rest for a day, tightly covered at room temperature, before slicing and serving.

roasted cherry kugelhopf with cherry bourbon glaze | Brooklyn Homemaker

Check out all of these delicious sounding stone fruit based bundts. What a perfect theme to celebrate all the wonderful fresh fruit the summer has to offer.


BundtBakers


Interested in learning more about us??  #BundtBakers is a group of Bundt loving bakers who get together once a month to bake Bundts with a common ingredient or theme. We take turns hosting each month and choosing the theme/ingredient. You can see all our of lovely Bundts by following our Pinterest board right here. Links are also updated after each event on the BundtBaker home page here.

If you are a food blogger and would like to join us, just send an email with your blog URL to foodlustpeoplelove@gmail.com. If you are just a lover of Bundt baking, you can find all of our recipe links by clicking our badge above or on our group Pinterest board.

DSC_0171

devil’s food cupcakes with salted caramel cream cheese icing

So, I was afraid this might happen.

devil's food cupcakes with salted caramel cream cheese icing | Brooklyn Homemaker

I’m back on a cupcake kick again. Last month when I made these, I warned you about my baking in cycles. Well, this month another friend had another birthday at another bar, and another fresh batch of homemade cupcakes crashed the party.

devil's food cupcakes with salted caramel cream cheese icing | Brooklyn Homemaker

I might be getting back on the cupcake train, but as you may have heard, a lot of Americans have had enough and want to get off. In case you’ve been living under a rock, the news broke recently that Crumbs cupcakes has shuttered their doors after being kicked off of the Nasdaq stock market. I’m not going to claim that I also predicted this, but I did say that the cupcake trend was over. And I was right. The Crumbs legacy has come to an end, but that’s not to say that the cupcake’s legacy has. While the trend is over, the cupcake itself is not.

devil's food cupcakes with salted caramel cream cheese icing | Brooklyn Homemaker

So the cupcake is no longer the celebrity of the dessert world. So what? That’s okay. Actually, I’m pretty happy about it. That means that now we can get back to enjoying the cupcake for what it is instead of what it represents. We can get back to just eating cupcakes because they’re good, and fun, and portable, and perfectly portioned; and stop eating them because they’re hip, and trendy, and expensive, and pretty, and because you saw Carrie Bradshaw eating one that one time.

devil's food cupcakes with salted caramel cream cheese icing | Brooklyn Homemaker

While I’m on the subject of eating cupcakes for all the wrong reasons, let’s go back to Crumbs for just a moment. Brace yourself though. I’m about to say something scandalous and potentially polarizing.

Crumbs sucked.

They were just terrible. Like, the worst. I know some people liked them, and I know the media is mourning their loss as they would the loss of a beloved celebrity, but this was one of those tacky celebrities that were famous for being famous, not for having any real talent or substance. People ate Crumbs because they heard that they were great. They saw their friends on Facebook taking a selfie with a cupcake the size of their head. They saw that the chain was everywhere and thought they had to be doing something right, but the only thing Crumbs was doing right was marketing. The cupcakes themselves didn’t live up to the legend, and eventually, finally, that caught up to them.

Crumbs cupcakes were stale and dry and tasteless, that is, unless you consider SWEET a flavor. They were piled high with mountains of thick, pasty, tooth-rottingly sweet frosting, and they were gigantic for no good reason. Those cupcakes could have fed a family of four.

The only thing better than a bad cupcake is a HUGE bad cupcake, right? right? Ugh.

devil's food cupcakes with salted caramel cream cheese icing | Brooklyn Homemaker

If you were one of the Crumbs lovers in the world, I’m truly sorry, but this is a good thing! There are plenty of other bakeries out there making way better cupcakes than Crumbs ever did, so please don’t mourn too hard. The way I see it, the fall of the famous-for-being-famous cupcakes empire is a step forward.  Now we can start our journey away from eating cupcakes because they’re trendy, pretty sugar-bombs, and get back to loving cupcakes for being tasty little single-serving cakes. Delicious, wonderful, festive, easily transported tasty little single-serving cakes.

If you’re like me, rather than hunting for a great bakery, you’d probably prefer to make your own cupcakes. Instead of mourning, why not celebrate by firing up the oven and making something tasty at home?

devil's food cupcakes with salted caramel cream cheese icing | Brooklyn Homemaker

The birthday girl who inspired these cupcakes is crazy about salt. She’s the kind of gal who eats (salted) tortilla chips with a salt shaker in hand. So, for her birthday I thought salted caramel was the obvious way to go. What better way to make our salt-fiend friend happy on her birthday?

Boy did these cupcakes ever deliver. Not only was she was thrilled, but so was everyone else, including the bartender. They combine super chocolatey cake, creamy homemade salted caramel sauce, and a tangy velvety cream cheese icing. Then the cherry on top of it all is a chocolate covered salty pretzel!

devil's food cupcakes with salted caramel cream cheese icing | Brooklyn Homemaker

The cake itself is delightfully chocolatey and just sweet enough; with a soft, moist crumb and a tender, almost springy texture. To pack as much punch into the cake as possible, I injected them with a little bit of caramel sauce using a marinade injector. It sort of melts into and moistens the cake, rather than creating a pocket of caramel. If you don’t want to do this, or don’t have a way to make it happen, it’s totally fine. The cake is really wonderful on it’s own, I just have a tendency to take things further than necessary.

The salted caramel sauce here is super easy to make and completely delicious. It’s creamy and sweet and buttery and rich and pleasantly salty. You’ll want to make it first so it has time to cool down while the rest of the components come together.

As if there wasn’t enough flavor in these cupcakes, I decided to go with a tangy cream cheese icing with plenty of sweet and salty caramel sauce whipped in. The end result is creamy and soft and full of rich caramely punch, backed up by that distinctive cream cheese twang. The one problem with cream cheese icing is that it tends to be so soft that it’s hard to pipe because it wants to kind of sink into itself. You can add more sugar to stiffen it, but then it ends up being too sweet, at least that is, for my taste. If you want to pipe this icing though, I’d recommend refrigerating it for at least an hour beforehand. Otherwise just slather it on with an offset spatula.

Just to drive the sweet and salty point home, I topped each finished cupcake with a salty chocolate covered pretzel, drizzled even more homemade caramel sauce over the top, and finished with a tiny sprinkling of flaky crunchy fleur de sel.

devil's food cupcakes with salted caramel cream cheese icing | Brooklyn Homemaker

Devil's Food Cupcakes with Salted Caramel Cream Cheese Icing

  • Servings: 24-32 cupcakes
  • Print
Salted Caramel Sauce: 
recipe from Brown Eyed Baker2 cups granulated sugar
12 tablespoons unsalted butter, at room temperature, cut into pieces
1 cup heavy cream, at room temperature
1 tablespoon fleur de sel (or any other flaky sea salt)

Add the sugar in an even layer over the bottom of a large heavy saucepan, and heat the sugar over medium-high heat, whisking it as it begins to melt. You’ll see that the sugar will begin to form clumps, but that’s okay. Just whisk regularly-ish and as it continues to cook it will melt back down.
Stop whisking once all of the sugar has melted, and swirl the pan occasionally while the sugar cooks.
Continue cooking until the sugar has reached a deep amber color. It should look almost a reddish-brown, and have a slight toasted aroma. This is the point where caramel can go from perfect to burnt in a matter of seconds, so keep a close eye. If you are using an instant-read thermometer, cook the sugar until it reaches 350 degrees F.
Immediately add the butter all at once. Be careful, as the caramel will bubble up when the butter is added. Whisk the butter into the caramel until it is completely melted.
Remove the pan from the heat and slowly pour the cream into the caramel. Again, be careful because the mixture will once again bubble up.
Whisk until all of the cream has been incorporated and you have a smooth sauce. Add the fleur de sel and whisk to incorporate.
Set the sauce aside to cool for 10 to 15 minutes and then pour into a glass jar or heat proof container to let cool to room temperature. You can refrigerate the sauce for up to 2 weeks. You might have a little extra after making these cupcakes. You won’t mind, I promise.

Devil’s Food Cupcakes
Recipe from Ad Hoc at Home

1 2/3 cups cake flour
1/3 cup plus 1 Tbsp unsweetened dutch process cocoa powder
1 tsp baking soda
1 1/2 cups granulated sugar
1/2 tsp. kosher salt
1 cup buttermilk
1 cup sour cream
3 large eggs, lightly beaten
6 Tbsp melted unsalted butter, cooled
1/2 cup salted caramel sauce, optional

Preheat oven to 350F. Prepare your muffin pan with paper liners. Sift all dry ingredients into the bowl of a stand mixer, place on mixer fitted with paddle attachment. Mix buttermilk and sour cream. In a separate bowl, combine eggs and butter. Alternately add sour cream mixture and egg mixture to dry ingredients with the mixer running on medium low just until mixed. Fill cups 2/3 full with batter. Bake about 20 minutes, turning pan midway through cooking time. The cupcakes are done when a cake tester or toothpick inserted in the middle comes out clean.
Remove cupcakes from the tins and cool to room temperature on a cooling rack. If desired, once cooled, inject centers of cupcakes with a little salted caramel sauce. You can do this using a bismark tip (which is basically an injector tip for a piping bag), a marinade injecting syringe, or by making a small hole with an apple corer or paring knife. Top with salted caramel icing, recipe below.

Salted Caramel Cream Cheese Icing:
recipe from Brown Eyed Baker

1 cup unsalted butter, at room temperature
8 ounces cream cheese, at room temperature
½ cup salted caramel sauce
4 cups powdered sugar

Beat together the butter and cream cheese on medium-high speed for 5 minutes (I like to use the whisk attachment for my KitchenAid stand mixer, but it’s not necessary). Pour in the salted caramel and beat until combined. Reduce the speed to medium-low and slowly add the powdered sugar, a little at a time, until it has all been incorporated. Increase the speed to medium-high and beat for an additional two to three minutes, until light and fluffy.

Garnish:
Salted Caramel Sauce
Fleur de Sel (or other flaky sea salt)
2 to 3 dozen small chocolate covered pretzels

To finish, pipe frosting (I used an Ateco #846 tip) onto the top of each cupcake (or use an offset spatula to spread the frosting). Top each cupcake with a chocolate covered pretzel, drizzle with some additional salted caramel sauce, and sprinkle with a pinch of fleur de sel.

sweet cherry pie

I love cherry pie.

sweet cherry pie | Brooklyn Homemaker

I mean, what’s not to love?

sweet cherry pie | Brooklyn Homemaker

Oddly enough, I’ve actually never made a cherry pie from scratch before now.  And you better believe that I’ve made a lot of pies in my day. Peach, pumpkin, sweet potato, apple, blueberry, strawberry rhubarb, lemon meringue… You get the picture.

sweet cherry pie | Brooklyn Homemaker

Pies have always been a big part of my life.

Growing up my grandmother did a lot of baking, and more than a few pies have come out of her oven. To this day, Thanksgiving is still my favorite holiday, partly because of the abundance of pie. I remember being a little kid and constantly sneaking away on Thanksgiving day to my grandmother’s sewing room just to stare at the pies and drool. The sewing room tended to be cooler than the rest of the house so she always kept them in there while the rest of the meal was cooking away. I guess she thought they wouldn’t be disturbed in there, but their sweet, fresh-baked siren song would have drawn me in no matter where they were hiding.

sweet cherry pie | Brooklyn Homemaker

It wasn’t until my teen years that I started making my own pies. During my senior year of high school I took a culinary course at a vocational school, and it was then that I learned to make homemade pie crust. Grandma tends to use store bought crust, and for some reason I was interested only in eating pie until I learned how to make the crust from scratch. After that I was a pie baking fool and developed quite a reputation for myself amongst my friends and family. I’ve made a few tiny variations to the recipe I learned in high school, mainly substituting butter for shortening, but for the most part I still use that same recipe, which I’ll share below.

sweet cherry pie | Brooklyn Homemaker

I cannot believe that this is the first pie recipe I’m sharing with you. I planned to post my favorite apple pie when I made it last Thanksgiving, but there were so many things going on that week that I just never found the time to get to it. It’s a good thing Thanksgiving comes every year!

sweet cherry pie | Brooklyn Homemaker

Ever since I’ve been thinking about when I might get around to making another, but I knew that if I just waited the opportunity would present itself. As soon as I saw fresh cherries showing up at the market this year, I knew the time had come for me to get my butt in gear and bake a pie for you. My very first cherry pie.

sweet cherry pie | Brooklyn Homemaker

I know that they say sour cherries make the best cherry pies, but so far I’ve only seen bing cherries at the store and I’m a man on a mission. Sweet cherries are so good on their own that there’s no possible way that covering them in an all butter crust and baking them in the oven could do anything but make them even more wonderful. So, sweet cherry pie it is.

sweet cherry pie | Brooklyn Homemaker

Since I’ve never made a cherry pie, I went straight to the queen of food bloggers to look for a recipe, and bingo. Smitten Kitchen‘s recipe looked amazing. I tend to prefer a really well stuffed pie, and all of my pie plates are 10 inches, so I increased and adjusted the recipe just a bit. If you don’t have a 10″ pan though, you can still use this recipe, as is, with a 9″ or 9.5″ plate and you’ll just have a generously stuffed pie. No one is going to complain about that I promise. You just might want to put a liner or some foil down on the bottom of the oven in case the syrupy filling bubbles over.

sweet cherry pie | Brooklyn Homemaker

This recipe is complete perfection. Delicious and beautiful. The total package.

The crust is buttery and flaky and tender, and the crimped outer edges are thick and wonderfully crisp. The egg wash gives the top crust a picture perfect shine and the coarse sugar adds a rustic kind of sparkle.

And the filling! The cherries soften a bit but don’t turn to mush, so they remain whole and retain some texture. The filling is sweetened just enough to bring out the cherries’ juices and highlight their flavor without overpowering them. When baked, the dark sweet bing cherries turn rich and jammy with a deeply concentrated flavor. The addition of lemon zest and juice brightens everything up and adds an almost floral quality.

sweet cherry pie | Brooklyn Homemaker

As if this pie wasn’t perfect enough already, I decided to add some vanilla ice cream. Heaven. Like, really. I’ve tasted heaven.

sweet cherry pie | Brooklyn Homemaker

Sweet Cherry Pie

Simple all-butter pie crust

makes enough for 1 double-crust or 2 single-crust pies

3 cups all purpose flour
2 tablespoons sugar
1 teaspoon coarse kosher salt
1 cup (2 sticks) unsalted butter, cold
(up to) 1 cup ice cold water

Stir or whisk together flour, sugar, & salt in a medium bowl. If you have time, toss the bowl in the freezer for a 15 or 20 minutes. Cube the butter, add it to the chilled flour, and cut it in with a pastry blender, until it looks like coarse pea sized chunks. You can also do this by pulsing in a food processor. If you took very long to cut the butter in, you can toss the bowl back in the freezer for another 15 minutes, but if the butter is still firm and cold, don’t bother.

Start mixing in the water and stirring and tossing with a fork to distribute and combine. Try starting with about 1/2 cup, mix together, and add about a tablespoon or two at a time, until it starts to come together. The less water you use the better and flakier the crust will be, but you don’t want to use so little that it won’t hold together. If you can press it together with your hands and it mostly stays in a ball, with a few little bits crumbling out, you’re good to go.

Divide the dough into to balls, and wrap each tightly in plastic wrap. Try to handle it as little as possible so as not to warm or melt the butter. Press or pat the covered balls of dough into thick disks and refrigerate for at least an hour or two (or up to a few days)

Sweet cherry pie
adapted from Smitten Kitchen
makes one 10 inch pie

3 lbs bing or other sweet dark cherries
zest and juice of 1 lemon
6 tablespoons cornstarch
3/4 cup sugar
1/8 teaspoon salt
2 tablespoons butter, cut into 5 or 6 pieces
1 egg
coarse sugar for sprinkling

Preheat oven to 400°F.

Stir together the cherries, cornstarch, sugar, salt, lemon juice and zest gently together in a large bowl.

Roll out half of chilled dough (use larger piece, if you’ve divided them unevenly) on a floured work surface to 13-inch round. Gently place it in 10-inch pie pan, either by rolling it around the rolling pin and unrolling it over the pan or by folding it into quarters and unfolding it in the pan. Trim edges to a half-inch overhang.

Pour filling into crust, and dot the filling with the bits of cold butter.

Roll out the remaining dough into a 12-inch round on a lightly floured surface. You can either drape it over the filling as is, or you can cut it into 1 inch wide strips and weave a lattice on top of the filling. If you like, follow this link for a great lattice tutorial. Either way, cut the excess dough from around the pie leaving a 1/2  to 1 inch overhang. Fold the overhang under the bottom crust, pressing the edge to seal it, and crimp the edge decoratively. Brush the egg wash over over pie crust, then sprinkle with coarse sugar. If you didn’t do a lattice, you’ll need to cut slits in the crust with a sharp knife to form steam vents.

Bake the pie in the middle of the oven for 30 minutes. Reduce the temperature to 350°F. and bake the pie for 30 to 35 minutes more, or until the crust is golden. Let the pie cool on a rack for at least 3 hours before serving.