seasonal

bourbon ginger pumpkin pie

There’s just something about pumpkin pie.

bourbon ginger pumpkin pie | Brooklyn Homemaker

When I was a kid I was completely obsessed with pumpkin pie and had a really hard time understanding why we only ate it at Thanksgiving and not, say, every single day of the year.

My grandmother would always make her pies a day ahead and stash them in her sewing room, usually one of the coolest rooms in the house, to rest until after dinner on turkey day. She always covered them with an oversized square of waxed paper, and when no one was looking I’d sneak into the sewing room, close the door behind me, and lift the paper up and just stare at those pies.

bourbon ginger pumpkin pie | Brooklyn Homemaker

I knew I couldn’t eat them until after dinner, but that didn’t stop me from just standing there taking in their earthy, homey aroma. I was tempted but I never touched them. I just wanted to look.

Of course, once dinner was over wild horses couldn’t have kept me from tearing into those rich, earthy, custardy pies.

bourbon ginger pumpkin pie | Brooklyn Homemaker

When I was trying to decide what to serve for my fakesgiving dinner, the pumpkin pie was the menu item I had the most trouble with.

I think that my love for pumpkin pie was clouding my judgement. I wanted to do something sort of elevated and innovative, but I just couldn’t make up my mind. I took to pinterest to soak up some inspiration, and quickly realized that anyone who has ever posted a recipe on the internet has their own way of making pumpkin pie, and that any and every type of dessert ever invented and has had pumpkin and spice added to it at some point.

Just try typing the words “pumpkin dessert” into the search bar on pinterest. I dare you. Pumpkin bread, pumpkin bars, pumpkin tarts, pumpkin cheesecake, pumpkin custards, pumpkin flans, pumpkin trifles, pumpkin mousse, pumpkin cookies, pumpkin ice cream served inside a hollowed out pumpkin…

bourbon ginger pumpkin pie | Brooklyn Homemaker

My head spinning, I moved on from pinterest and decided to check some of my favorite food blogs and websites for ideas. Eventually I stumbled across an entire opinion thread on serving these fancy pants pumpkin desserts for Thanksgiving.

Someone had written to say that he was invited by some foodie friends to a Thanksgiving potluck and he was in charge of the pumpkin pie. He wanted to impress his friends and take pumpkin pie to the next level, and was asking for some help with ideas and inspiration.  (sound familiar?)
The answers he got back were a total surprise to me, but the more I think about it, the more sense it makes.

Everyone was basically saying either:
A) just make a damn pumpkin pie because that’s all people really want to eat anyway.
or
B) go ahead and make your fancy pants “elevated” pumpkin dessert, but you should make a damn pumpkin pie too and bring both, because that’s all people really want to eat anyway.

bourbon ginger pumpkin pie | Brooklyn Homemaker

So, I tossed all the recipes for pumpkin tarts and custards and trifles out the window, and started thinking about why I was so enamored with Grandma’s pumpkin pie in the first place. It was all about the buttery crust, the earthy sweet pumpkin, the warm spices, and the rich creamy custard. Why complicate things?

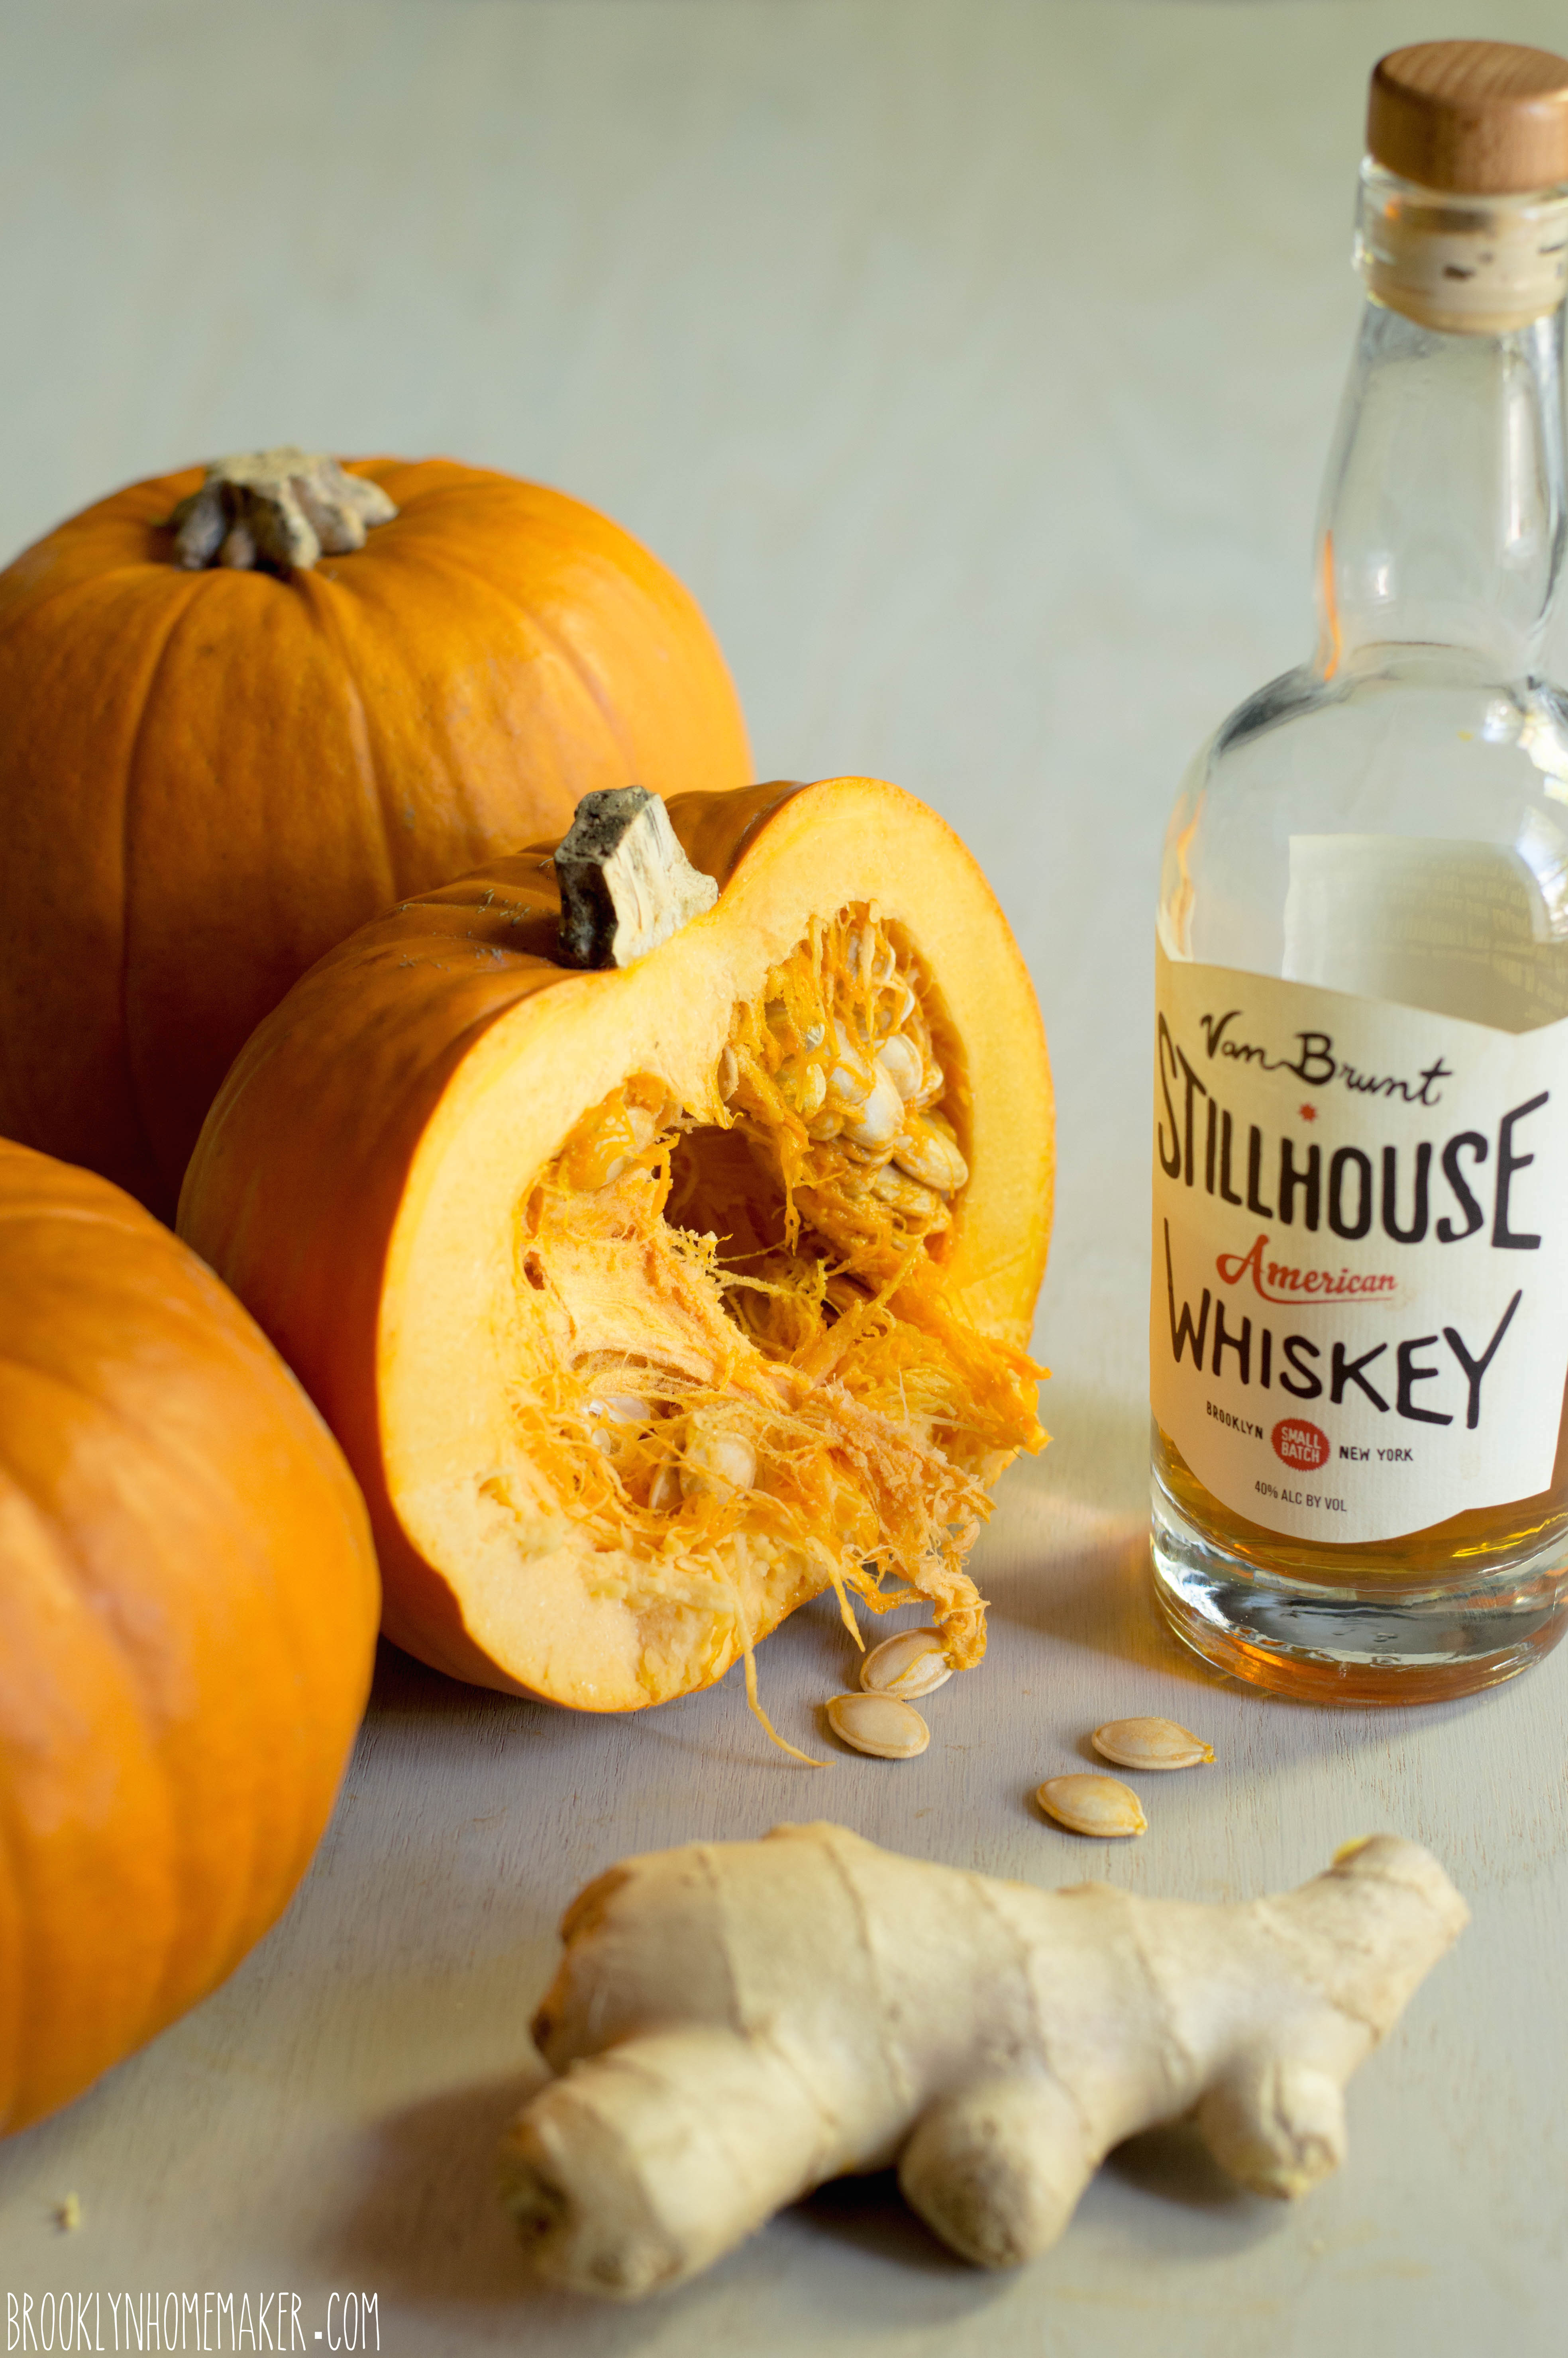
Of course I did want to do something just a little special with my pie this year, but was looking for a subtle twist on the classics rather than trying to reinvent the wheel. Just a touch of (totally optional) bourbon and some grated fresh ginger was all I needed to take things to the next level.

bourbon ginger pumpkin pie | Brooklyn Homemaker

I also thought it would be fun to make some more work for myself by roasting my own sugar pumpkins instead of using canned. To save some time and a few dishes I tried mashing the pumpkin flesh rather than completely pureeing it in the food processor. You guys. Don’t do this. Just puree your pumpkin. (Or use canned)

When I started mixing in the rest of the ingredients, I realized that my pumpkin was kind of lumpy and had some strands of fiber in it.  Not wanting to end up with a funky lumpy pie filling, I decided to toss the entire bowl into the food processor to smooth it out. What I didn’t realize was that doing this would also whip the cream in my filling and make it sort of frothy. While the texture of the filling wasn’t changed, it did make the top of the pie look sort of funky and pitted. Not a big deal really, just a little funny looking.

A few days later I read online that in a blind taste test, most people preferred the taste and texture of pies made with canned pumpkin puree over homemade. Ugh. Whatever.

bourbon ginger pumpkin pie | Brooklyn Homemaker

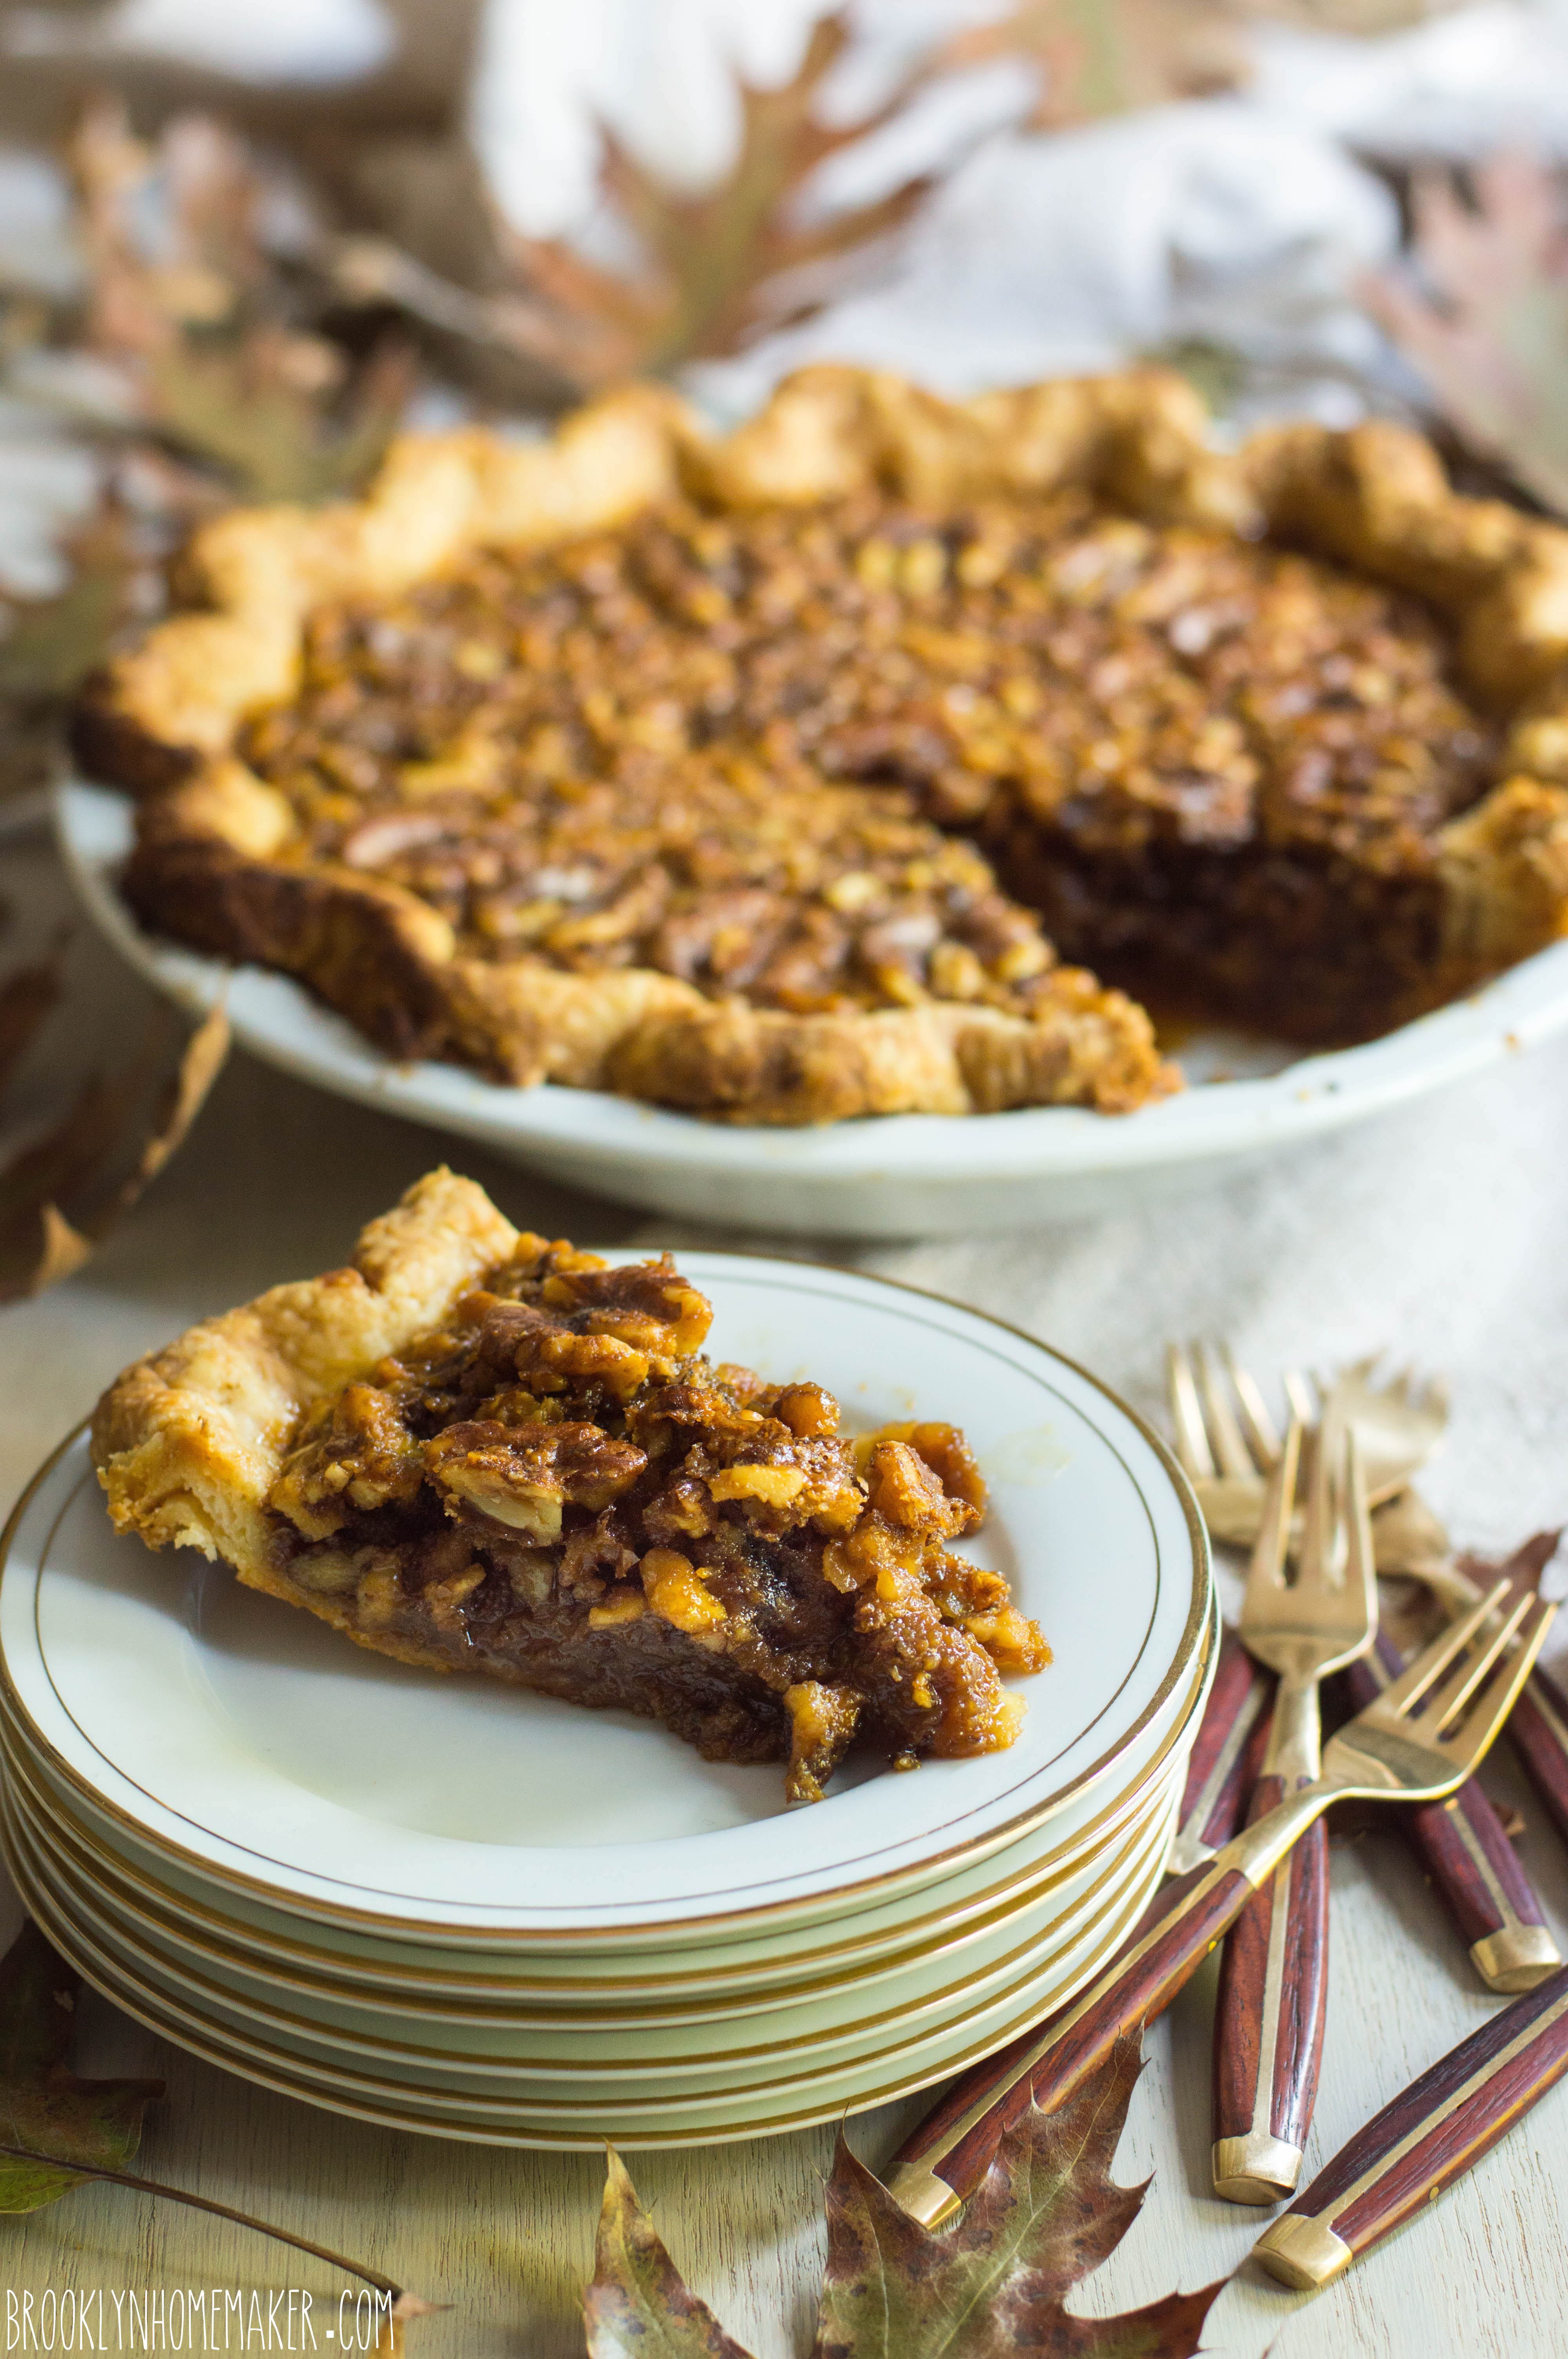
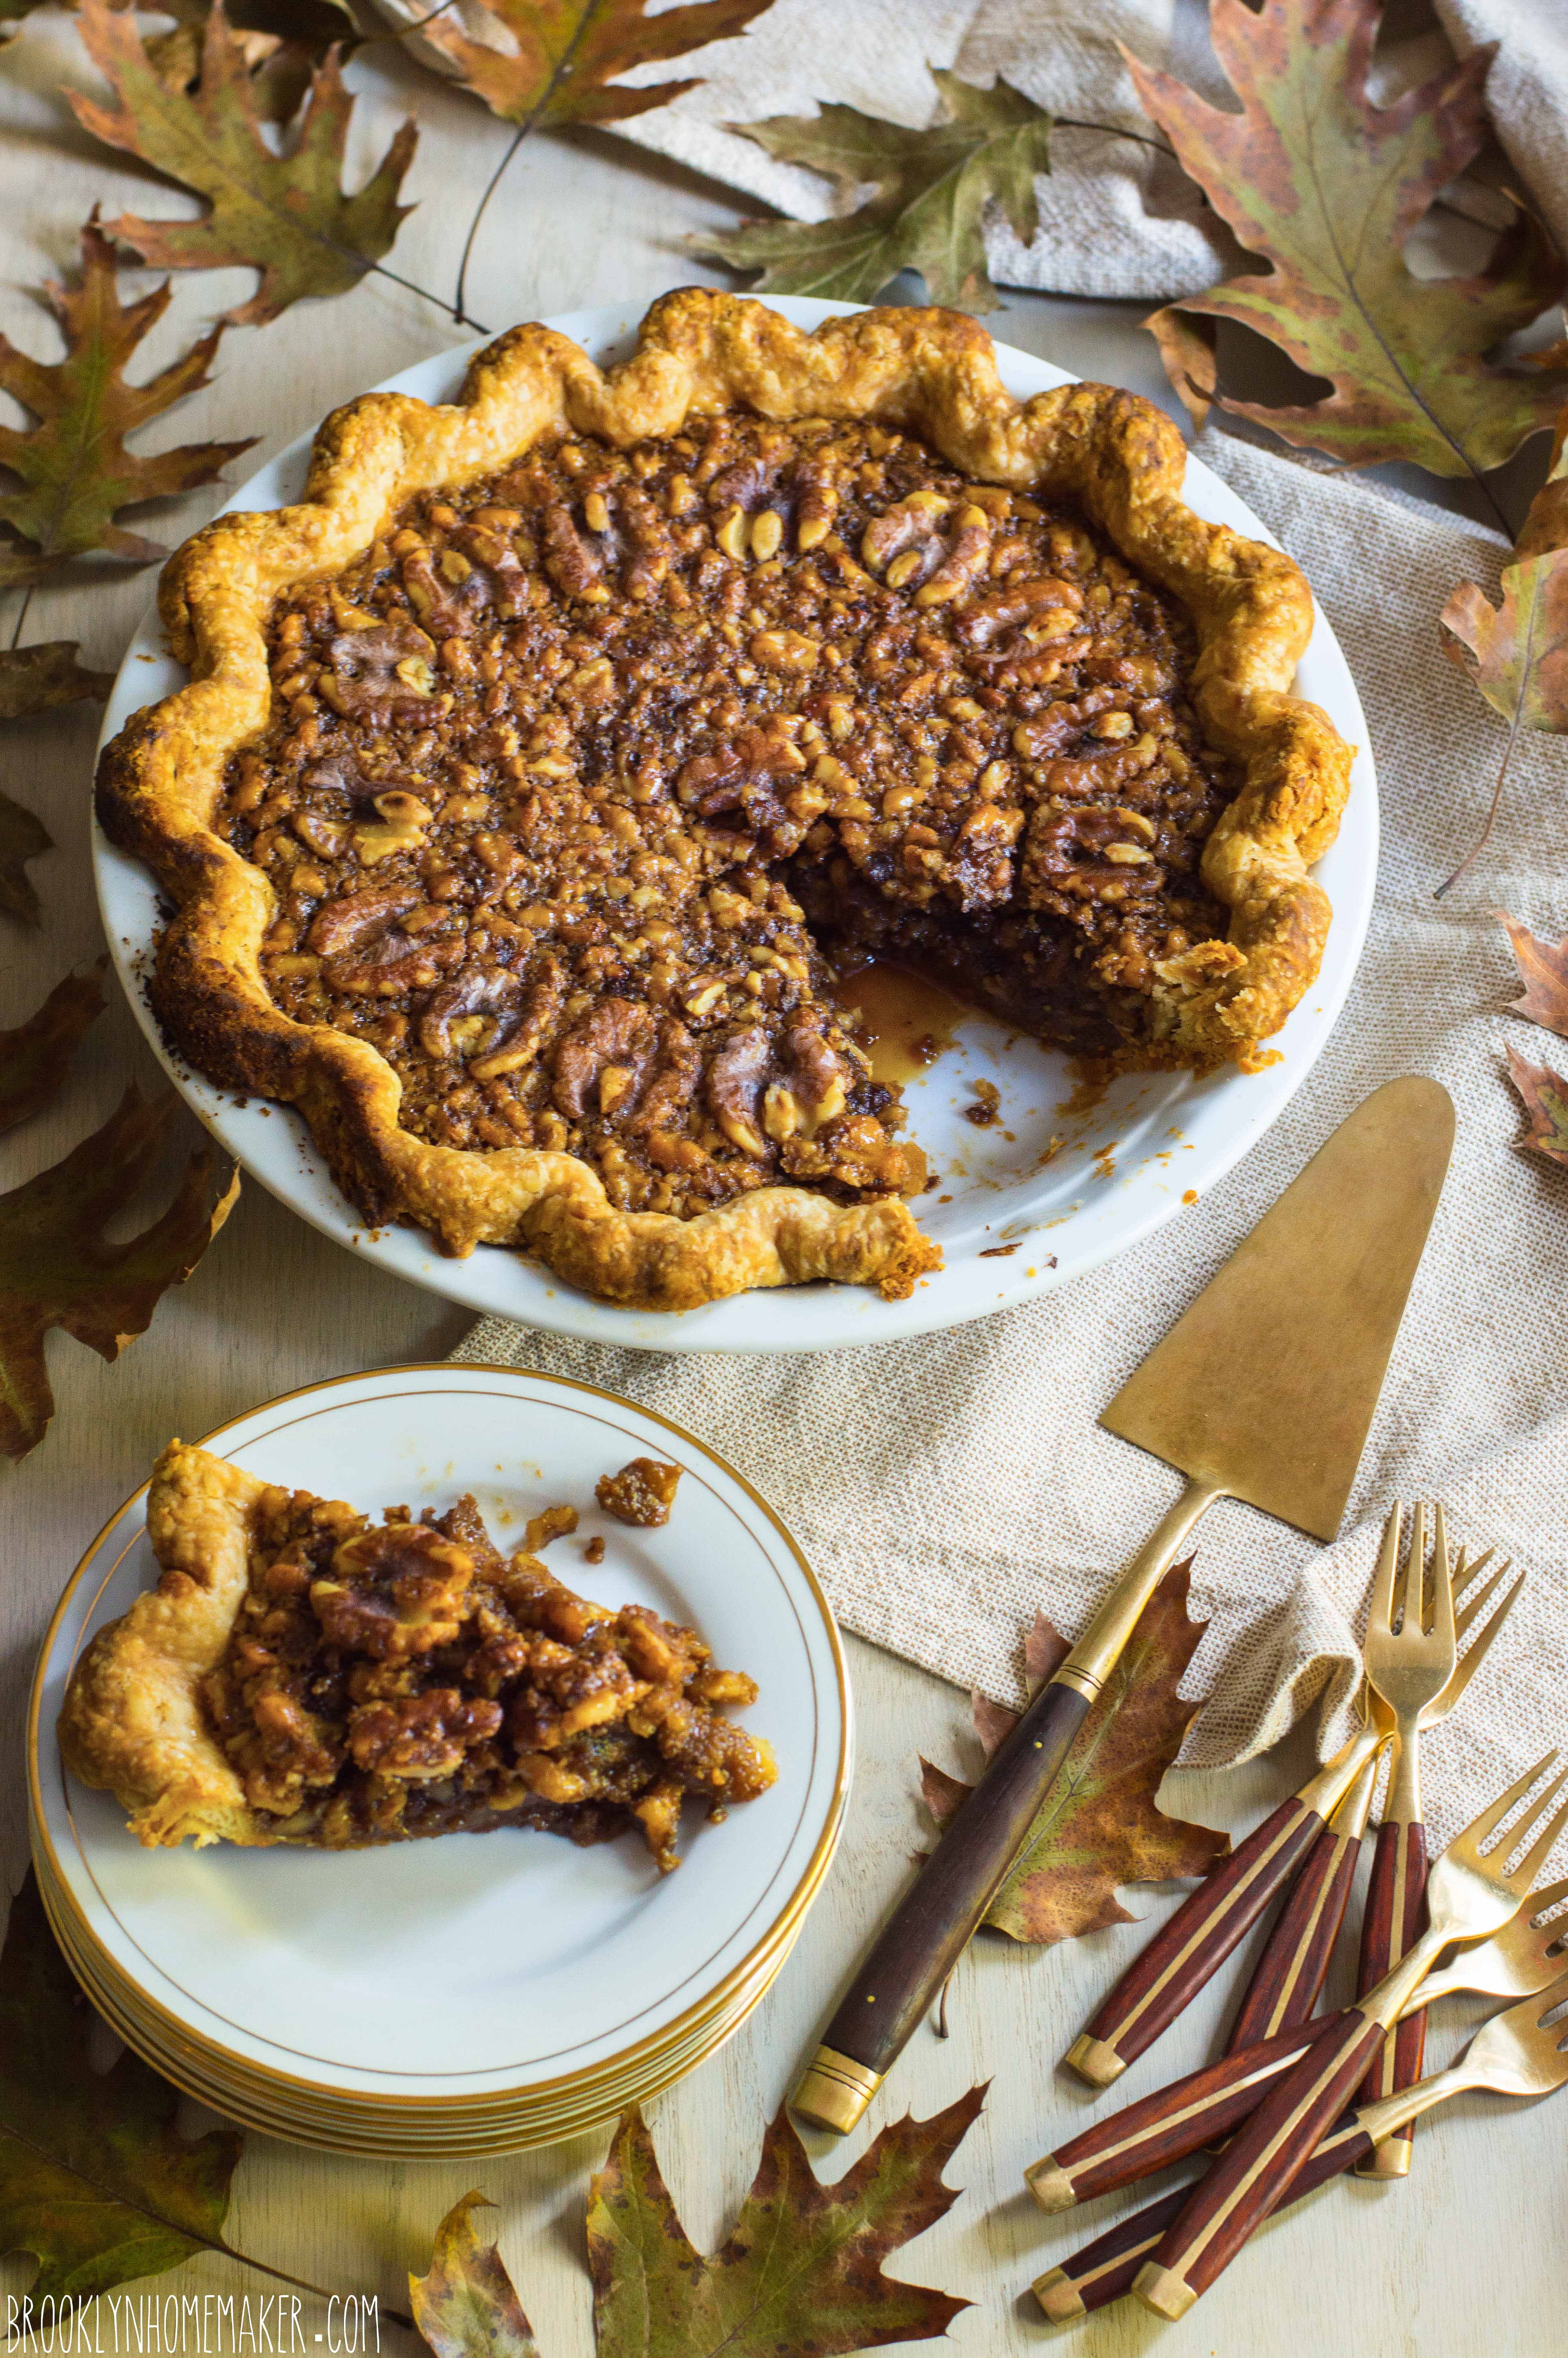
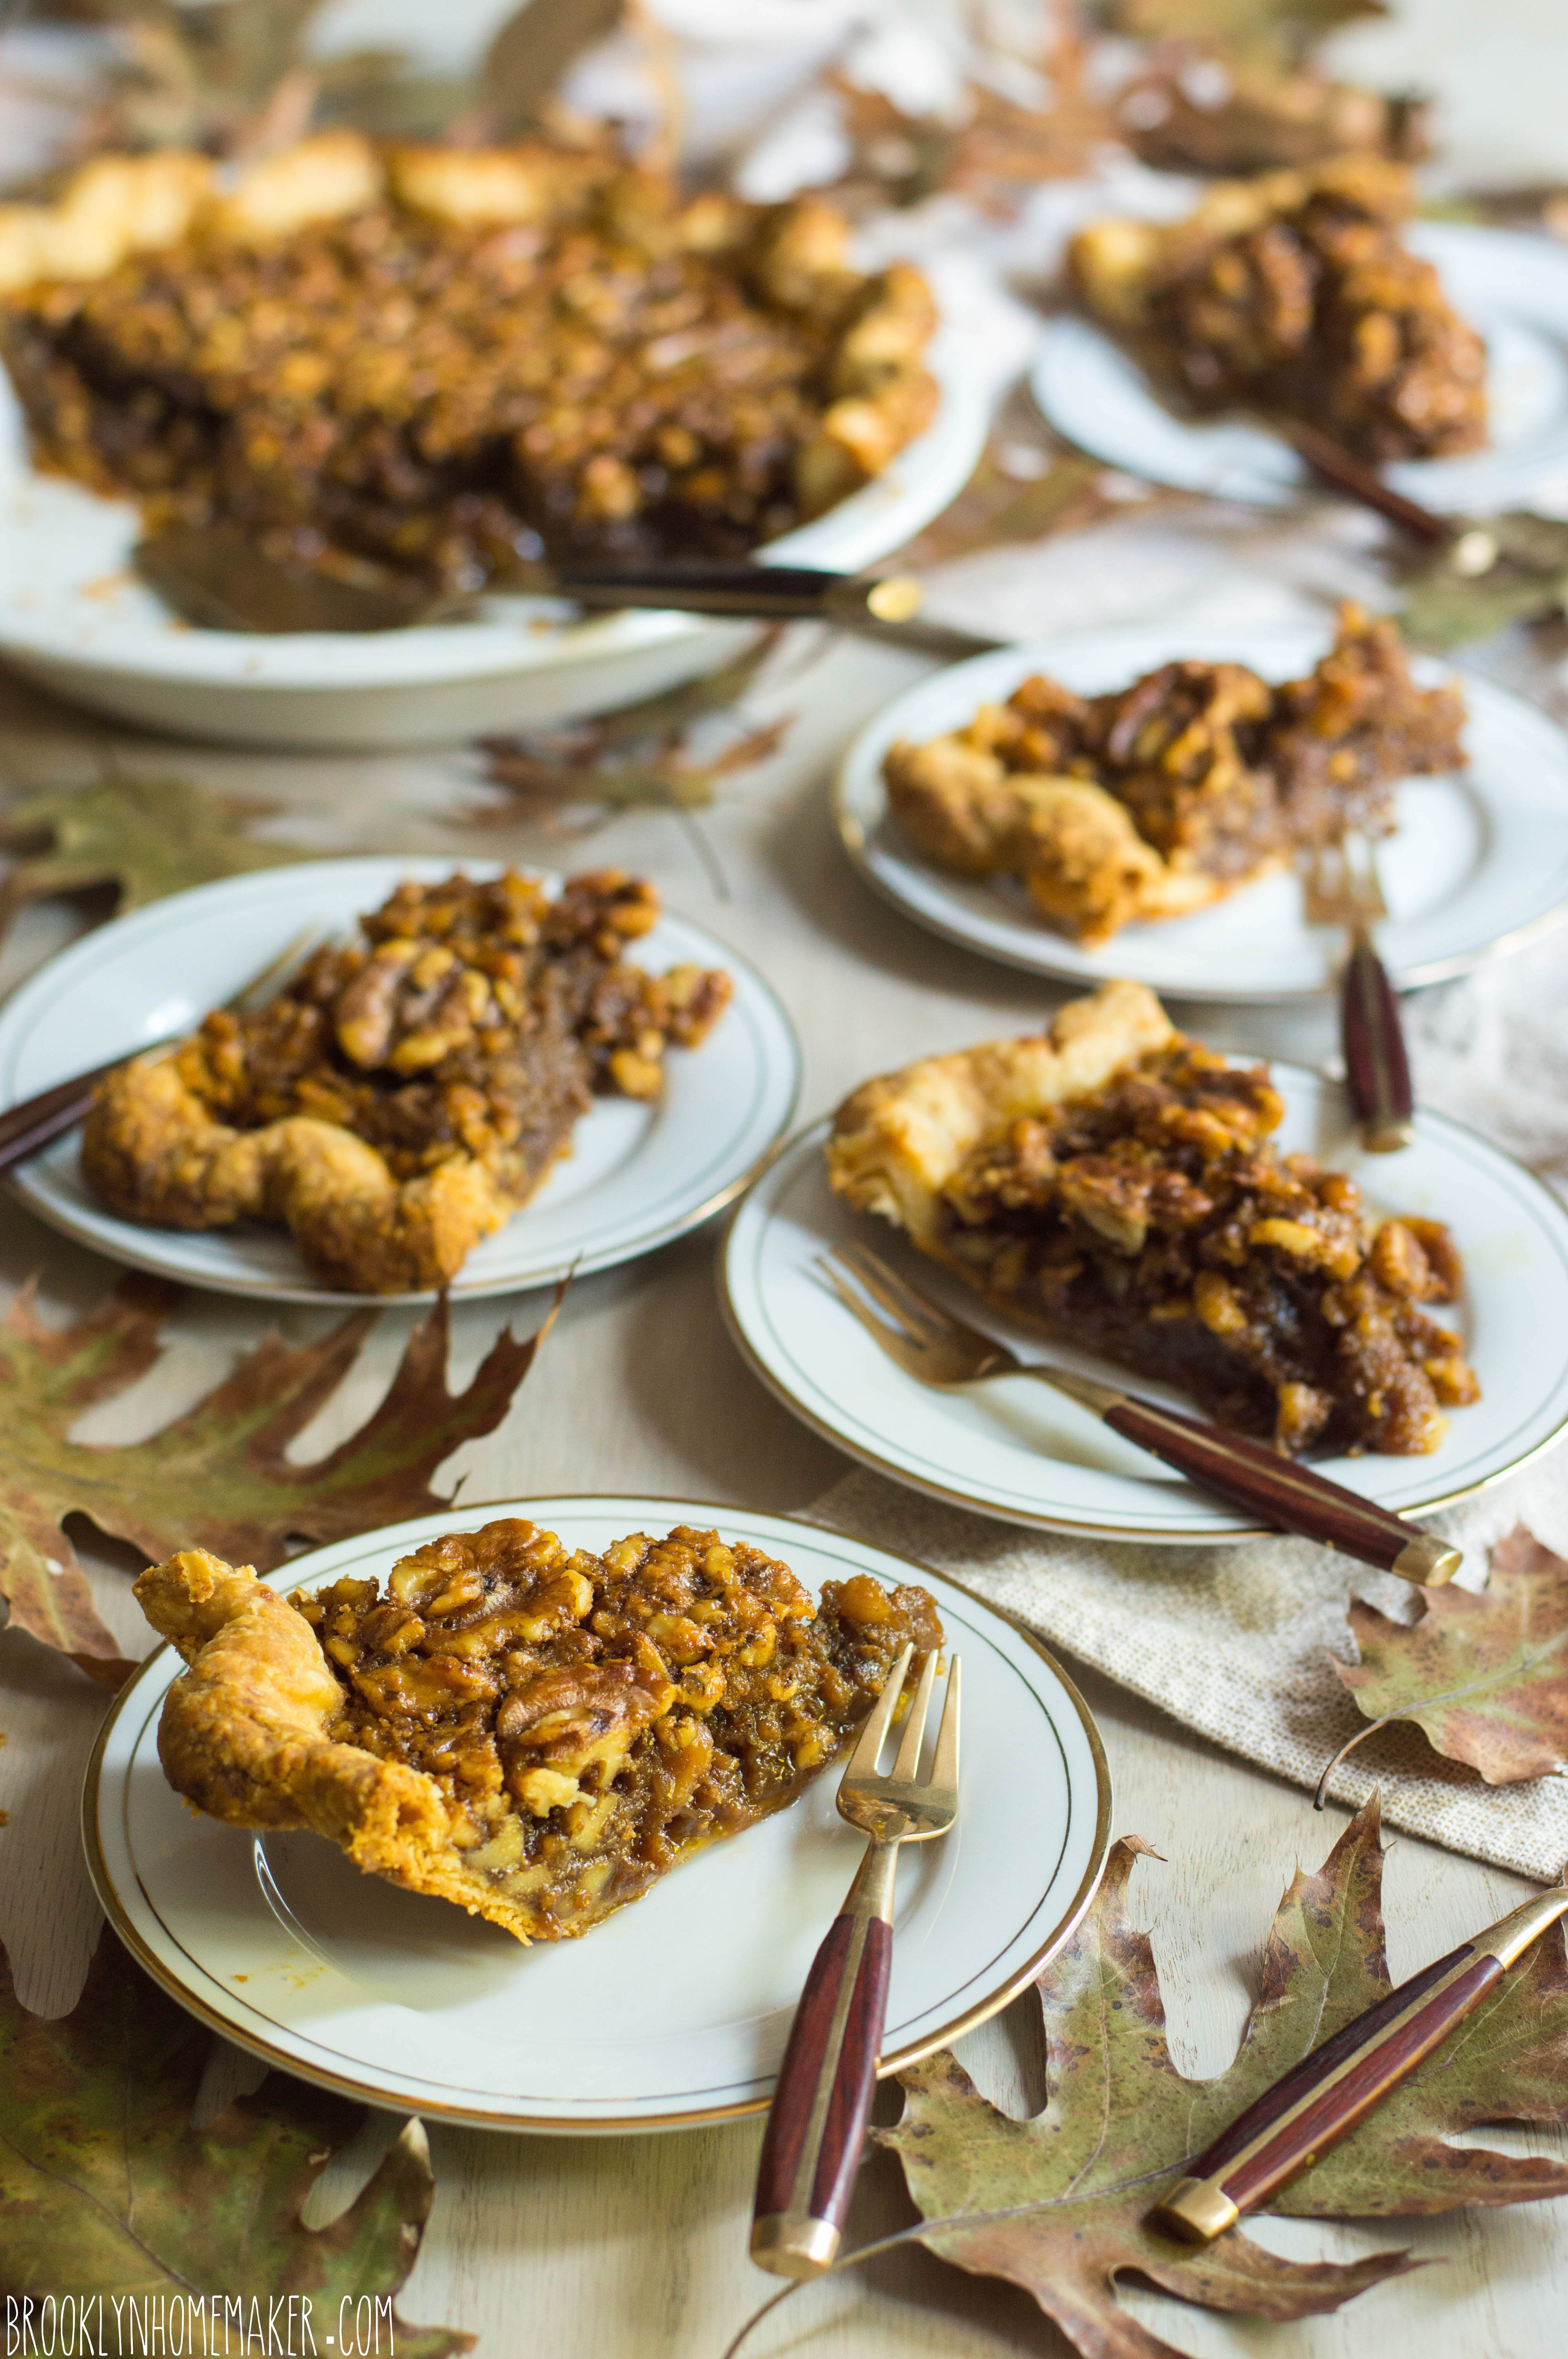
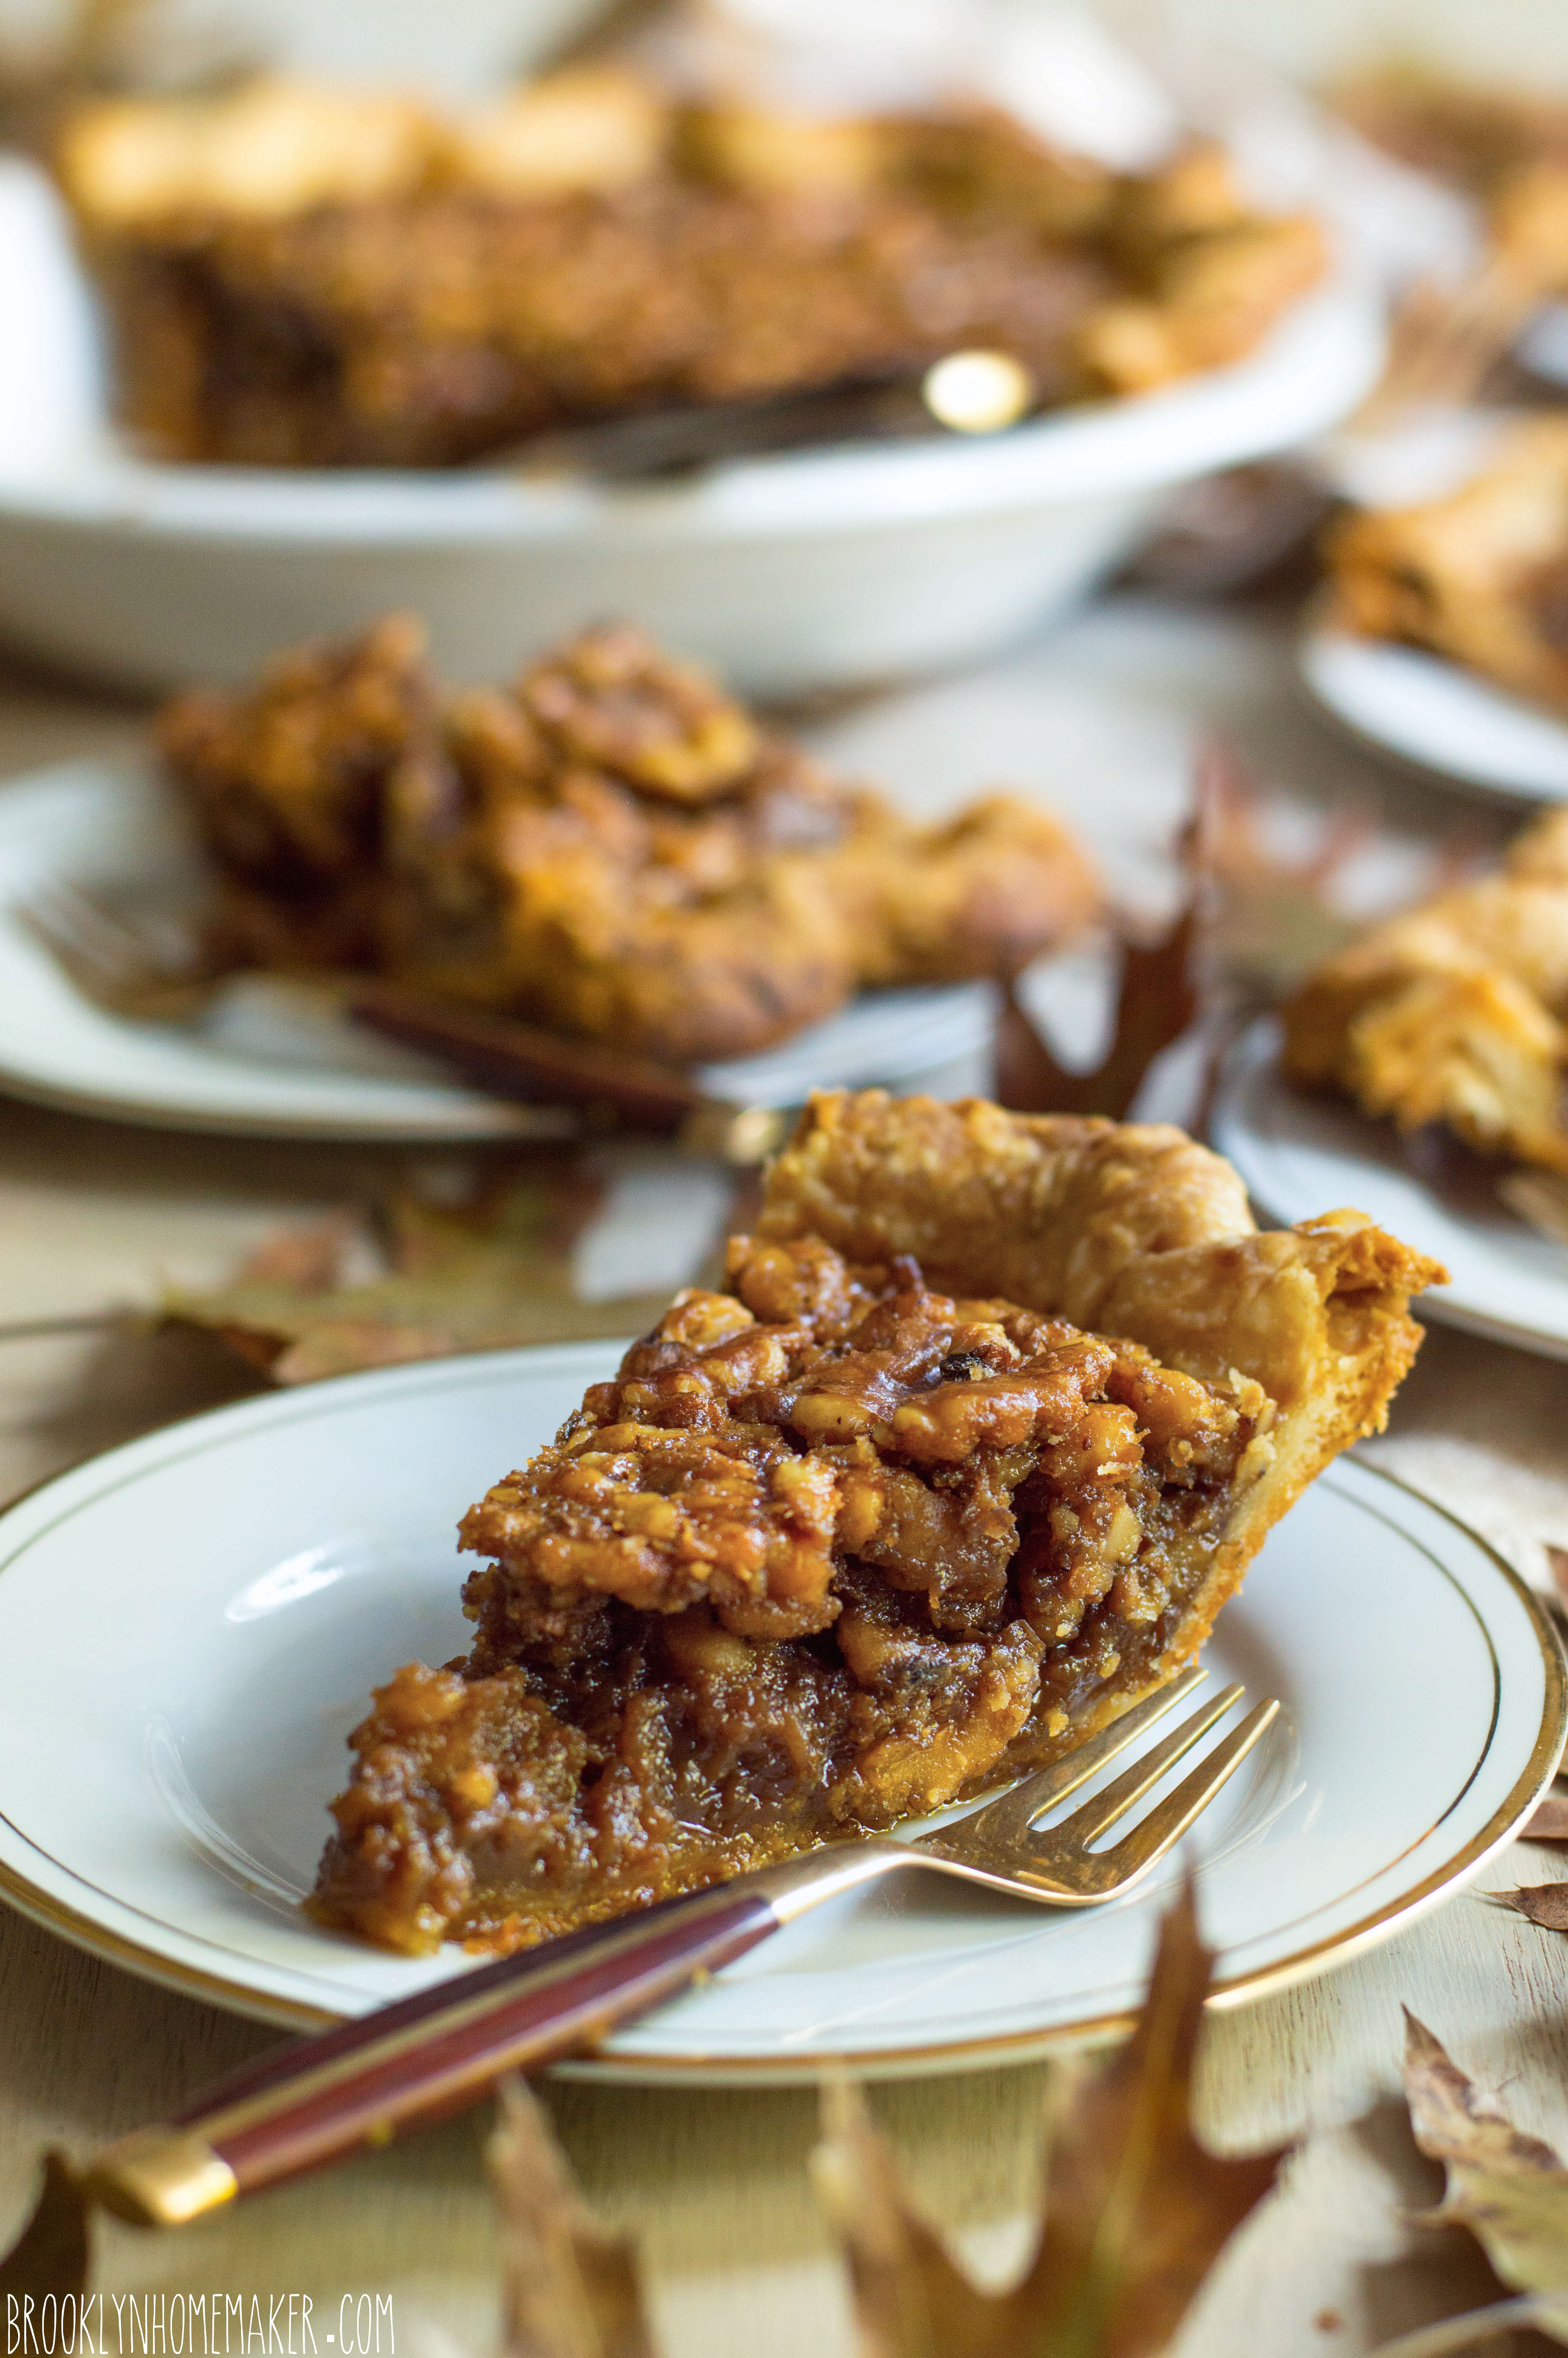
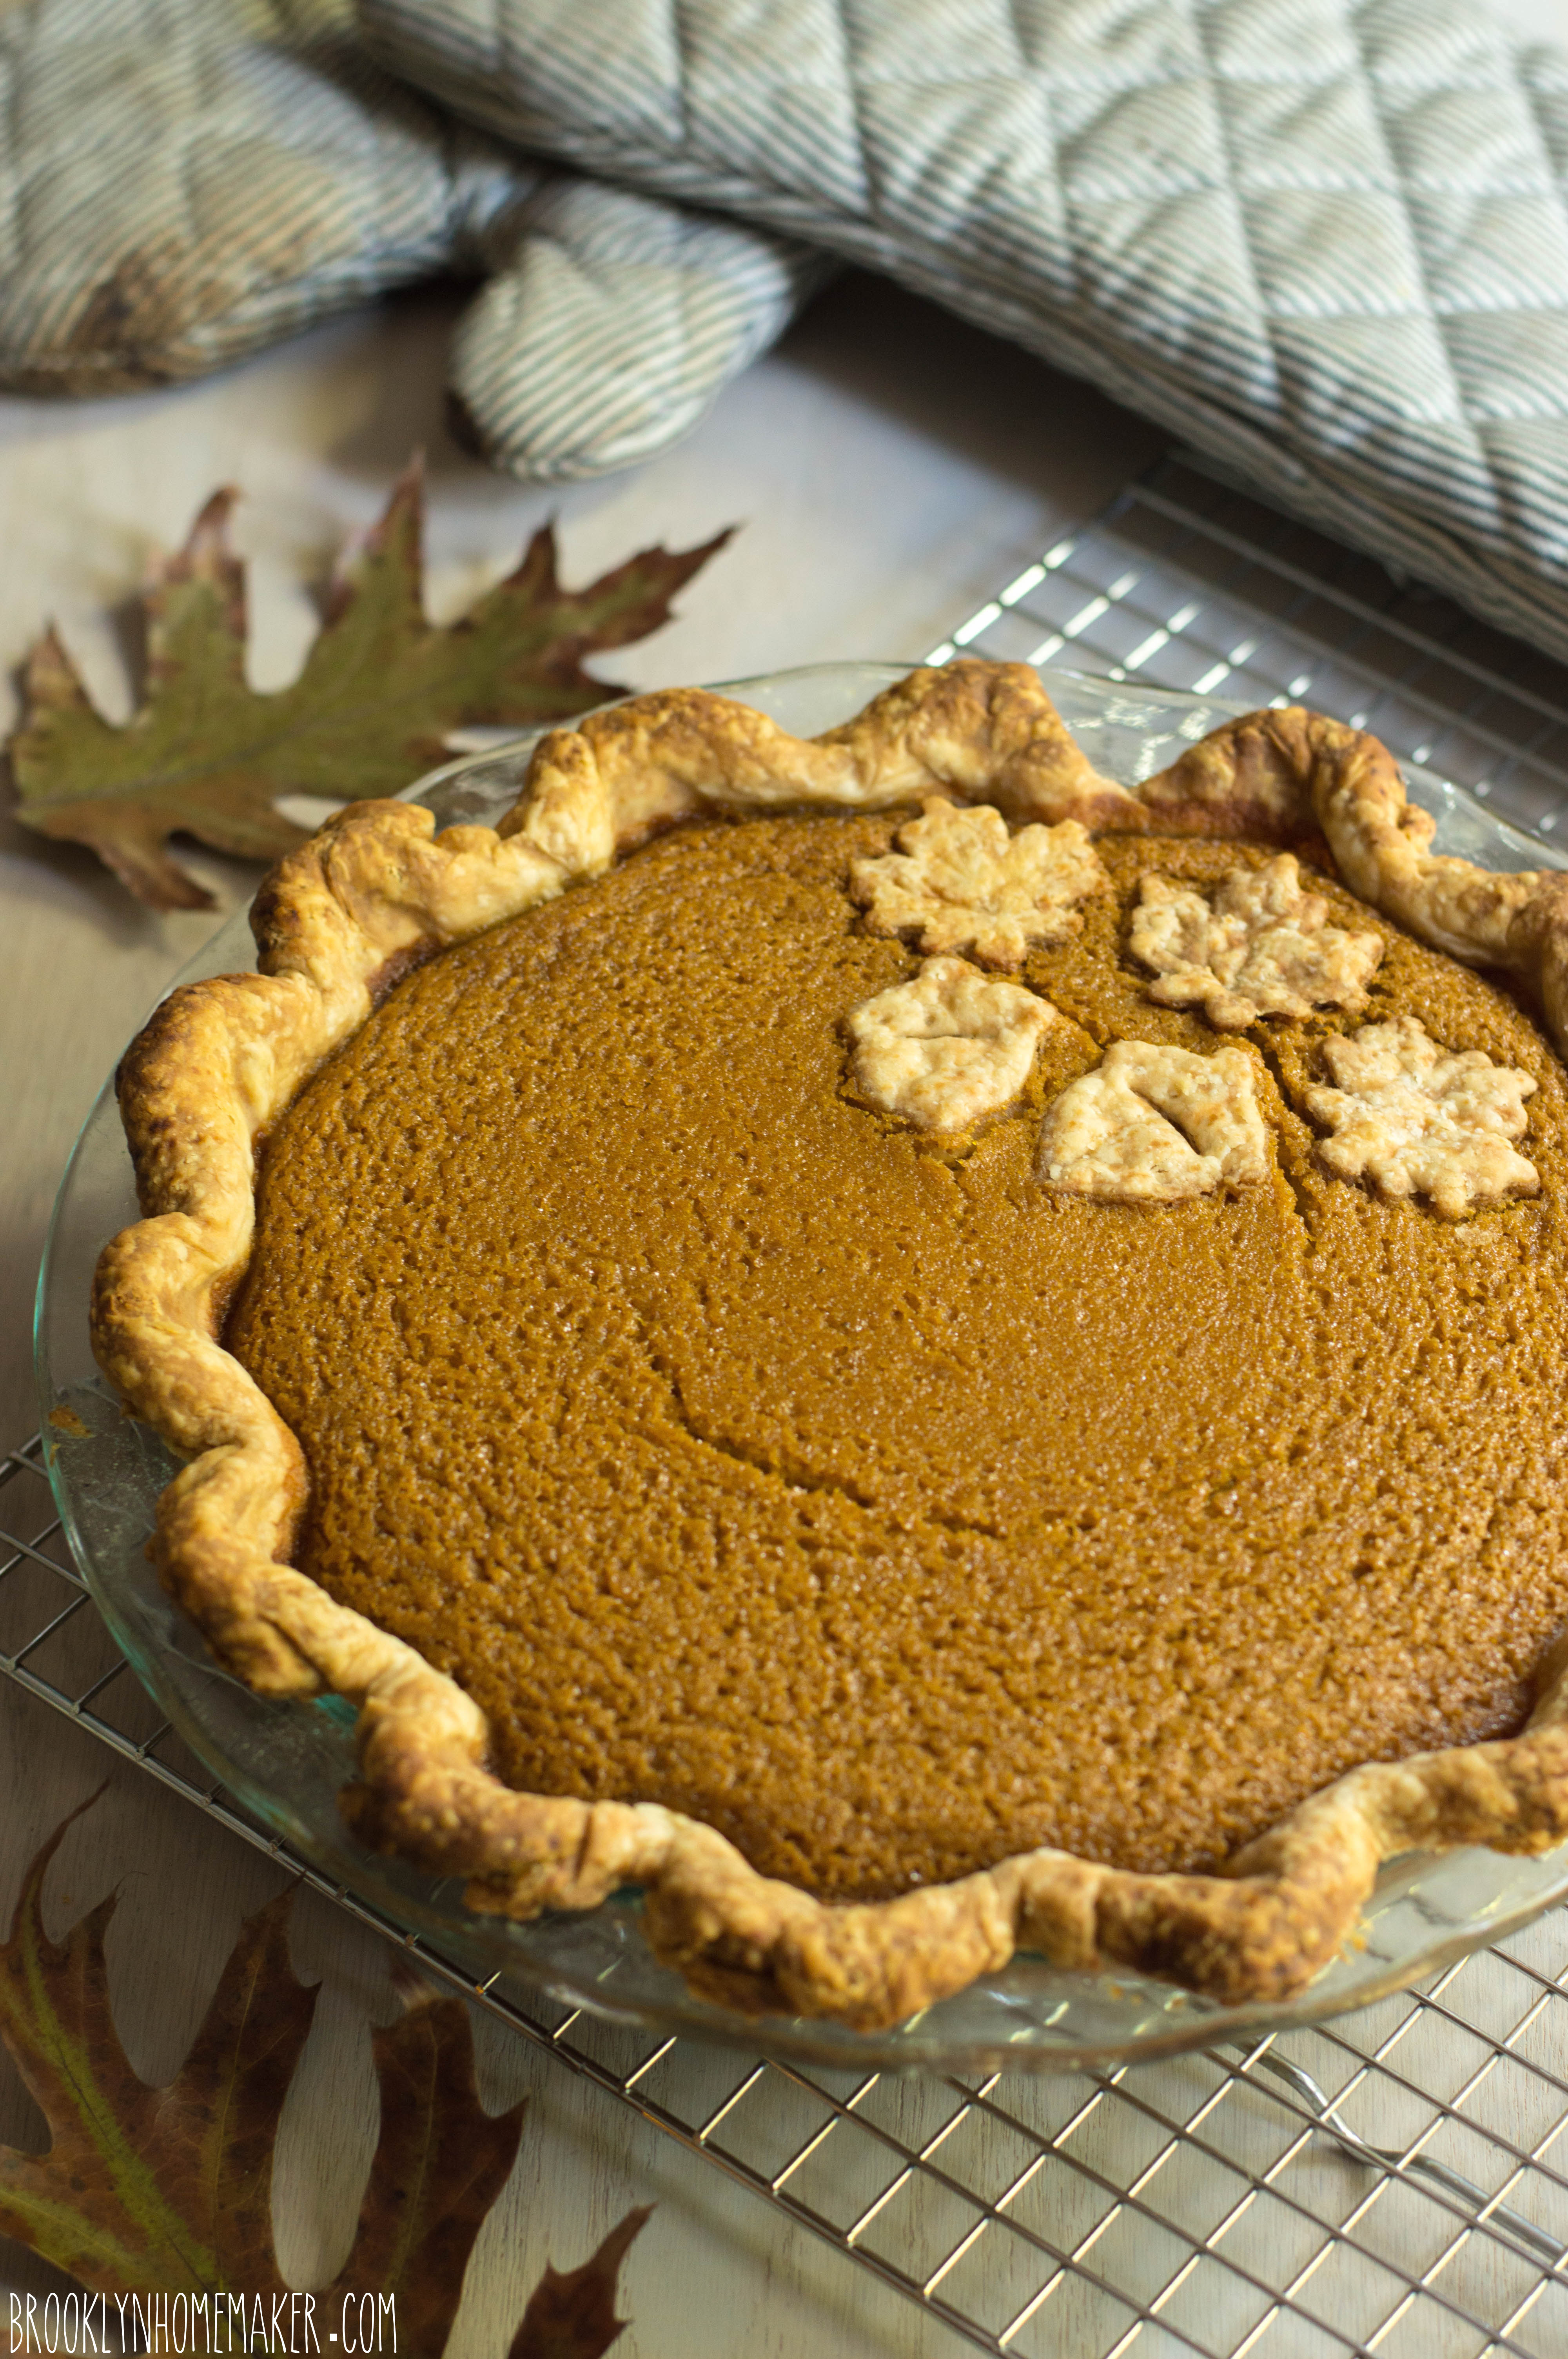
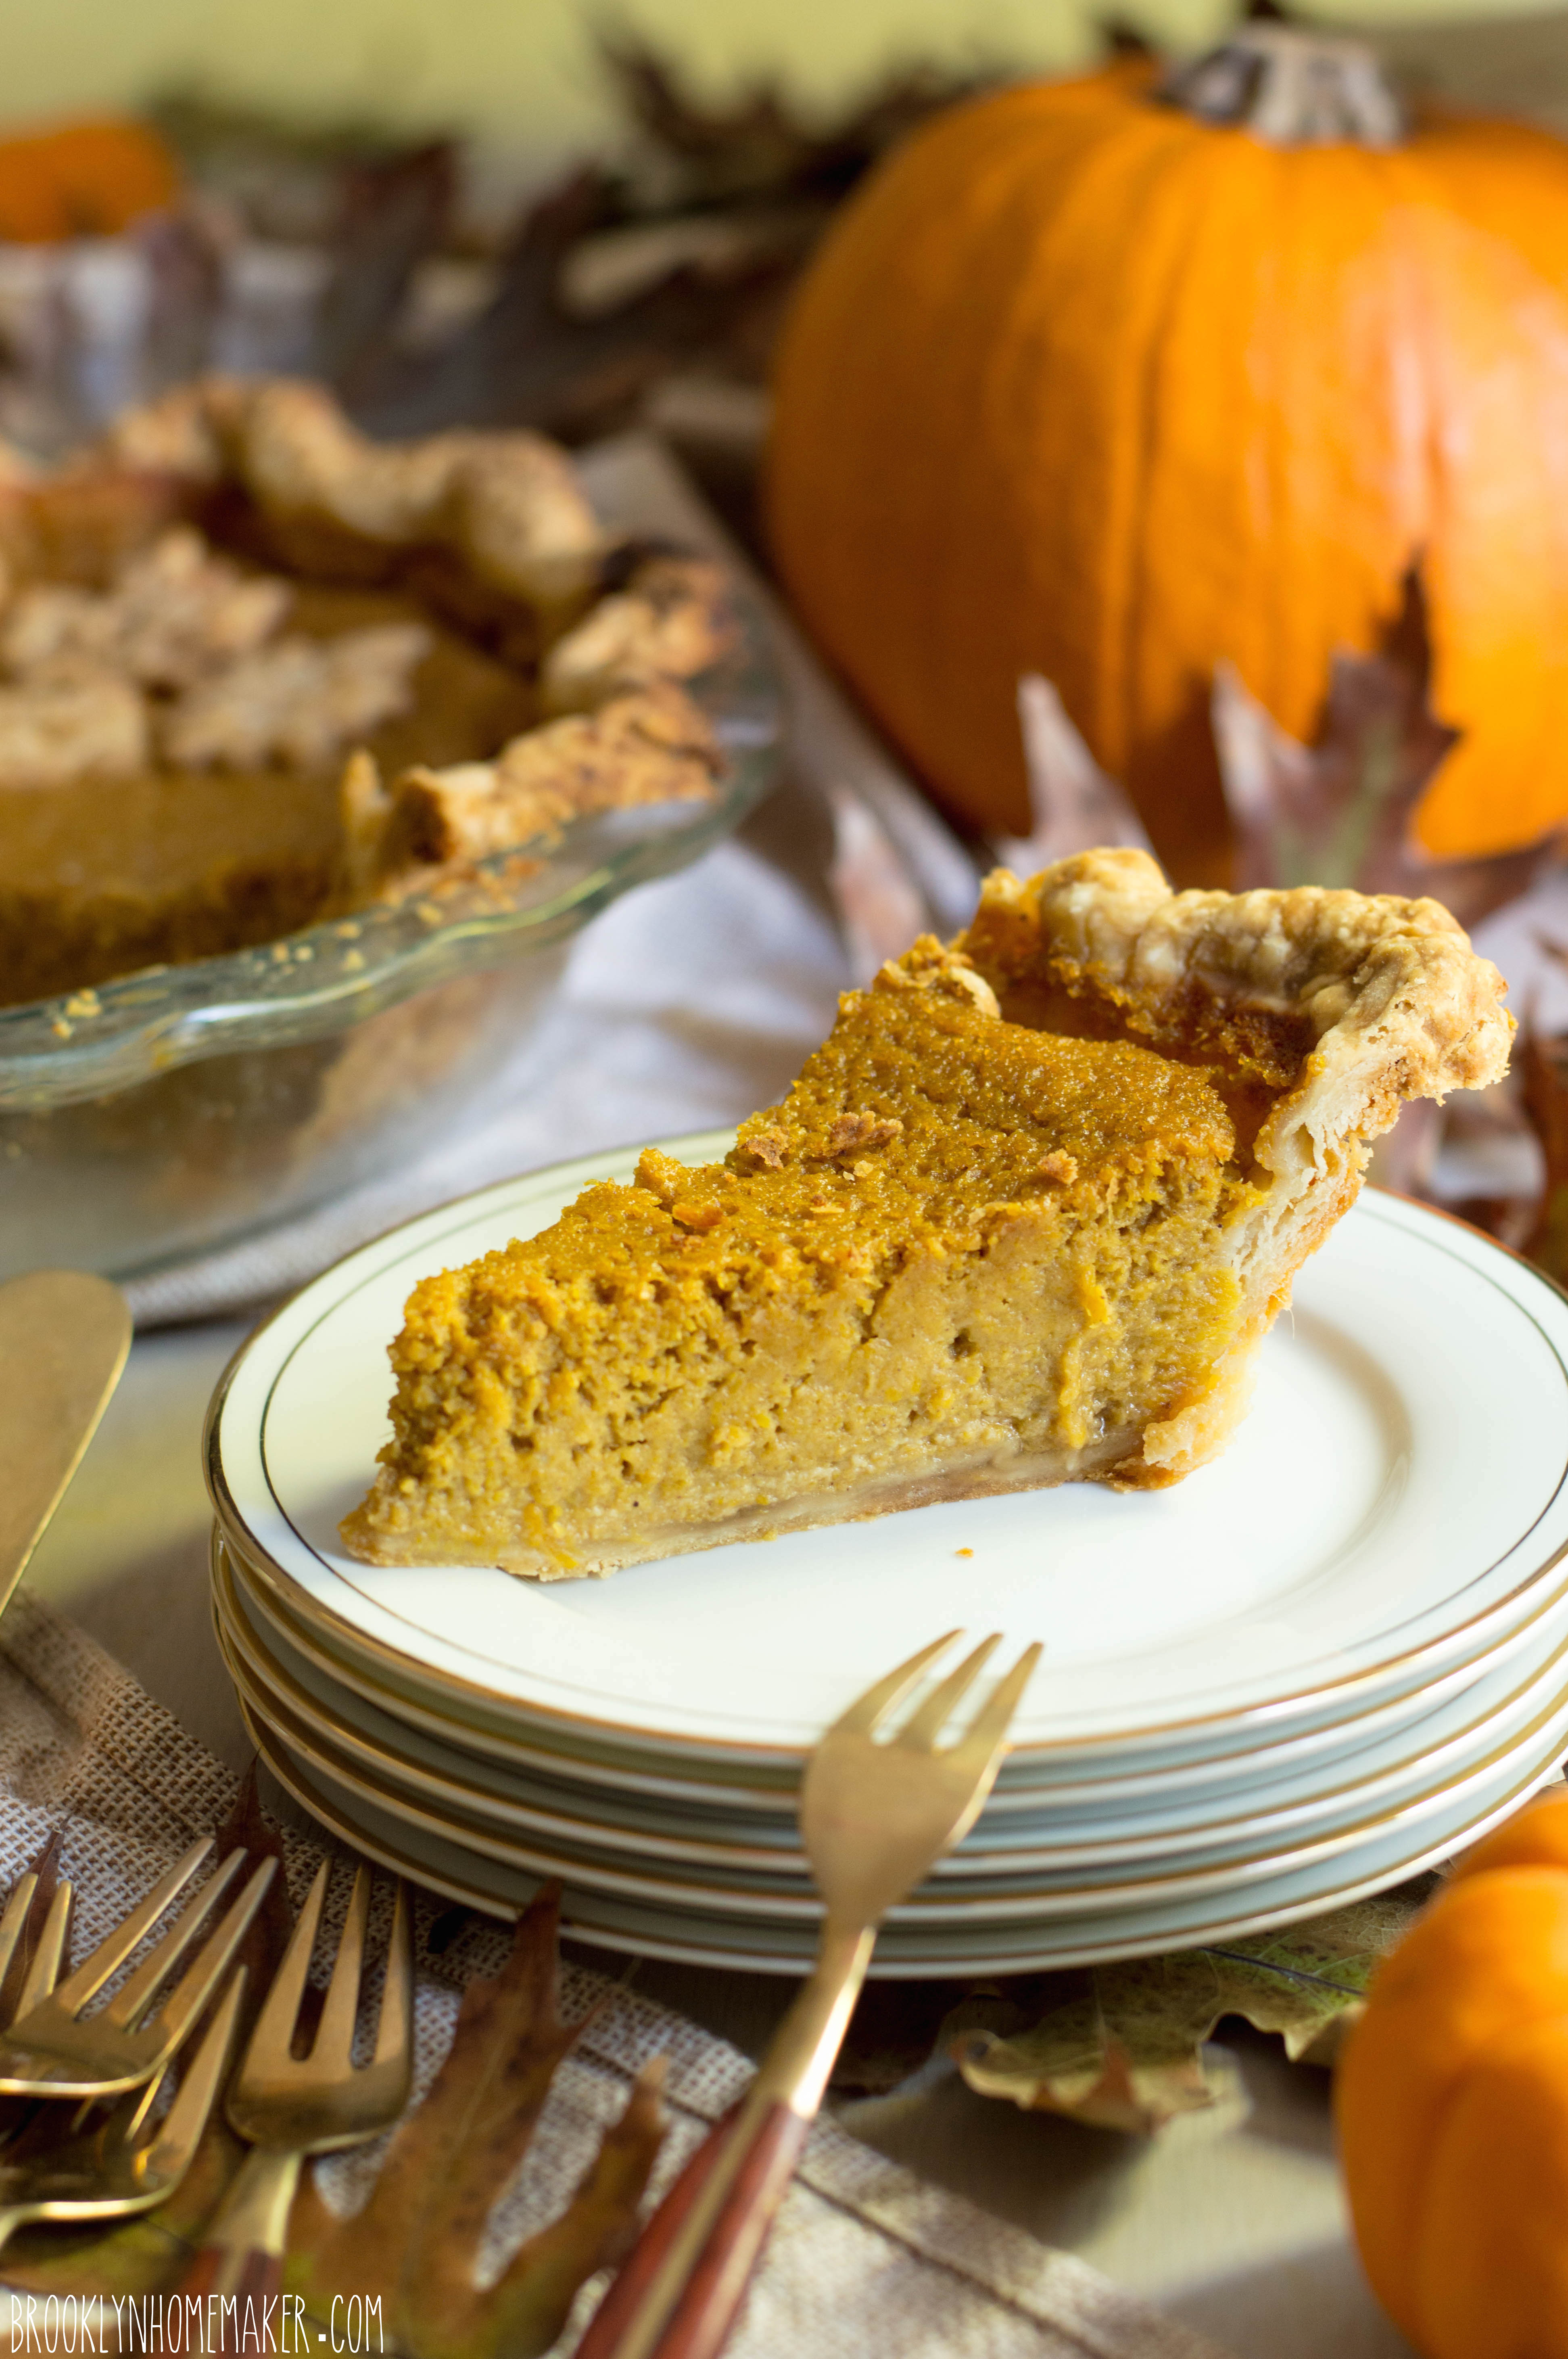
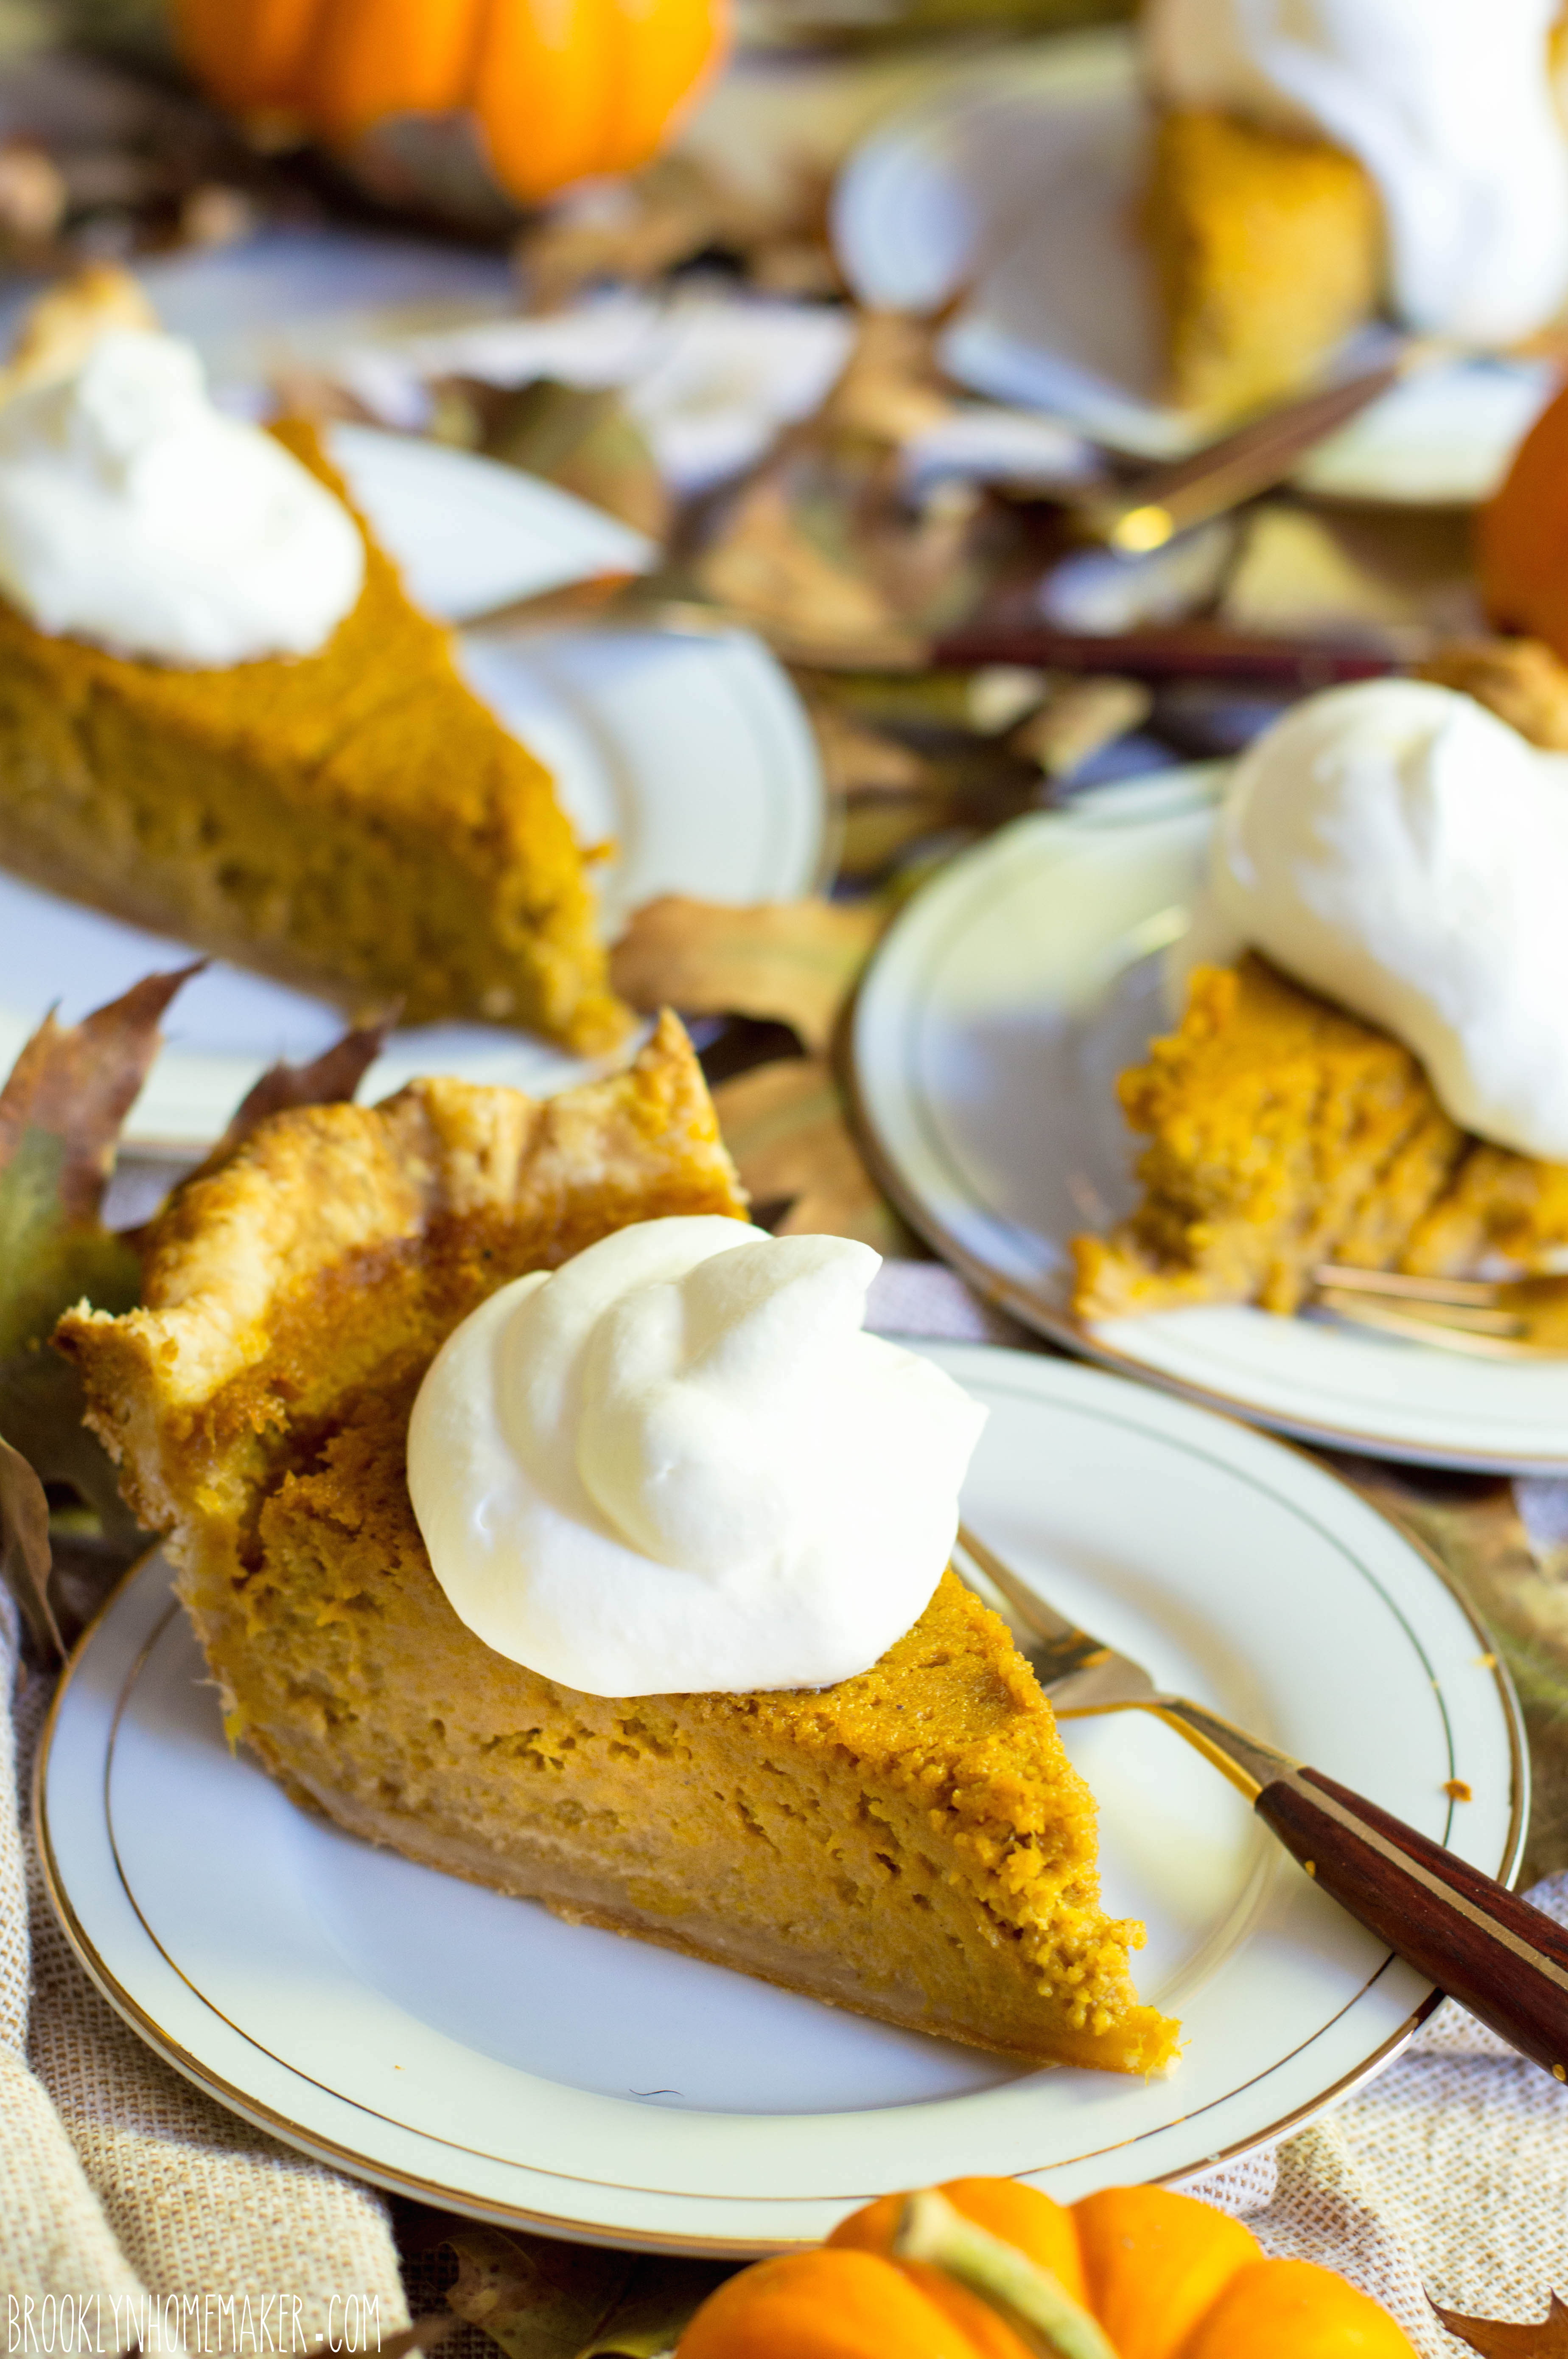
Whether you decide to roast your own pumpkins or reach for the can, this pumpkin pie is everything you could ever want in a Thanksgiving pie. Rich, thick, creamy, custardy, earthy, & warmly spiced. A little slice of heaven with a buttery flaky crust.

Because I don’t usually keep evaporated milk in the house, the filling is made completely from scratch, using only eggs and cream and milk instead of evaporated or condensed milk for the base of the custard. A splash of  bourbon adds a touch of warmth and depth without necessarily making it taste “boozey”, and using grated fresh ginger adds an edge of zingy heat that you wouldn’t otherwise get. When sliced and served a few of our friends noticed the hint of bourbon, others the touch of ginger, and others still didn’t notice anything until I told them. Neither of these flavors is overpowering, nor do they really change or alter the flavor profile of the classic pie everyone is craving on Thanksgiving day. If you’re looking for a classic pumpkin pie with a subtle something extra, this is the recipe for you.

bourbon ginger pumpkin pie | Brooklyn Homemaker

Bourbon Ginger Pumpkin Pie

Adapted from Sally’s Baking Addiction

1 single pie crust * see note
2 cups (or 15oz can) pumpkin puree
3 large eggs
1 and 1/4 cups packed dark brown sugar
1 tablespoon cornstarch
1/2 teaspoon salt
1 1/2 teaspoons ground cinnamon
2 teaspoons finely grated fresh ginger
1/4 teaspoon ground or freshly grated nutmeg
1 cup heavy cream
1/4 cup milk
3 tablespoons bourbon whiskey (or rum would work too)
1 tablespoon vanilla extract

Preheat oven to 425F.
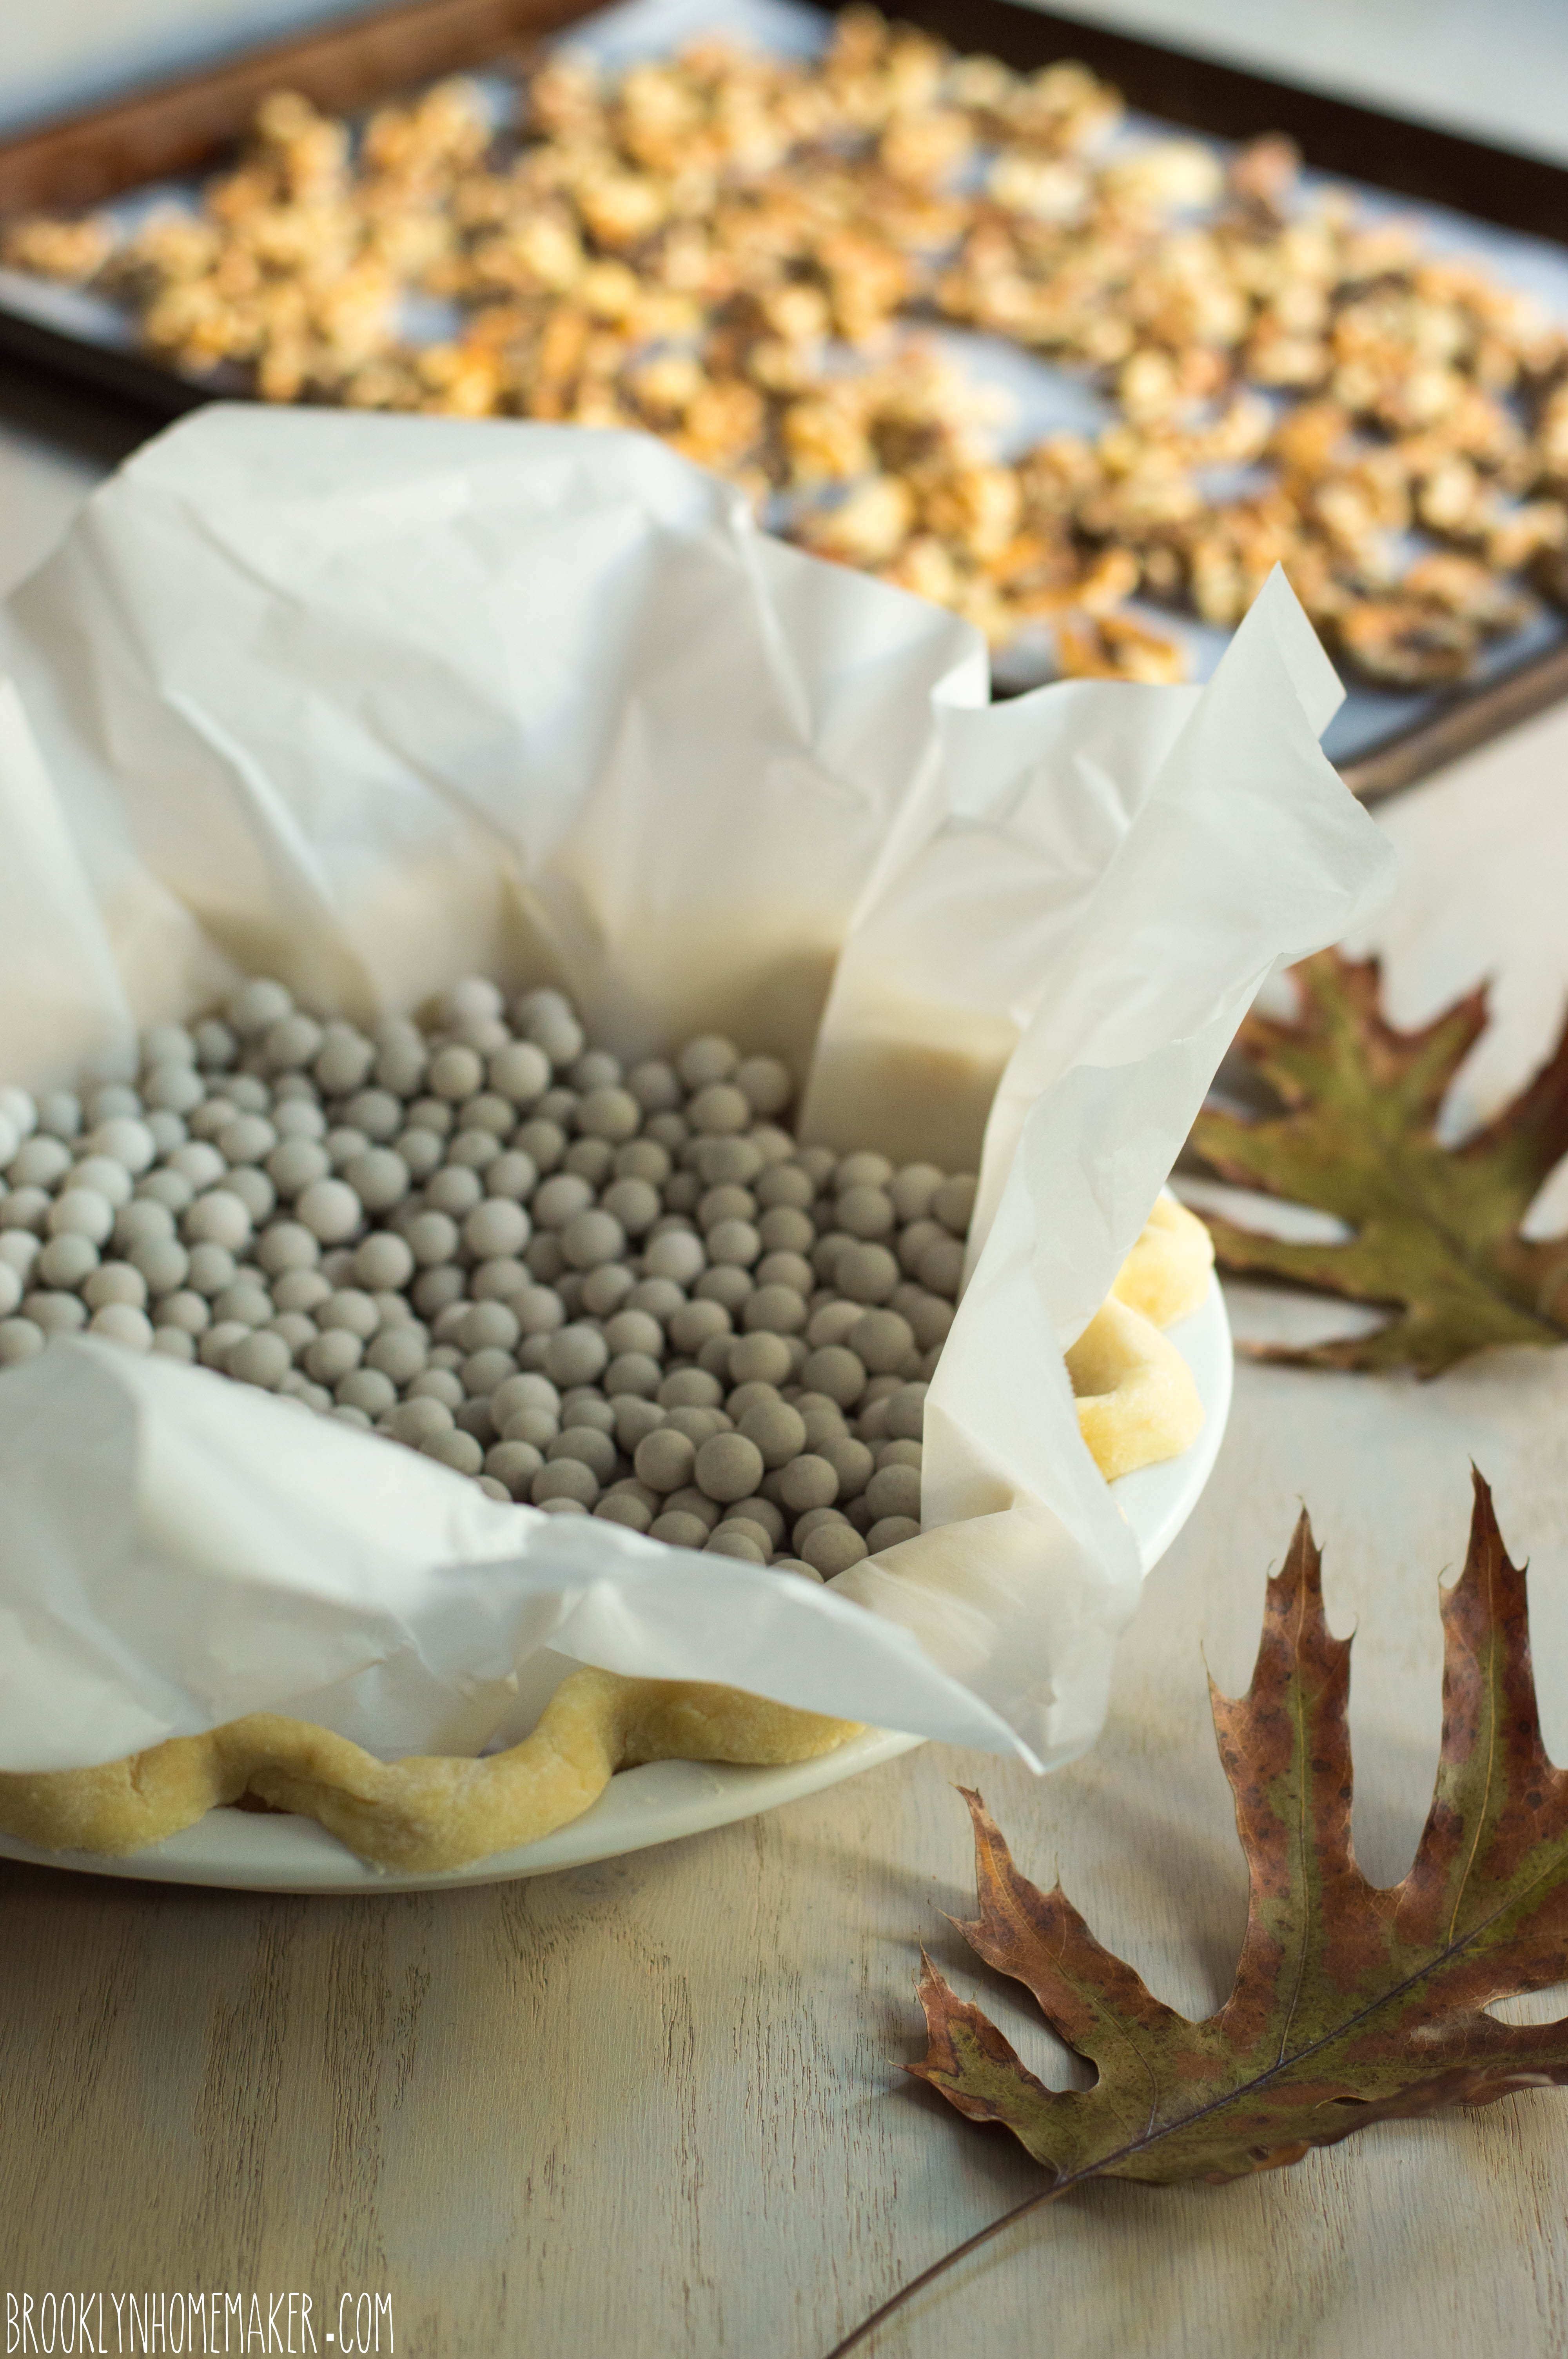
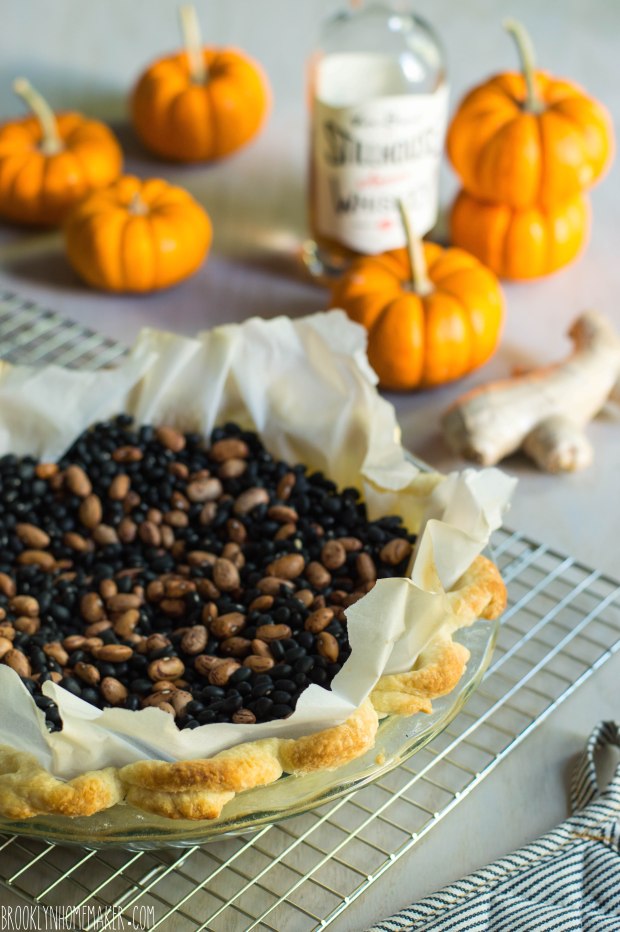
Roll out pie crust and gently transfer to a 9.5″ or deep dish pie dish (** see note). Trim and crimp the edges and freeze the crust for at least 15 or 20 minutes. Fit the crust with a large square of parchment paper and fill the dish with pie weights, dried beans, or even pennies. Bake the crust at 425 for about 15 minutes or until the crust is set and the edges are beginning to brown. This is called blind baking the pie shell. For more info, the Kitchn has a great tutorial.

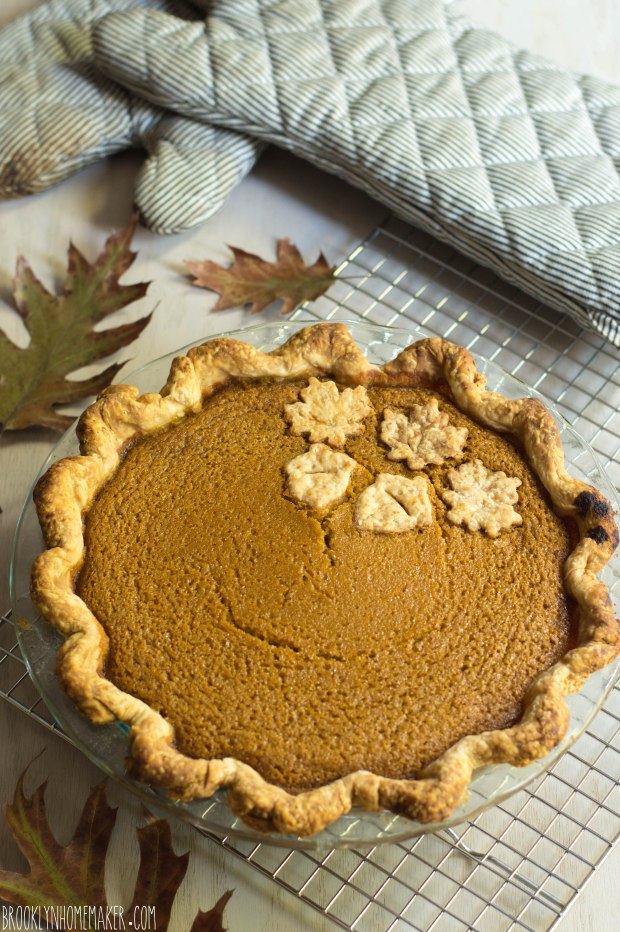
If you have any leftover dough from trimming and want to get fancy, you can use a cookie cutter or pastry stamp to create fall leaves for decoration. This is totally unnecessary but kind of fancy and fun. Cut the leaves out and bake on a parchment lined sheet pan in the same oven as the pie crust for about 10 minutes. You want them cooked through and nicely browned, but not burned. They won’t really brown any further once you add them to the pie filling.

Let the leaves and the pie shell cool and turn the oven down to 375F.

For the filling:
Whisk or stir the pumpkin, eggs, and brown sugar together until combined. Add all remaining ingredients and whisk vigorously until everything is well combined.

Pour filling into the pre-baked shell. Bake until the center is almost set, about 55-60 minutes or so. It’s okay if a small part of the very center is still wobbly, it’ll continue to cook and set as it cools. After about 25 or 30 minutes of baking, Add the pre-baked fall leaves if desired.

Cool completely before serving. Cover leftovers tightly and store in the refrigerator for up to 3 days.

Notes:
*You can use any recipe you like, or even a store bought crust, but I think all butter crusts have the best flavor. I used my favorite crust recipe, but it makes two single crusts so you can freeze one, make another pie, or use the other for your maple walnut pie.

**If you don’t have a 9.5″ or deep dish pan, you’ll likely have a bit too much filling. Do not overfill or it may run and drip. Any extra can be baked separately in ramekins if necessary.

flaky butternut squash & sage biscuits

I have a confession to make…

flaky butternut squash & sage biscuits | Brooklyn Homemaker

I’m a biscuit snob.

There.
I said it.

flaky butternut squash & sage biscuits | Brooklyn Homemaker

Over the past few years there has been a sudden explosion of “Southern” “Soul Food” restaurants in my little corner of North Brooklyn.

It would appear that fried chicken is the new cupcake. No, that’s not right. Gourmet doughnuts are the new cupcake.
Fried chicken is the new… burger?

Don’t get me wrong. I ain’t complainin’. I can’t fry chicken to save my life, and I LOVE fried chicken.
Every time I’ve tried to make it at home it’s come out under or over cooked, usually pretty greasy, and never as crispy as I’d like. There are very few recipes I’ve never been able to master, but I’d like to think I know when enough’s enough. At this point I’ve accepted defeat and decided it’s better to just leave the fried chicken to the professionals.

flaky butternut squash & sage biscuits | Brooklyn Homemaker

The problem though, is that for all of the fried chicken professionals we have running around, I haven’t yet found a place where their biscuits don’t feel like an afterthought. It’s as if they know they have to serve biscuits because, like, they’re a chicken joint, but they don’t actually care about making sure they’re just as good as the chicken.

flaky butternut squash & sage biscuits | Brooklyn Homemaker

Instead of light, tender, flaky, delicate, pillowy, buttery little clouds of biscuits, most of the these so called chicken joints serve dense, tough little hockey pucks. Most of the time they serve them with a big ramekin full of honey butter, hoping you’ll slather so much on that you won’t notice there’s anything wrong. It makes me sad, and it doesn’t need to be this way.

flaky butternut squash & sage biscuits | Brooklyn Homemaker

I know a lot of people are afraid of making biscuits at home. I know it’s easy to screw them up if you don’t know to use a delicate hand. I know a lot of people think of biscuits the way I think of fried chicken. I’m reminded of the words of wise old G. Dubya, “Fool me once, shame on… shame on you. Fool me… you can’t get fooled again.”

Here’s the thing though. Biscuits are not that hard to get right. I promise you that they’re easier than frying chicken. Whether you’re at home on a Sunday morning, or slinging chicken in a busy hipster soul food restaurant, if you want a tender delicate biscuit the only trick is to treat them tenderly and delicately. It’s really that simple.

flaky butternut squash & sage biscuits | Brooklyn Homemaker

It doesn’t matter how you get the butter into the flour, as long as it doesn’t melt in the process. You always want to keep that butter cold. I used to think a pastry blender was the only method gentle enough for a tender biscuit, but I’ve tried pulsing the butter in with a food processor, cutting it in with two knives, even mashing it in with a fork, and they all worked just fine.

I think the thing that really makes the biggest difference is how you mix the liquid into the flour. You want to gently stir and fold the liquid and dry ingredients together to moisten as much of the flour as possible without over mixing it. If a bit of the flour doesn’t want to mix in, don’t sweat it. To make sure you have super flaky layers you’ll want to fold the dough over on itself a few times, so you can mix that little bit of extra flour back in then.

flaky butternut squash & sage biscuits | Brooklyn Homemaker

To add some extra flavor and interest, I took my old standard biscuit recipe and substituted some pureed roasted butternut squash for a bit of the buttermilk. This is a perfect recipe if you already plan to serve butternut squash at your Thanksgiving dinner. If you don’t, and you don’t want to take the time to roast the squash just for the biscuits, you can use canned squash if you can find it, or canned pumpkin if you can’t.

I also wanted to add the flavor of fresh sage to compliment the squash, but I didn’t really want to have large visible chunks of sage in the dough. I decided that the best way to evenly distribute the sage, and it’s fragrant earthy flavor, all throughout the biscuits would be to pulse the sage together with some brown sugar in the food processor. If you don’t have a food processor though, just try to chop the sage as finely as you can.

The combination of fresh sage and roasted squash really adds wonderful earthy sweetness and depth that, to me at least, just screams fancy pants Thanksgiving dinner. Homemade biscuits are always a welcome addition to any meal, but this recipe is so quintessentially Autumnal that you’re guests are sure to be ooohing and aaahing over them all through dinner.

flaky butternut squash & sage biscuits | Brooklyn Homemaker

Flaky Butternut Squash & Sage Biscuits

  • Servings: 12-16 biscuits
  • Print
Roasted squash:
1 small butternut squash
1 tablespoon peanut oil or vegetable oil

Biscuits:
12 to 15 sage leaves
1/4 cup packed brown sugar
2 3/4 cups all purpose flour, plus more for dusting
4 teaspoons baking powder
1 1/2 teaspoons salt
3/4 teaspoon cream of tartar
1/2 teaspoon ground pepper
1/4 teaspoon cinnamon
3/4 cup butter (1 1/2 sticks)
1 cup butternut squash puree (or pumpkin puree)
1/2 cup buttermilk
2 tablespoons heavy cream or melted butter

Preheat oven to 400.

Slice the squash in half, lengthwise, and scoop out seeds with a spoon. Rub the cut side of the squash flesh with oil and place cut side down on a parchment lined baking sheet. Roast squash for about 40 minutes or until fork tender. Cool completely, remove the skin, and mash the flesh with a fork, or puree in a food mill or food processor.

Turn oven up to 450.

Combine the sage leaves and brown sugar in the bowl of a food processor and run until the sage is very finely chopped (you can also just chop the sage very very finely with a knife). Add flour, baking powder, salt, cram of tartar, ground pepper, and cinnamon and pulse to combine. Cut the cold butter into 1 inch chunks, add to flour, and pulse into small pea sized pieces (if you don’t have a food processor use a pastry blender). Transfer to a bowl, cover, and chill for at least 30 minutes (or overnight). Mix squash puree and buttermilk together, make a well in the center of the flour, and pour in buttermilk all at once. Gently stir and fold together with a fork until just moistened, and bring together in a ball with your hands. Do not try to mix the liquid into the flour in the food processor or your biscuits will be tough and dense.

Turn dough out onto a lightly floured surface. Gently push dough out into a flat disk using your hands (or a rolling pin). Dust lightly with flour, fold in half, and gently roll or press back out. Repeat 5 or 6 times to create layers in your biscuits that will separate when baked. Roll or pat dough out to about 3/4 inch thick and cut into circles using a 2.5 inch biscuit cutter. Remaining dough can be recombined once, but no more or it will get tough. Recombined biscuits will not be as pretty or as flaky as the first batch, but they’re still worth it. Transfer biscuits to parchment lined baking sheets and brush tops with cream or melted butter. Bake for 12-15 minutes, or until golden brown on top.

maple walnut pie

Growing his own food has always been very important to my grandfather and it shows.

maple walnut pie | Brooklyn Homemaker

His entire house in surrounded by food. Edible things are everywhere, and as a child, I took it completely for granted.

Now that I’m an adult I realize the value of having access to home grown produce, and pay a hefty premium at New York’s green markets to buy food that someone else grew for me. As a kid though, the stuff was literally growing up out of the ground and falling from the trees. Even today grandpa has more than he and my grandmother could even imagine eating, and give it away for free to anyone who stops by for a visit.

maple walnut pie | Brooklyn Homemaker

When I was young though, I didn’t even like most of what Grandpa grew. Other than strawberries and grapes, much of what came out of his garden was completely wasted on me. I wasn’t very fond of apples, I thought pears were grainy and disgusting, and I wouldn’t even eat tomato sauce on pasta, let alone eat a fresh tomato from the garden. I hated squash, asparagus, peppers, you name it. As fondly as I remember my childhood, I can’t help but look back on those days with a bit of remorse for the things I could have eaten but didn’t.

Now that I do like most of these foods, I live too far away to take much advantage of the bounty of Grandpa’s garden. I don’t get to take home any of the bags of asparagus and bright juicy berries in the spring, peaches and zucchini and summer squash in the summer, tidy rows of tomatoes ripening on the window sills later in the year, or mountains of butternut squash and branches weighed down by apples and pears in the fall.

maple walnut pie | Brooklyn Homemaker

The whole coulda, shoulda, woulda, but didn’t thing doesn’t end with the fruits and veggies either. Grandpa also has plenty of nut trees growing on his land too. Big spiky chestnuts litter the yard behind his garage, and he’s locked in a constant battle with squirrels over the English walnuts towering over the gravel driveway across from the house.


maple walnut pie | Brooklyn Homemaker

Walnuts though, took me even longer to learn to appreciate. I didn’t like nuts as a kid (suprised?) but even after I started eating tomatoes and squash and asparagus, I still hated walnuts. In most baking recipes that called for them, I usually left them out entirely or occasionally might substitute pecans in their place.

maple walnut pie | Brooklyn Homemaker

While pecans are sweet and subtle, walnuts are bitter and bold in a way that I only learned to love a year or two ago. I think it was my love of dark chocolate that finally taught my palate to appreciate the earthy bitterness of walnuts in baking.

maple walnut pie | Brooklyn Homemaker

Look at me now, only a few short years later, substituting walnuts for pecans instead of the other way around. I absolutely love pecan pie, especially at Thanksgiving, but I thought adding walnuts might be a fun twist. Pecan pie is sweet and crunchy and buttery and wonderful in every possible way, but I sometimes find it can be a little one note with all that corn syrup and sweet nuts.

maple walnut pie | Brooklyn Homemaker

This maple walnut pie is basically a Yankee version of the traditional Thanksgiving pecan pie. Rather than just subbing walnuts for pecans, I also swapped the corn syrup for maple syrup and brown sugar. The pie retains every bit of it’s sweet buttery goodness, with crunchy nuts and a crispy flaky crust, but instead of one-note sweetness it has incredible depth. The earthy bitter walnuts are perfectly balanced by the rich sweetness of the caramel-y maple syrup and deep molasses-y brown sugar. Even people who might not love the bitter crunch of walnuts will likely love this pie. I’m reluctant to say that I’ve improved upon the pecan pie that many hold so dear, but this year when I had my fakesgiving dinner this was definitely the fastest pie to disappear.

Just sayin’.

maple walnut pie | Brooklyn Homemaker.

Maple Walnut Pie

1 single pie crust * see note
2 1/2 cups shelled walnuts
6 tablespoons unsalted butter
3/4 cup dark brown sugar (light will work fine too)
1 cup REAL maple syrup
1/2 teaspoon salt
3 large eggs
1 tablespoon vanilla extract
2 tablespoons bourbon
1/4 teaspoon grated nutmeg

Preheat oven to 425.
Roll out pie crust and gently transfer to a 9 to 9.5″ pie dish. Trim and crimp the edges and freeze the crust for at least 15 or 20 minutes. Fit the crust with a large square of parchment paper and fill the dish with pie weights, dried beans, or even pennies. Bake the crust at 425 for about 15 minutes or until the crust is set and the edges are beginning to brown. This is called blind baking the pie shell. For more info, the Kitchn has a great tutorial. Let cool.

Turn the oven down to 350.
Arrange walnuts in a single layer on an ungreased baking sheet. Toast the nuts until fragrant and oily looking, about 8 to 10 minutes. Be careful they don’t burn or they can become very bitter. Let cool and crush 2 cups of the nuts, keeping 1/2 cup whole if desired.

Turn the oven back up to 375.
Melt butter in a small saucepan over medium heat. Add brown sugar and stir until completely dissolved. Add maple syrup and salt, stir, and let cool for at least 10 minutes.
In a medium bowl lightly beat eggs and add vanilla, bourbon, and nutmeg. Mix in butter mixture and the 2 cups of crushed walnuts. Stir until well combined, and pour into baked pie shell. If desired, top with reserved whole walnuts in a circular pattern.
Bake for 45 minutes or until well set and puffed in the center. Cool on a wire rack. Cool completely before serving.

*note:
You can use any recipe you like, or even a store bought crust, but I think all butter crusts have the best flavor. I used my favorite crust recipe, but it makes two single crusts so you can freeze one, make another pie, or use the other for your pumpkin pie.

citrus herb roasted turkey

I’ve been keeping a little secret from you guys.

citrus herb roasted turkey | Brooklyn Homemaker

Ever since last Thanksgiving I’ve been considering the fact that Thanksgiving recipes need to be posted well in advance of the big day if they’ll actually be of any use to you guys. I love the idea that some of my recipes might make it on to your buffet and feed your family miles and miles away from Brooklyn, but if I wait until after Thanksgiving to post them, odds are that you’ll forget all about them by this time next year. So essentially I need to test, and make, and photograph, and eat an entire buffet’s worth of recipes in advance to make sure you have time to see them, drool over them, pin them, plan your grocery lists, and make your action plan for turkey day.

citrus herb roasted turkey | Brooklyn Homemaker

So, that’s exactly what I did.

At first I thought I’d just take my time, trying out one recipe at a time and collecting the posts slowly until I had everything I needed. It didn’t take me long to realize though, that eventually I’d need to roast a turkey. Not a chicken, an entire turkey. Russell and I are only two people, and we can only eat so much turkey ourselves without getting sick to death of the stuff.

So the slow and steady plan was tossed out the window and I decided to make an entire Thanksgiving dinner and invite some friends over to eat it with me. I also decided that if I was going to make the whole dinner, I might as well go all out and host one hell of a dinner party while I was at it.

citrus herb roasted turkey | Brooklyn Homemaker

We don’t have room for a dining table in our tiny Brooklyn apartment, so the bulk of our “dinner parties” usually involve our guests plopping their butts where ever they can find a seat, be it on the sofa, a chair, or the floor. However, since I was cooking and staging an entire fake Thanksgiving dinner for the blog, I wanted it to feel a little fancier and more formal than randomly plopped butts. Since we do have a table in our backyard, we decided Thanksgiving would have to come early enough that our guests wouldn’t be shivering between bites of turkey. A date was set late in September and we started planning the guest list.

With an actual table to sit at, I immediately started a mental inventory of our stemware, serving dishes, and flatware. If you asked Russell he’d probably tell you I went a little overboard looking for salad plates and linen napkins and searching ebay for vintage brass flatware. If you asked me instead though, I’d tell you it was worth it for the opportunity to host a real sit down dinner party with good food and great friends.

citrus herb roasted turkey | Brooklyn Homemakercitrus herb roasted turkey | Brooklyn Homemaker

A lot of other food blogs do a similar pre-Thanksgiving dinner and photoshoot, and many of them refer to their staged meal as Friendsgiving. Since I work in retail and don’t live close to family, my Thanksgivings are always spent with friends though, so I wanted to call it something else.

I was making a entire fake Thanksgiving spread two whole months ahead of time, so I decided to call it Fakesgiving.

citrus herb roasted turkey | Brooklyn Homemaker

When it came to menu planning, I wanted to try to cover the bases for a traditional menu but put my own twist on things. I wanted to keep the flavors simple and complimentary, while offering interesting, impressive, and totally delicious recipes. While I like to try to make as much from scratch as possible, roasting my own pumpkins and squash rather than using canned, I also didn’t want any of my recipes to be so fussy that they’d be unattainable or unrealistic for a meal that’s already so involved and time consuming to prepare. In the end, I think I did alright!

Thanksgiving pies |Brooklyn Homemaker

Our Fakesgiving Menu:

Shaved Brussels Sprouts Salad with Walnuts and Pomegranate
Citrus Herb Roasted Turkey (recipe below)
Mushroom, Leek, & Sourdough Dressing (from 2 years ago)
Herb and Cheddar Corn Pudding
Creamed Kale Gratin
Roasted Maple Dijon Carrots
Flaky Butternut Sage Biscuits

Bourbon Ginger Pumpkin Pie
Maple Walnut Pie
Classic Apple Pie (from last year)

fakegiving dinner spread| Brooklyn Homemaker

I talked a bit last year about how I like to get ready for Thanksgiving dinner, but I want to mention again that I think it’s really helpful to think ahead. This might seem a little neurotic, but I really like to sort of mentally pair each recipe I’ll serve with an appropriate serving dish and utensil, just to make sure I don’t realize that day that I don’t have a big enough salad bowl, or I don’t have enough serving spoons for everything on the table. I also like to write out timelines and grocery lists and to do lists (so many lists) for myself so there are no surprises. I’m sure that Russell got sick of hearing about my Fakesgiving planning but everything went off without a hitch so I think it was worth it.

citrus herb roasted turkey | Brooklyn Homemaker

With dinner served, photos snapped, and wine poured, it was time to chow down. Boy did we ever chow down.

citrus herb roasted turkey | Brooklyn Homemakercitrus herb roasted turkey | Brooklyn Homemakercitrus herb roasted turkey | Brooklyn Homemaker

Doris wanted to see what all the excitement was about and see if her puppy dog eyes could get her a bite or two of turkey.

citrus herb roasted turkey | Brooklyn Homemaker

Now that we’ve talked about the party, let’s talk turkey shall we?

I definitely have some more sharing to come, but one of the most important recipes when it comes to Thanksgiving is the ol’ turkey, so I thought now would be a good time to tell you how I like to do mine. I’ve been making this same recipe for years now, because after all the things I’ve tried in the past, this has produced the most consistent, moist, and delicious results. I’ve done the brine thing before, but this method is way less hassle and produces, hands down, the best turkey I’ve ever made. Year after year I’m showered with compliments.

The key to this recipe is that the turkey is roasted breast-side down for the first few hours. Even though flipping it back over can be tricky, doing it this way is the key to moist and flavorful breast meat. As the dark meat cooks the fat and juices run downward through the breast adding tons of fat and flavor. The only reason it’s flipped back up is to brown the skin on the breast for crispier skin and a prettier and more traditional presentation. I don’t have silicone or waterproof oven mitts, so I cover them in ziplock bags and lift the turkey up as Russell holds the roasting pan steady.

To avoid drying the breast meat I think it’s also really important to give the turkey a good long rest, between 30 and 45 minutes, for the juices to reabsorb into the meat before slicing. Luckily, this resting time also gives you a really cozy window for making gravy, reheating casseroles, and browning biscuits.

citrus herb roasted turkey | Brooklyn Homemaker

To add even more fat and flavor and make the bird as moist and flavorful as possible, a citrus and herb compound butter is rubbed all over the skin before it goes into the oven. I like to use super traditional poultry herbs like thyme, sage, and parsley to really compliment the rich flavor of the turkey. To brighten things up a little though, I love using a mix of lemon and orange zest for a bit of zip.

I’m telling you guys. I’ve made this recipe three years in a row and I’m planning on making it a second time this year in a few weeks. It’s a real winner, and many of my friends can attest to that.

citrus herb roasted turkey | Brooklyn Homemaker

Roasted Turkey with Citrus Herb Butter

  • Servings: Feeds many many people, depending on the size of your bird
  • Print

Citrus Herb Butter:
1 1/2 sticks of salted butter, softened
1 teaspoon coarse kosher salt
1 teaspoon fresh cracked pepper
1 teaspoon cayenne pepper
2 tablespoons finely chopped fresh sage
2 tablespoons finely chopped fresh parsley
2 tablespoons finely chopped fresh thyme
2 tablespoons brown sugar
zest of one large orange
zest of two lemons

Roasted Turkey:
1 15-20 lb fresh turkey *see note
citrus, herbs, onions and apples for filling
carrots, onions, celery (and apples if desired) for roasting to flavor gravy

chicken or turkey stock

To make the flavored butter, mash all ingredients into the softened butter with a fork (or with a mixer) and mix until well combined. Place in an air tight container and refrigerate. Remove from fridge and soften for an hour or two before you’re ready to use it. If you forget to do this you can soften it in your hands.

If possible, wash the turkey and remove the gizzards and neck the night before Thanksgiving. Pat dry, inside and out, with paper towels and season with salt and pepper. If you can’t do this the night before, do at least one hour before the turkey goes into the oven. Cover with foil or a lid and move to the refrigerator. Hold onto the gizzards and neck for gravy.

Preheat your oven to 325 degrees. Roughly chop a few pieces of celery, carrots, onions & apples and place in the bottom of a large roasting pan. You don’t need to peel the skin off the onion and you can use the leafy tops of the celery. Add a few sprigs of herbs and your reserved neck and gizzards, and add enough chicken or turkey stock to come about an inch up the side of the pan. Add a large roasting rack to the pan.

Rub the softened citrus herb butter completely over your turkey on all sides and some on the inside cavity. Reserve a few tablespoons to reapply later. Place your butter covered turkey, breast side down, on your roasting rack. Fill the cavity of the turkey with roughly chopped citrus, apples, onions and herbs, or whatever flavors you’d like. Leave some room for air to circulate in the cavity or the turkey will take longer to cook and could dry out.

Transfer Turkey to the oven, uncovered, and roast for 3 1/2 hours basting every 30 minutes. Remove from oven and flip the turkey breast side up. They make special turkey lifters to make this easier, or you can use large rigid spatulas, or oven mitts covered in plastic bags. You might want an extra set of hands to keep the roasting pan steady or help out. Rub the remaining citrus herb butter on the breast side of the turkey and return to oven for 1 1/2 to 2 more hours, or until a meat thermometer placed in the thigh meat reads 165 degrees. Continue basting every 30 minutes until done. Your total roasting time will depend on the size of the bird. Closer to 15 pounds should take about 4 1/2 to 5 hours, 20 pounds more like 5 1/2 hours.

When the turkey is done, remove from oven and transfer from roasting rack to a large carving board. Tent with aluminum foil and let rest for at least 30 minutes, up to 45 or 50. Strain the juices from the pan and use for gravy, adding more stock if necessary. You can use this resting time to reheat or finish any remaining sides in the oven. Carve and serve your bird and brace yourself for a barrage of compliments.

*Note: I like to say you want your about 1 1/2 to 2 pounds of turkey per person- this will ensure everyone is completely satisfied and you have some leftovers for sandwiches and something leftover to make soup or turkey pot pie.