spring

Cash me outside

If you follow me on instagram, you probably noticed I was spending A LOT of time out in our backyard this spring.

urban outdoor space | Brooklyn Homemakerurban outdoor space | Brooklyn Homemakerurban outdoor space | Brooklyn Homemaker urban outdoor space | Brooklyn Homemaker

As soon as the weather turned warm and things started turning green, I was out there every night. You may have even been sick of all the pictures and videos of our yard, usually with smoke pouring out of my charcoal grill and string lights hanging overhead. Sorry not sorry.

I grew up in cow and corn country in Upstate New York, so I was always outdoors in nice weather, and even though I live in Brooklyn now my love for the outdoors is just as strong. We were lucky enough to find an apartment with outdoor space years ago, but if you’ve been reading for a long while now, you’ll remember that the space out back was a little, well, rough around the edges when we first moved in.
A few years back I posted about the progress we’d made so far, which felt monumental at the time, but looking back at pictures seems pretty meager compared to how things look now. Up until that point we’d spent every Summer clearing out debris and weeds and sick unhealthy plants. It took a long time to get everything clean and tidy before we could even begin planting anything new or making the space livable and attractive.

That post was basically the beginning of when we were able to finally start planting, and since then things have changed quite a bit so I thought you might enjoy a little update.  I’ve planted plenty in the past few years, figured out what plants do well and which ones don’t, and added some fancy-pants new outdoor furniture to boot.

urban outdoor space | Brooklyn Homemakerurban outdoor space | Brooklyn Homemakerurban outdoor space | Brooklyn Homemakerurban outdoor space | Brooklyn Homemaker

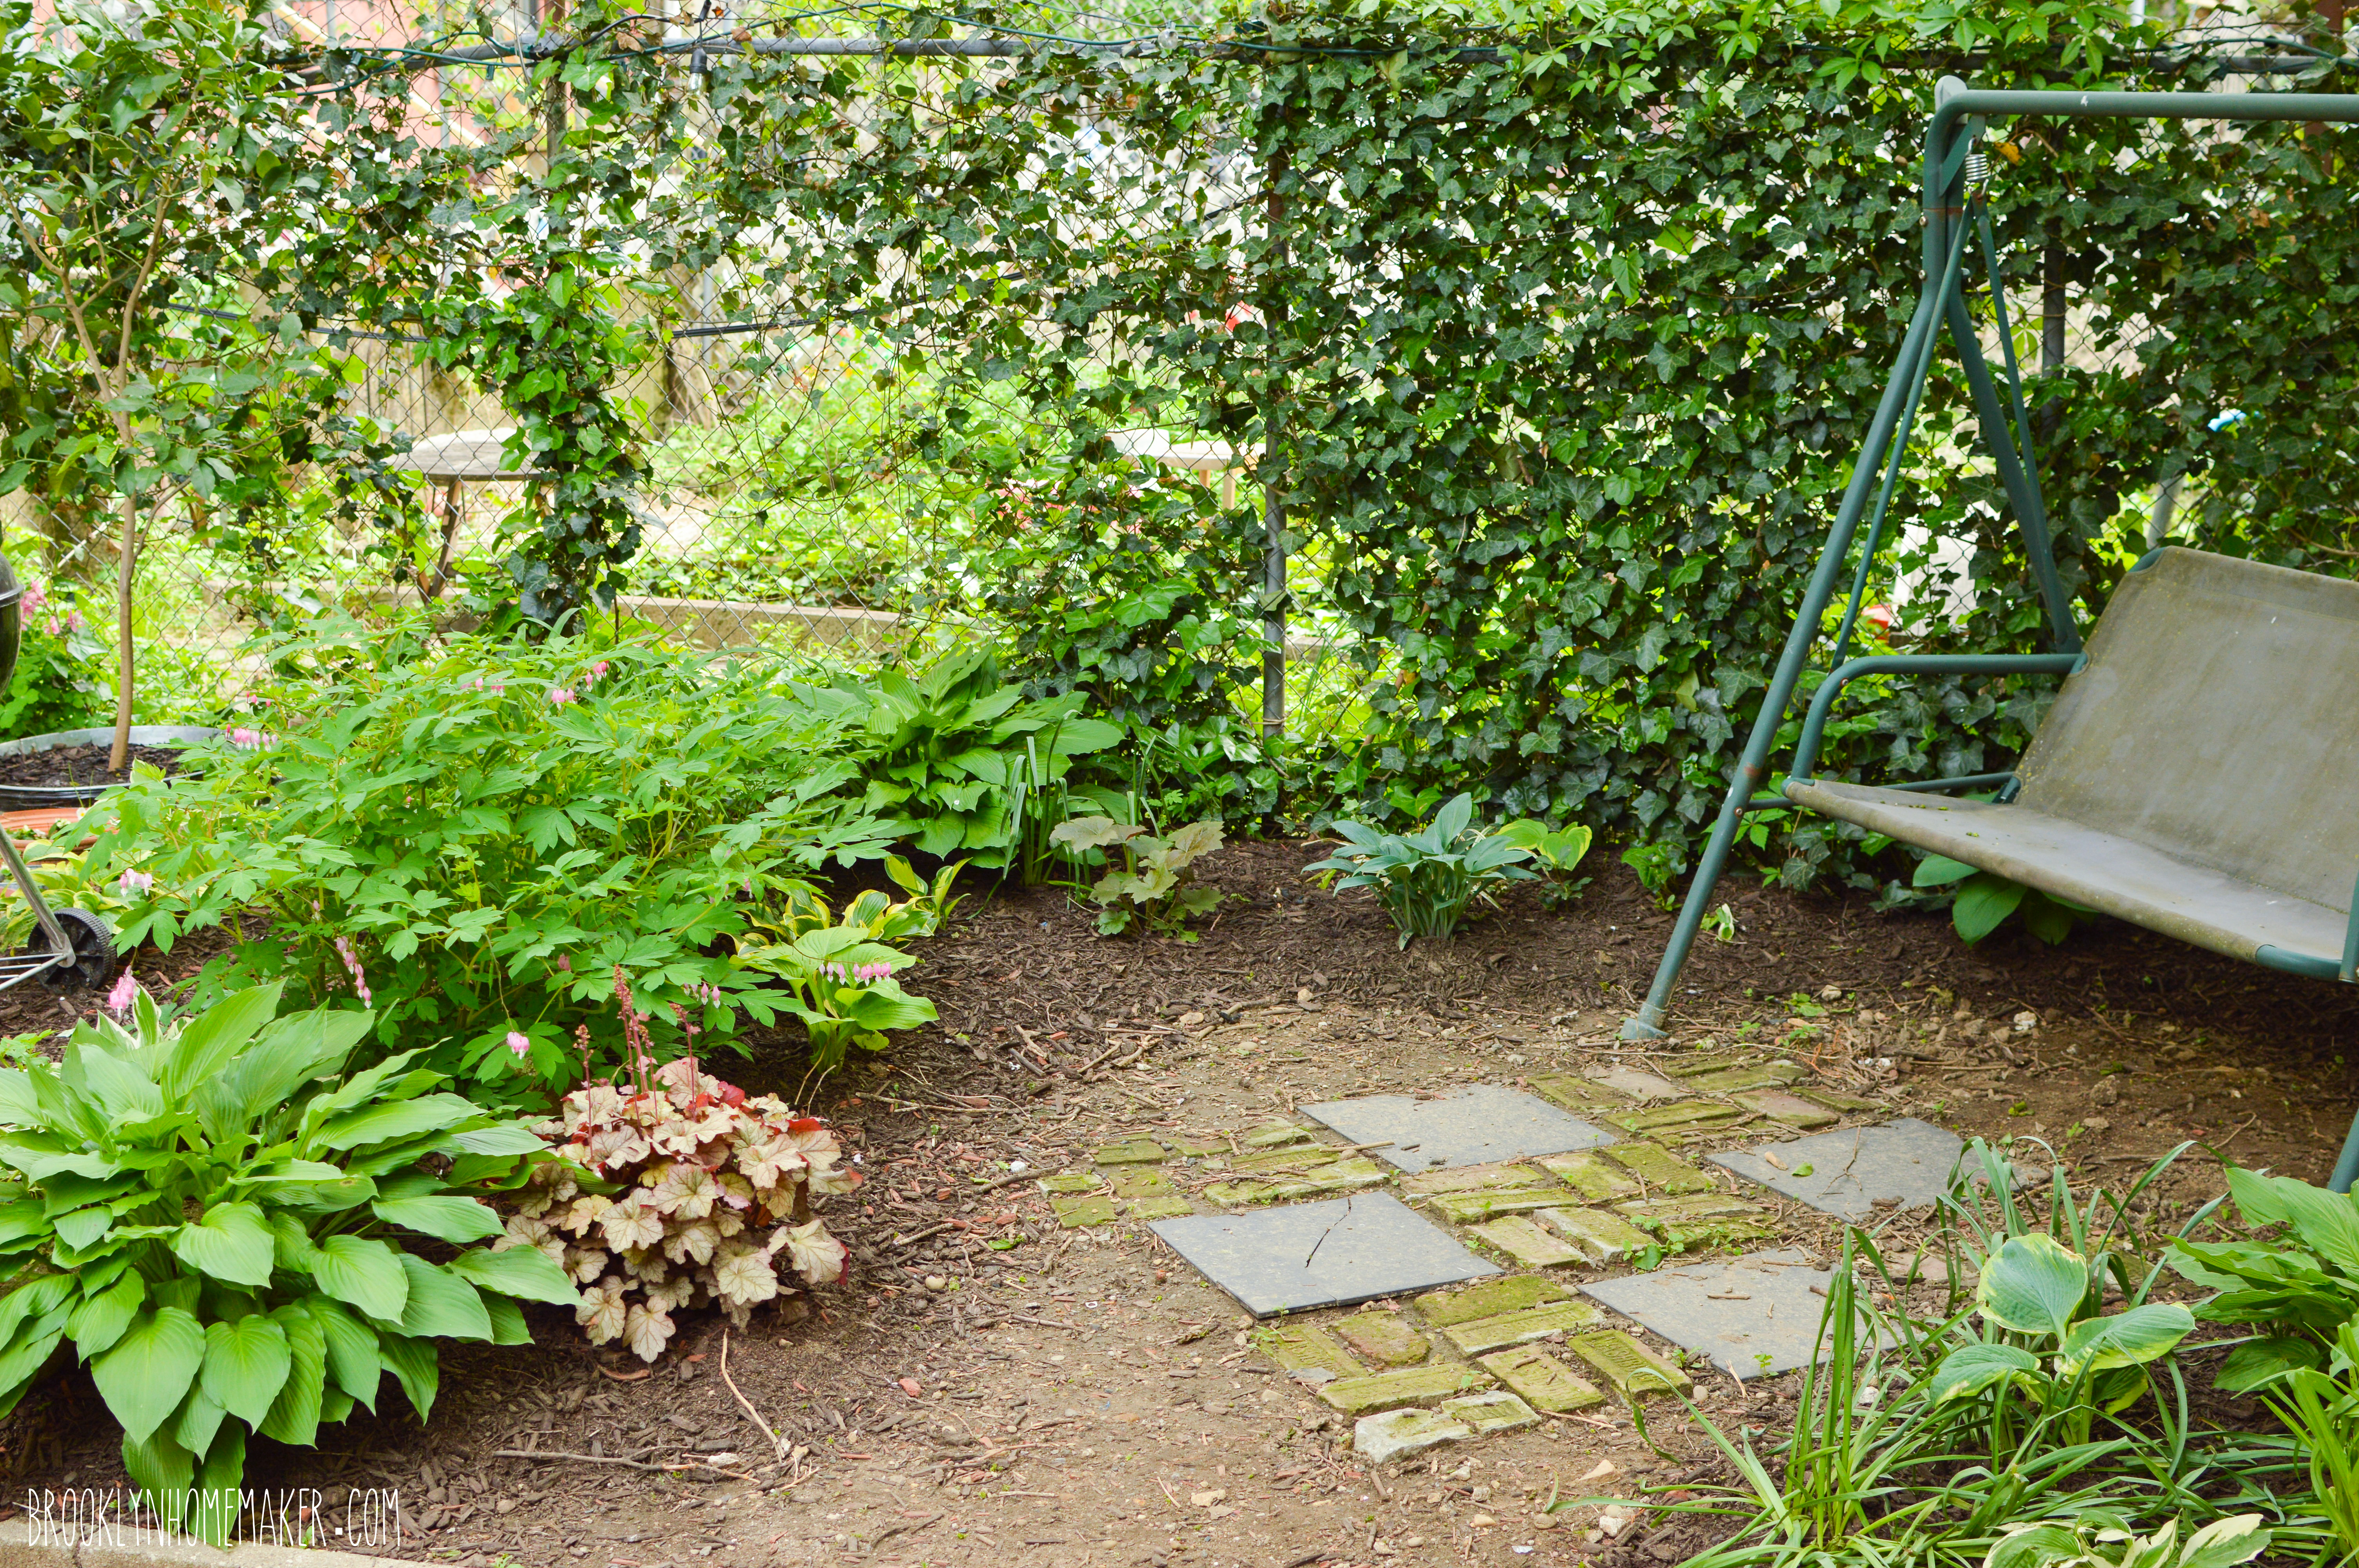
I know I also mentioned this in my last gardening post too, but just to refresh your memory, we have a big evil mulberry tree out there that makes the yard a disgusting unusable mess for anywhere from 4 to 6 weeks out of every summer. The tree is too tall and the berries fall too far to make collecting them possible, so instead they just splatter into a juicy mulberry paste that attracts flies and ants and birds (and bird poo) and eventually turns moldy and stinky and awful. And guess what. We’re in the midst of berry season proper right now, so I haven’t been back there for a good three weeks. The photos in this post were taken a few weeks ago, just before it started.
Even when the tree isn’t dropping the got-damned berries, instead it’s shading most of the yard and sucking up all the moisture in the soil. As if the berries weren’t enough to deal with, that tree is the source of two little words that have made my life very difficult over the past few years.
Dry.
Shade.

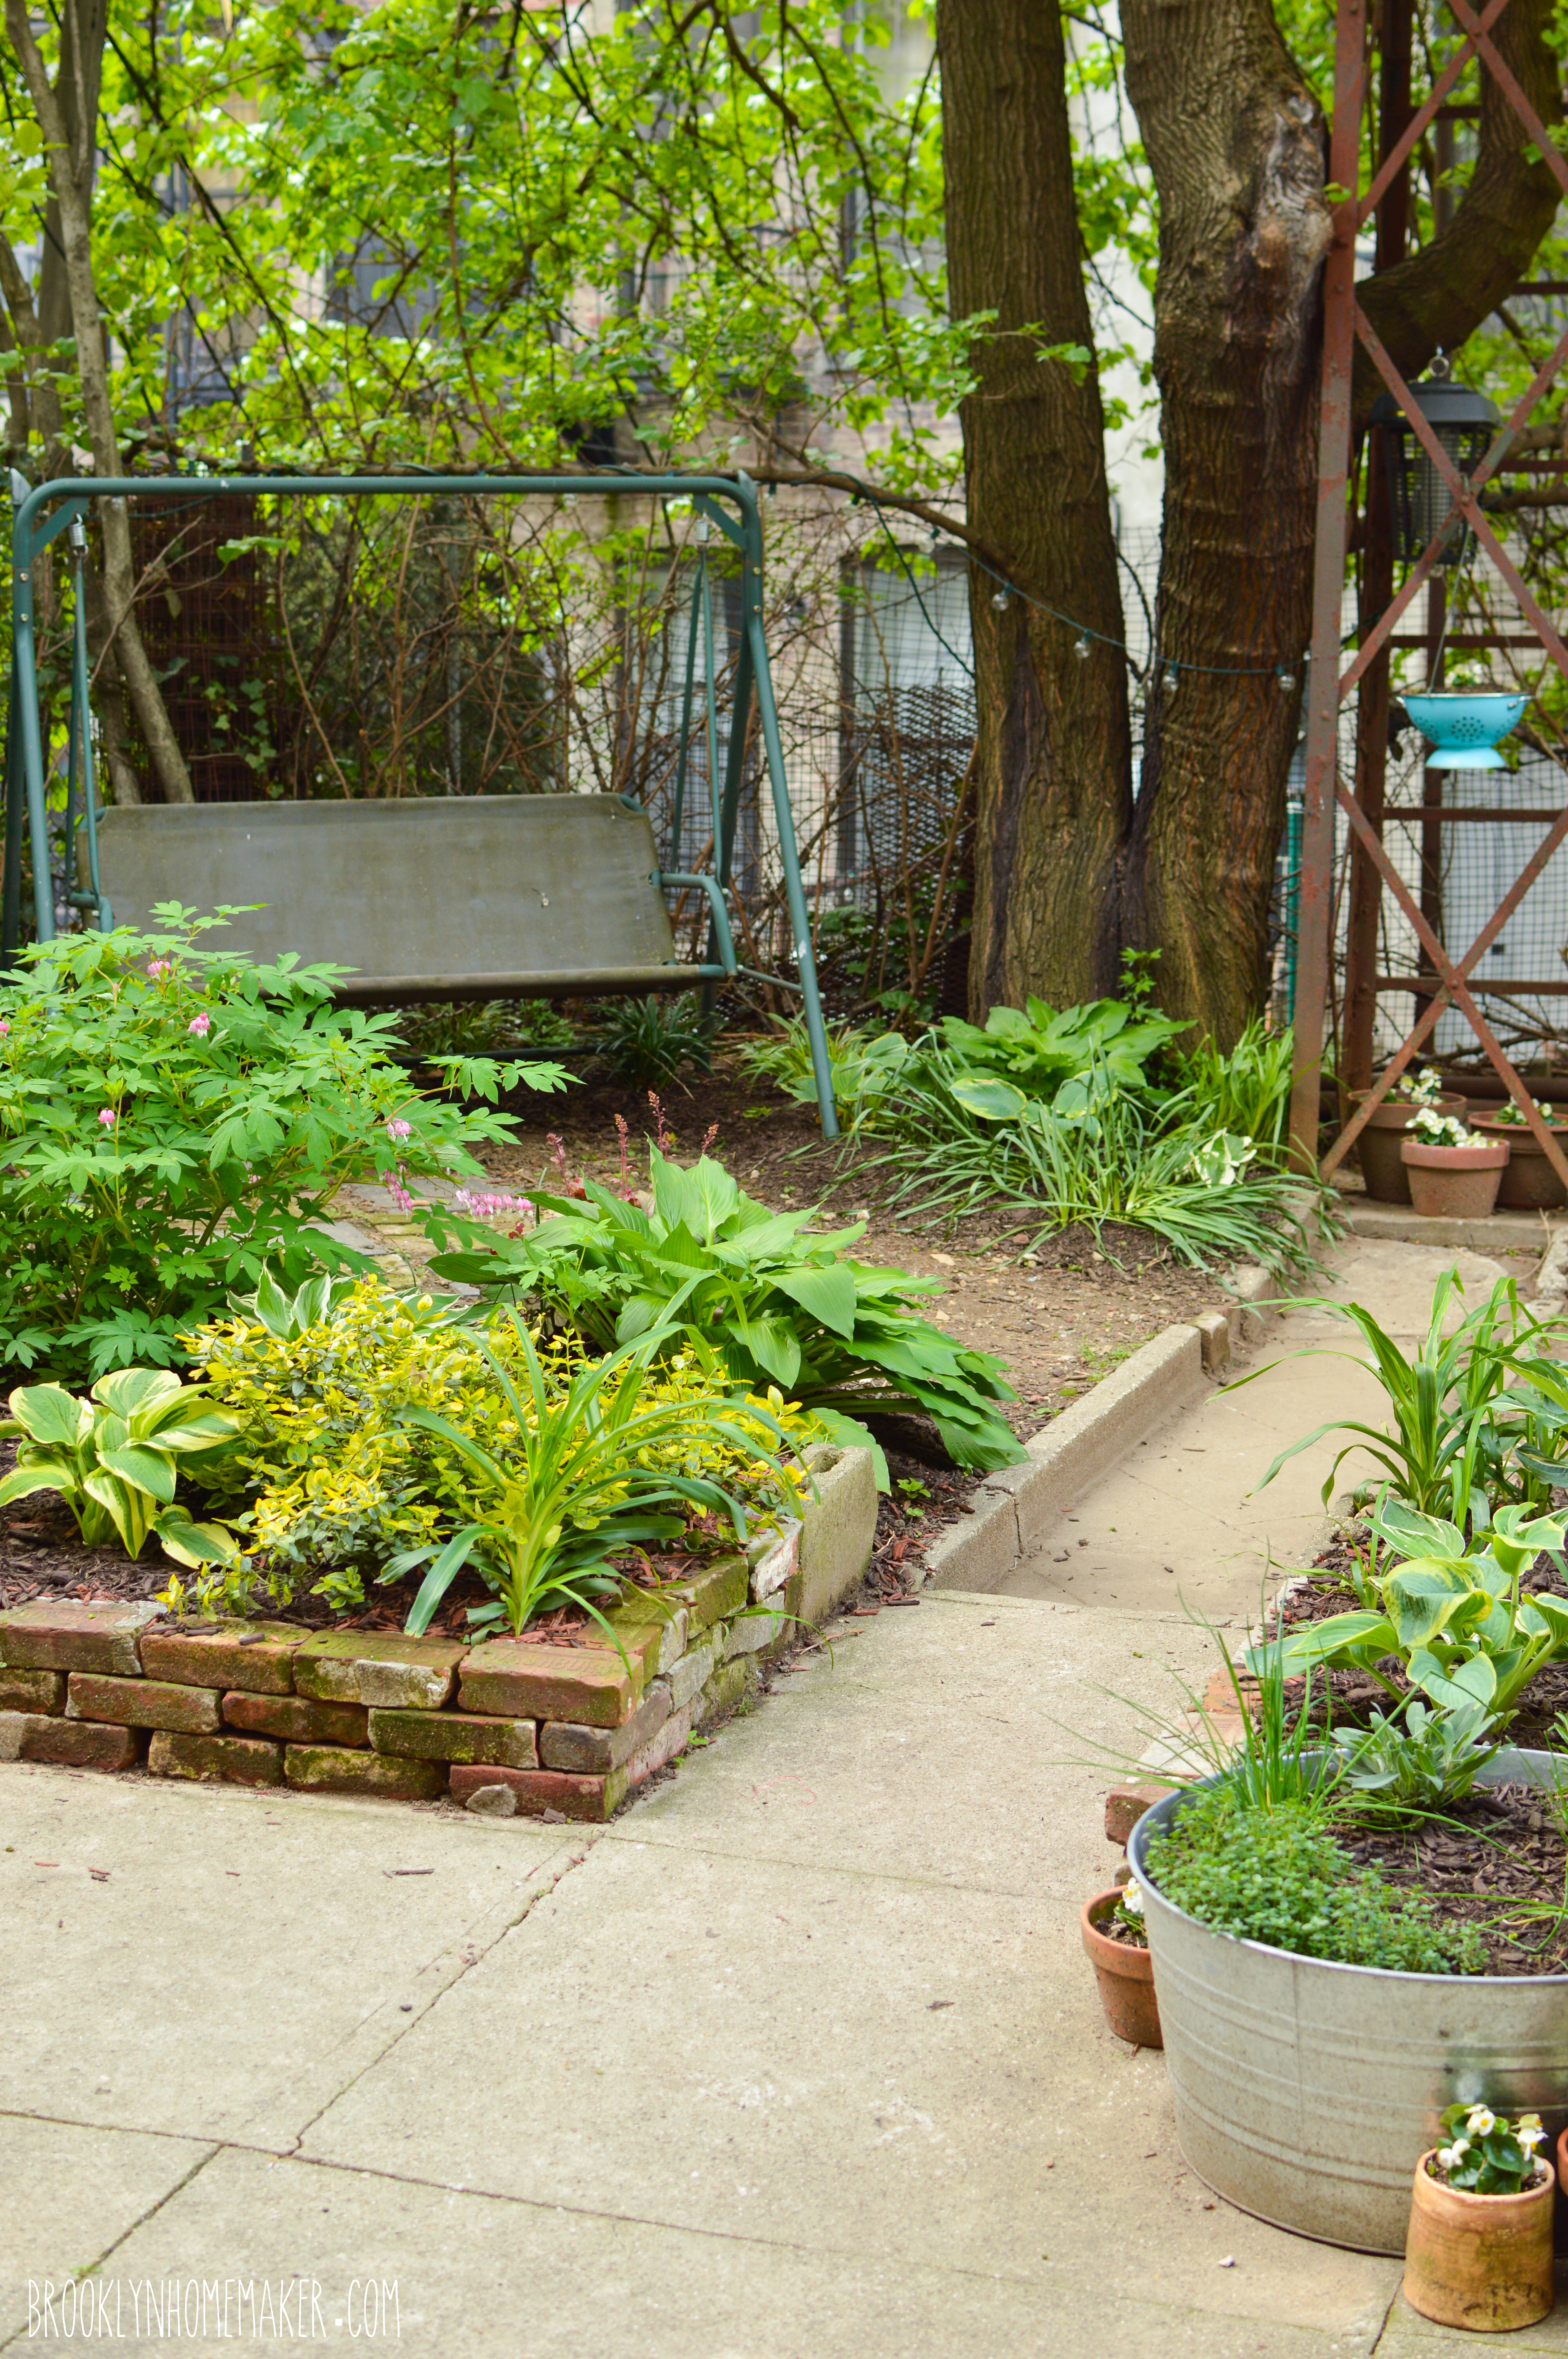
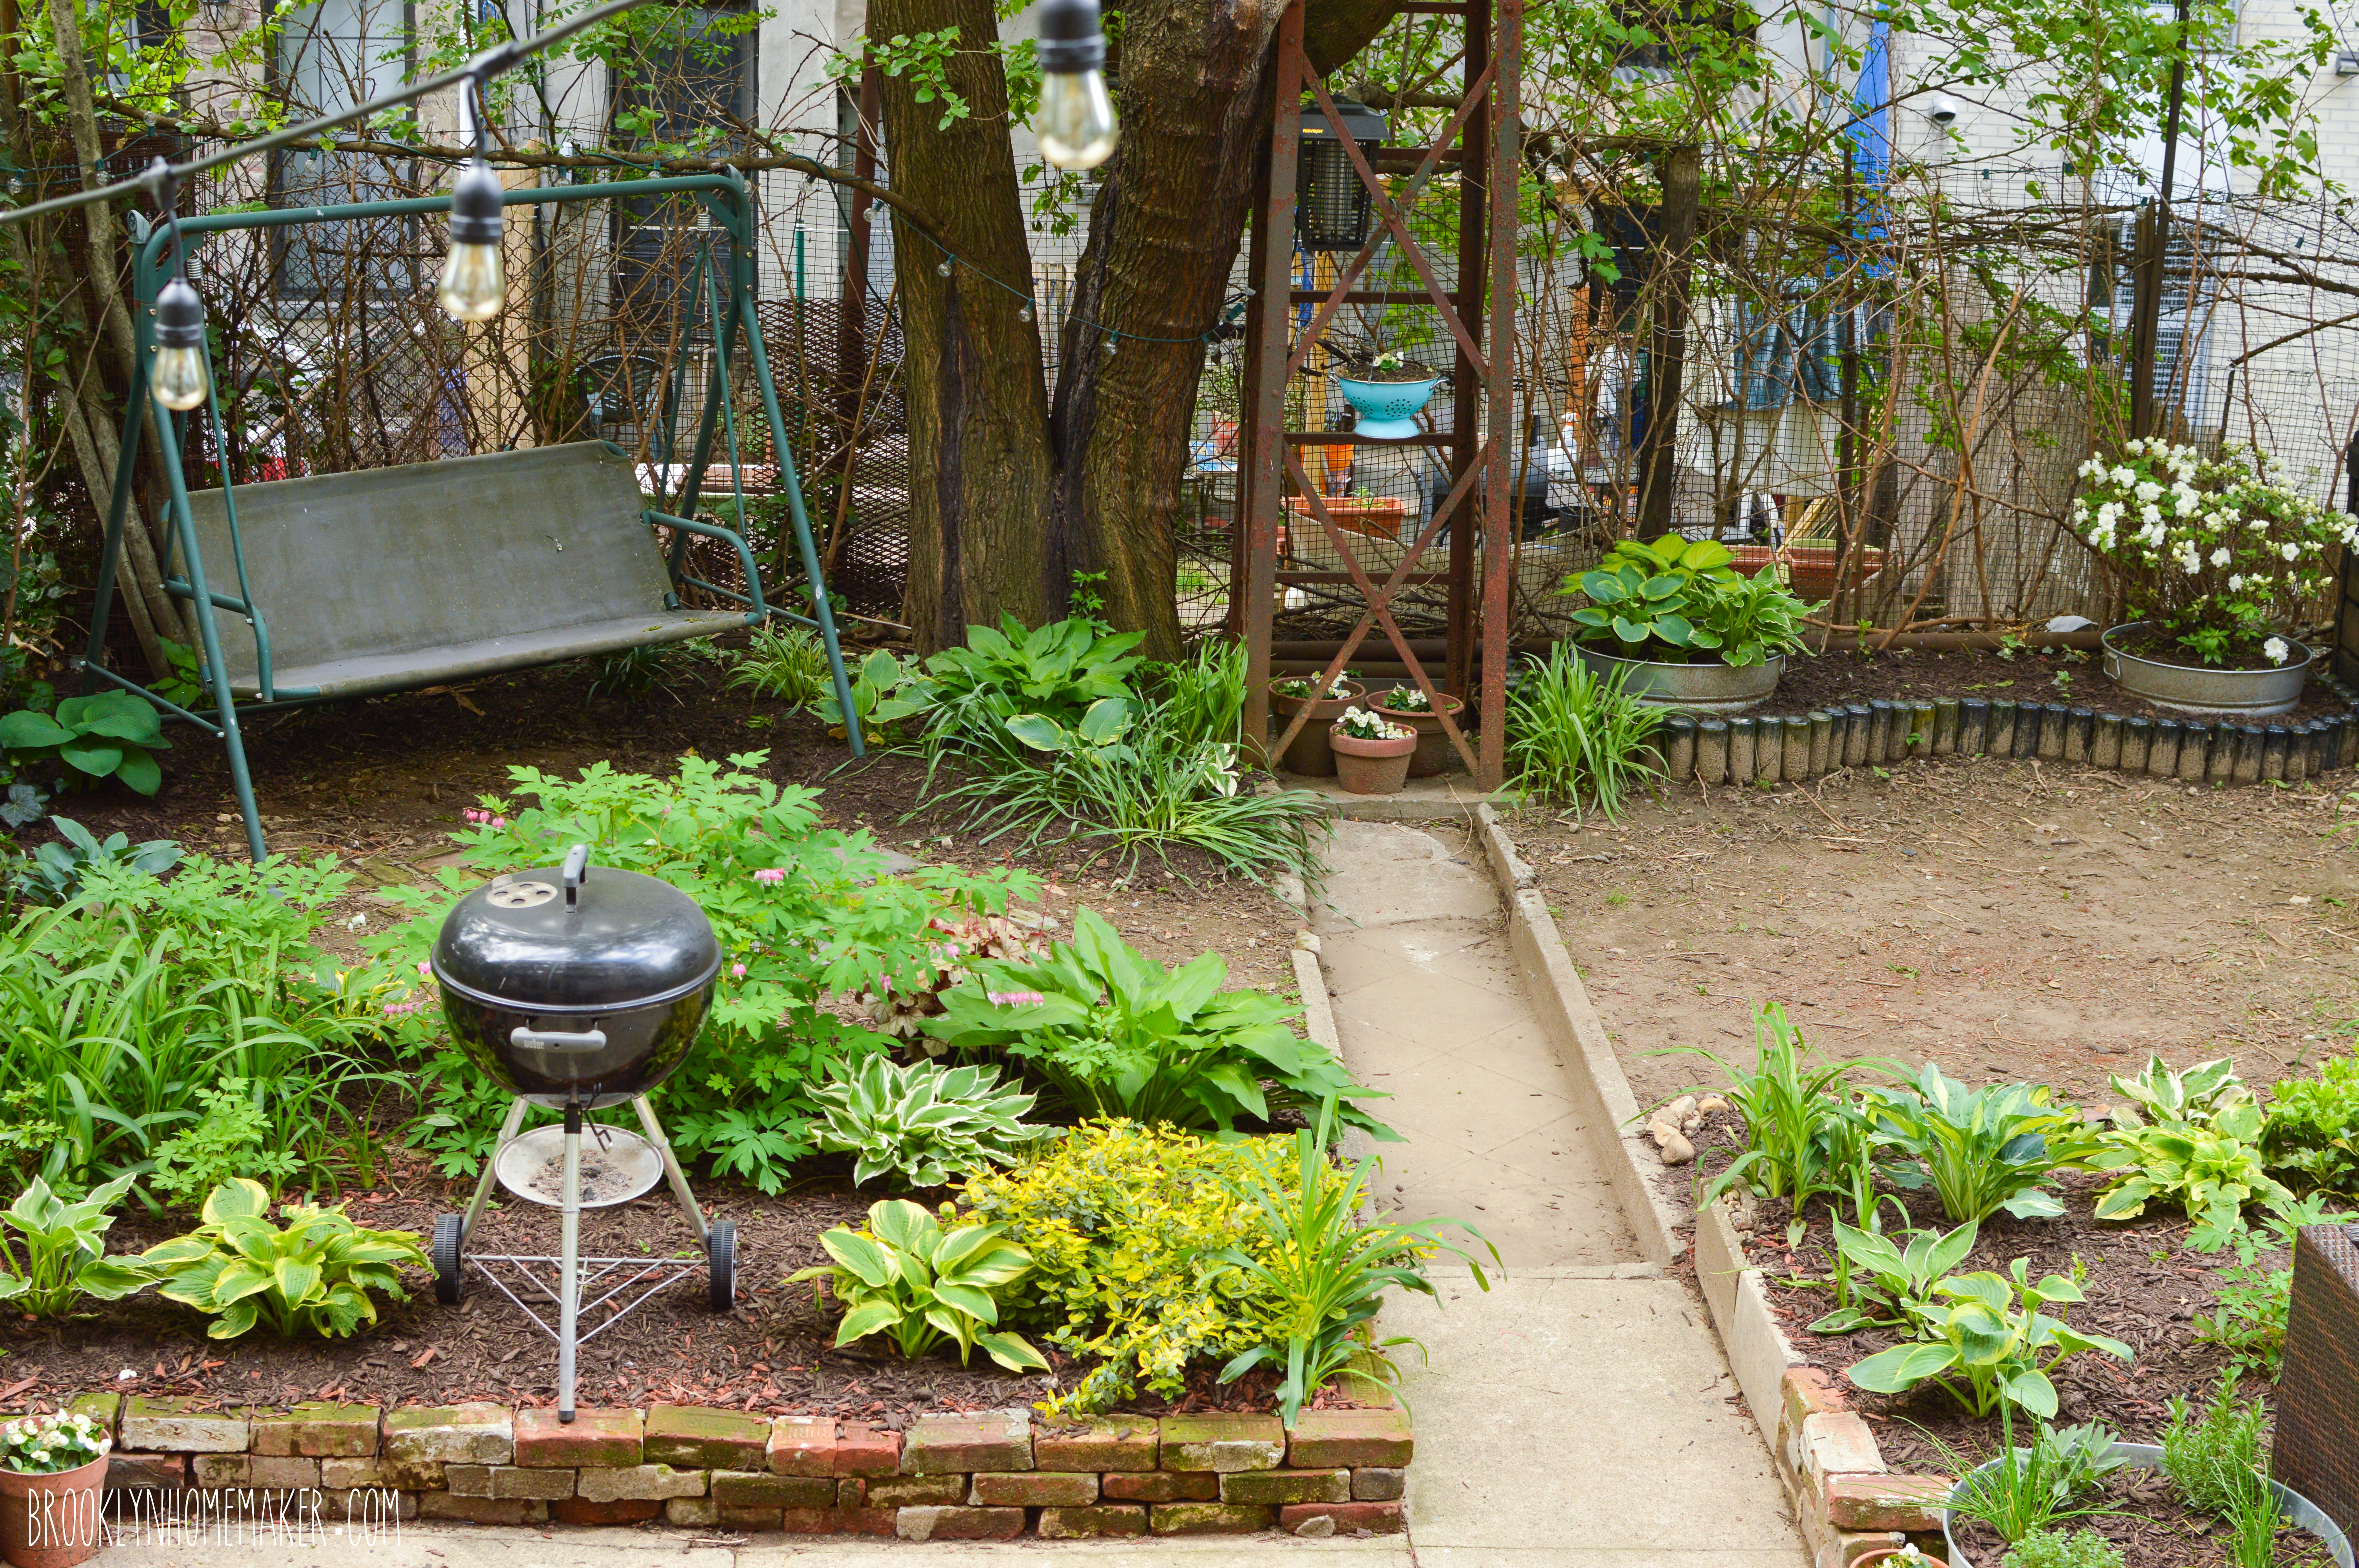
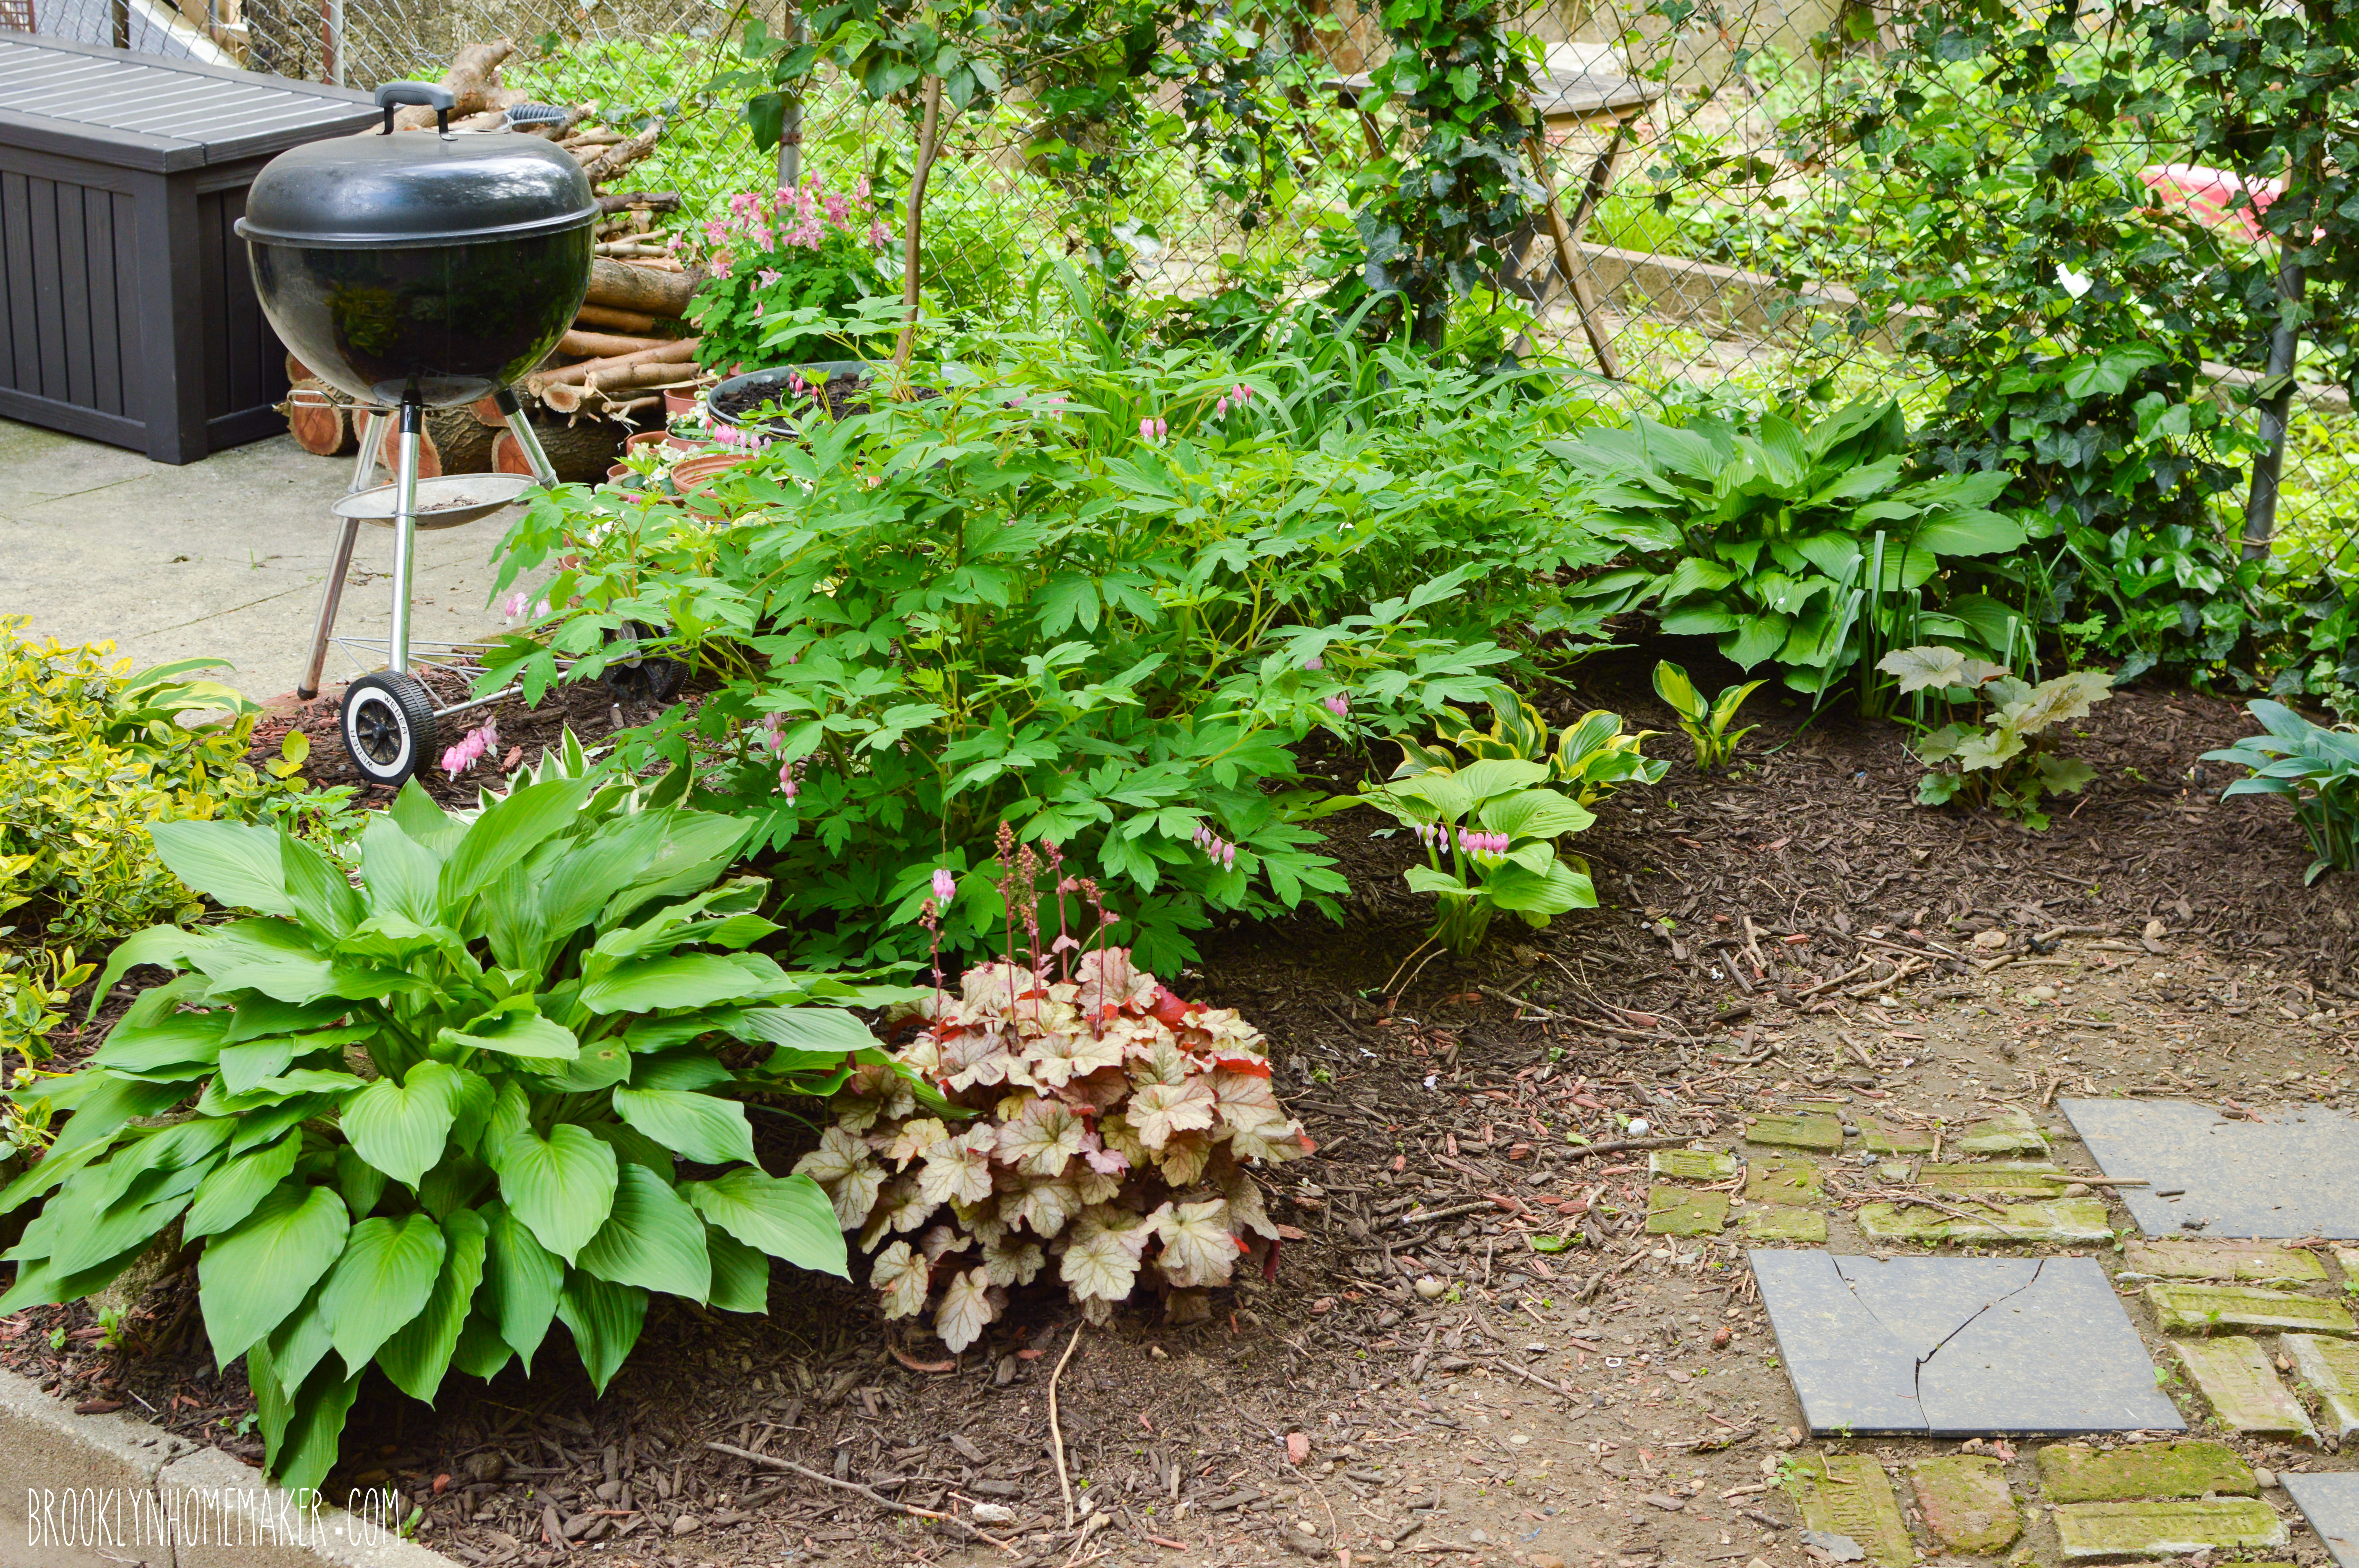
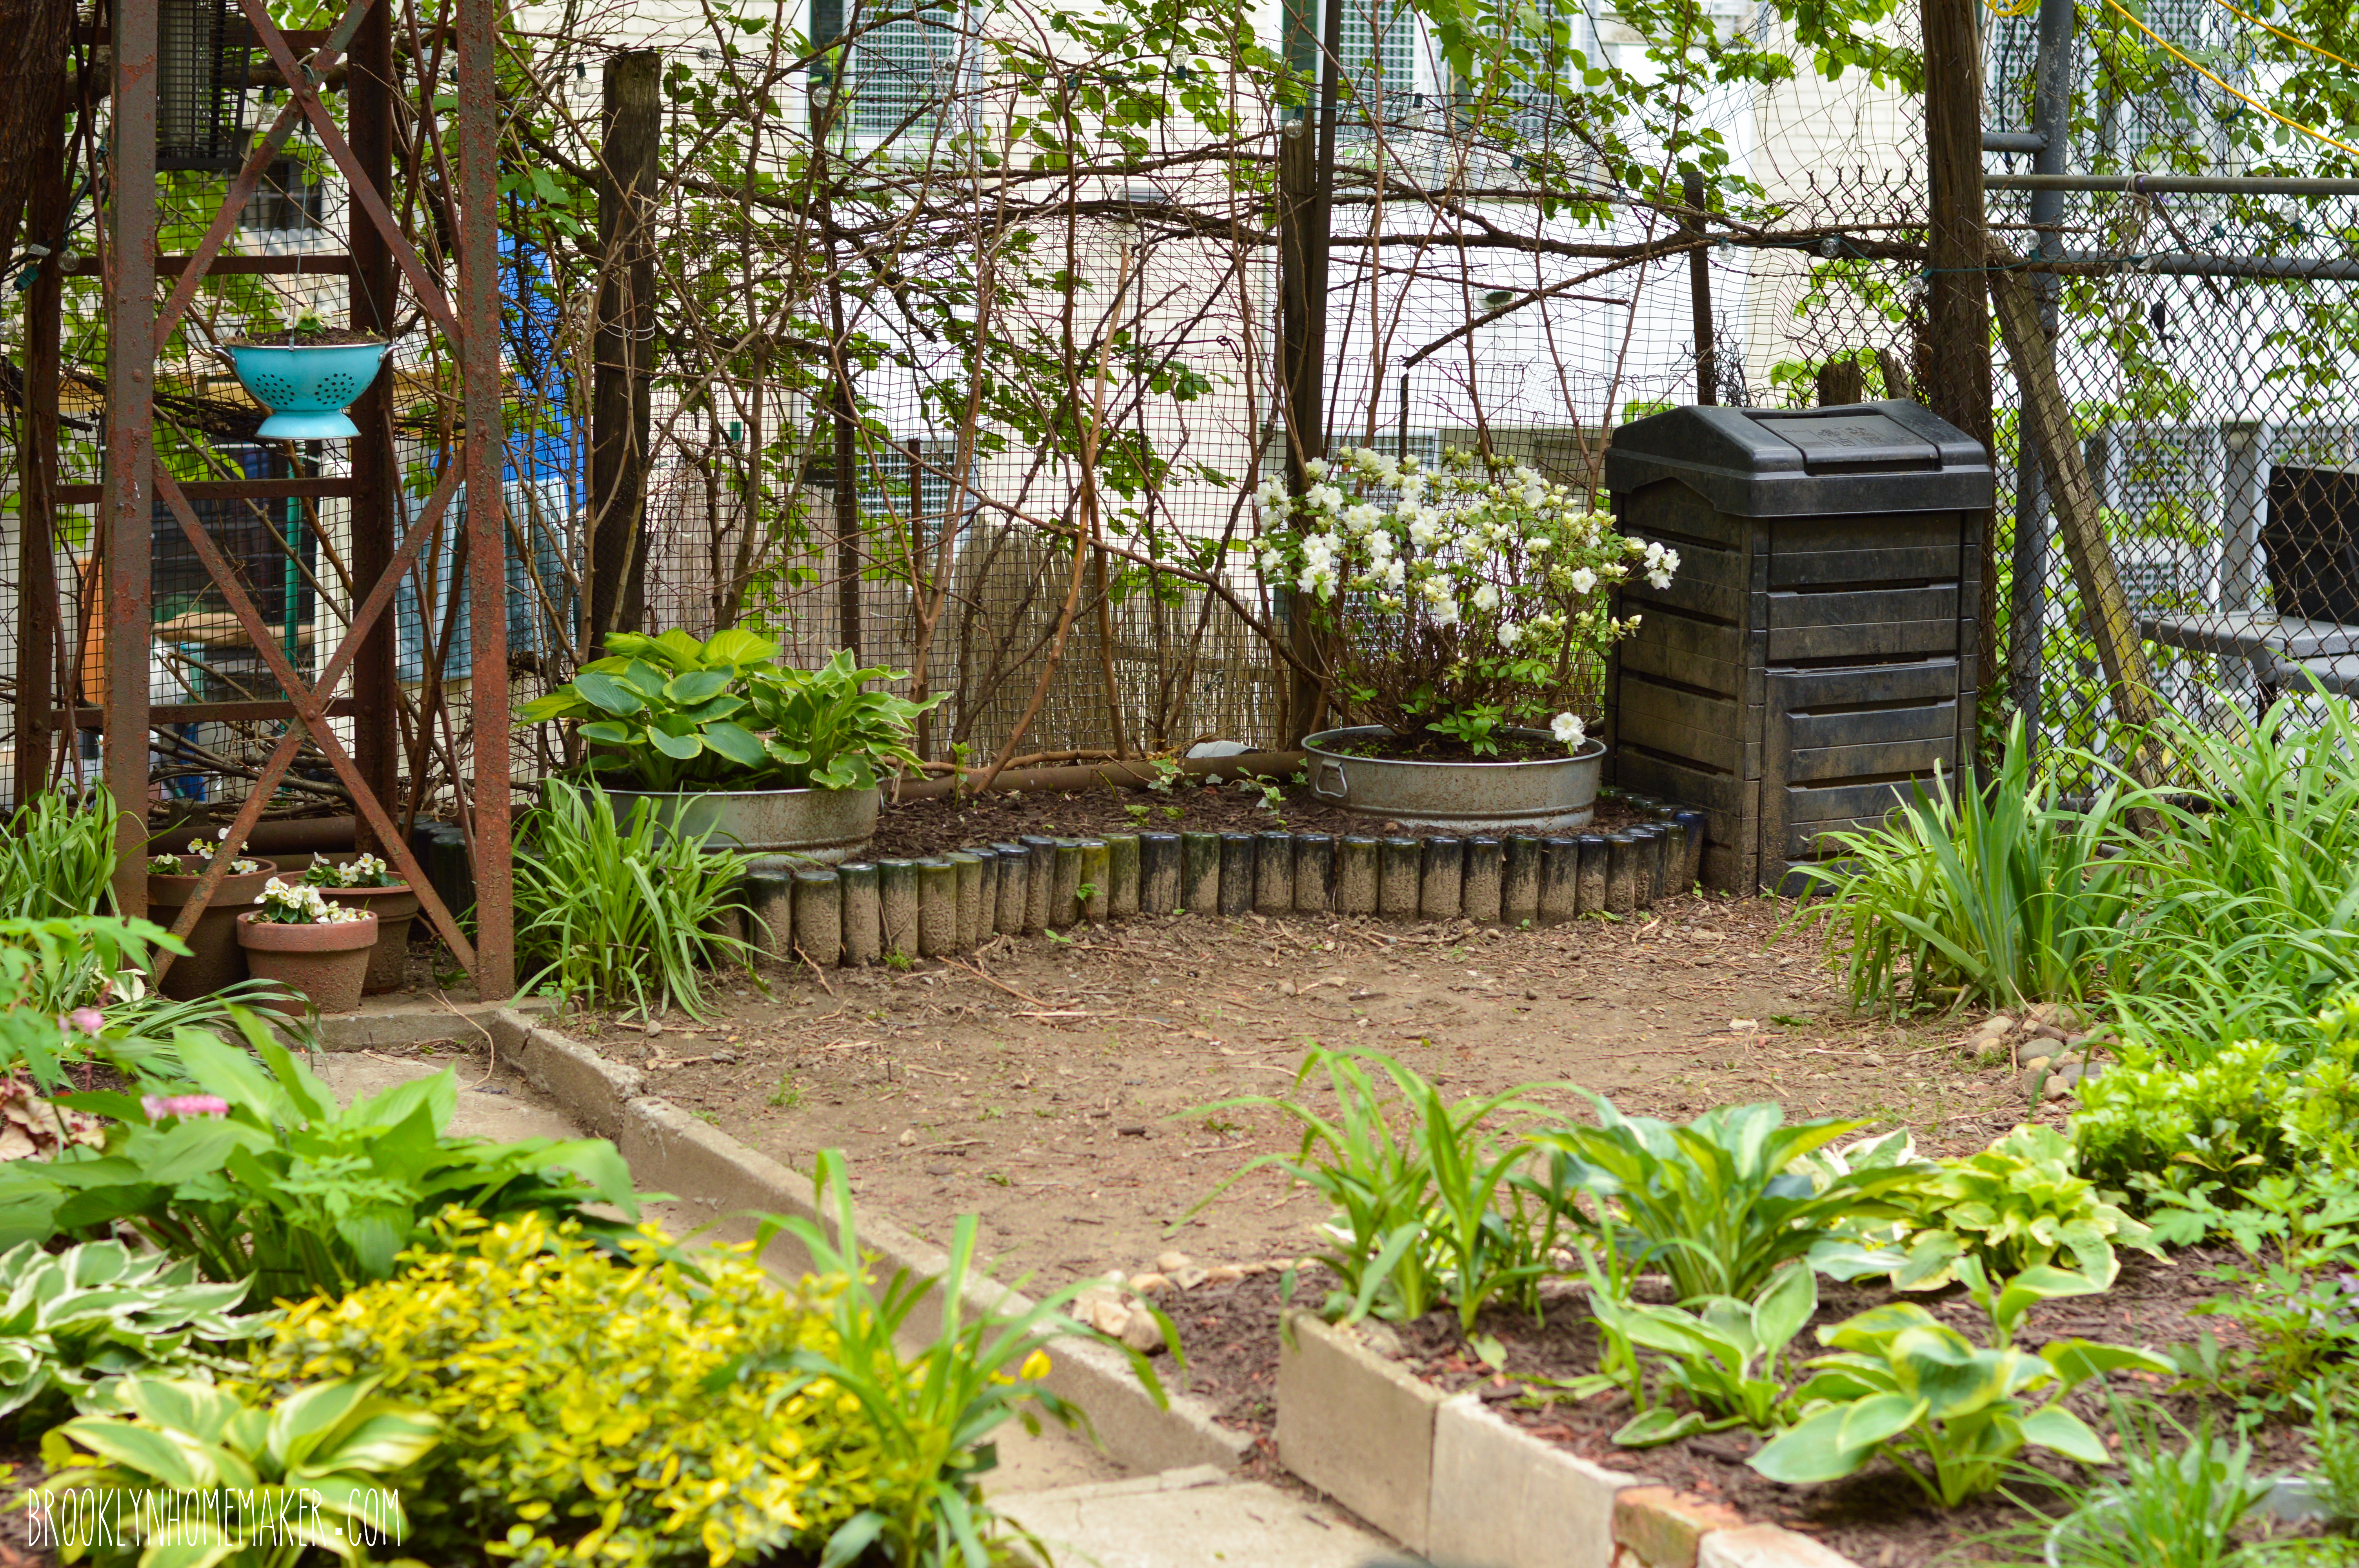
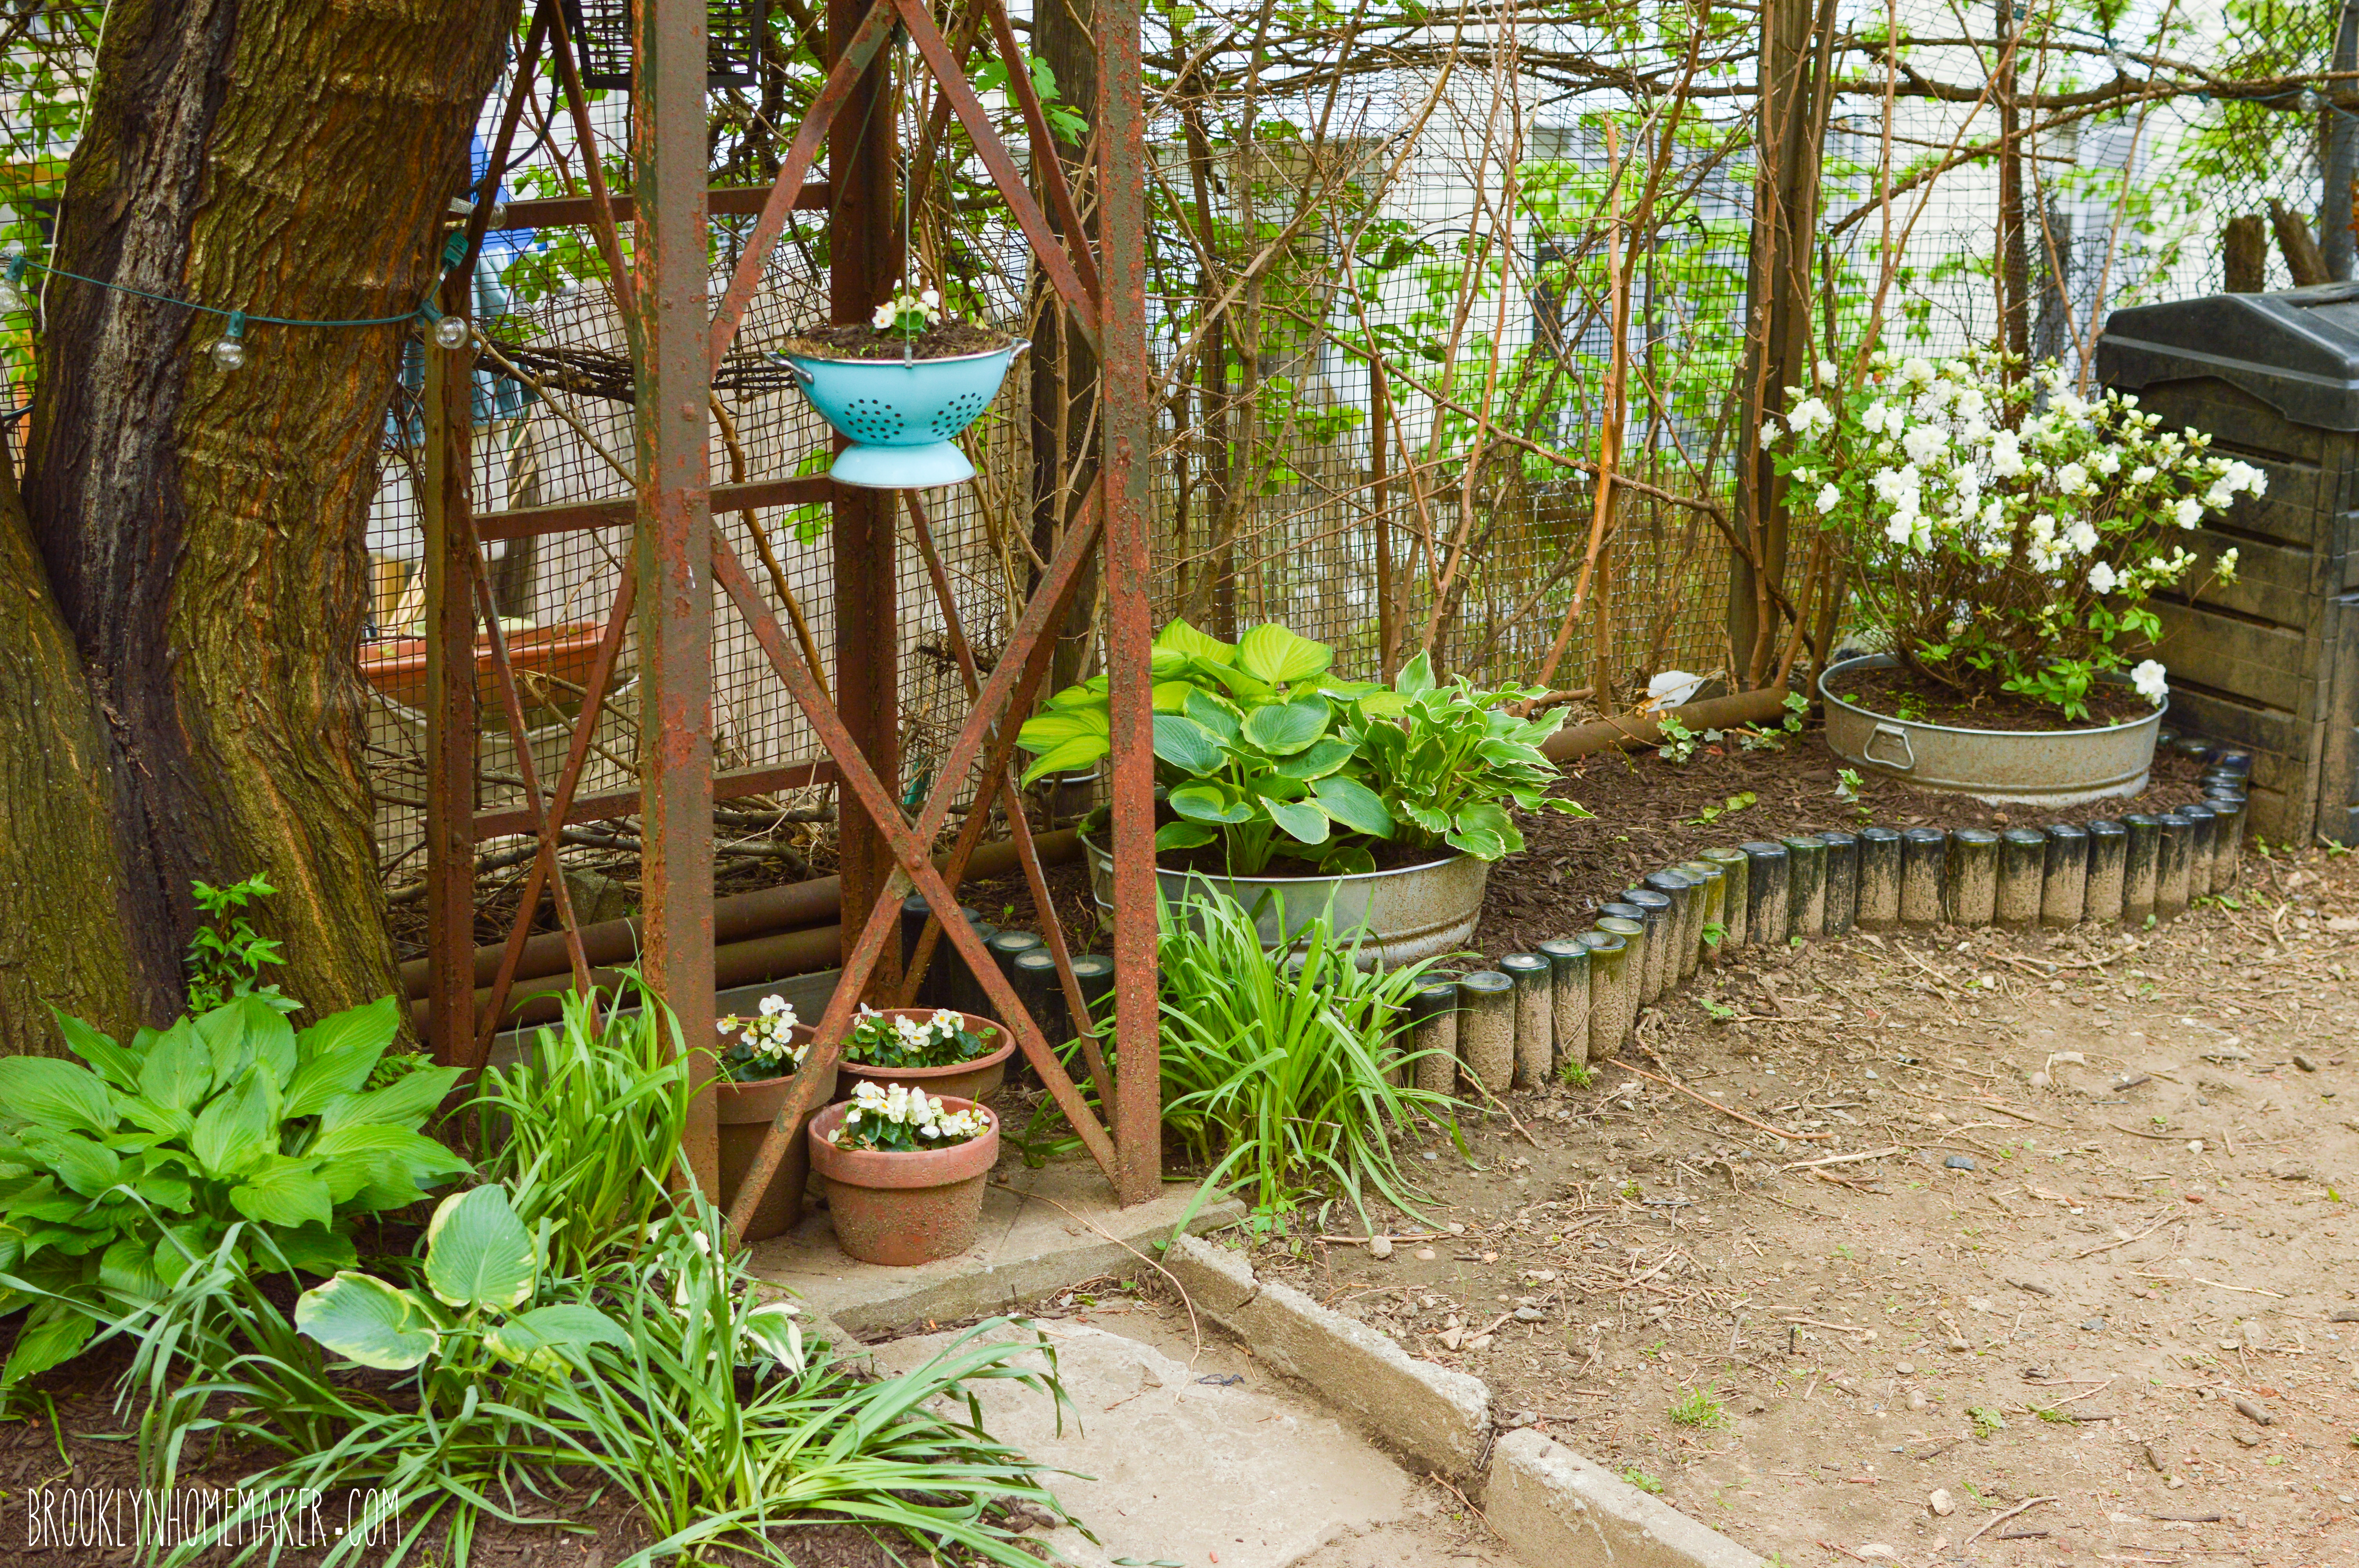
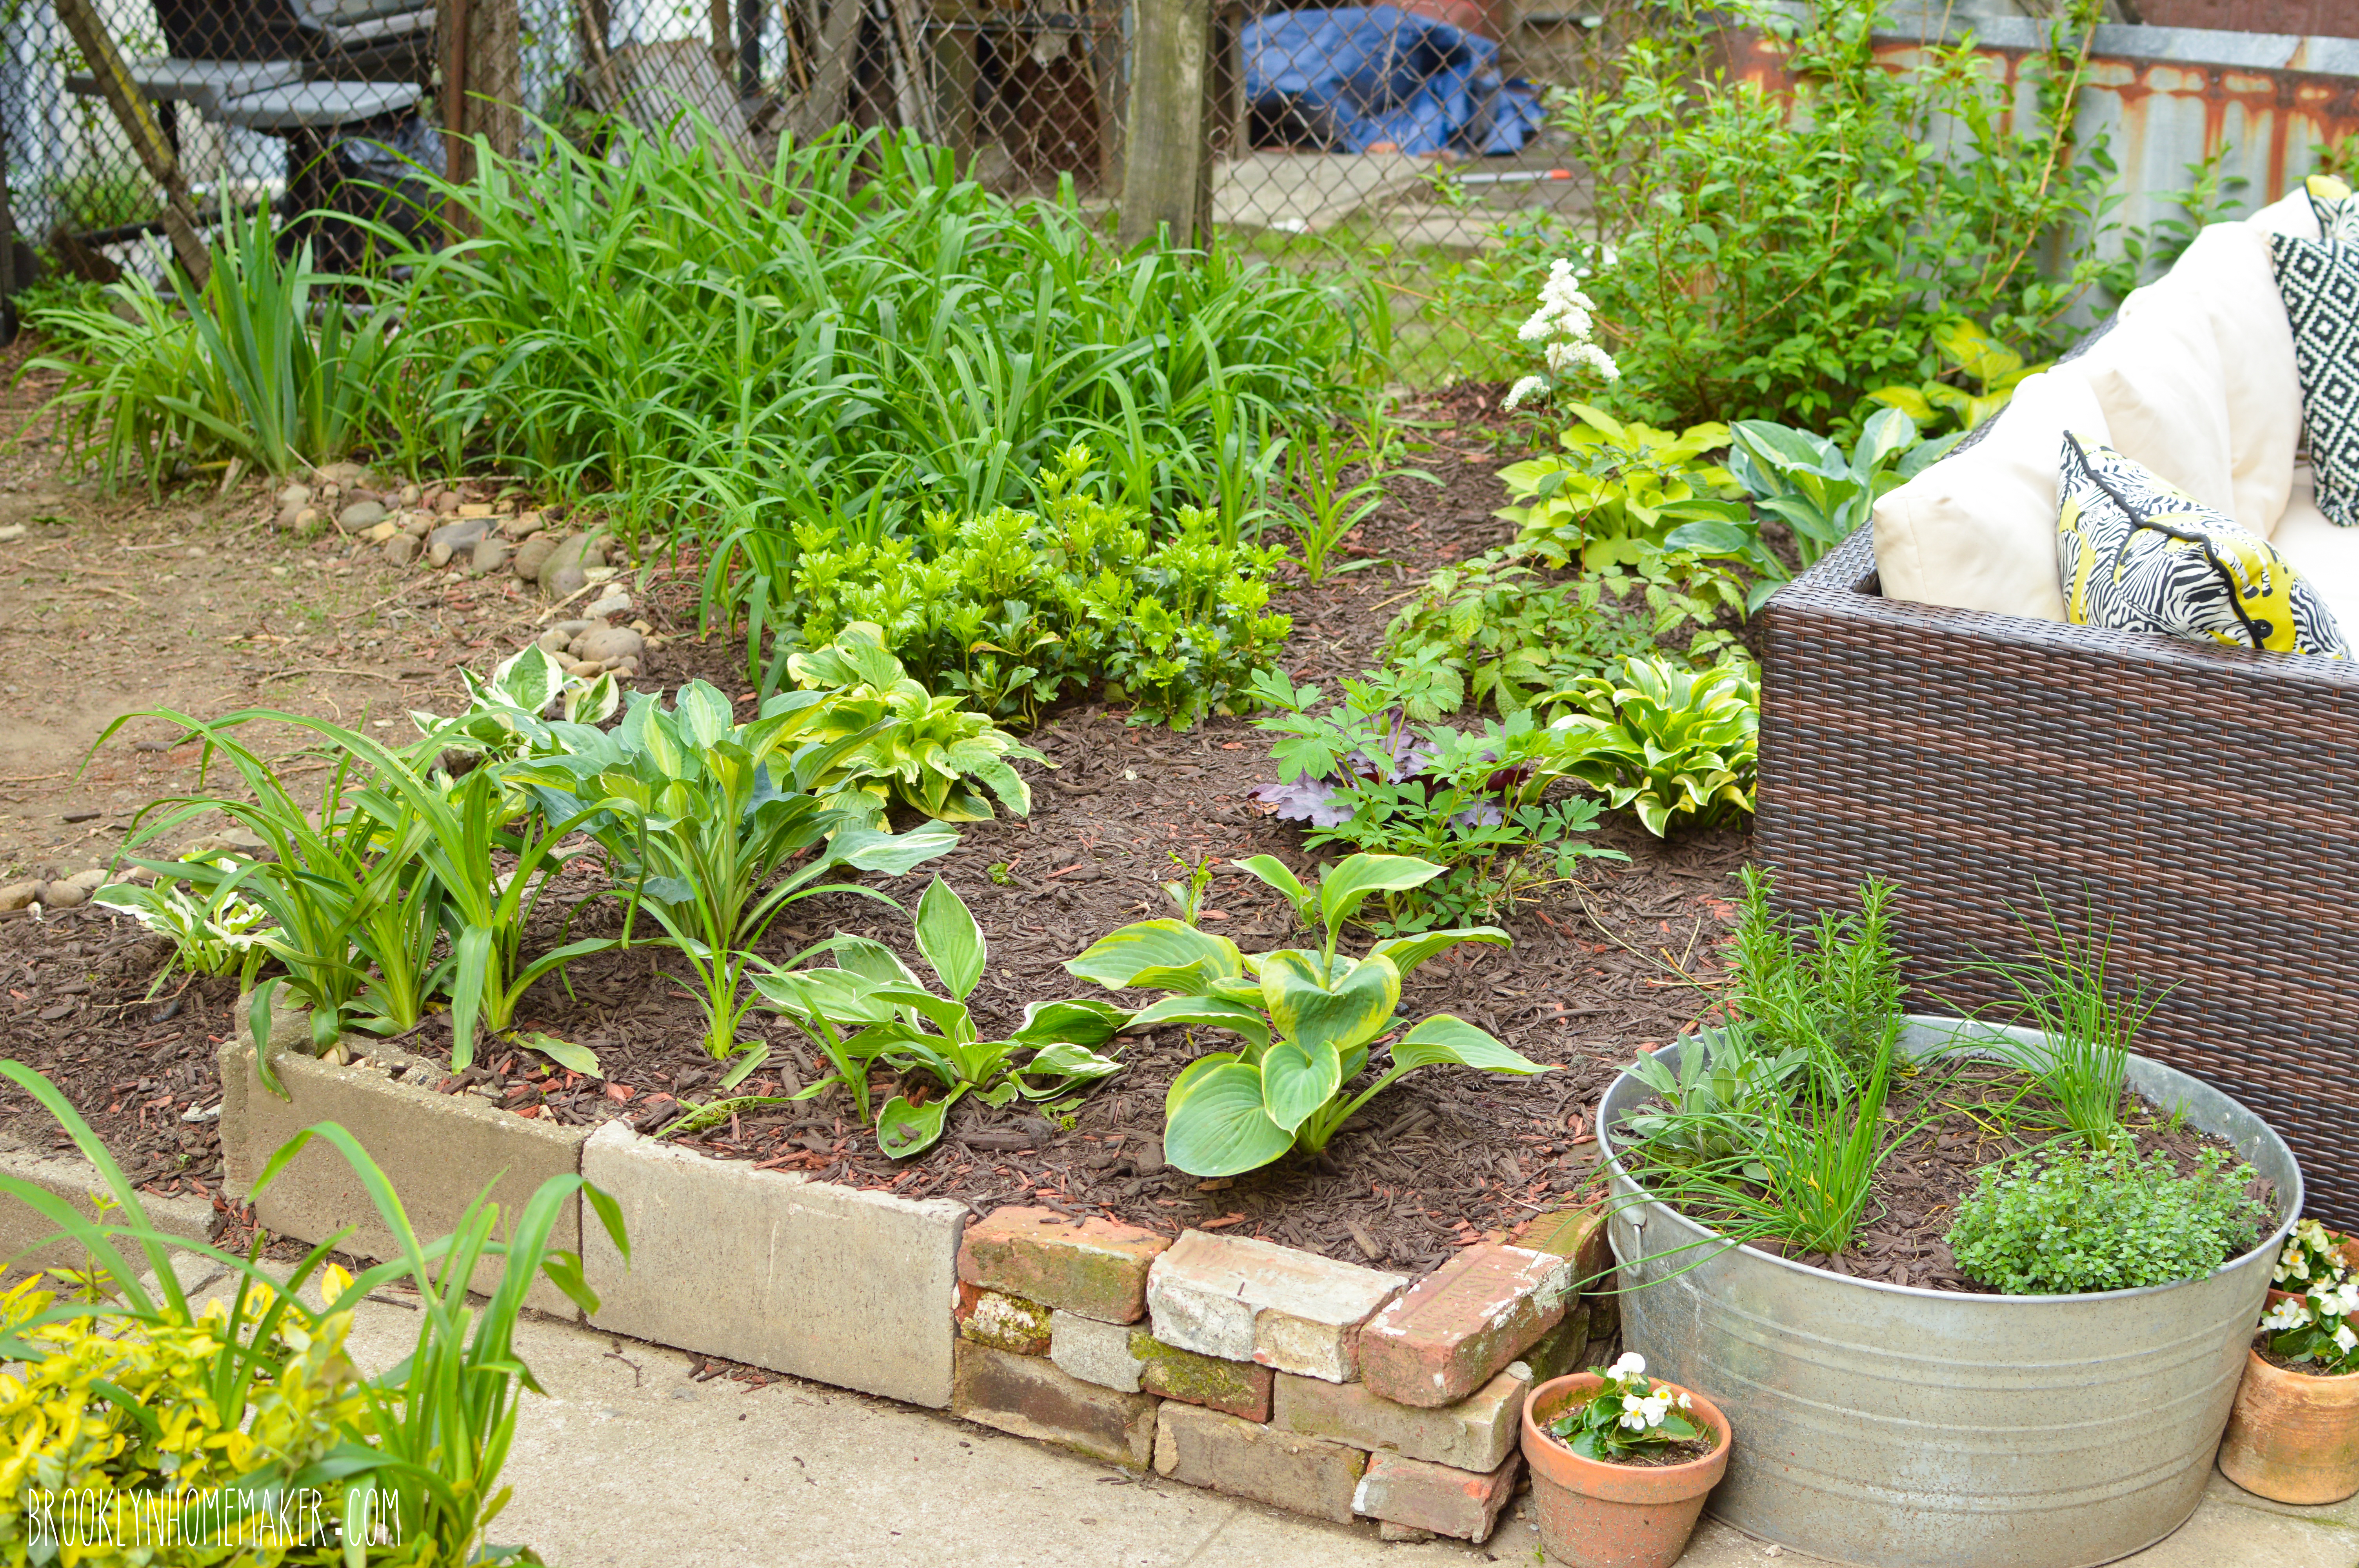
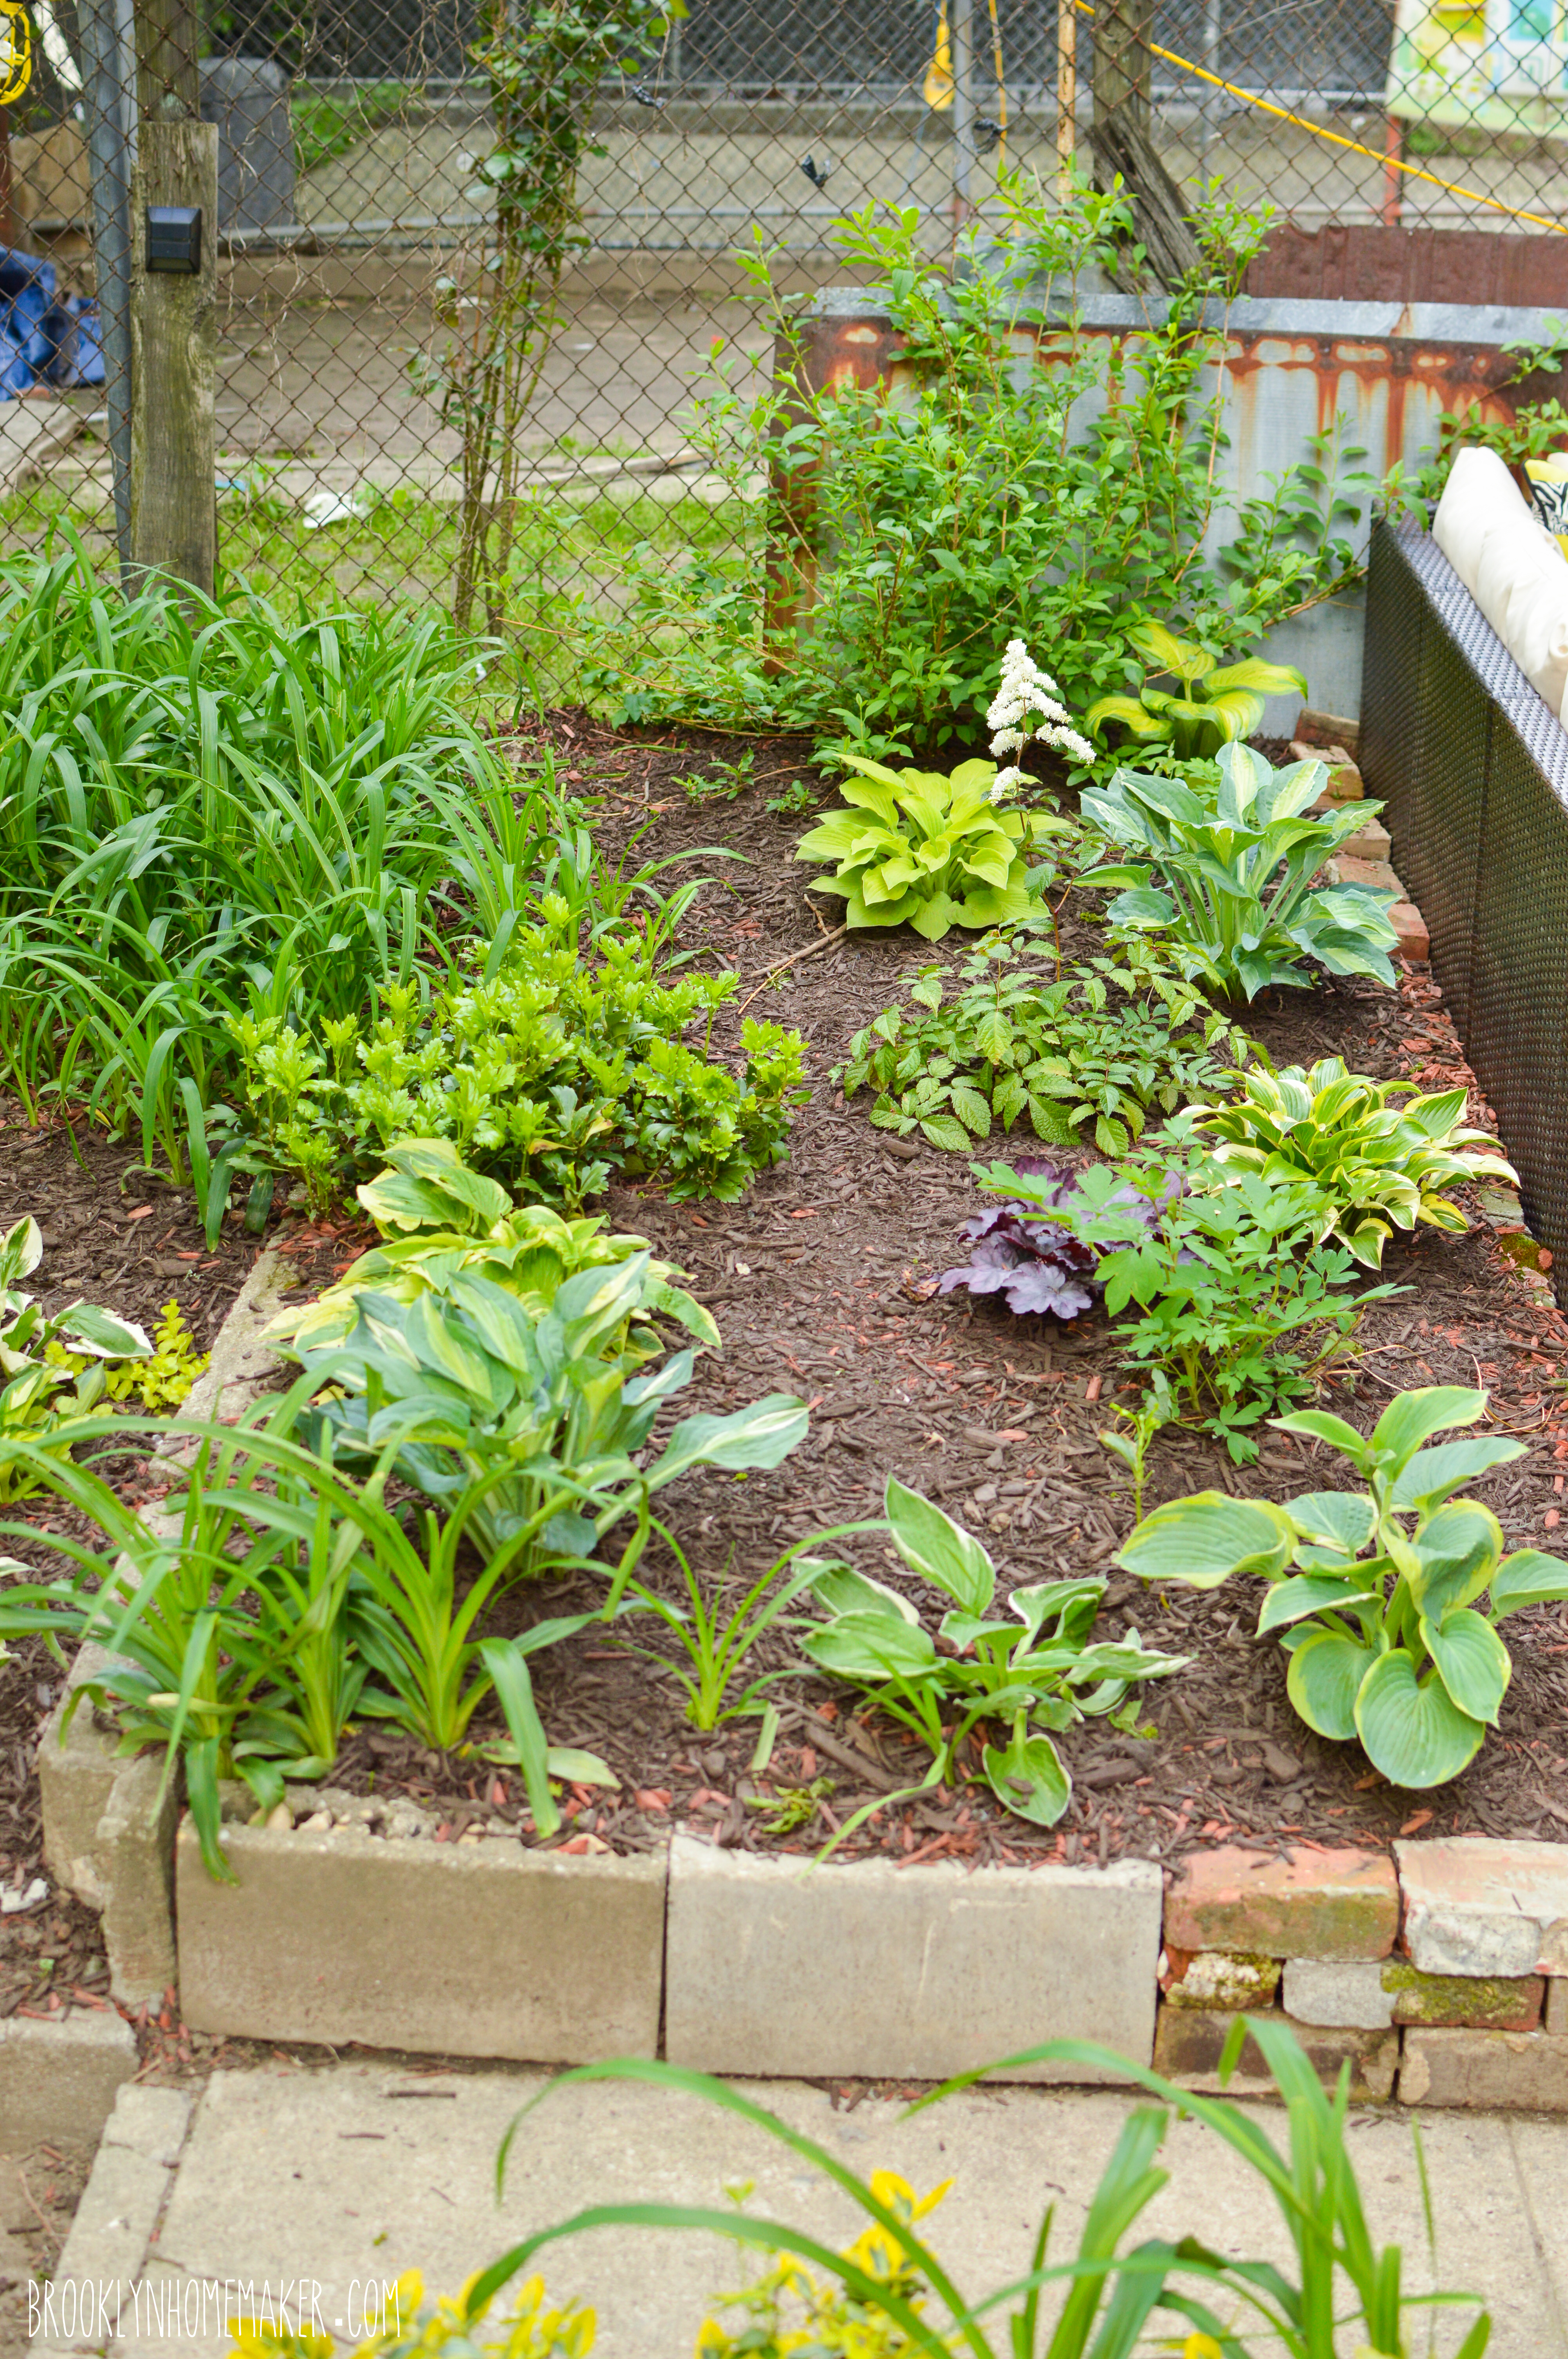
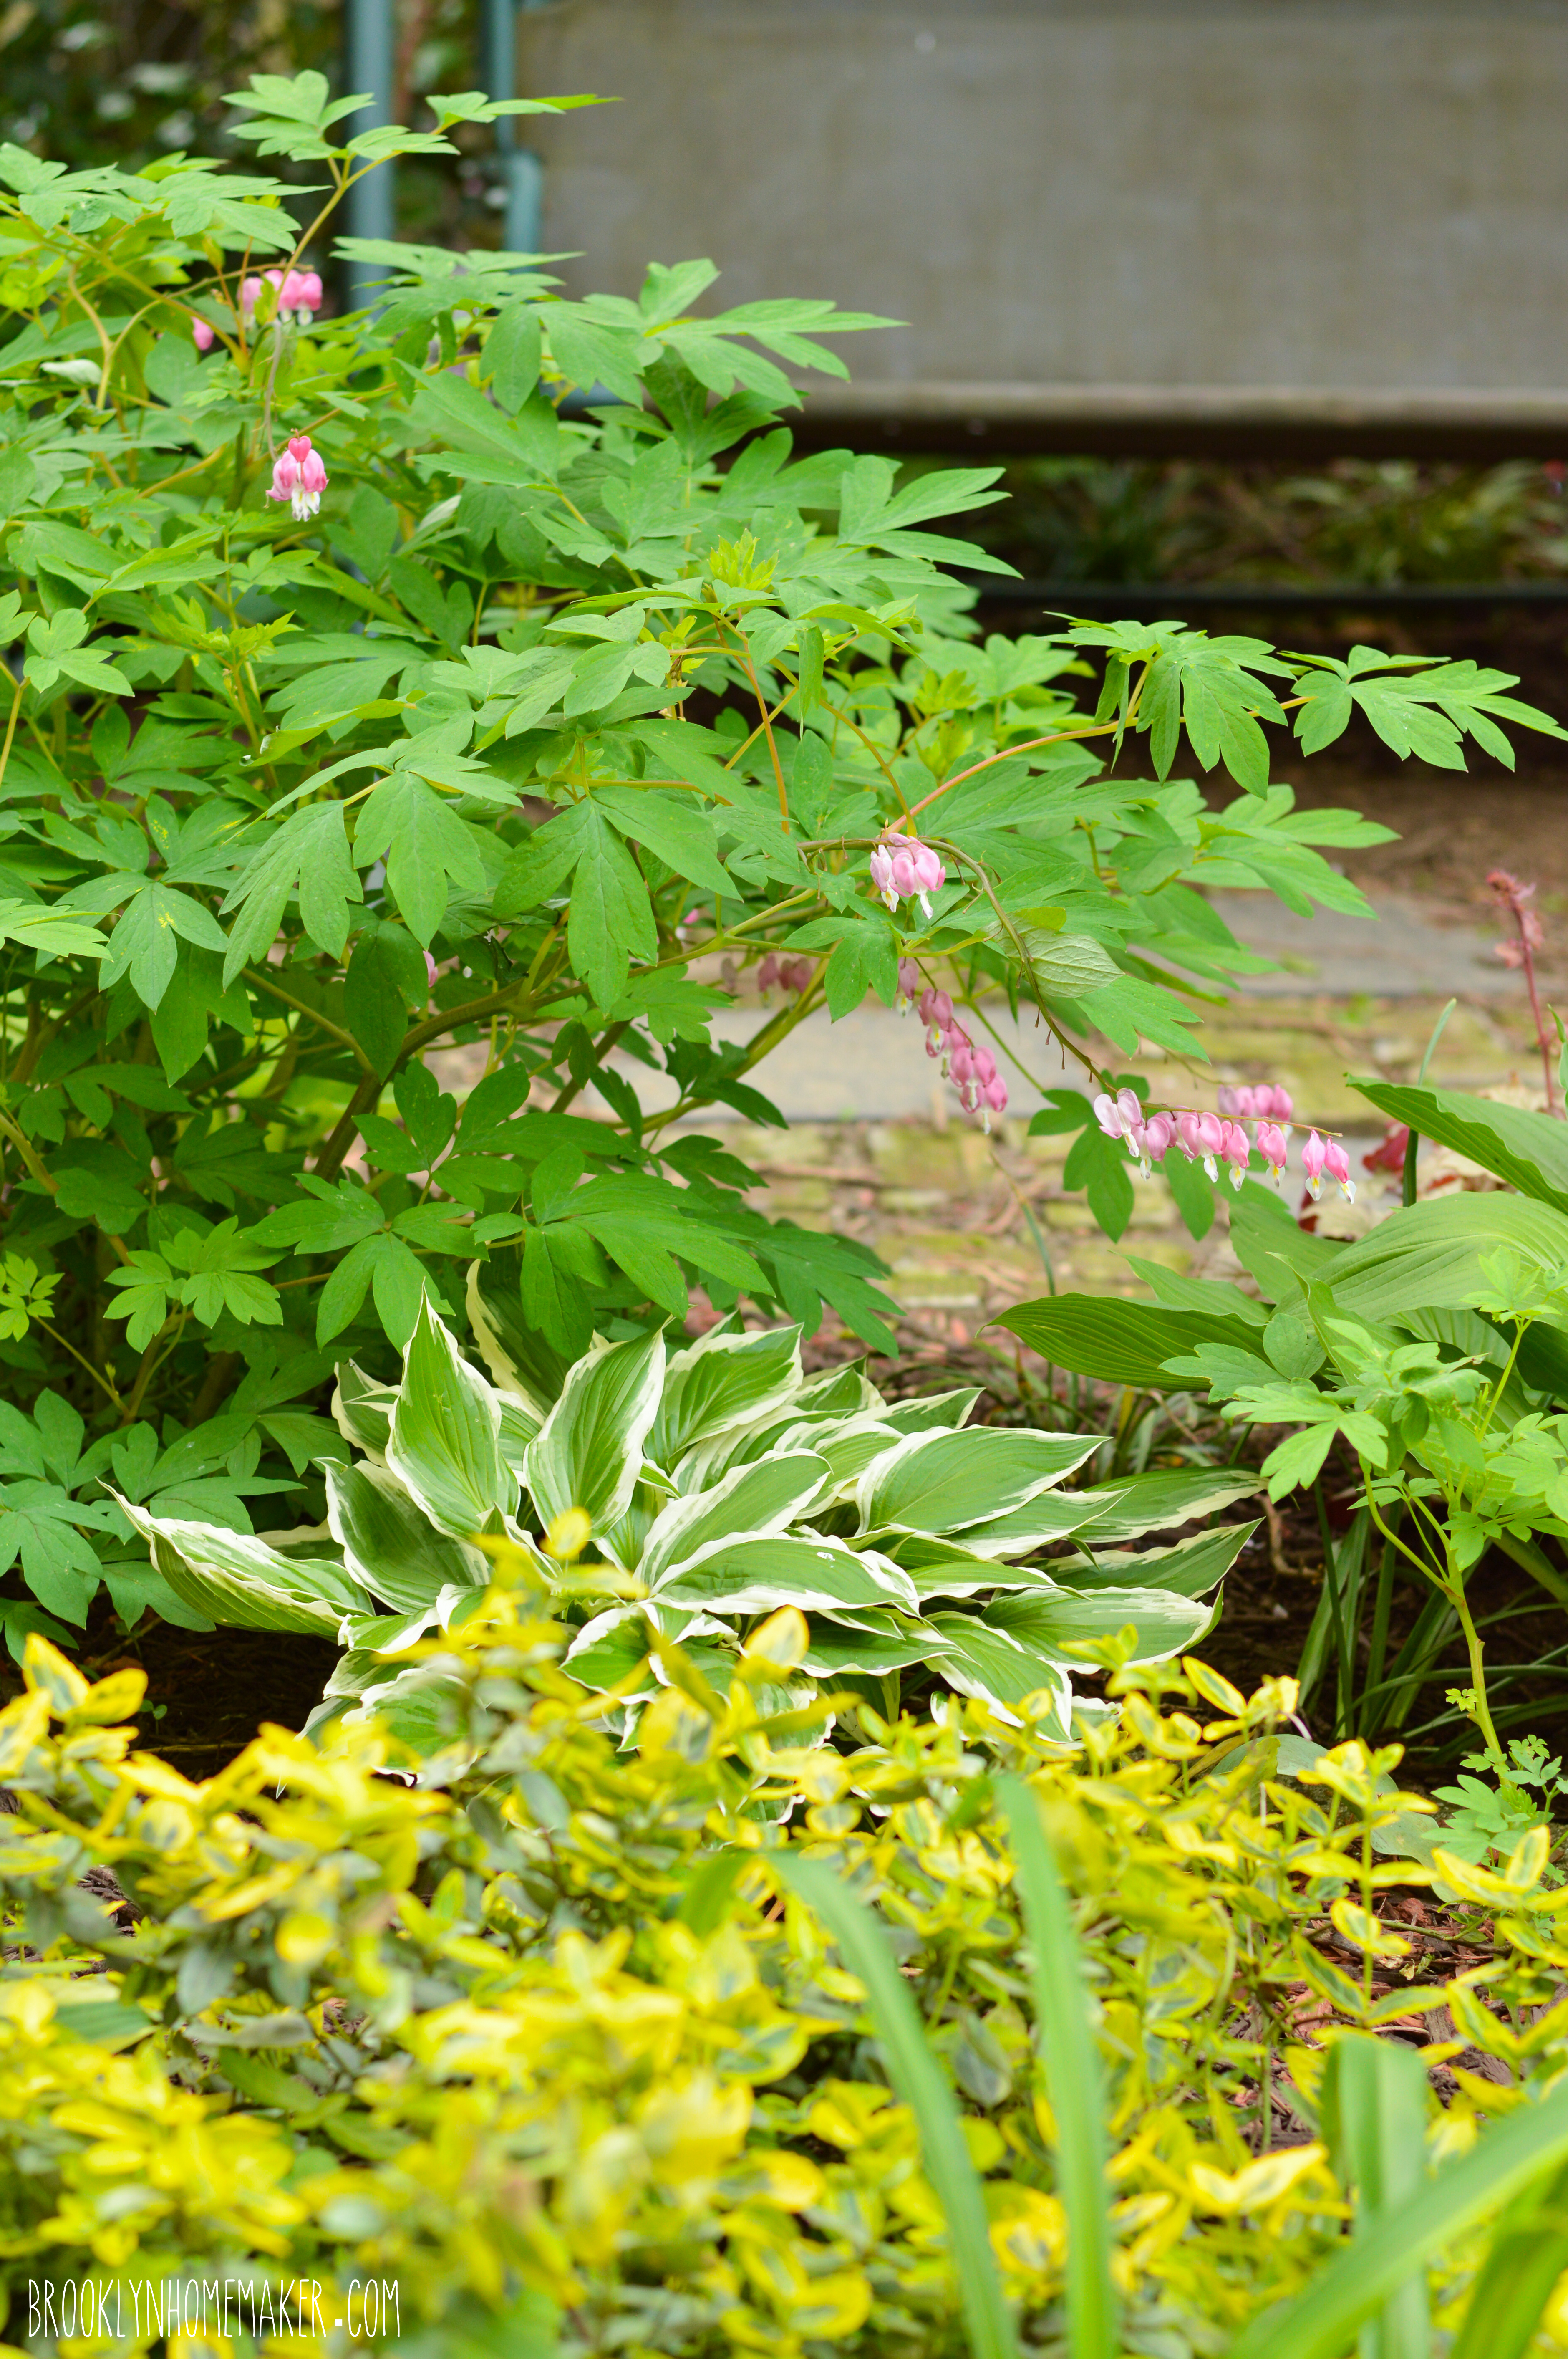
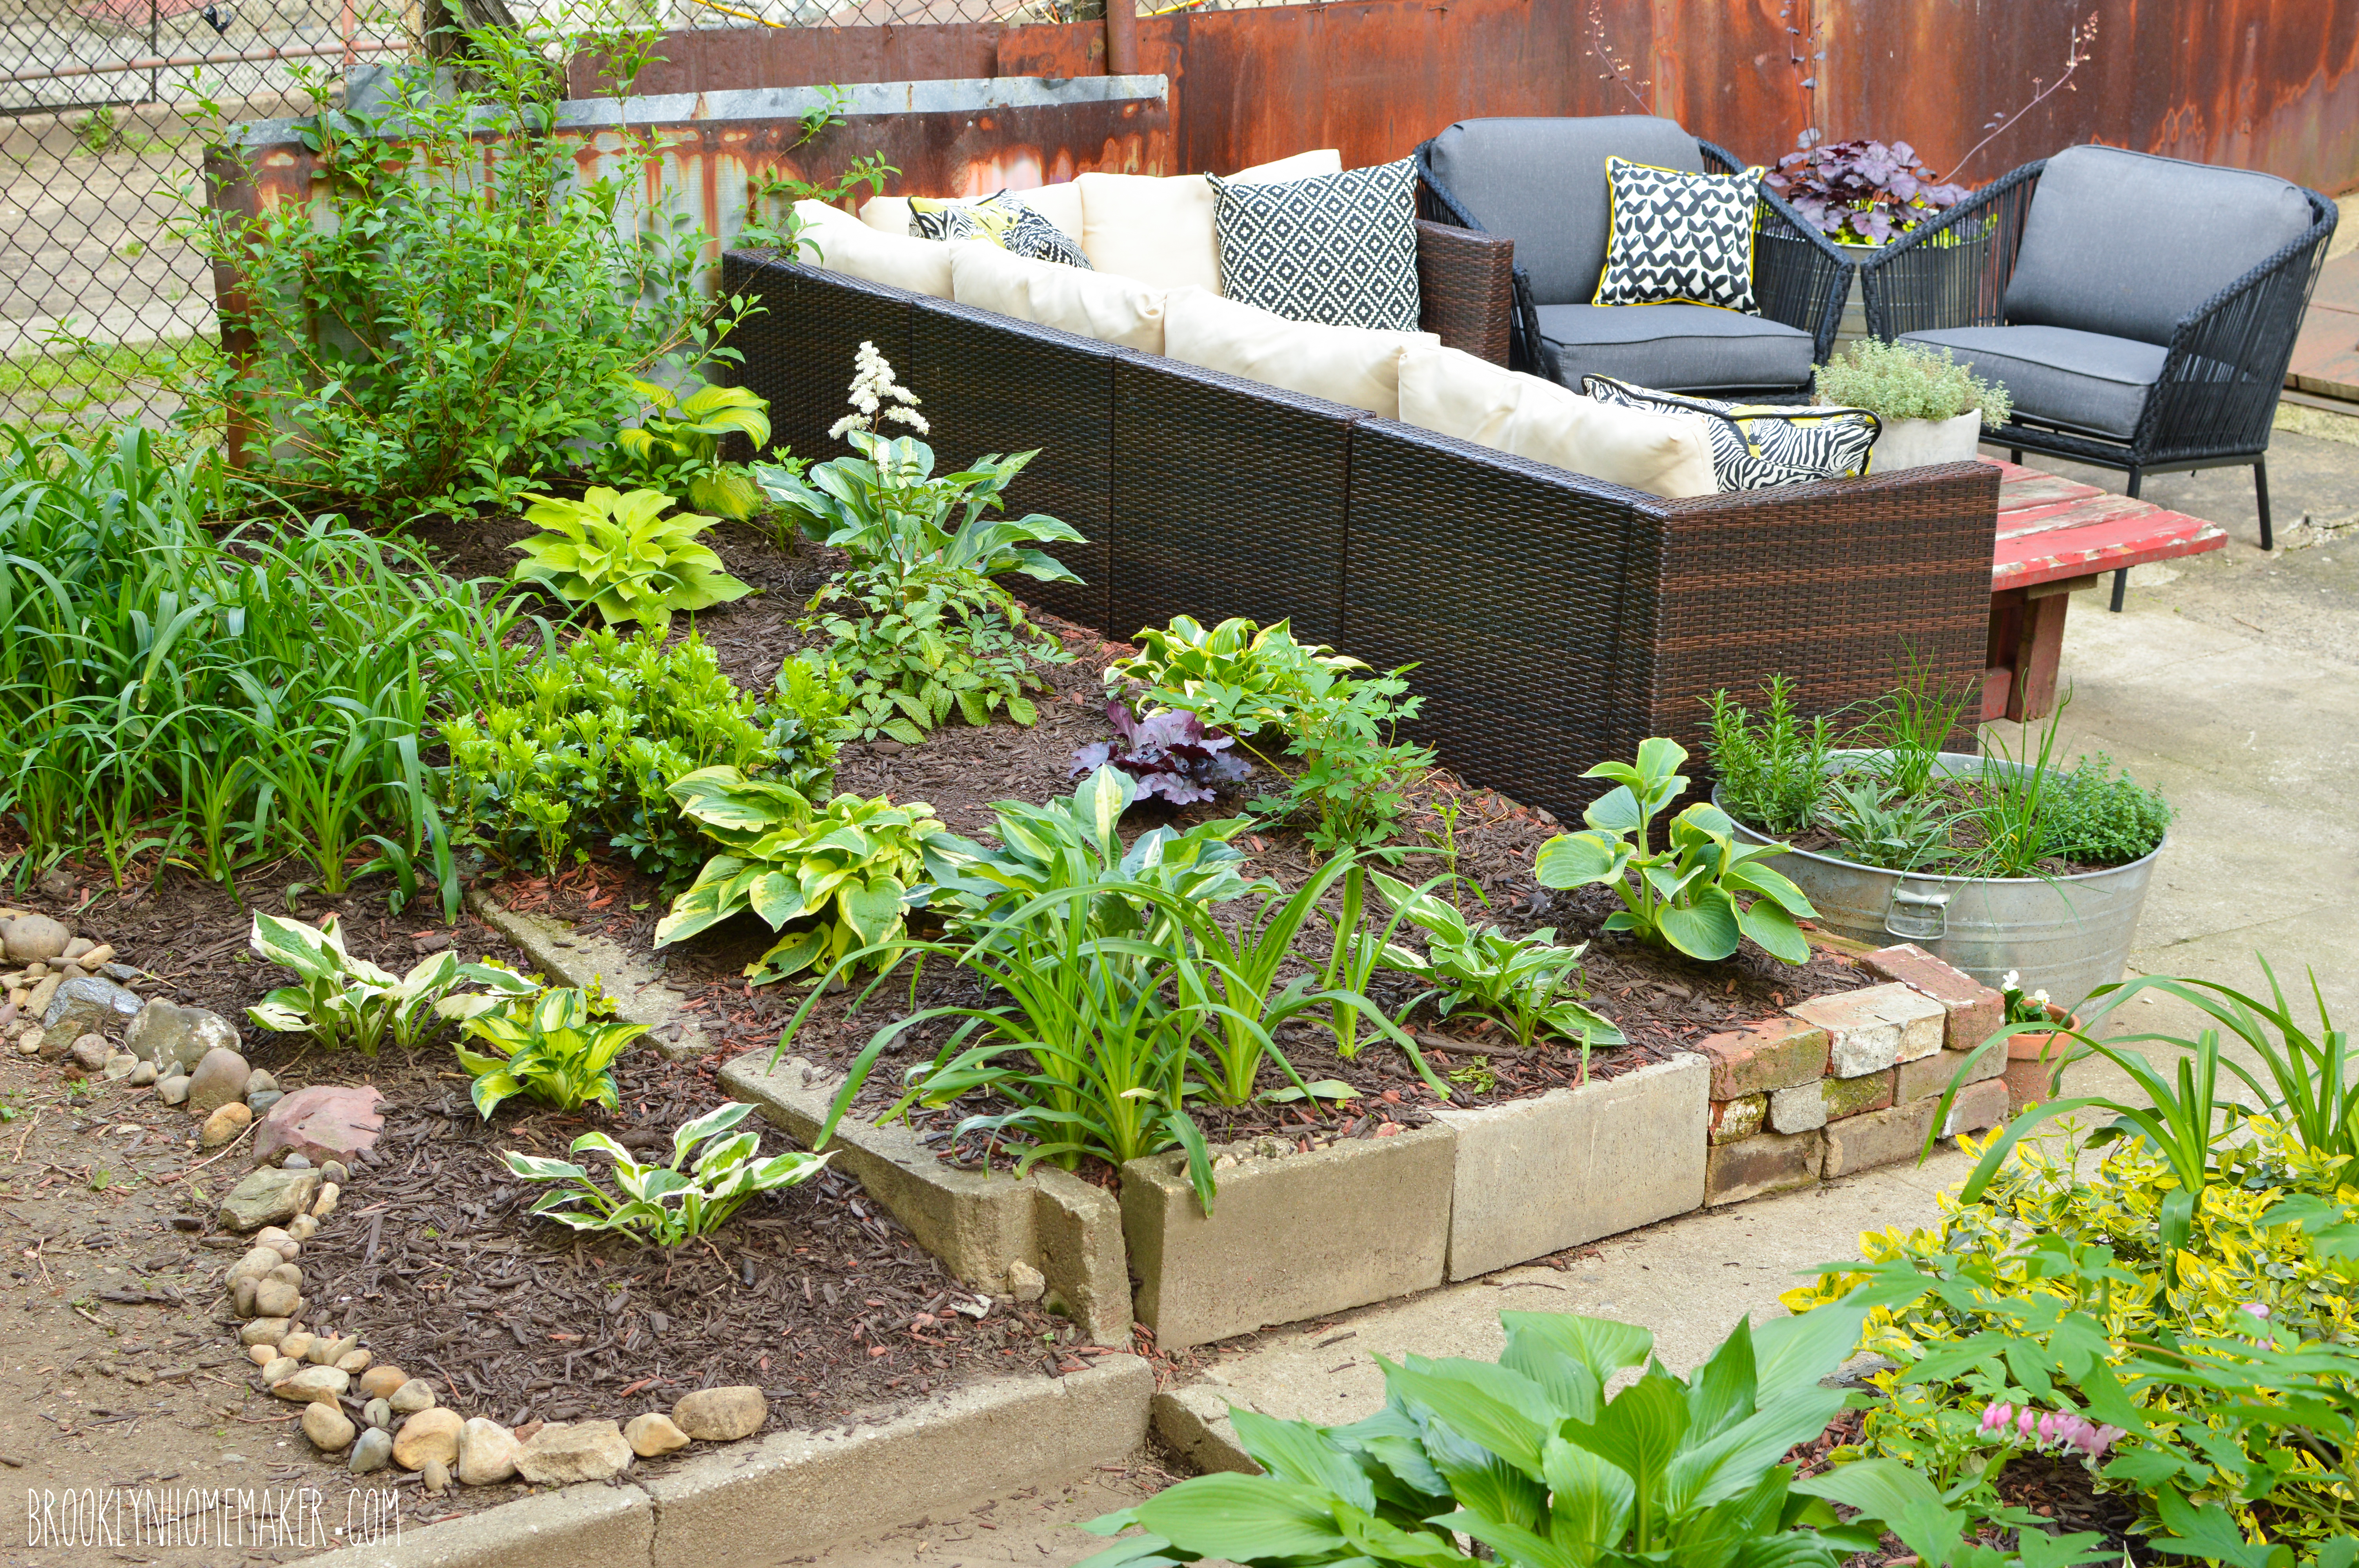
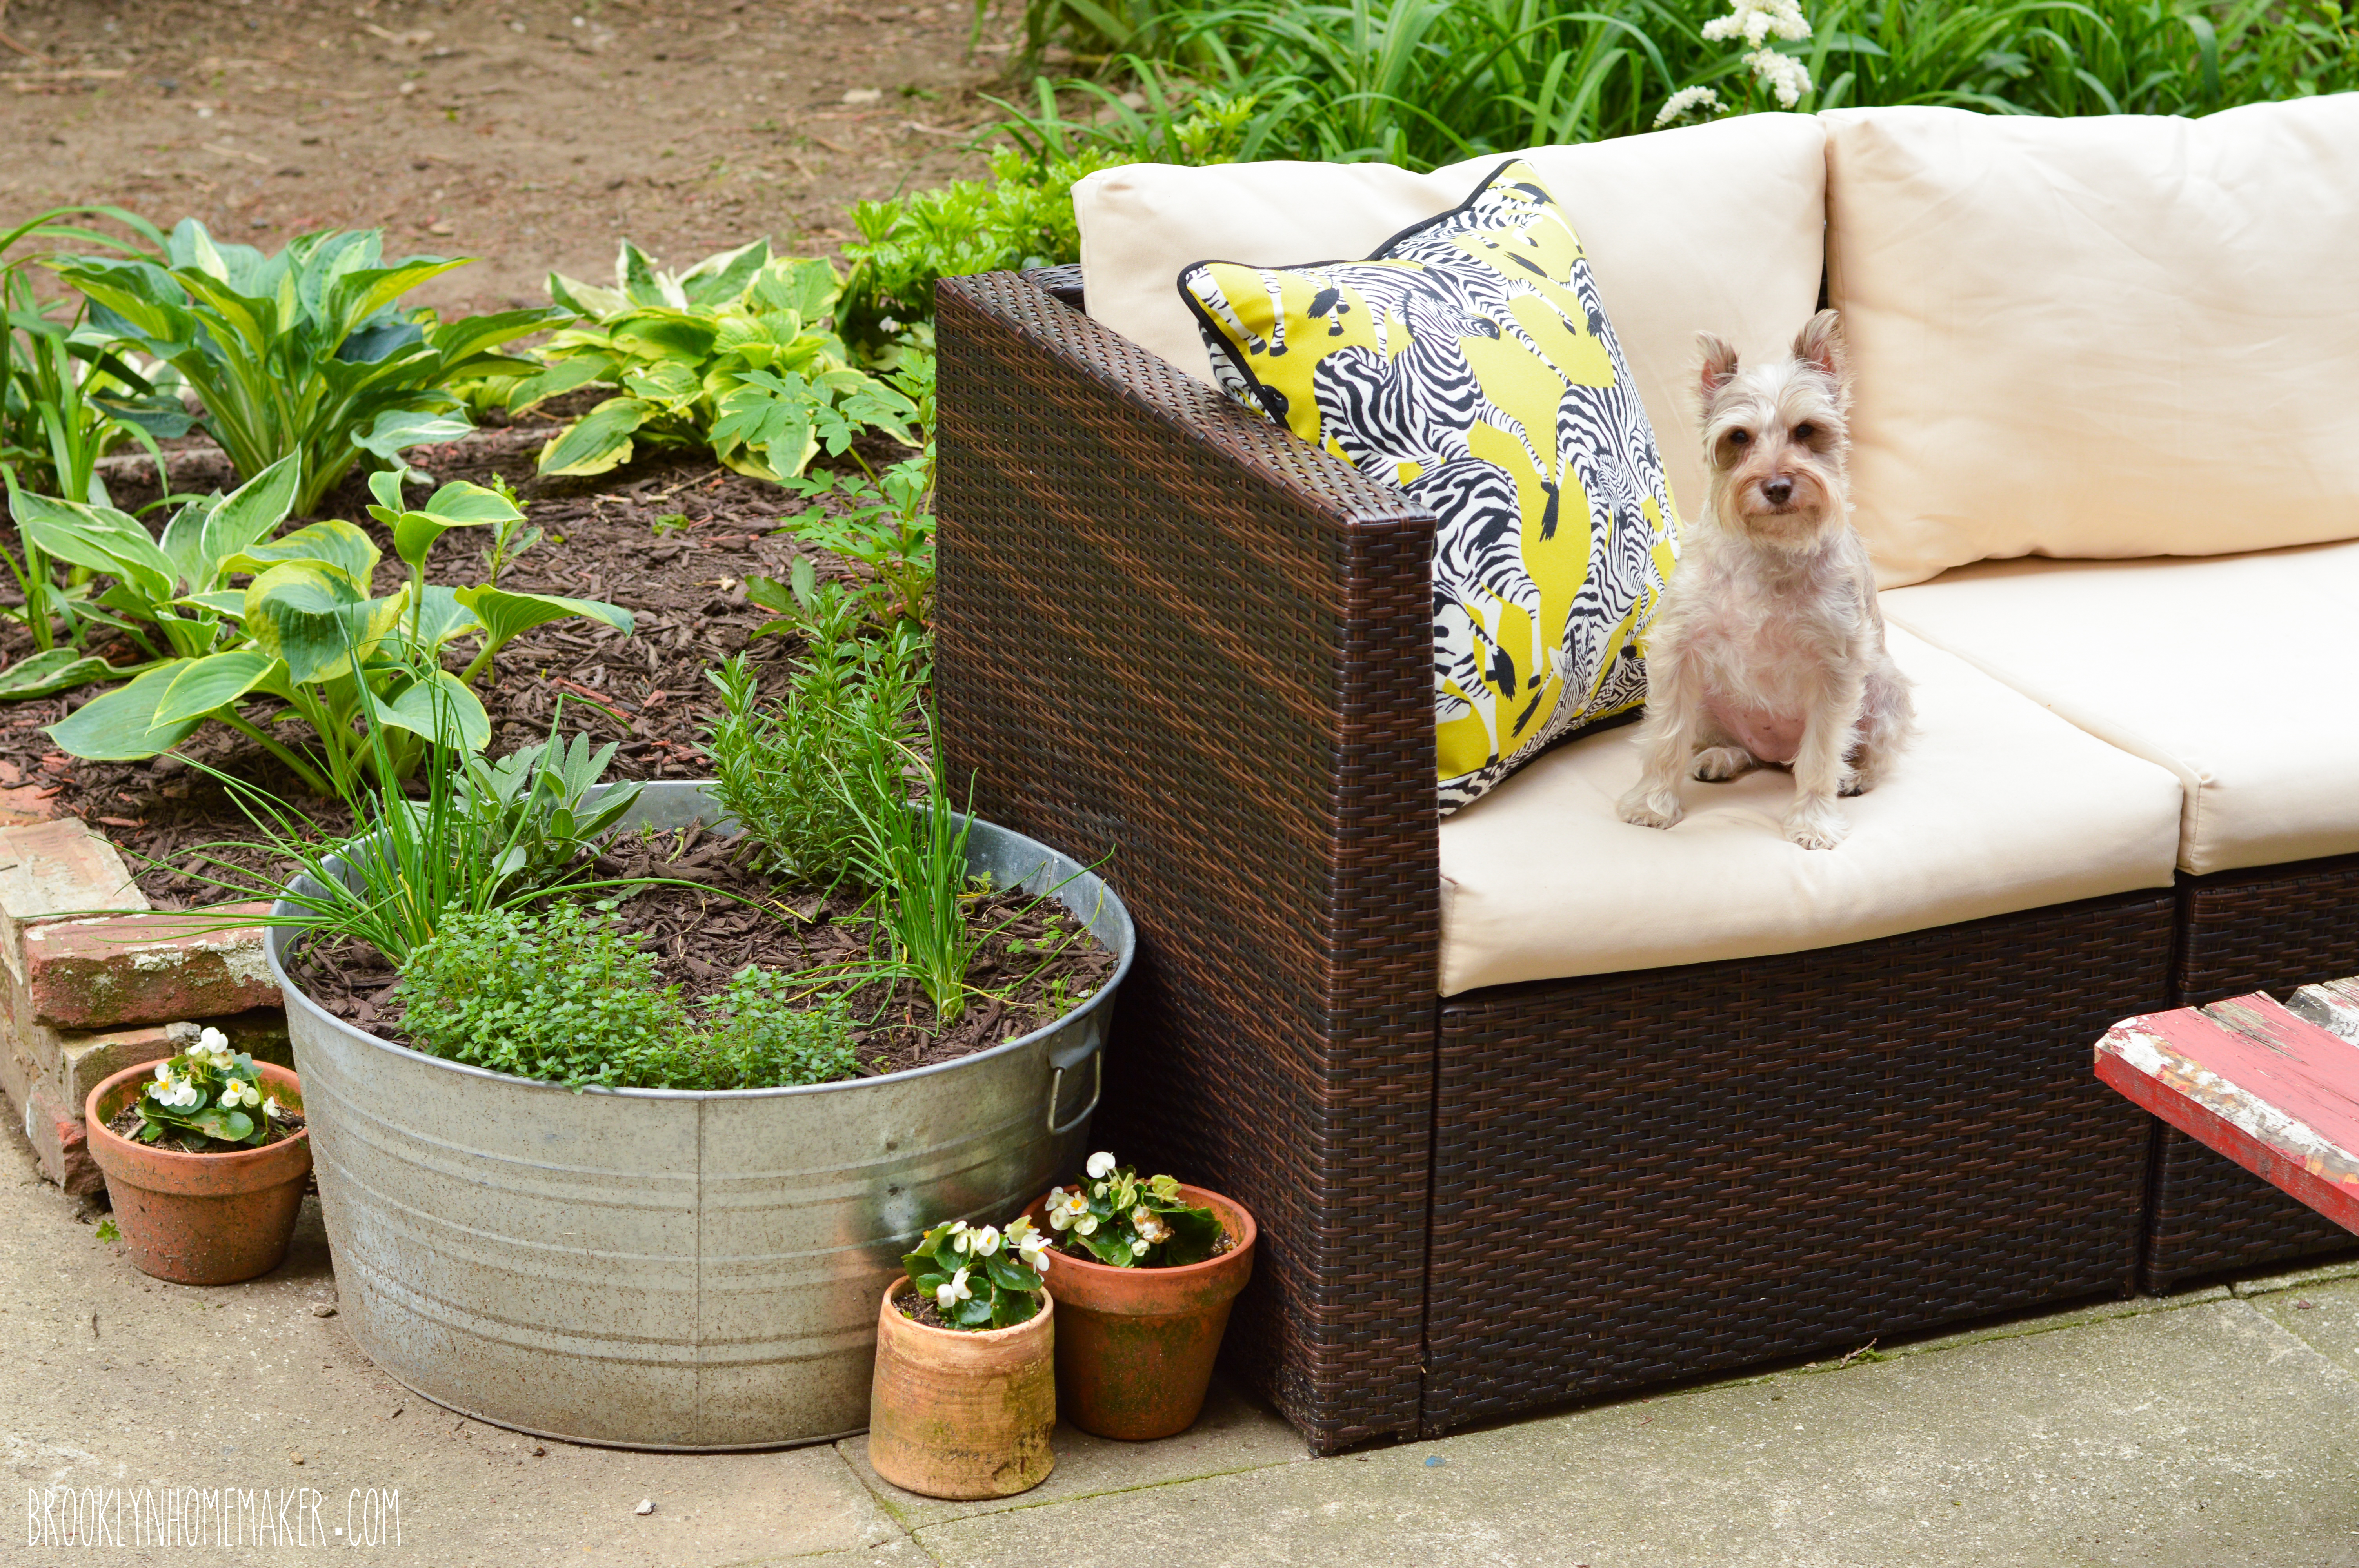
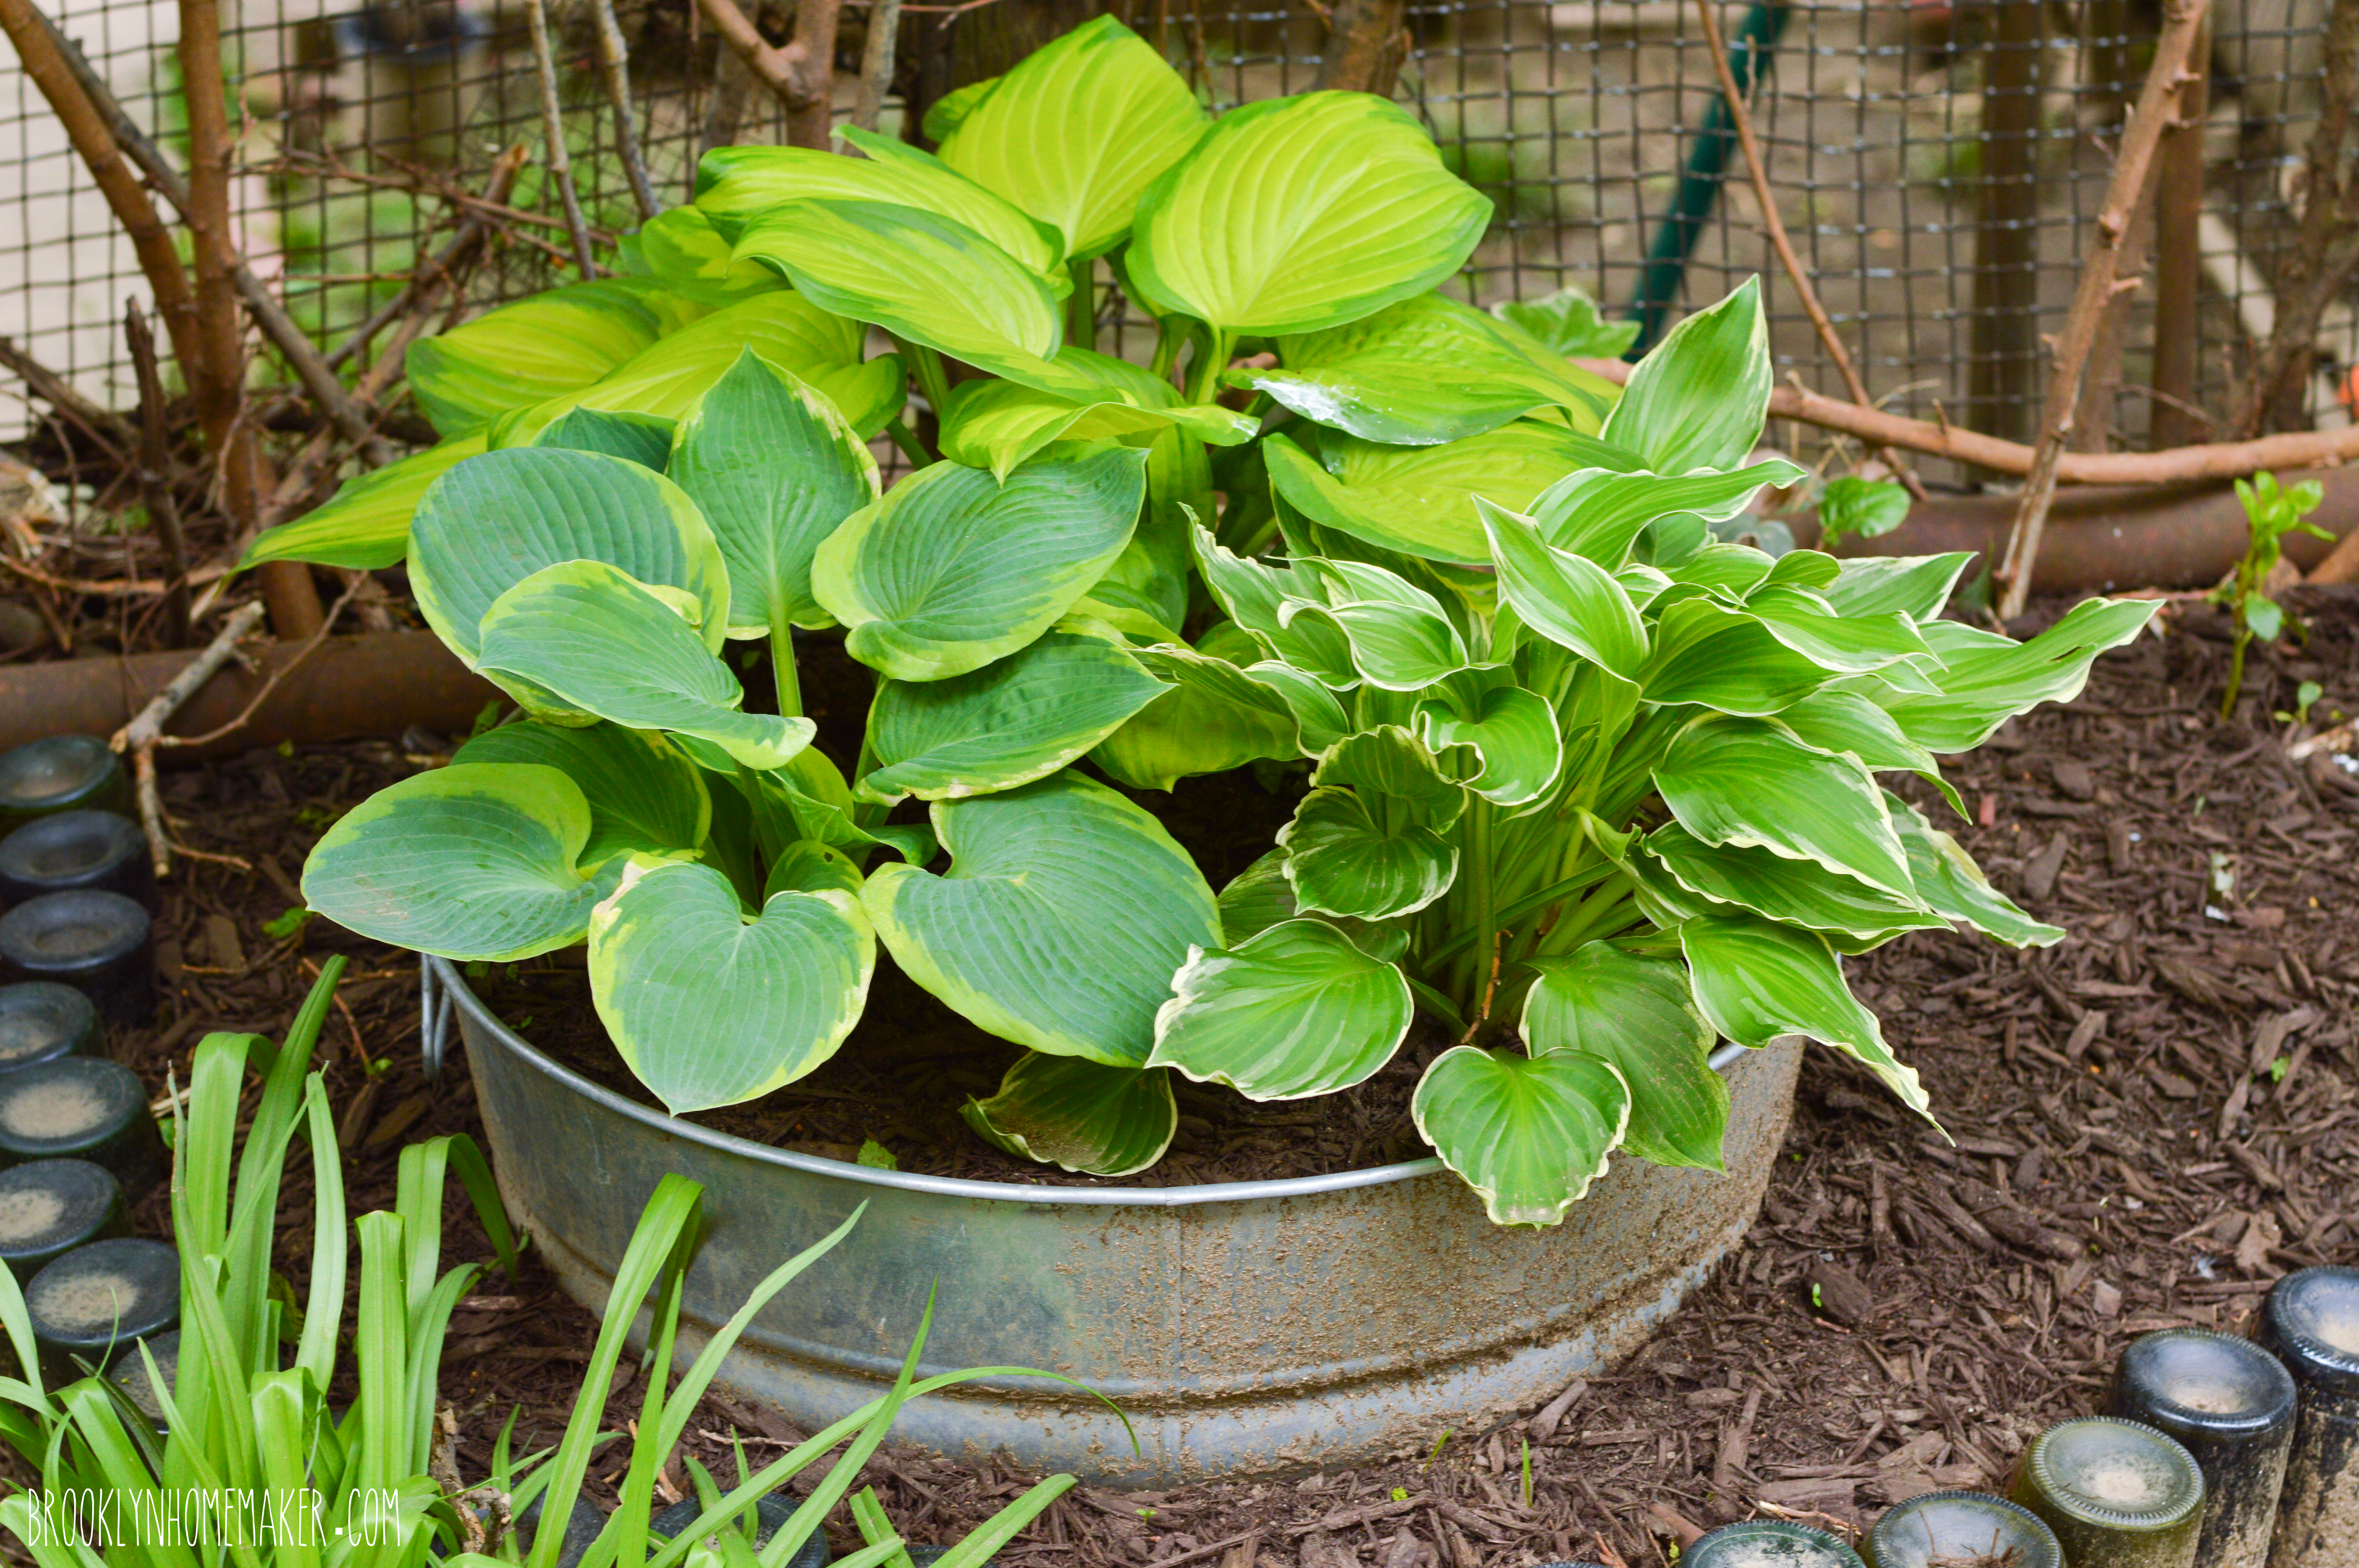
It’s incredibly difficult to find plants that thrive in dry shade. Most shade plants are moisture lovers, and most drought-tolerant plants love lots of sunshine. So, after years of experimenting, I’ve basically learned that Hostas are my best friend if I want the yard to look green and lush. I know they’re kind of boring, but there are so many different colors and shapes and sizes available these days that even a yard filled with Hostas can look interesting and modern. I’d actually already figured this out before my last yard post, but at that point I’d only gotten around to planting few of them. These days they’re all over the place.

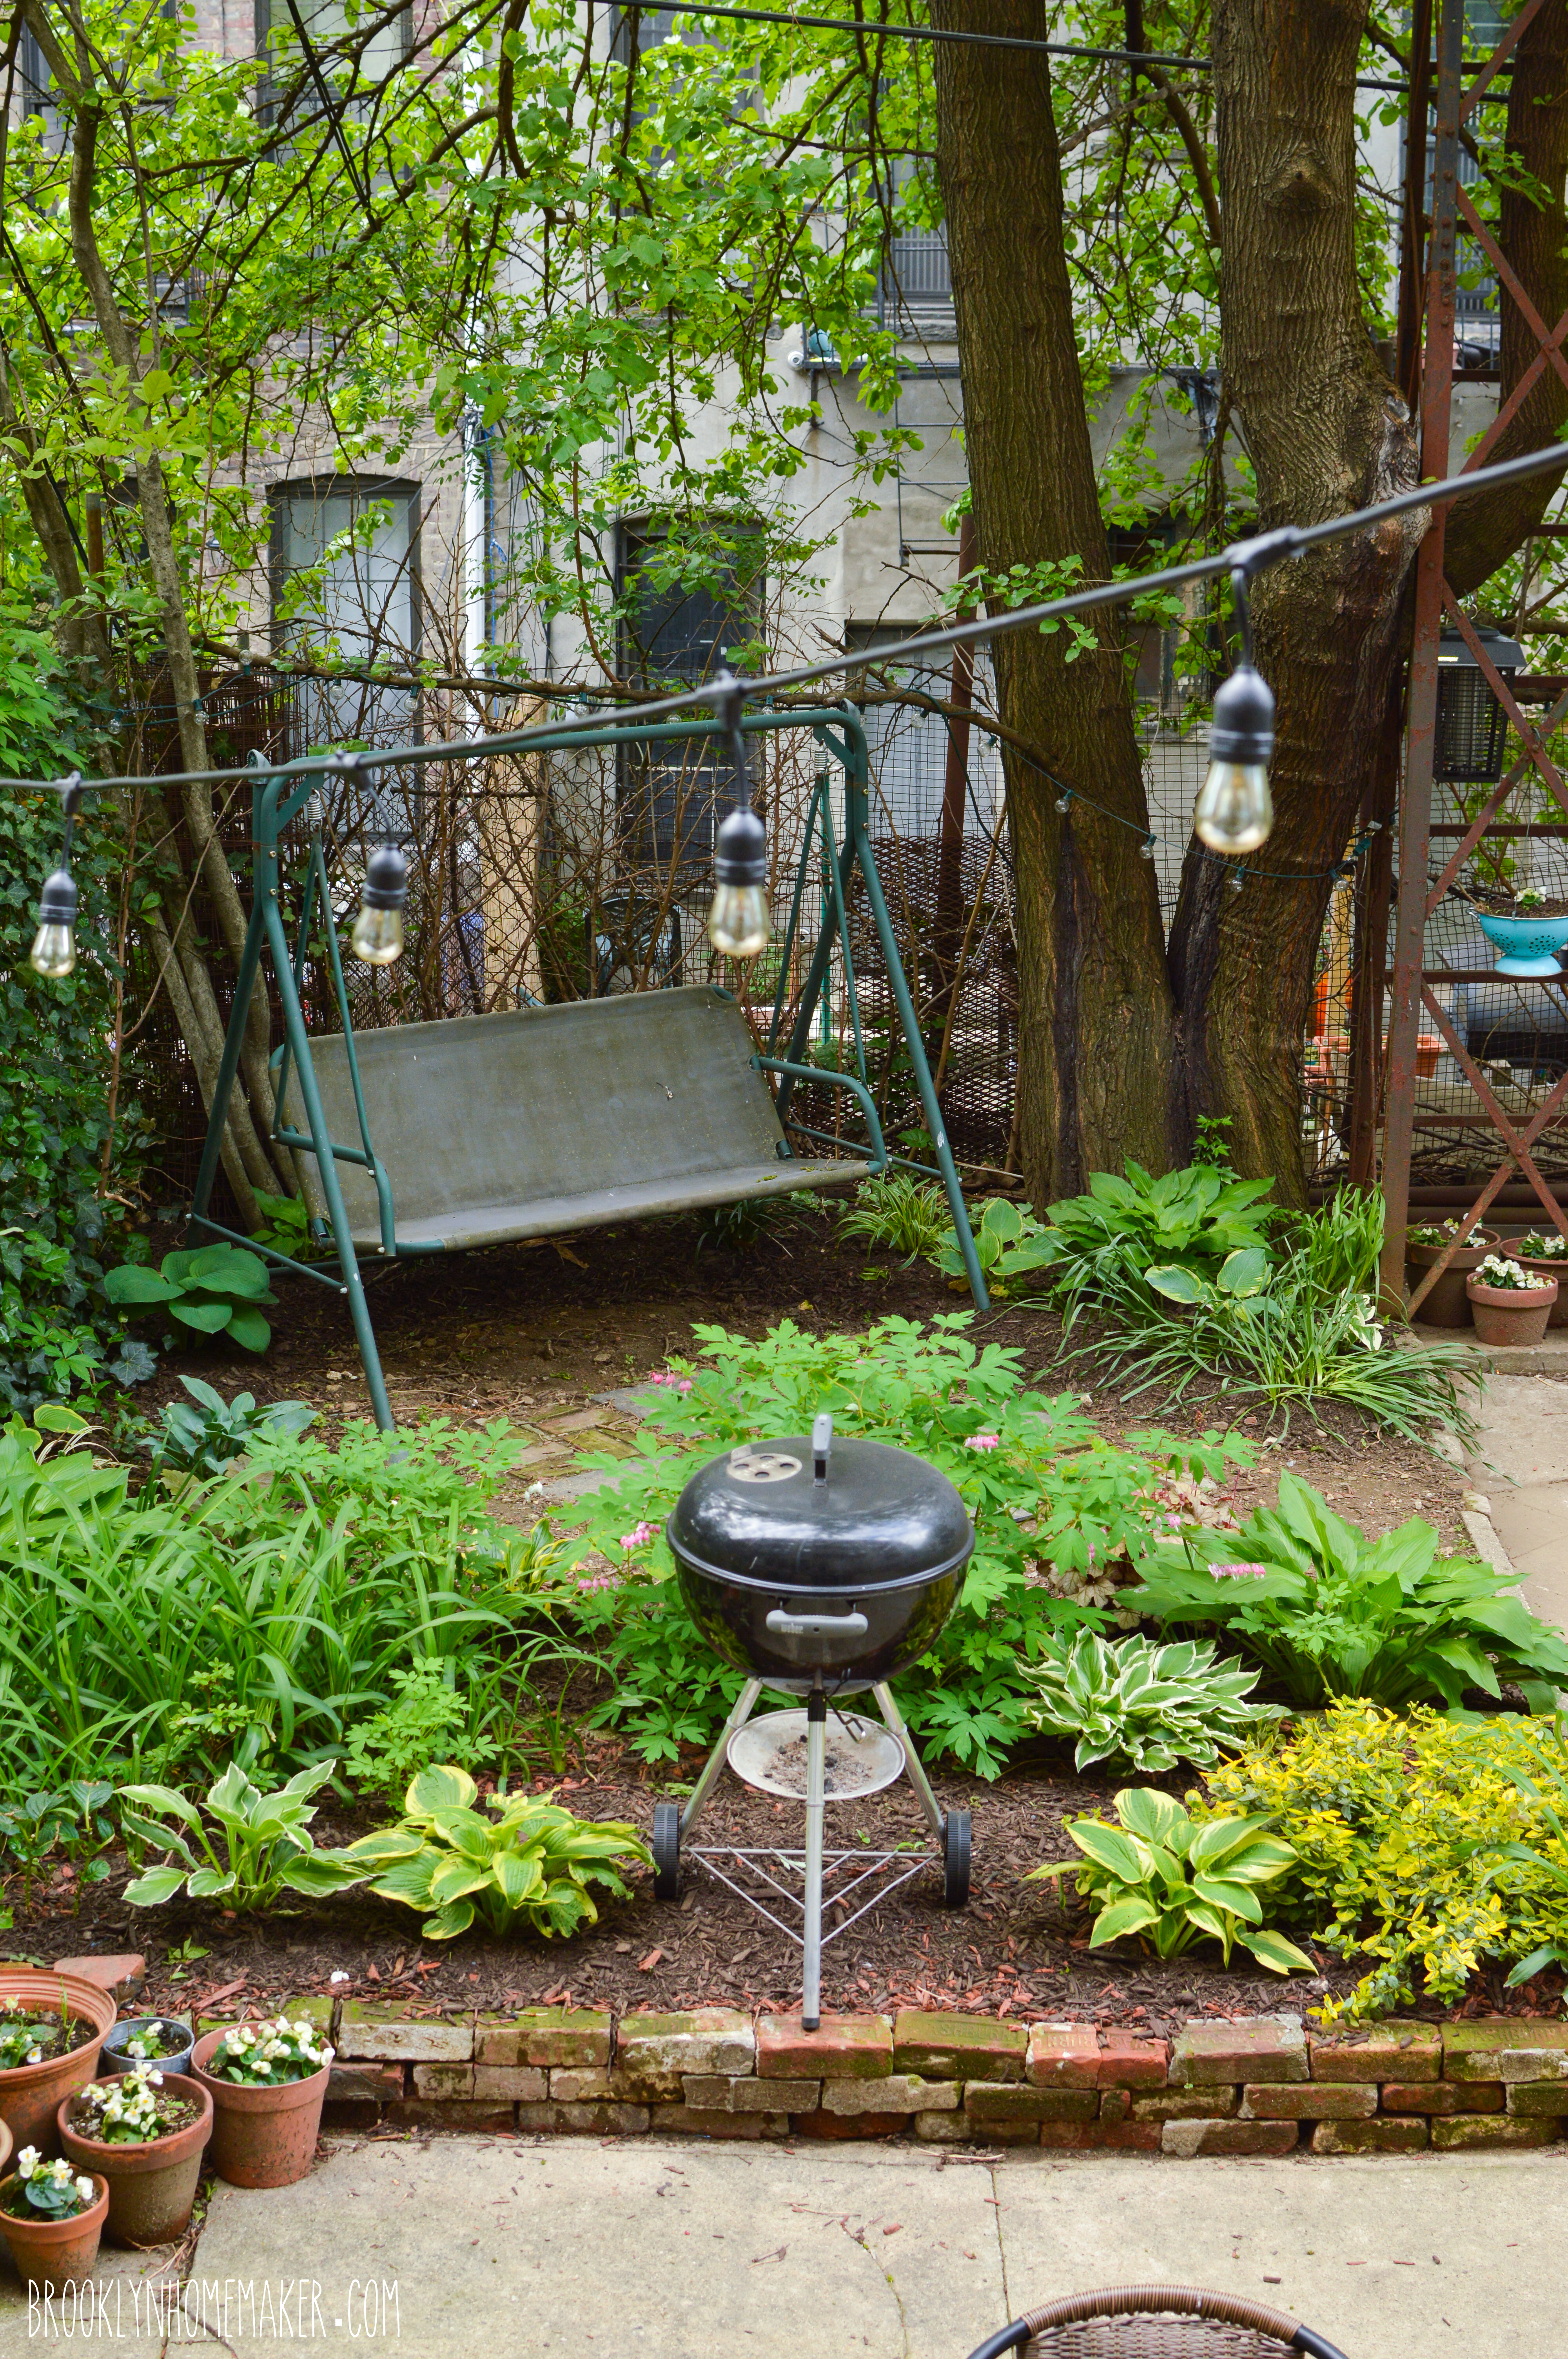
Bleeding Hearts and Coral Bells seem to do well back there too, so I’ve started mixing them in between the Hostas. There’s one little corner of the yard that gets a few hours of decent light, so I have some orange day lilies planted there, but they haven’t flowered yet and so far they just look like overgrown grass. Because I like to live dangerously, this spring I also decided to test the limits of the sunshine back there, and planted a sun-loving Forsythia against the fence. Fingers crossed!

urban outdoor space | Brooklyn Homemakerurban outdoor space | Brooklyn Homemaker

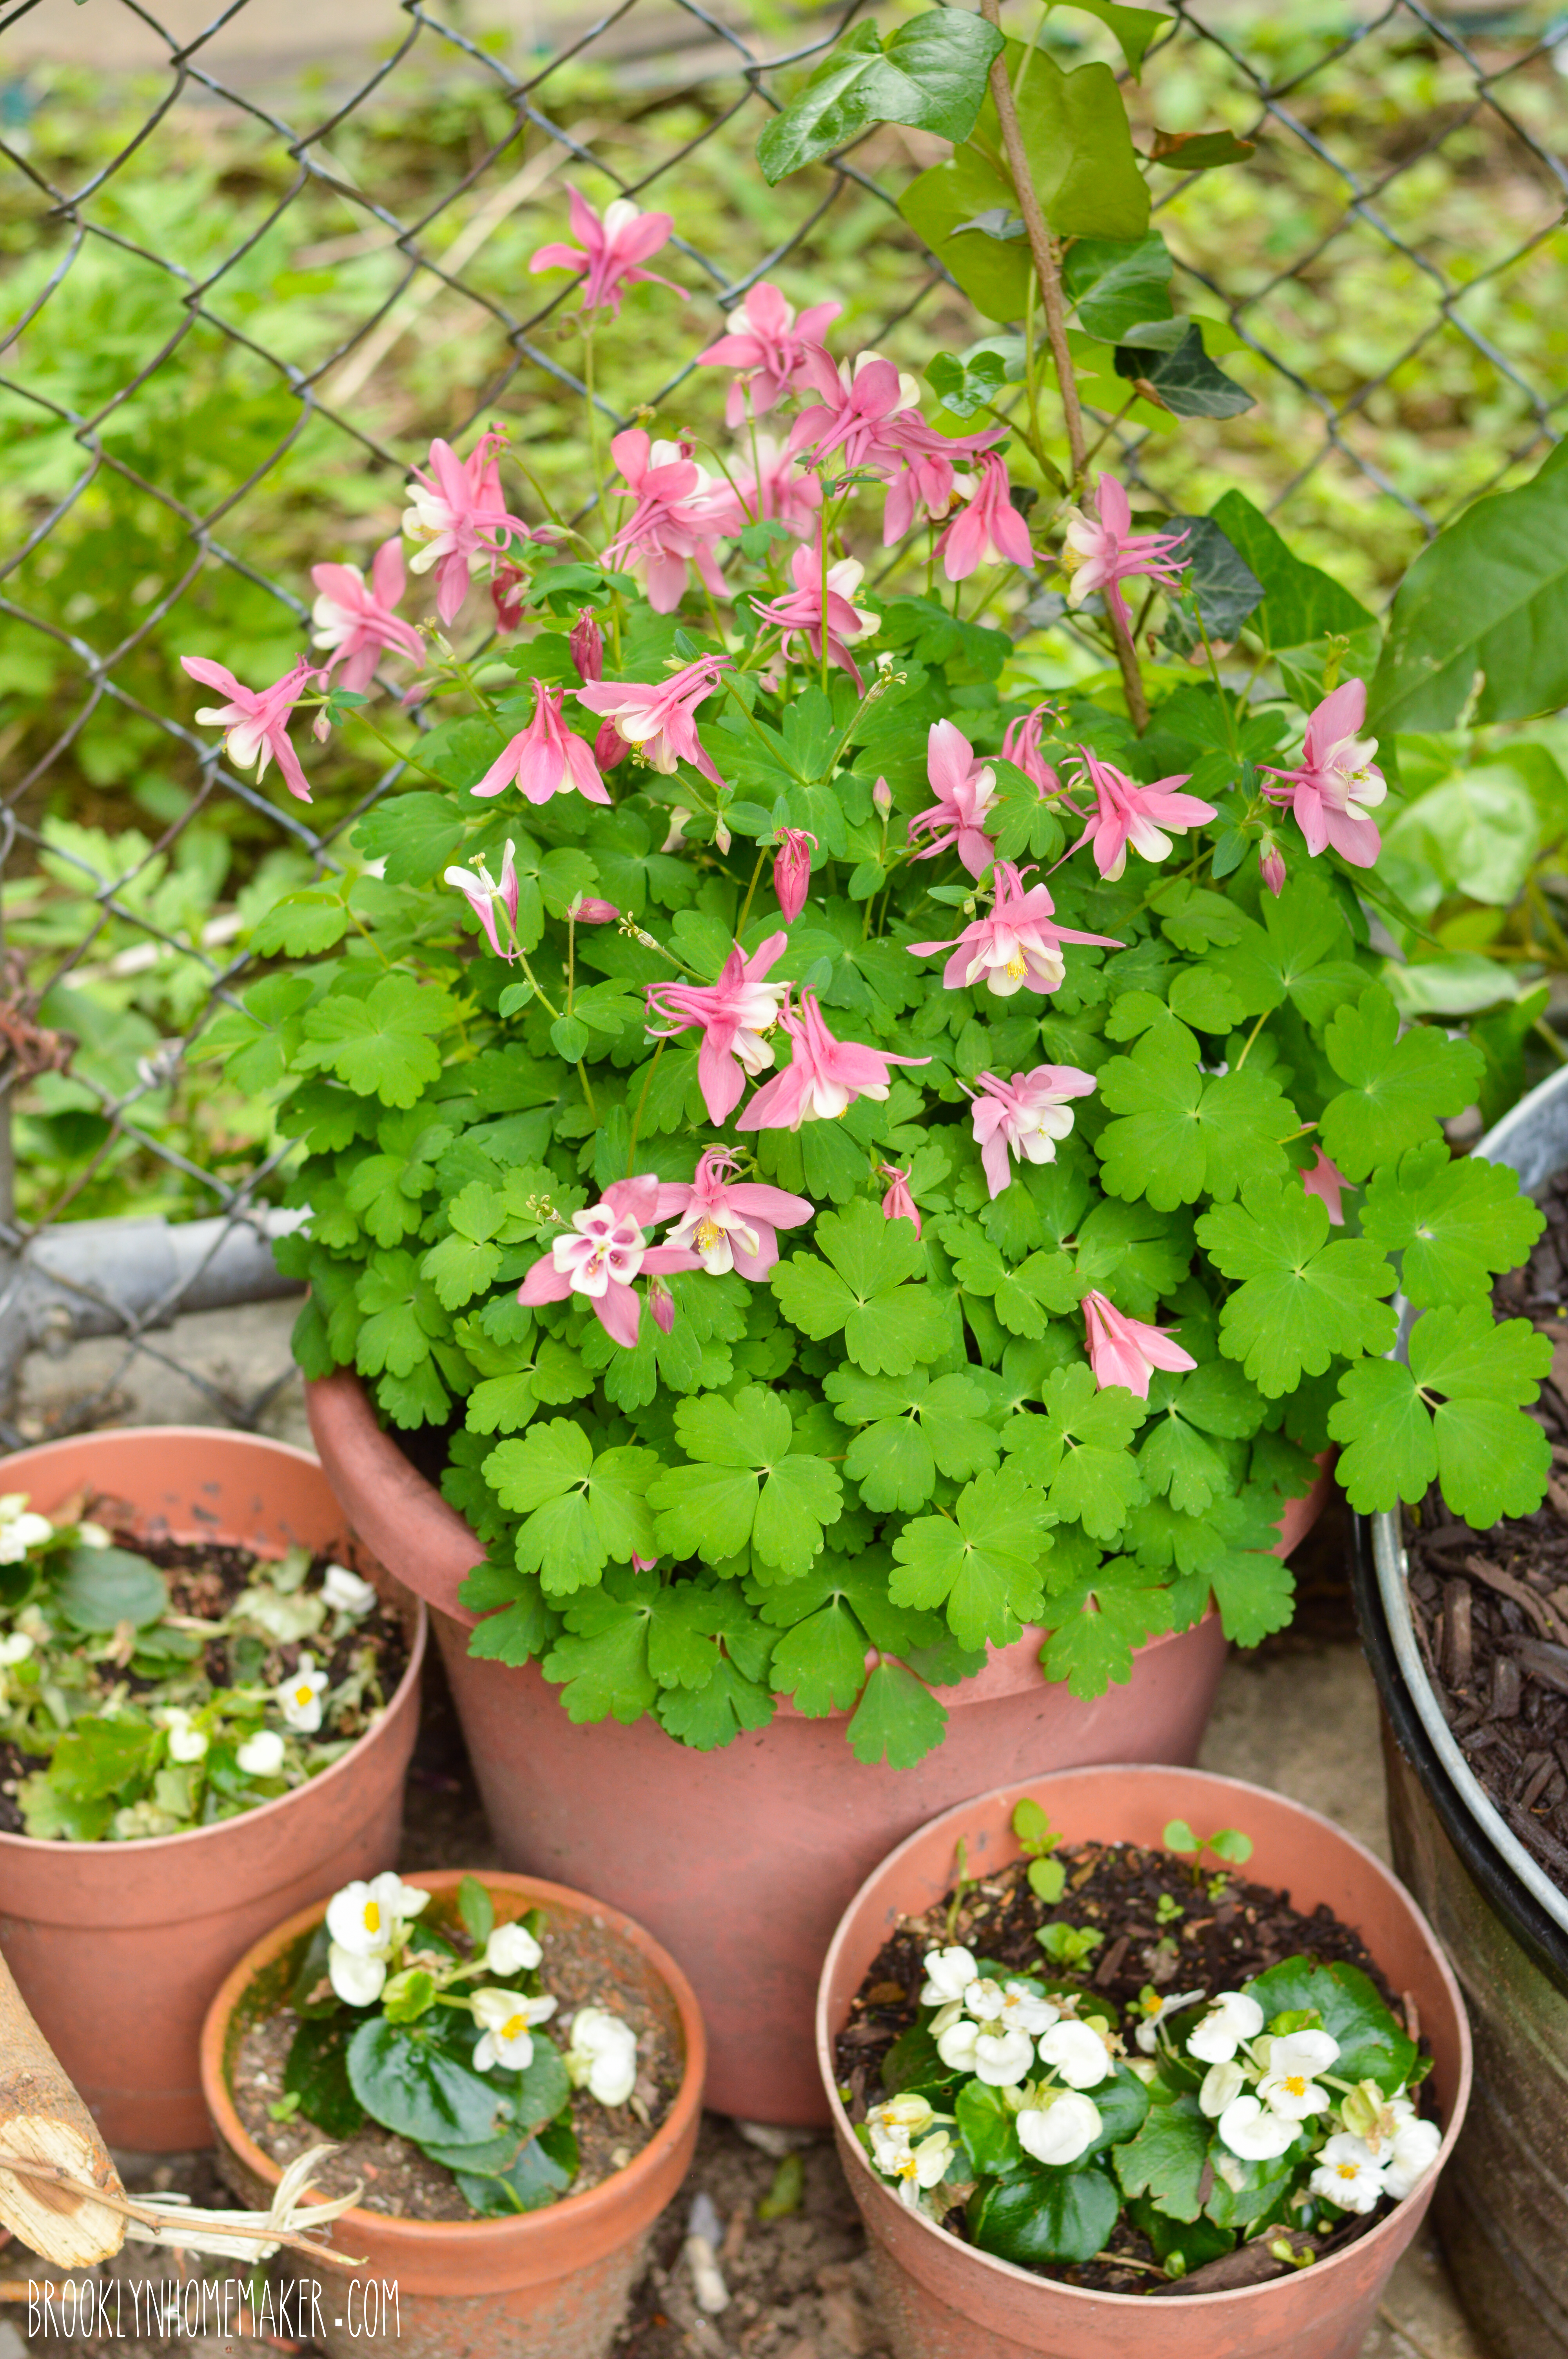
To mix in some color and texture, I like to fill pots with hardy annuals like wax begonias and I always do a few herbs in one of the big galvanized buckets we added a few years ago too. Sometimes they don’t get enough sun and don’t last the whole summer, but they’re nice while they last and so far they seem to be doing well this year.
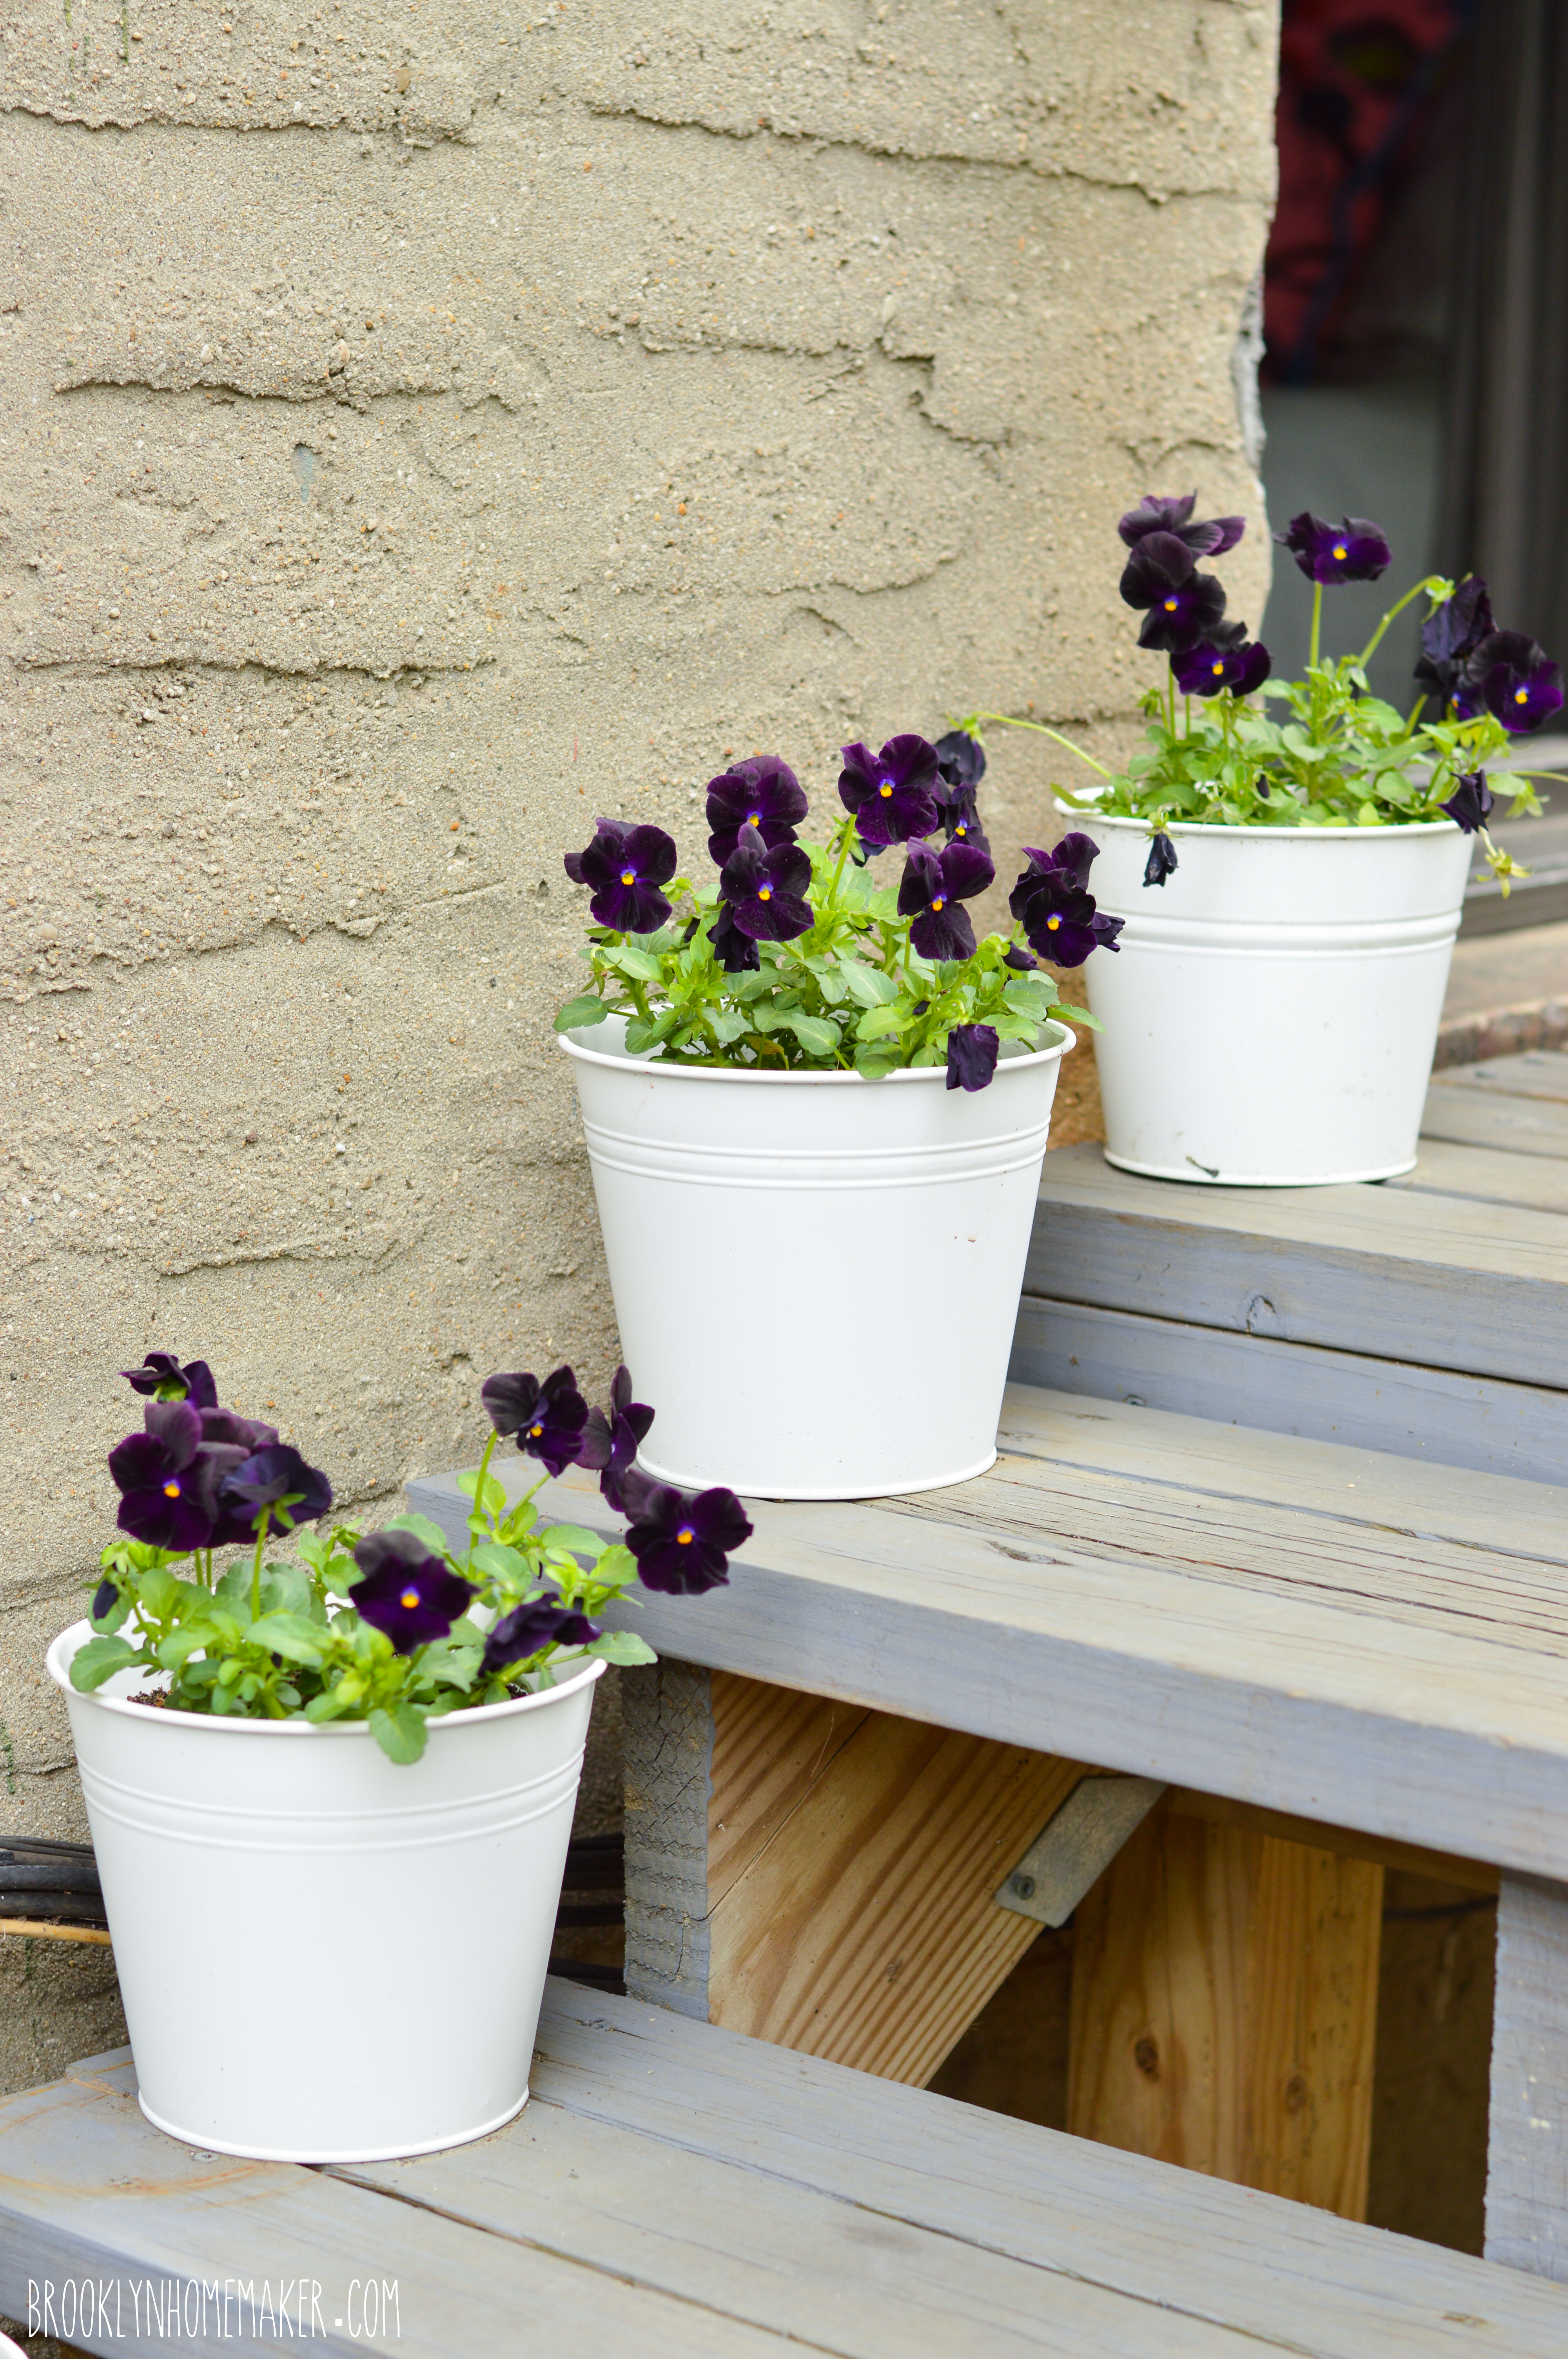
Early in the spring I usually try some pansies too for some color and life while the hostas are just barely poking out of the ground, but they don’t really last once the weather turns hot and I’ll need to replace them with something else mid-summer. They looked great in the photo below, but they’re already starting to look pretty scraggly.

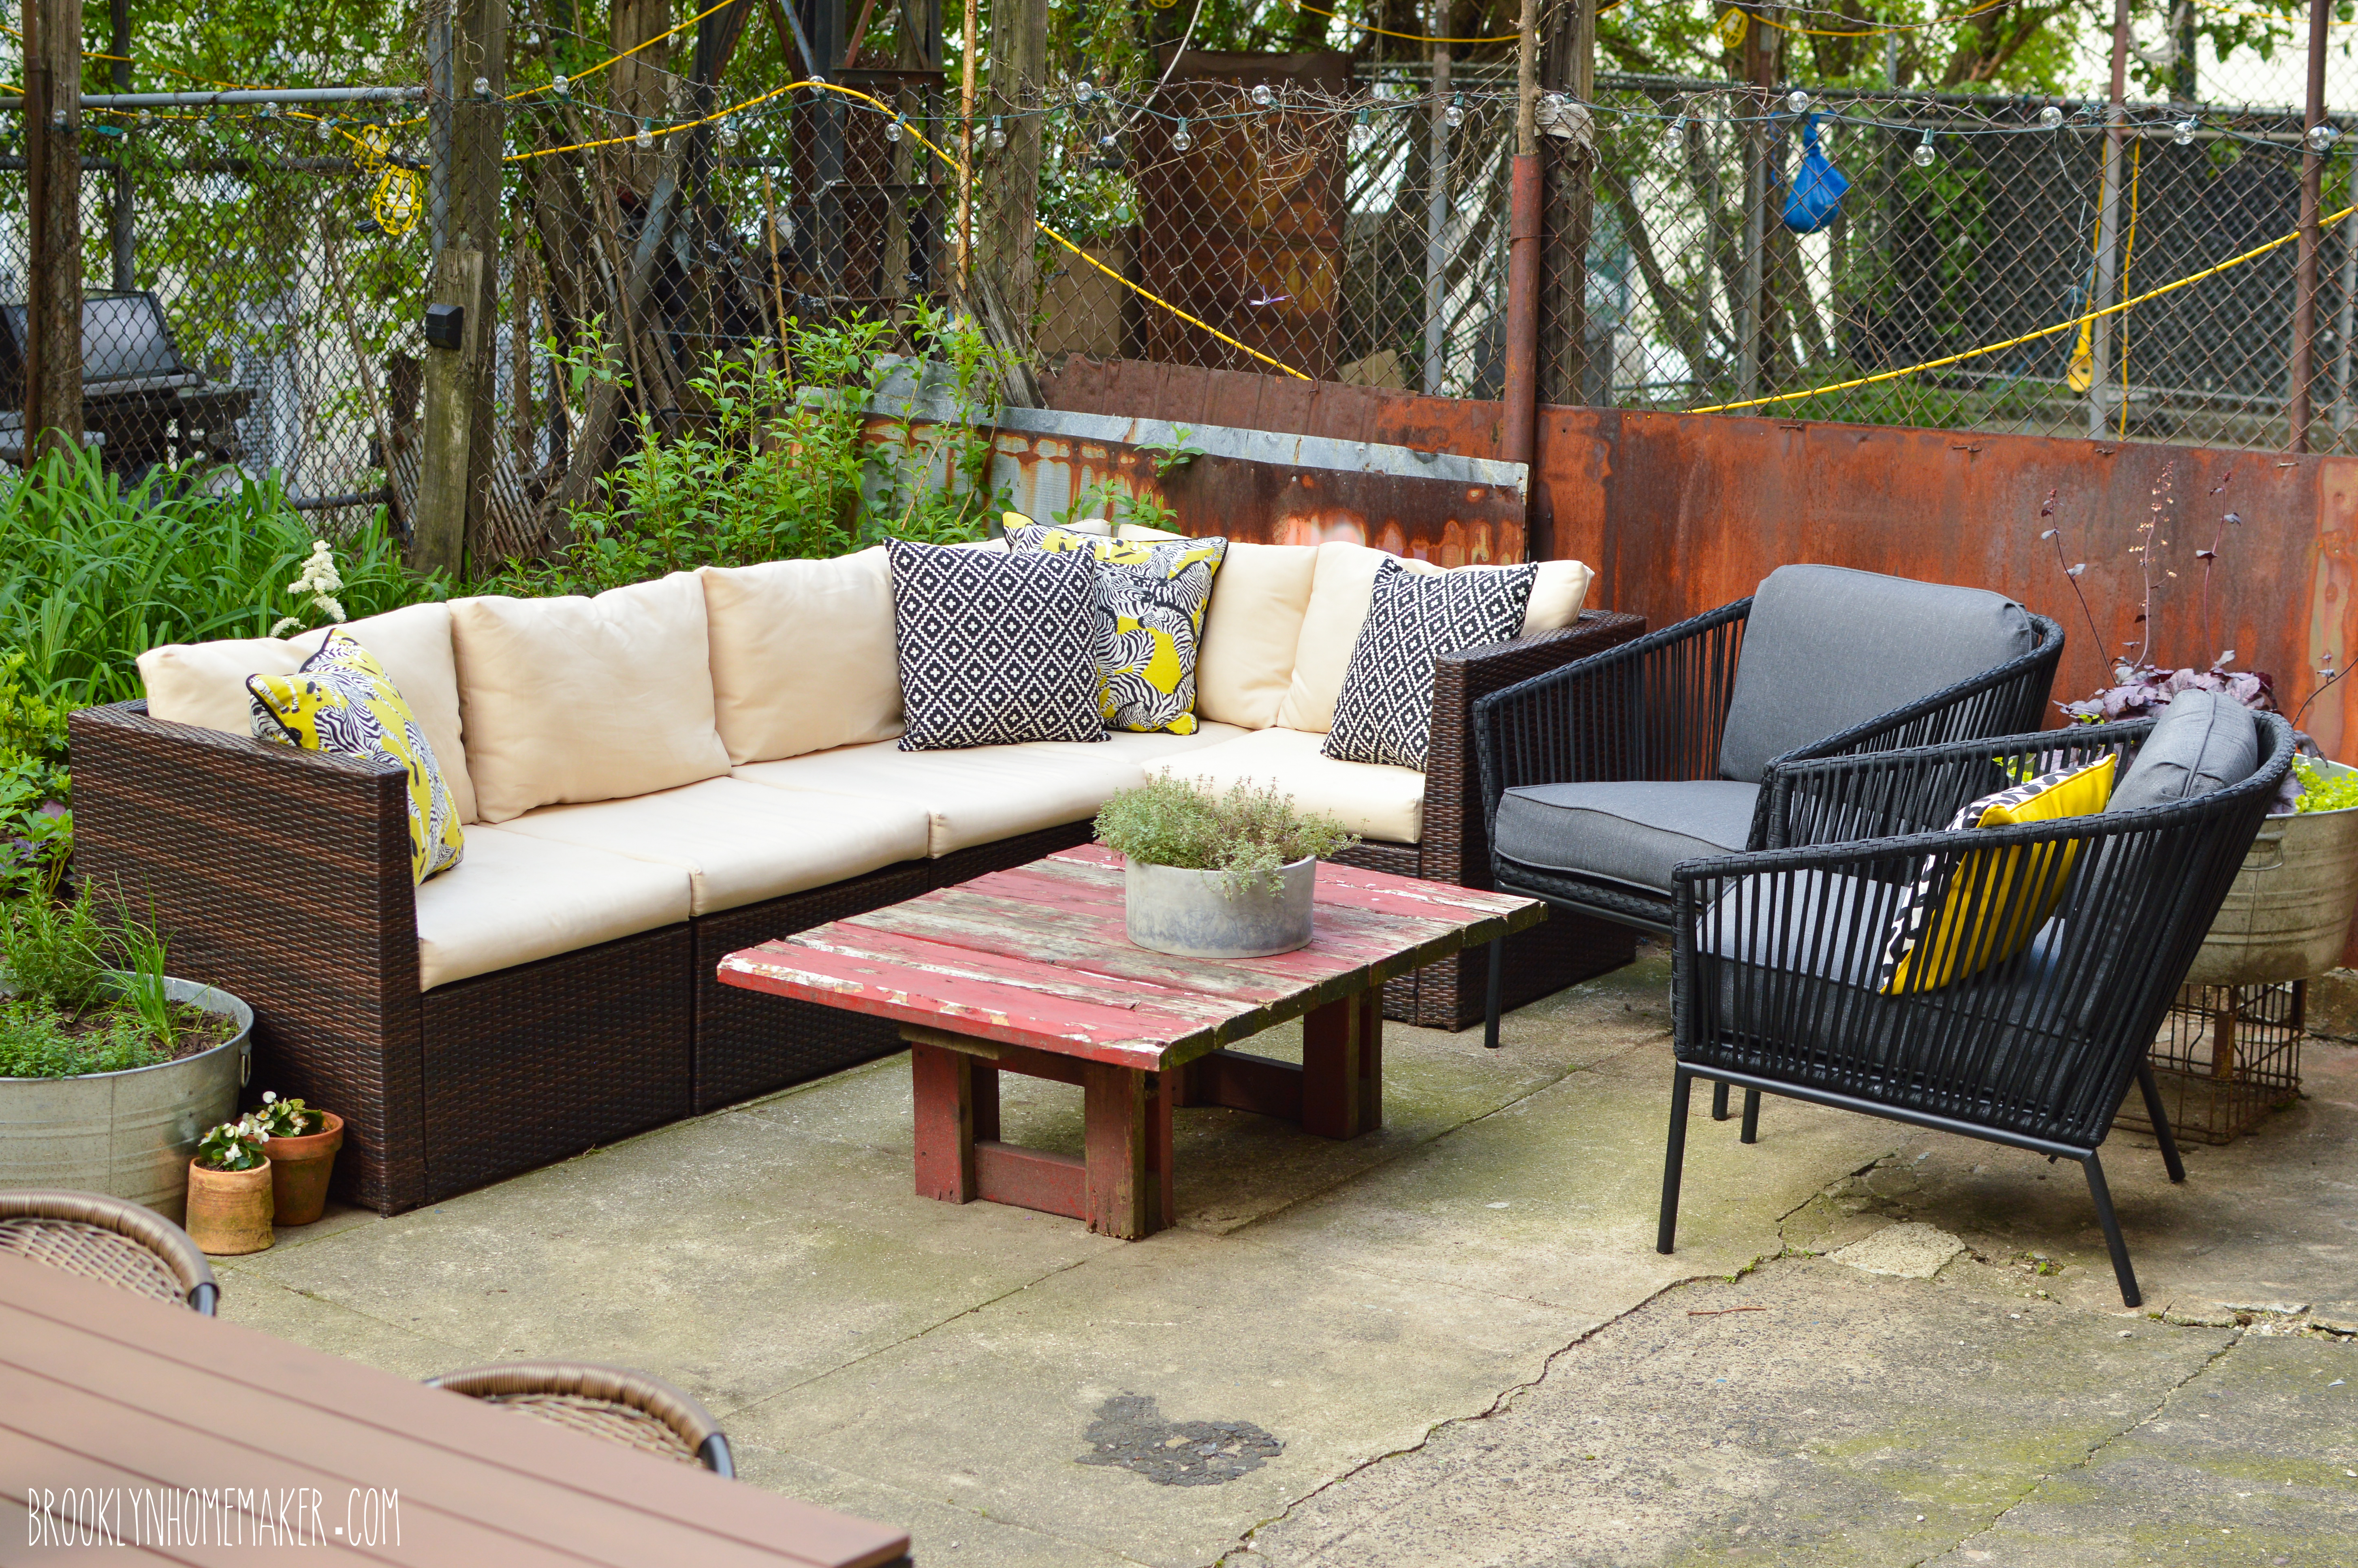
For the first time ever this year, I mulched a good portion of the beds to try to keep them moist and healthy during the hot dry spells we always seem to get in Brooklyn summers. Not only do I hope it’ll keep the plants happier, it also went a long way in making the yard feel so much more “finished” and attractive. We went with brown mulch so it doesn’t really “read” in photos all that well, but I promise it looks great in person, especially compared to bare dirt. Getting the heavy, wet, stinky bags of mulch out there meant carrying them all by hand through our apartment and out our bedroom window, and we needed about 30 bags for the area we mulched, but it was well worth the effort in the end and I really wish we’d done it sooner!

urban outdoor space | Brooklyn Homemakerurban outdoor space | Brooklyn Homemakerurban outdoor space | Brooklyn Homemaker

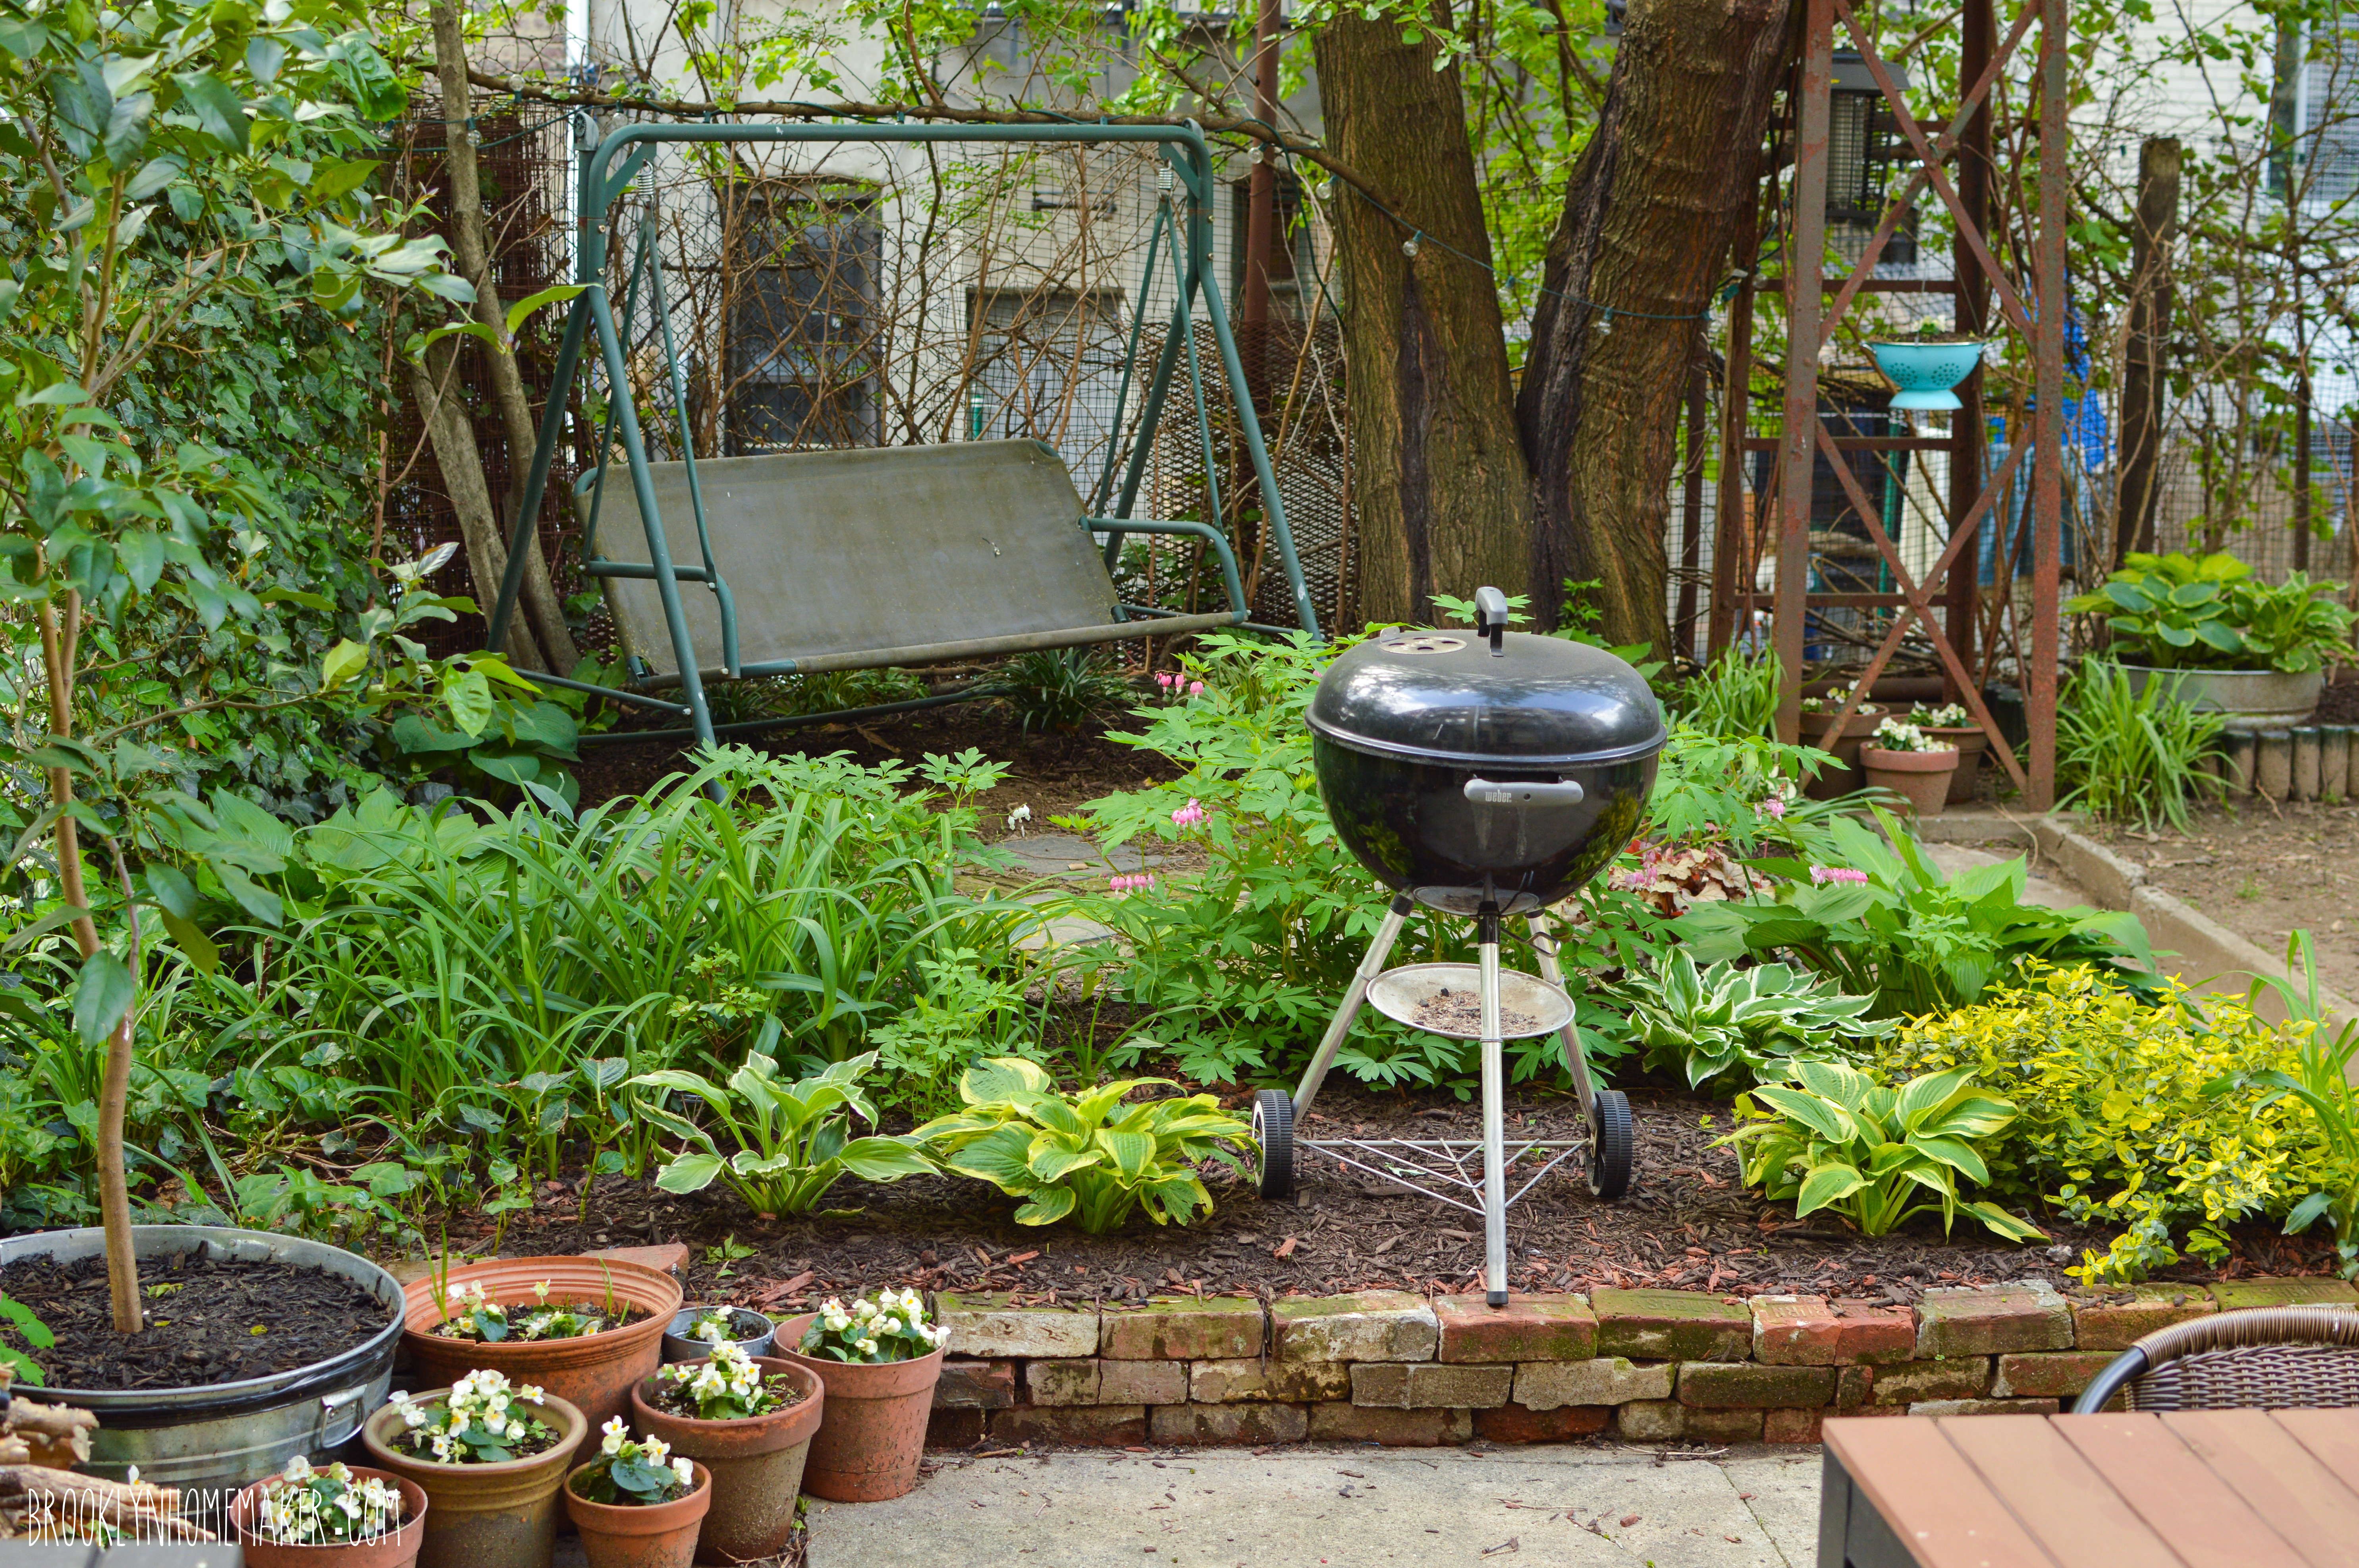
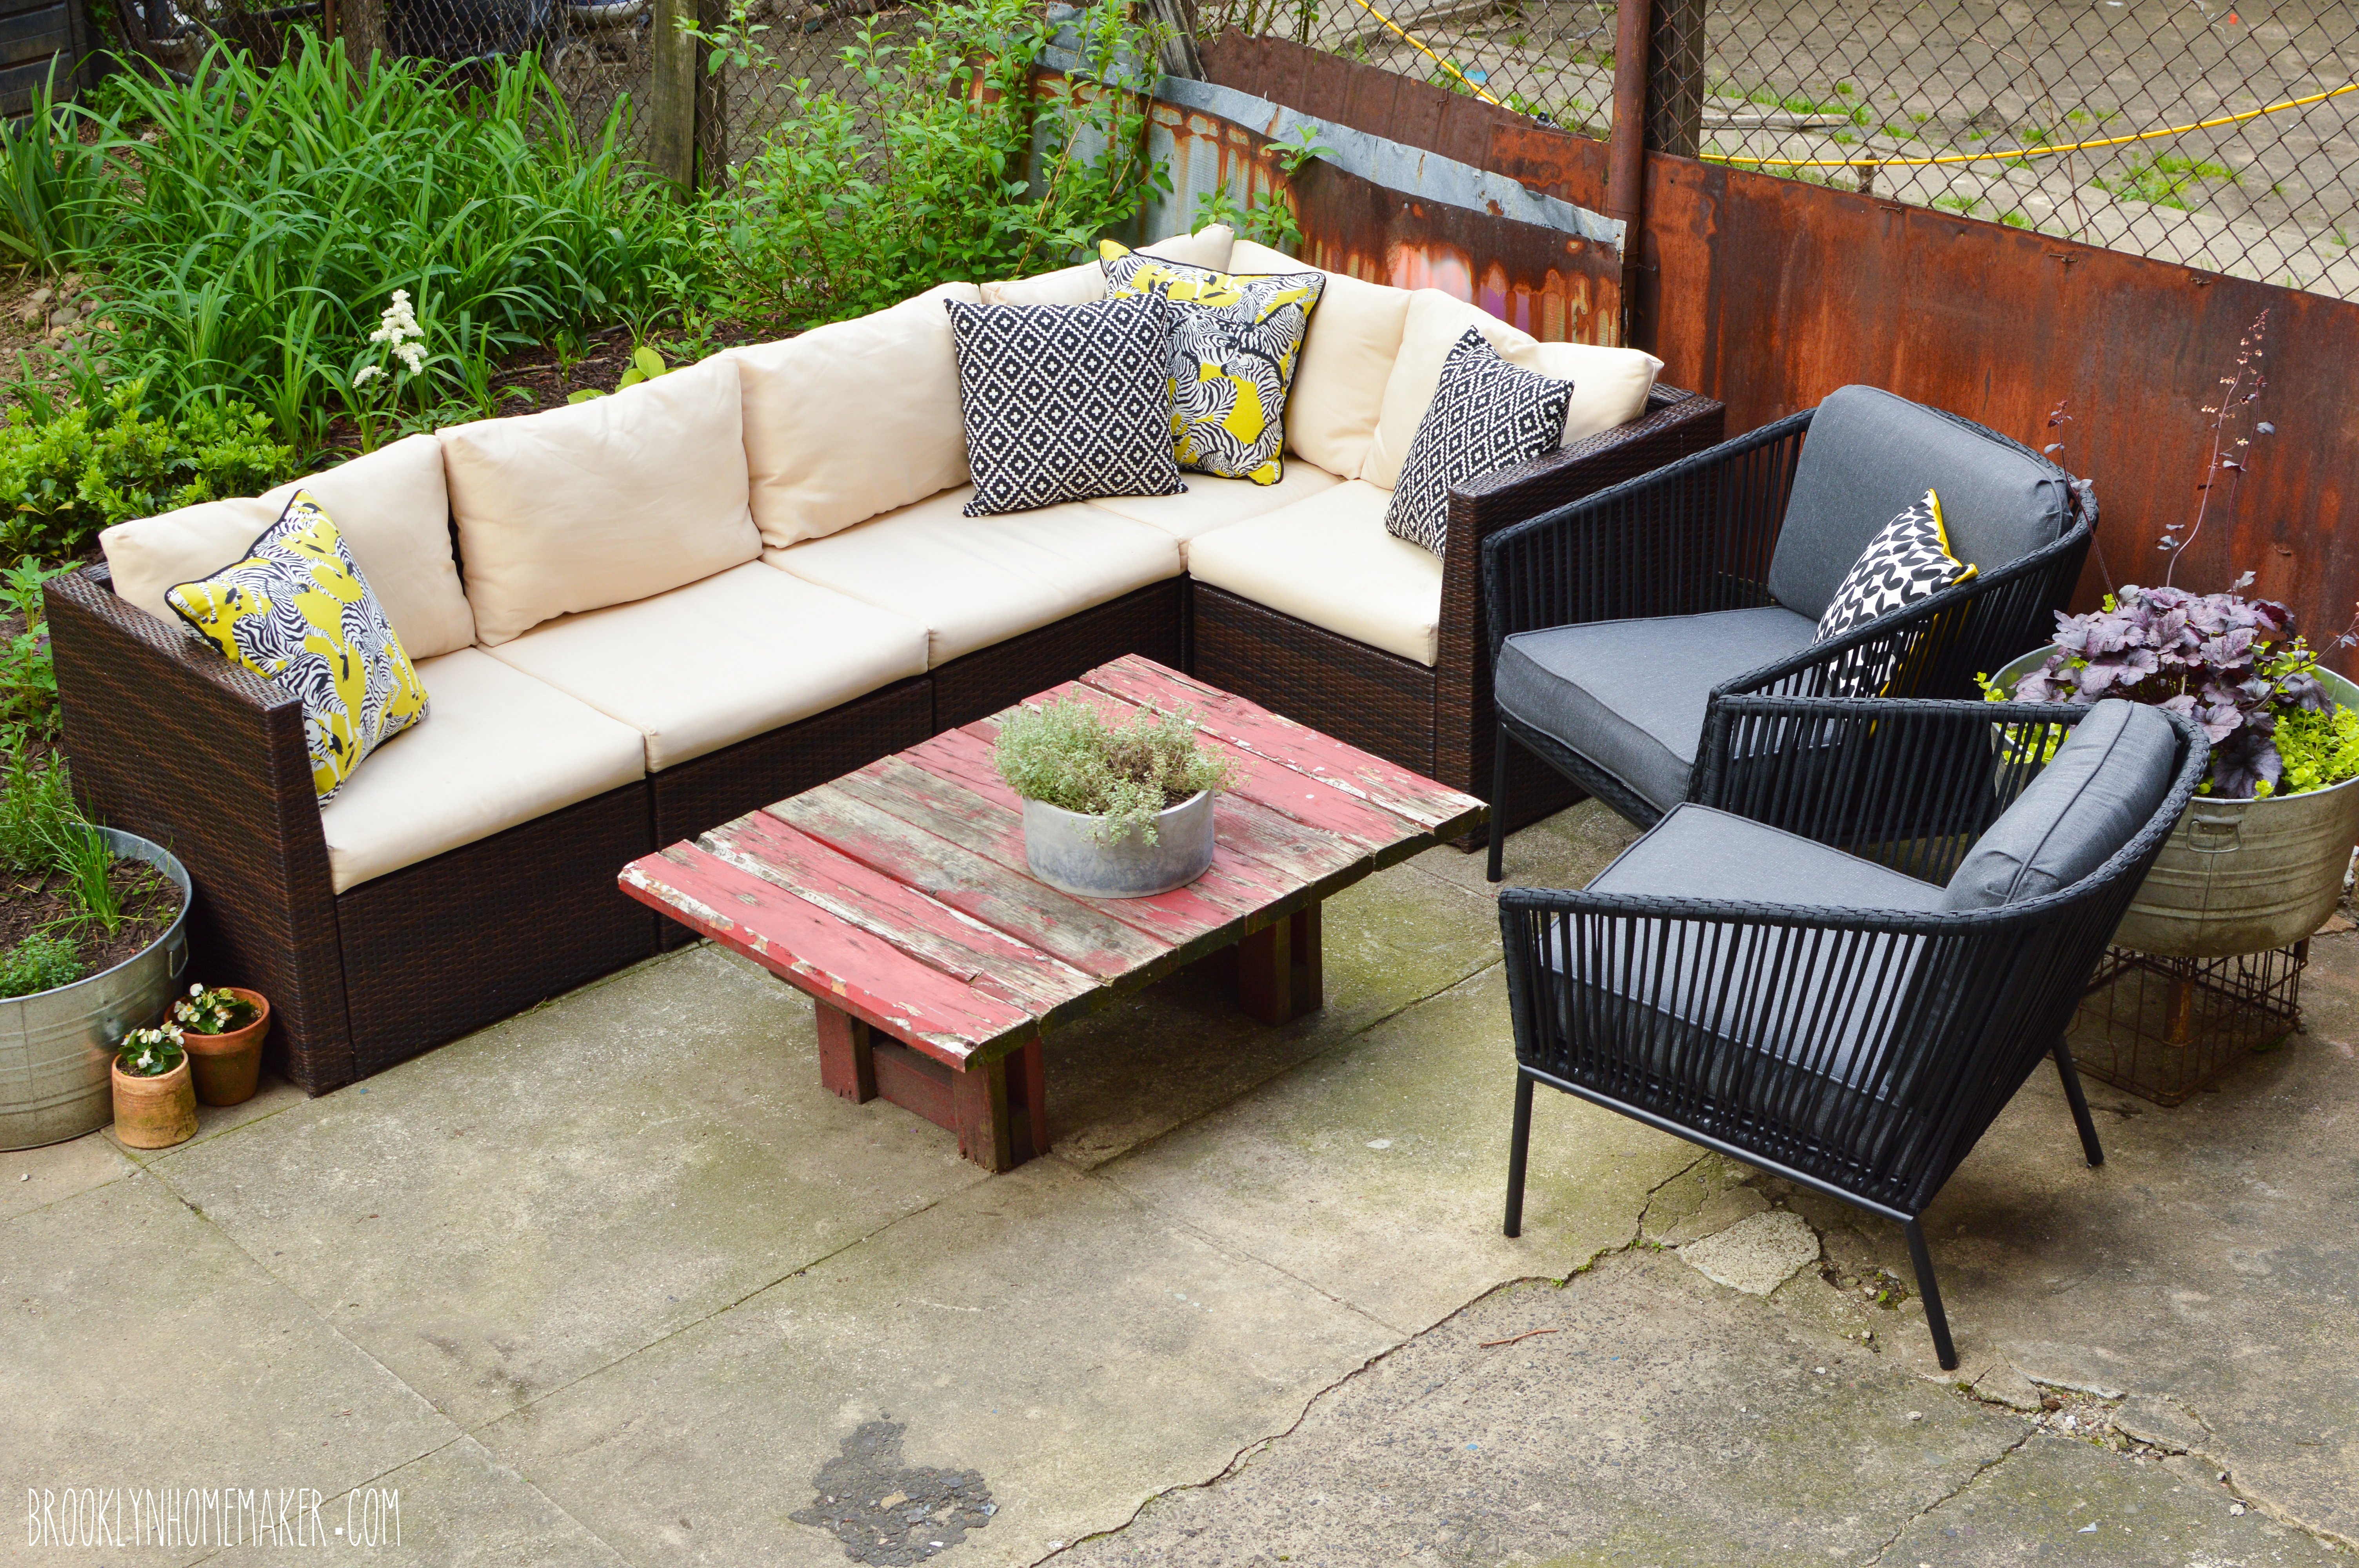
When we first moved in there was an old swing in the yard, and a rotting old wooden table left by one of the previous tenants. We moved the swing into the back of the yard this spring, and the table has since fallen apart. I re-used the legs to build the red coffee table you’ll notice in some of these photos, but I don’t know how much longer that old wood will hold out. The paint is peeling pretty badly so I’m hoping new paint will protect it and help it last a few more years.
I just need to decide on a color…
Any suggestions?

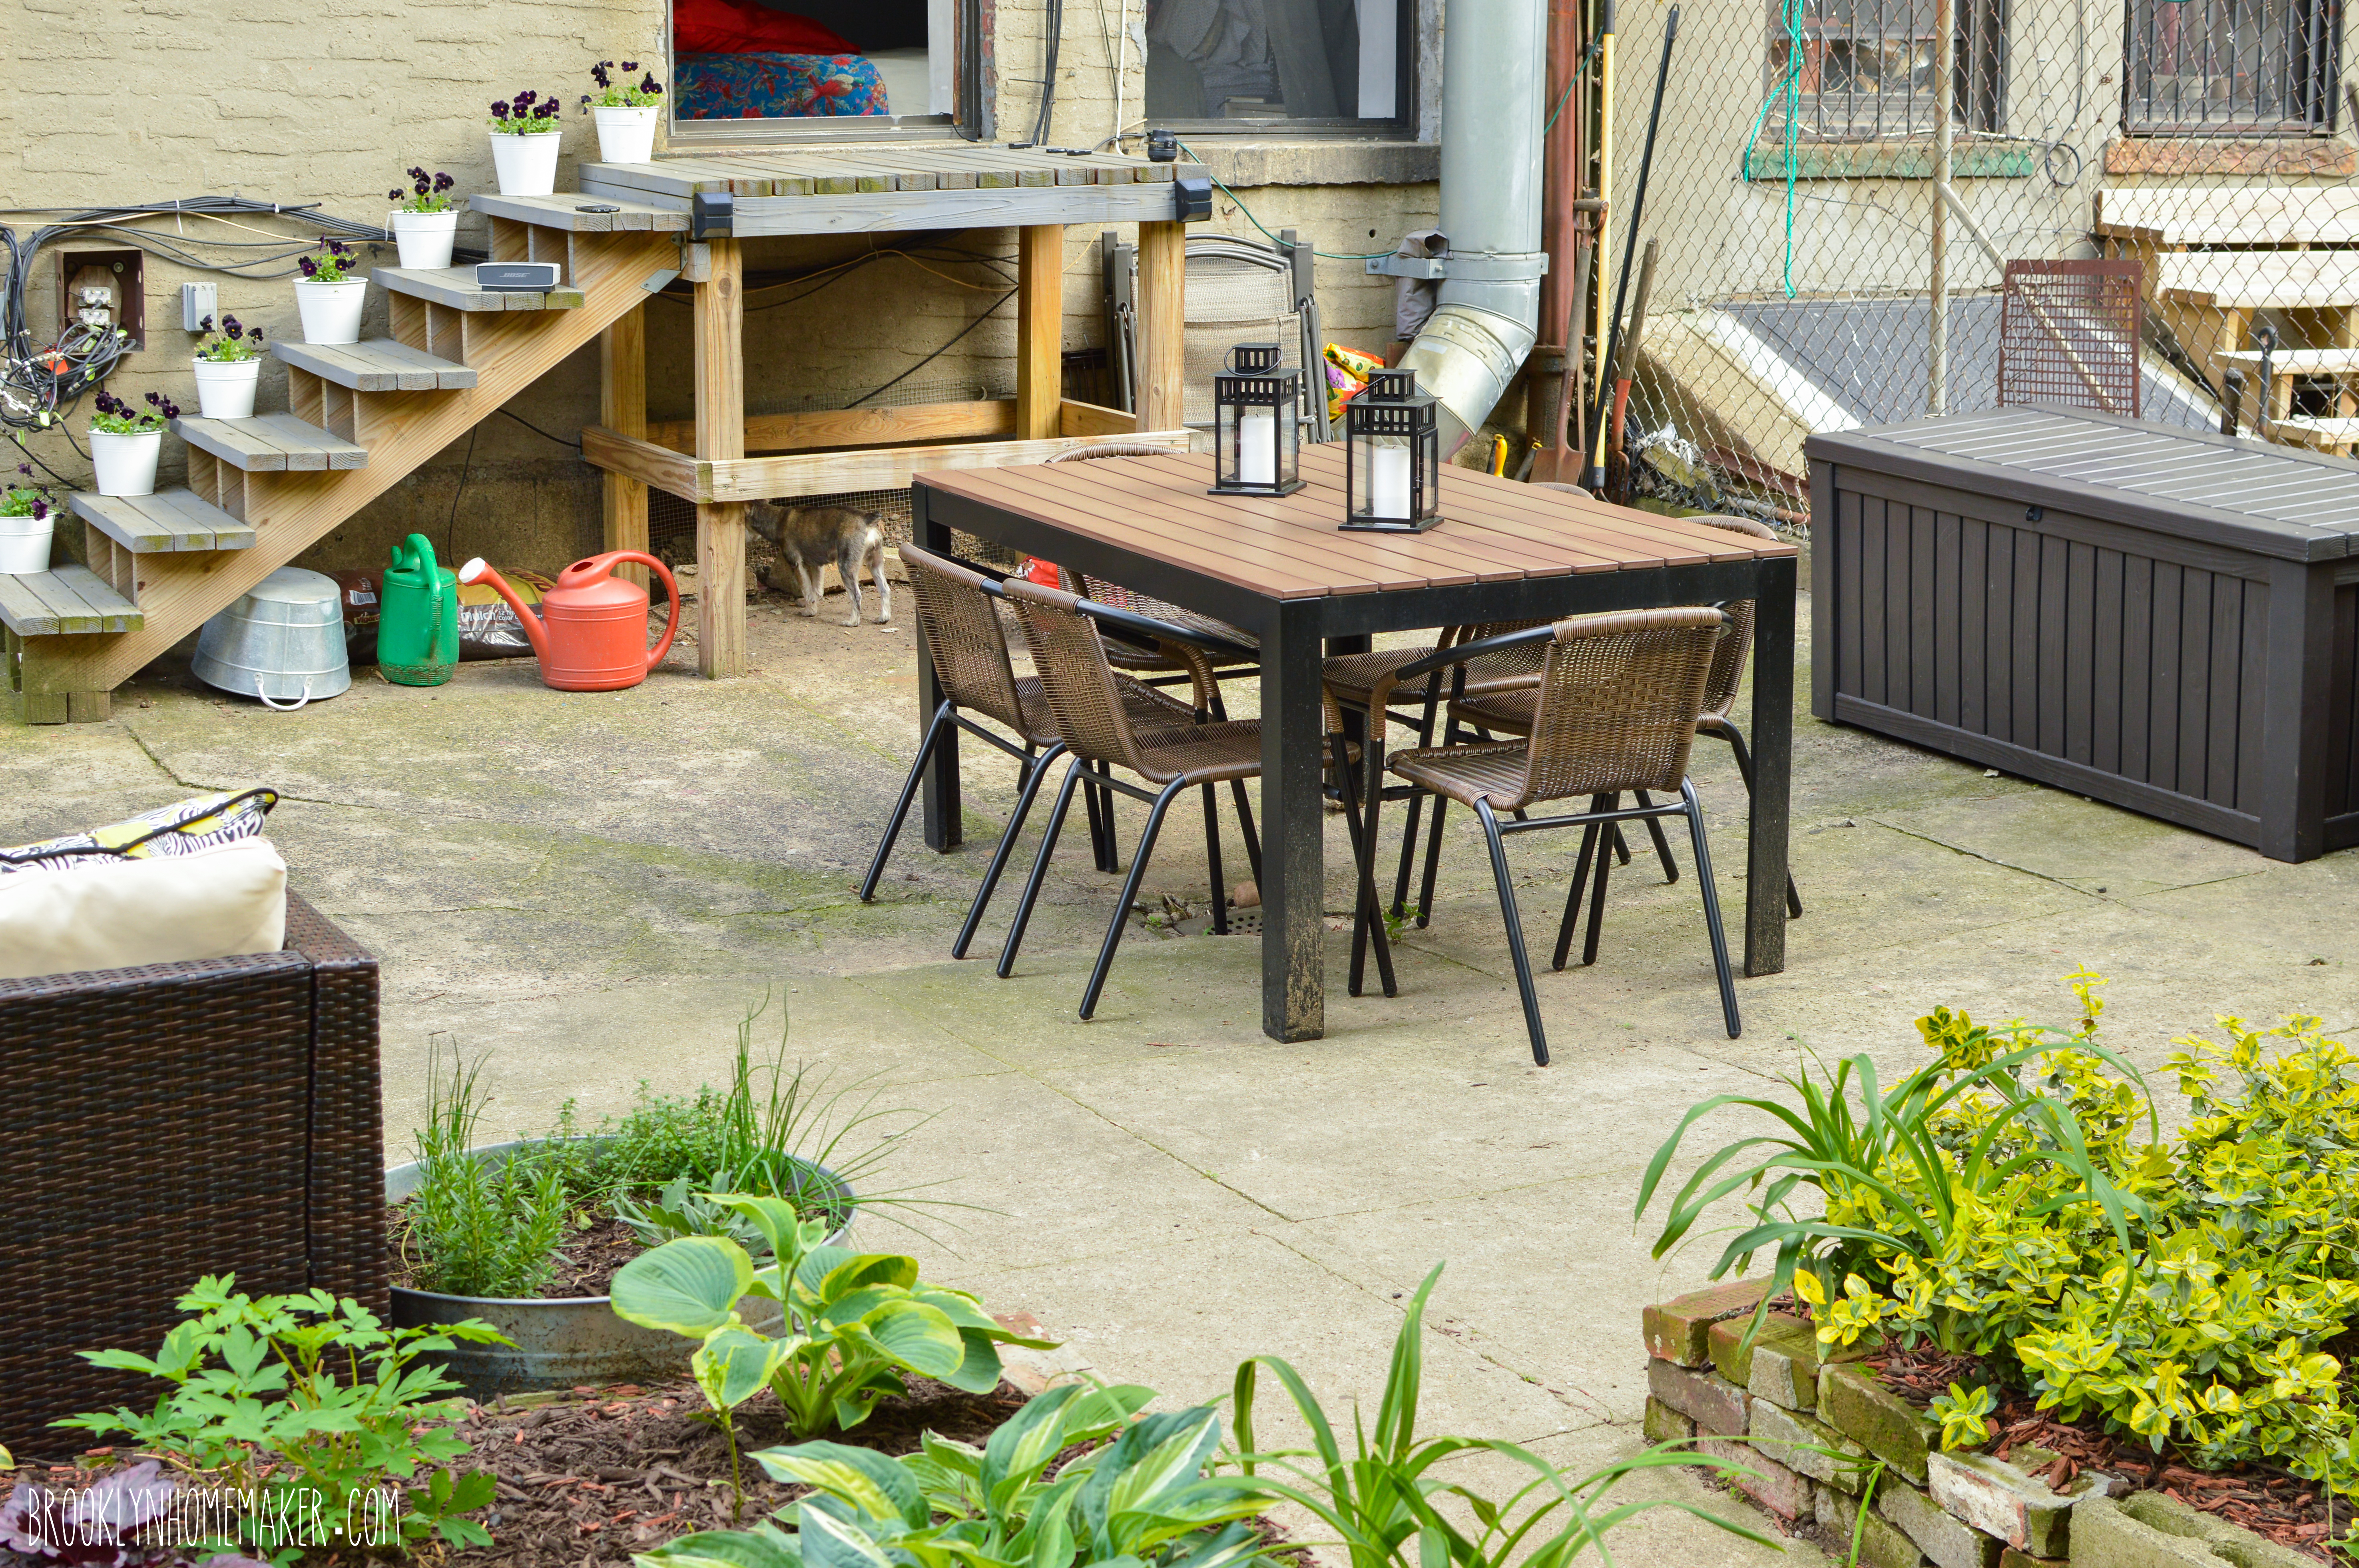
Almost half of the yard space is covered in concrete and works as a patio area for us. When we first moved in I was disappointed that there wasn’t more space for planting, but now that I know how challenging it is to get plants to thrive in our dry shade conditions, I’m actually relieved that we have more space for entertaining and lounging.
That’s why we decided to make a pretty serious investment in outdoor furniture this year. Russell got me an outdoor sectional for my birthday, and it all kind of snowballed from there. Upgrading from the old two-seater swing made me suddenly realize how much more comfortable our outdoor space could be if we were willing to put the time and money into it, so I kind of went a little overboard with the online shopping. We’d gotten the dining table a few years ago but never really got around to finding chairs to go with it, so that was my next mission. Then came the throw pillows, and a deck box to store all the cushions and pillows in. Then we just stumbled on those black and grey club chairs one day and we had to have them! Luckily everything was (relatively) reasonably priced.
In case you’re interested, the sectional, dining chairs, and deck box are from Wayfair. Unfortunately the sectional and chairs don’t seem to be available right now. The outdoor throw pillows and big grey club chairs are from Target, and the dining table and lanterns are from Ikea.

urban outdoor space | Brooklyn Homemakerurban outdoor space | Brooklyn Homemakerurban outdoor space | Brooklyn Homemaker urban outdoor space | Brooklyn Homemakerurban outdoor space | Brooklyn Homemaker urban outdoor space | Brooklyn Homemaker urban outdoor space | Brooklyn Homemakerurban outdoor space | Brooklyn Homemakerurban outdoor space | Brooklyn Homemaker
Things are looking a little more full and lush since I’ve taken these photos because we’ve had a lot of rain lately, so once the berries stop dropping I’ll get out there to clean up the mess and start barbecuing again! You’re more than welcome to live vicariously through my instagram stories, but my life really isn’t all that exciting so I’d suggest trying to find someone a little more interesting to follow!

Who knows, if things look different enough maybe I’ll give you another glimpse into our yard in another couple years.

Advertisement

grilled pork chops with vidalia onion and peach relish

Okay friends. I’m officially, like, the worst blogger in the entire world.

grilled pork chops with vidalia onion and peach relish | Brooklyn Homemaker

I literally was just saying how sorry I was about waiting so long between posts, and how much I’ve missed you and was so ready to get back into the swing of things and get back to posting regularly and often.

Then I disappear for another month.

grilled pork chops with vidalia onion and peach relish | Brooklyn Homemaker

Here it is, the beginning of summer. The beginning of fresh fruit, bright greens, a beautiful bounty I’ve been dreaming about for months. Asparagus season. Strawberry season. Rhubarb. Ramps. Snap peas. Scapes. Swiss chard. Fava beans. Fennel. Fiddlehead ferns. Vidalia onions. The first summer peaches.

This is the beginning of the best possible time for a food blogger, and suddenly I fall off the face of the internet.

grilled pork chops with vidalia onion and peach relish | Brooklyn Homemaker

So, here I am again to apologize to you. My readers. My friends.

This has been a crazy summer so far, and it’s only just begun.

grilled pork chops with vidalia onion and peach relish | Brooklyn Homemaker

See, Russell and I just started working on a really special project together. It’s in the very early stages still so I don’t really want to get into the details just yet.

Sorry to be so mysterious and leaving you hanging. We just want to get a little further along before we really share the whole thing. Don’t you worry none, I promise that I’ll spill all the beans as soon as we’re ready.

grilled pork chops with vidalia onion and peach relish | Brooklyn Homemaker

For now though, this special project is requiring almost all of my attention when I’m not at work, so as much as it pains me, that means we’re going to be missing each other for most of this summer.  I hope to be able to get at least a few fresh summer fruit pies or big fancy salads in before it’s too late, but I’m going to be posting a lot less frequently than I’d like to.
It’ll all be worth it in the end though. I promise!

grilled pork chops with vidalia onion and peach relish | Brooklyn Homemaker

All this craziness doesn’t mean that I’ve missed out completely on the bounty of the season. I’ve done my best to take advantage of the early summer. Whenever I’ve had a minute to myself I’ve tried to play with strawberries and asparagus and everything I can get my hands on.

I even got my hands on some real Vidalia onions, in season, fresh from Georgia. I haven’t had much experience with sweet onions before, and I have to tell you these puppies are unbelievable. I knew they’d be sweeter than a regular yellow onion, but I didn’t expect them to be so mild. I’ve been using them for everything I can think of, including an amazing German cucumber salad, and of course, the amazing recipe I’m sharing today.

grilled pork chops with vidalia onion and peach relish | Brooklyn Homemaker

You want to get the thickest prettiest pork chops you can get your hands on, and cook them over real hardwood charcoal until they’re seared and smoky on the outside and tender and juicy on the inside. It’s super easy to overcook pork, so I recommend using a meat thermometer.

Back in the days of yore people were really afraid of pink pork because they’d been told it’d make them sick. I won’t get into all the weird and nerdy details, but let me just say that perceived threat isn’t really a threat any longer and the USDA has recently reduced their recommended cooking temperature for pork from 160F to 145F. If you bring your pork up to 135 and remove and tent with foil for a 10 minute rest, your pork will just hit 145 to 150 and perfect. It may have a tiny touch of pink in the center but it’ll be so moist and juicy you won’t believe it. Don’t be scared. You have nothing to be scared of. I promise. So does the USDA.

I didn’t brine my chops, but I did follow this recipe from Serious Eats.

To compliment this smoky tender heavenly pork, you can’t go wrong with a sweet and creamy relish of caramelized Vidalia onions with peaches and a touch of bourbon and ginger.
This shit is thebomb.com

grilled pork chops with vidalia onion and peach relish | Brooklyn Homemaker

Grilled Pork Chops with Vidalia Onion and Peach Relish

2 tablespoons butter
1 large Vidalia onion, sliced thin into half circles
3 ripe peaches, peeled pitted and diced
salt and pepper to taste
2 tablespoons apple cider vinegar
1/2 teaspoon ground ginger
1/4 teaspoon chili flakes
1 to 2 tablespoons bourbon or American whiskey
1 tablespoon sugar (optional, depending on sweetness of peaches)
2 to 4 pork chops, thick cut (1 to 1.5 inches thick), about 3/4 to 1 pound each

Melt butter in a large skillet over medium-high heat. Once butter is bubbling add onions and about 1 teaspoon of salt. Stir occasionally, watching carefully that the onions don’t brown too quickly, for about 20 to 30 minutes. Caramelizing onions is all about going slow and low, be patient and turn down the heat a bit if the onions are browning unevenly or too quickly.

Once the onions are softened and take on a creamy quality, add peaches, vinegar, ginger, and red pepper flakes. Cook for about 5 minutes, add bourbon, and cook 5 minutes more. Taste and adjust seasoning if necessary. If your peaches weren’t very sweet, or if you’d like the relish sweeter, stir in sugar and cook a few minutes more.
This relish can be made days in advance if you’d like, but should be served warm over the pork. This recipe makes enough relish for at least 4 pork chops.

Generously season your pork chops on both sides with salt and pepper.
Prepare your grill. If using a charcoal grill (recommended) try to organize the coals on one side so you have a hot side and a cooler side.

Sear your chops over the hot side of the grill, for about 3 to 5 minutes per side. Once both sides are seared transfer the chops to the cooler side of the grill with the bones facing the hotter side. Cover about 10 minutes and start checking with a meat thermometer. Once the chops reach 135 to 140, transfer to a plate and tent with foil to rest for about 10 minutes.

Serve with a generous dollop of warm onion relish, and with grilled asparagus if desired.

strawberry basil layer cake

I’ve officially made it through another entire year of life.
(I recently celebrated a birthday.)

strawberry stuffed yellow layer cake with basil buttercream | Brooklyn Homemaker

I am a big fan of surprise parties, and I’ve thrown a couple for Russell over the course of our relationship, but Russell can’t keep a secret to save his life. If he ever decided he wanted to throw me a surprise party, he’d probably accidentally let the cat out of the bag before he invited any guests.
He’s the kind of person that wants to give me my Christmas presents the day he buys them, while I am the kind of person who staunchly refuses to even look in the general direction of my gifts until Christmas day. His eagerness and honesty are positive qualities in the grand scheme of things, but, like I said, I am a big fan of surprise parties.

strawberry stuffed yellow layer cake with basil buttercream | Brooklyn Homemaker

That means that I am usually responsible, to some extent at least, for the planning of my own birthday party each year. I asked Russell to take the lead in throwing the party this year, but he said he didn’t want to be in charge because I’m “too controlling” about parties. I was pretty annoyed at first, but then realized he’s probably right. I’m such a perfectionist, and love entertaining so much, that I do tend to get a bit uptight about wanting everything to be just right.

After making him feel appropriately crappy for calling me controlling, I assured him that this year I didn’t want to play any part in the planning, save for one single thing.

strawberry stuffed yellow layer cake with basil buttercream | Brooklyn Homemaker

I wanted to make my own cake.

I know.
I’m weird.

strawberry stuffed yellow layer cake with basil buttercream | Brooklyn Homemaker

Last year I made my own cake too, a 3 layer funfetti cake with the sides completely covered in tiny rainbow nonpareils. Most people, when told that I planned to make my own cake, reacted with a mix of sorrow and horror.

How depressing? Why?!?!? You’re not supposed to make your own birthday cake. That’s just sad!

But here’s the thing. I love to bake. I just do. It’s one of my favorite hobbies, and I’m pretty good at it. Birthdays are big festive events and I think they call for big festive baked goods. Russell isn’t much of a baker, and I know that anything from the grocery store wouldn’t be half as good as what I could make myself. I also know that a cake from fancy pants specialty bakery here in Brooklyn would cost an arm and a leg.

So, the so called “rules” against making your own birthday cake went out the window and it was game on. Again.

 strawberry stuffed yellow layer cake with basil buttercream | Brooklyn Homemaker

I’ve been thinking about what I’d do for months, and while I knew that I wanted to include the flavor of fresh strawberries, I wasn’t quite sure how I’d do it. I could bake the strawberries into the layers of the cake, or mix them into the icing, but after some thought I decided to just let them sing as fresh sliced berries stuffed between layers of cake.

Next I had to decide on cake and icing flavors. Originally I thought I might go in a kind of strawberry shortcake direction with yellow cake and whipped cream icing, but then I had to go and turn on the damned TV. There was some show on the cooking channel about a bakery using “basil sugar” made by grinding white sugar and fresh basil together in a food processor. The idea is that since the sugar absorbs the basil’s oils, baked goods made using the sugar taste fresher than they would if made with basil puree.

It didn’t take long for the wheels to start turning about a strawberry layer cake paired with the subtle summery flavor of basil.

strawberry stuffed yellow layer cake with basil buttercream | Brooklyn Homemaker

Knowing that I wanted this cake to be a real knock-out, I decided to test the idea out ahead of time. I found a recipe for basil sugar online and conducted an experiment with three different batches of cupcakes. The first batch was made with one of my favorite yellow cake recipes, the next with half of the white sugar substituted with basil sugar, and the third with an even higher basil sugar ratio.

To complicate my life even further, the pinterest gods had to go and show me a beautiful layer cake iced with a basil buttercream made from milk and cream steeped with fresh basil leaves.

I decided, just in case, that I should try the basil buttercream out for my “control group” cupcakes, while the two batches of basil sugar cupcakes would be topped with stabilized whipped cream. All three versions were cored and filled with fresh strawberries, and I took a big tray of cupcakes to work and started taking votes.

As much as everyone loved the cakes made with basil sugar (the 1/2 basil to 1/2 white ratio worked best), I was surprised to find that the silky smooth texture and amazing flavor of the basil buttercream won by a landslide. I still love the basil sugar idea, and have a tub of it in my freezer waiting to line the rims of cocktail glasses or get sprinkled on vanilla ice cream or fresh berries.

For my purposes though, the experiment gave me the results I needed and the plan for the cake was settled. Tender yellow cake layers would be stuffed with fresh sliced strawberries and everything would be coated in a satin layer of palest green basil buttercream.

strawberry stuffed yellow layer cake with basil buttercream | Brooklyn Homemaker

The day of the party came, and Russell did it up right proper. Good friends, good food, good music, good wine, and good weather on a good night in our backyard. A smoking grill and a big bowl of phenomenal homemade guacamole. Rosé by the bucket. It was perfect. Best husband ever. After all, he puts up with me, uptight perfectionist and all.

strawberry stuffed yellow layer cake with basil buttercream | Brooklyn Homemaker

Then, toward the end of the evening, there was the pièce de résistance.

While it’s true that I write a food blog (you may have noticed) and getting feedback and words of encouragement comes with the territory, getting compliments in person tends to make me feel more than a little uncomfortable.

When the cake was served I was made plenty uneasy by the barrage of positivity coming my way. Maybe it was the river of wine and whiskey that was flowing in the yard that night, but people were plenty free with the praise for this cake.
You made this?!?! The crumb is so tender! Those fresh strawberries!! And OMG that basil icing!!!
People are still talking about it almost two weeks later.

Happy birthday to me!

strawberry stuffed yellow layer cake with basil buttercream | Brooklyn Homemaker

Strawberry Stuffed Yellow Layer Cake with Basil Buttercream

Fresh Strawberry Filling:
2 lbs fresh strawberries (plus another 1/2 lb for decorating if desired)
1/3 cup sugar
pinch salt
1 teaspoon vanilla extract

Wash strawberries and place let them drain in a colander or dry on a towel. Working only with the 2 lbs for the filling, hull the strawberries and slice them thinly. Place in a medium bowl and toss with sugar, salt, and vanilla. Allow the strawberries to macerate in the sugar for at least an hour or two at room temperature.
Drain the juices from the bowl into a small to medium saucepan. Over medium/high heat, reduce the strawberry juice by about half or a little more, stirring frequently. This should take about 20 minutes. Cool the reduced juice completely before pouring back over the berries and tossing to coat. Cover and refrigerate until ready to assemble the cake.

Yellow Cake:
adapted from Epicurious

4 cups cake flour
4 1/2 teaspoons baking powder
1 teaspoon salt
1 1/2 cups (3 sticks) unsalted butter, room temperature
2 1/2 cups granulated sugar
6 large eggs
1 tablespoon vanilla extract
1 3/4 cups buttermilk

Preheat oven to 350°F. Butter three 8×2-inch round cake pans and line with parchment paper. (I use pre-cut parchment rounds) Butter the parchment and lightly coat the interior of the pans with flour. Refrigerate until ready for use.

Whisk together the flour, baking powder, and salt in a medium bowl.
In the bowl of an electric mixer fitted with a paddle attachment, cream the butter on medium/high speed for 3 minutes or until light and creamy in color. Scrape down the sides of the bowl and cream the butter for an additional minute.
Add the sugar, about 1/4 cup at a time, beating for 30 seconds to a minute after each addition. Scrape the sides of the bowl occasionally. Once all sugar is added, scrape down the bowl and add the eggs one at a time.
Stir the vanilla into the buttermilk. Reduce the mixer speed to low or stir, and add the dry ingredients alternately with the buttermilk. Mix just until incorporated. Scrape the sides of the bowl and mix for 15 seconds longer.

Divide the batter evenly between the prepared pans and smooth the tops. If possible use a scale to ensure each pan has the same amount of batter.
Lift up each pan about an inch and let them drop onto the counter top to knock out any air bubbles and settle the batter.
Center the pans onto a rack in the lower third of the oven and let bake 45 to 50 minutes or until the cakes are lightly brown and a toothpick or cake tester inserted in the centers comes out clean.

Let cool on a rack for about an hour before removing from pans. Leave parchment rounds on the bottoms of the cakes until assembly, and return layers, parchment side down, to the rack until completely cool to the touch.

Basil Buttercream
adapted ever so slightly from the Vanilla Bean Blog

1 1/2 cups whole milk
1/3 cup heavy cream
1 cup fresh basil leaves, well packed
1 1/2 cups granulated sugar
1/3 cup all purpose flour
1 1/2 cups (three sticks) unsalted butter, soft but cool, cut into small pieces (about 70 degrees – butter should be  soft enough to mix well, but firm enough to give some structure to the buttercream)
1 tsp pure vanilla extract

Combine milk, heavy cream, and basil in a heavy bottomed saucepan. Heat gently, until just simmering, and remove from the heat. Let cool for about 30 minutes and pour the mixture in the bowl of a food processor. Process for about 30 seconds or until the basil is well chopped. Scrape all basil and liquid into a small bowl, cover and refrigerate for at least 2 hours, or ideally overnight.
Pour mixture through a fine mesh sieve into a small heavy bottomed saucepan. Use the back of a spoon to squeeze any ‘basil juice’ from the leaves into the milk/cream mixture. Whisk in the flour and sugar, and cook over medium heat, whisking occasionally, until the mixture comes to a boil and has thickened, about 10 or 15 minutes.
Transfer the mixture to the bowl of a stand mixer fitted with a paddle attachment. Place a kitchen towel over the top of the mixer to prevent splashing. Beat on high speed until the mixture has completely cooled, about 7-9 minutes. Reduce the speed to low and add the butter, mixing until thoroughly incorporated. At first it might not look right, but just keep going. Increase the mixer speed to medium/high and beat until the frosting is light and fluffy, about another 2 minutes.
Add the vanilla and mix until combined. If the frosting is too soft, put the bowl in the refrigerator to chill slightly, then beat again until it is the proper consistency. If the frosting is too firm, set the bowl over a pot of barely simmering water and beat with a wooden spoon until it is the proper consistency.

Assembly:
1) Level the tops of the cake layers using a cake leveler or a very sharp serrated knife.

2) Place the first layer on an 8″ cardboard cake round or on a cake stand.  Place the round or cake stand on a revolving turntable or lazy suzan.

3) Fill a piping bag with about one cup of the basil buttercream icing. It isn’t necessary to fit the bag with a decorating tip.

4) Pipe a tall border around the perimeter of the first layer, using about 1/2 of the icing in the bag.

5) Top the first layer with about half of your strawberries and reduced juice, staying within the icing border. Try to even the berries out so they’re in an even level layer.

6) Center the next layer over the first, checking from several angles to be sure the layers are perfectly lined up straight and evenly.

7) Repeat steps 4, 5, & 6.

8) Using about 1/3 to 1/2 of the remaining icing , cover the entire outside of the cake with a thin crumb coat using an icing spatula. I like to pile the icing at the top of the cake and work it down the sides little by little, turning the turntable as you go, until the entire cake is coated. I find that an offset spatula is easier to use, but that’s up to you.
This step ensures that any crumbs coming off the cake will be captured in this first thin layer of icing and will not show on the finished cake. I find it also makes it easier to get a smooth profession looking final layer of icing.

9) Refrigerate the entire cake for about 30 minutes to an hour. This step sets the crumb coat so it doesn’t mix into your final top layer of icing. I also find that it helps steady the filling and makes the layers of cake less likely to slip and slide around while you’re trying to ice or decorate.

10) Using the remaining icing, coat the entire cake using an icing spatula in the same way you did the crumb coat.

11) Try to smooth the icing as much as possible using your spatula or a straight bench scraper. I find that holding the spatula straight up and down, almost stationary, while turning the cake is the easiest way to get a smooth finish to the sides.

12) If desired, top the cake with the remaining 1/2 cup strawberries and a few leaves of basil. I think it looks more attractive if the stems and leaves are still attached to the berries, but that’s your call. It will mean that your guests will have to remove the stems themselves if they plan to eat the berries along with the cake.  If you’d prefer to do a piped icing border you will need to reserve some icing, or increase the recipe slightly.

For a more in depth tutorial, see my funfetti birthday cake recipe from last year. For an AMAZING how-to video on how to get a smooth and professional icing job, check out this “modern buttercream” class, completely free, from Craftsy.

If you need to refrigerate the cake, I recommend letting it chill in the fridge for about an hour to set the icing before covering in plastic wrap (so the wrap doesn’t stick to the icing and ruin the smooth coat you worked so hard to create.) This cake is at it’s best the day it’s baked, but once covered, it can be refrigerated for a day or two. The fresh berries may lose their freshness the longer it’s held. Bring completely to room temperature before serving, at least an hour or two.

strawberry rhubarb skillet cake

You guys. I have a confession to make.
I’m the world’s WORST blogger.

strawberry rhubarb skillet cake | Brooklyn Homemaker

It’s been sunny and warm for the past few days and I had to draaaag myself indoors to write this post. I’ve really wanted nothing more than to lay out in the yard after work and snuggle puppies and drink rosé.
Russell’s been visiting family in LA and I should be taking this opportunity to catch up on my writing, but once the sun goes down and the spring chill sets back in, I’d rather be watching reruns of the Walking Dead or RuPaul’s Drag Race with a pint of pistachio ice cream.

strawberry rhubarb skillet cake | Brooklyn Homemaker

In addition to laziness and springtime distractions, I’ve also fallen victim to springtime cravings. The arrival of warm weather and green leaves makes me crave fresh produce and bright spring berries like crazy. I mentioned last week that as much as I crave these foods, local production hasn’t caught up to my cravings just yet and so far the produce at the green markets leaves a bit to be desired.

strawberry rhubarb skillet cake | Brooklyn Homemaker

I’ve been trying to hold out, but the other day I caved. I’m really the worst.

Just awful.

strawberry rhubarb skillet cake | Brooklyn Homemaker

Wandering the aisles of the grocery store the other day I stumbled across a big bucket filled with rhubarb stalks. Conveniently located behind the rhubarb were stacks and stacks of organic strawberries fresh from the freight truck.

I tried to resist, but their strawberry siren song was too much for me and I circled the produce section twice before finding them in my basket at the checkout line.

strawberry rhubarb skillet cake | Brooklyn Homemaker

Truth be told, I had no damned clue what I would do with my pre-season berries and rhubarb but I just HAD to have them. There aren’t many things in this world that I love more than a strawberry rhubarb pie, but a pie is so filling-centric that I know I need to wait for strawberry season proper to go that route.

In terms of flavor, nothing beats a berry that was ripened in the sun, in season, a few miles (or footsteps) from your home. These bright red little berries however, fresh off the truck from California, travelled a looooong way before finding their way onto the shelves at the Food Town in Williamsburg, Brooklyn. They were pretty durn good, especially after not tasting a fresh strawberry for months, but they tasted nowhere near as fresh and flavorful as they will in a few short weeks.

strawberry rhubarb skillet cake | Brooklyn Homemaker

Tart rhubarb and a healthy bit of sugar would help doctor up my lackluster berries, but in this case they would need to be more of an accent flavor and less of the main attraction. I needed to come up with a recipe that would elevate them and let them shine without expecting too much of them.

strawberry rhubarb skillet cake | Brooklyn Homemaker

It didn’t take me long to think of a rustic skillet cake I made last summer, with caramelized peaches and cornmeal. Perfect! I didn’t want to go the cornmeal route this time, but the basic idea was spot on. I’d cook the sliced berries with the rhubarb, a bit of butter, and some sugar; and then I’d pour them over a tender buttermilk cake baked in a big ol’ cast iron skillet.

strawberry rhubarb skillet cake | Brooklyn Homemaker

This cake is perfect.

In another week or two, when strawberries are actually in season here, this will definitely be happening again because then it’ll be even more perfect than it’s current state of perfection.

Topped with fresh barely sweetened whipped cream, it’s like a jammy little slice of strawberry shortcake.
Rustic and unfussy. Sweet and tart. Fluffy and tender. The cooked strawberry rhubarb is sweet and bright and jammy and fresh. The cake is just sweet enough and a tiny bit tart from the lemon and buttermilk. It’s buttery and light and moist and just…

perfect.

strawberry rhubarb skillet cake | Brooklyn Homemaker

Strawberry Rhubarb Skillet Cake

adapted from Joy the Baker

Strawberry Rhubarb filling:
1 cup sliced rhubarb (from about 3 stalks)
2 cups hulled and quartered strawberries
2 tablespoons unsalted butter
3 tablespoons sugar
pinch of salt

Cake:
1/4 cup + 1 tablespoon unsalted butter
zest of one lemon
2 1/2 cups all-purpose flour
1 tablespoon baking powder
1/2 cup plus 2 tablespoons granulated sugar
1/2 teaspoon salt
2 large eggs
1 1/4 cups buttermilk
1/4 cup lemon juice
1 teaspoon pure vanilla extract
2 to 3 tablespoons turbinado sugar or coarse finishing sugar

Preheat oven to 350 and move a rack to the center position.

Combine strawberries, rhubarb, 2 tablespoons butter, 2 tablespoons sugar, and pinch of salt in an 11 or 12 inch skillet.* Place over a medium high flame and cook, stirring frequently, until fruit is soft and coming apart and juices have reduced to a thick syrup, about 10 to 15 minutes. Do not let juices burn.

Scrape strawberry rhubarb mixture into a bowl to cool and scrape skillet clean with a silicone spatula. It’s okay if a little residue remains.
Melt butter in skillet and pour out all but 1 tablespoon to cool. Coat skillet evenly with remaining tablespoon. Add lemon zest to cooling butter and stir to combine.

In a medium bowl, whisk together flour, baking powder, salt and sugar.  Set aside.
In a small bowl or large measuring cup, whisk together buttermilk, lemon juice, eggs, vanilla and butter.

Make a well in the dry ingredients and pour in the buttermilk mixture all at once.  Stir with a silicone spatula just until combined, scraping the sides of the bowl until there are no dry pockets of flour. Do not over mix.  Pour batter into the prepared skillet and spread (or shake) smooth.  Dot the batter with strawberry mixture as evenly as possible, and sprinkle generously with turbinado sugar.

Bake for 20-25 minutes, or until a toothpick or cake tester inserted in the center of the cake comes out clean.  Allow cake to cool for at least 30 minutes before serving. If desired, serve with a generous dollop of lightly sweetened whipped cream or a light dusting of powdered sugar.

Cake will last, removed from skillet and well wrapped in the refrigerator, for up to 3 days.

*If you don’t have a cast iron skillet you can cook the strawberries and melt the butter in any pan you have, and use an 11-inch round tart or quiche pan, or a 9×13-inch pan for the cake. The batter may spread more thin so you’ll need to keep a close eye on it in the oven.