autumn

basic bundt series: spice cake

Hey guess what!
It’s finally officially fall, y’all!

basic bundt series | spice cake | Brooklyn Homemaker

I’ve said it before and I’ll say it again (and again and again and again).

Fall is absolutely my favorite time of year. It’s clearly, obviously, indisputably the best season ever, and if you don’t agree with me, you’re wrong.
I told you it was indisputable okay?
The only negative thing I could ever say about fall, if I had to come up with something, is that it doesn’t last nearly long enough.

basic bundt series | spice cake | Brooklyn Homemaker

Cooler weather means we can finally turn off the air conditioner and open up the windows. It means layered clothing, and finally giving up on the “beach body” I’m never going to have. It means beautiful brightly colored foliage, falling leaves, crisp fresh air, and spending as much time outdoors as possible before it’s too late.

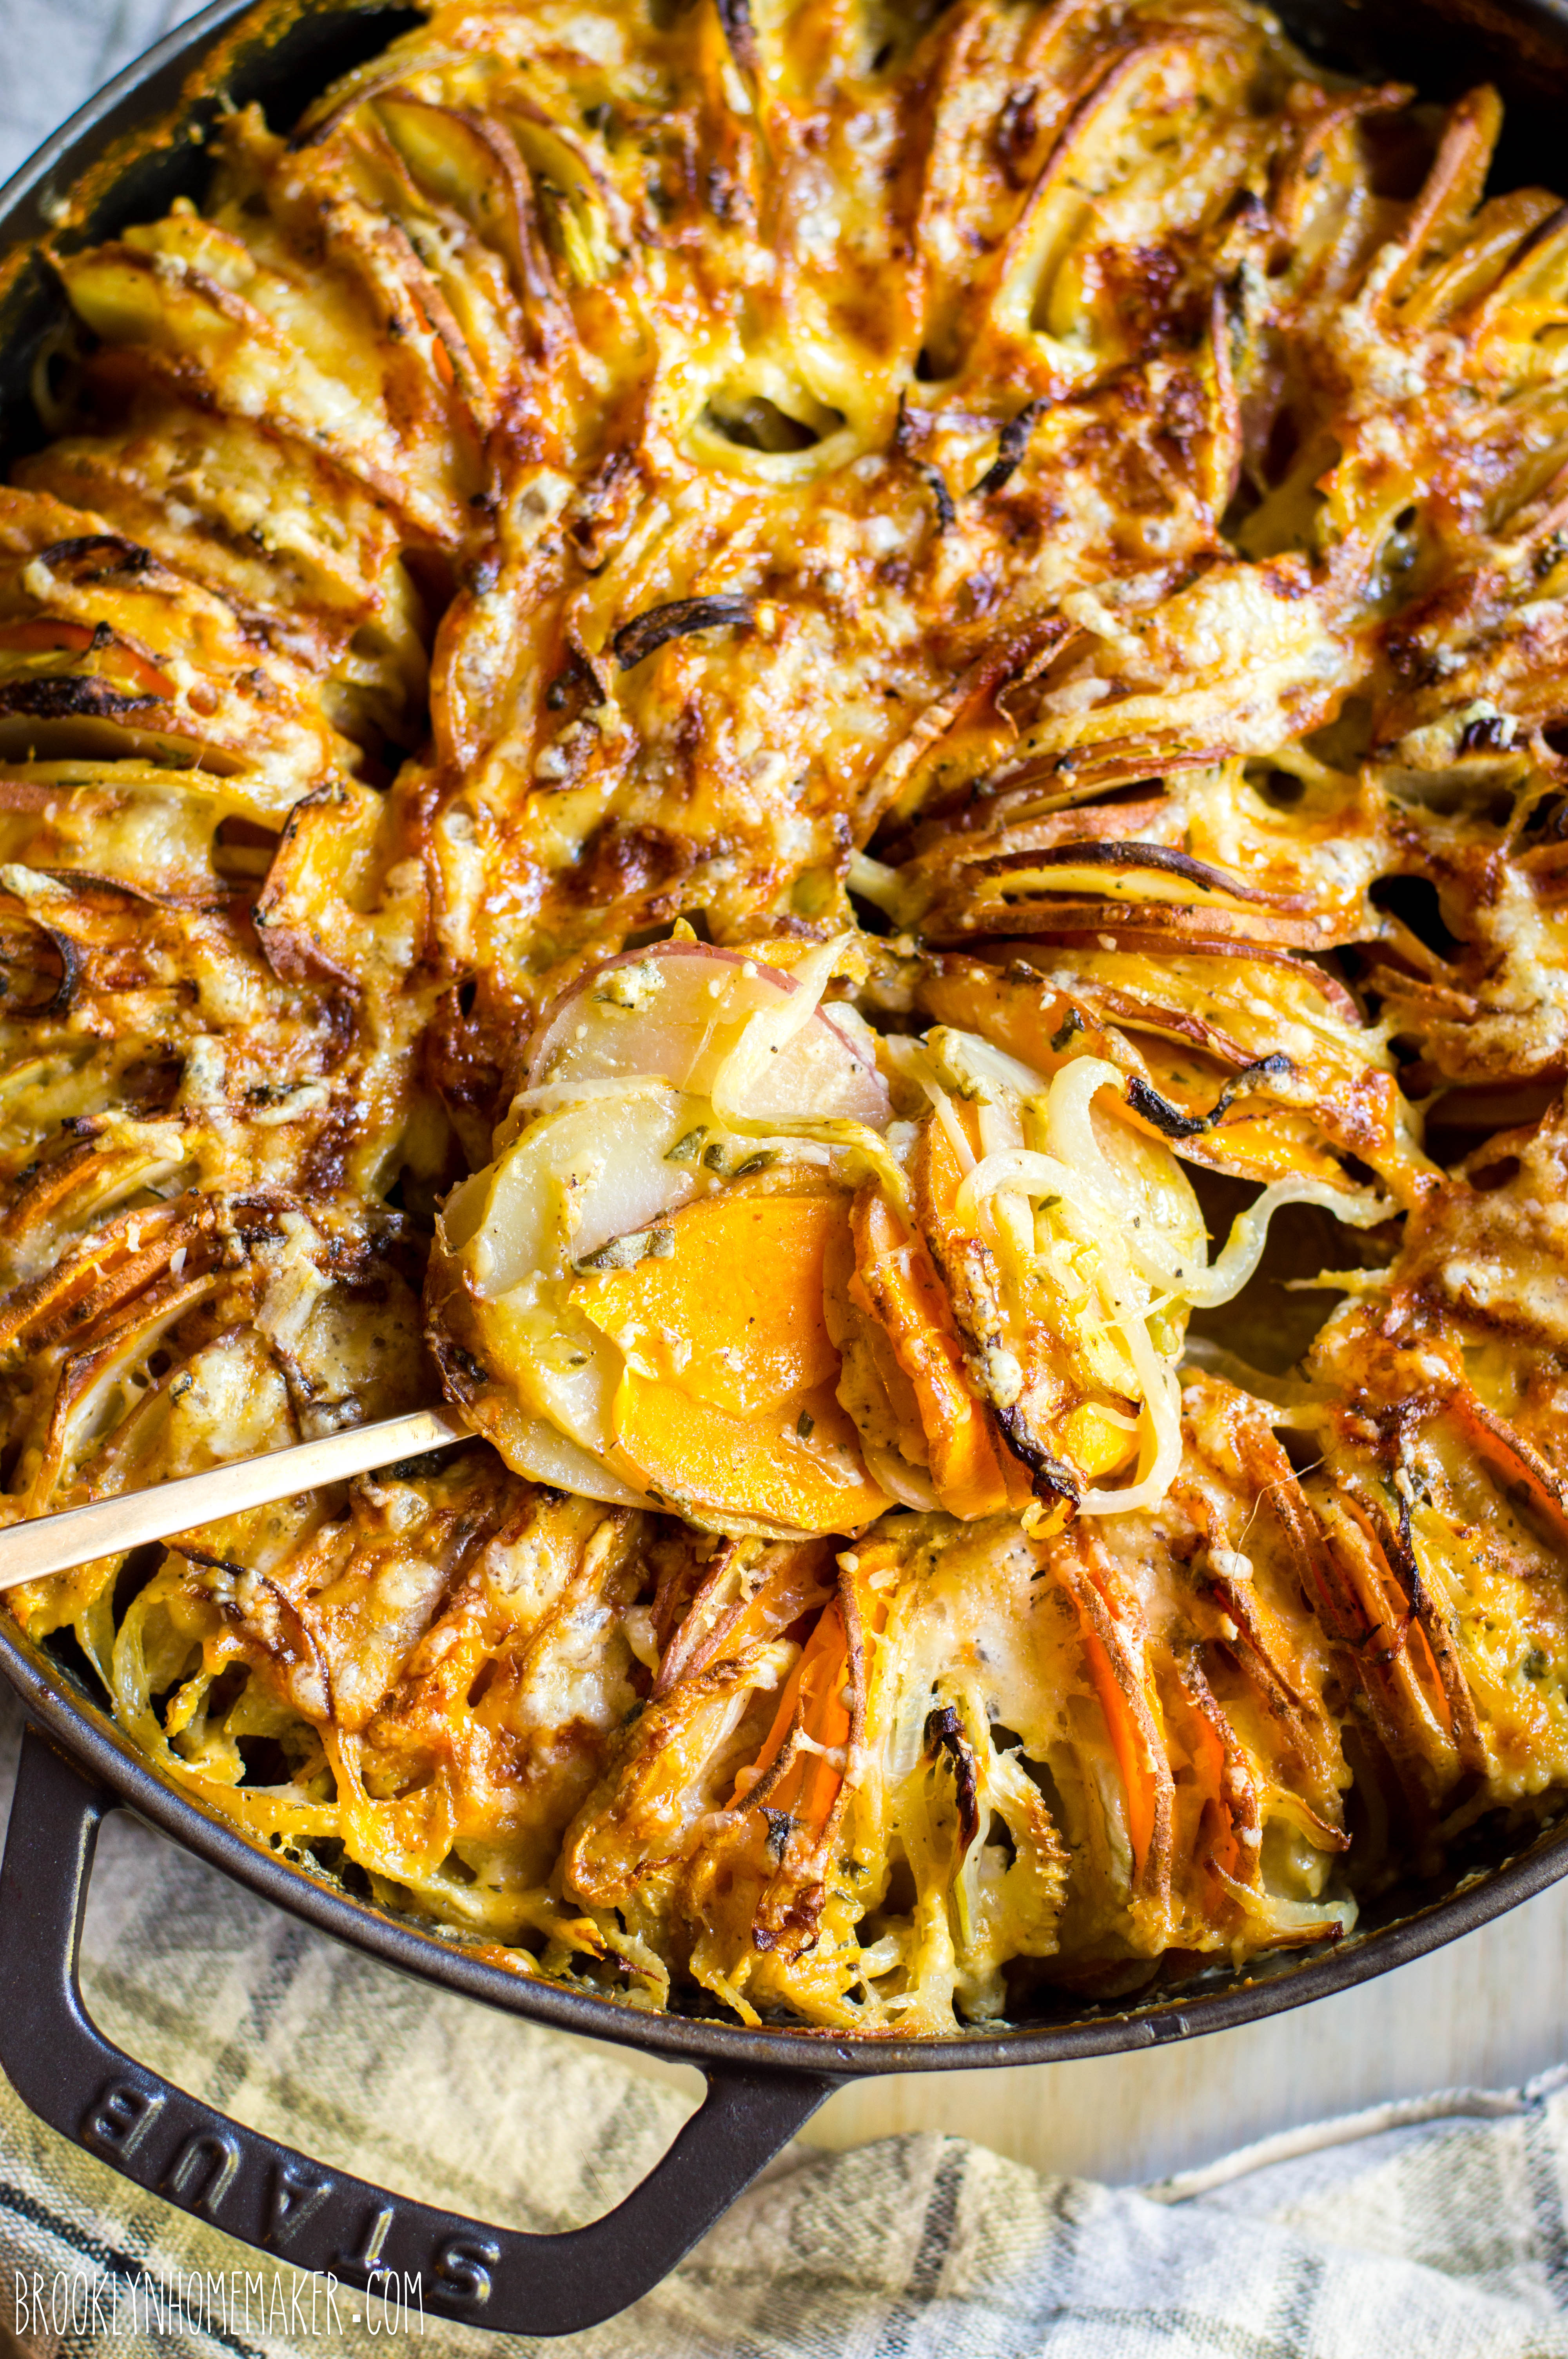
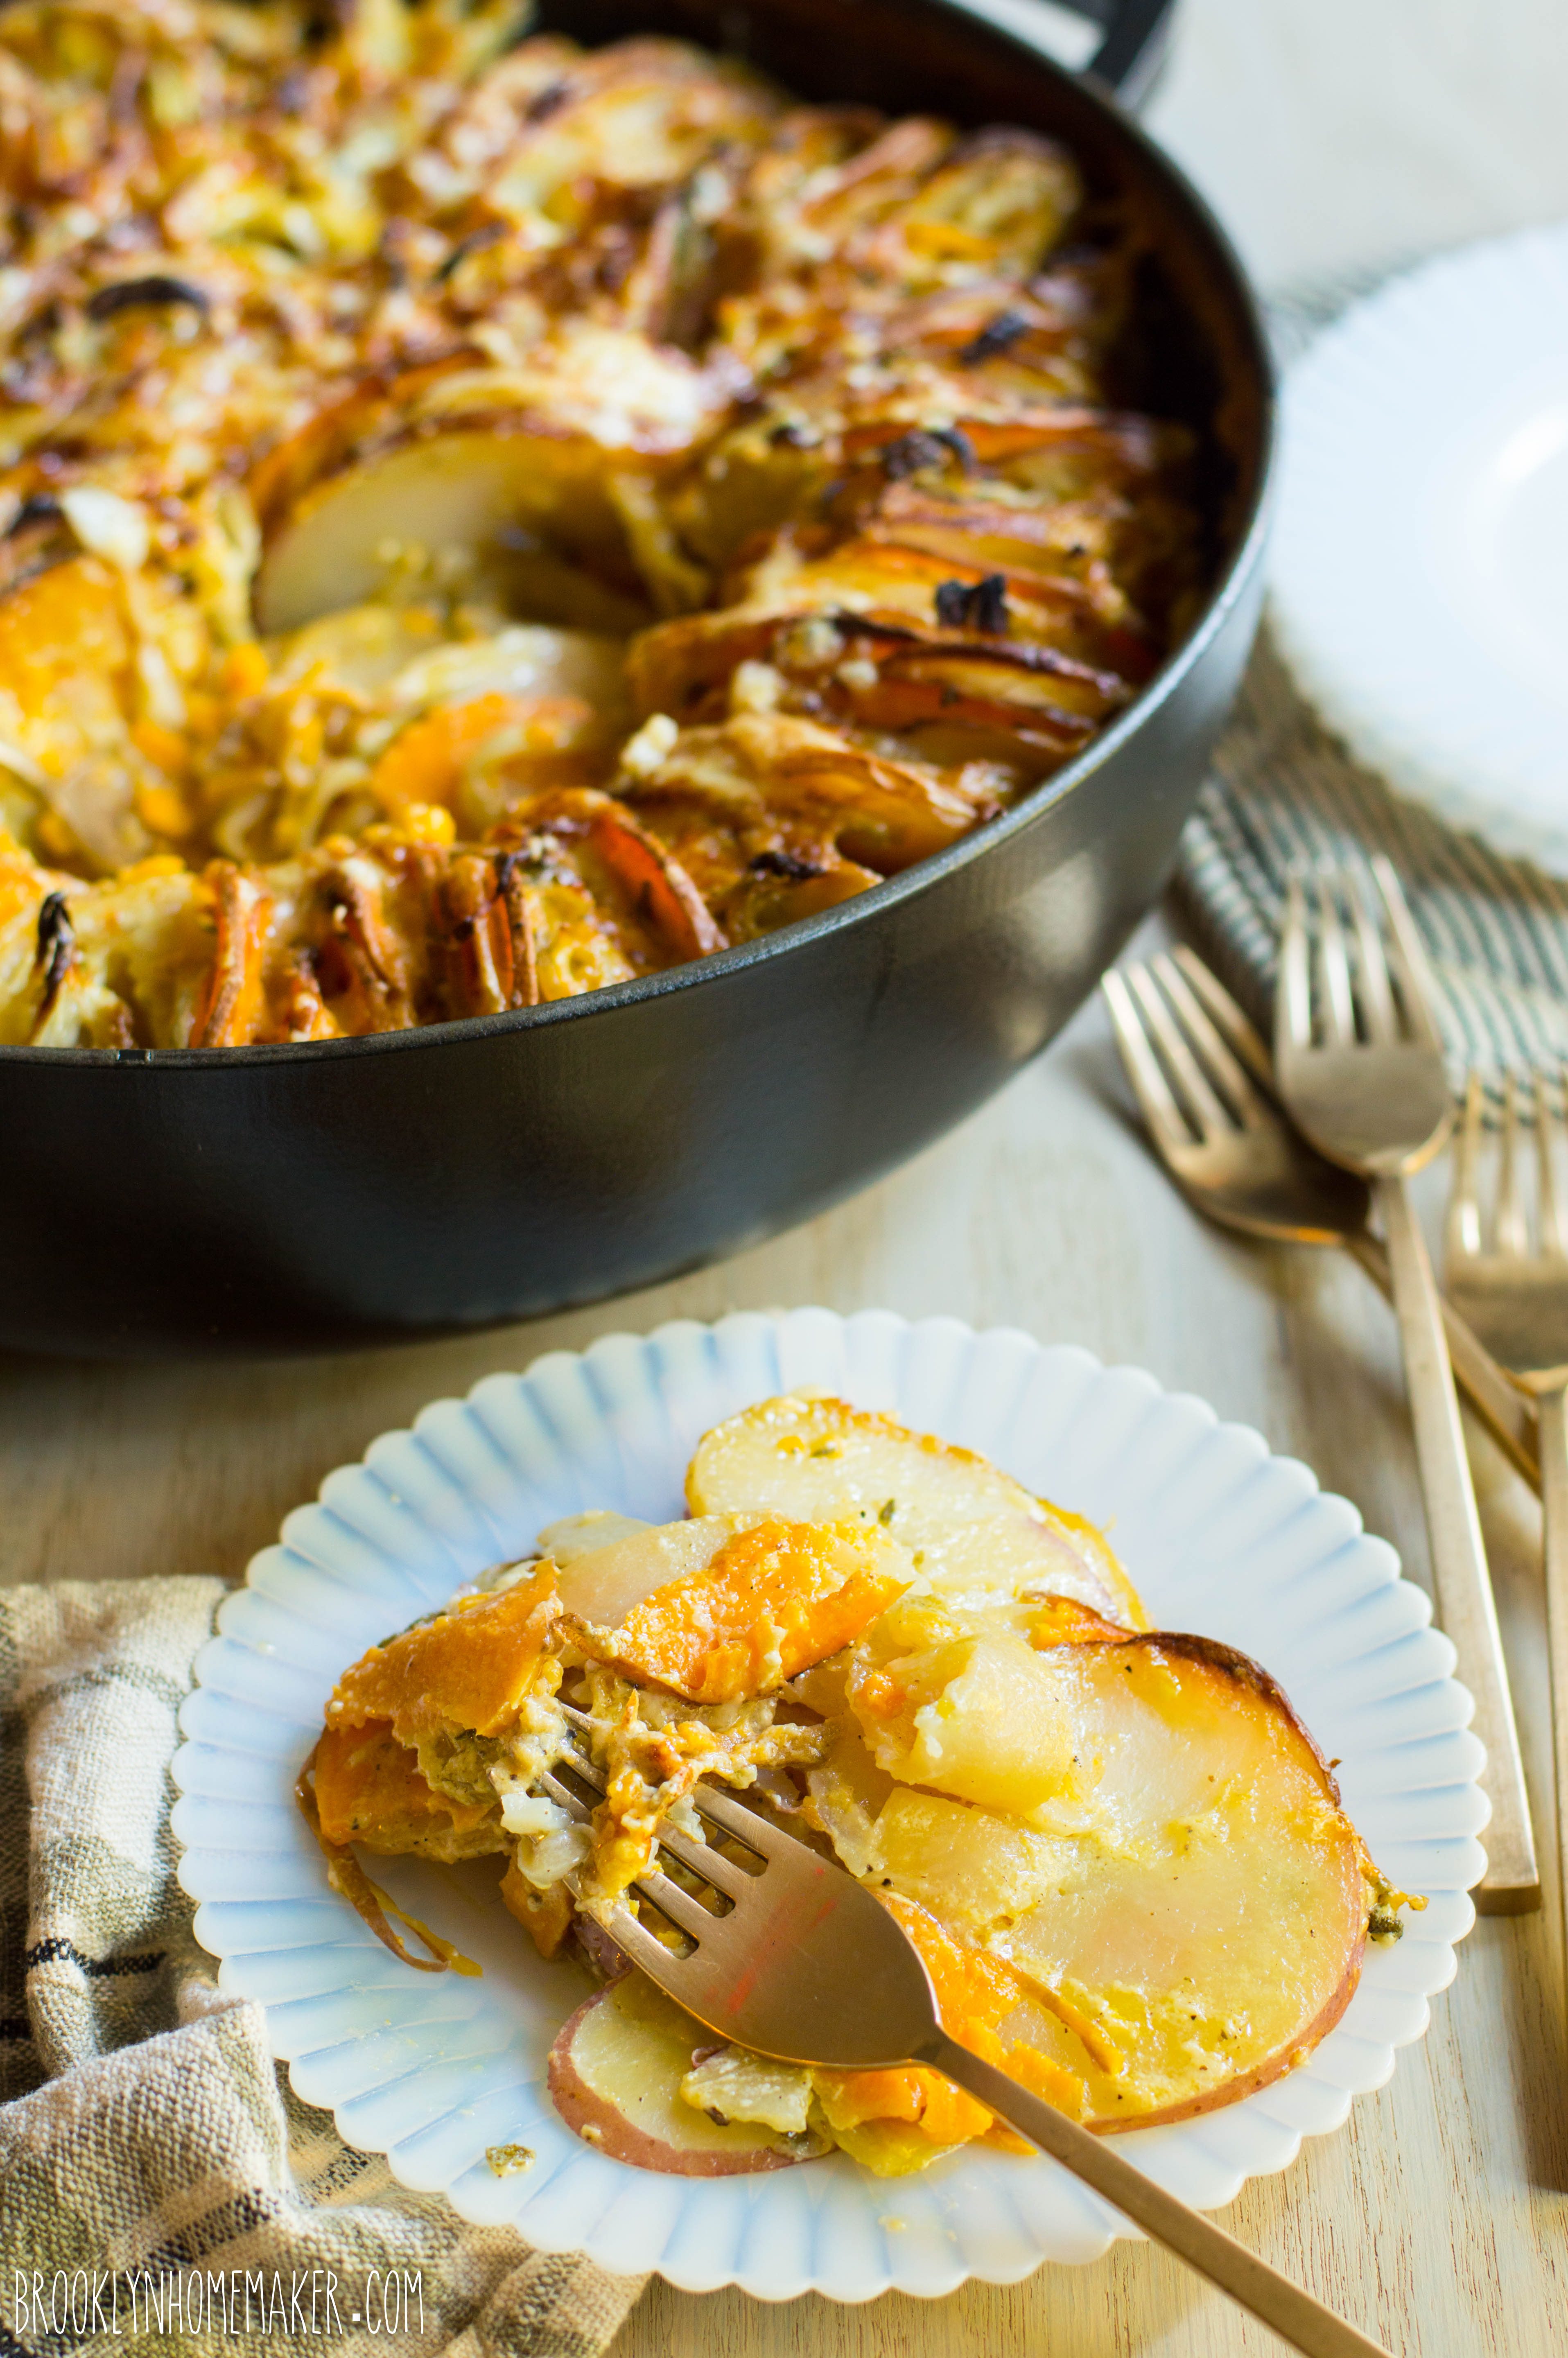
It also means all of my favorite foods are back in season. Squash and pumpkins and root veggies and soups and stews and braises and apples and pears and fresh sweet cider and sugar-coated cider doughnuts and everything infused with warm homey baking spices.

basic bundt series | spice cake | Brooklyn Homemaker

Now, I’m well aware that Martha Stewart thinks pumpkin spice is for basic bitches only, but I also happen to know that she has a thing for a well baked spice cake. And hey, this is the basic bundt series after all, so why not embrace the basic and just go for it?

Basic or not, the classic combination of cinnamon, ginger, nutmeg, & clove will never go out of style. I mean, can you think of any better flavor to usher in the best season of the year?

No.
You can’t.

basic bundt series | spice cake | Brooklyn Homemaker

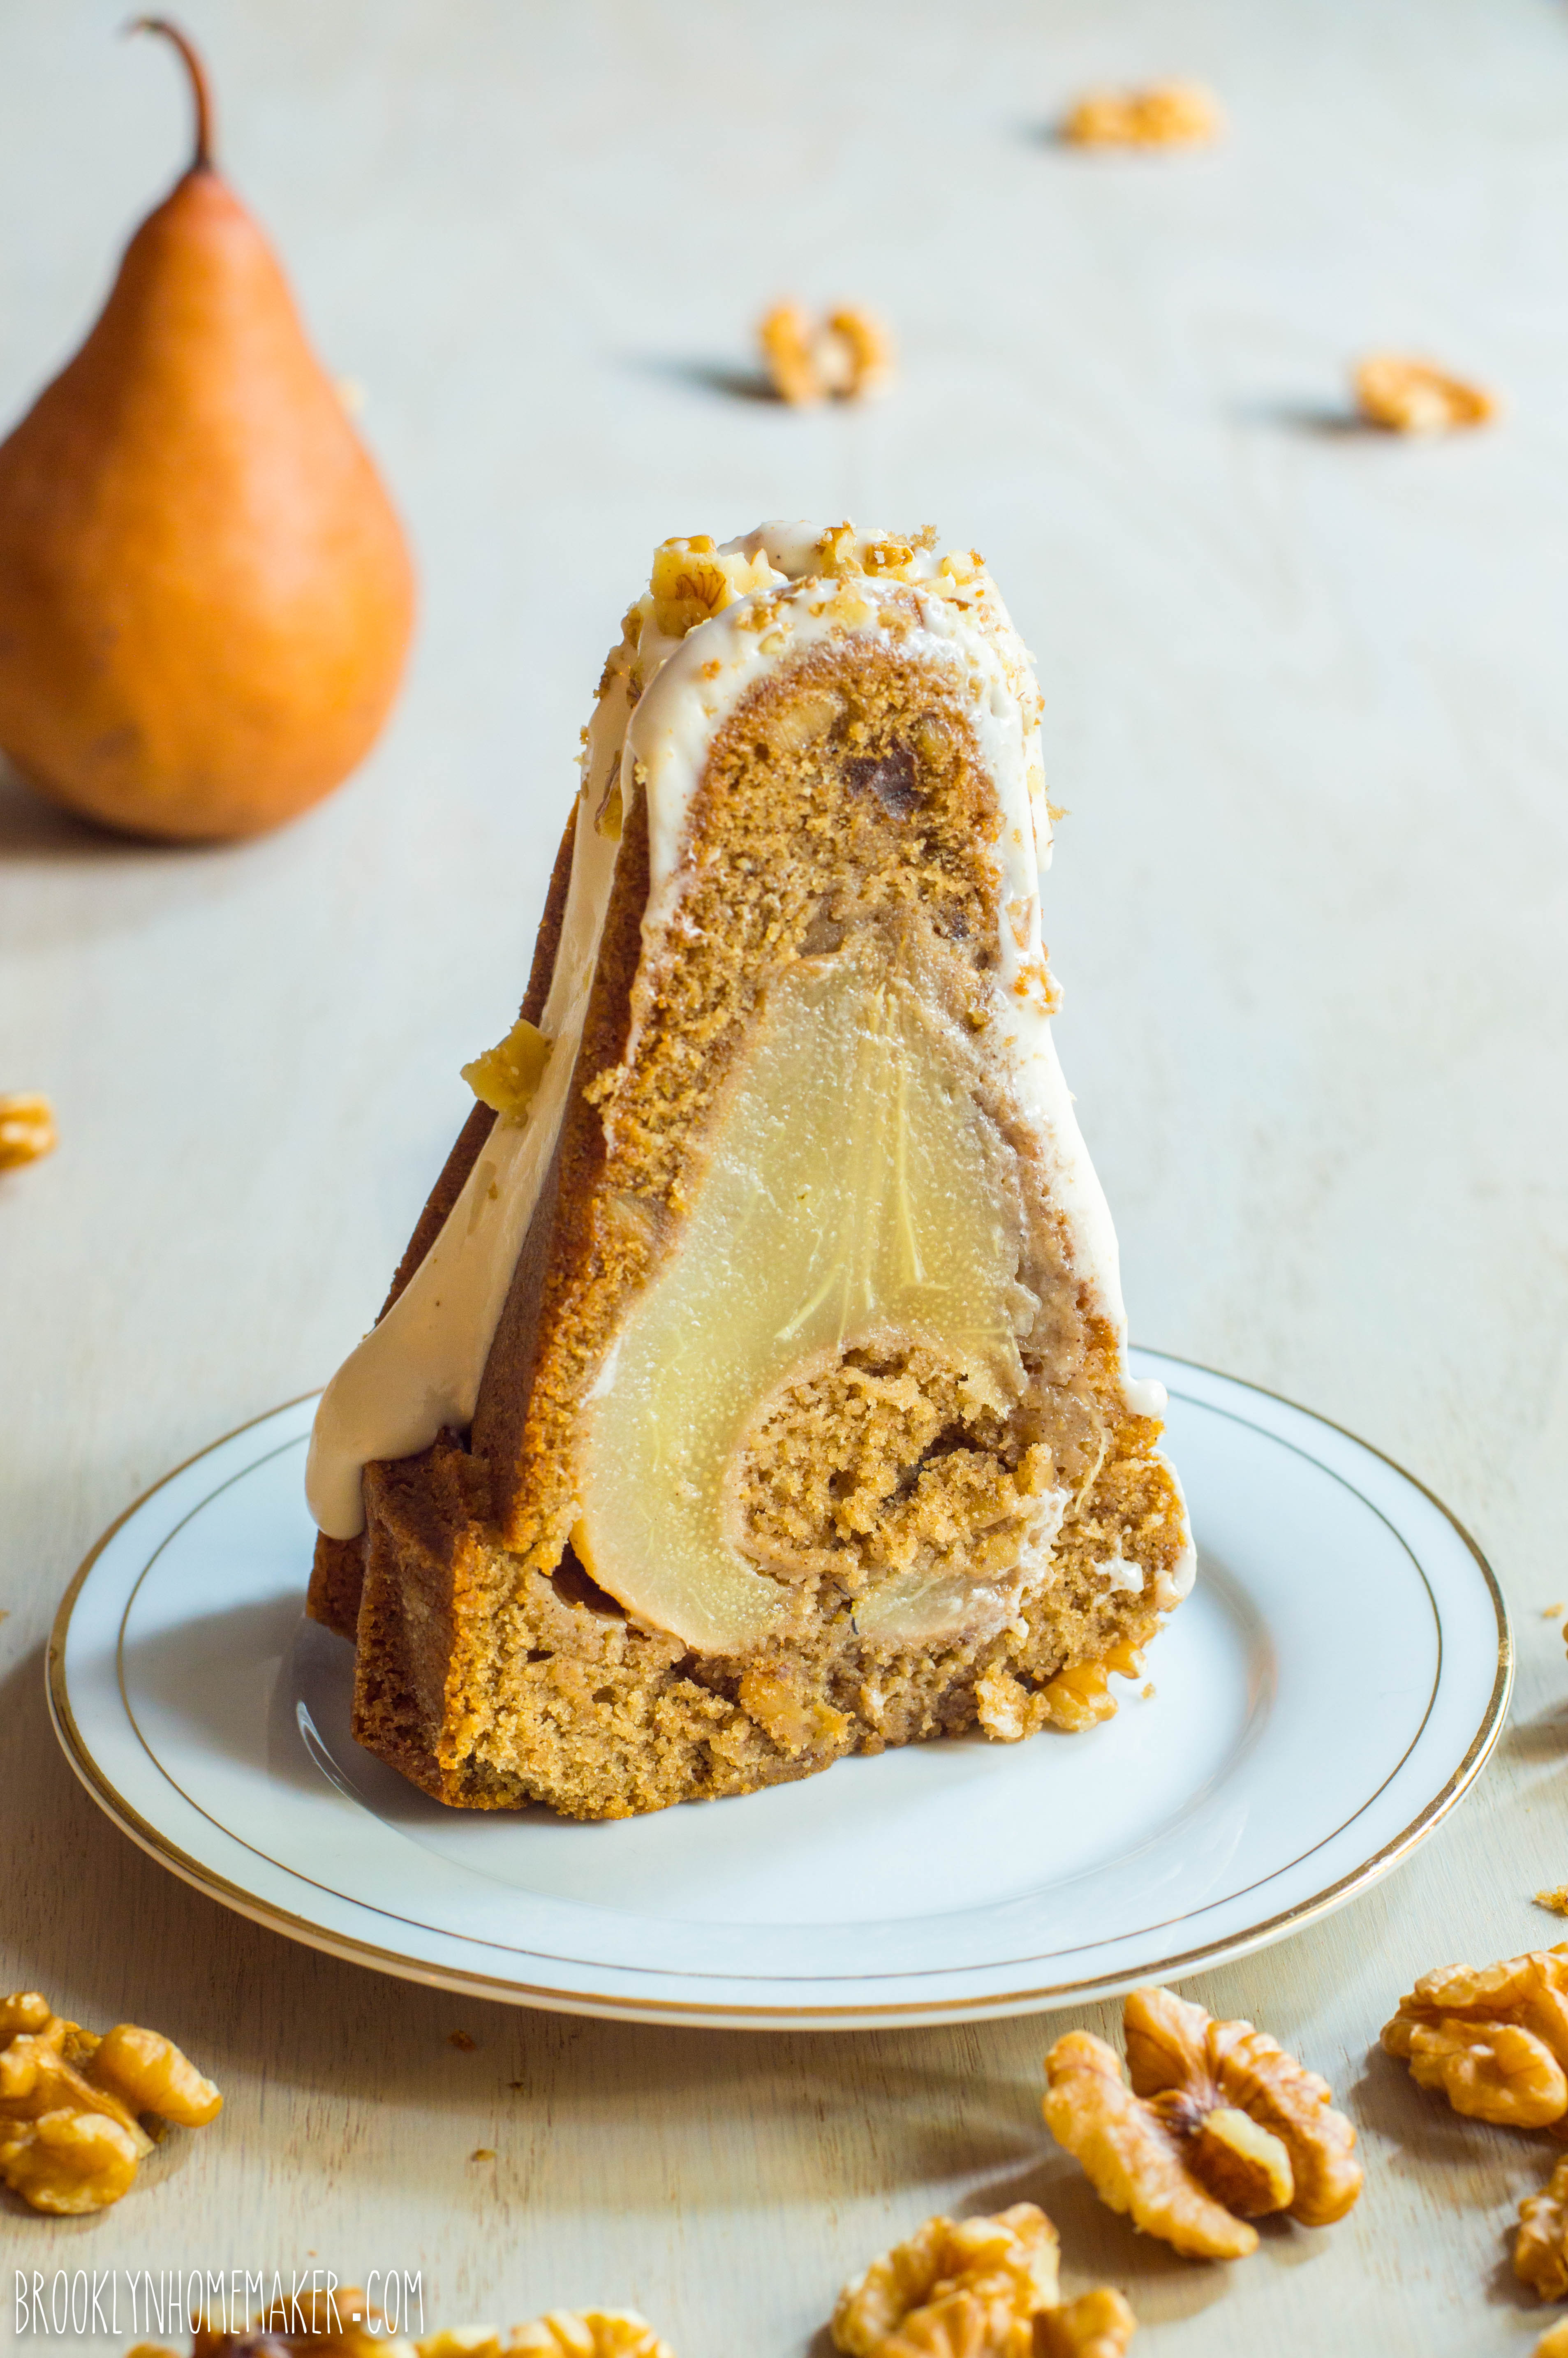
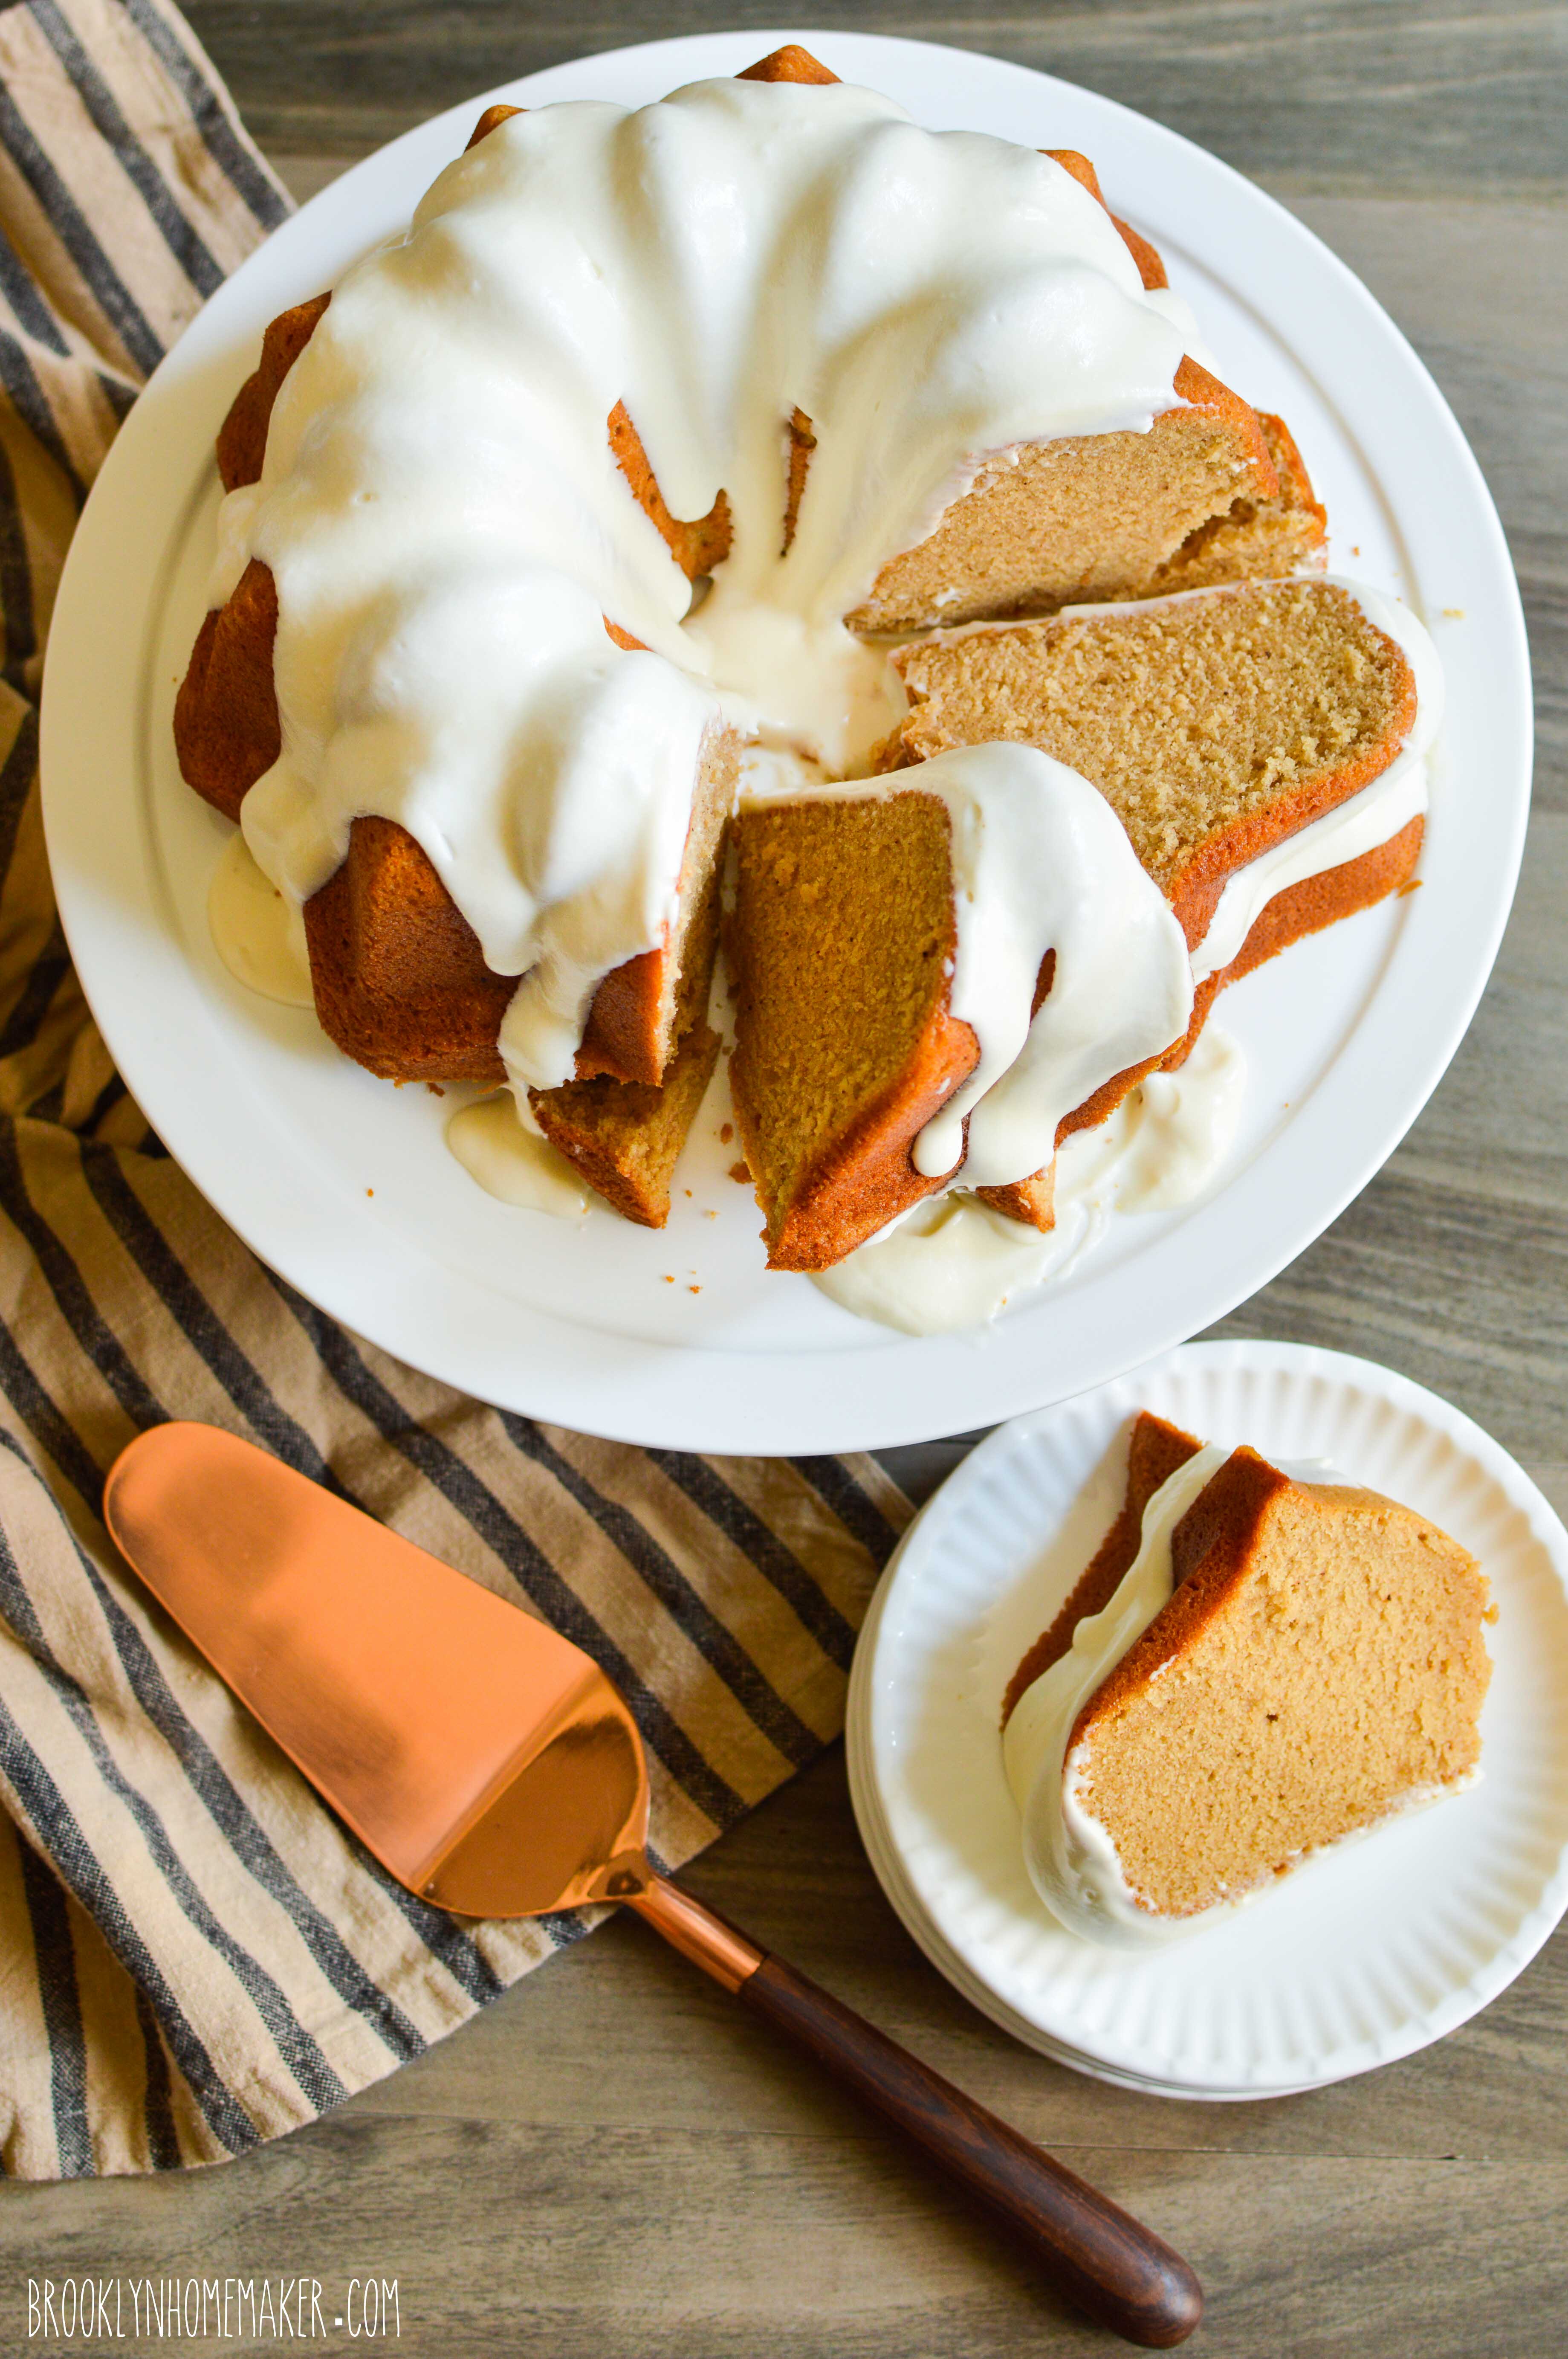
Anyways, not to toot my own horn or anything (toot toot), but this is one seriously delicious freaking cake!

It’s tender and moist with a soft delicate crumb, a refined subtle sweetness, and the perfect amount of spice. I tested this recipe half a dozen times to get it juuuust right, and I seriously couldn’t be happier with the results. My coworkers, for that matter, couldn’t have been happier that I baked so many cakes to get the recipe just right either. The poor dears.

basic bundt series | spice cake | Brooklyn Homemaker

My favorite thing about this recipe though, is just how versatile it is.

The whole idea behind the basic bundt series was to come up with simple and straightforward, but completely flawless, cake recipes that can either be baked and enjoyed as is, or gussied up and personalized with a few easy additions or substitutions.

basic bundt series | spice cake | Brooklyn Homemaker

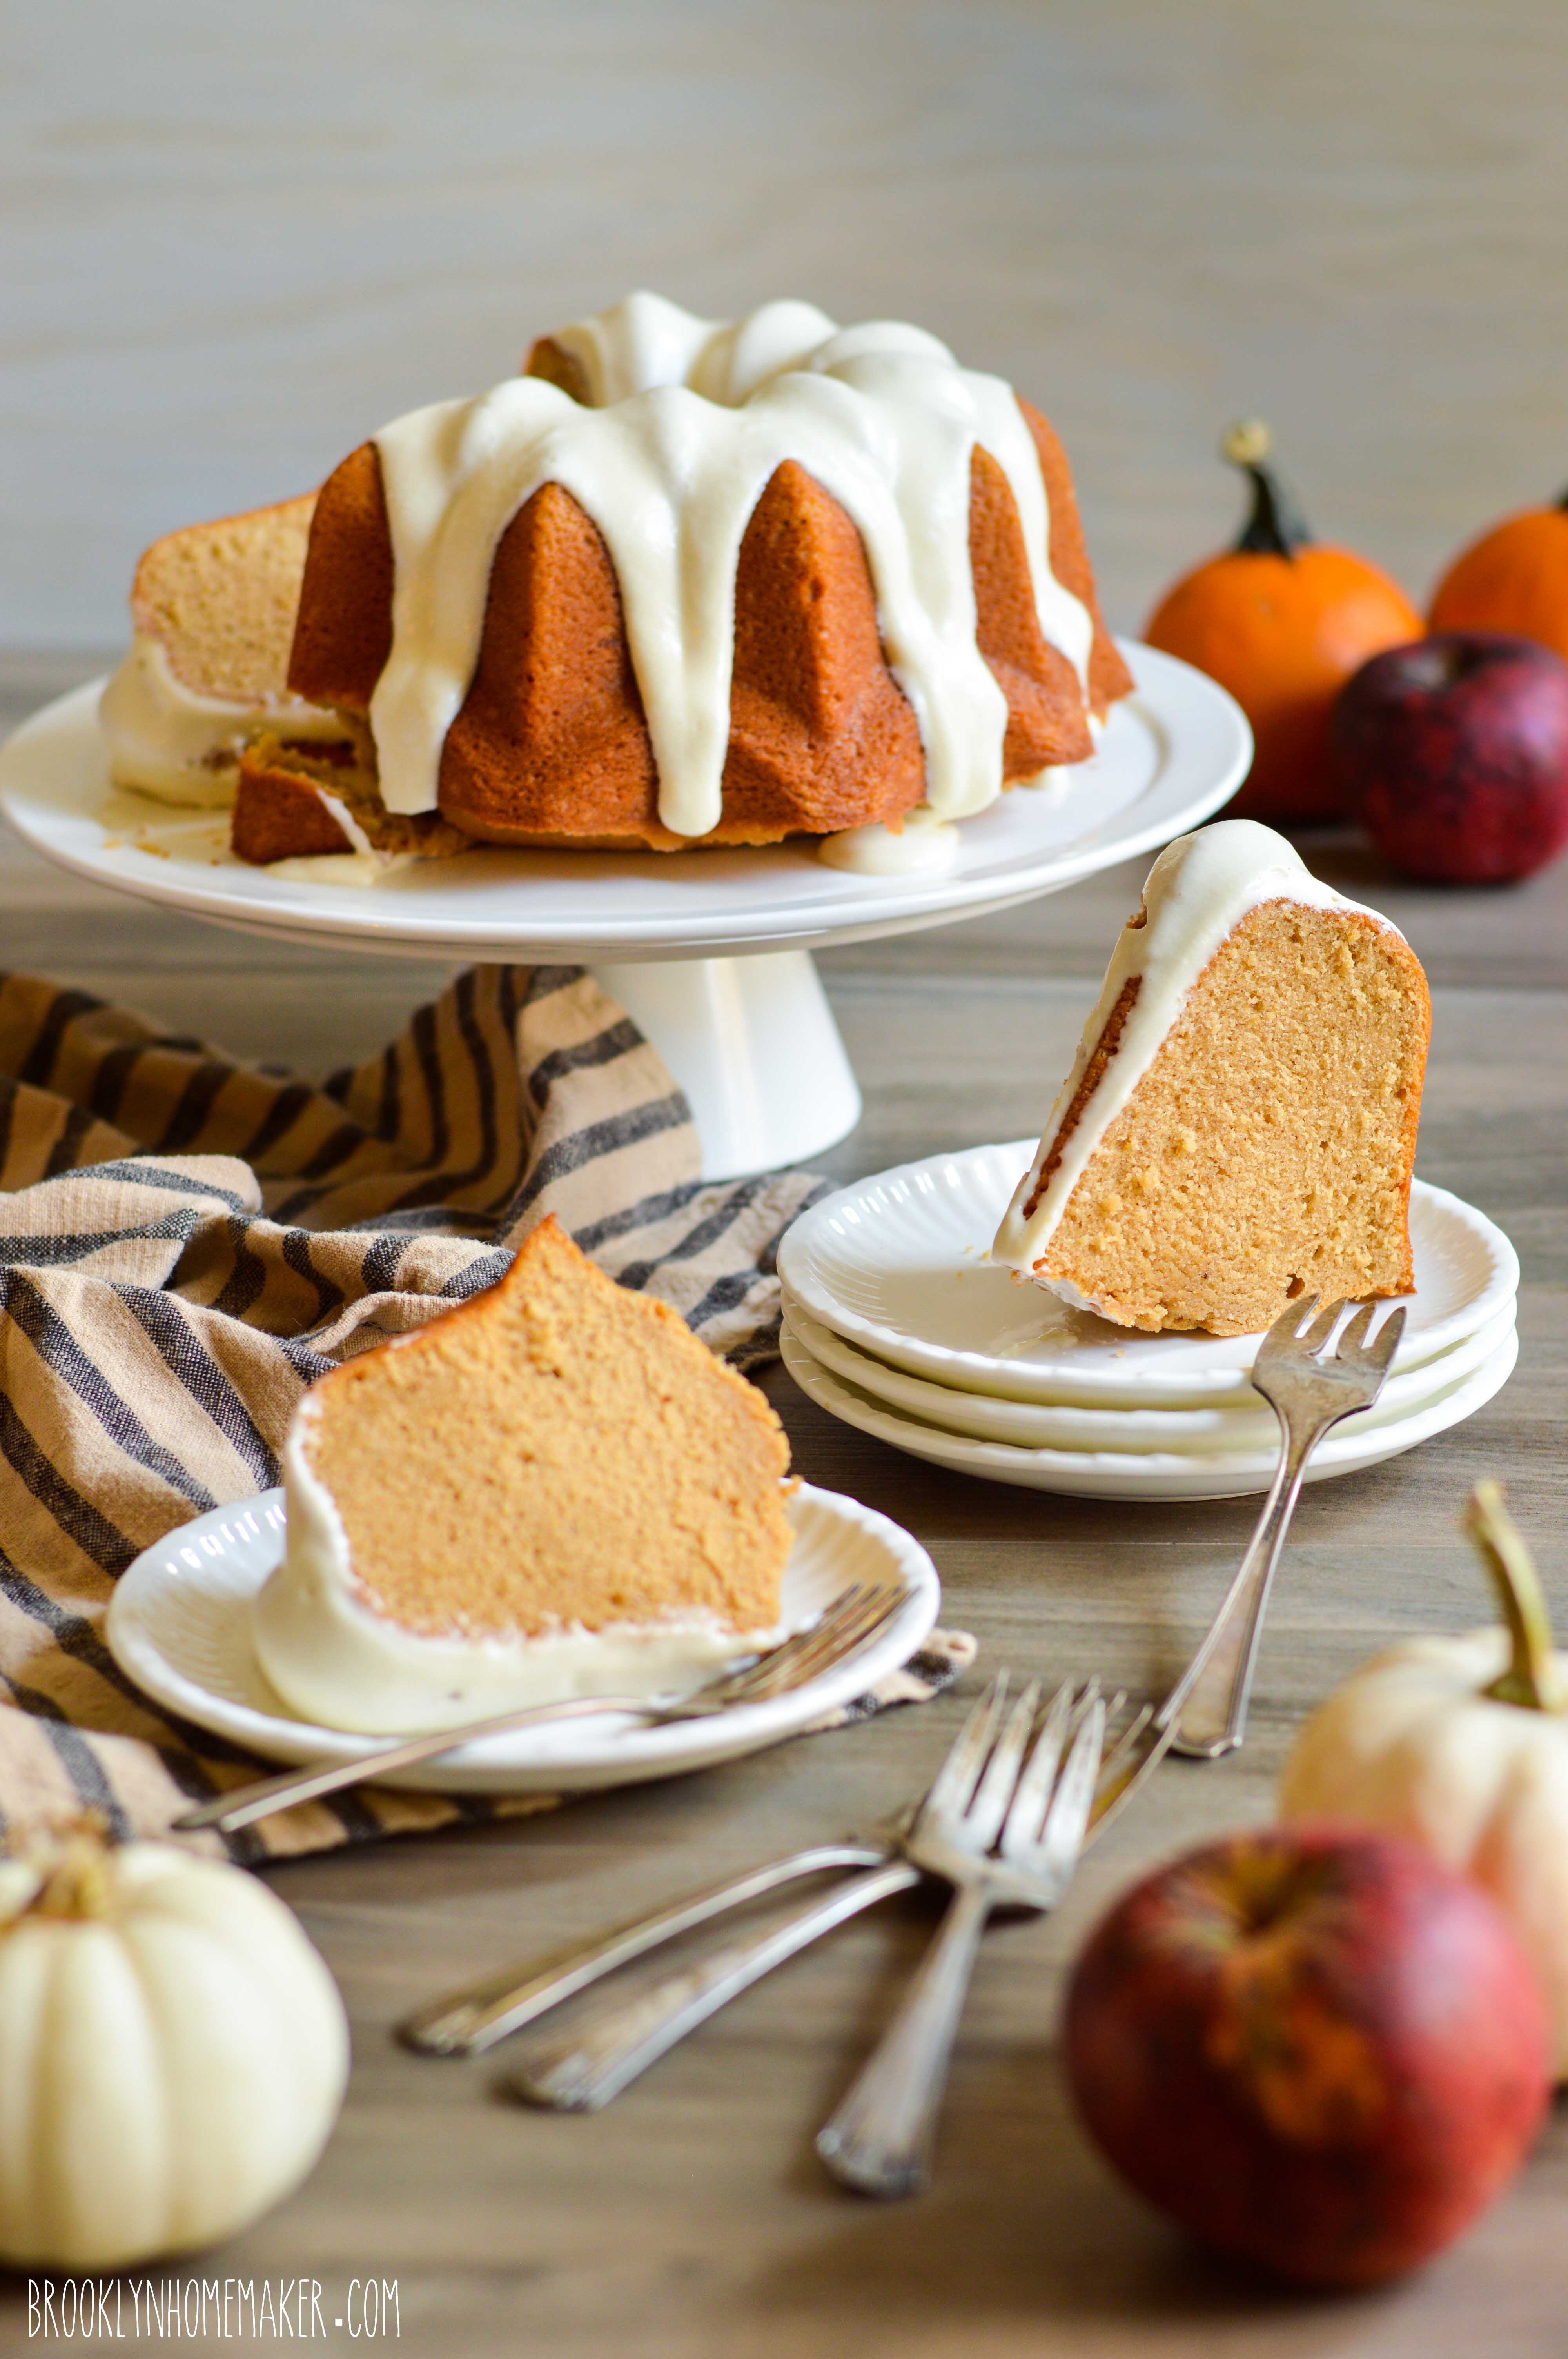
When I did my recipe testing this time around, I didn’t just play with the spice levels to perfect them, I also experimented with different “liquid” ingredients to change the flavor profile. I started with and perfected a simple buttermilk-based spice cake, but then I tried swapping the buttermilk for other ingredients like unsweetened applesauce, grated fresh apples, and canned pumpkin puree.

Without changing a single other ingredient, swapping out the buttermilk for something else produces an entirely new and distinctly different cake! I promise that I’ve tried and tested all of these substitutions and they’re all equally delicious and perfectly spiced.
The pumpkin version was definitely a favorite with my (decidedly basic) coworkers.

basic bundt series | spice cake | Brooklyn Homemaker

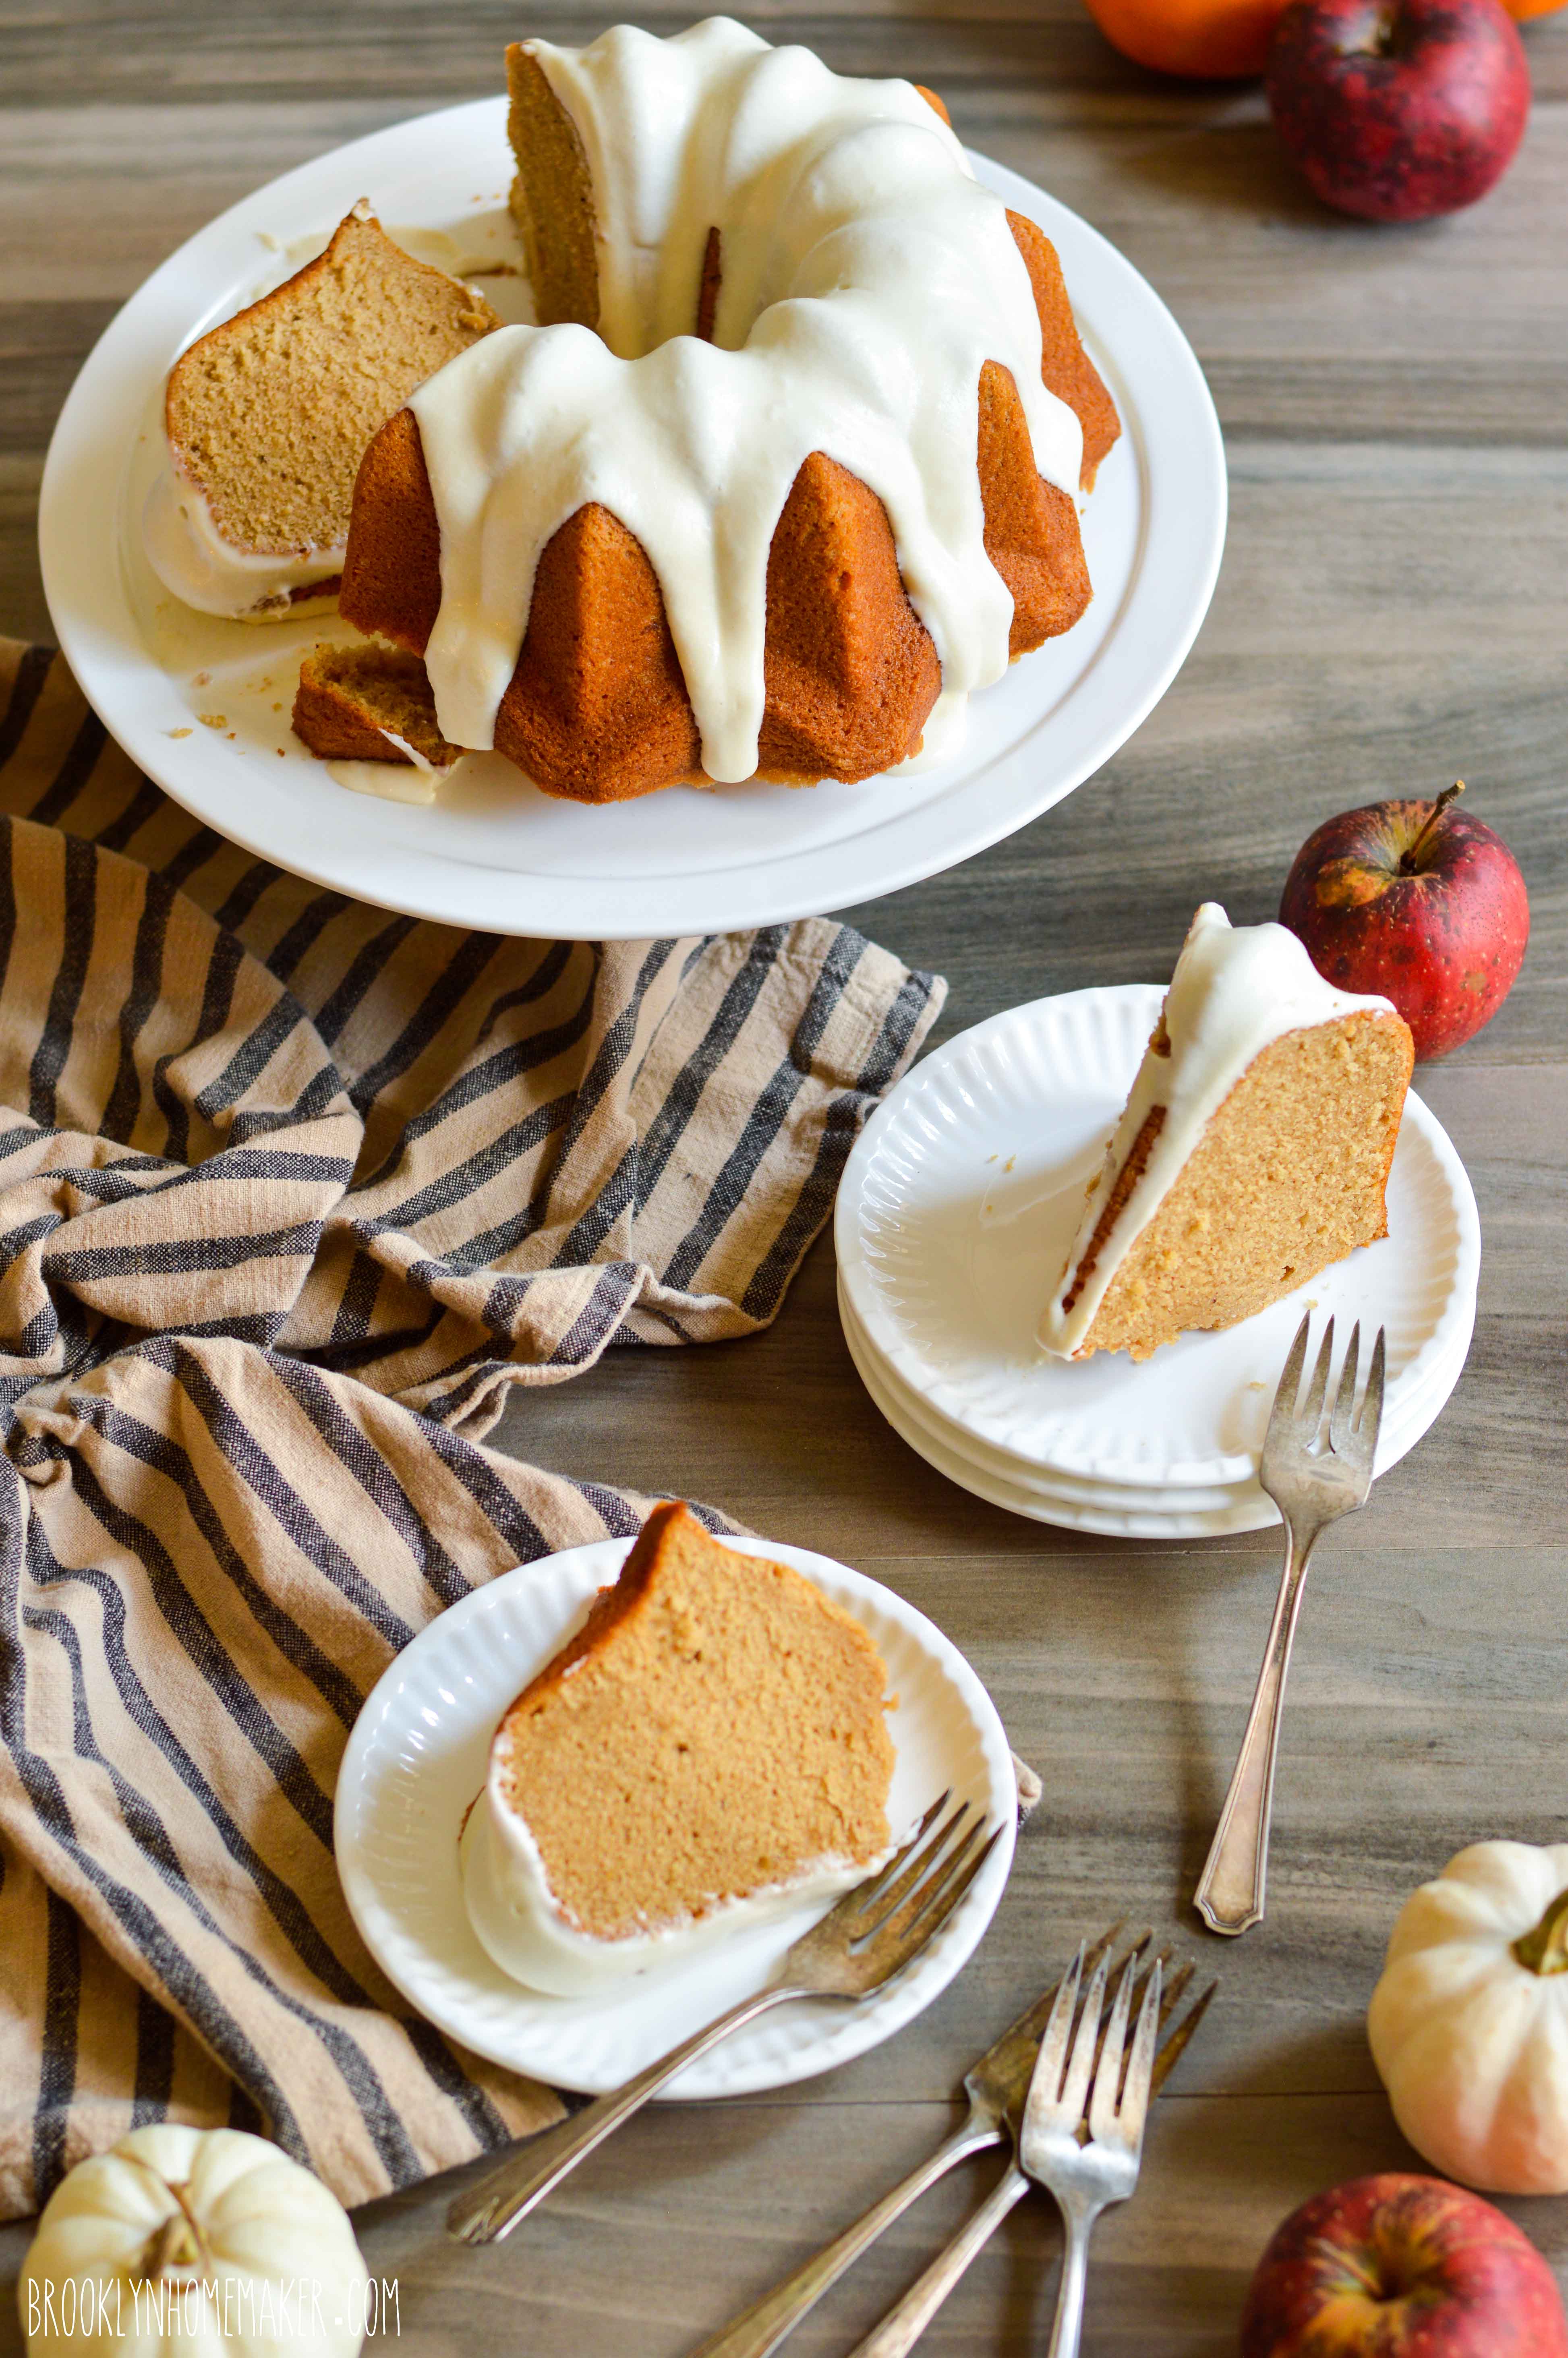
The endless variations you can put on this recipe don’t have to stop with swapping out the buttermilk either. This cake is just screaming for a cup of toasted walnuts or pecans, or a bit of buttery streusel. Even changing the glaze could make a difference in the flavor profile. I decided that a tangy cream cheese glaze would pair perfectly with any one of the buttermilk, apple, or pumpkin versions of the cake; but I think that a thick caramel glaze would be heavenly too. You could also do a bourbon glaze, or maybe even just sprinkle the cake with cinnamon and granulated sugar.

No matter what variation you choose to bake though, this perfectly spiced basic bundt is sure to satisfy the basic bitch in all of us this fall.

basic bundt series | spice cake | Brooklyn Homemaker

Spice Cake Bundt

3 cups flour
2 teaspoons baking powder
1 teaspoon salt
1 1/2 teaspoons ground cinnamon
1 1/2 teaspoons ground ginger
1/2 teaspoon ground cloves
1/2 teaspoon ground nutmeg
1/2 cup (1 stick) unsalted butter, at room temperature
1 cup granulated sugar
1 cup dark brown sugar, firmly packed
4 large eggs
1/2 cup peanut oil (or vegetable or canola oil)
2 teaspoons vanilla extract
1 1/4 cup buttermilk *see note below for alternatives

Preheat oven to 350F.
Butter and flour a 10 to 12 cup bundt pan (or spray with a baking spray that includes flour), and refrigerate while preparing the cake.

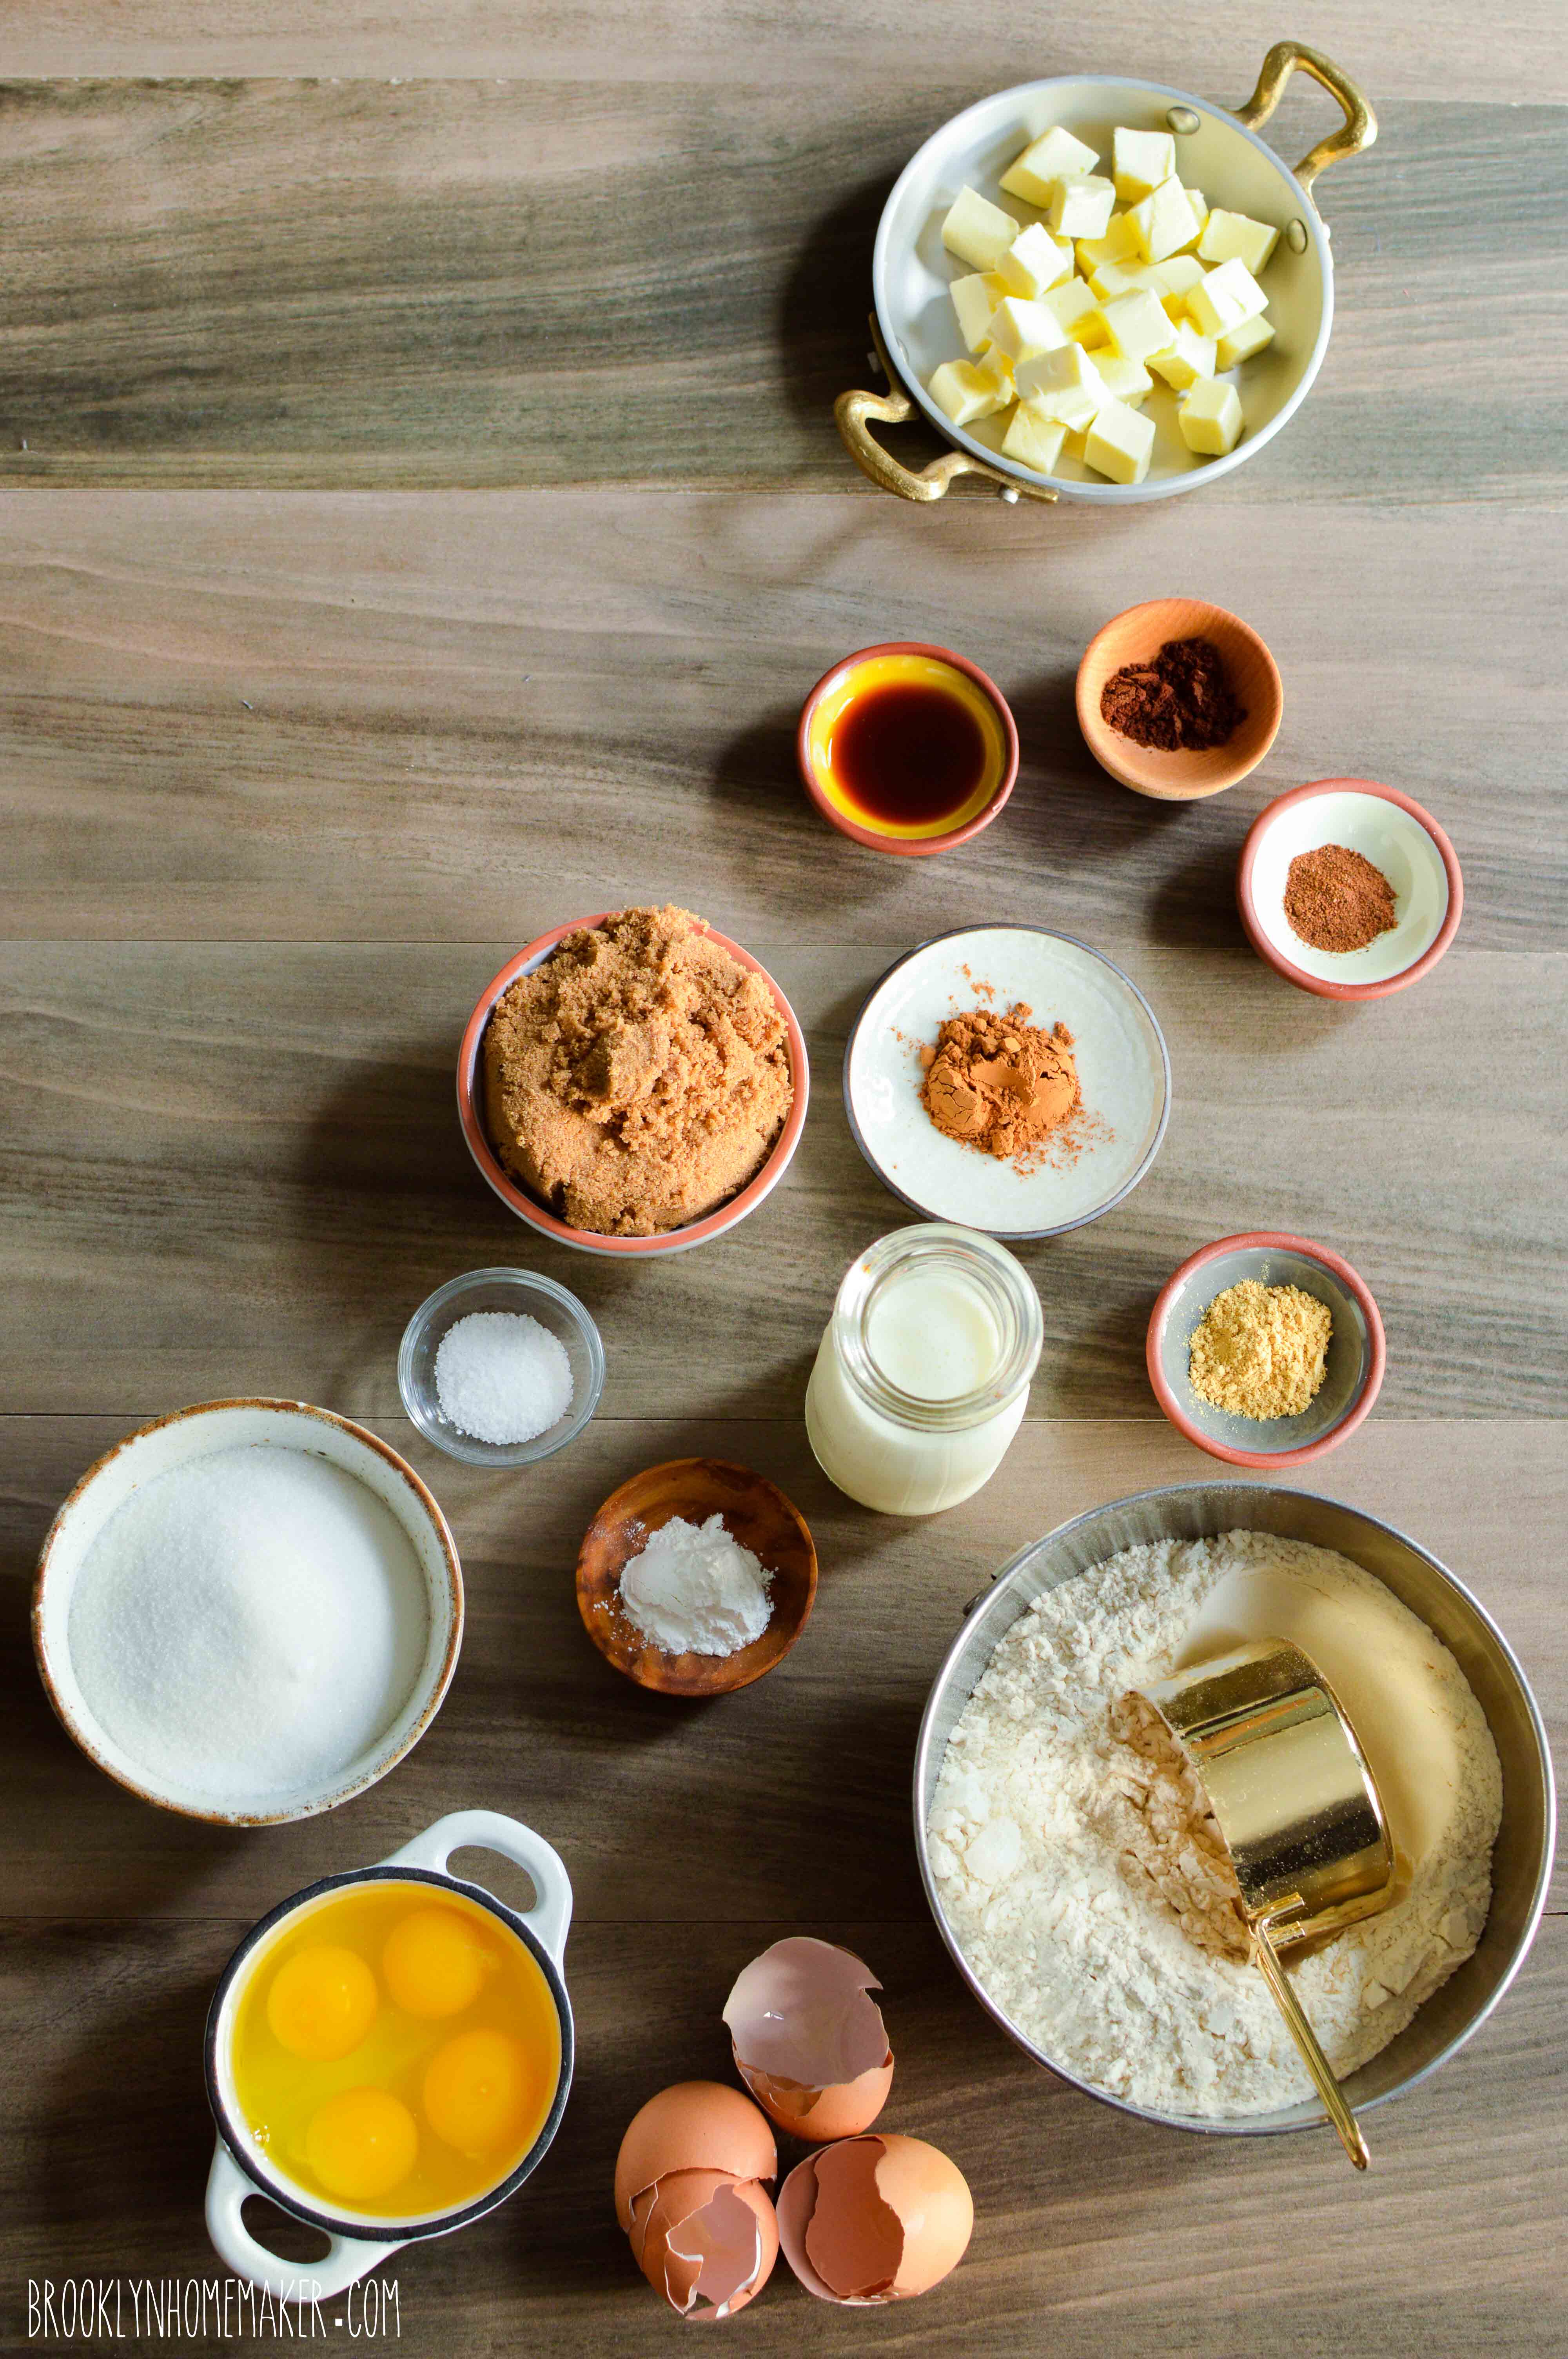
Whisk flour, baking powder, salt, cinnamon, ginger, cloves, & nutmeg together in a bowl and set aside. In the bowl of a stand mixer fitted with the paddle attachment, beat the butter, sugar, & brown sugar together on high speed until light and fluffy, about three minutes. Scrape down the sides of the bowl and add the eggs, one at a time, scraping between additions. In a small bowl or measuring cup, stir together oil, vanilla, & buttermilk (or substitution). In the bowl with the butter and sugars, alternate additions of the flour and buttermilk mixtures at low speed, beginning and ending with flour. Mix just until combined and do not overwork the batter. Scrape down the sides of the bowl to make sure all ingredients are well incorporated.

Pour the batter into the prepared bundt pan, smooth out the top, and firmly pound the pan against the countertop several times to tap out any air bubbles. Bake in the center of the oven for 50 to 55 minutes, or until a toothpick or cake tester comes out clean from the center of the cake.

Transfer the pan to a wire rack to cool for about 20 to 30 minutes before turning the cake out onto the rack to cool completely. Once cool, drizzle with cream cheese glaze (recipe below) if desired. Cake should keep, in an air tight container at room temperature, for about 3 or 4 days.

*baker’s note:
Changing the flavor profile of this cake couldn’t be simpler.
Just omit the buttermilk completely, and substitute with one of the following:

  • 1 1/2 cups unsweetened applesauce
  • an entire 15 oz can (1 3/4 cups) of pumpkin puree (not pumpkin pie filling)
  • 2 cups grated baking apples, well packed (peeled and cored before grating)

The applesauce cake should bake for the same time, and the pumpkin and grated apple cakes may take about 5 extra minutes or so.

Cream Cheese Bundt Glaze: 
4 ounces (1/2 package) cream cheese, at room temperature
1 cup powdered sugar
1 teaspoon vanilla extract
3 to 6 tablespoons milk

In the bowl of a stand mixer, beat the cream cheese until it’s soft and smooth and light. Add the powdered sugar, vanilla, and 3 tablespoons of milk and blend until there are no lumps. If necessary, add more milk, a tablespoon at a time, beating after each addition until the glaze reaches the desired drizzle-able consistency. It should be about the consistency of melted ice cream to drizzle correctly.

Place a tray under cake and cooling rack to catch any drips. Pour glaze over cake and let the glaze work its way down the side, gently tapping the tray on the counter to smooth it out if necessary.

Advertisement

red, white, & sweet potato gratin with fennel & sage

I can’t even believe that it’s almost Thanksgiving already.

red, white, & sweet potato gratin with fennel & sage | Brooklyn Homemaker

I swear it really just snuck up on me this year. Last year I had my entire meal planned months in advance, and because I wanted to share my whole menu with everyone here, I’d even tested, modified, written out, and photographed the recipes well before November even started.

red, white, & sweet potato gratin with fennel & sage | Brooklyn Homemaker

This year though, the Maxwell’s build-out and opening occupied most of my attention from summer well into the fall, and everything else in my life had to be put on the back burner. I’ve had some ideas stewing that I wanted to test out for my Thanksgiving spread this year, but I just never really found the time, even once Maxwell’s was open and I was able to re-focus my attention elsewhere.

red, white, & sweet potato gratin with fennel & sage | Brooklyn Homemaker

The funny thing is that I actually first attempted this recipe when I was trying to plan for my Thanksgiving spread last year. I knew that I’d want to make some significant changes to it, and I just had too many other recipes to focus on, so I decided to dog-ear the idea to come back to later.

Well, it’s later now.

red, white, & sweet potato gratin with fennel & sage | Brooklyn Homemaker

So, a couple weeks ago I started playing with it to fine tune my vision and streamline the steps. My first instinct was to caramelize the onions and fennel before mixing them in with the cream, but I actually found that by the time the whole thing baked for an hour an a half, the onions and fennel cooked down way too much and were almost indistinguishable. I also originally planned to peel the potatoes, or maybe just the sweet potatoes, but after trying the recipe both ways, peeling just seemed like an unnecessary extra step.

red, white, & sweet potato gratin with fennel & sage | Brooklyn Homemaker

With everything that goes into making an entire Thanksgiving dinner, I figured that everyone, including myself, would appreciate any unnecessary steps that I could eliminate. Enough effort goes into slicing everything with the mandoline and arranging the slices in tight circles, so as long as it still tastes great, why not make everything else super easy?

Speaking of slicing everything with a mandoline, please be careful when you’re slicing. Those pesky mandolines have bitten me a few times, but if you go slow and use a guard when you get toward the end of the potato, I promise that you can keep your fingertips intact. Another option to keep your fingers super safe would be to invest in a cut resistant glove. Whenever I’ve had any accidents with mandolines though, it’s been because I was going too fast or was distracted by something else in the kitchen. The blades are sharp and deserve your undivided attention, so please use caution! Unfortunately this recipe will be kind of difficult to perfect without one. Sorry friends!
I mean, if you have surgically precise knife skills, by all means please go ahead and just use a knife, but it’s really important that all the slices are the exact same thickness so everything cooks at the same time.

red, white, & sweet potato gratin with fennel & sage | Brooklyn Homemaker

Let me tell you friends, this recipe was worth the wait and the effort. Who could say no to tender, delicate, richly flavored potatoes with crunchy, crispy top edges? The mix of red, white, and sweet potatoes is wonderfully autumnal without being too sweet, and the onions and fennel caramelize in the oven and their flavors go from pungent and intense to rich, mellow, and slightly sweet. The mix of cheeses adds a salty, nutty richness, and the sage, thyme, and garlic make this dish the perfect side to serve with turkey or poultry.
Or maybe I should say turkey would be the perfect side to serve with this gratin, because these potatoes are sure to steal the Thanksgiving spotlight.

It doesn’t have to end at Thanksgiving though! This recipe would be an amazing addition to any fall or winter meal, be it a special occasion, or just a way to up the ante on your sunday dinner.

red, white, & sweet potato gratin with fennel & sage | Brooklyn Homemaker

In the recipe below, I say that this dish should yield 6 to 10 side-sized servings, but I want to mention that if you’re serving this at Thanksgiving or Christmas dinner, with a wide array of other foods, your yield should actually be higher because your portion sizes will be smaller. Although many of your guests may go back in for seconds, people tend to take smaller portions when there’s a lot on the table because they’re trying to fit 15 different things on one plate.

So, at a normal dinner with a main and a side or two, this should feed about 6 to 10 people, but at Thanksgiving I think this recipe should be enough for about 12 to 15. The more the merrier, right?

red, white, & sweet potato gratin with fennel & sage | Brooklyn Homemaker

Red, White, & Sweet Potato Gratin with Fennel & Sage

  • Servings: 6 to 10 side-size servings
  • Print
Recipe adapted from Serious Eats

1 cup grated comte cheese (or other semi-firm nutty cheese like gruyere or emmental)
1/2 cup grated parmesan
2 cups heavy cream
1 tablespoon coarse kosher salt (sounds like a lot, but this is a lot of potatoes)
1 1/2 teaspoons ground black pepper
4 cloves garlic, minced or crushed
1 1/2 tablespoons finely chopped fresh sage
2 teaspoons finely chopped fresh thyme
1 lb red potatoes
1 lb white potatoes
1 1/2 lbs sweet potatoes
1 large to 2 small fennel bulbs (about 1/2 to 3/4 lb)
2 small to medium onions (about 1/2 lb)
2 tablespoons butter, softened

Preheat oven to 400F and adjust rack to the middle of the oven.

Toss cheeses together in a medium bowl to combine. Transfer about 1/3 of the mixture to another bowl and set aside for later use. Back in the first bowl, add cream, salt, pepper, garlic, sage, & thyme; and stir or toss to combine. Set aside.

Using a mandoline slicer, slice all the potatoes, unpeeled, into 1/8 inch thick disks and place into a very large bowl.  The larger the bowl, the easier it will be to toss the potatoes with the cream without making a mess. Slice the onion(s) and fennel bulb(s) to the same thickness and add to the potatoes. Pour cream and cheese mixture over the potatoes and toss toss toss to completely coat each slice of potato with cream. Use your fingers to separate any potatoes that may have become stuck together, so that every single slice is coated in the cream mixture.

Butter the inside of a large casserole, or 12″ cast iron skillet *see note. Organize handfuls of potatoes into neat stacks, along with some slices of onions and fennel, and line them up in the casserole with their edges aligned vertically. Continue placing stacks of potatoes into the dish, working around the perimeter and into the center until all potatoes have been added. Potatoes should be tightly packed. If necessary, slice an additional potato, coat with the remaining cream mixture, and add to the casserole. Pour the remaining cream mixture evenly over the potatoes until the mixture comes about half way up the sides of the potato slices. You may not need all the liquid.

Cover dish tightly with a lid or aluminum foil and transfer to oven. Bake for 30 minutes. Remove lid/foil and bake for 30 minutes longer. Carefully remove from oven, sprinkle with remaining cheese, and return to oven to bake until deep golden brown and crisp on top, about 30 minutes longer. Remove from oven, let rest for at least 15 minutes, and serve.

*cooks note:
I used a braising pan that measures about 12″ across, so a 12″ cast iron skillet would perfectly as well. I also think a 9×13″ casserole should work great, but rather than arranging the potatoes in circles, just line them up lengthwise in three rows.

roasted pear and walnut spice cake bundt #bundtbakers

Whoa. I just realized that I haven’t baked a bundt cake since April.

roasted pear and walnut spice cake bundt | Brooklyn Homemaker

This has been one hell of a year, both personally with the Maxwell’s build out and opening, and for the country as a whole. This election cycle really has consumed me, chewed me up and spit me out, and just when I thought it would all finally be over, it seems like we’re in for even more struggle and strife.

While things may feel a little disheartening right now, life must go on, and getting back into the kitchen and revving up the ol’ stand mixer certainly helps me feel centered and whole again.

roasted pear and walnut spice cake bundt | Brooklyn Homemaker

I’m so so thrilled that Lauren from Sew You Think You Can Cook chose pears as our inspiration for the #bundtbakers this month. Thank you so much Lauren! Not only do I absolutely love pears on their own, there’s also something especially cozy and satisfying about baking with fall fruit pear-ed (har har) with warm homey spices.

With Thanksgiving only a week away, a pear bundt cake is just what the doctor ordered.

roasted pear and walnut spice cake bundt | Brooklyn Homemaker

I have a confession to make though.
I haven’t always liked pears.

My grandfather has always had several fruit and nut trees on his property, and when I was little I thought pears were absolutely disgusting. I don’t know if it was the grainy texture, or the thick sandy skin, or what, but to be perfectly honest I didn’t care for a lot of the bounty of grandpa’s garden.

I was truly a child of the 80’s, and a lot of my culinary influence during my formative years came from spending time in my grandmother’s kitchen. She is a product of her generation, and Grandma’s food philosophy came from the atomic-age desire for shiny, new, packaged convenience foods rather than the back-to-earth approach many of us prefer today. As a kid in Grandma’s kitchen, packaged food was celophane-wrapped, sterilized heaven to me, and I couldn’t get enough of it. Give me a box of doughnuts, a bag of chips, a can of soup, a bottle of soda, and a grilled cheese sandwich made with plastic-wrapped processed “cheese food”, bagged sliced white bread, and margarine from a tub.
Who wants to have to pick and wash fresh fruits and vegetables from outside with all the dirt and bees and bugs, when the fridge is stocked with Cool Whip and Velveeta that’s clean and delicious and ready to eat?

roasted pear and walnut spice cake bundt | Brooklyn Homemaker

Not me.
That’s who.

I did like Grandpa’s strawberries and plums, but even the strawberries had to be scrubbed and sliced and covered in sugar before I deemed them edible.

roasted pear and walnut spice cake bundt | Brooklyn Homemaker

Obviously my tastes have changed over the years, and as an adult I’ll take a ripe juicy pear, still warm from the sun, over a tub of chemically Cool Whip any day of the week.

As a kid, trips to my grandparents house filled me with excitement because I knew the cupboards were bursting with store-bought chips and cookies and doughnuts. These days I still get excited when I get to visit my grandparents, but now it’s because I know grandpa will load me up with sagging grocery bags filled with dirty bell peppers, lopsided butternut squash, fuzzy warm peaches, or sun-ripened tomatoes when I get ready to leave.

roasted pear and walnut spice cake bundt | Brooklyn Homemaker

When I was planning my bundt for this month, I knew that I really wanted the pears to be the stars of the show. My first instinct was to chop or cube or grate them just like apples into a traditional spice cake for flavor and added moisture, but somehow that didn’t seem like it was “enough”. My pears deserved better than playing second fiddle to cinnamon.

Determined to leave the pears whole (or at least halved) inside the cake, I decided to poach them in a bourbon ginger syrup. They smelled like heaven in the poaching liquid and I couldn’t help myself from sneaking spoonfuls of batter from the pan before it went into the oven. I was congratulating myself on a job well done before the cake even started to rise, and I couldn’t wait to get it out of the oven and see the autumnal perfection I’d come up with.

Aaaaaaand…

It was an absolute disaster.

The pears soaked up too much moisture in the poaching liquid, releasing it back into the cake to create a jiggly bundt with the weirdest almost blubbery texture I’ve ever had the misfortune to put in my mouth. As the cake cooled it sagged and the cake separated from the pears and slumped into a wobbly mess on the plate.

So, back to the drawing board. I knew I’d need a thicker, denser batter, and I obviously needed to find a way to pull moisture out of the pears before baking them into the cake. With poaching out of the question, I decided to try dry roasting the pears so they’d be tender but slightly dried out before going into the batter. Thankfully, it worked out beautifully and I think the pears are almost as happy about it as I am.

roasted pear and walnut spice cake bundt | Brooklyn Homemaker

You’ll want to use the smallest pears you can find for this recipe, because if they’re too big or tall they’ll take up too much room in the pan. They might cause the batter to run over in the oven, or could stick out the top of the cake and cause it to sit unevenly when plated. I also think that Bosc pears are the only variety firm and sturdy enough to stand up to being roasted, handled, and baked in this way without turning to mush or falling apart.

The bit of extra effort in roasting the pears and toasting the walnuts really pays off when you slice down into the cake to reveal a perfect cross-section of a whole pear (depending on where you slice).
And the flavor? Fuggitaboudit. Warm spices, tender roasted pears, crunchy toasted walnuts, buttery tender brown sugar spice cake, and a thick and tangy cream cheese glaze.
I mean. Come on.

This is basically THE perfect fall cake, and it would make an excellent addition to your Thanksgiving spread to boot. If you’re looking for even more fall inspiration and pear-y wonderfulness, make sure you scroll down past the recipe to see what the other #bundtbakers came up with this month!

roasted pear and walnut spice cake bundt | Brooklyn Homemaker

Roasted Pear and Walnut Spice Cake

  • Servings: 8 to 12-ish
  • Print
4 to 5 small firm Bosc pears, depending on the size of your pan
1 1/4 cups chopped walnuts
2 1/4 cups all-purpose Flour
1 teaspoon baking powder
1/4 teaspoon baking soda
1 teaspoon salt
1 tablespoon cinnamon
2 teaspoons ginger
1 teaspoons cardamom (optional)
1/2 teaspoon nutmeg
1/2 teaspoon cloves
1 cup buttermilk
2 teaspoons vanilla extract
1 cup (16 tablespoons) unsalted butter, softened
1 1/2 cups dark brown sugar, packed
3 large eggs

Cream Cheese Glaze:
4 ounces (1/2 package) cream cheese, softened
1 cup powdered sugar
1 teaspoon vanilla extract
2 to 4 tablespoons milk

Preheat the oven to 350°F. Lightly butter and flour a 10 to 12 cup bundt pan, refrigerate.

Peel pears, slice in half, and scoop out seeds with a melon baller or spoon. Place cut side up on a parchment lined baking sheet and bake for 20 minutes. Flip and bake 15 minutes more. Remove from oven and set aside to cool.

Spread walnuts in an even layer on a small baking sheet and toast for 5 to 8 minutes, or until they smell toasty. Do not let them burn. Set aside to cool. Reserve 1/4 cup for topping the cake.

Whisk flour, baking powder, baking soda, salt, & spices together in a bowl. Set aside. Mix vanilla into buttermilk and set aside.
In a the bowl of and electric mixer, beat together the butter and brown sugar until light and fluffy, about 3 to 5 minutes. Add the eggs one at a time, beating for a minute or two and scraping the sides and bottom of the bowl between additions.
Alternate additions of flour and buttermilk, mixing on low just until combined, and scraping the bowl between each addition. Start and end with flour so there are 3 additions of flour and 2 of buttermilk. Stir in 1 cup walnuts until evenly distributed.

Pour about 3/4 of the batter into the prepared pan, and tap the pan on the counter to remove air bubbles. Push pear halves into the batter, top side facing down into the bottom of the pan, arranging them so the cut halves face each other as a whole pear. Arrange pears so they’re evenly spaced around the pan. Spread remaining batter over the top, leaving at least half an inch of room for the cake to rise so it doesn’t overflow in the oven. It’s okay if the pears stick out of the batter a bit, as the cake should rise around them. Bake for 50 to 55 minutes, until a cake tester or toothpick inserted in the center comes out clean.
Remove the cake from the oven, and cool in the pan for 30 minutes before turning it out onto a rack to cool completely.

While the cake cools, make the glaze.
In the bowl of a stand mixer, beat the cream cheese until it’s fluffy and smooth. Add the powdered sugar, vanilla, and 4 tablespoons of milk and blend until there are no lumps. If necessary, add more milk, a tablespoon at a time, beating after each addition until the glaze reaches the desired drizzle-able consistency. It should be about the consistency of thick melted ice cream to drizzle correctly.

Place a tray under cake and cooling rack to catch any drips. Pour glaze over cake and let the glaze work its way down the side, tapping the tray on the counter if necessary. Top with toasted walnuts.

Well covered in an airtight container, this cake should keep at room temperature about 2 days, or longer in the fridge. Just make sure to serve it at room temperature if you refrigerate it.

roasted pear and walnut spice cake bundt | Brooklyn Homemaker

The bundt bakers really outdid themselves this month, and all these perfect pear cakes have my mouth watering like crazy!

BundtBakers
 .
You can see all our of lovely Bundts by following our Pinterest board. Updated links for all of our past events and more information about #BundtBakers, can be found on our home page.

shaved brussels sprout salad

Earlier this week I shared my first official Thanksgiving recipe for the year. Now that I think about it though, I guess I started sharing things a little out of order.

shaved brussels sprouts salad | Brooklyn Homemaker

Sometime next week I’ll let you guys in on my secret for perfectly cooked, perfectly moist turkey, and I might even give you a sneak peek into the rest of the meal. Today, though, I’m sharing my first course.

shaved brussels sprouts salad | Brooklyn Homemaker

Have you ever noticed how certain vegetables get a bad rap?

Brussels sprouts have a reputation for making children stick their tongues out and gag, but I know more people who love them than don’t. I never ate brussels sprouts growing up, I don’t even think I’d tasted one until college. A few years ago I was gabbing with my mom on the phone when I casually mentioned that i was roasting brussels sprouts for dinner. She was like, “Really? Brussels sprouts? You like Brussels sprouts?”

This got me thinking. Maybe it was the parents that didn’t like brussels sprouts? Maybe I grew up thinking they were gross even though I’d never had them, because my parents thought they were gross? If that was the case, I would guess that that generation didn’t like them because of the way they were prepared by the previous generation, our grandparents.
Growing up I also thought I hated asparagus. My grandfather has a gorgeous vegetable garden with a huge asparagus patch, and every spring he’d get really excited when the pale little stalks started coming in. He’d be out in the garden bent over staring at the ground with a little paring knife just waiting for the moment they were ready for harvest.
But then my grandmother would wash the stalks, plunk them into a pot of boiling water, and boil the ever loving crap out of them until they were reduced to limp, flabby, grey-green strands having little in common with what went into the pot initially. Then they’d be served, covered in butter and smelling like farts, where I’d politely decline or push them around my plate until I was excused. If I was forced to guess why my parents might not have liked brussels sprouts, it probably was because they’d only ever had them prepared the same way my grandmother prepared asparagus. Boiled until mushy and farty and entirely unappetizing.

shaved brussels sprouts salad | Brooklyn Homemaker

Oddly enough, I was gabbing with mom again sometime last week and she mentioned that my 16 year old sister had ordered brussels sprouts out at a restaurant. My how the tables had turned! It was my turn to ask, “Really? Brussels sprouts? She likes brussels sprouts?”
This time around though, mom’s response was a little different. “Yeah, She does! We both do. We love them!”

My my how times have changed. In world where Kale is king, Brussels sprouts might be queen. Or at least, maybe the little prince?

I think that the trend of properly cooking vegetables, leaving them bright and crisp and flavorful (and more nutritious), has finally reached the restaurants in my little slice of Upstate New York and taught my mom to finally see brussels sprouts in a different light.

shaved brussels sprouts salad | Brooklyn Homemaker

For this recipe I wanted to get as far away from mushy, farty, overcooked sprouts as possible, so I shaved them super thin with a mandolin and tossed them completely raw with a few simple ingredients.

The first time I tested this salad out on Russell, the sprouts I used were sort of sad and wilty and well past their prime, and the resulting salad was really unpleasant. No matter how thinly I shaved them, they were rubbery and flabby and no fun at all to eat raw. Russell said the salad was awful and that I should do something else, something with wilted brussels sprouts or maybe arugula or something.
I almost took his advice and ditched the recipe altogether, but I knew I really had something with this idea, and that better fresher sprouts would result in a far superior salad. So, I decided to ignore Russell’s advice and try the recipe again with fresher, crisper produce. Even Russell had to admit it was a huge success, entirely different from the first attempt.

So, take it from me, when eating them raw you really need to make sure your brussels sprouts are as fresh as can be.

shaved brussels sprouts salad | Brooklyn Homemaker

This salad is bright, light, delicate, and wonderfully refreshing. While it would make a great side salad for any meal, it’s the perfect thing to serve along with a rich, hearty, heavy meal like Thanksgiving dinner. It’s exactly what you want along with all that decadent food. The crisp bitter walnuts, crunchy sweet bursting pomegranate seeds, freshly shaved raw brussels sprouts, and simple bright lemony dressing are a welcome contrast against all the rich roasty indulgences that make up the rest of the meal. A lot of similar salads call for goat cheese or parmesan to compliment the acidic and bitter flavors, but I intentionally kept this salad as light and simple as possible, and it couldn’t be more perfect.

shaved brussels sprouts salad | Brooklyn Homemaker

Shaved Brussels Sprout Salad

Dressing: 
6 tablespoons olive oil
3 tablespoons lemon juice
2 tablespoons honey
generous salt and pepper to taste

Salad:
1 1/2 lbs brussels sprouts
1 1/2 cups walnuts
1 1/2 to 2 cups pomegranate seeds

To make the dressing combine olive oil, lemon juice, honey, salt and pepper in a bowl or lidded jar and whisk or shake until well combined. Can be made a day ahead an stored in an airtight jar.

Slice off the tough bottoms of the brussels sprouts and discard. Using a mandolin slicer (use a guard and watch those fingers) or the slicing blade of a food processor (or with a sharp knife and some patience) slice the brussels sprouts as thinly as possible. Soak in very cold water for 5 to 10 minutes before drying with a salad spinner or some kitchen towels. If necessary, this can be done a day ahead and covered with a damp paper towel and plastic wrap or an air tight lid.

Preheat the oven to 350 degrees. Arrange the walnuts in a single layer on a baking sheet and toast them for about 8 minutes or until they smell like toasty nutty heaven. Be careful they don’t burn. Cool.

Combine brussels sprouts, walnuts, pomegranate seeds, and dressing and toss to combine. Taste for seasoning and adjust if necessary. Serve immediately.

Note: Brussels sprouts should be as fresh as you can find them or they can be rubbery and a bit unpleasant to eat raw. The thinner you can shave them, the easier they’ll be to eat.