valentine’s day

pomegranate panna cotta

There were certain foods that I was never really exposed to growing up, foods that even as I grew older still seemed exotic, fancy, and out of reach.

pomegranate panna cotta | Brooklyn Homemaker

Even after taking culinary courses in college and working in restaurants for years, it wasn’t until a few years ago that I really felt comfortable selecting and buying avocados. In restaurants I would enjoy guacamole, but it was never something I was adventurous enough to try making myself. A few years ago something suddenly changed, a paradigm shift if you will, an avocado paradigm, and all at once the avocado started entering my grocery basket just as effortlessly as a loaf of bread or a carton of eggs.

pomegranate panna cotta | Brooklyn Homemaker

More recently my pomegranate paradigm shifted too. It started with a pomegranate dessert at a bakery in Williamsburg or a salad with pomegranate delivered for lunch at work, and then one day a pomegranate came home with me from the market and I had to figure out how to get the damned seeds out.

pomegranate panna cotta | Brooklyn Homemaker

My kitchen a mess, with red splatters on the walls and seeds strewn about the counters and floor, I vowed I’d never do that again.

Then I did that again.

Somewhere along the way I learned a trick on how to get the seeds out without having to repaint the kitchen ceiling, et voila, pomegranates were no longer scary and exotic things only to be eaten when other people were doing the work. Suddenly they were accessible and familiar, and while they don’t come home with me as often as avocados, they do find themselves in my grocery bags every so often.

pomegranate panna cotta | Brooklyn Homemaker

If you don’t already have a good method to get the seeds out, or you’re intimidated by pomegranates the way I used to be, look no further! It’s actually a lot more simple than you might think.

Slice the pomegranate in half – straight through the middle. Hold one half firmly with your hand over a large bowl. With the other hand, use a wooden spoon to give the outside several good firm whacks. It may take a bit to loosen the seeds, but once they loosen up they’ll start falling out into the bowl without losing much of their juice. You’ll need to rotate it to get the seeds out of every part of the fruit, but it’s truly not difficult, messy, or time consuming in the way that other methods can be. Some of the white membranes may get knocked out with the seeds too though, so you’ll need to pick through and remove them.

pomegranate panna cotta | Brooklyn Homemaker

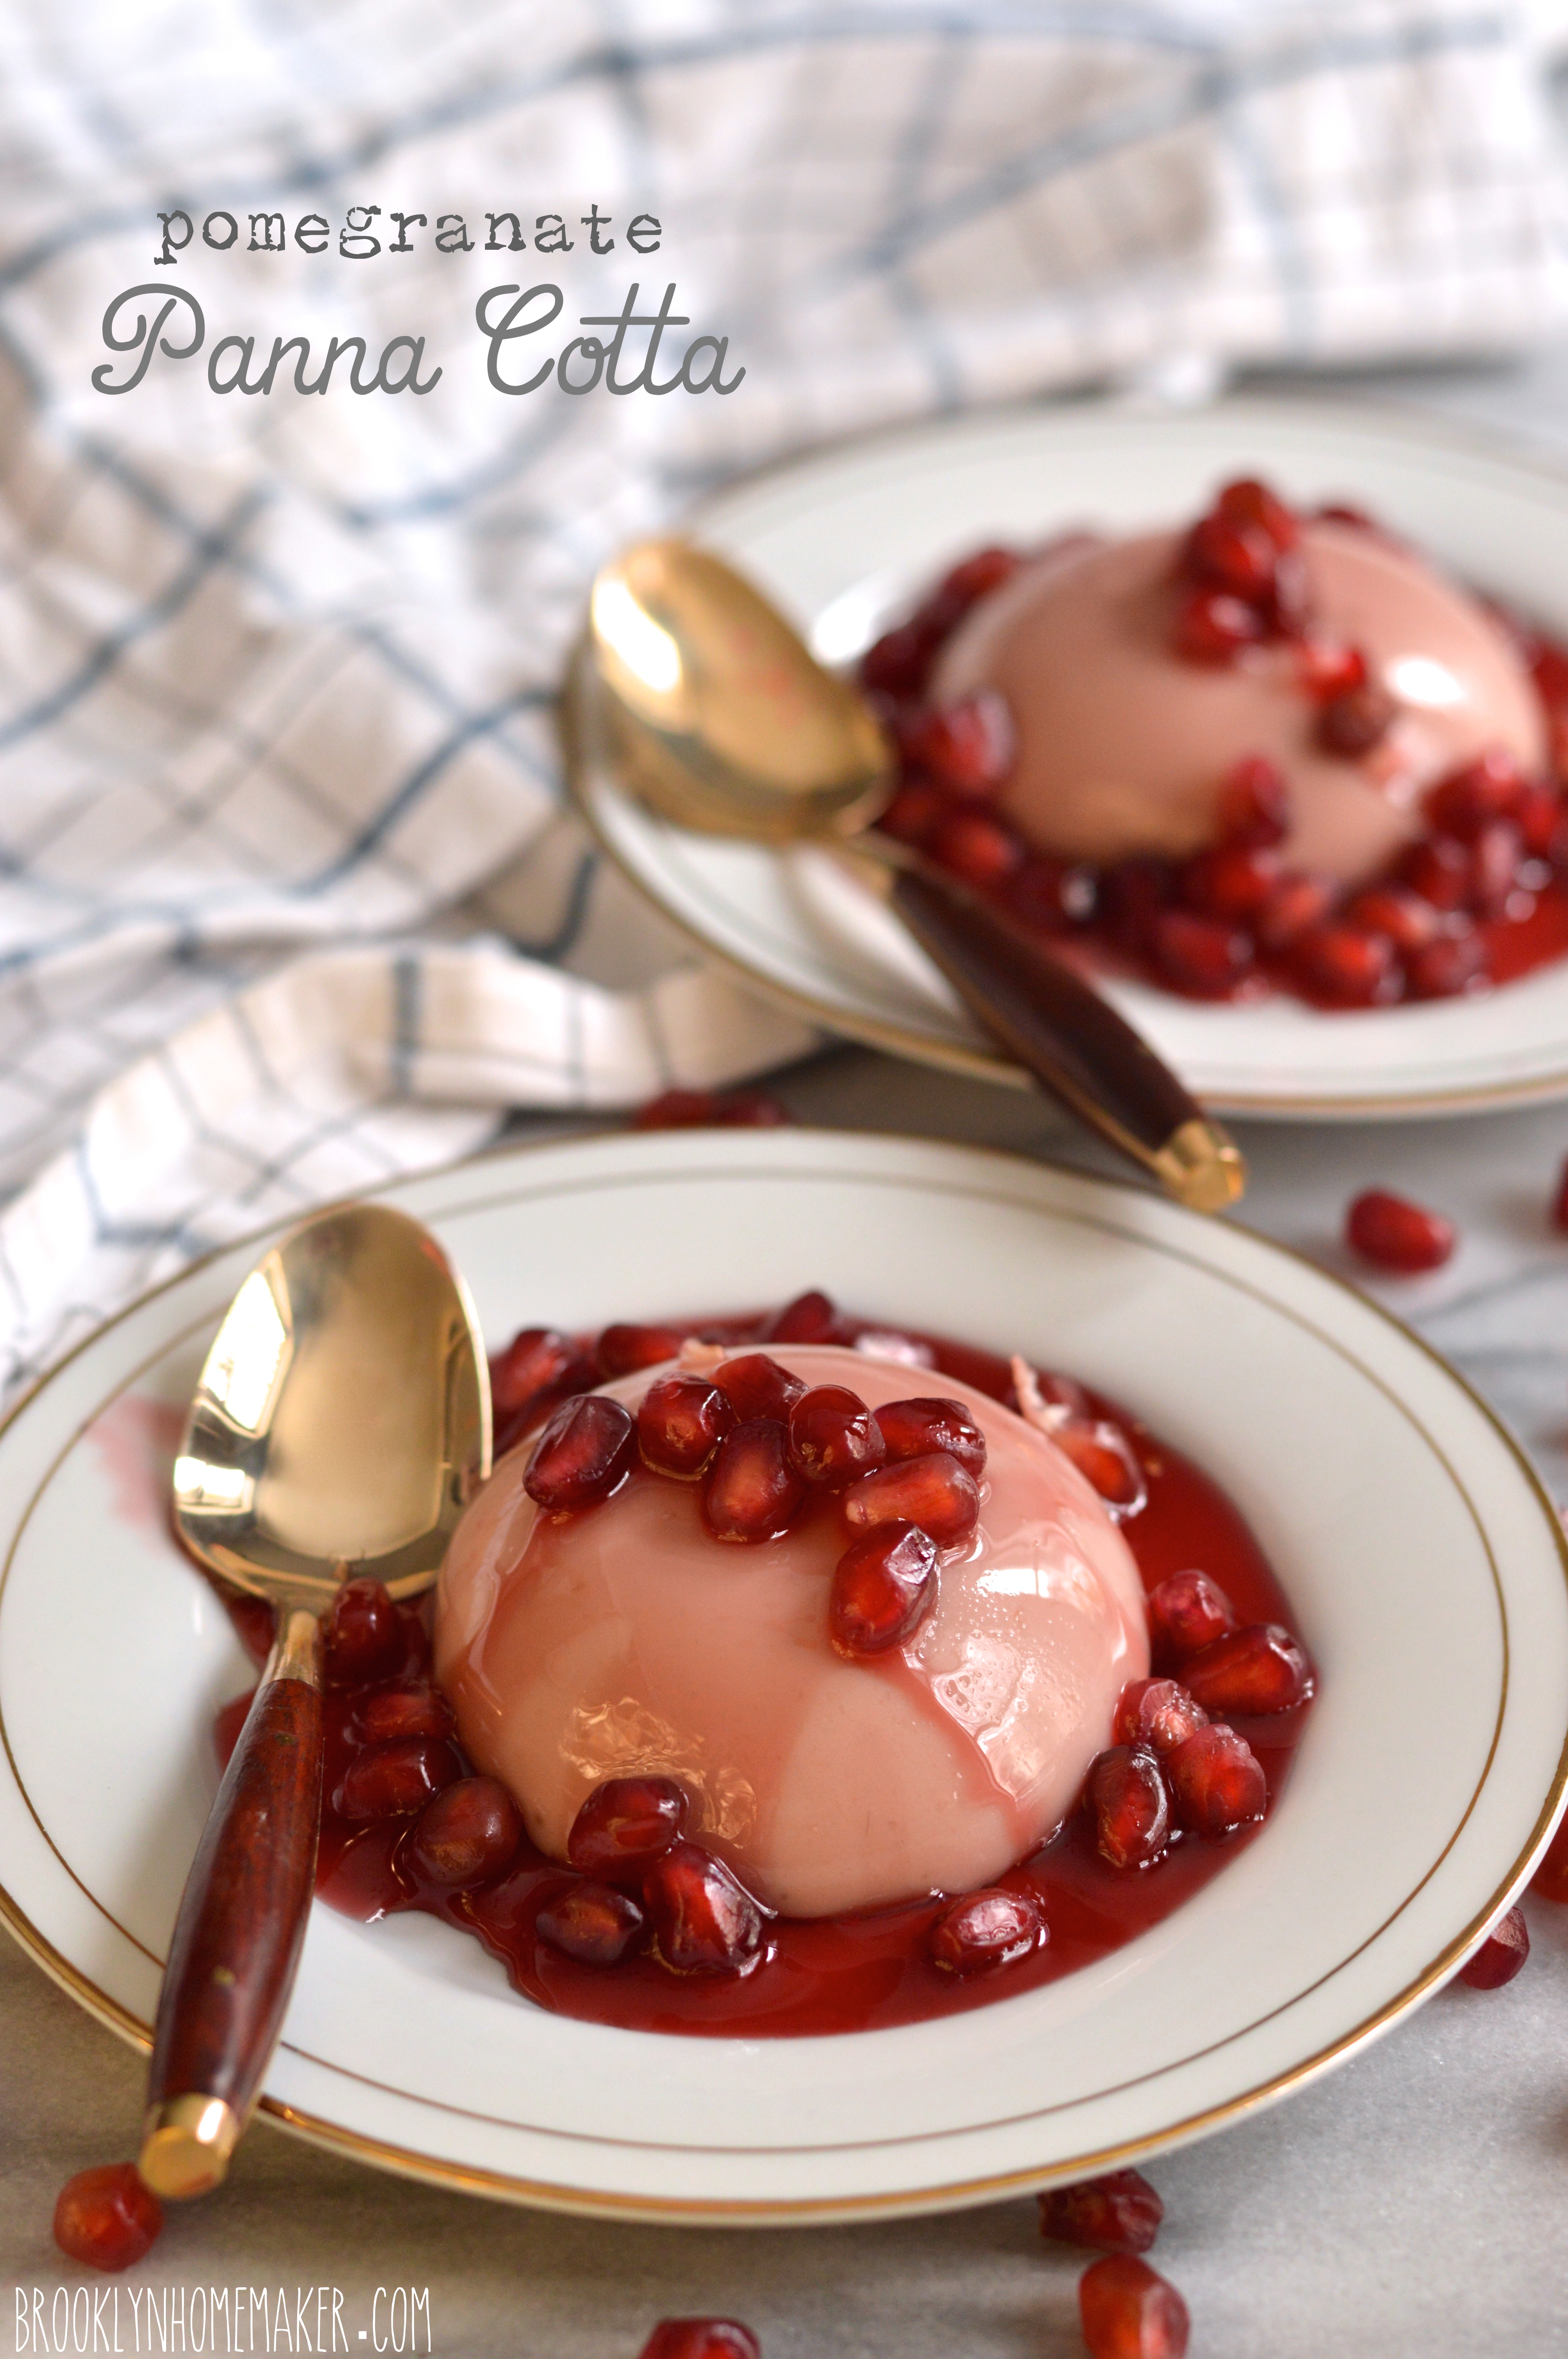
When I was thinking of something I could make for the hubby for Valentine’s day, it didn’t take me long to decide on a pomegranate flavored panna cotta. I’ve always loved the silky smooth texture and subtle sweetness of panna cotta, and I thought pomegranate would be an ideal flavor to pair with the tangy buttermilk that traditional panna cotta usually contains.

pomegranate panna cotta | Brooklyn Homemaker

It may seem fancy or fussy, but I promise that making panna cotta is really quite simple. It’s basically like a custard or pudding that’s thickened with gelatin rather than eggs or cornstarch. If you can make jello, you can make panna cotta. The most difficult part of this recipe is reducing the pomegranate syrup, which actually isn’t difficult at all.

pomegranate panna cotta | Brooklyn Homemaker

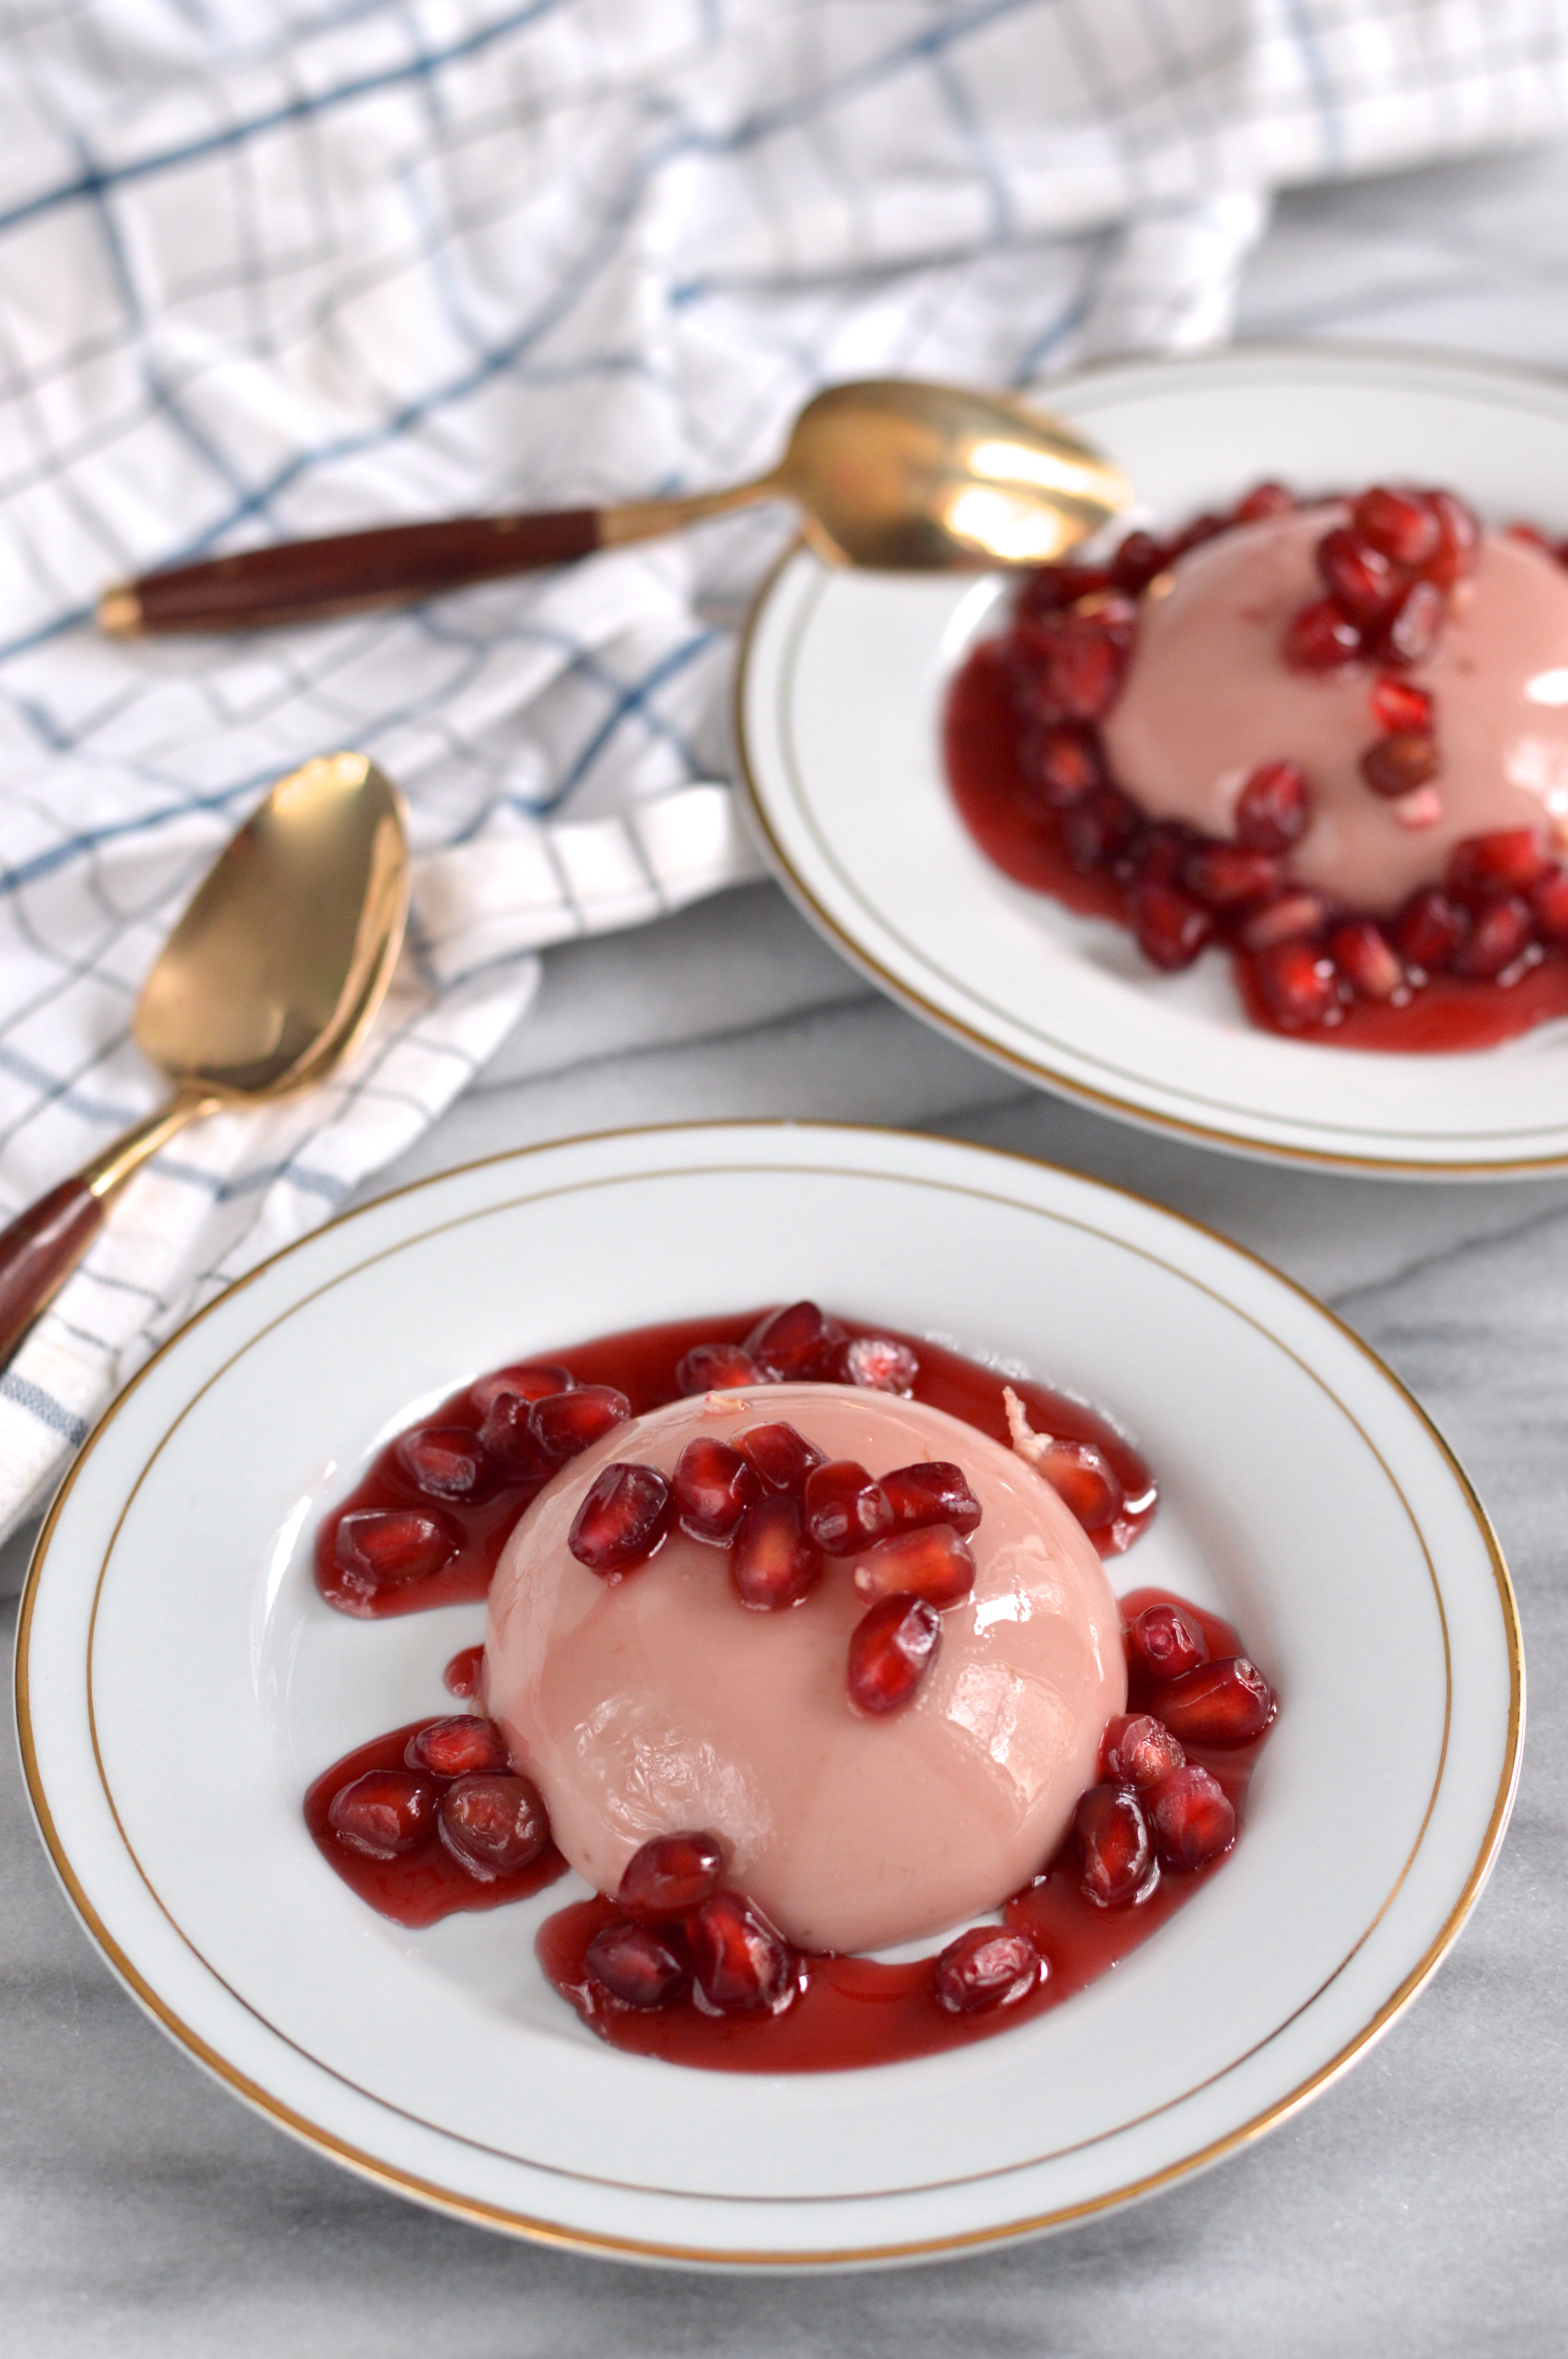
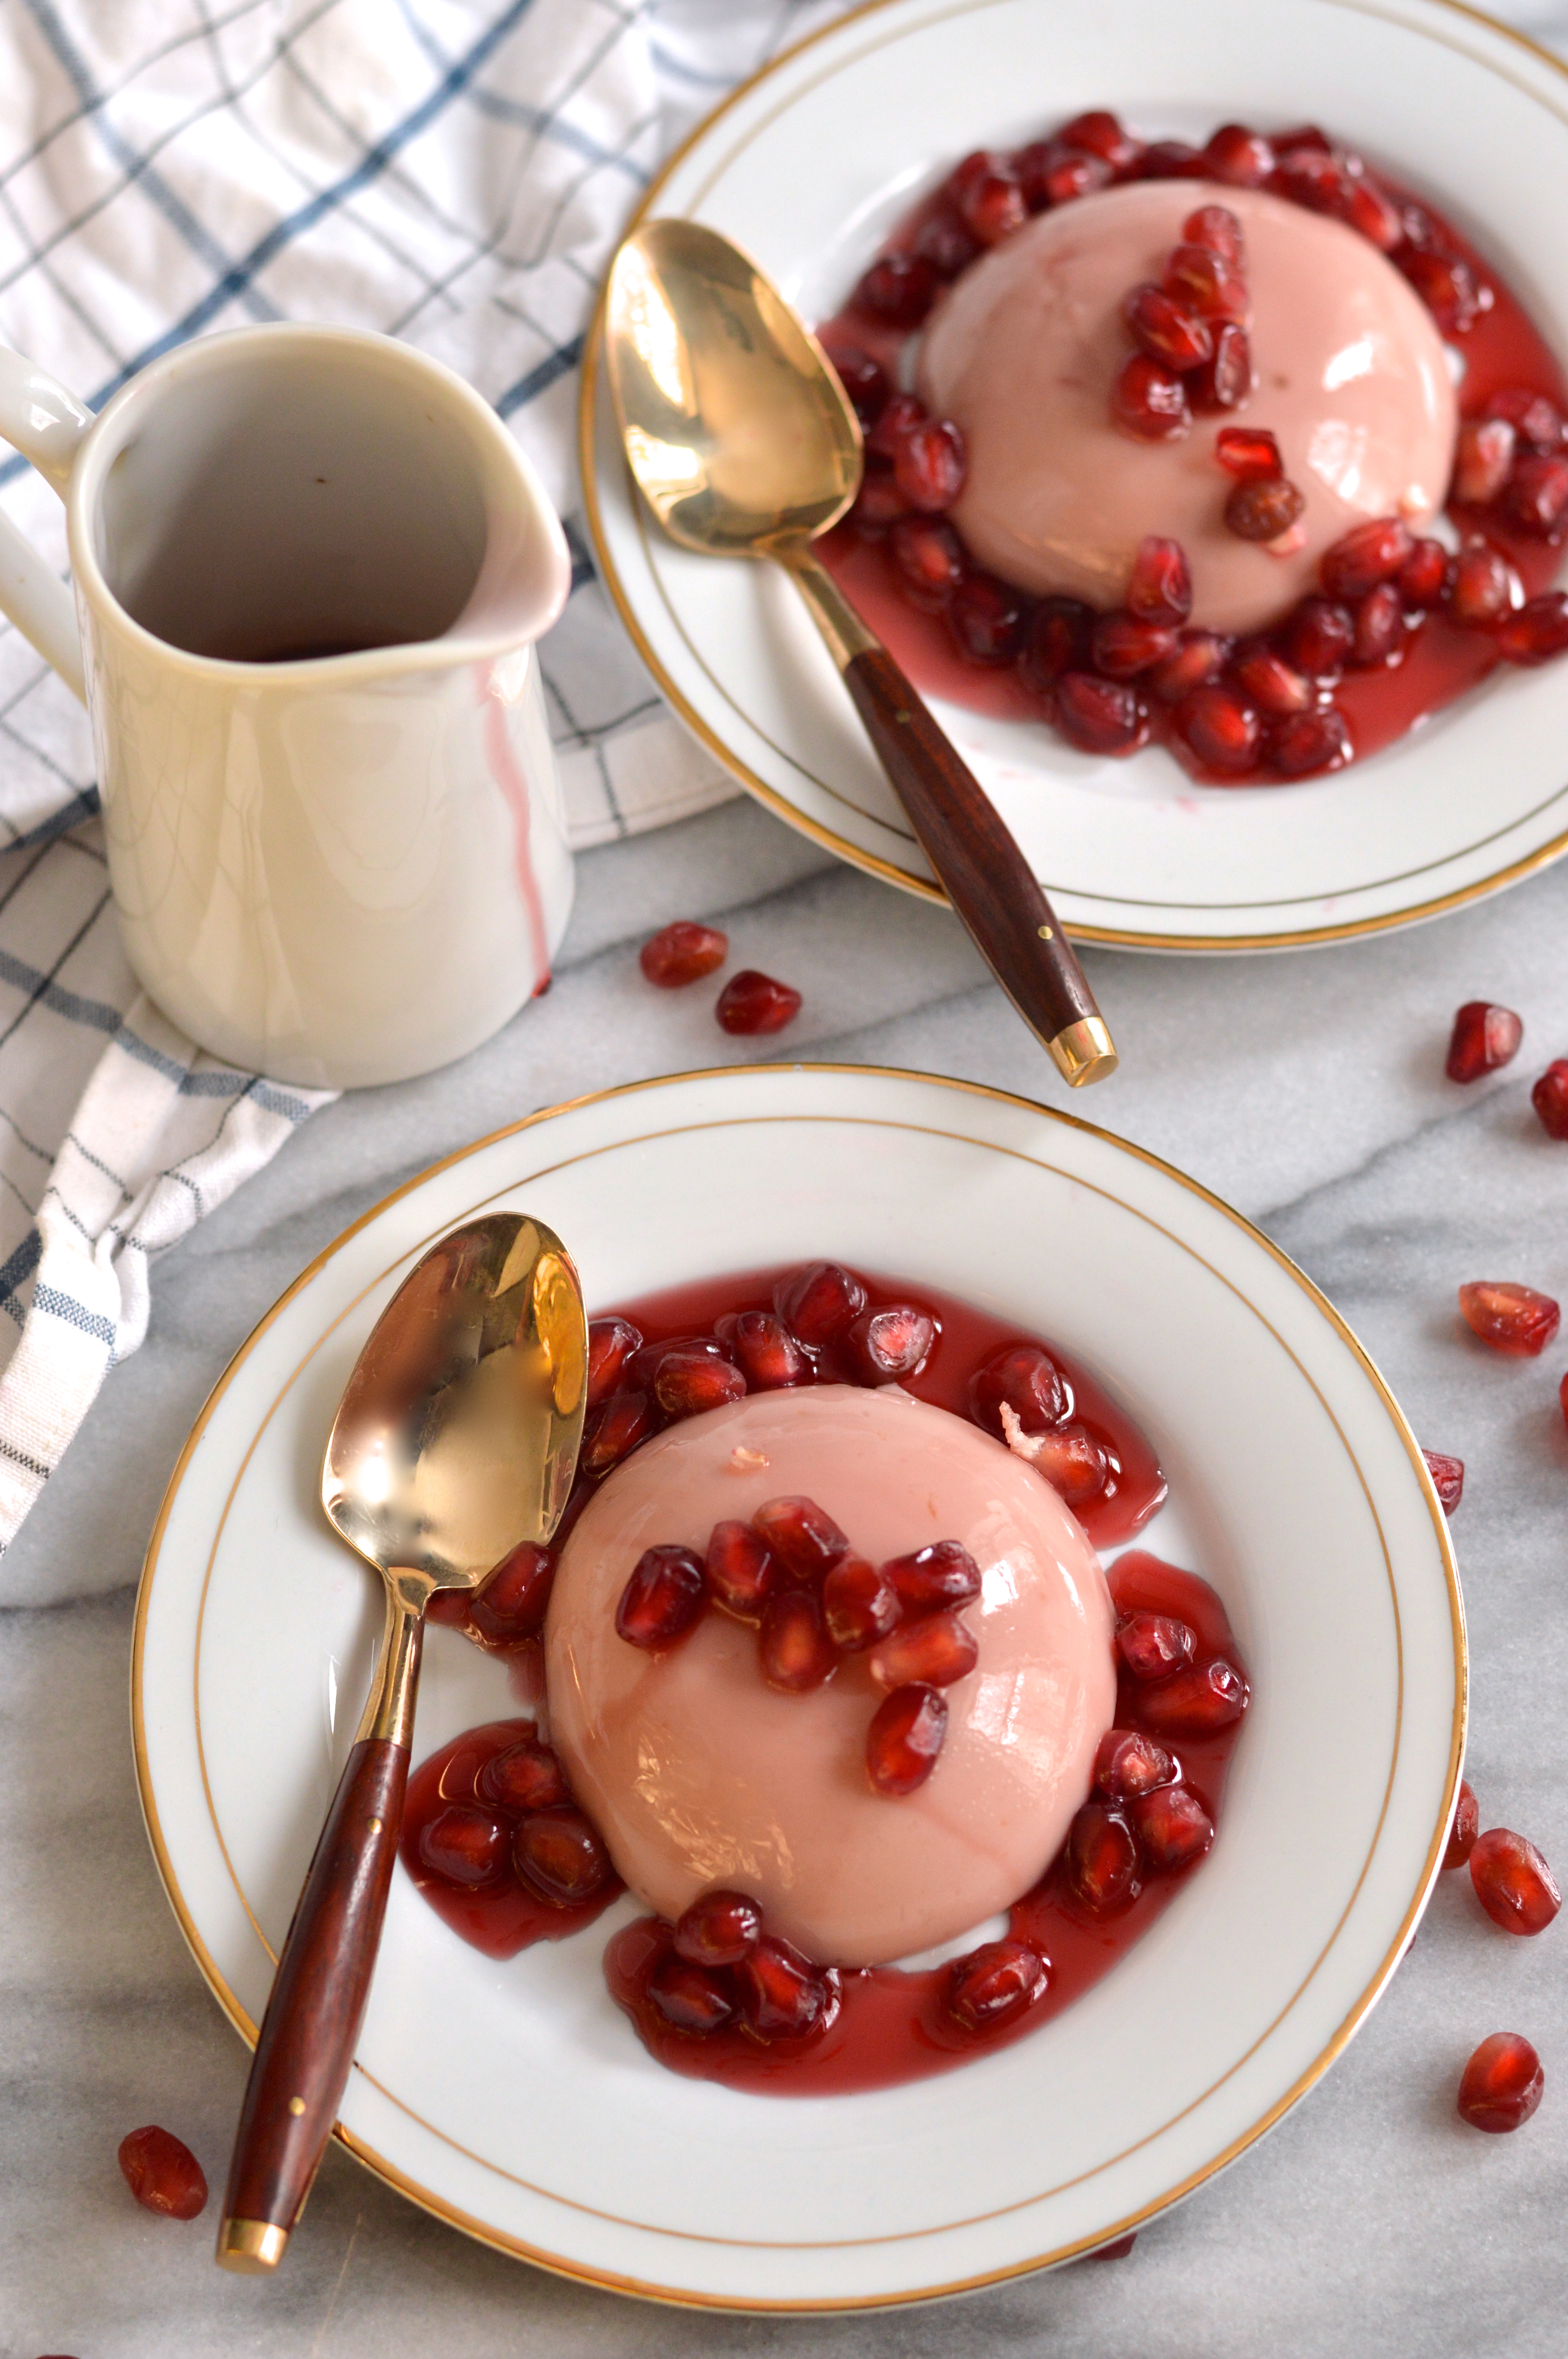
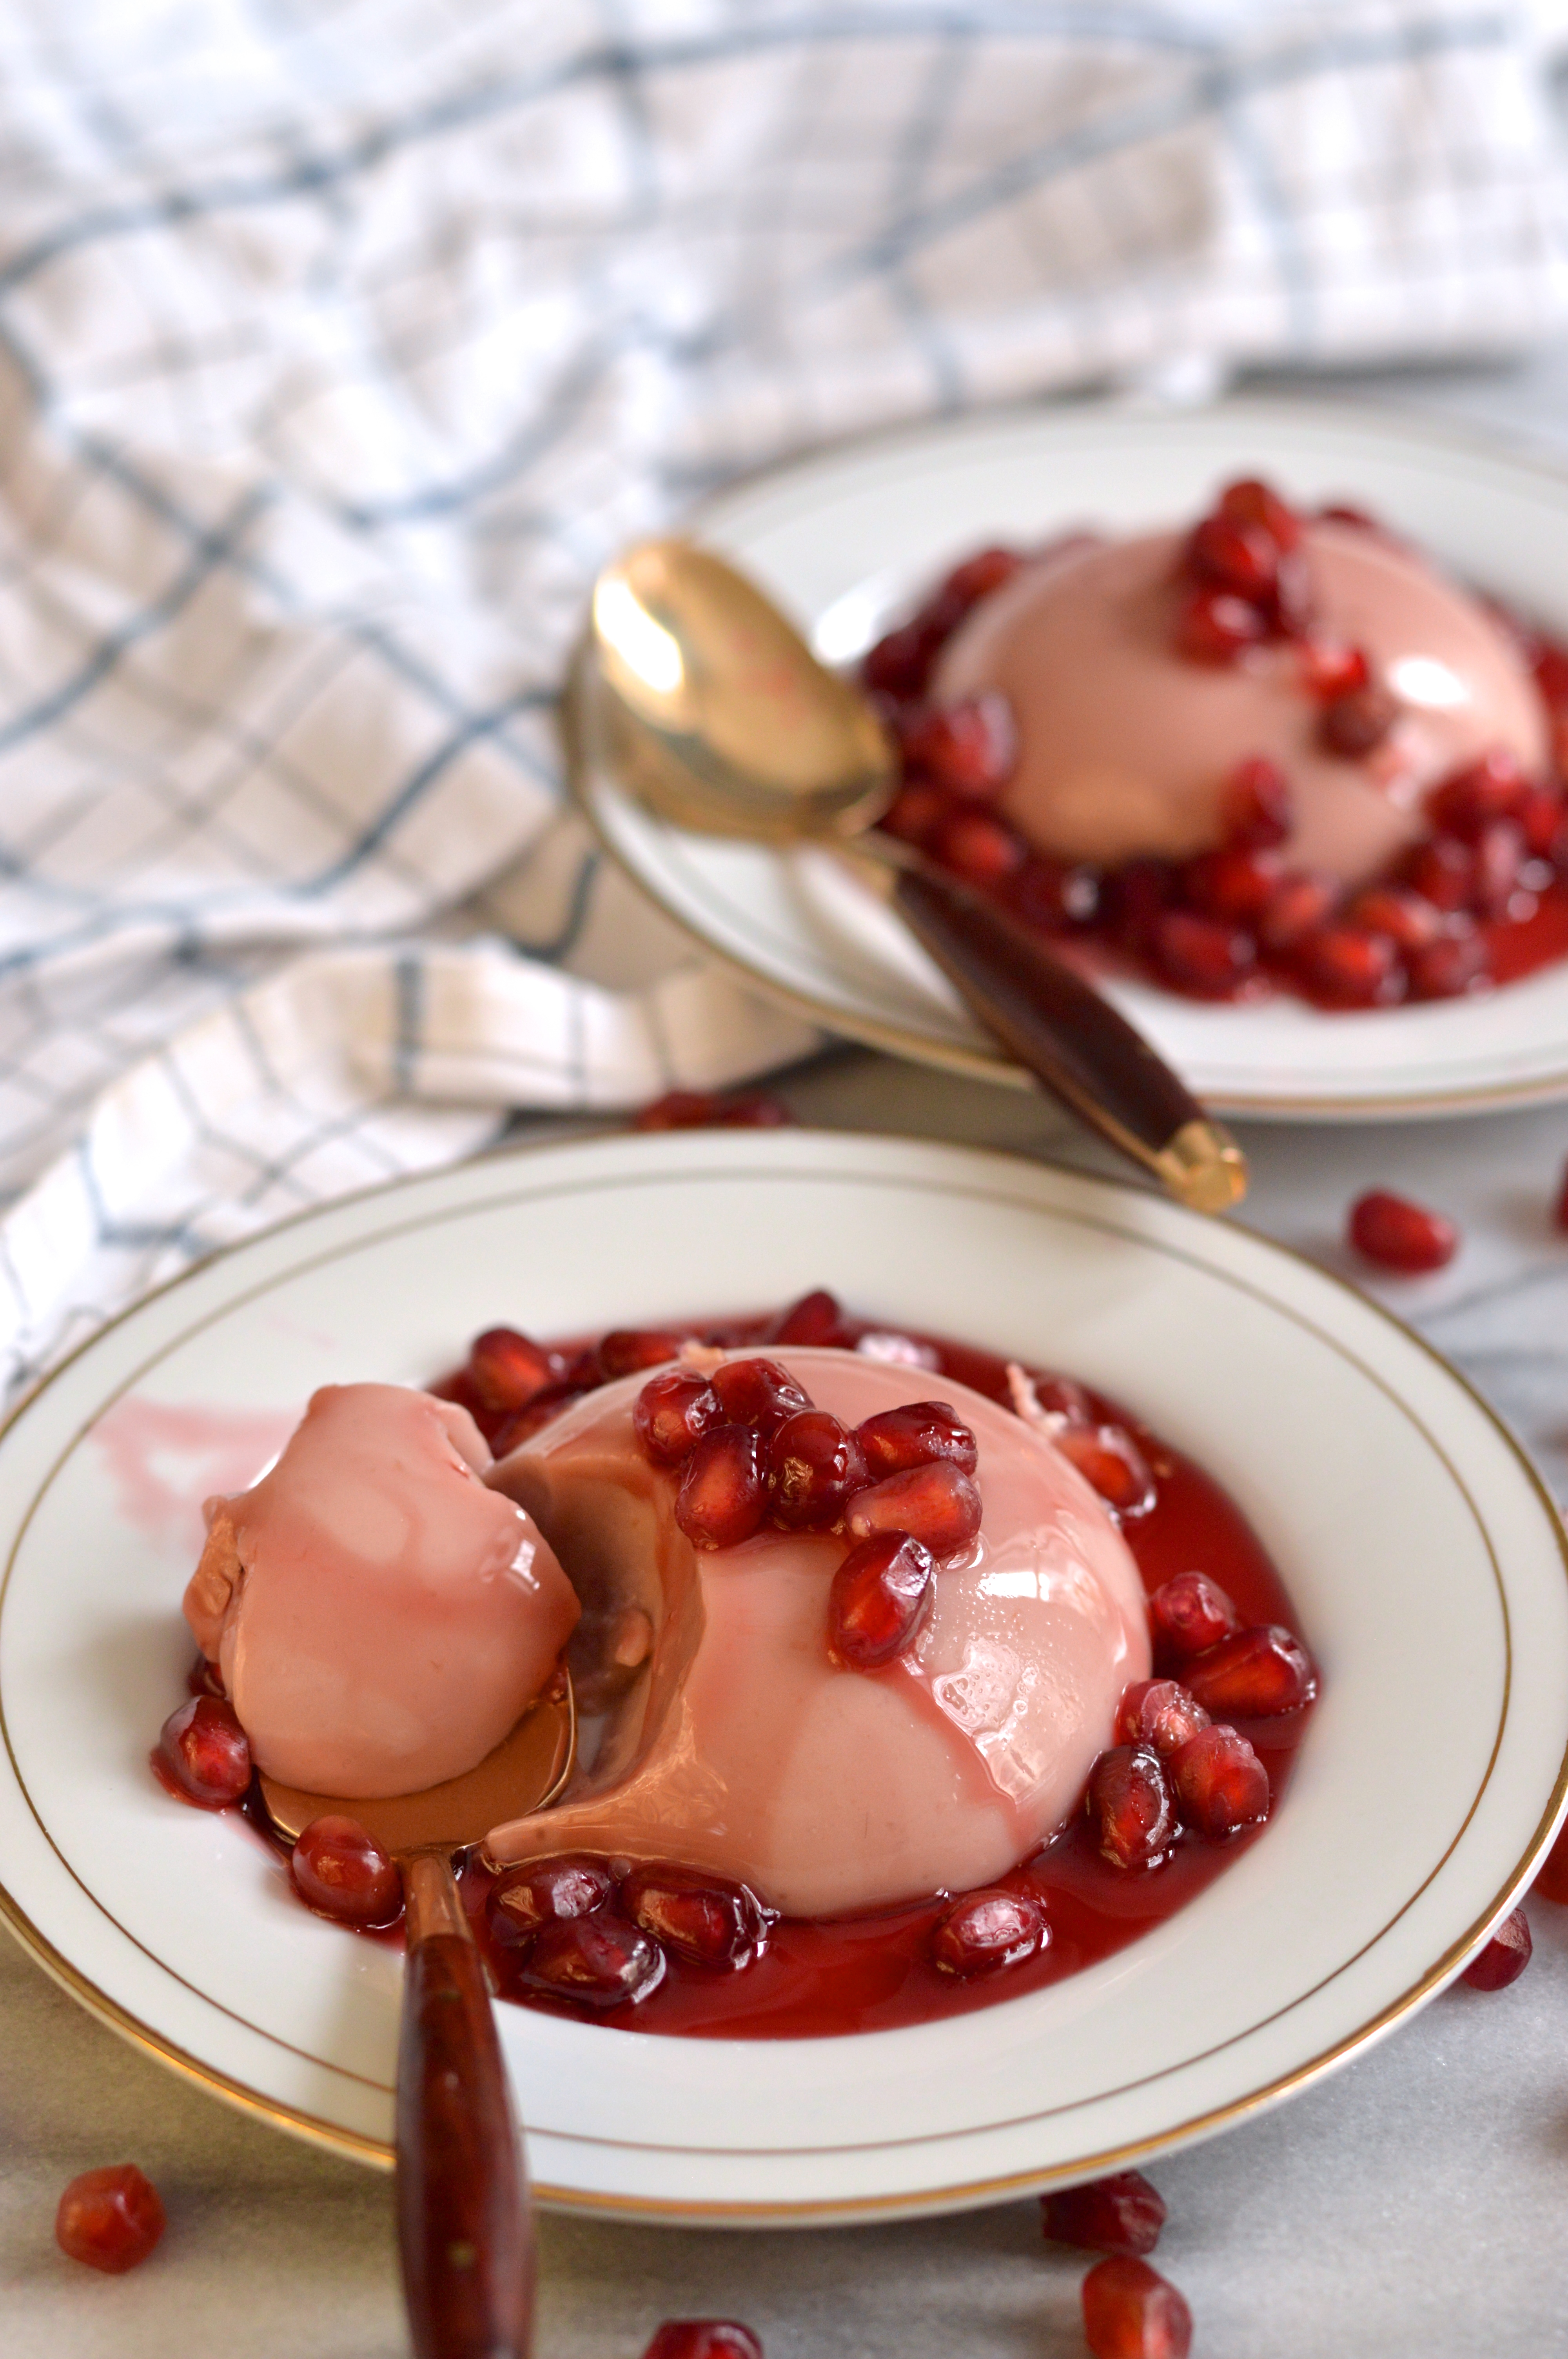
This dessert is wonderfully flavorful, beautifully pale pink, and perfectly light and delicate. The pomegranate and orange are the perfect tart and sweet complement to the tangy buttermilk, and the heavy cream ensures a rich creamy flavor and velvety smooth texture. Since I usually like my desserts to be subtly sweetened, I served this with just a touch of reserved pomegranate syrup, but if you prefer sweeter desserts just pour it on thick! The texture of a good panna cotta shouldn’t be jiggly or gelatinous like jello, but silky and almost just barely set. This recipe doesn’t disappoint in that respect. A few fresh pomegranate seeds on top help to add a bright freshness, a nice bit of texture, and a beautiful ruby color.

pomegranate panna cotta | Brooklyn Homemaker

Pomegranate Panna Cotta

adapted (just barely) from Epicurious

peanut or vegetable oil
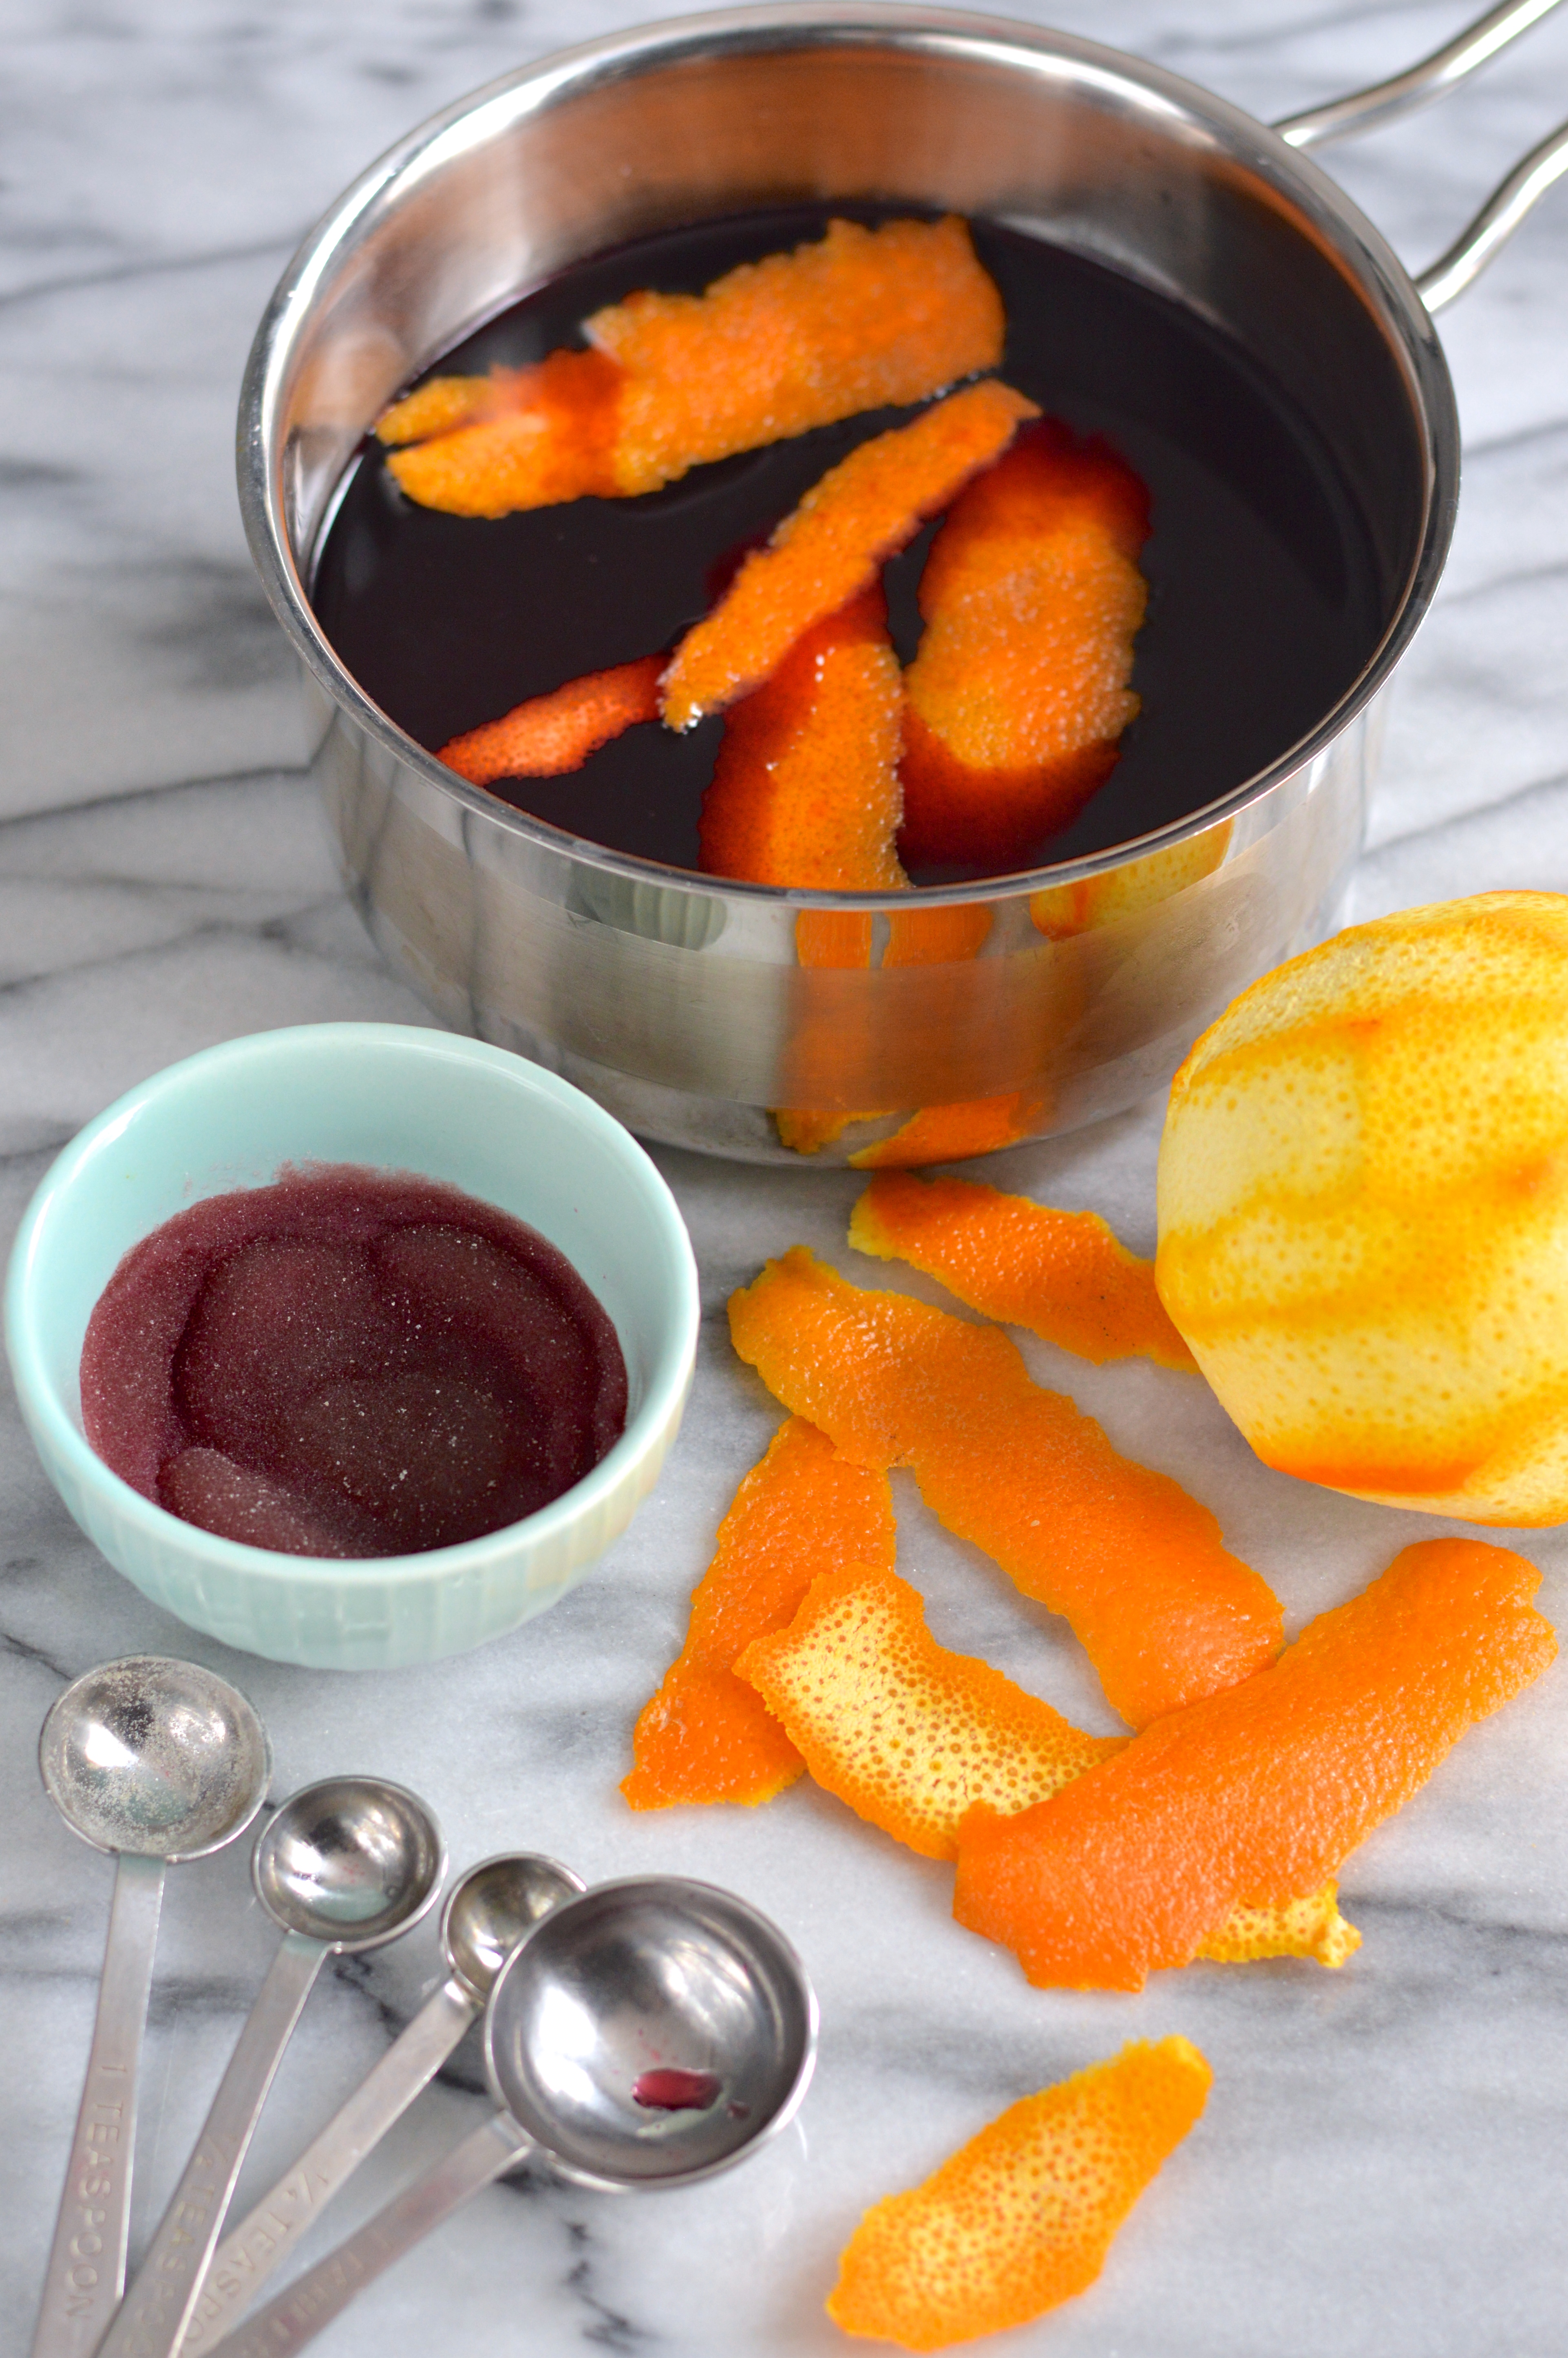
3 tablespoons plus 2 cups pomegranate juice
2 teaspoons unflavored gelatin
3/4 cup plus 2 tablespoons sugar
Peel from 1 orange, removed in strips with vegetable peeler
1/2 cup fresh orange juice
3/4 cup whipping cream
1 1/4 cups buttermilk
handful of pomegranate seeds for garnish

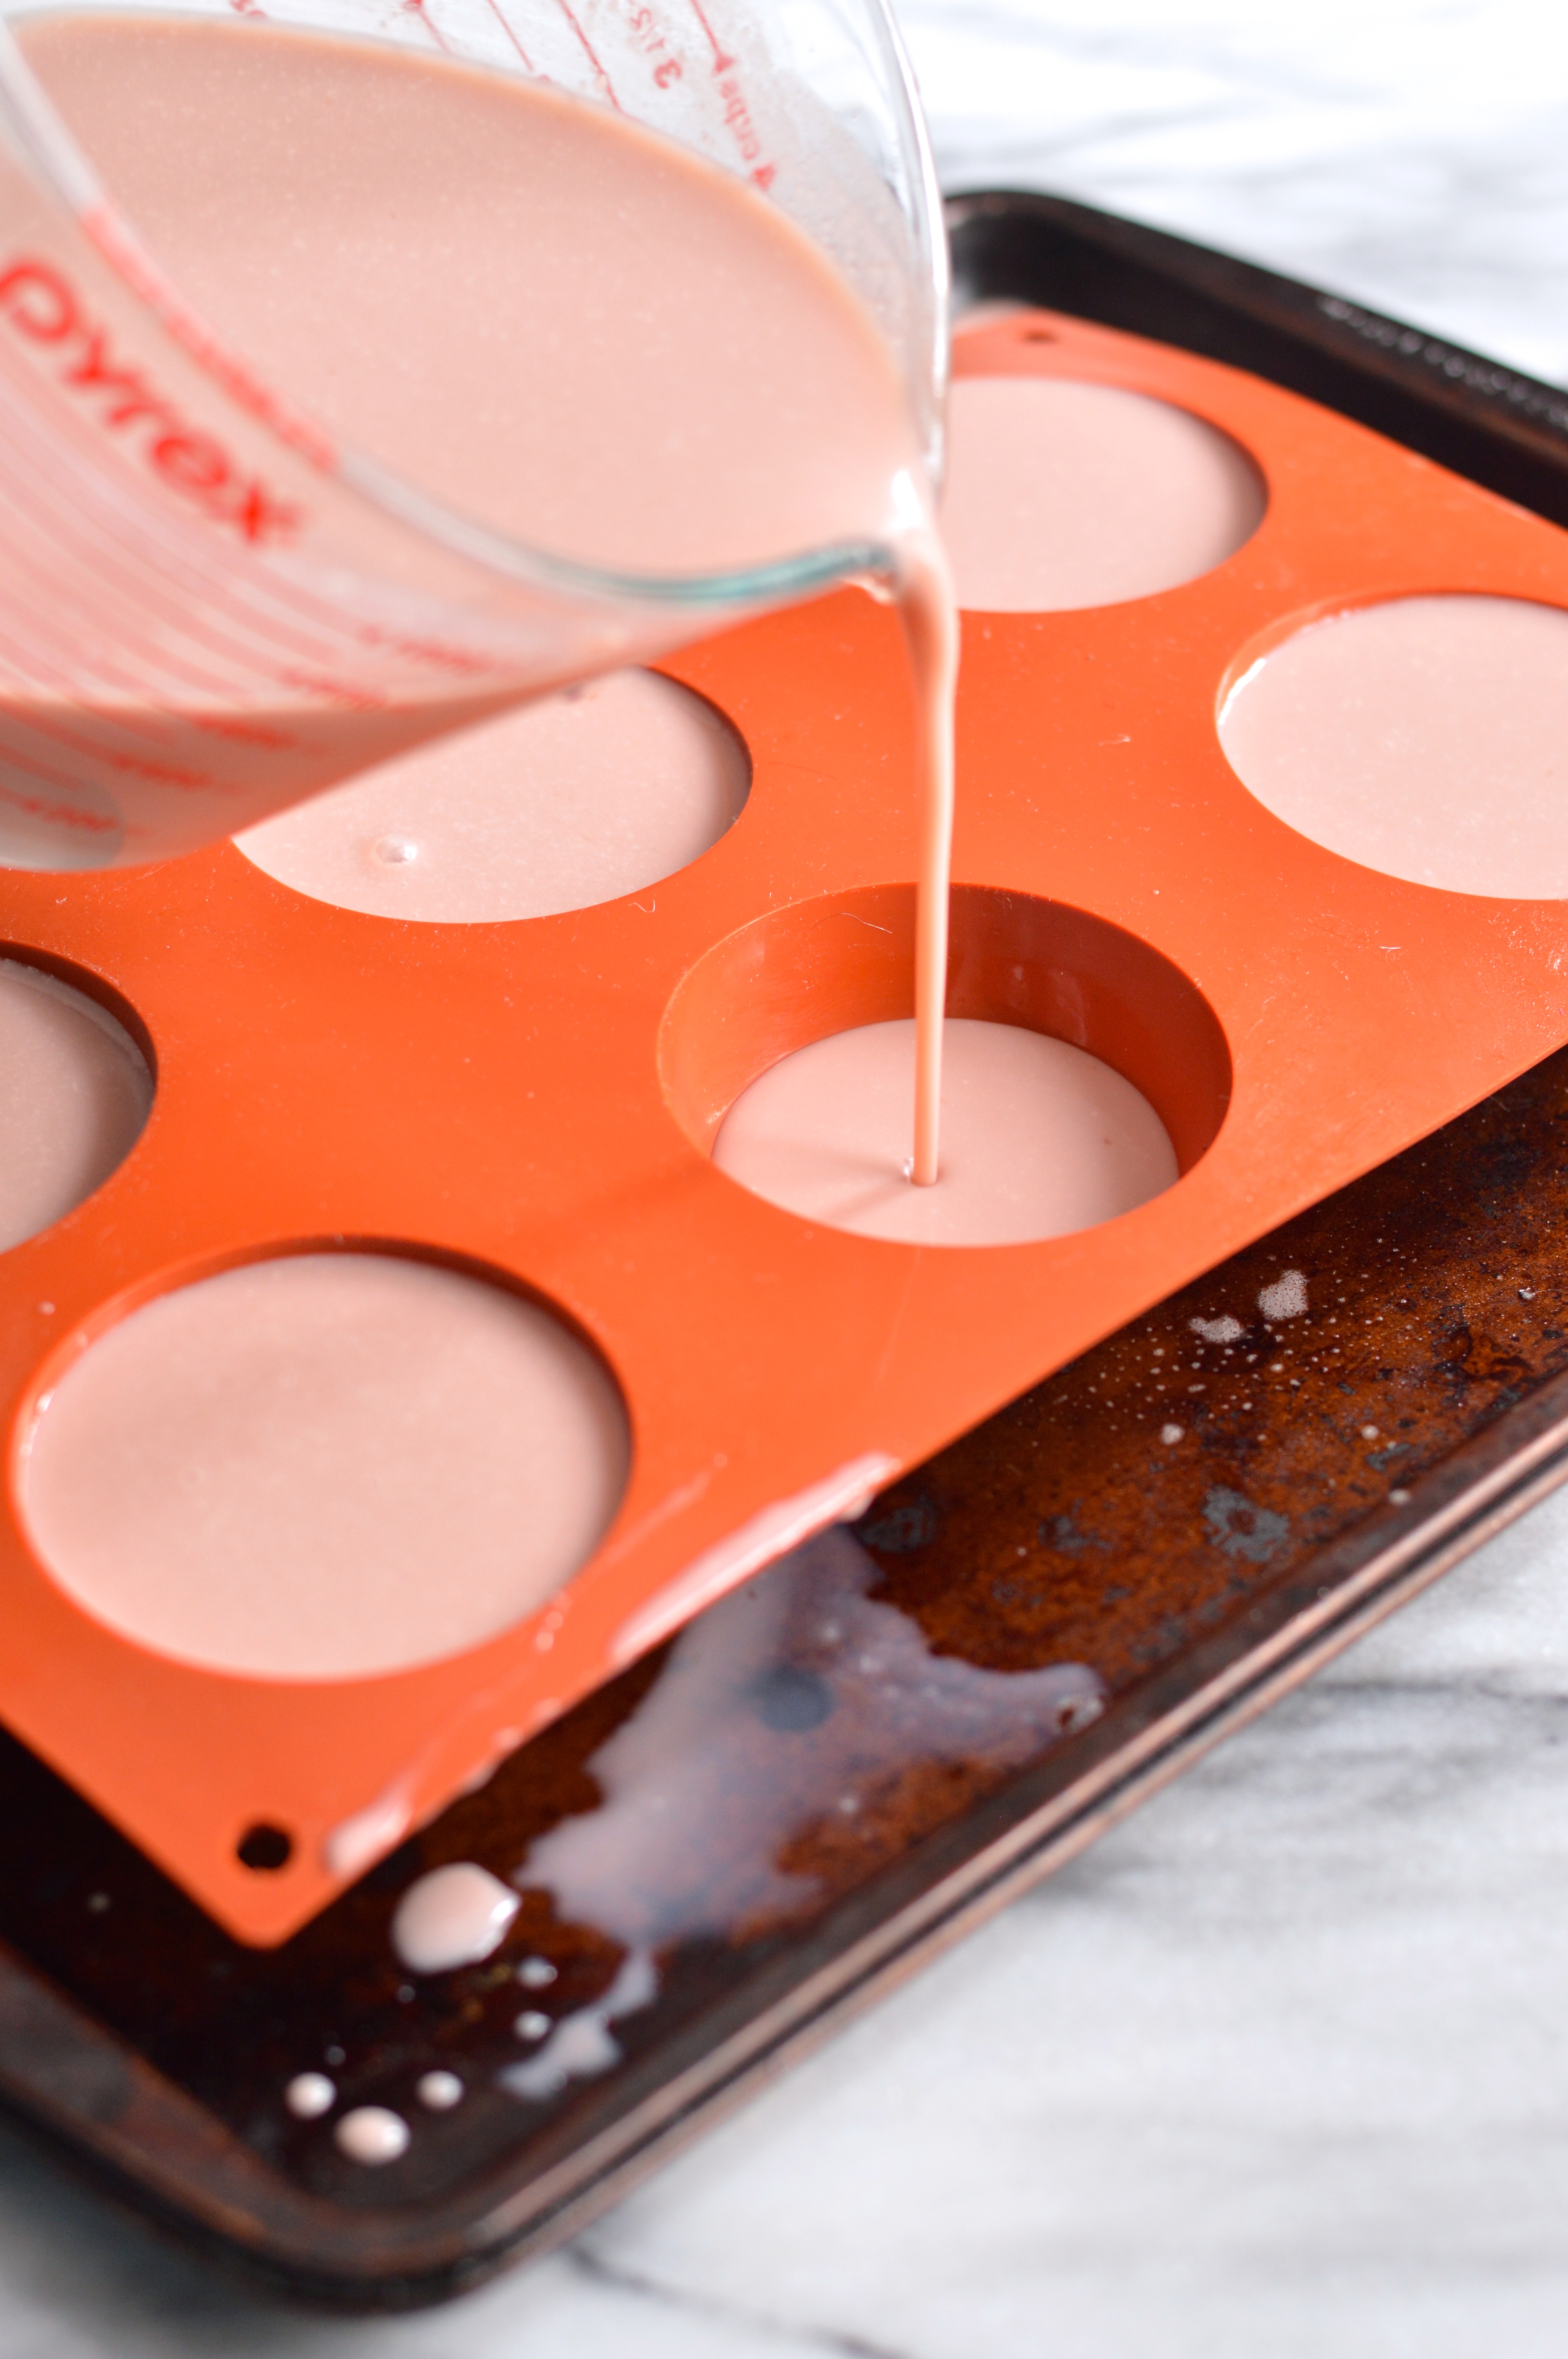
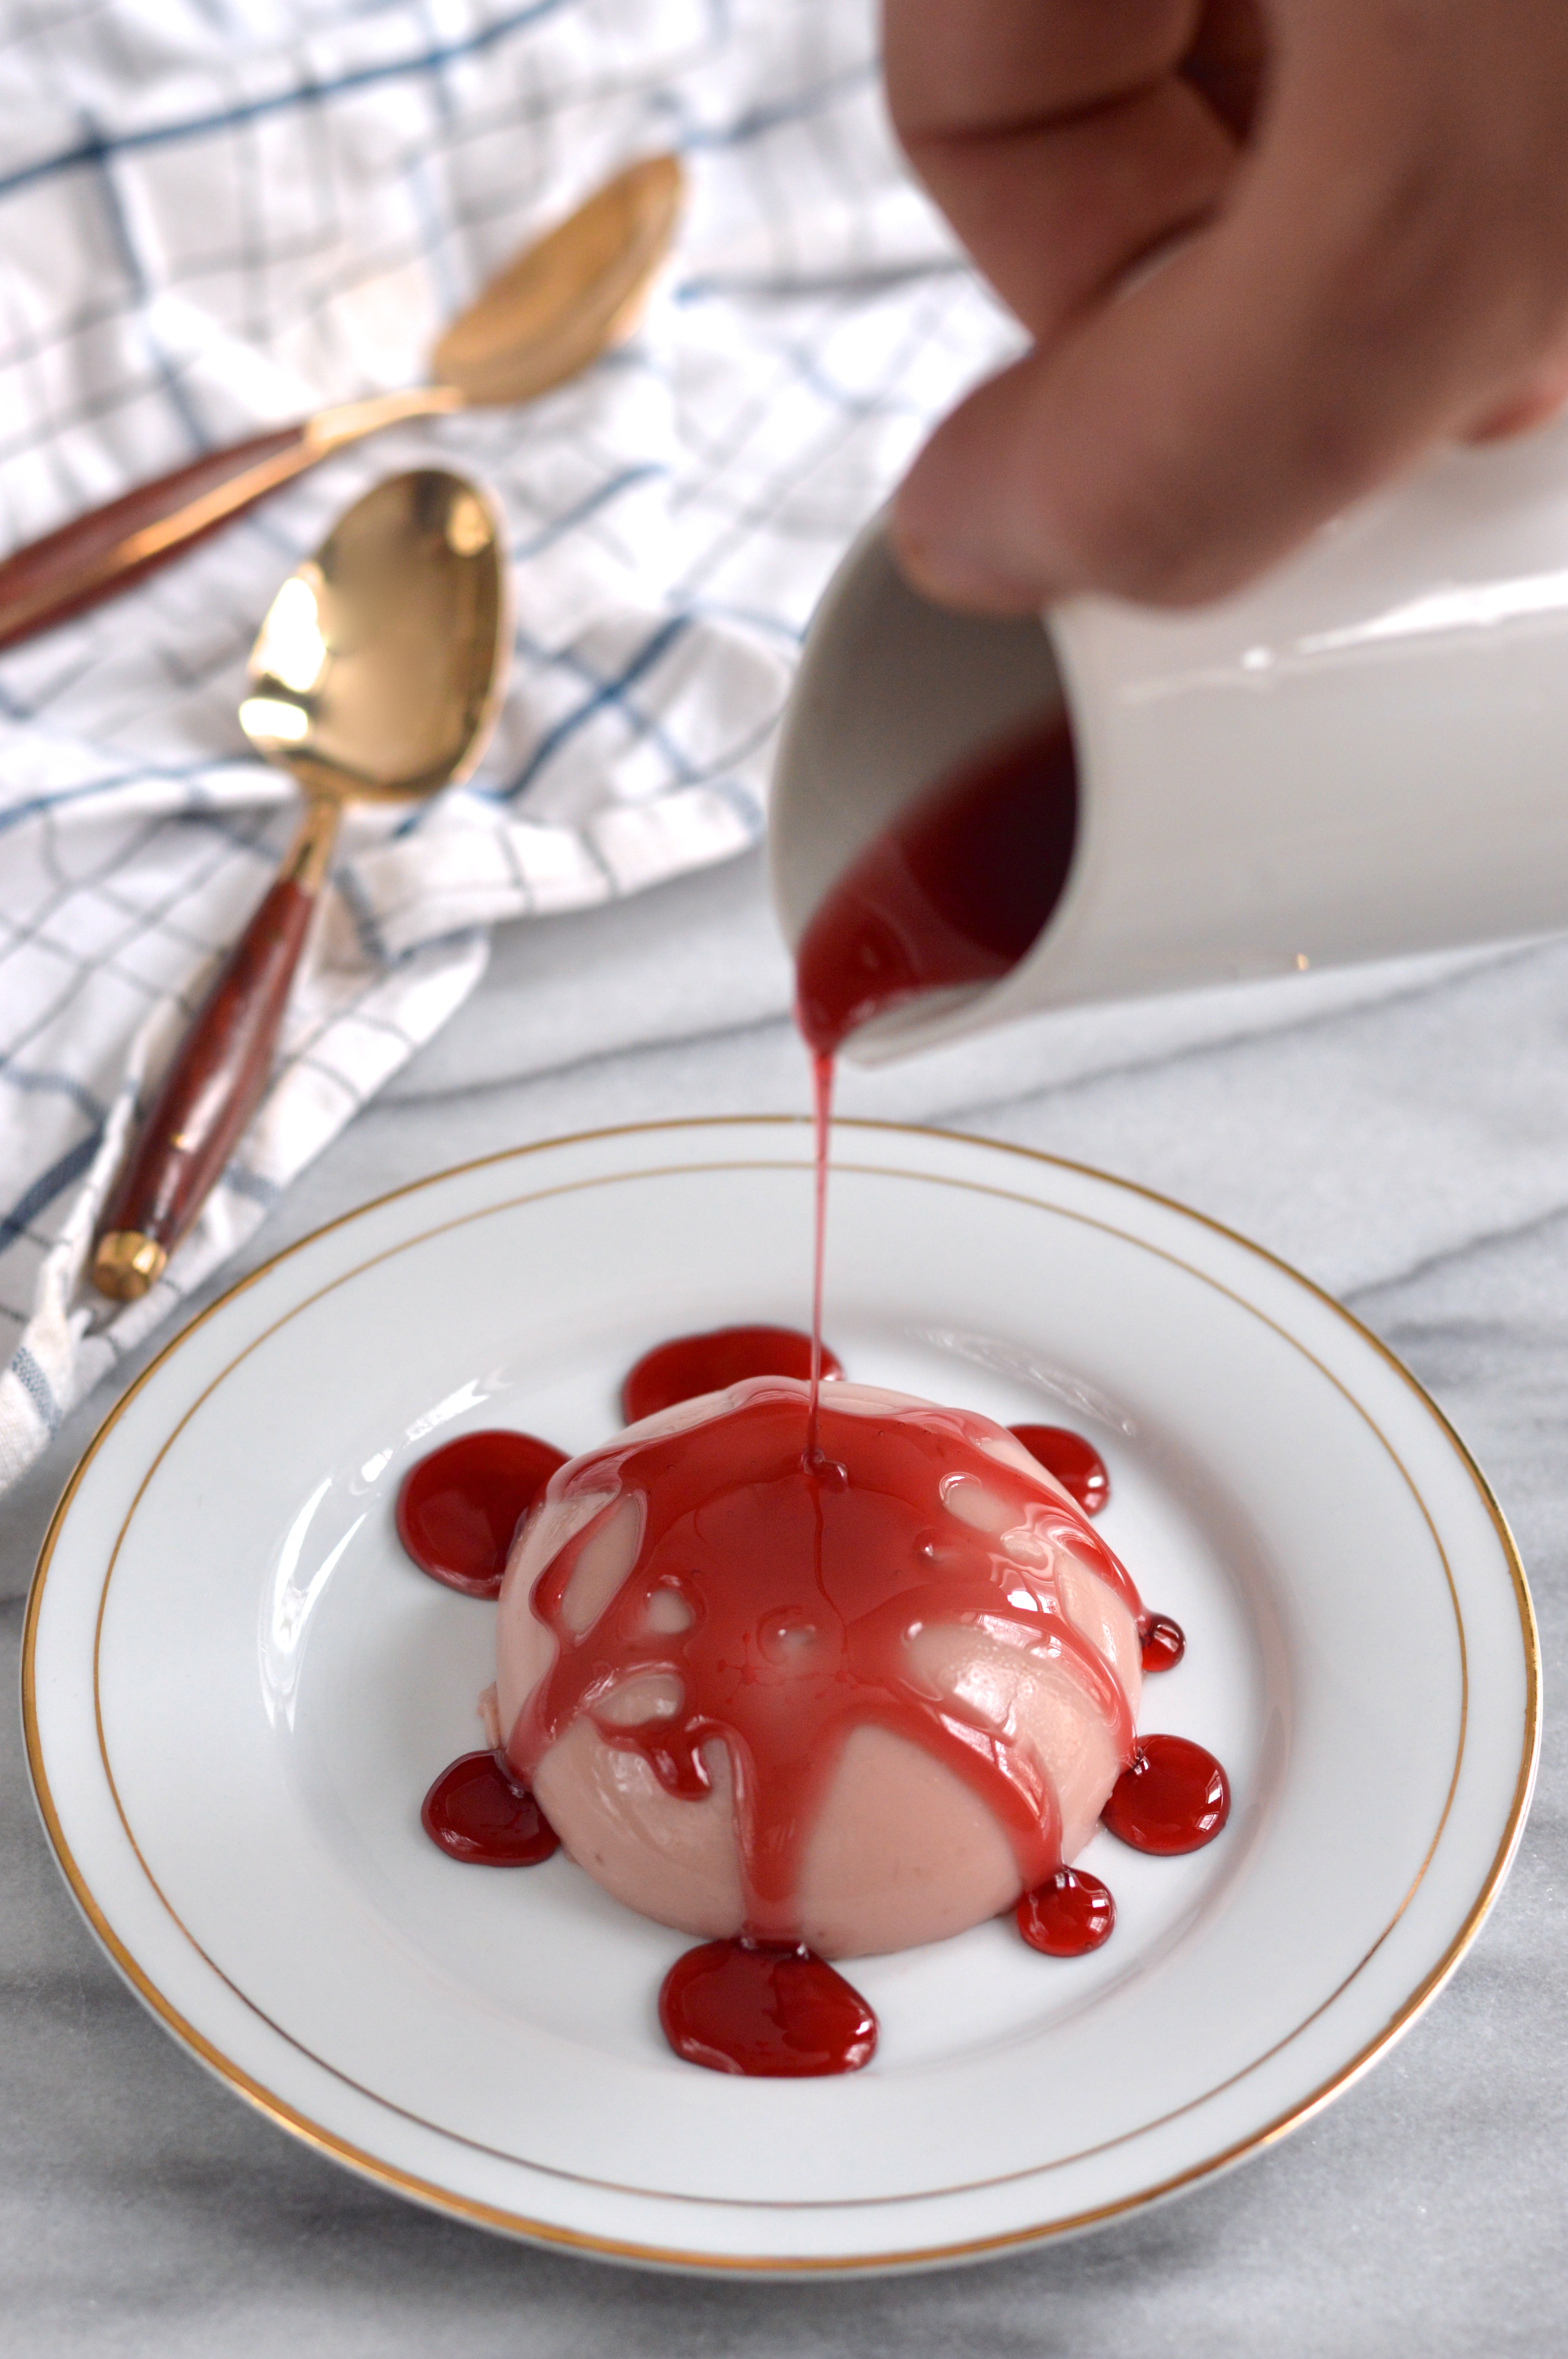
Lightly oil six 3/4-cup ramekins, custard cups, or silicone molds with a paper towel. Place 3 tablespoons pomegranate juice in small bowl, sprinkle gelatin over it, and let stand for 10 minutes. Heat remaining 2 cups pomegranate juice, sugar, and orange peel in large saucepan over high heat, stirring to dissolve sugar. Boil until syrup is reduced to 1 1/4 cups, about 20 minutes or so. I found it helpful to keep a heatproof measuring cup with mesh strainer (to catch the orange peel) next to the stove to check how much the syrup had reduced. Once reduced to 1 1/4 cups, remove orange peel. Reserve 1/3 cup of the syrup as a sauce; cover and refrigerate.
Add gelatin mixture to remaining hot syrup in the pan and stir well until completely dissolved. Whisk in orange juice and whipping cream, then buttermilk. Strain the mixture to remove any lumps or buttermilk solids. Divide among prepared ramekins. Chill until set, at least 4 hours or overnight.

Run knife around edge of ramekins; invert onto plates. If you have trouble getting them out you may need to run the ramekins under warm water for a few seconds. Drizzle with sauce, sprinkle with a few pomegranate seeds, and serve.

Advertisement

conversation heart mini cakes

Valentine’s Day is one of those holidays that most people either love or hate. Usually you hate it when you’re single, and suddenly appreciate it when you’re in a relationship. Growing up gay in a small town in upstate New York, for most of my life I was on the team against this holiday. Once I started dating I began to like it, but even then usually thought of Valentine’s Day as an excuse for restaurants to pack as many couples as possible into a tight space and charge a small fortune for a “prix fixe” menu. After a bottle (or two) of cheap champagne and several courses of dinner, I was usually done for the night, and that was that. Now that I’m married and don’t have to try so hard to impress my dates or seal the deal or whatever it is people do on Valentine’s day, I finally have a new appreciation for it. My husband Russell and I usually skip the over-priced meals and crowds and try to re-create the date experience at home. We like to use this holiday as an excuse to brighten our home with fresh-cut flowers, cook a nice meal, drink some wine and, of course, buy some chocolates. My favorite part of this holiday was, is, and always will be the chocolates.

conversation heart mini cakes | Brooklyn Homemaker

This day hasn’t always been all about chocolates and flowers though. Valentine’s Day has its roots in ancient Rome, and the holiday’s two namesakes were Roman saints who both shared the name Valentine. Though there are some rumors, there is no evidence linking either saint to the romantic ideas people have about the holiday today. Back then this holiday was strictly about martyrdom and religious beliefs. It wasn’t until the medieval era, when the tradition of courtly love flourished in the spring, that people started tying Saint Valentine’s Day to romance and love.  Men would pick spring flowers and write love songs to try to woo their fair maidens, but even then sugar was a precious commodity in Europe, so candy wasn’t yet a part of the experience.

conversation heart mini cakes | Brooklyn Homemaker

It wasn’t until the 1800s that the British chocolate manufacturer Cadbury started marketing chocolate candies for Valentine’s Day. Before then, chocolate was usually consumed as a hot beverage. When Cadbury made some improvements to its chocolate manufacturing technique they were left with an excess of cocoa butter. It was then that they started to produce a wide array of their “eating chocolate” and recognized Valentine’s Day as a marketing opportunity. Richard Cadbury started designing and selling ornate decorated boxes filled with an assortment of his new chocolate candies.  Victorians were already in the practice of showering each other with cards and gifts for Valentine’s Day, and Cadbury’s chocolate boxes were a wild hit. Within a few decades these elaborately decorated boxes were everywhere, and their popularity continued to grow until governments started rationing sugar during World War II. By then the idea of candy, chocolate, and heart-shaped everything was deeply tied to Valentine’s day, and continues to be today.

conversation heart mini cakes | Brooklyn Homemaker

Another Valentine’s Day confection that roots back to Victorian England is the conversation heart. The English had a tradition of writing phrases and sayings on small pieces of paper embeded inside of small colored sugar candies. The Victorians took this fashion even further by creating “conversation lozenges”, which came in various sizes and shapes, and were common all year round. Some of the more common phrases on them included “Can you Polka?” and “How do you flirt?”, but they were even sometimes used as marketing tools with the names of businesses written on them. In 1866 a device was invented to imprint the phrases into the candies rather than hand writing them, and in 1901 the Necco company, makers of Necco wafers, starting cutting their conversation lozenges into heart shapes and marketing them as Valentine’s Day “Sweethearts”. For decades some of the most popular phrases on conversation hearts were “Be mine”, “Kiss Me”, and “I’m Yours”. In the 1990s the company decided to update some of their phrases and retire others, introducing new phrases like “Email Me”, “Hot Stuff”, and Russell’s favorite, “Fax Me”.

conversation heart mini cakes | Brooklyn Homemakerconversation heart mini cakes | Brooklyn Homemaker

When I was trying to decide on a dessert to make for Russell on Valentine’s Day, I thought it would be really fun to try combining these two traditions. I’m not really a fan of real conversation hearts, but I am a big fan of chocolate! So, prepare to have your mind blown, I decided to make conversation hearts made of chocolate! Boom. Rather than trying to make tiny hearts out of real chocolate I decided that little chocolate cakes were where it’s at.

conversation heart mini cakes | Brooklyn Homemakerconversation heart mini cakes | Brooklyn Homemaker

I started with my favorite recipe for Devil’s Food Cake from Russell’s birthday, but decided to ice them with a traditional American buttercream. For fancy layer cakes I’m usually a bigger fan of meringue buttercream because American buttercream tends to be too sweet and have a slightly gritty texture, but I thought it was the clear choice for these cakes. Since they’re so cutesy and retro, and since they’re the size of large cupcakes, I thought this old school classic would be the perfect complement. I baked three 9-inch layers of Devil’s Food Cake and used a 4-inch heart-shaped cookie cutter to cut out twelve Devil’s Food hearts. Then I filled, stacked, and iced the hearts to make 6 mini heart layer cakes. To make the cakes look just like traditional conversation hearts, I chose pastel tones for my icing and piped on phrases in red.

conversation heart mini cakes | Brooklyn Homemaker

Not only are they completely adorable, they’re totally delicious. Super moist, tender & chocolatey cakes covered with rich sweet & creamy icing. Heaven. The recipe below makes 6 cakes, which each feed 2 people at least, so they’re perfect for a party. If you wanted to just make 2 heart cakes you could cut hearts from one layer and freeze the other two layers of cake for another use. If wrapped good and tight in plastic, these cake layers should keep for up to a month in the freezer.

I really hope you give these a try. They might be a little advanced for beginners, but if you are a confident crumb-coater and can pipe a straight line, I promise you can handle it.

conversation heart mini cakes | Brooklyn Homemaker

Conversation Heart Mini Cakes

  • Servings: makes six 2-layer 4-inch heart cakes, serves 12ish
  • Print
Devil’s Food Cake

butter and flour for pans
2 cups peanut oil or vegetable oil
1 1/2 cups unsweetened natural cocoa powder
1 1/2 cups hot water
3 1/4 cups cake flour
1 1/4 teaspoons coarse salt
1 teaspoon baking powder
1 teaspoon baking soda
1 cup granulated sugar
1 1/4 cup packed brown sugar
4 large eggs
4 teaspoons vanilla extract
1 cup buttermilk

Preheat oven to 350 degrees. Butter three 9 inch round cake pans, line bottoms with parchment paper, butter paper, and dust pans with flour. Whisk together cocoa powder and hot water until smooth.

Sift together flour, salt, baking powder, and baking soda; set aside. Beat oil and sugar together on medium-low speed until combined.
Add eggs, one at a time, beating after each addition. Beat in vanilla and cocoa mixture. Reduce speed to low. Add flour mixture in two batches, alternating with buttermilk and beginning and ending with flour. Beat until just combined.
Divide batter between pans, and bake until a cake tester inserted into centers comes out clean, 35 to 40 minutes. Transfer pans to a wire rack to cool for 15 minutes. Invert cakes onto rack, peel off parchment, and let cool completely.

Classic American Buttercream
just enough for six 4″ heart cakes

2 cups unsalted butter (4 sticks or 1 pound), room temperature
6-8 cups confectioners sugar, SIFTED
1/2 teaspoon table salt
2 tablespoons vanilla extract
4-6 tablespoons milk

Beat butter for a few minutes with a mixer with the paddle attachment on medium speed. Add first six cups of confectioners sugar, one cup at a time, with your mixer on the lowest speed until the sugar has been incorporated. Increase mixer speed to medium and add vanilla extract, salt, and 4 tablespoons of milk and beat on high for 3 minutes. If your frosting needs a more stiff consistency, add remaining sugar, a cup at a time. If your frosting needs to be thinned out, add remaining milk 1 tablespoons at a time. For these hearts you want the icing fairly stiff.

Assemble the heart cakes

Wrap each 9″ cake layer in plastic wrap and refrigerate for at least an hour, or over night. Level each layer with a sharp bread knife or cake leveler, and using a 4″ heart-shaped cookie cutter, cut four hearts out of each layer, giving you 12 hearts. Keep the heart cut-outs cold in the refrigerator while you’re working on each cake.

Divide your icing into 7 bowls. You’ll need about a cup of icing for each of the six cakes, and about 1/2 a cup of icing for the seventh bowl which you’ll use for the writing. Color the writing icing bright red, and then color each of the 6 remaining bowls whichever colors you prefer. Keep in mind that conversation hearts come in pastels so go easy on the food coloring. Fit a piping bag with a medium writing tip, I used a Wilton #7 , and fill the bag with your 1/2 cup of red icing. I used CK Products gel colors (available here) to avoid thinning out the icing. A little goes a long way, so use sparingly.

Working with one color at a time, spread about 1/4 cup of icing on the top of one heart cut-out and layer with another cut-out. Using another 1/4 cup of icing spread a thin layer to cover sides and top of the cake. This is called the crumb coat, and since these cakes are cut-outs they produce a lot of crumbs. This step is very important if you don’t want visible crumbs in your icing. Once your cake is completely crumb coated, refrigerate while you work on remaining five cakes. Repeat until all 6 cakes are crumb coated and each has refrigerated for a minimum of 30 minutes or more.

Working with the same color the cake was crumb coated with, ice each cake with remaining 1/2 cup of icing. Use a small offset icing spatula to get a nice smooth finished surface. Once iced, write your favorite conversation heart phrase on top with red icing. Repeat with remaining five cakes. Take pictures and show your friends, family, co-workers, first grade teachers, and college RAs.