winter

cherry and wild rice stuffed pork loin roast

The holiday season is well under way and it really shows here in North Brooklyn.

cherry and wild rice stuffed pork loin roast | Brooklyn Homemaker

Christmas tree stands every few blocks, a giant electric menorah on the corner of Bedford and North 7th, blinking lights lining apartment windows and fire escapes, subway passengers with arms loaded up with shopping bags, inescapable holiday music everywhere you go…
You know, the ushe.

cherry and wild rice stuffed pork loin roast | Brooklyn Homemaker

Yesterday we stopped at one of those aforementioned Christmas tree stands and I carried our little 3 foot cutie home with one hand. After dinner we drank Dark and Stormys and listened to disco music (instead of the usual holiday tunes) while we gussied her up.

cherry and wild rice stuffed pork loin roast | Brooklyn Homemaker

I’ve usually got cookies and cakes and candies (and sugar plums et al) dancing in my head this time of year, but instead I’ve been very concerned about what to make for Christmas dinner lately.

(fret not dear friends, I promise the cookies and cakes are still in the works too!)

cherry and wild rice stuffed pork loin roast | Brooklyn Homemaker

See, we’ve got big plans on Christmas day this year so I’m getting really excited about making a big fancy dinner.

Working in retail for the past several years has always meant that it’s just me and Russell and the pups for Christmas. These past few years have been totally fun, and really refreshingly casual and stress free, but they haven’t really been occasions to go all out when it comes to the holiday meal.

This year though, my mom and little sister found themselves with no plans for Christmas so they’re piling in the car and coming down to pay us a visit! Let the festivities begin!

cherry and wild rice stuffed pork loin roast | Brooklyn Homemaker

Mom’s always bummed that she never gets to eat any of the treats I post here on the blog, so I’ve got big plans to make a few of my recent recipes for her while she’s here. I’m going to load her up with enough sugar and sweets and goodies that she won’t even want to look at another blog post for at least a year. Or, at least until the new year that is!

We can’t just live on Christmas cookies for three days though. I mean, we might still try anyway, but I thought I should at least attempt to think of an actual meal to serve on Christmas day.

cherry and wild rice stuffed pork loin roast | Brooklyn Homemaker

Growing up my family usually served either ham or prime rib on Christmas, but Russell doesn’t really like either of those. Ham tends to be too salty for him, and we always have way too much leftover after dinner anyway. The last time I made a ham for Christmas we were eating ham sandwiches and split pea soup for a week! As for prime rib, I’d be in heaven but Russell doesn’t like meat that isn’t cooked completely through so that’s out too.
Womp womp.

cherry and wild rice stuffed pork loin roast | Brooklyn Homemaker

My initial thought was to make the pot roast I made a few months back, which would probably make everyone happy (very happy) but I’ve already made that so I couldn’t share it here and where’s the fun in that?
Oh what an exciting life I lead!

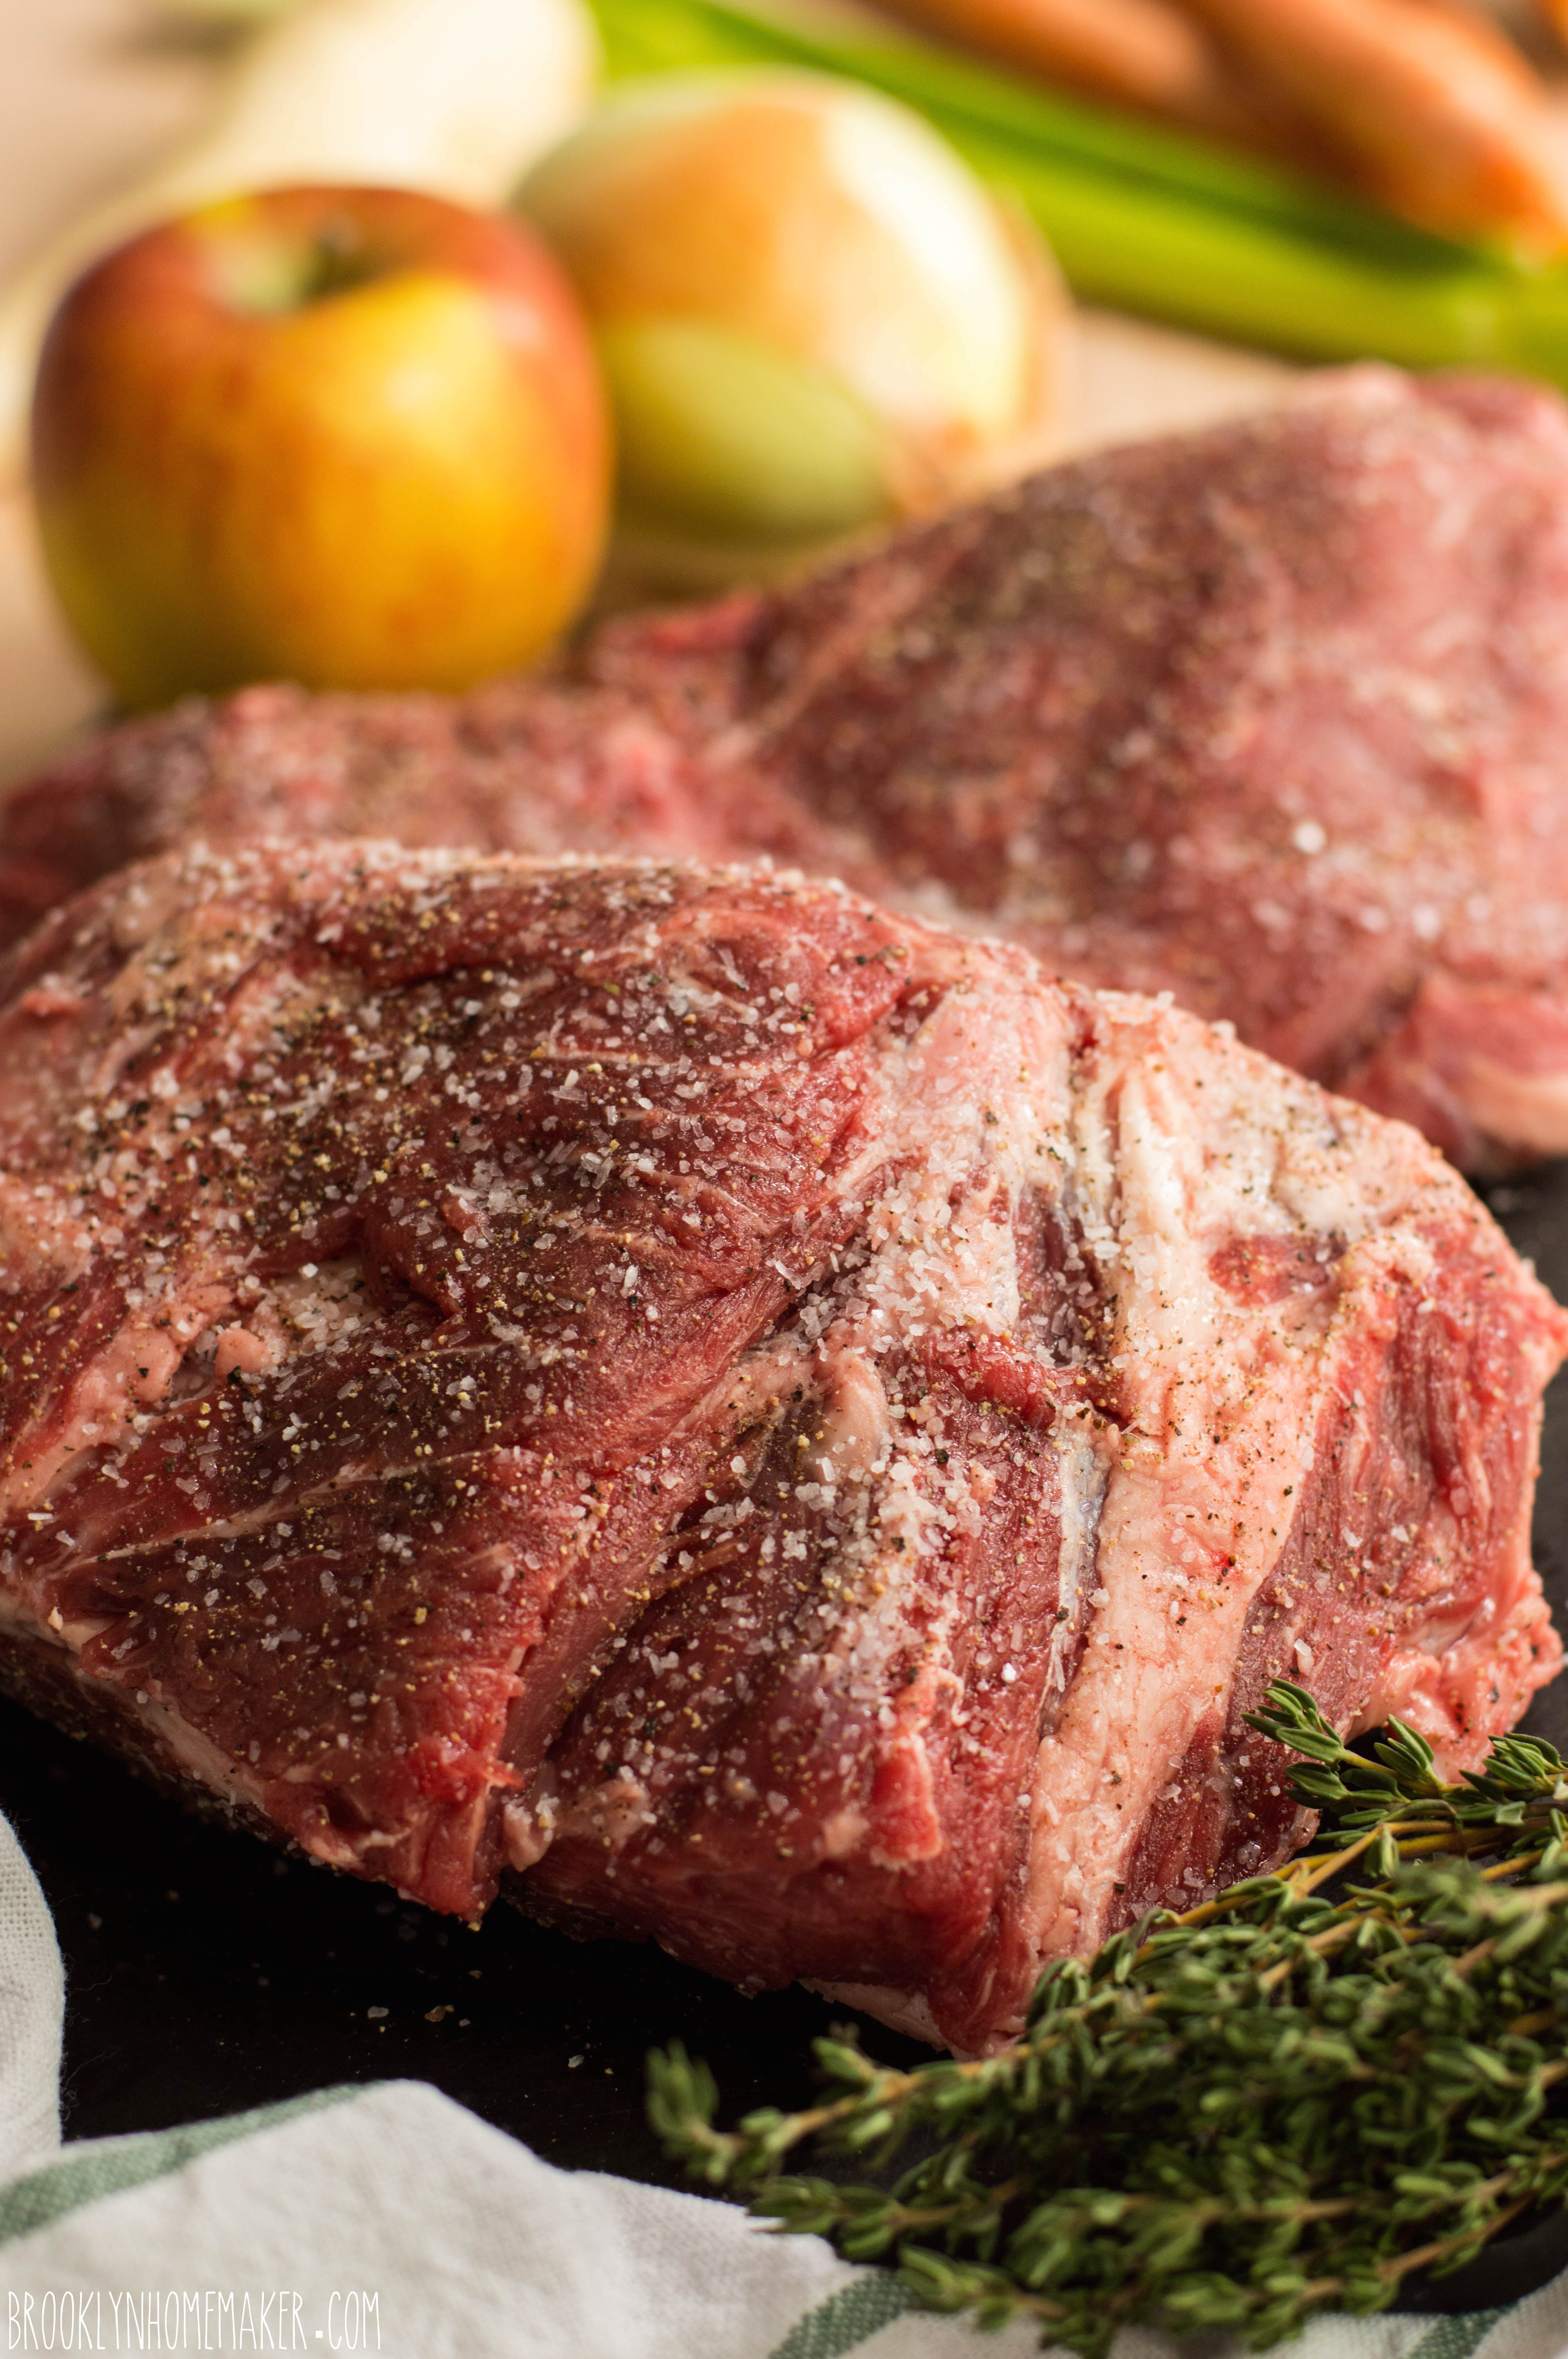
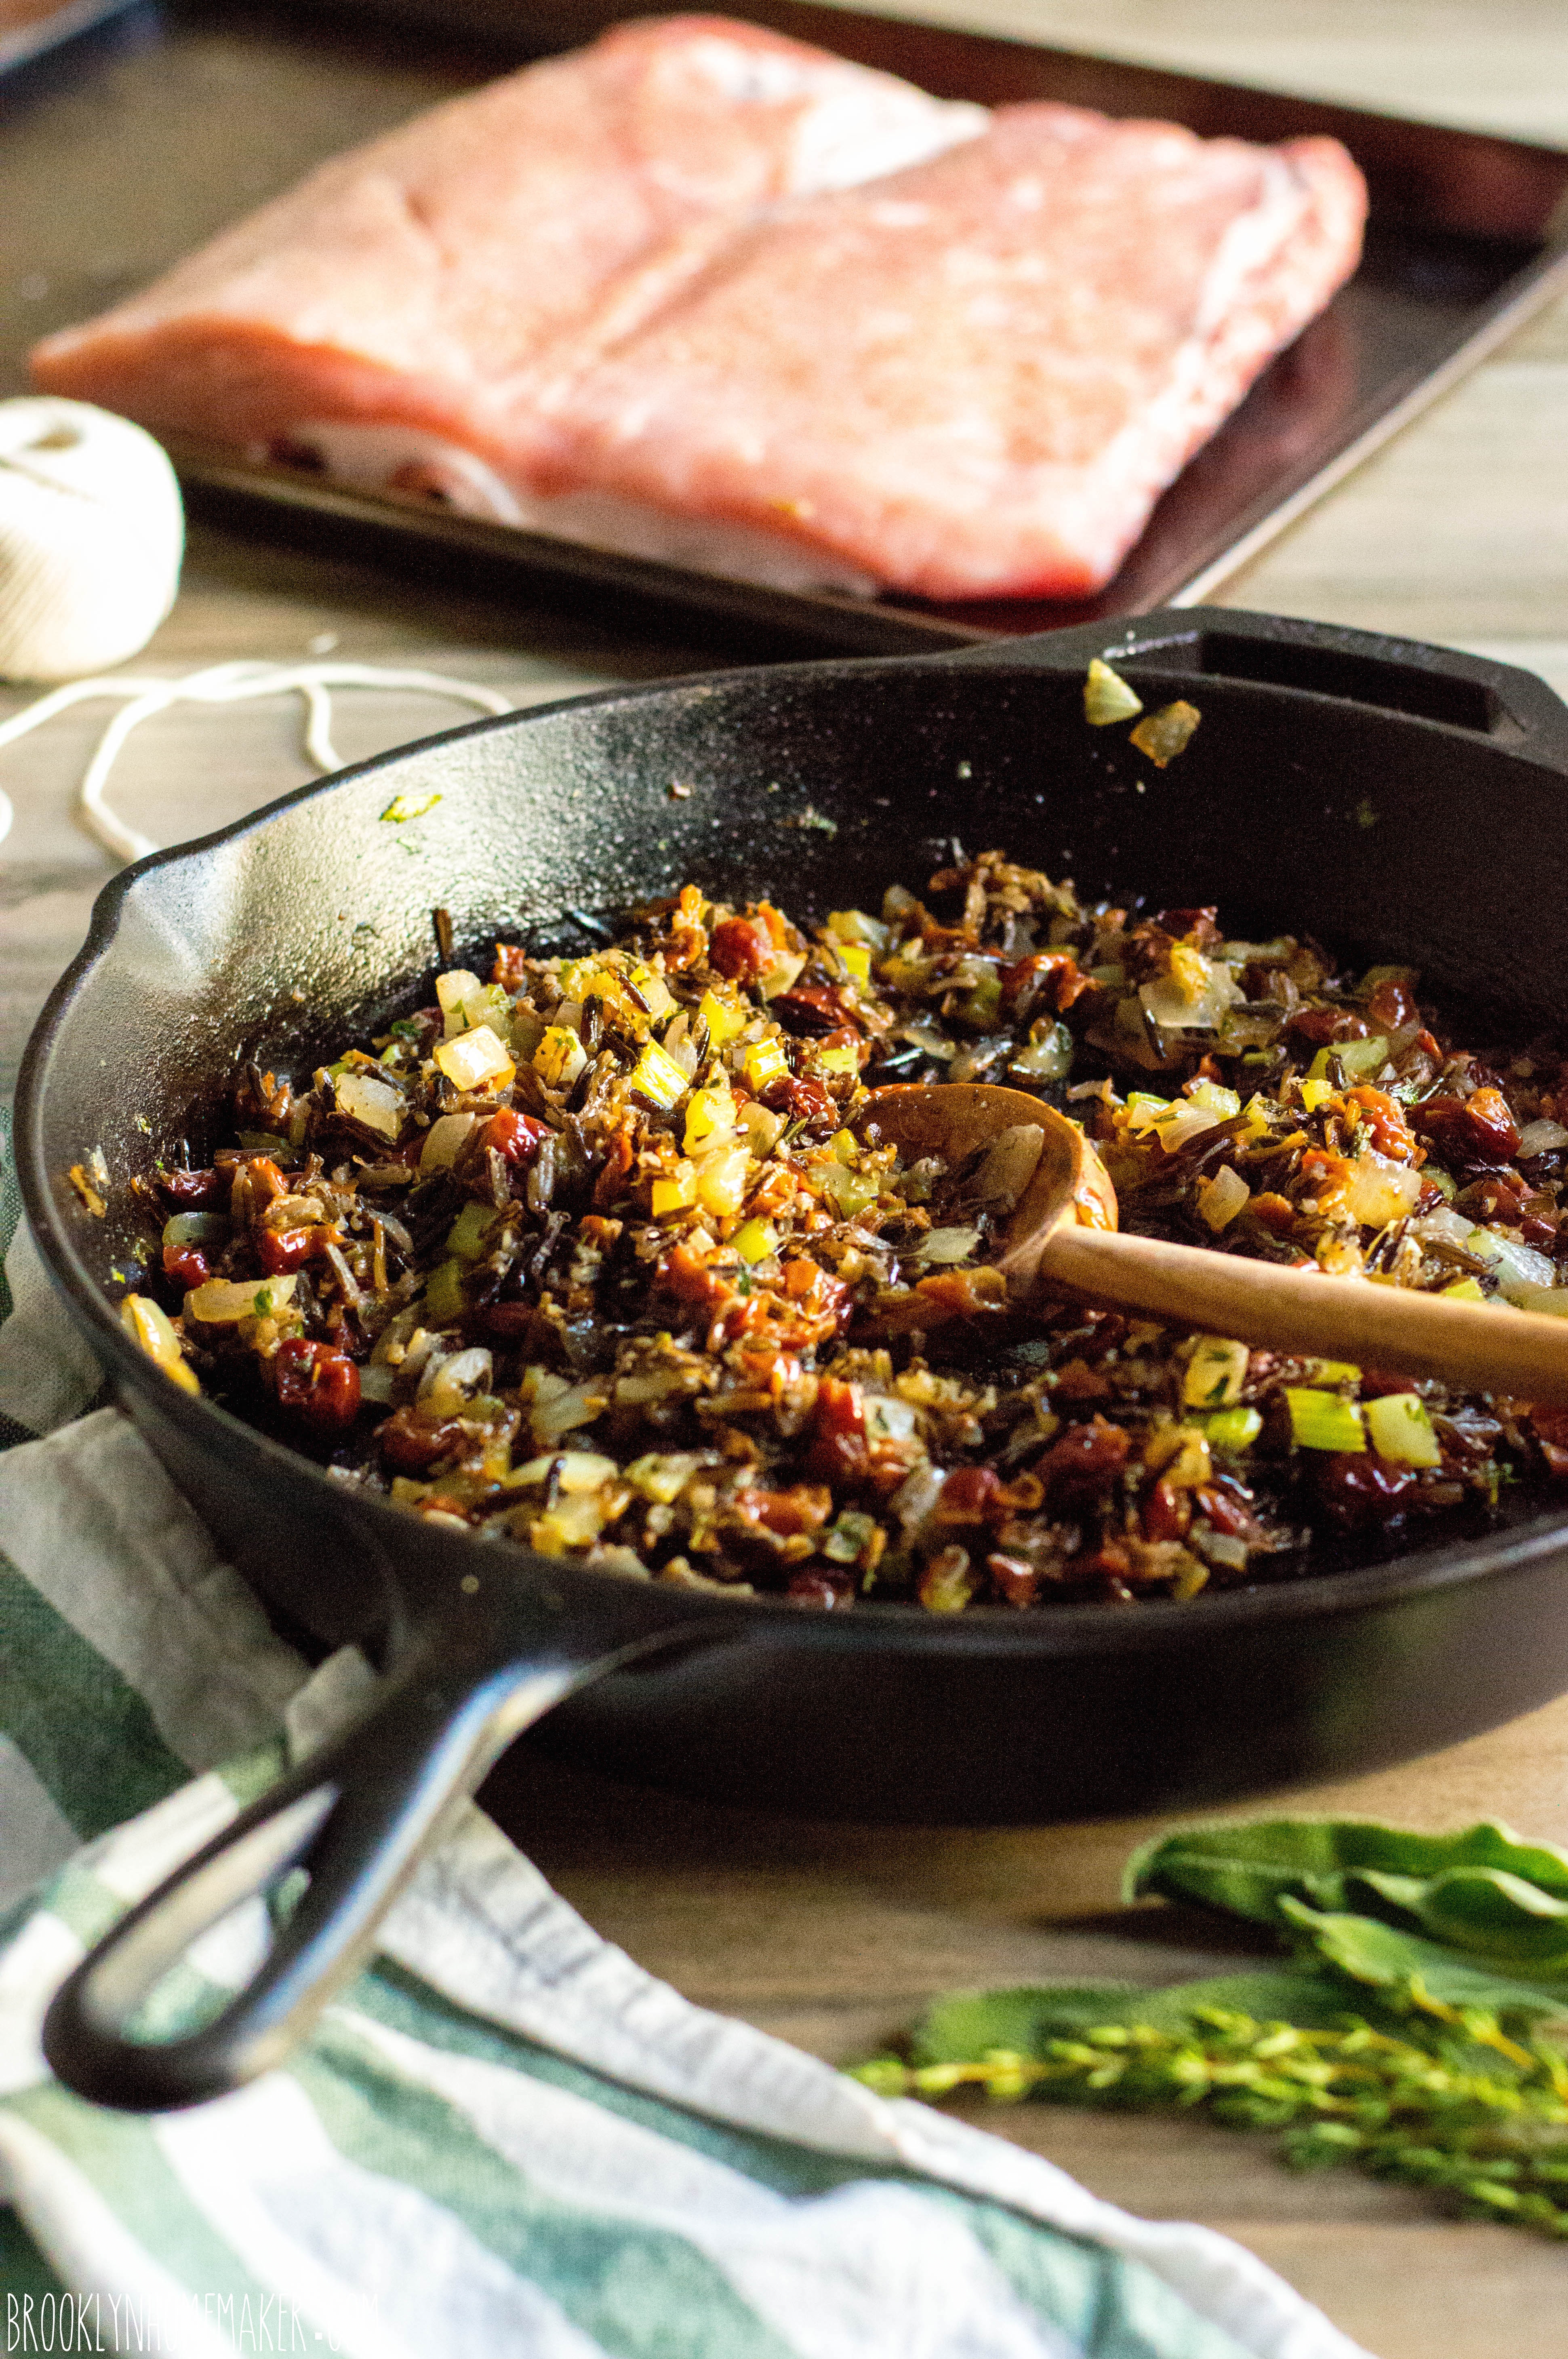
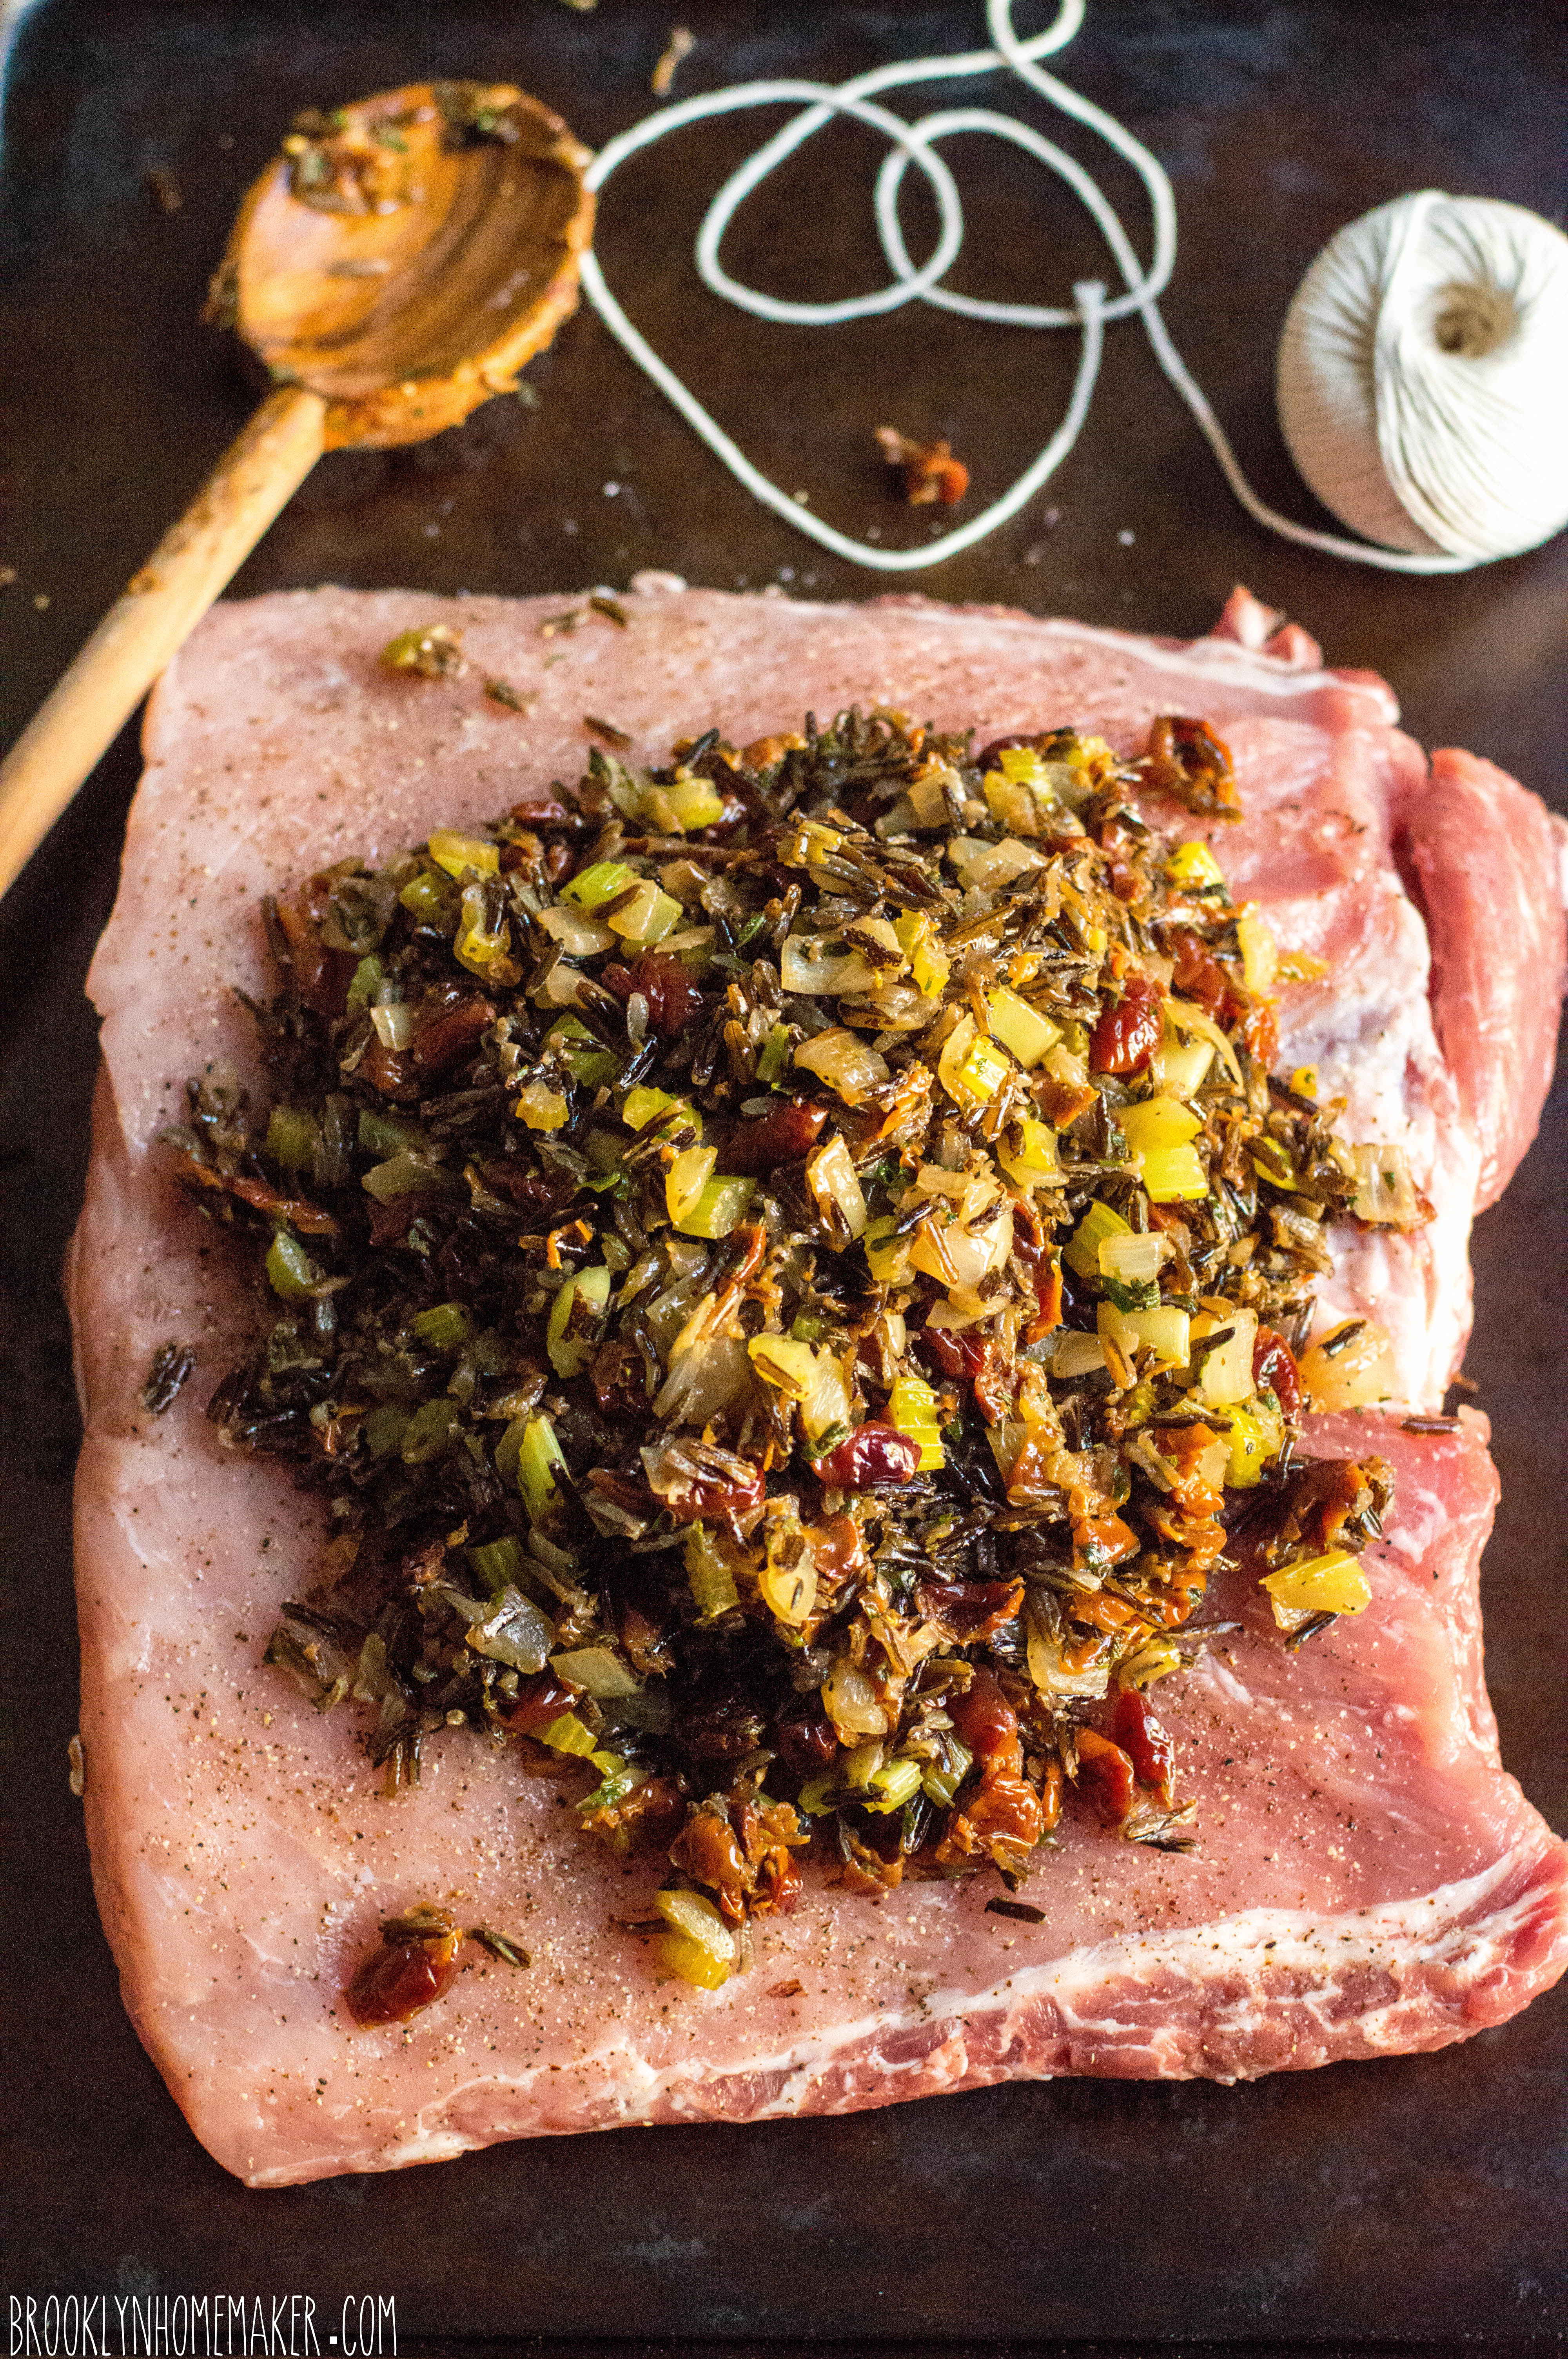
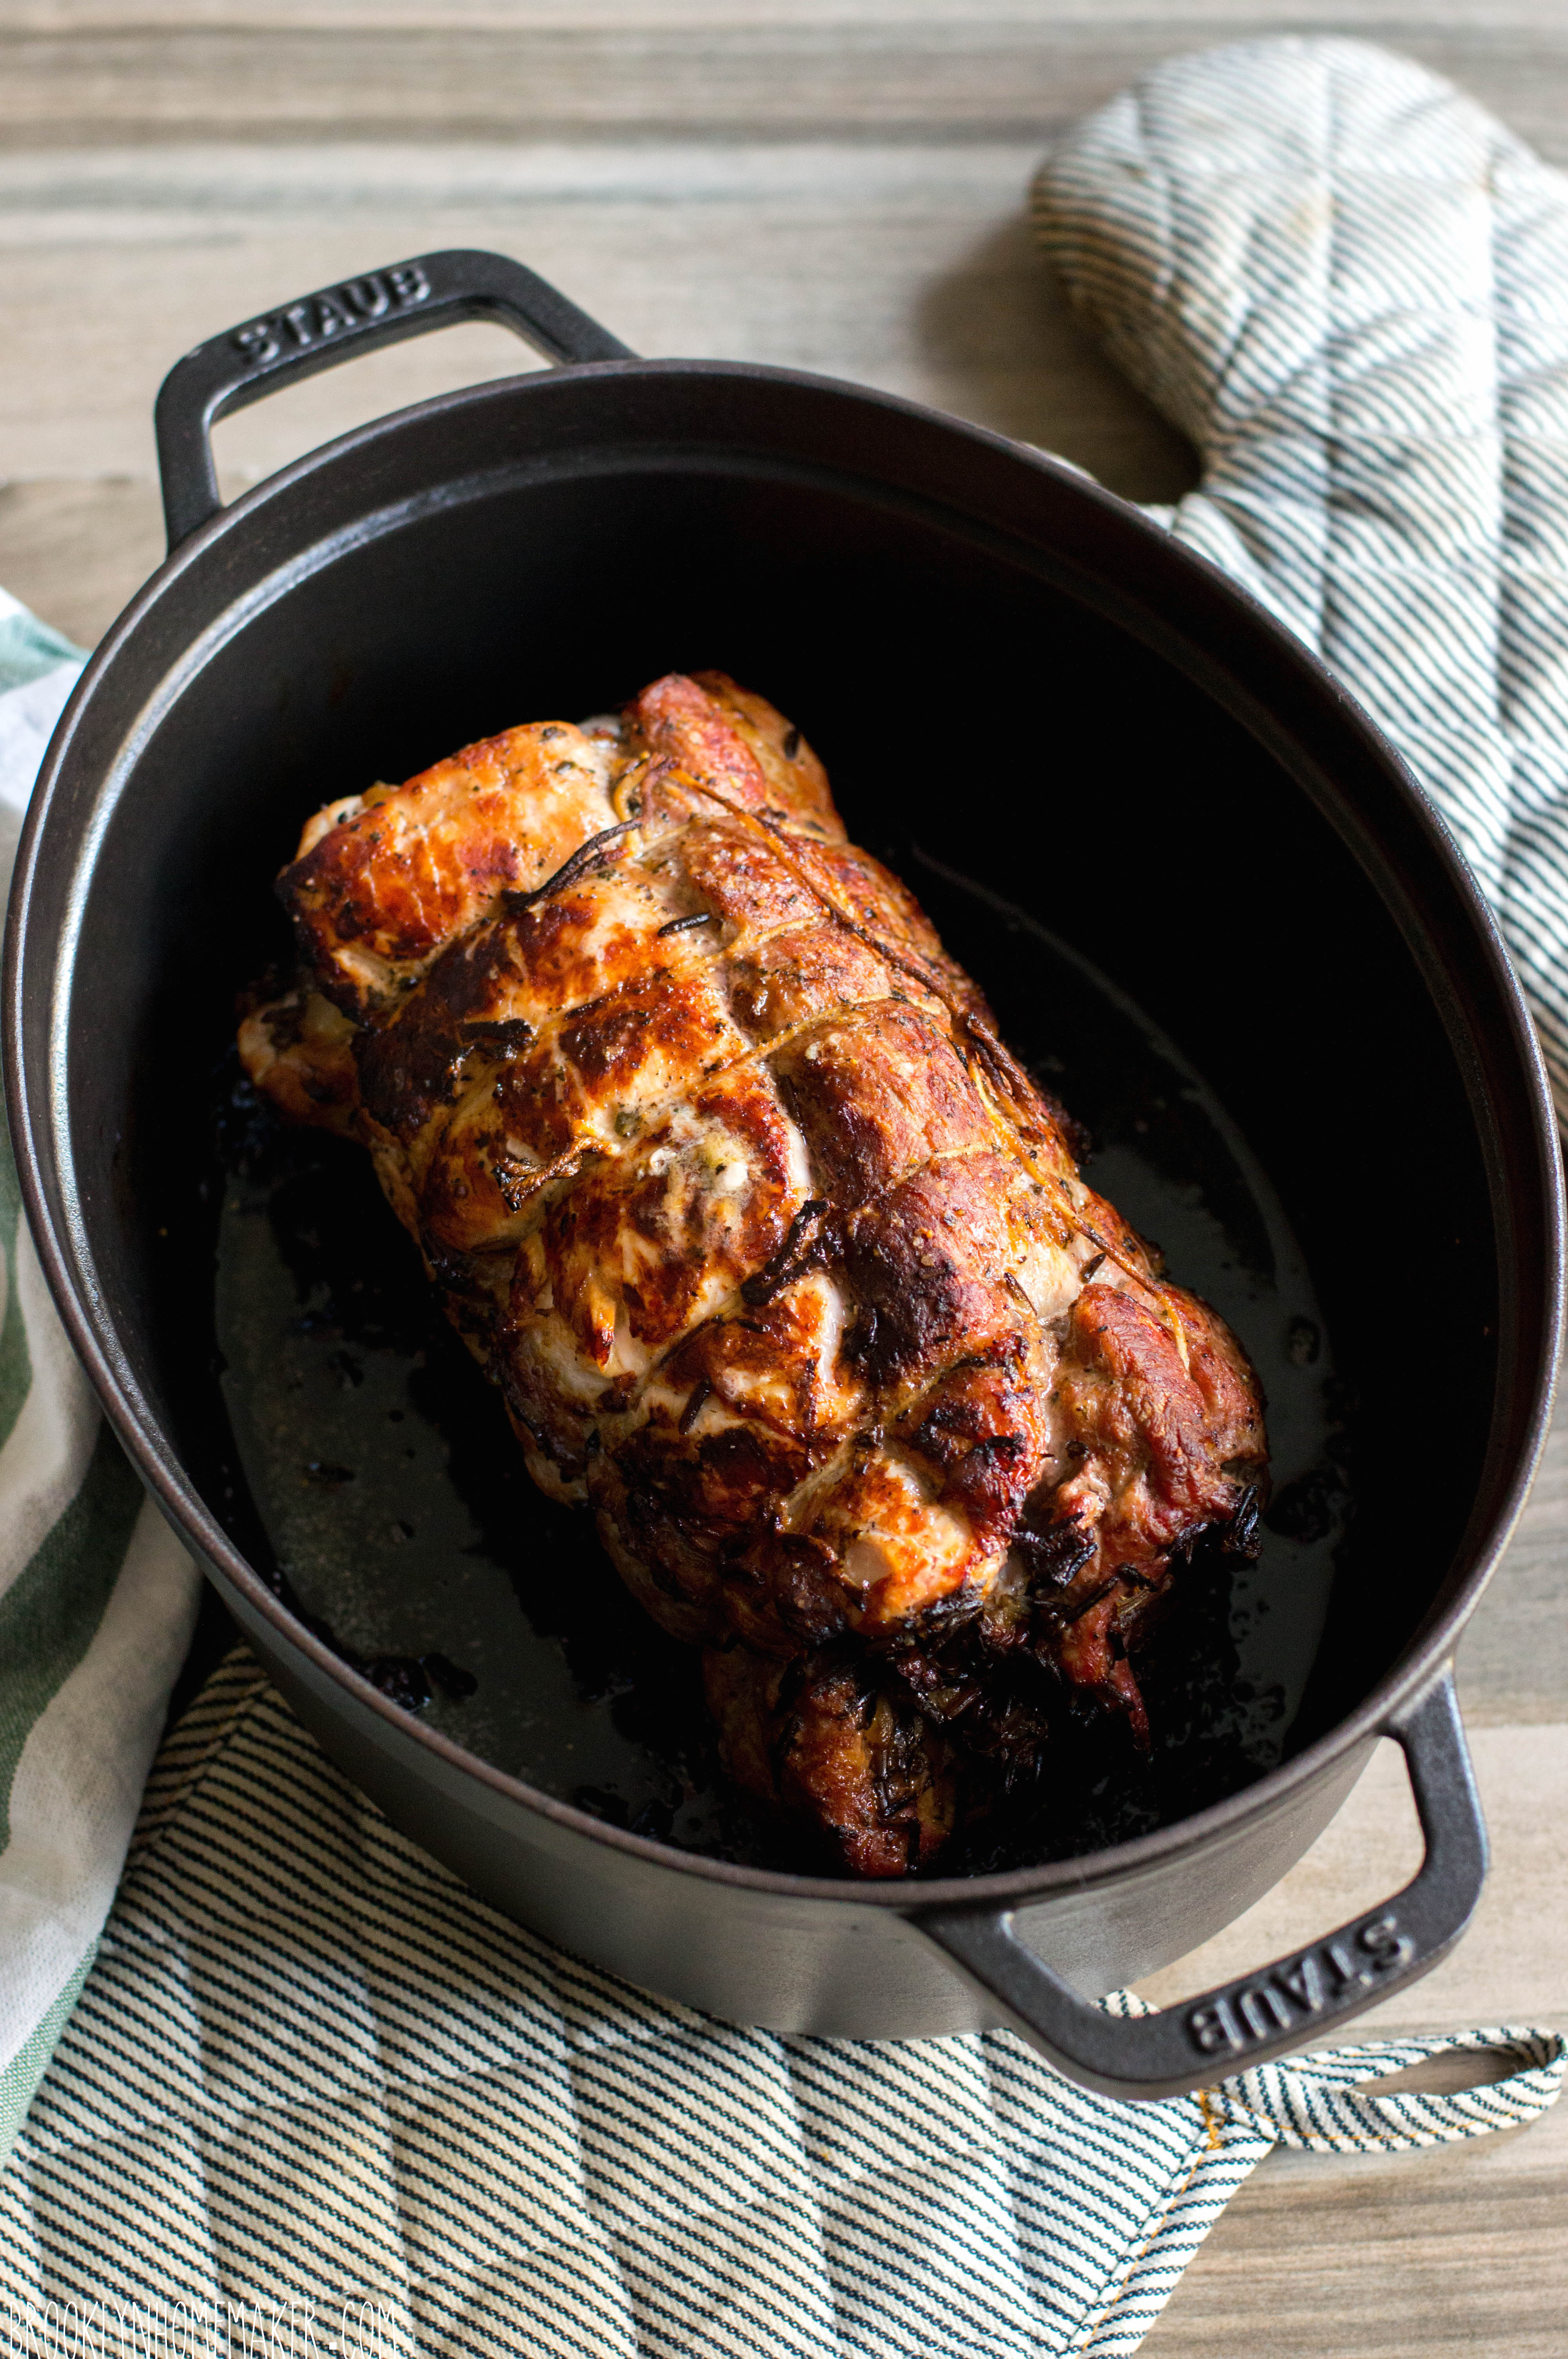
Instead I decided to make a pork loin roast. Not just any pork loin roast though, this puppy is butterflied, pounded flat, stuffed with magic, and rolled up jelly roll style before it’s roasted and sliced.

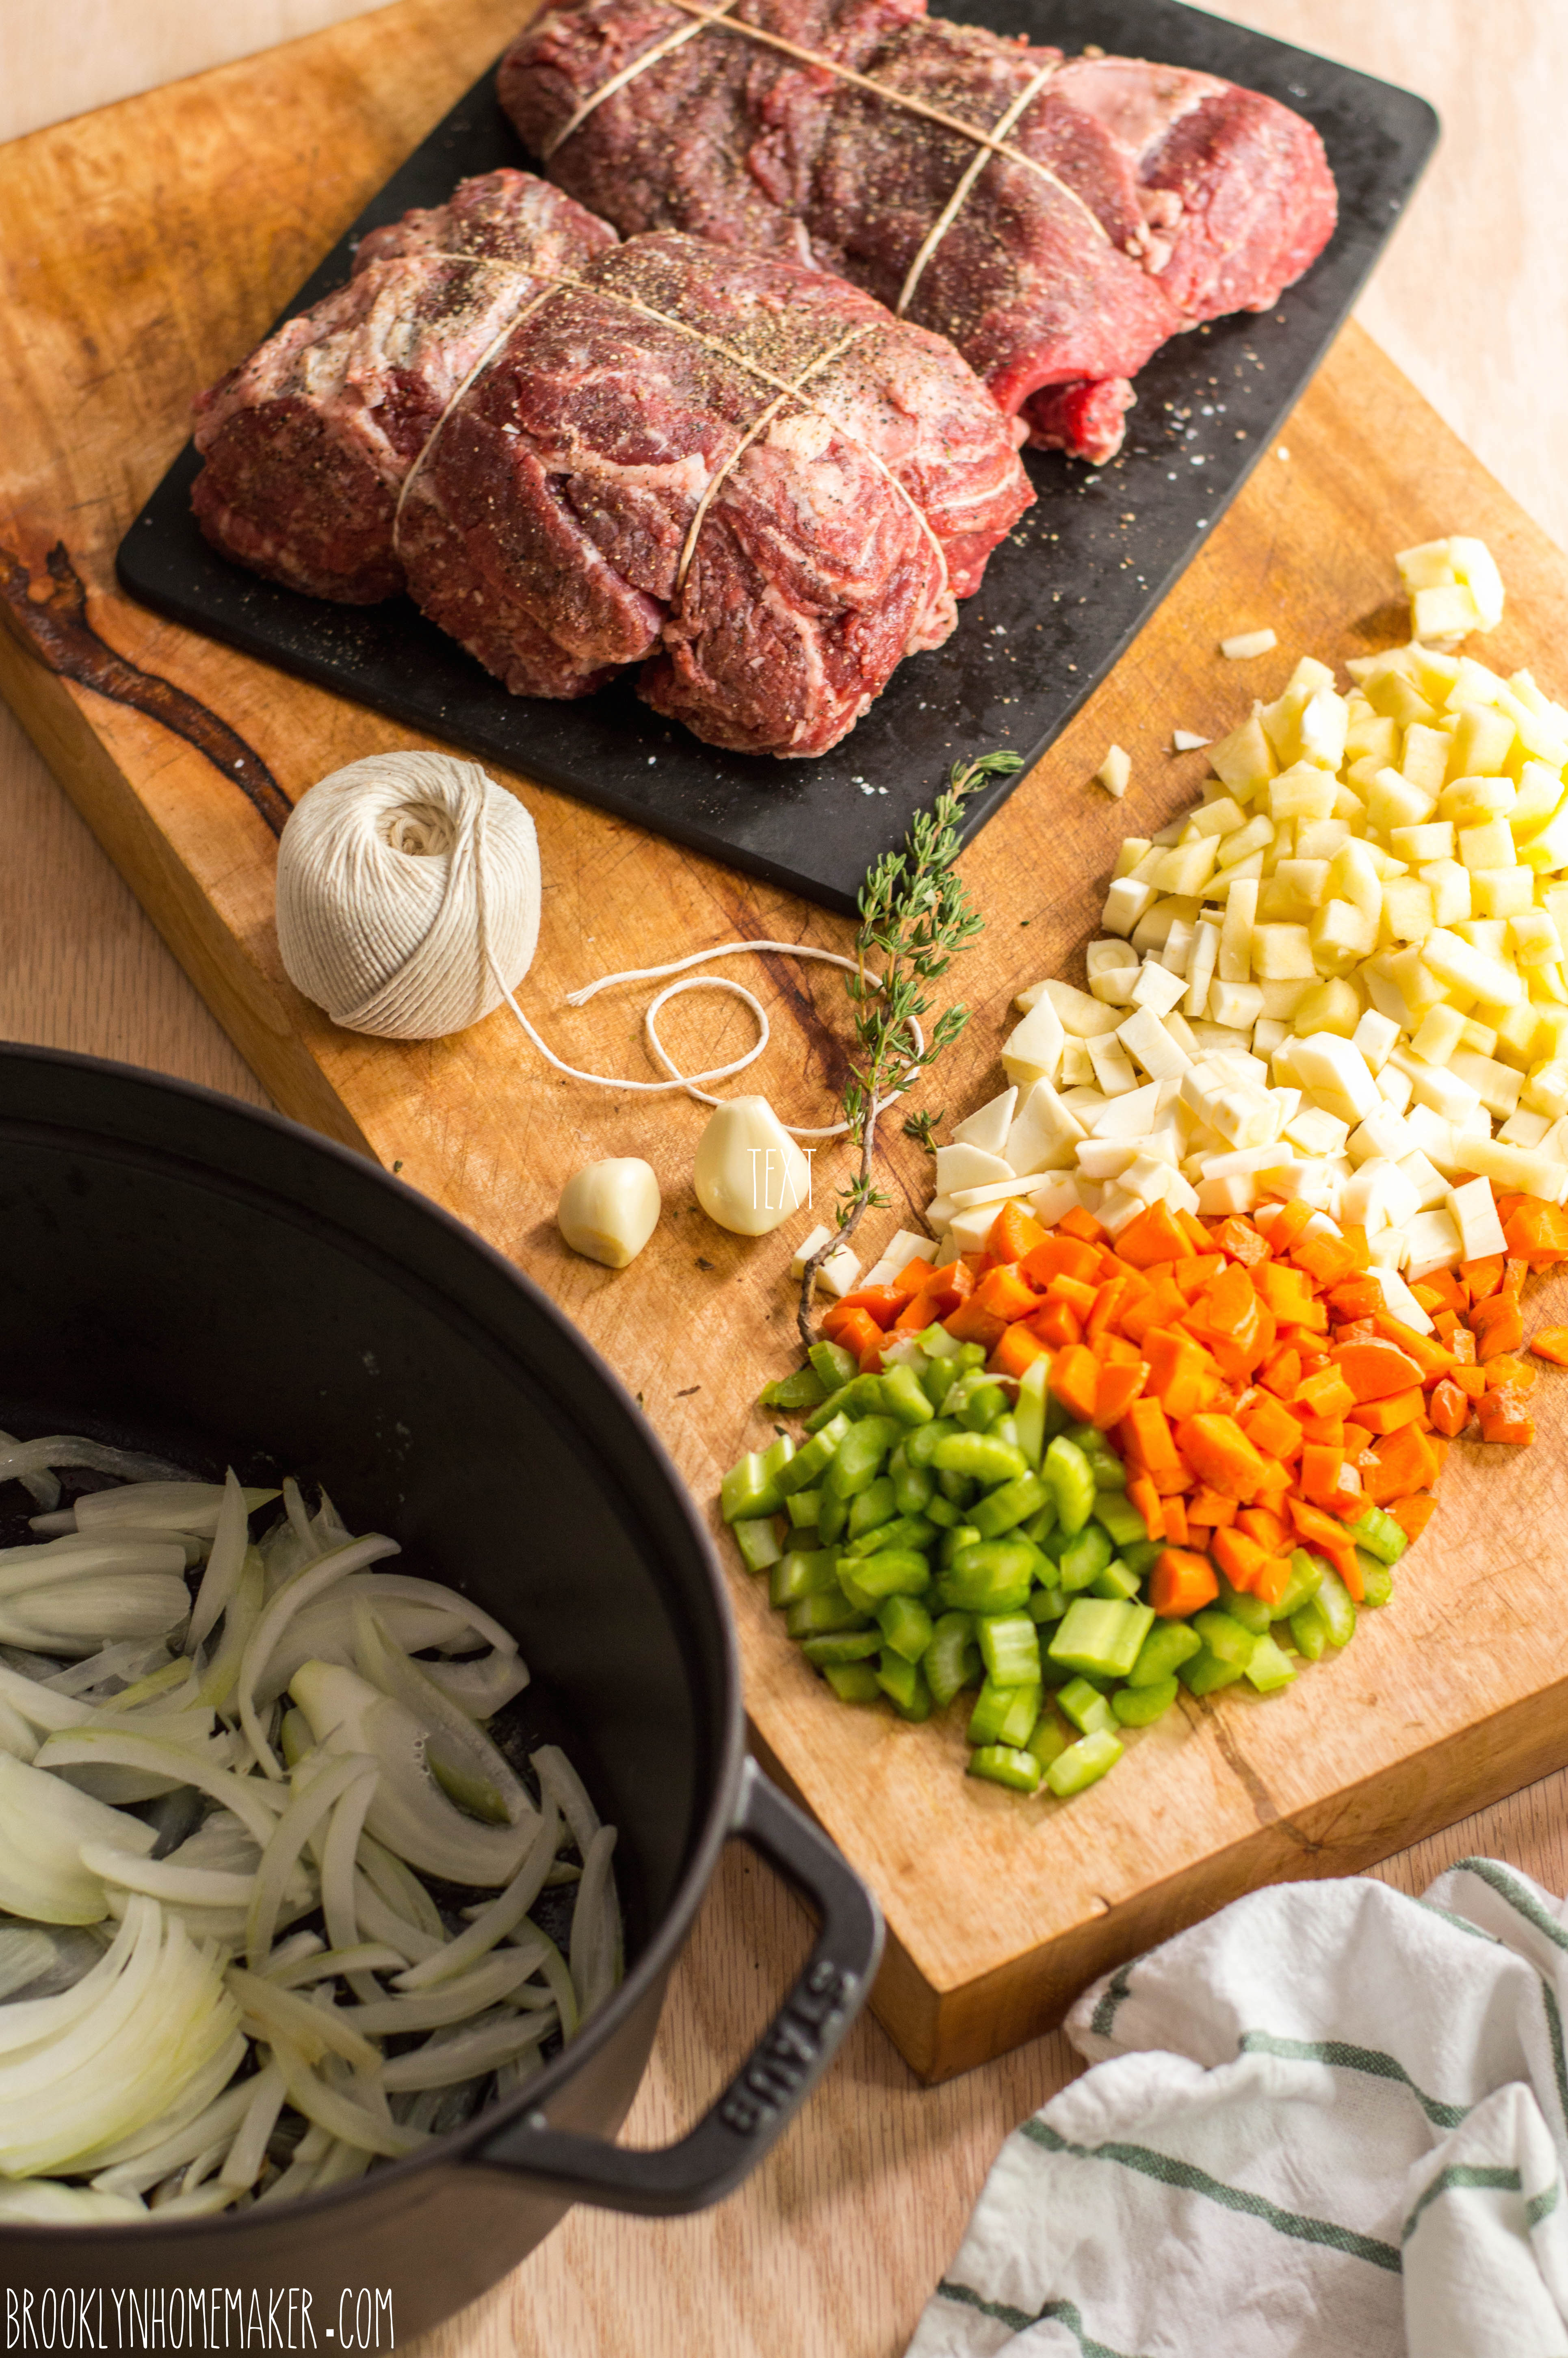
Rolling this back up and tying it with butcher’s twine can be a bit challenging but when you take your first bite you’ll know it was all worth it. The thinner you can pound out the meat the easier the rolling will be, but the pounding can be a time consuming (and noisy) job. The good news is that it’s also a great way to work out any pent-up frustrations after you do your holiday shopping!

cherry and wild rice stuffed pork loin roast | Brooklyn Homemaker

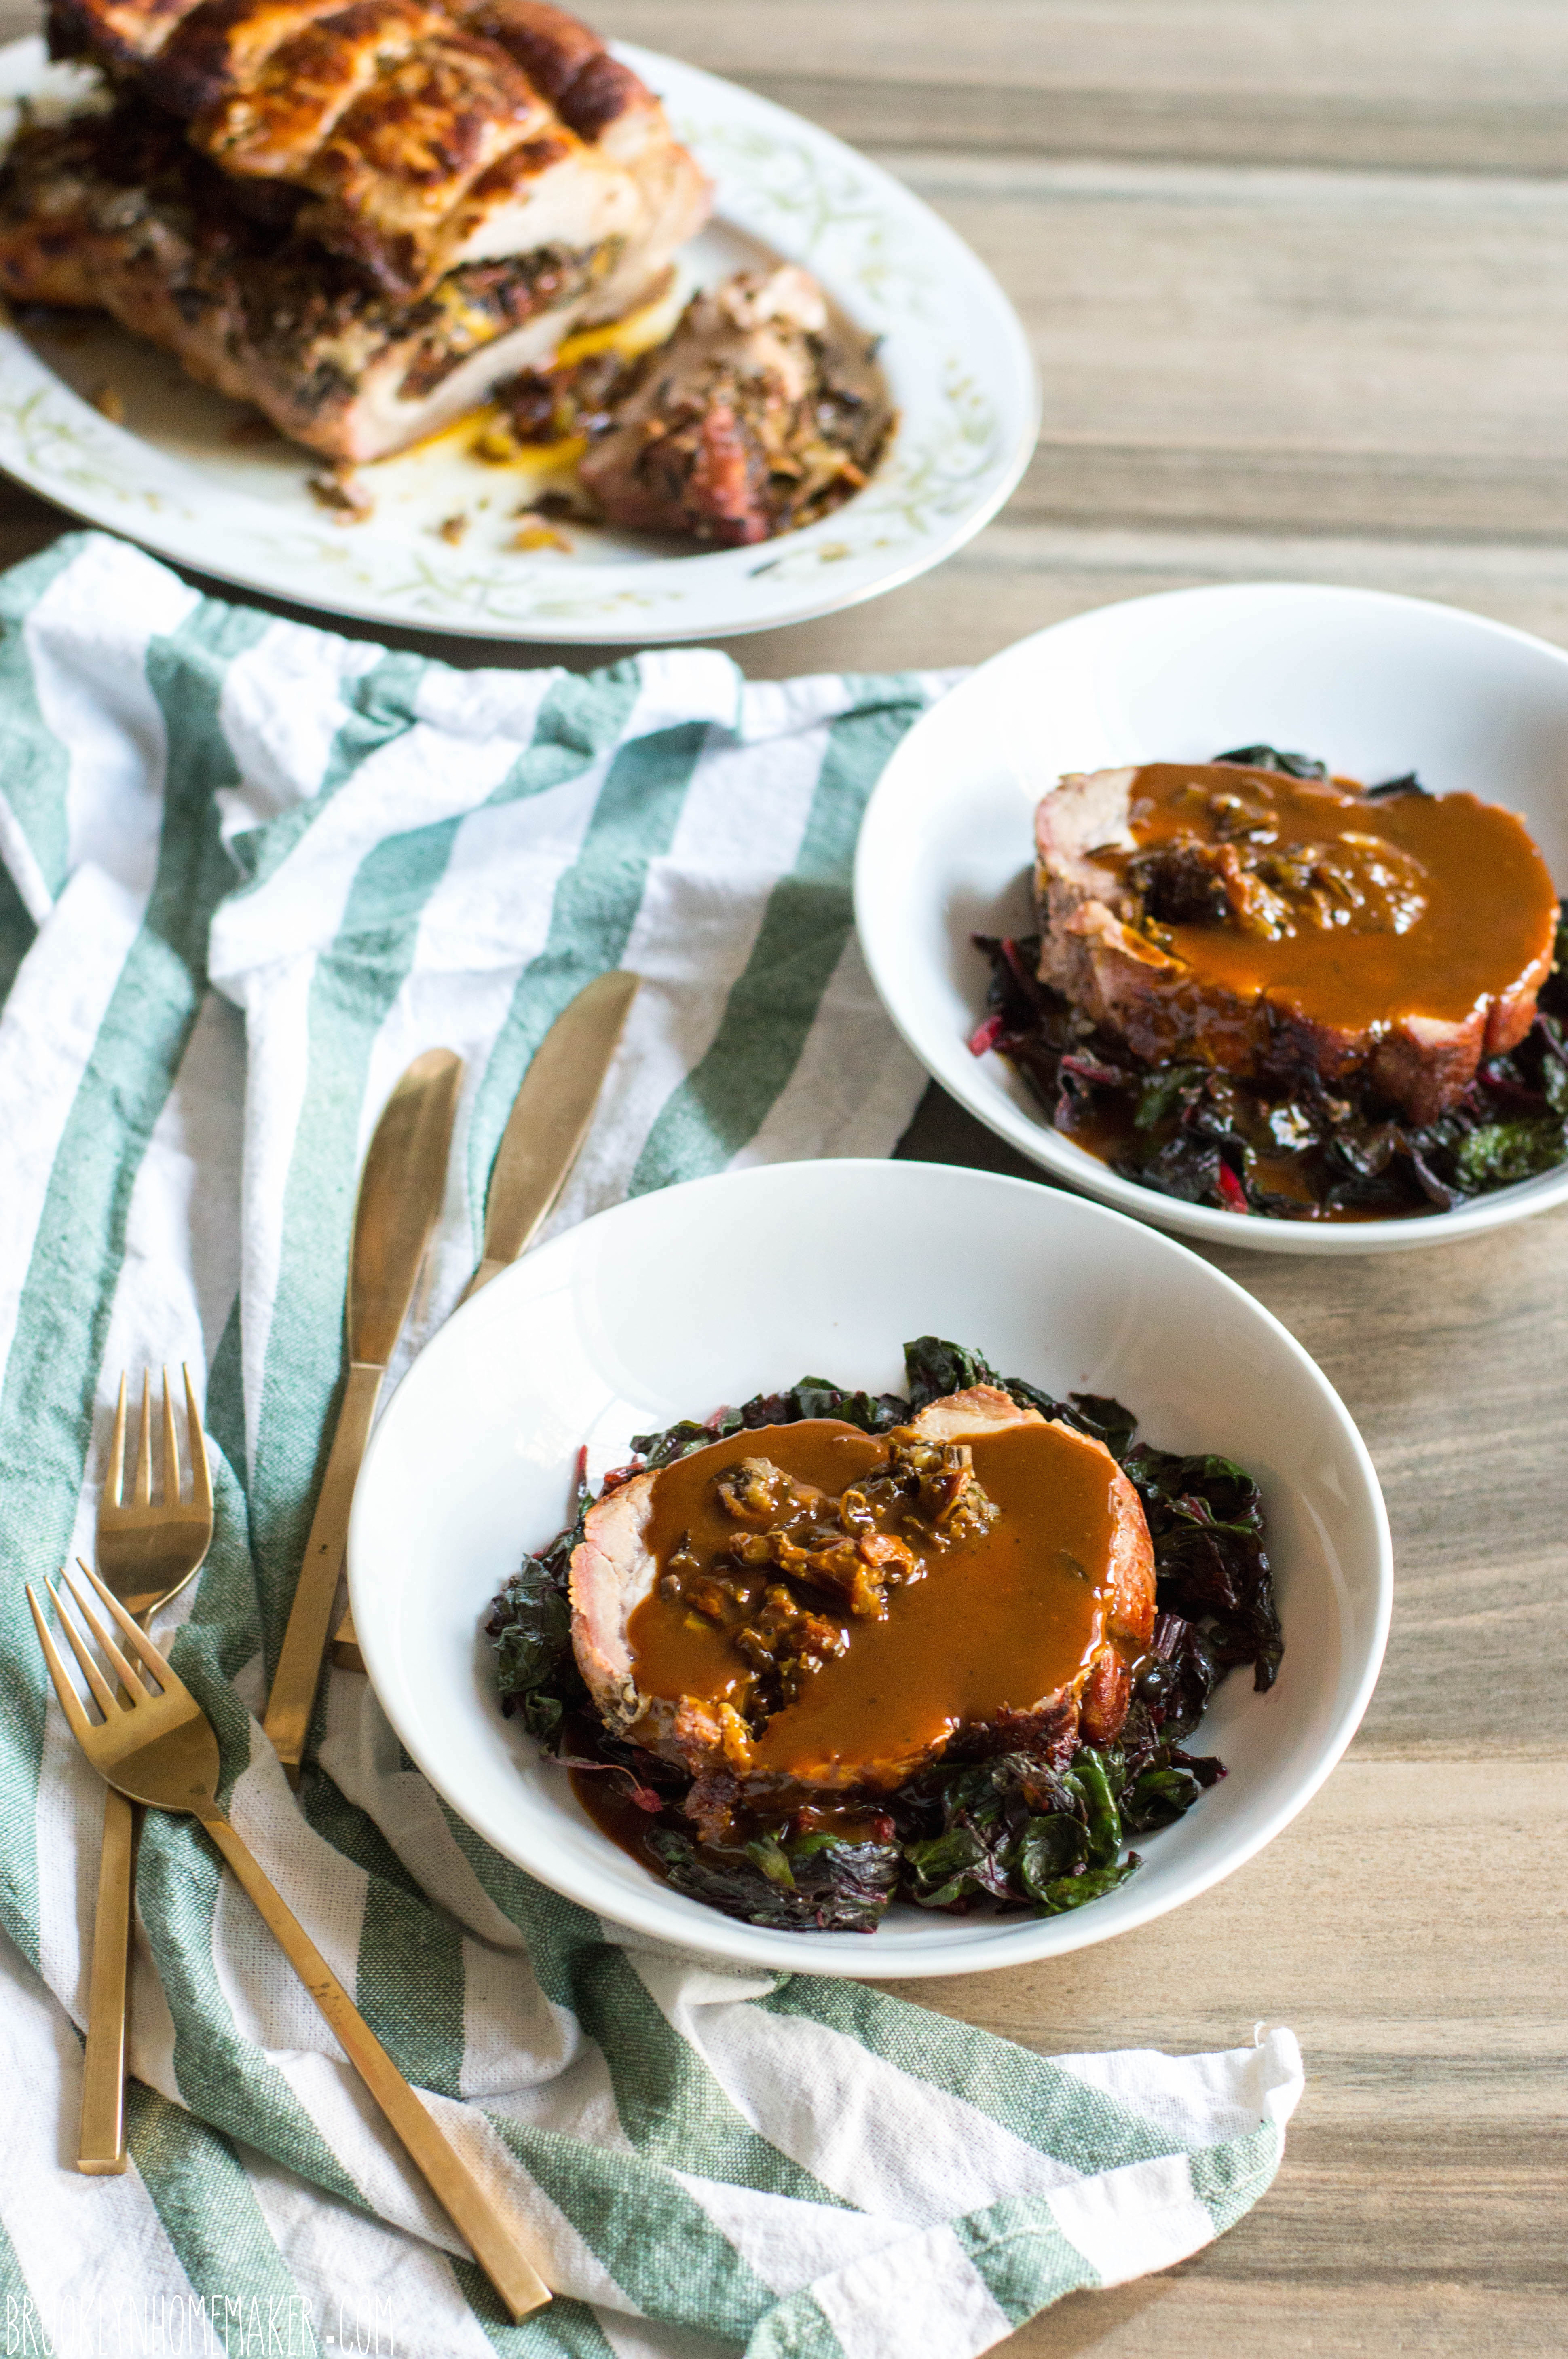
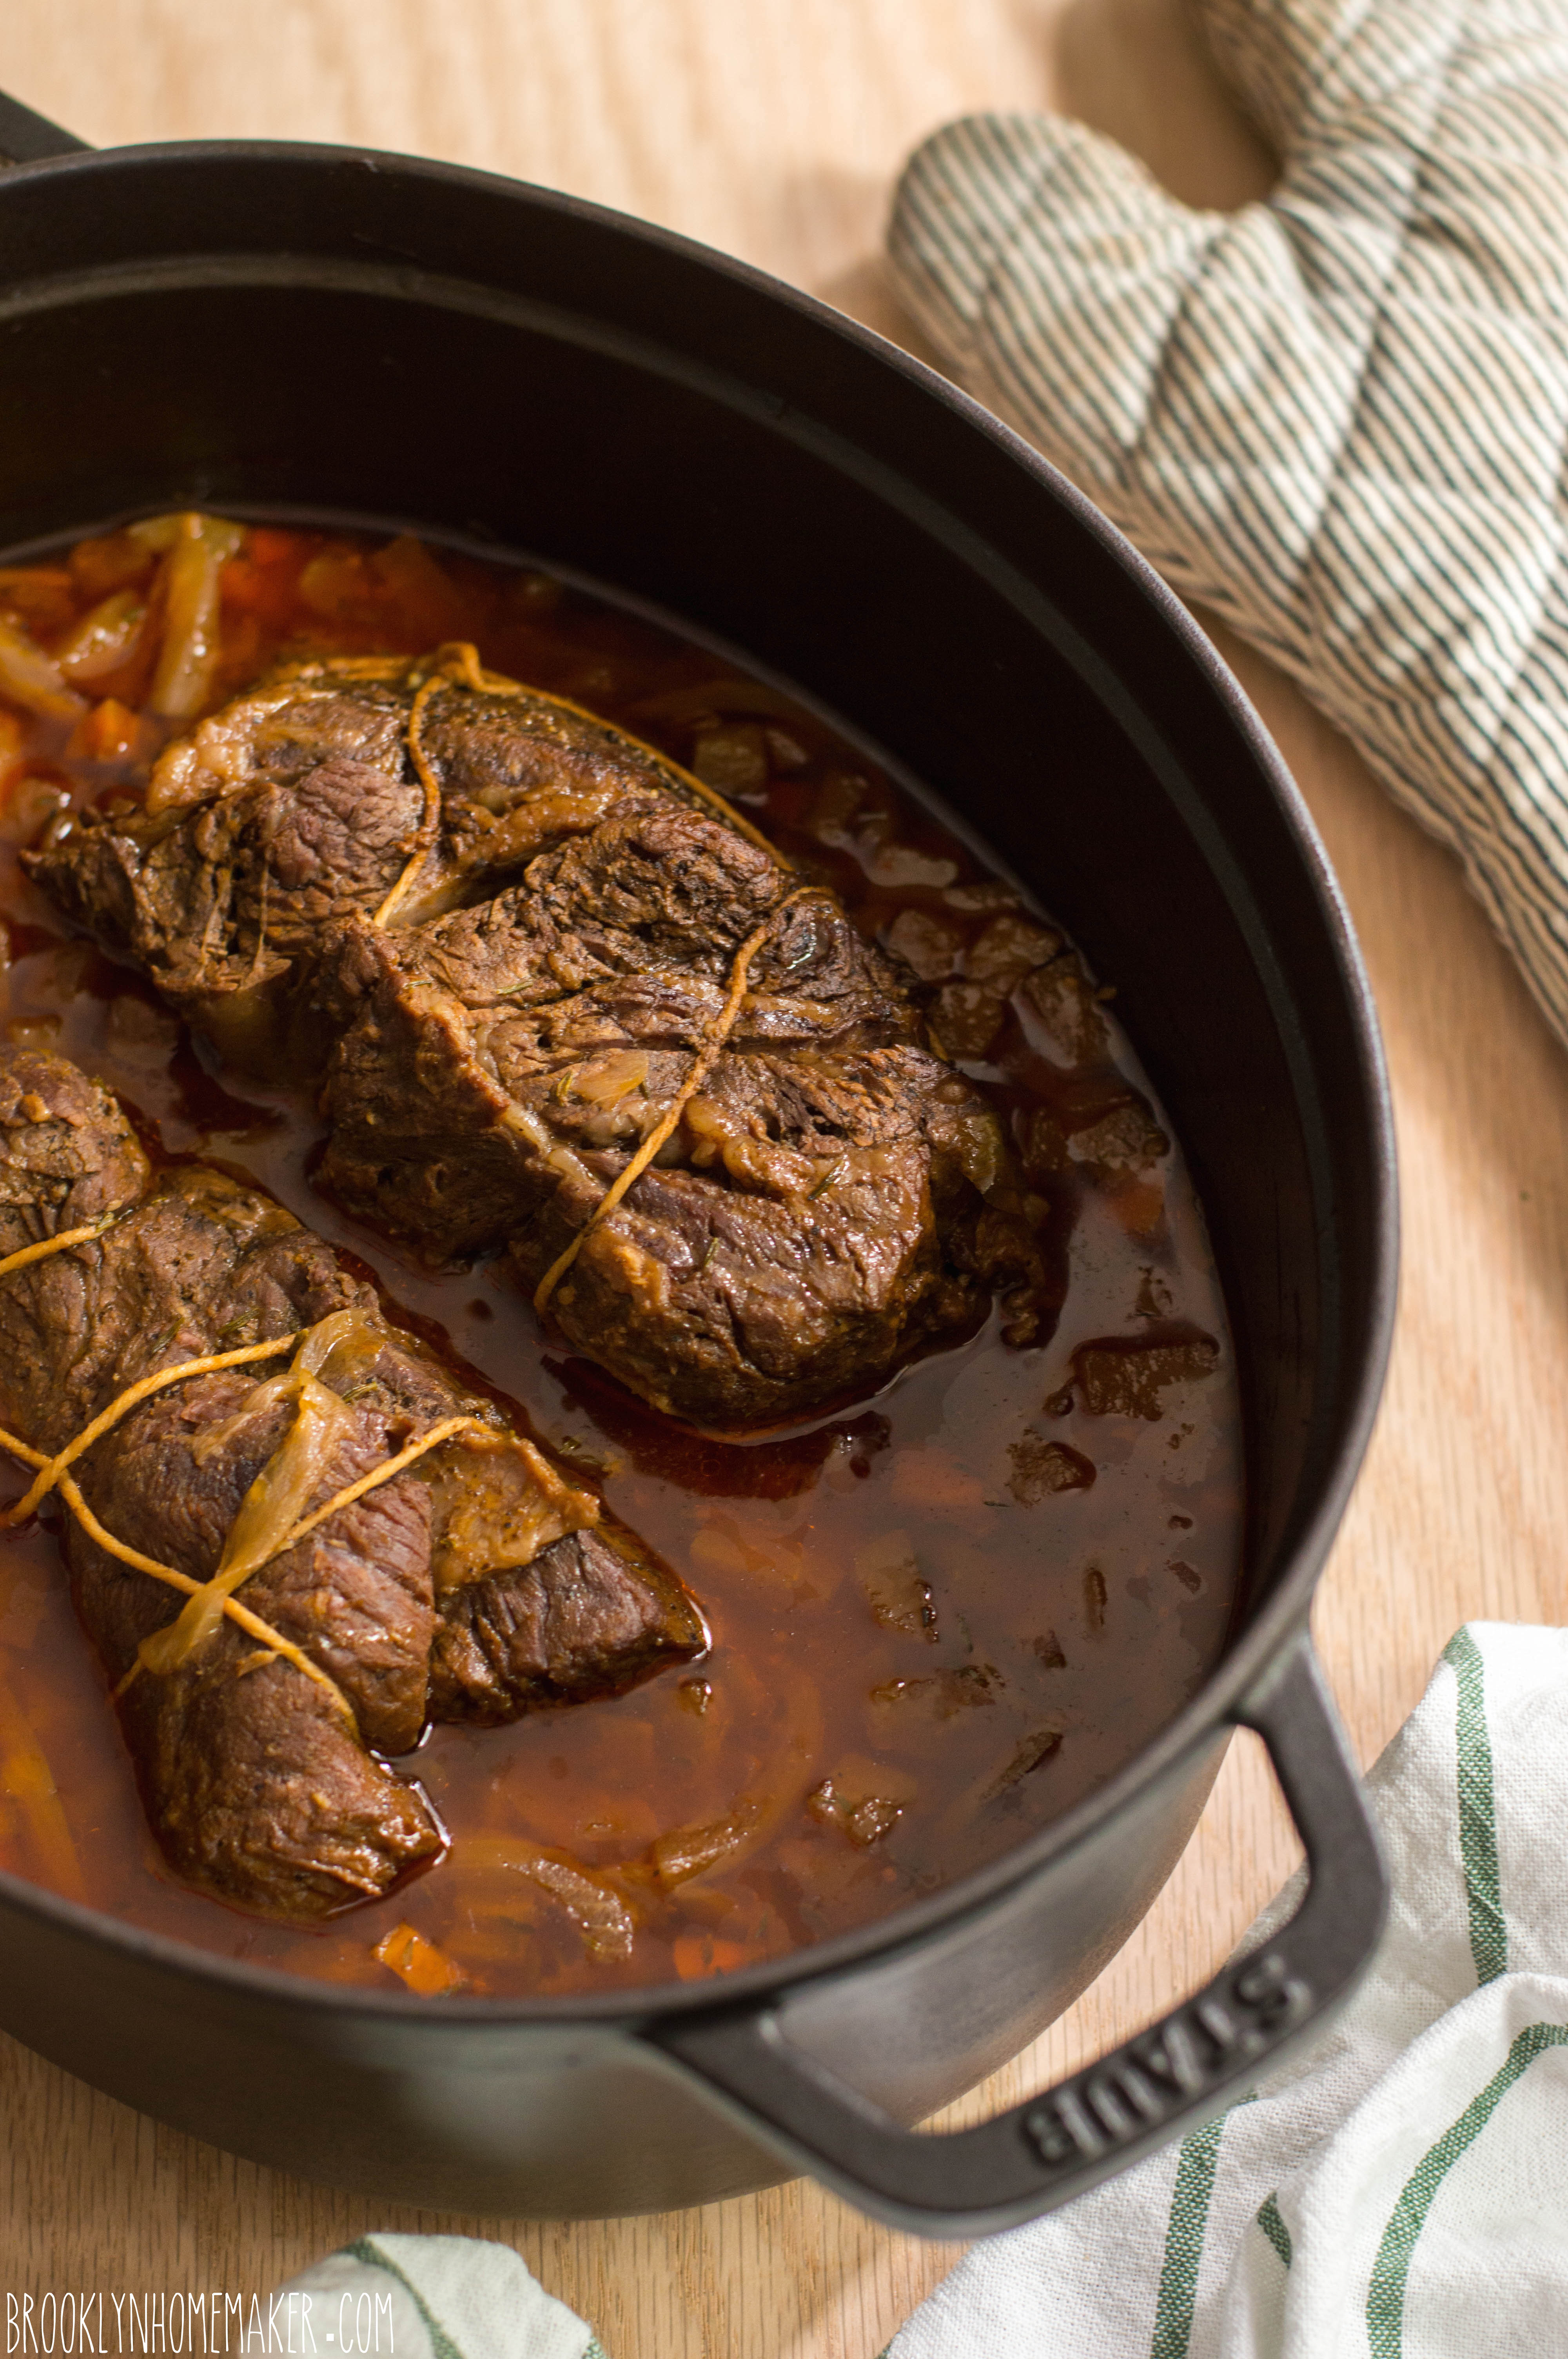
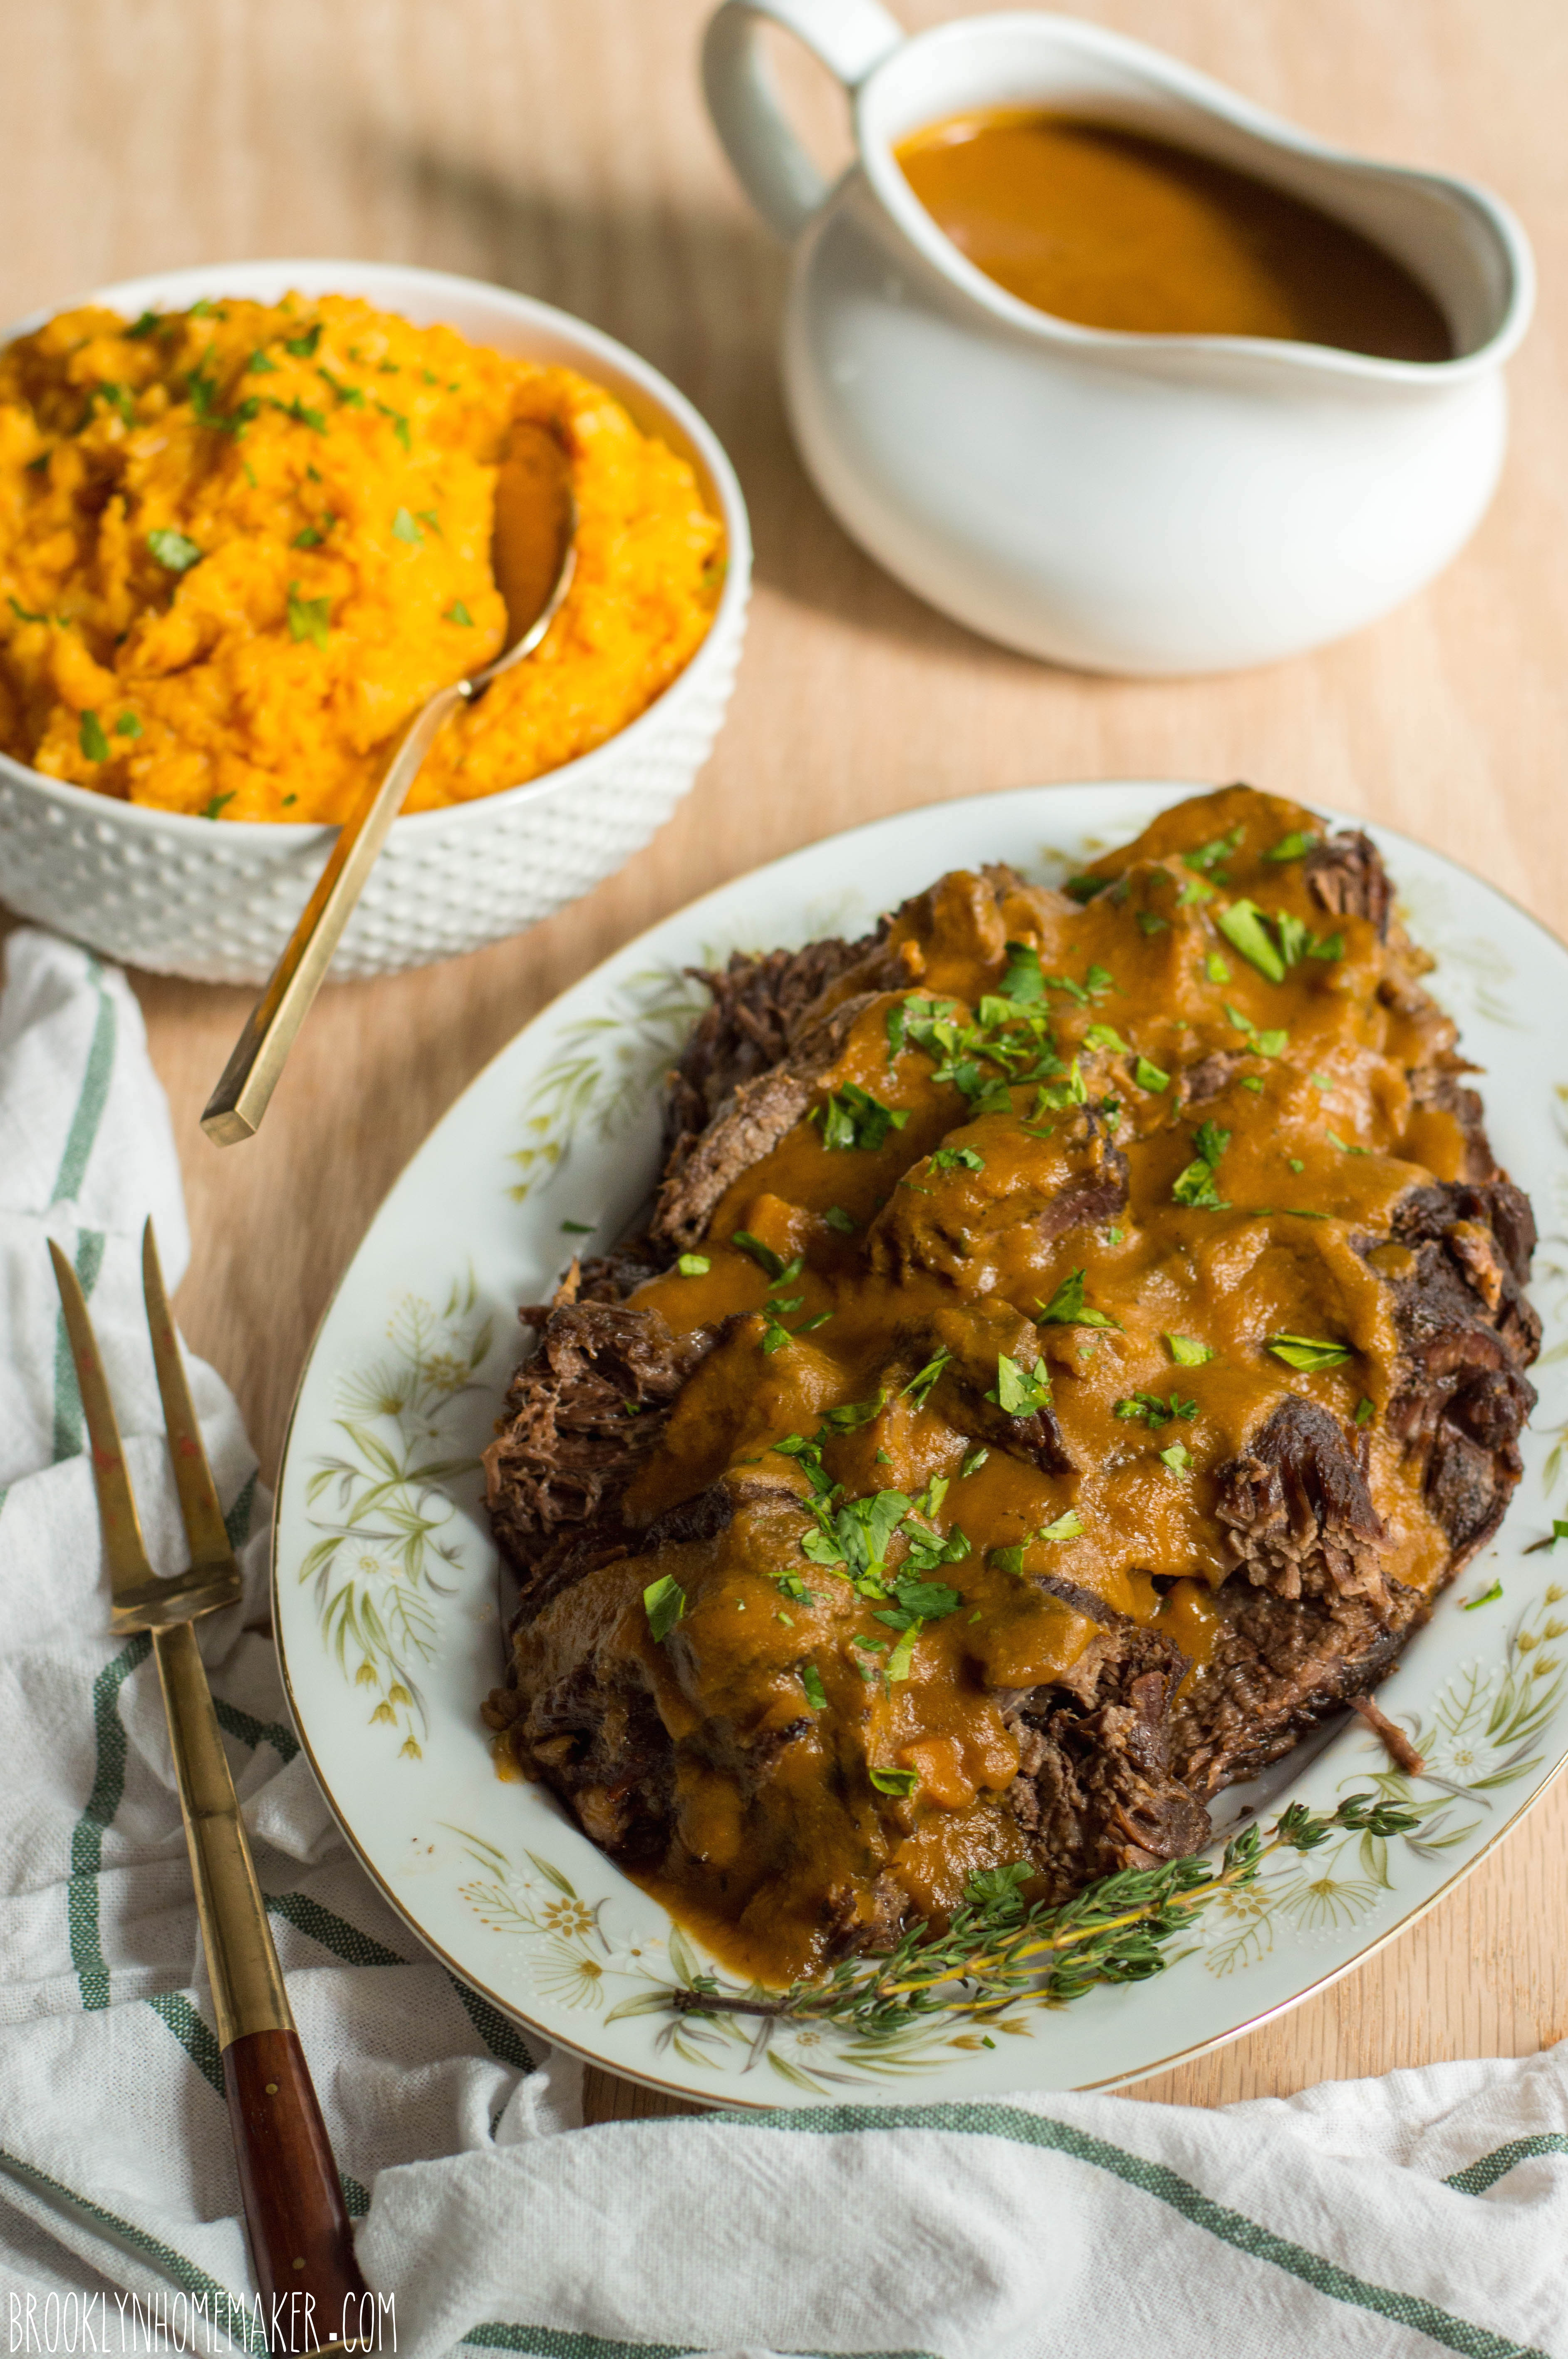
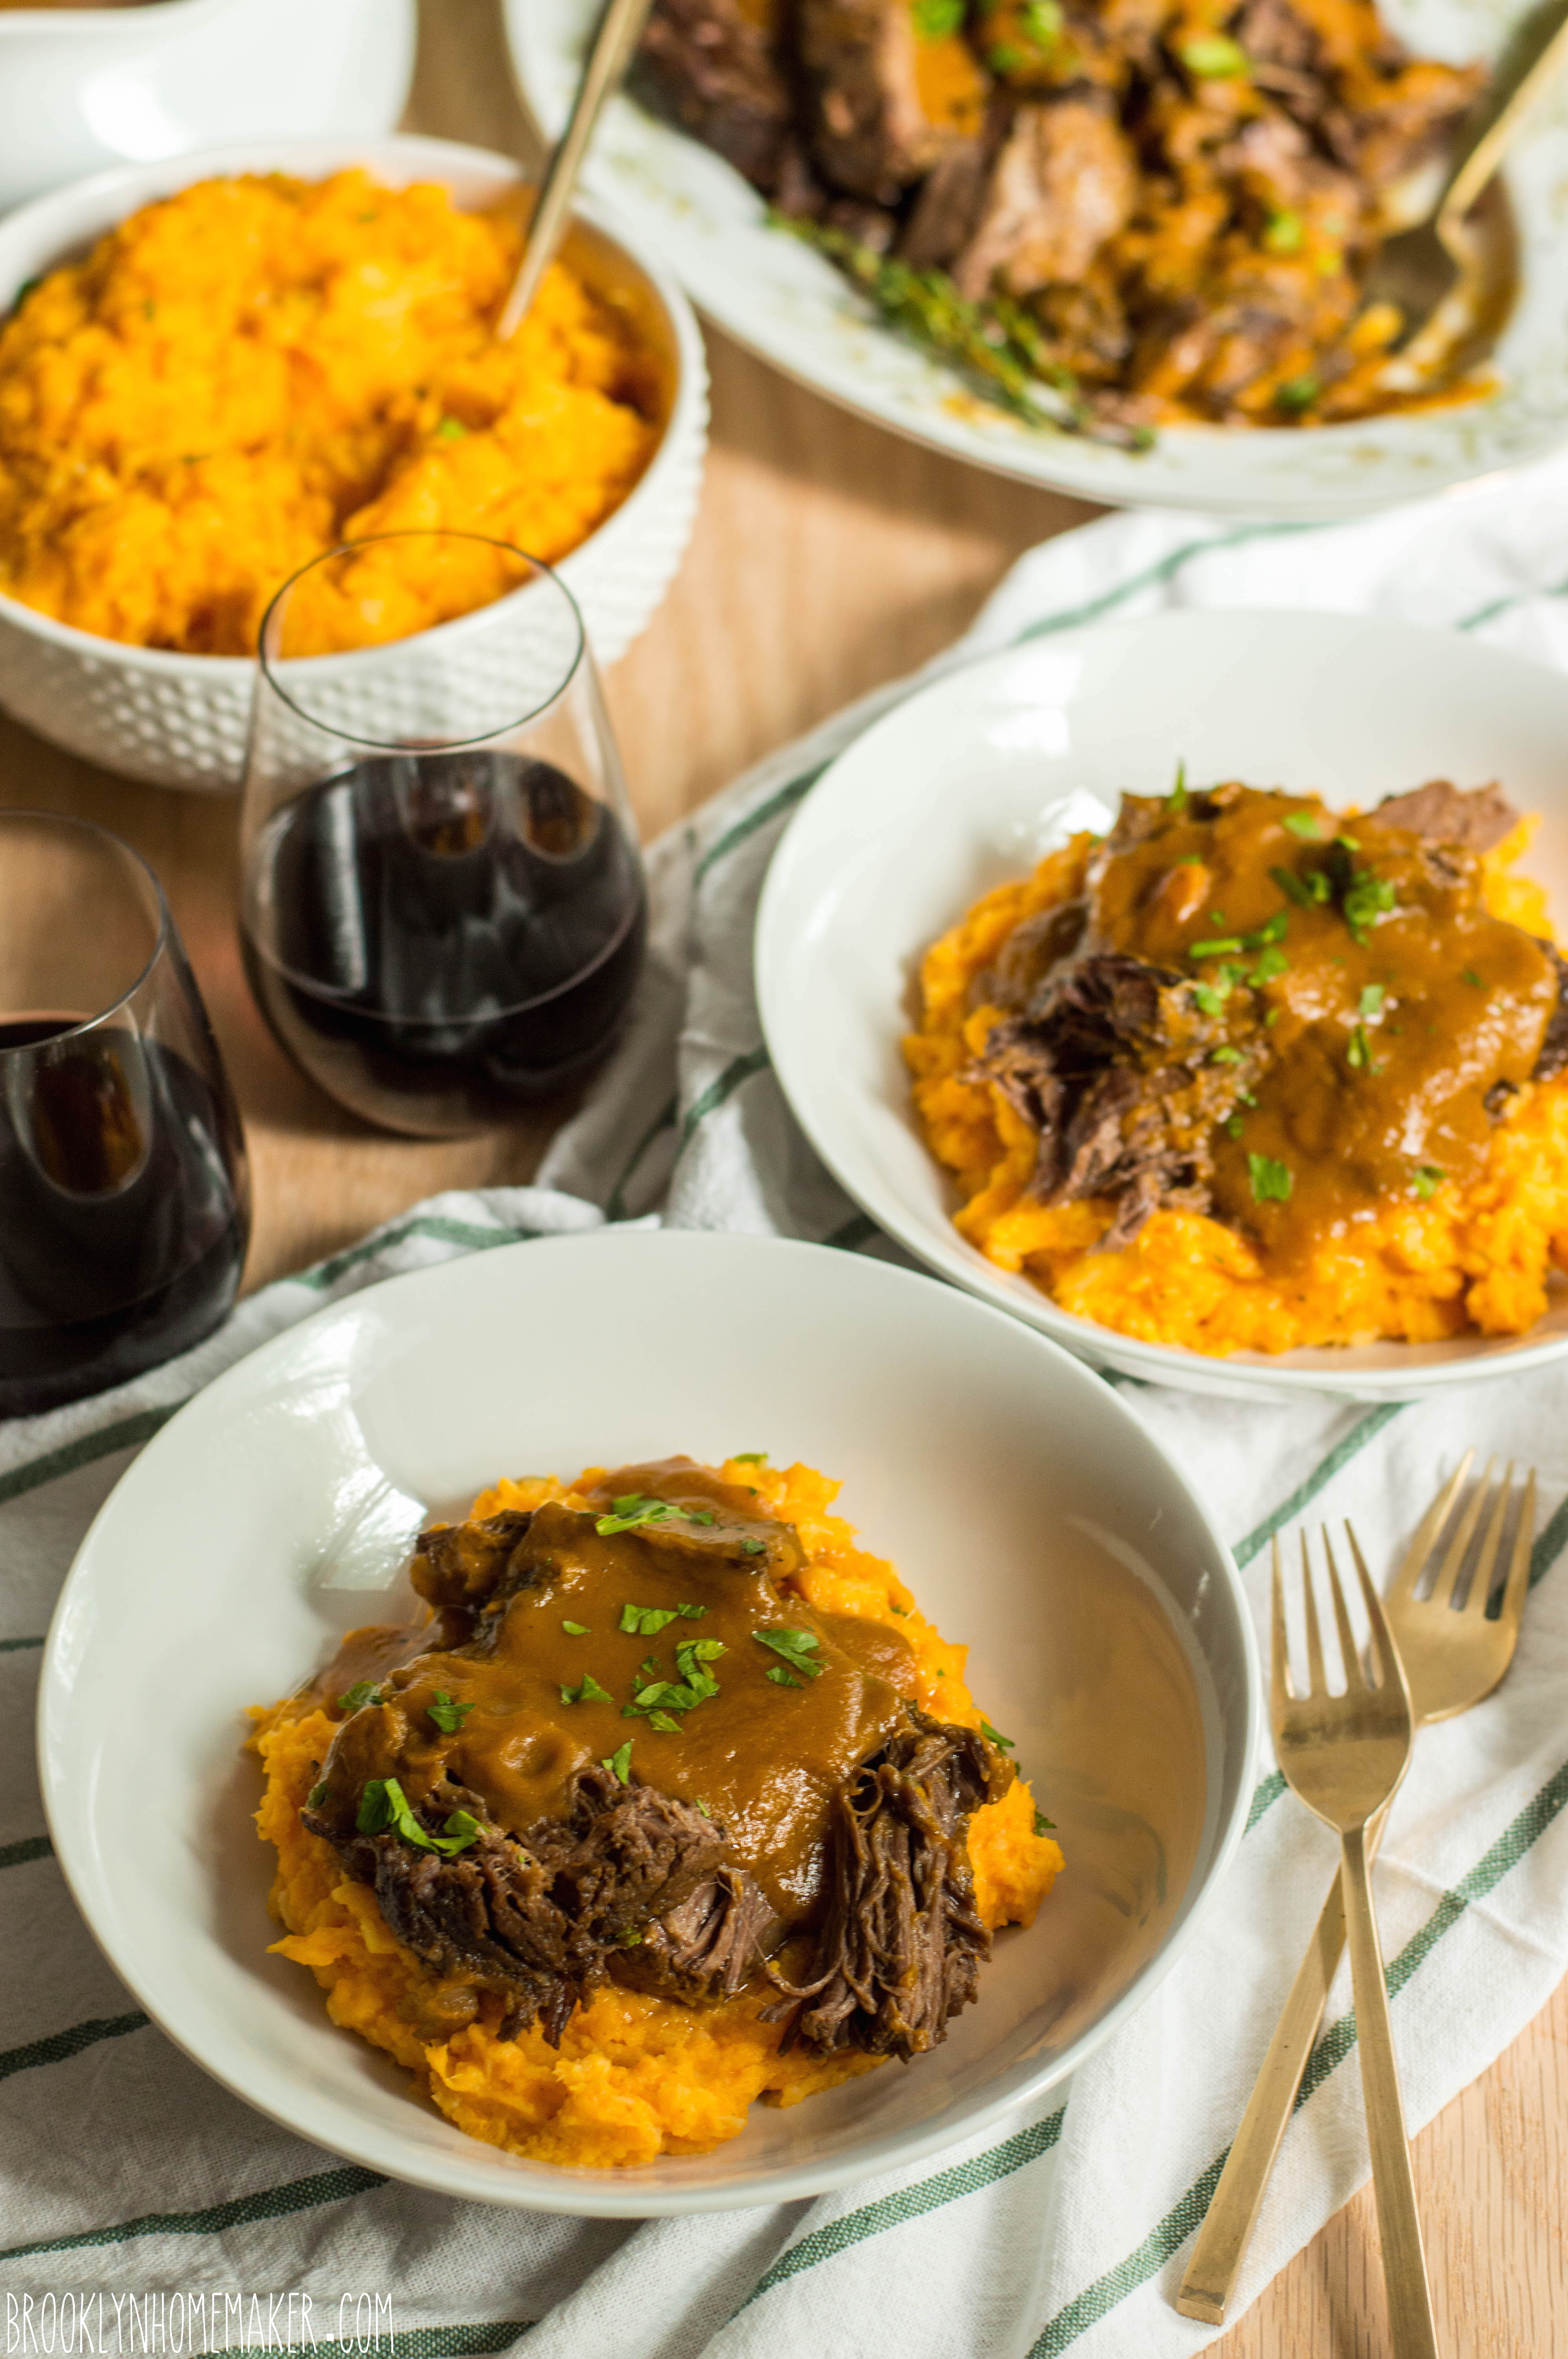
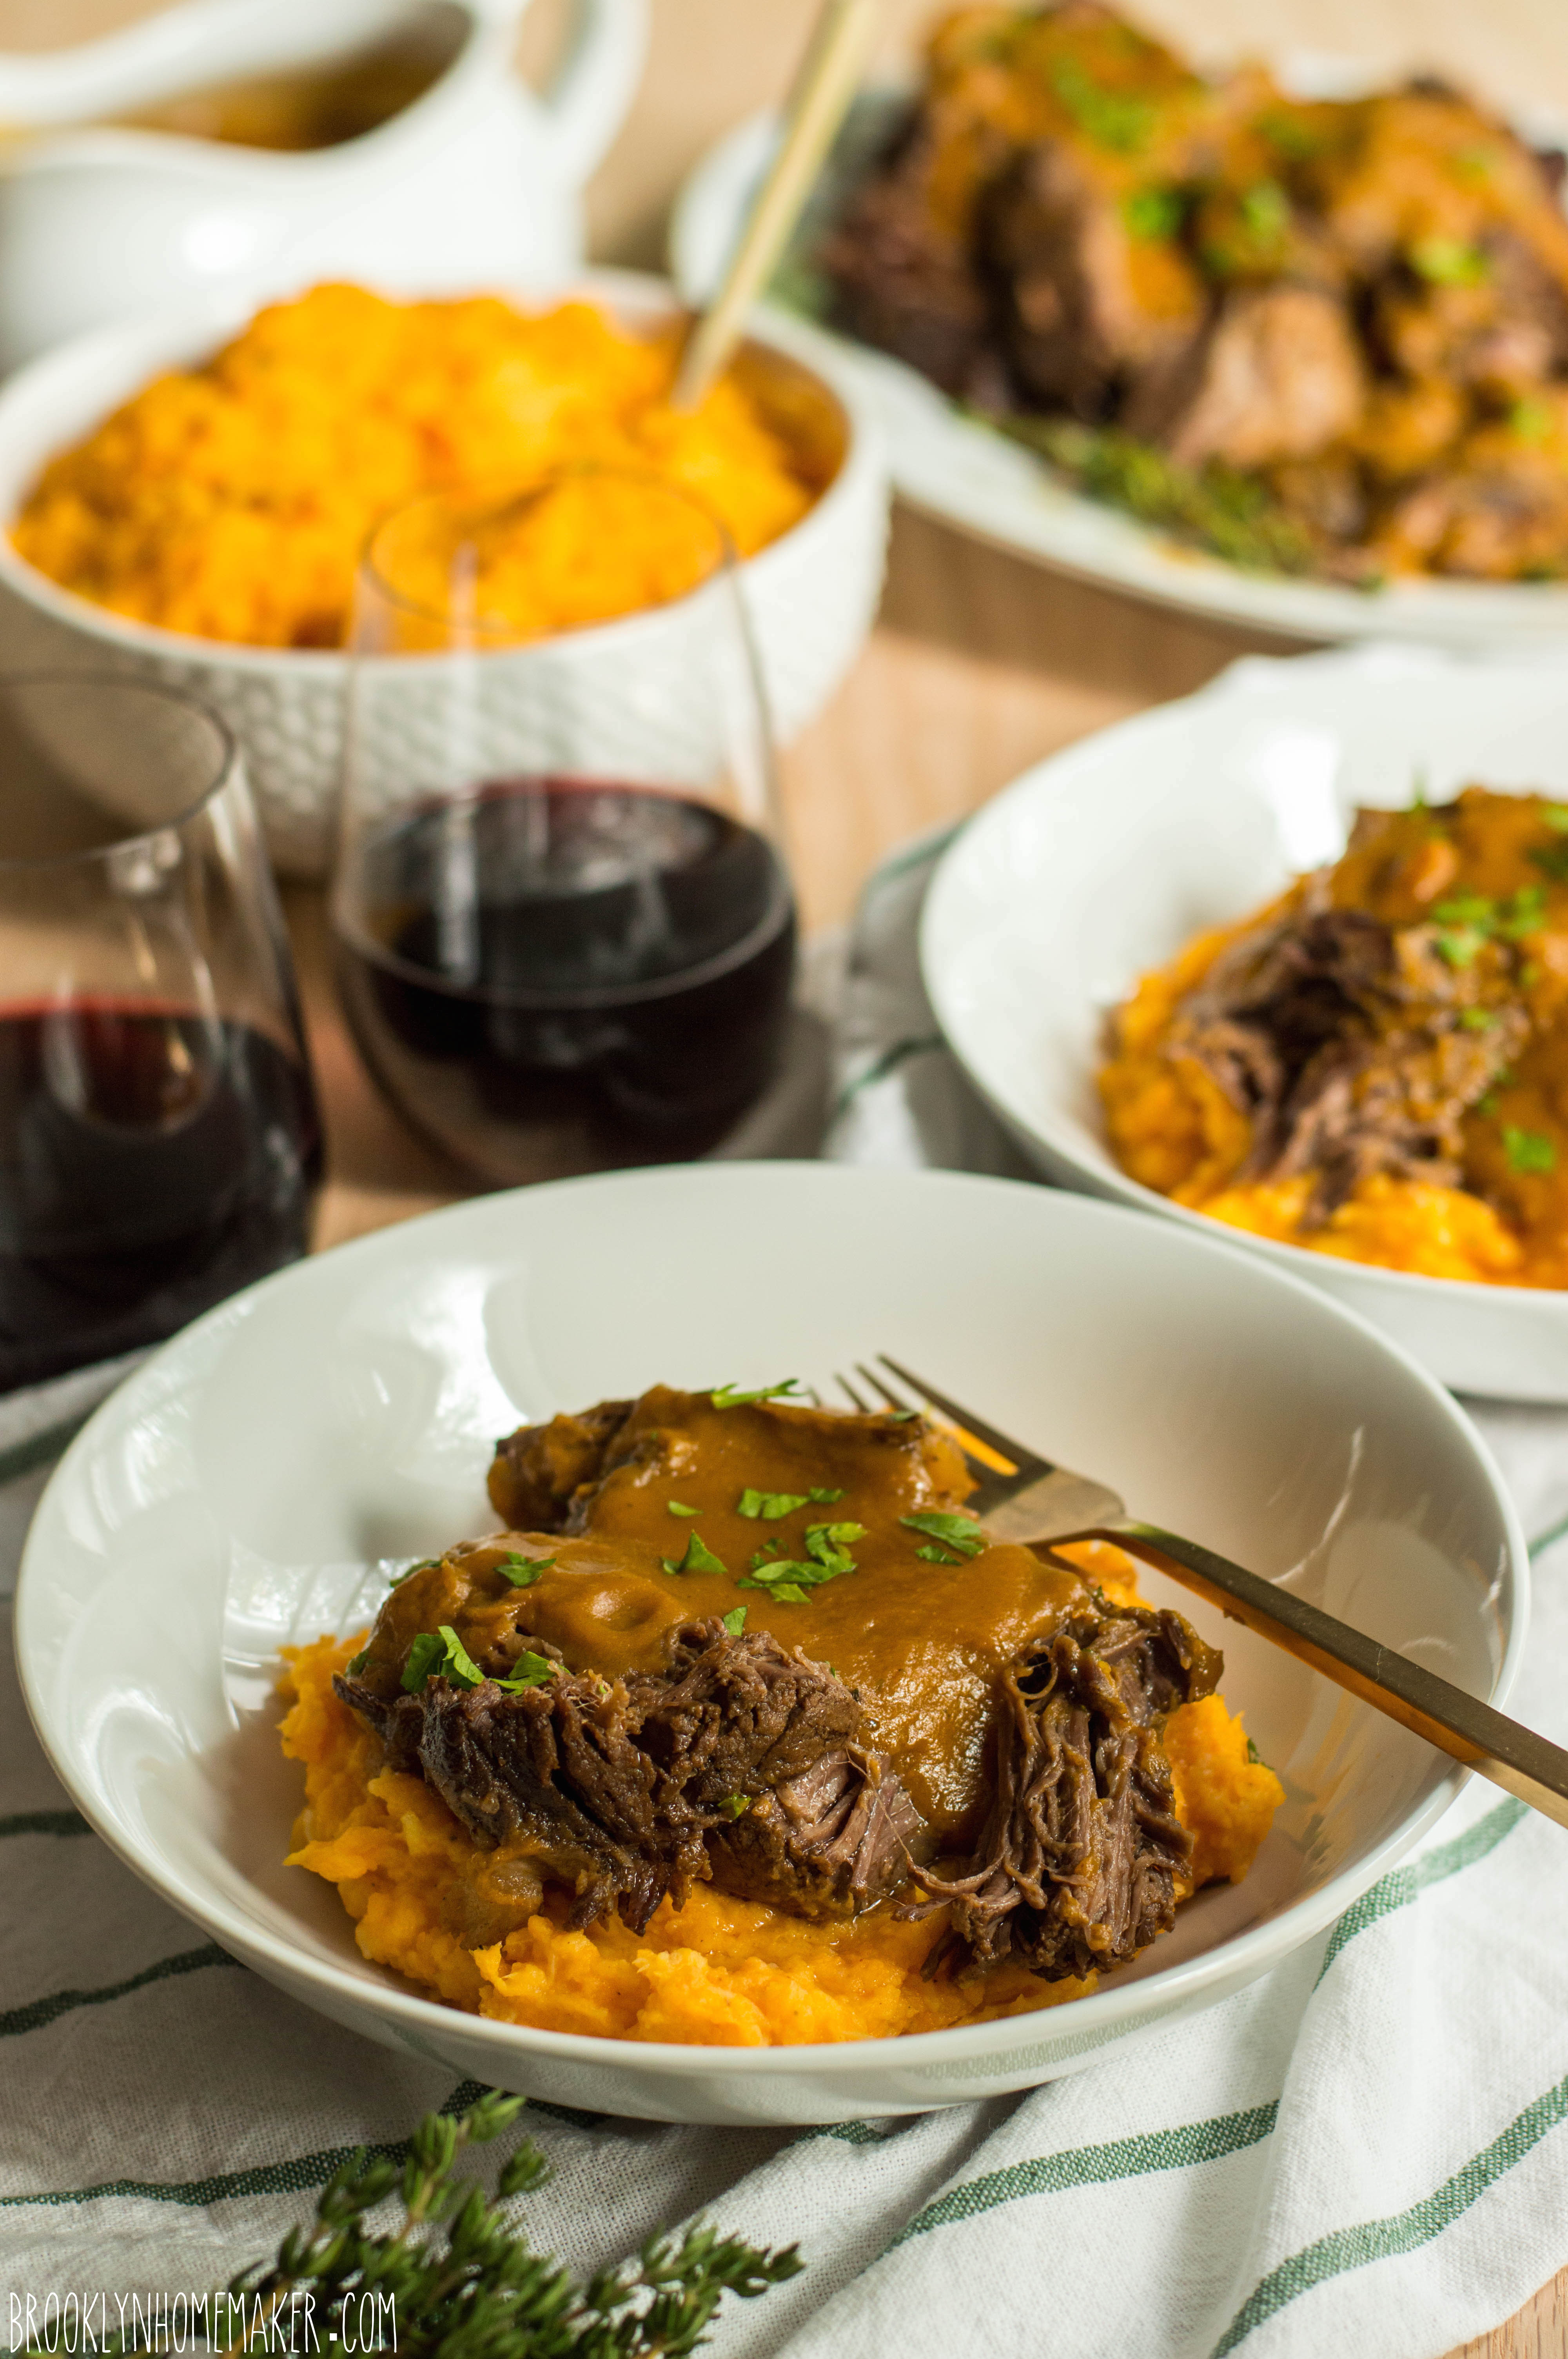
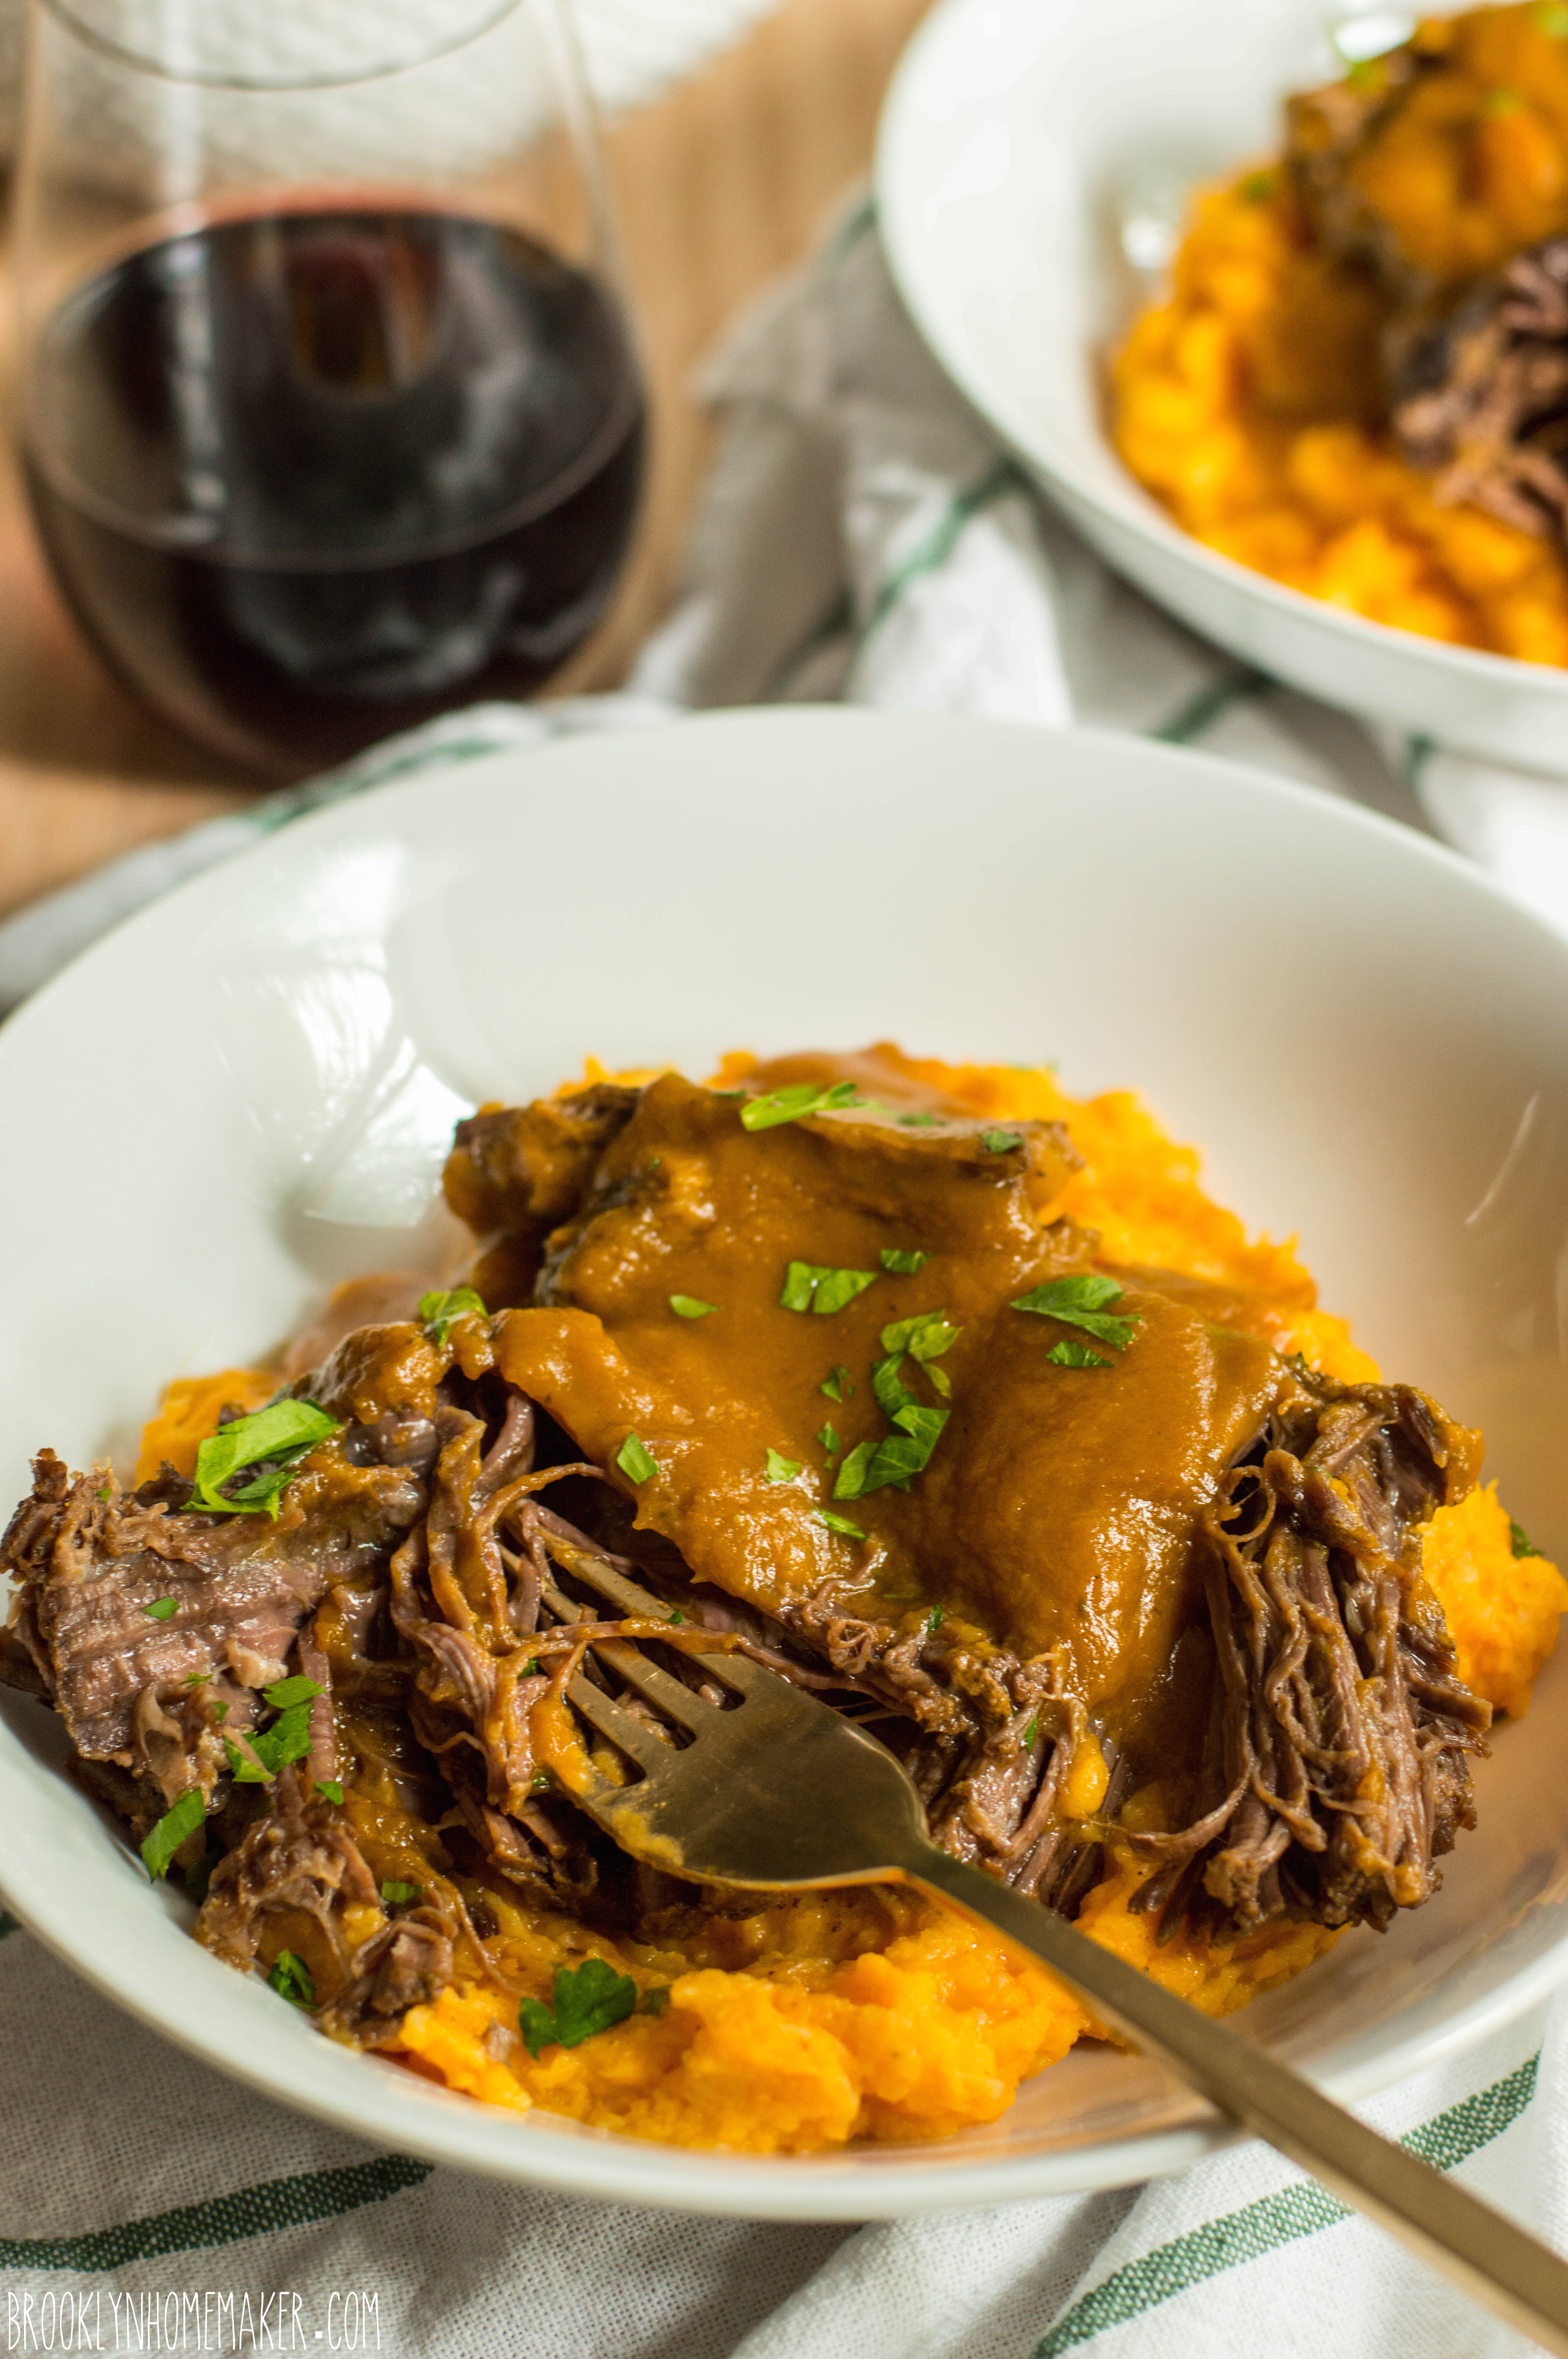
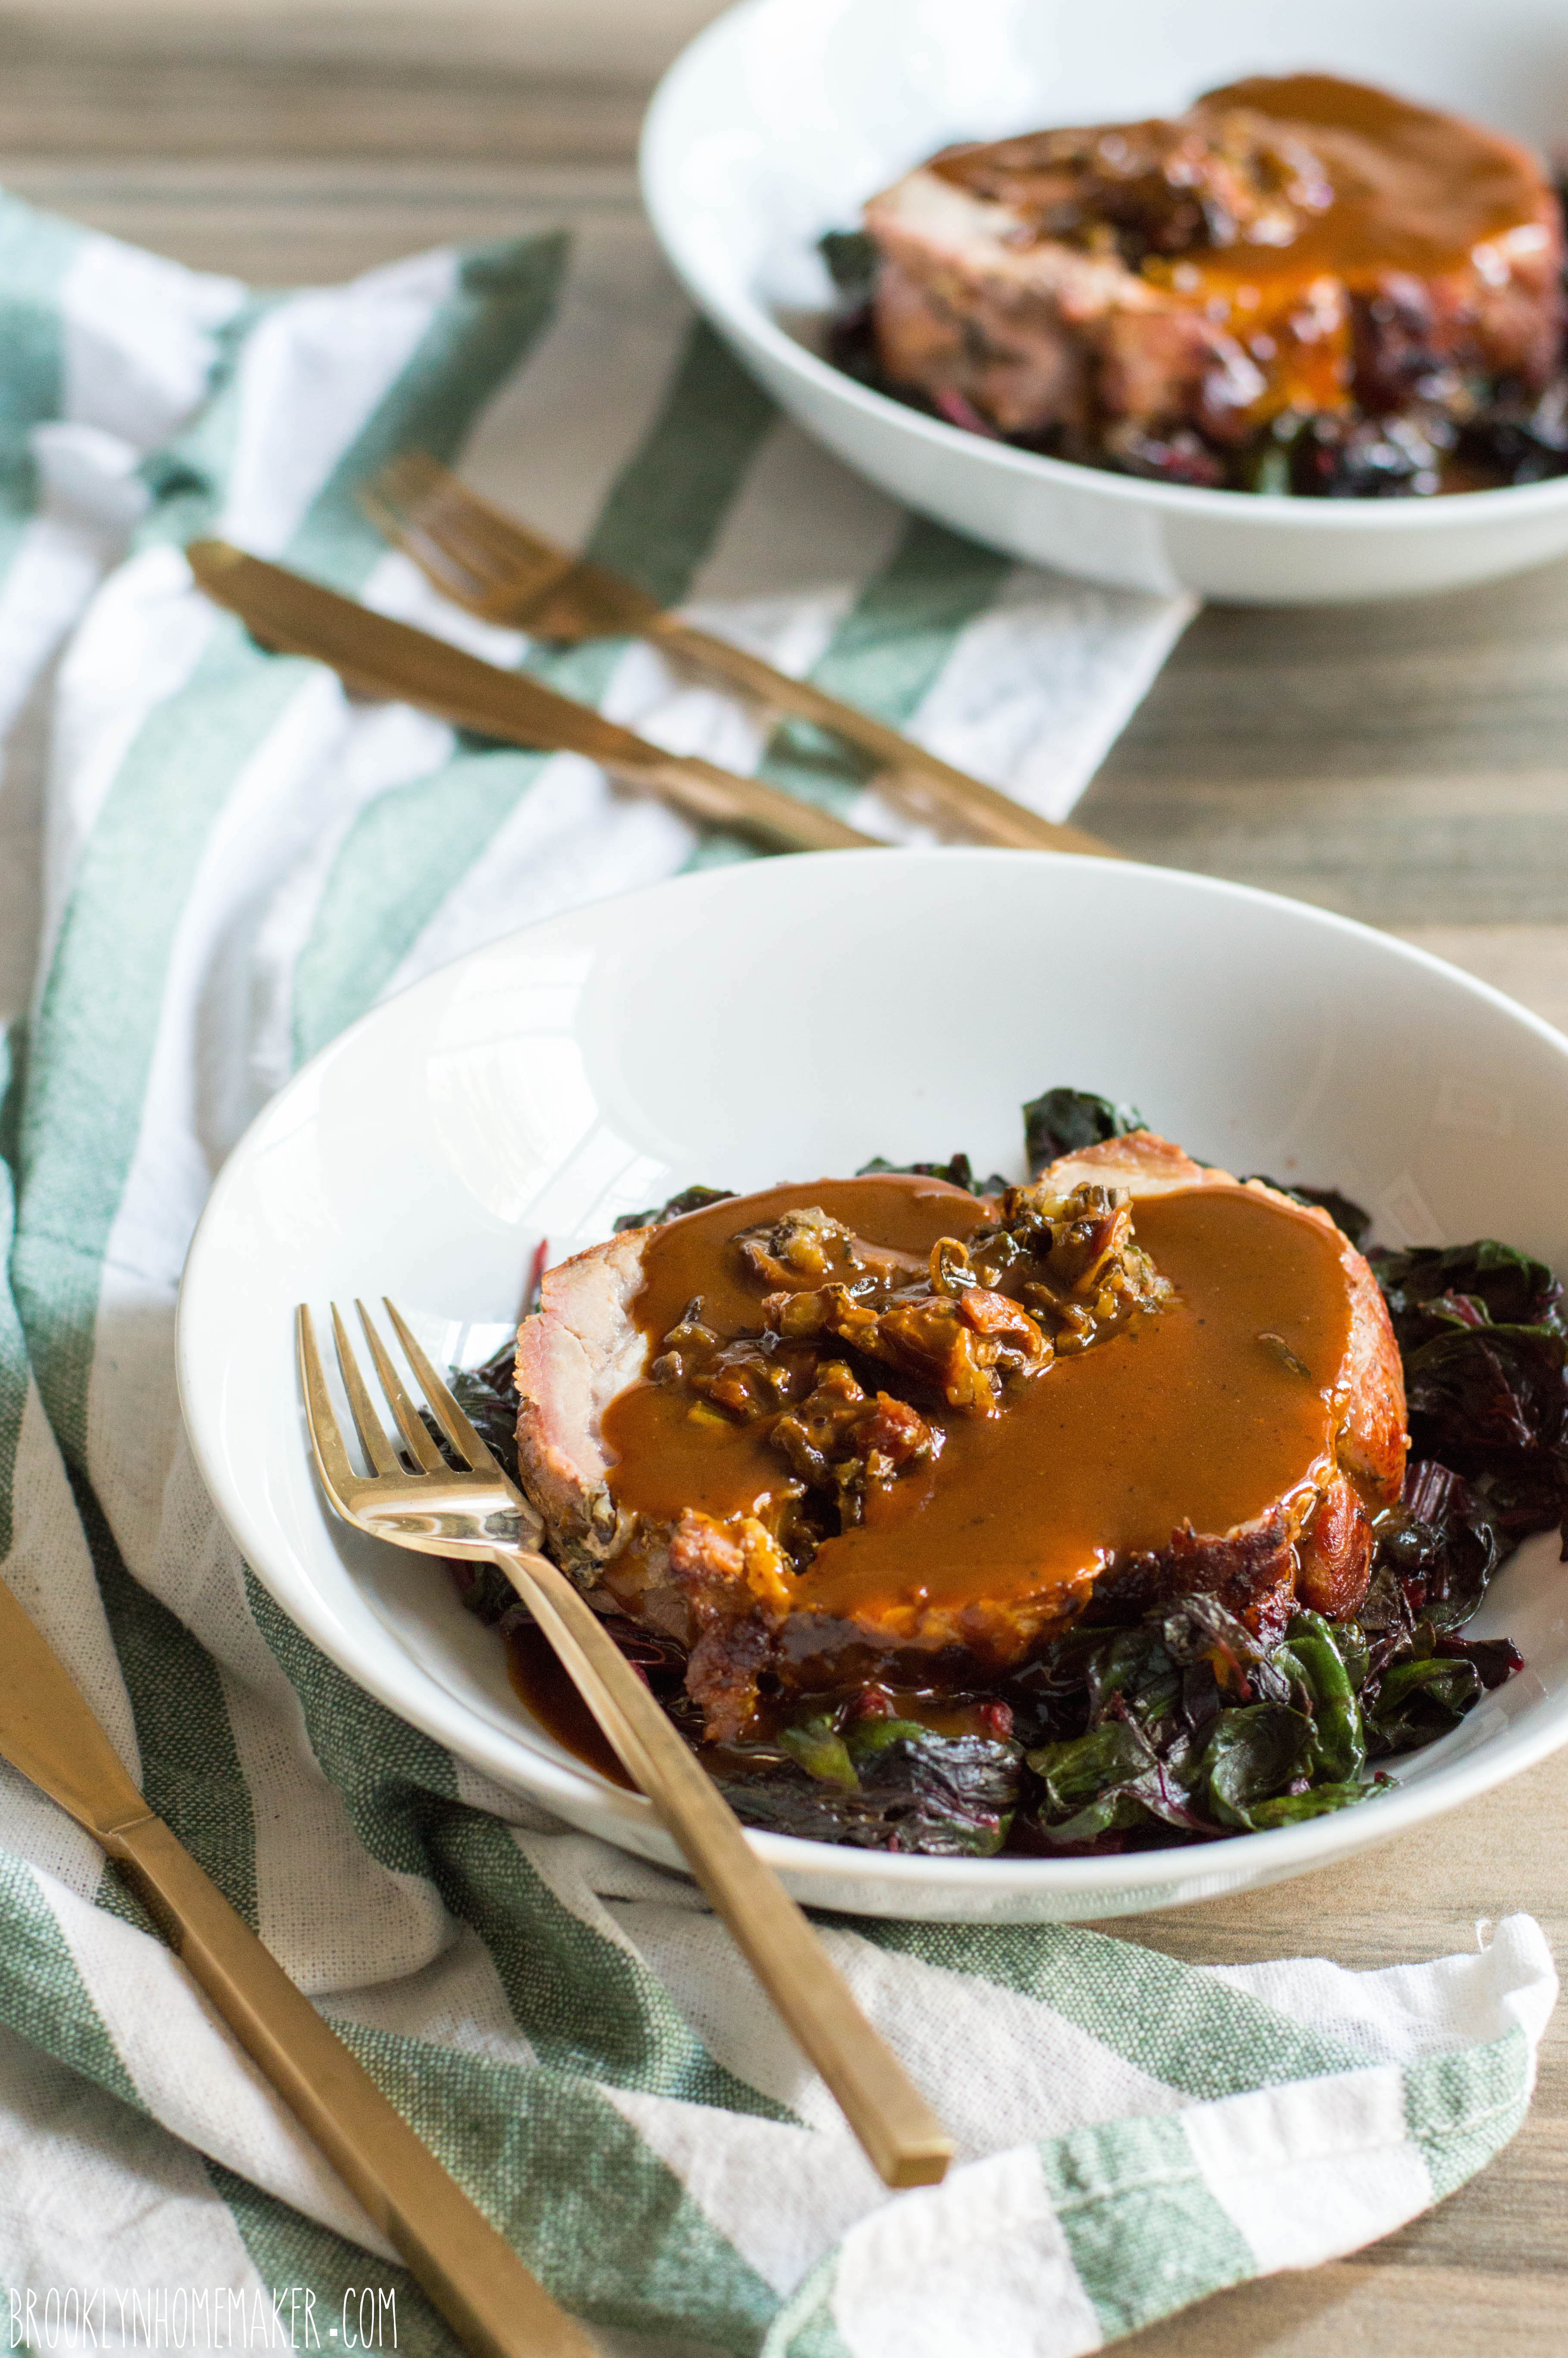
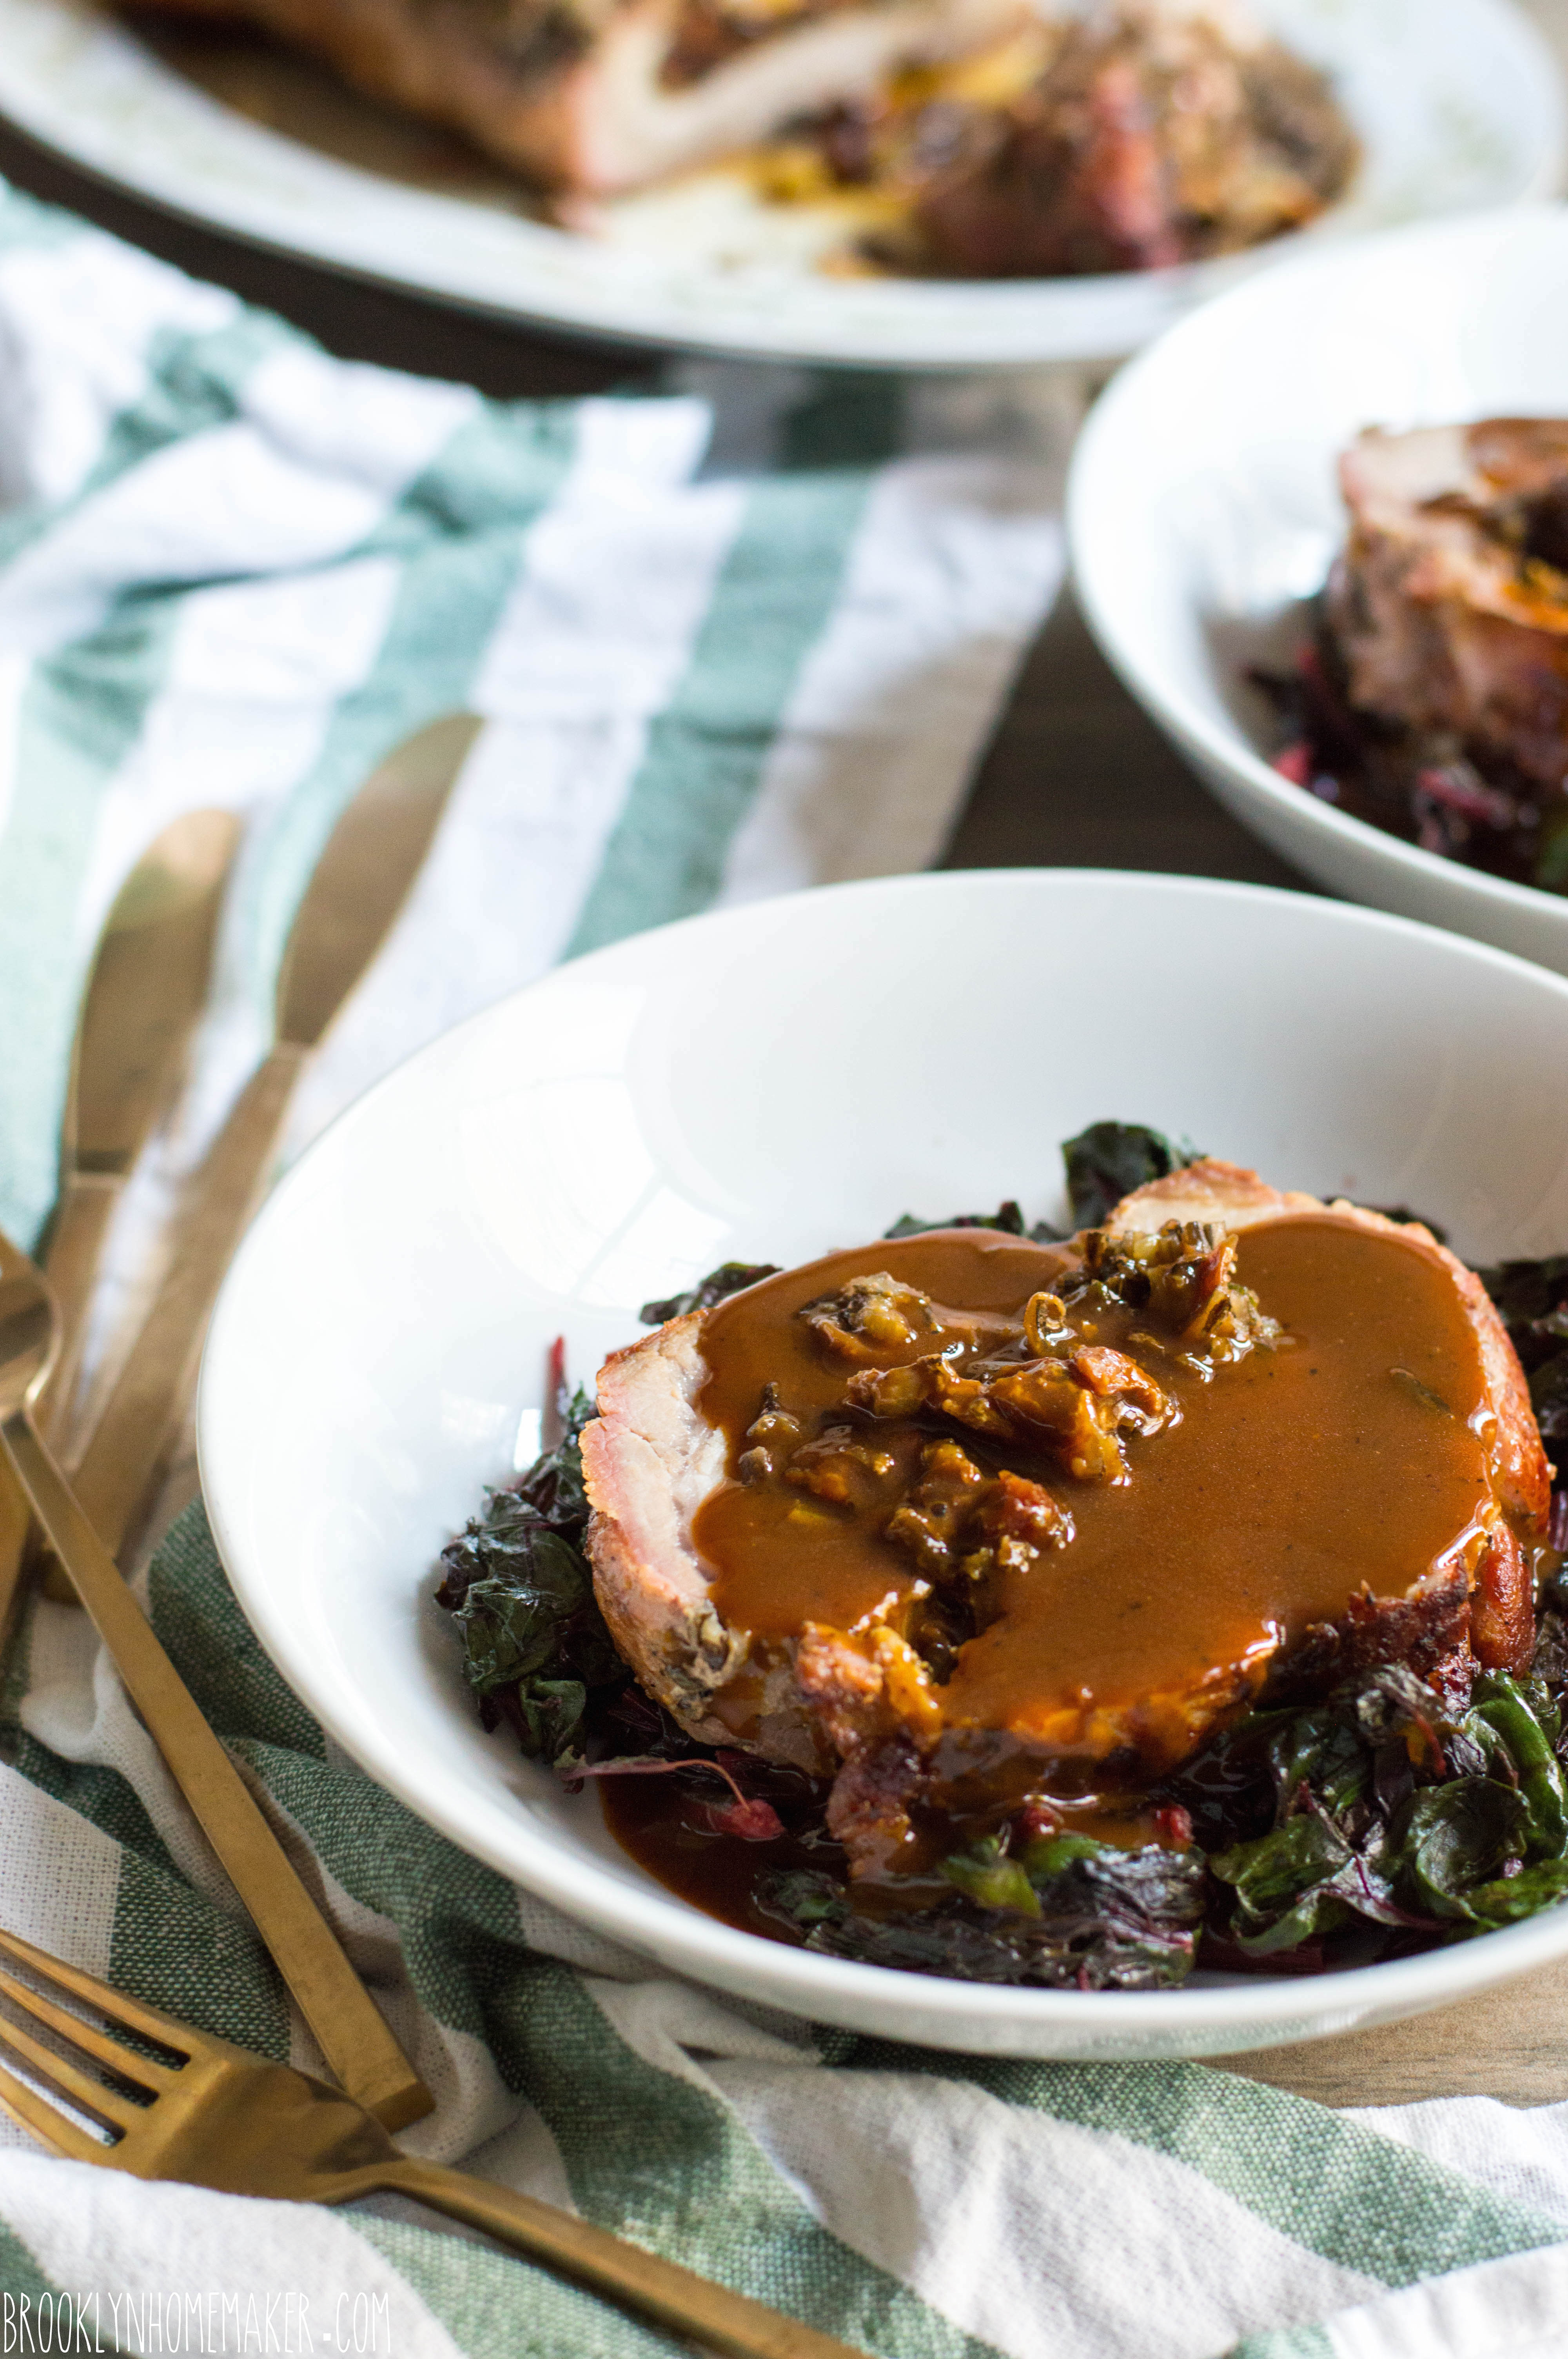
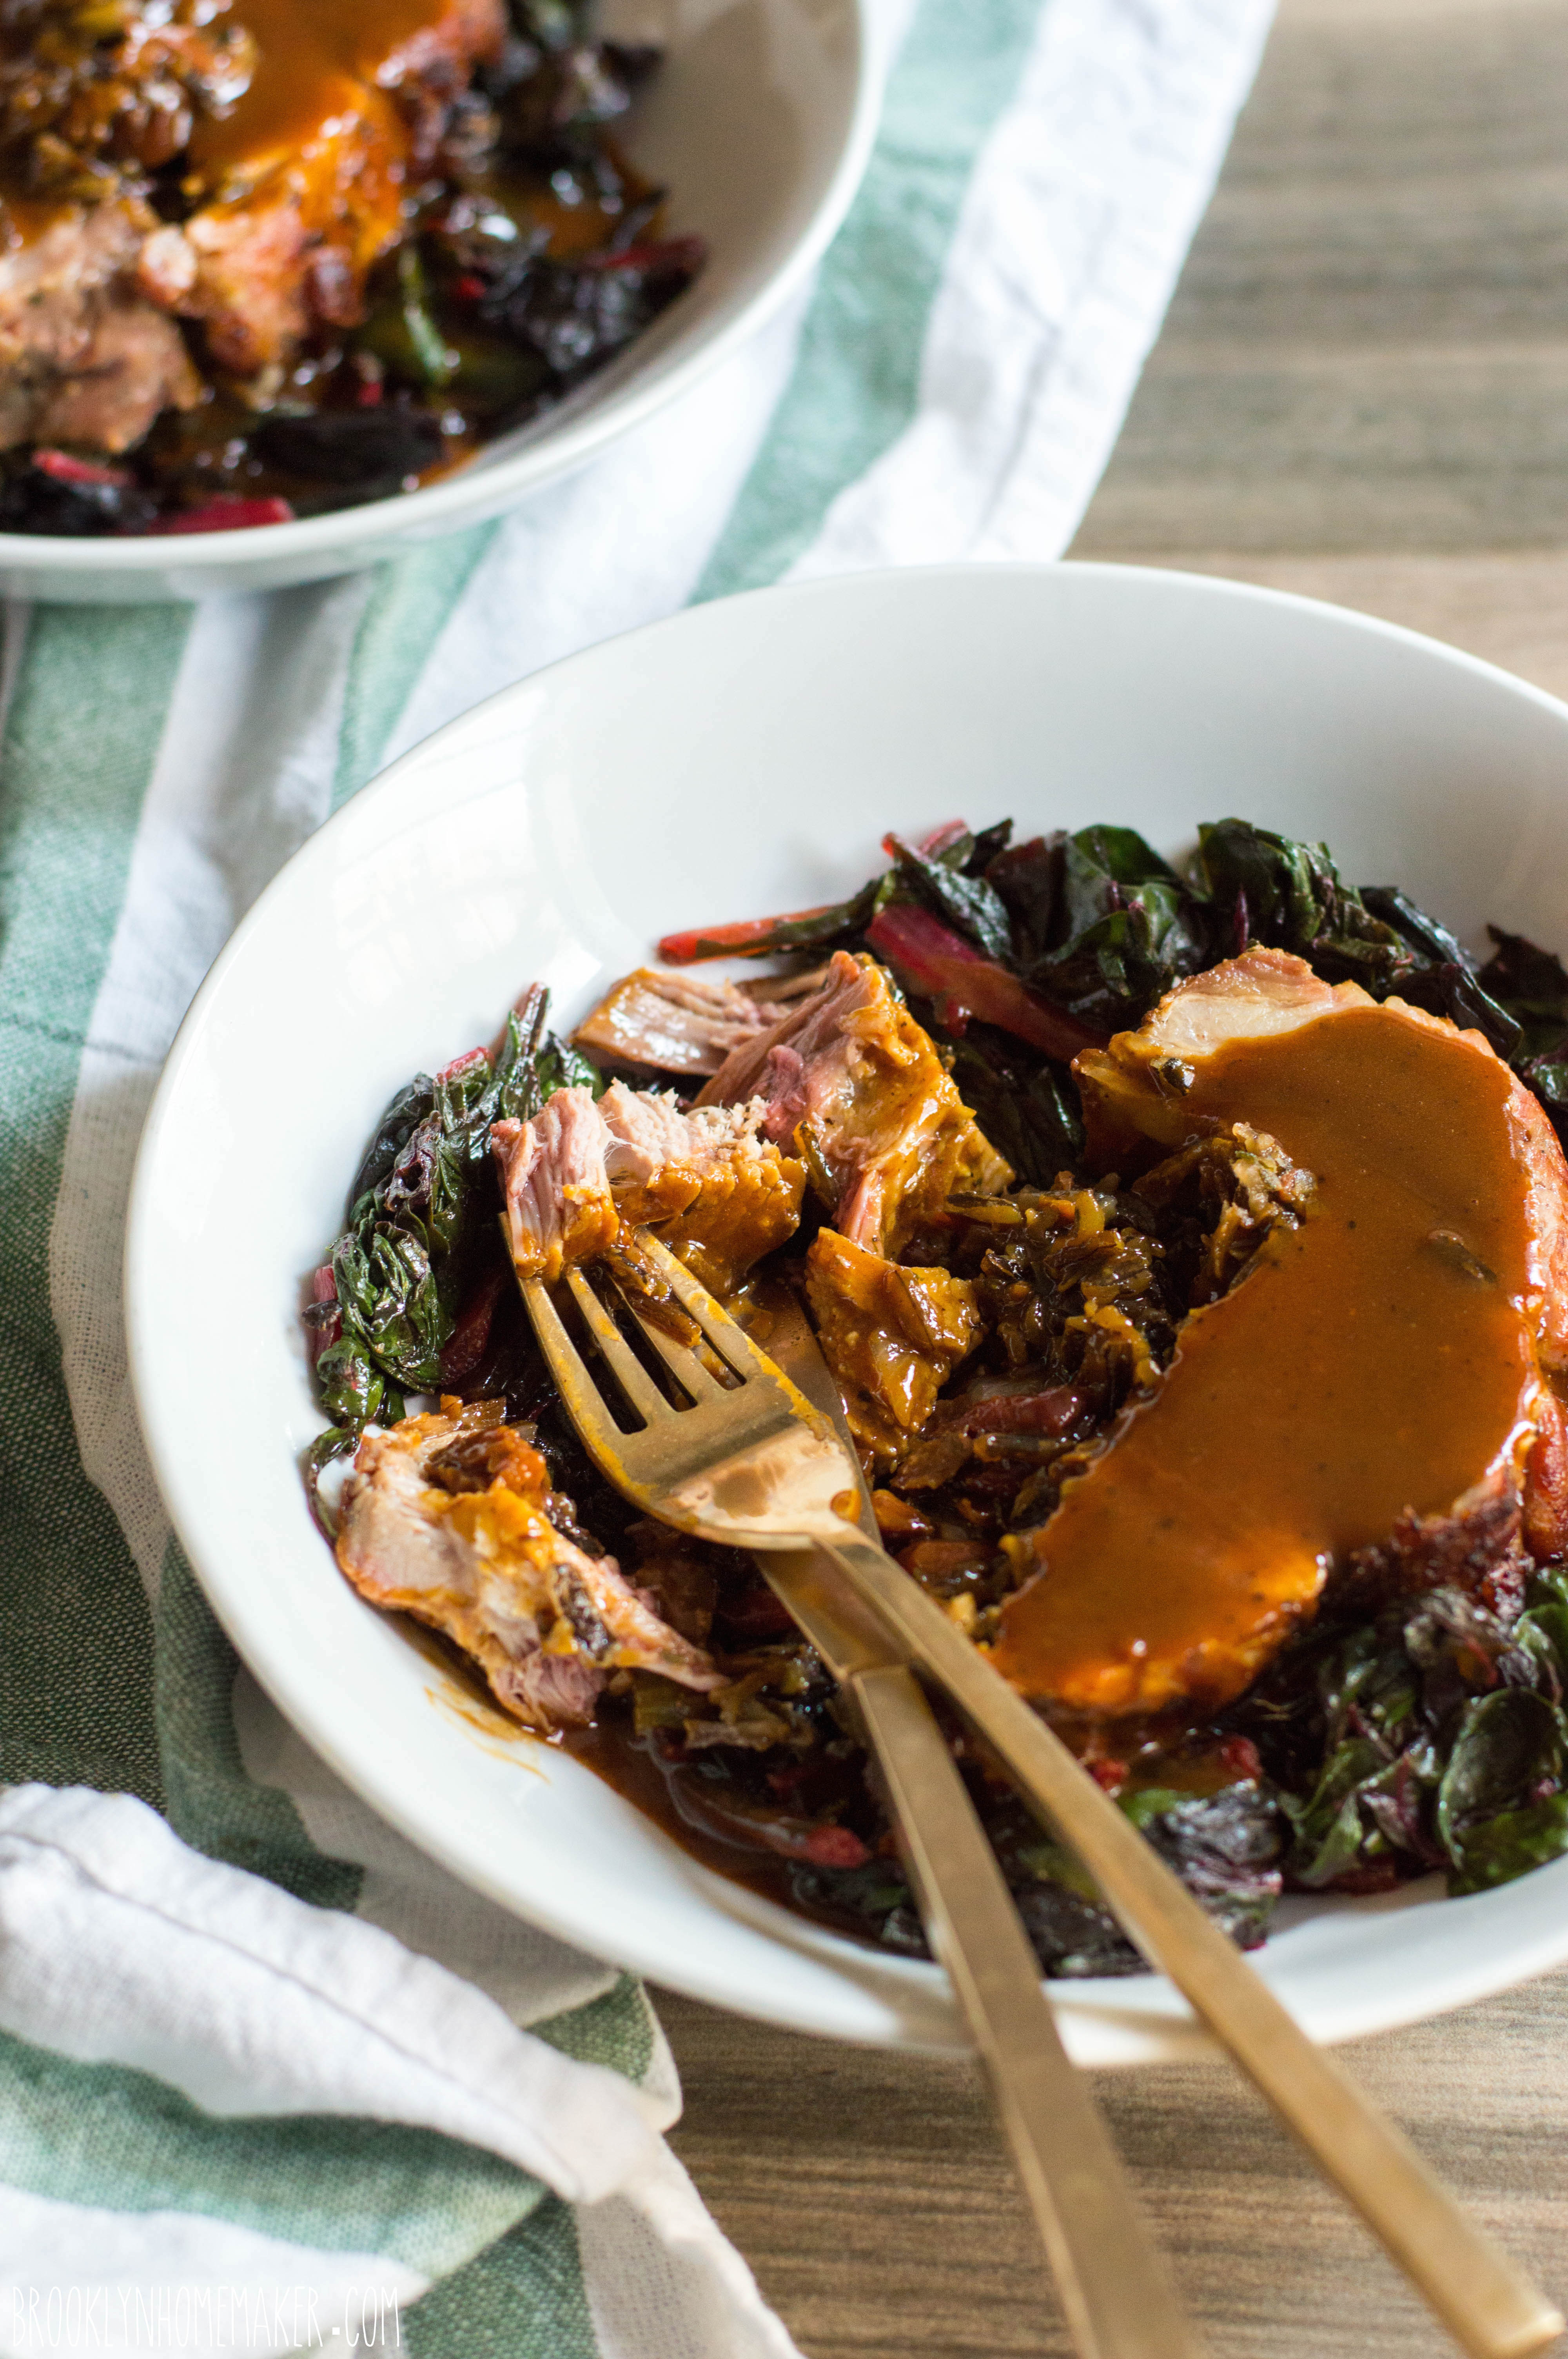
This roast is truly amazing and I can’t wait to serve it for mom on Christmas. The meat is rich and tender and moist, and the stuffing is flavorful and sweet and earthy all at once. You really can’t ask for a better stuffing for pork than bright jammy dried cherries, tons of fresh herbs, and chewy earthy wild rice. As if the roast wasn’t amazing enough on it’s own, you finish it all off with a pan gravy made from white wine and the liquid leftover from soaking the dried cherries. The result is a rich, bright, and slightly sweet and fruity gravy that is literally the cherry on the sundae!

Are you reading this mom? Is your mouth watering yet?
Can’t wait! Happy Holidays y’all!

cherry and wild rice stuffed pork loin roast | Brooklyn Homemaker

Cherry and Wild Rice Stuffed Pork Loin Roast

1 (3 pound) pork loin roast
salt and pepper
3/4 cup dried tart cherries, roughly chopped
2 tablespoons butter
1 small onion, finely chopped (about 1 cup)
2 to 3 stalks celery, finely chopped (about 3/4 cup)
1 cup cooked wild rice (from about 1/3 cup dry)
2 teaspoons fresh thyme leaves, finely chopped
1 tablespoon fresh sage, finely chopped
2 tablespoons fresh parsley, finely chopped
1/2 dry white wine, divided
1 tablespoons olive oil
3 tablespoons flour
1 cup chicken stock (low sodium if possible)

Preheat oven to 375F.

Trim large pieces of fat from pork roast. Butterfly the meat by making a lengthwise cut down the center, cutting to within 1/2 inch of the other side so that the meat can be spread open and laid flat. Cover the flattened roast with plastic wrap and, working from center to the edges, pound with flat side of a meat mallet (or small cast iron skillet) until meat is a uniform 1/2- to 3/4-inch thick. Remove plastic wrap and generously season meat with salt and pepper on both sides. Set aside to rest while you make the stuffing. Refrigerate if you won’t be making stuffing right away.

Bring one cup of water to a boil in a small lidded saucepan. Add chopped cherries and bring back to a boil. Remove from heat, place lid on pan, and let the cherries soak for 10 minutes.

Heat butter in a skillet over medium high heat. Add onions and celery, season with salt and pepper, and sauté until soft and translucent, about 10 minutes. Remove cherries from soaking liquid with a slotted spoon and add to onions and celery. Reserve liquid. Add cooked wild rice and herbs and stir to combine. Add 1/4 cup of white wine and reduce until mostly absorbed. Cool stuffing completely before proceeding.

Spread stuffing over pork and roll up as tightly as possible. Seal the seams with toothpicks, leaving enough pick showing that they’ll be easy to remove after cooking. Tightly tie up the roast with cooking twine.

Heat olive oil in a large dutch oven or oven safe roasting pan over medium high heat. Sear roast on all sides, for about 3 to 5 minutes per side. Transfer, uncovered, to a 375F oven. Roast until a meat thermometer inserted into the middle of the roast reads at least 145F, about 80 to 90 minutes.

Remove roast from the pan and transfer to a cutting board tented with foil. Rest for at least 15 minutes before carving. If any stuffing or meat burned onto the pan, try to scrape it up with a wooden spoon but leave it in the pan. There should be at least a few tablespoons of oil and grease in the pan, if not, add a bit more olive oil. Add flour and stir into oil and grease and heat over medium for 2 to 3 minutes. Slowly stir in remaining 1/4 cup of wine, 1/2 cup of reserved cherry soaking liquid, and chicken stock. Bring to a boil and thicken for a 2 to 3 minutes. Strain any burned bits of stuffing or pork out of the gravy with a fine mesh sieve.

Remove toothpicks and twine from roast, and slice into 1 inch thick slices. Serve topped with gravy. If desired, serve over a bed of wilted ruby chard or braising greens.

gingersnap icebox cake with maple mascarpone cream

Why hello there! It’s so nice to see you again!

gingersnap icebox cake with maple mascarpone cream | Brooklyn Homemaker

First, I want to say that I hope you all had a perfectly wonderful (and delicious) Thanksgiving day. I know I did!

Second, I want to let you know that the pressure and the stress of making and testing and photographing and posting eight Thanksgiving recipes and making two actual Thanksgiving dinners (not to mention working at a kitchenware store leading up to the biggest food holiday in the US of A) was just too much for me. I promise that it was all worth it, but it actually killed me. I hate to be the bearer of bad news, but I’ve passed away.

gingersnap icebox cake with maple mascarpone cream | Brooklyn Homemaker

Despite my untimely demise, there’s no rest for the weary, and here I am again posting from the great unknown.

The holidays are fast approaching so I know that I need to get my blogging butt in gear and get baking! Being that I’m recently deceased though, I wanted to try to do something sort of easy(ish). Easy doesn’t mean that it shouldn’t also be really fun and impressive and totally delicious though!

gingersnap icebox cake with maple mascarpone cream | Brooklyn Homemaker

Thing is,
I don’t really do “easy”.

A while back I saw Martha (yes, THE Martha) on TV promoting her new entertaining cookbook and she made an icebox cake with thin, crisp homemade chocolate chip cookies. I’d never had an icebox cake, but her version sounded amazing and actually pretty simple (especially for Martha).

gingersnap icebox cake with maple mascarpone cream | Brooklyn Homemaker

A traditional icebox cake is make with thin, store bought crisp wafer cookies sandwiched and stacked together with whipped cream. You do a layer of cookies, a layer of cream, a layer of cookies, a layer of cream, and so on and so forth until you suddenly have a round, cake shaped stack.

It doesn’t seem like this should work, but it does. You’d think that the cream would separate and wilt and the cookies would turn to mush and the whole thing would just fall apart and be weird and gross. But that’s not what happens. Magic happens.

gingersnap icebox cake with maple mascarpone cream | Brooklyn Homemaker

The crisp cookies soften as they absorb some of the liquid from the cream and so, rather than separating and wilting, the whipped cream actually thickens even more as the cookies soften up. When left for several hours (or overnight) the whole thing sort of takes on one perfect smooth, sliceable texture, just like a rich silky cake.

Like I said.
Magic.

gingersnap icebox cake with maple mascarpone cream | Brooklyn Homemaker

I decided that if it was good enough for Martha, it was good enough for me.

Rather than Martha’s chocolate chips, or the traditional chocolate wafer cookies, I wanted to do something a little more “holiday-y”. To me, growing up with German grandparents, the holidays were always filled with molasses and spice. Gingerbread and gingersnaps and the like. You know.

So I thought that a gingersnap icebox cake was just the ticket to kick off the holiday baking season. Like I said before though, I don’t really do “easy”. I know I set out to do an easy dessert, but once I got inspired and excited I decided that it would be more fun to make my own gingersnaps rather than using store bought. This is totally unnecessary, but I’m a weirdo so I totally enjoyed the process. If you do want to make your own though, I’d suggest using a little extra ginger in the cookies. The spice is mellowed out a bit by the cream so a little extra will kick it back up to where you’d expect a gingersnap to be.

gingersnap icebox cake with maple mascarpone cream | Brooklyn Homemaker

To add a little extra depth and richness to the standard whipped cream I added mascarpone and a touch of maple syrup. A splash of bourbon was a nice touch too but could easily be left out if you’re serving this to the under 21 crowd.

The ginger and molasses in the gingersnaps pairs perfectly with the sweet mascarpone maple whipped cream. The combination is like a rich velvety gingerbread flavored mousse. A sprinkle of chopped crystalized ginger adds a nice touch of extra spice and lets your guests know that rather than simple chocolate, this cake is made with sugar and spice and everything nice.

This cake is seriously amazing. Like, totally unbelievable. Russell has been raving about it ever since the last bite disappeared and keeps saying how he wasn’t expecting something so simple to taste so delicious. But, again, this cake is made of magic. You might even say that it’s special powers were strong enough to bring me back to life!

gingersnap icebox cake with maple mascarpone cream | Brooklyn Homemaker

Gingersnap Icebox Cake with Maple Mascarpone Cream

Maple Mascarpone Cream Icing:
2 1/2 cups cold heavy cream
1/4 cup sugar
1/4 cup real maple syrup
2 tablespoons bourbon or rum (optional)
1 tablespoon vanilla extract
8 oz mascarpone at room temperature
pinch of salt

At least 63 gingersnaps, for nine layers of seven cookies each
(I made my own using a double batch of smitten kitchen‘s recipe)
A tablespoon or two of finely chopped crystalized ginger, optional

In the bowl of an electric mixer fitted with the whisk attachment, whip the heavy cream until it begins to thicken and form soft peaks. In a separate bowl, stir together the mascarpone, sugar, maple syrup, bourbon, vanilla, & salt until smooth and well combined. Transfer mascarpone mixture to bowl with thickened cream and beat on low speed until almost smooth, 30 to 60 seconds. Scrape down the sides and fold to incorporate. Increase the speed to medium high and beat until the mixture is thick and holds firm peaks, another 30 to 60 seconds. Do NOT overbeat or the icing will become grainy.

On an 8″ cake board, cake stand, or serving plate, arrange a layer of cookies into tight a circle. You’ll want one cookie in the center with a ring of cookies surrounding it with as little space between them as possible. With the size of the cookies I used I could fit 7 cookies per layer. Place about 3/4 to a cup of icing over the first layer of cookies and smooth it out with a small offset icing spatula. Spread the icing almost to the outer edge of the cookies, leaving just a small edge of cookies showing. Arrange another layer of cookies, alternating the layers so they appear staggered above one another. Repeat another layer of icing and then another layer of cookies, again and again until you have as many layers as you desire or until you run out of icing or cookies. Finish the top of the cake with a final layer of icing. My cake was 9 layers tall.

If you have a cookie or two left over, crumble it over the top and sprinkle with crystalized ginger if desired.

Transfer cake to refrigerator for a minimum of 6 hours (or overnight) before serving. 

classic pot roast with sweet potato parsnip mash

Being raised by a single parent meant that my sister and I shared in a lot of the household responsibilities.

classic pot roast with sweet potato parsnip mash | Brooklyn Homemaker

It was a different time, we lived in a safe neighborhood, and my grandma lived next door. When we’d get home from school mom would still be at work and we’d have the house to ourselves. Every day we’d be met at the door with a long list of chores taped to the newel post at the foot of the stairs. The list changed daily and was usually pretty substantial, at least long enough to keep us out of trouble until mom got home. Chores didn’t just include vacuuming or washing the dishes either, we were in charge of serious cleaning jobs like vacuuming out heating vents and scrubbing the bathroom tile surround.

At the time, I don’t think it would have been humanly possible (if you consider pre-teens human) for us to hate our chores any more than we did, but looking back on it I’m incredibly grateful. After living with countless roommates through college and until meeting Russell, I now realize that beyond keeping a tidy house, mom was also teaching us valuable life skills that many of my friends and neighbors weren’t learning. I know all sorts of things about not living like a slob that many of my peers don’t, like how to wash dishes and actually get them clean. I can remember the specific moment in college when I realized I no longer wanted to fight with my roommate about who’s turn it was to do the dishes, because whenever she did them I’d end up wanting to wash them again anyway.

classic pot roast with sweet potato parsnip mash | Brooklyn Homemaker

Another item that was usually on the list was making dinner. Working later in the day meant mom wouldn’t always have time to get dinner on the table after she got home, so she taught me a few simple recipes I could make on my own. Cooking dinner was one of the chores that I actually enjoyed doing and as time went on I started teaching myself new dishes all the time.

Pot roast was one of my old standbys, but back then I didn’t really know the “rules” when it came to braising and roasting, so to be honest my roasts weren’t very good. At the time I don’t think I even realized it, and mom never complained, but I hold myself to much higher standards nowadays. I was probably using the wrong cuts of meat, or cooking them at too high a temperature too quickly. I may have even been undercooking them, or at least not cooking them long enough to melt the collagen and make them tender. Either way, they were often as rubbery as shoe leather and flavored with little more than dried onion flakes, so as I got older I decided I didn’t really like pot roast.

classic pot roast with sweet potato parsnip mash | Brooklyn Homemaker

Unfortunately I was a vegetarian in college, so even though I took several culinary courses, at the time I didn’t really feel the need to pay much attention during the meat classes.

If I could turn back time…
If I could find a way…

classic pot roast with sweet potato parsnip mash | Brooklyn Homemaker

It was only a few years ago that I finally decided to give pot roast another go around, and that’s when I looked to the internet to show me the way. I tried a few recipes that came out okay; certainly better than what I made when I was 12, but not really good enough to make me want to bookmark any of them to make again.

Then, one day, I discovered the Cook’s Illustrated pot roast recipe.

Game-changing. Mind-blowing. Life-altering.
Etc.

classic pot roast with sweet potato parsnip mash | Brooklyn Homemaker

Seriously. Their method makes, hands down, the best pot roast I’ve ever tasted in my entire life.

It is a little more work than some of the other recipes I’ve tried, but it is WELL worth it. It’s important to find the right cut of meat, and to speed up the collagen melting you’ll need to do some butchering of your own. You’ll also need to tie the meat up with cooking twine so it doesn’t fall apart in the pot, and to promote even cooking you have to flip it half way through cooking. Then the sauce for the meat is made by pureeing the vegetables from the roasting pan with broth and red wine for texture and flavor. This makes it a bit more involved than the set-it-and-forget-it style recipes prominent on Pinterest, but you guys, I swear. You’ll never want to make pot roast any other way.

classic pot roast with sweet potato parsnip mash | Brooklyn Homemaker

Because I don’t know how to leave well enough alone, I did go ahead and make a few changes to their recipe to make it my own. The cooking method is exactly the same though, and produces the same mouthwatering, fork tender, practically falling apart results. Beyond the traditional red wine, the sauce benefits from a bit of acid and the original recipe calls for balsamic vinegar to be added at the end. Instead, I added apple cider (and a bit of chopped apple) to the cooking liquid. I thought this could be a fun seasonal twist and would add a subtle sweetness. It really works and makes this roast the perfect dish for welcoming fall weather.

Instead of roasting large chunks of potatoes and carrots to serve with the roast, I decided that I wanted to serve it over a bed of mashed sweet potatoes and parsnips. I think the slight sweetness and bright color pairs perfectly with the subtle apple flavor in the sauce.

classic pot roast with sweet potato parsnip mash | Brooklyn Homemaker

I know I already said this, but hello fall flavors. You couldn’t ask for a more perfect dish to celebrate the change of seasons. A word of warning though, the house will smell unbelievable for up to four hours and your mouth will be watering constantly.

The flavor of this meat is just so…. meaty, and you won’t believe how tender it comes out. No knife required.
The pureed veggies in the sauce add a great rich and roasty flavor, and gives the sauce a nice thickness without having to make a roux for gravy.
Adding parsnips to the mashed sweet potatoes really helps balance their sweetness and adds a depth of flavor. Taking the time to brown the butter gives them an extra richness, and helps them feel well paired with the roasted meat.

Go make this.
Now.

classic pot roast with sweet potato parsnip mash | Brooklyn Homemaker

Classic Pot Roast with Sweet Potato Parsnip Mash

Adapted from Cook’s Illustrated

3 1/2- to 4-pound boneless beef chuck-eye roast
Kosher salt
2 tablespoons unsalted butter
2 medium (or 1 large) onions, halved and sliced thin (about 2 cups)
1 large carrot, chopped medium (about 1 cup)
1 parsnip, peeled and chopped medium (about 3/4 cup)
2 celery ribs, chopped medium (about 3/4 cup)
1/2 firm tart apple (I used Braeburn), peeled cored and chopped medium (about 1/2 cup)
2 medium garlic cloves, minced or crushed (about 2 teaspoons)
1 cup beef broth, plus more for sauce
1/2 cup dry red wine, plus another 1/4 cup for sauce
1/2 cup fresh apple cider
1 tablespoon tomato paste
1 bay leaf
1 large sprig plus 1/4 teaspoon chopped fresh thyme leaves
Ground black pepper
chopped fresh parsley for garnish, if desired

Sweet Potato Parsnip Mash:
3/4 pound parsnips, peeled and cut into 2-inch pieces
2 pounds sweet potatoes, peeled and quartered
6 tablespoons butter
1 to 1 1/2 cups milk
1/4 teaspoon grated nutmeg
salt and pepper to taste

Pull your chuck roast into two pieces at the natural seam, and trim off any large layers and knobs of fat. Sprinkle both pieces of meat with 1 tablespoon salt (1½ teaspoons if using table salt), place on wire rack set in rimmed baking sheet, and let stand at room temperature 1 hour.

Adjust your oven rack to the lower-middle position and preheat oven to 300 degrees.

Heat butter in heavy-bottomed Dutch oven over medium heat. When foaming subsides, add onions and cook, stirring occasionally, until softened and beginning to brown, about 10 minutes. Add carrot, parsnip, celery, and apple; and continue to cook, stirring occasionally, for 5 minutes more. Add garlic and cook until fragrant, about one minute. Stir in 1 cup of broth, ½ cup wine, apple cider, tomato paste, bay leaf, and thyme sprig; and bring to simmer.

Pat the roasts dry with paper towels and generously season on all sides with pepper. Use kitchen twine to tie each piece of meat into a loaf shape for even cooking and prevent it from falling apart.

Nestle the meat on top of the vegetables. Cover pot with a tight fitting lid and transfer to the oven. Cook beef for three hours, flipping halfway through. Check and, if necessary, continue cooking until beef is completely tender and sharp knife easily slips in and out, about 30 minutes to 1 hour. This extra time is best used to start your sweet potato parsnip mash, recipe below.

Once fully cooked, transfer roasts to cutting board and loosely tent with foil. Strain liquid through mesh strainer into a large liquid measuring cup. Discard bay leaf and thyme sprig. Transfer cooked vegetables to blender jar. Allow liquid to settle 5 minutes, then skim any fat off surface. Add beef broth as necessary to bring liquid amount to 3 cups. Place liquid in blender with vegetables and blend until completely smooth, about 2 minutes. Transfer sauce to medium saucepan, add remaining wine and chopped thyme, and bring to simmer over medium heat. If sauce is too thick it can be thinned out with more beef stock. If too thin let it reduce to the desired consistency. Once reduced taste and adjust seasoning if necessary.

While sauce heats and reduces, remove twine from roast and slice against grain into ½-inch-thick slices.

Sweet Potato Parsnip Mash: 
Place sweet potatoes and parsnips in a large stockpot, cover with salted water, and bring to a boil. The parsnips can take longer to cook than the sweet potatoes, so it’s important that they’re in smaller pieces. Once the pot comes to a boil reduce the heat to medium and cook until vegetables are fork tender. This should take about 15 or 20 minutes, but can vary depending on the size of the pieces.

Once tender, transfer sweet potatoes and parsnips to a colander to drain. In the same pot heat the butter over medium heat just until it begins to brown. Stir occasionally and watch it closely or it can burn. Remove from heat. You can either push the drained sweet potatoes and parsnips through a potato ricer or food mill and add them back into the pot, or add them to the pot first and mash them with a potato masher. Stir in milk, a little at a time, until you reach your desired consistency. Add nutmeg, and salt and pepper to taste. Taste for seasoning and adjust if necessary.

Serve the meat on top of the mash and top with sauce and a sprinkle of chopped parsley.

orange glazed roasted butternut squash bread

It’s been a minute I know. I’m sorry.

orange glazed roasted butternut squash bread | Brooklyn Homemaker

I think this little two week break is the longest I’ve ever gone between posts since I started this whole adventure. I promise that I have a very good reason for for my little hiatus.

orange glazed roasted butternut squash bread | Brooklyn Homemaker

I’ve been working on giving my kitchen a little facelift. I told you a few weeks ago that I wanted to change a few things in there, and your comments and encouragement gave me the strength to take action on a project I’ve wanted to tackle for years but never did. I don’t want to give anything away just yet, but rest assured things are looking rather different in there.

orange glazed roasted butternut squash bread | Brooklyn Homemaker

I’ve still got a bit of work to do, but I hope to be able to give you a peek at the progress in a week or two. Right now though, the kitchen is a total mess, and Russell and I have been surviving on delivery pizzas, tacos, and Thai food. I really can’t wait to get back in there and start cooking again, and get back into the swing of things over here too.

orange glazed roasted butternut squash bread | Brooklyn Homemaker

Luckily, I had the foresight to make one last treat before the disarray began. I’ve been so distracted over the past few weeks though, that it’a just taken me this long to get around to posting the recipe.

orange glazed roasted butternut squash bread | Brooklyn Homemaker

This cold weather has me craving some homey comforting sweet bread, with a healthy dose of warm spice. At first I was thinking about making pumpkin bread, but on a whim I decided to try it with butternut squash instead. Butternut squash, roasted and pureed, has much the same texture as pureed pumpkin, but has a brighter, fresher, sweeter flavor.

orange glazed roasted butternut squash bread | Brooklyn Homemaker

To compliment that brightness and sweetness, I added a bit of fresh orange zest to the recipe. I kept the cinnamon in the recipe for the traditional warmth, but in place of nutmeg I substituted a bit of ground ginger and clove to compliment the citrus.  Then I topped the whole thing with a thick orange glaze.

orange glazed roasted butternut squash bread | Brooklyn Homemaker

This loaf is incredibly moist and tender, with a wonderfully homey and satisfying flavor. It’s such a fun yet familiar twist on traditional pumpkin bread. The warm spice is perfectly suited to the flavor of the earthy roasted butternut squash, and the orange zest adds a lovely touch of brightness. The bread itself is so perfect on it’s own that it doesn’t even really need the glaze, and would be just as good with a simple swipe of soft unsalted butter.

I added the glaze to boost the citrus flavor, but I have to admit that I found it just a bit too sweet for my taste. My sweet tooth just prefers something a bit more subtle. If you think you’re like me and might prefer a more refined sweetness, you could skip the glaze altogether if you like. You could also try using less sugar to make a thinner glaze, or even try a cream cheese icing instead. If you like a nice dessert-like sweetness though, just make the glaze as is. Either way, a slice of bread will be heaven with your morning coffee or perfect as a treat at the end of the day.

orange glazed roasted butternut squash bread | Brooklyn Homemaker

Orange Glazed Roasted Butternut Squash Bread

  • Servings: Makes 2 loaves
  • Print
adapted from Once Upon a Chef

Bread:
1 small to medium butternut squash
2 teaspoons peanut or vegetable oil
2 cups all-purpose flour
1 teaspoon baking soda
1/2 teaspoon baking powder
1/2 teaspoon salt
zest of 1 orange
1 teaspoon ground cinnamon
3/4 teaspoon ground cloves
1/2 teaspoon ground ginger
1 3/4 cups sugar
1 1/2 sticks (3/4 cup) unsalted butter, melted
2 large eggs

Glaze (optional):
zest of 1 orange
1/4 cup fresh squeezed orange juice
2 cups confectioners (powdered) sugar, sifted

Preheat oven to 400 degrees. Cut the butternut squash in half lengthwise and remove seeds. Rub flesh with oil and place cut side down on a parchment lined baking sheet. Roast for 35 to 40 minutes or until soft when pushed with a finger. Cool until cool enough to handle.
Peel the skin off the outside of the squash, and puree the flesh in a blender or food processor, or in a bowl using an immersion blender.
Measure out 2 cups of puree and save the rest for another use, or feed it to your dogs.

Reduce oven to 325 degrees. Butter and flour two 8 ½” x 4 ½” loaf pans.
Combine flour, salt, baking powder, baking soda, orange zest, and spices in a bowl. Whisk until well combined and set aside.
In another bowl, mix together sugar, melted butter, and squash puree. Whisk in eggs, one at a time, until well combined. Fold squash mixture into flour mixture until combined.
Turn batter into prepared pans, dividing evenly, and bake for about 65 – 75 minutes, or until cake tester inserted in center comes out clean. Let loaves cool in pan about 10 minutes, then turn out on wire rack to cool completely.

Once the loaves are cooled, whisk together the glaze ingredients until smooth and free of lumps. Pour over the loaves and smooth the top. Let the glaze set for a bit before slicing.