garlic press test

Today I want to talk to you for a bit about garlic presses. For the longest time I’ve been using my mom’s old garlic press that somehow made it into my kitchen when I moved into my first apartment. I don’t know how it got there. I didn’t take it, I swear.

The thing about my mom’s old garlic press is, well, that it sucks. It’s a cheap flimsy press with a deep narrow hopper that’s nearly impossible to clean. It’s easy enough to use, but I learned quickly that if I didn’t want dried bits of garlic stuck in the holes then I’d have to soak the press immediately after use. Most of the time I would end up deciding that the pain of cleaning it outweighed the convenience of using it in the first place, and I’d reach for a chefs knife instead. As I’ve mentioned before, I manage a kitchenware store, and after a year or so at Whisk I finally realized that I had no excuse not to have a decent garlic press in my life.  Of course, then the pressure of choosing the right one was too much for me and I stalled again. We carry so many that I just couldn’t decide which was the one for me.

So, I decided to just try them all!garlic press testing | Brooklyn Homemaker

With Whisk’s help I took home a sample of each style, used them all a few times, and kept notes so I could share my new knowledge with you!  I think Whisk has done a really great job of choosing a nice well-edited selection, so to be honest, I didn’t really dislike any of them, but there were some that I did like more than others. To me, the three main things to take into consideration with a garlic press are efficiency, ease of use, and ease of cleaning. Below I’ll give you my honest opinion of each tool I tested, along with a link to each one in case you’re looking for one yourself!

First though, I have a special treat for you! My amazing and talented friends Karen and Mari of Crown Street Productions joined me in my research and made this handy video guide to some of the presses I tested! Not every tool below is in the video, but we thought that seeing some of them in action might give you a better idea of the different features and how they work. Check it out, and please excuse my serious expression. I’m not used to being in front of the camera and I was a bit nervous. Also, I take garlic presses very seriously! haha! I hope you like it!

Learn anything?

Okay, back to the testing.

I wanted to see how these tools would stand up to both peeled and unpeeled cloves, so to get started I tried out the Zak! Designs garlic peeler, available for $9 here.garlic press testing | Brooklyn Homemaker
It’s just a simple silicone tube, but the garlic’s papery peel wants to stick to it. All you do is insert a clove or two into the tube and roll it back and forth on your countertop, then out comes the naked clove! I was skeptical at first, but was really impressed with how well it worked.  It really couldn’t be more simple to use, and if you find yourself peeling a lot of garlic, I’d highly recommend it. The one thing I noticed is that the peels of garlic that’s been sitting around for a few days (or weeks) comes off much easier than garlic that just came home from the grocery store.

The first press I tested is the Fante’s Cousin Umberto’s garlic press by the Harold Import Company and is available for $8 here.garlic press testing | Brooklyn Homemaker
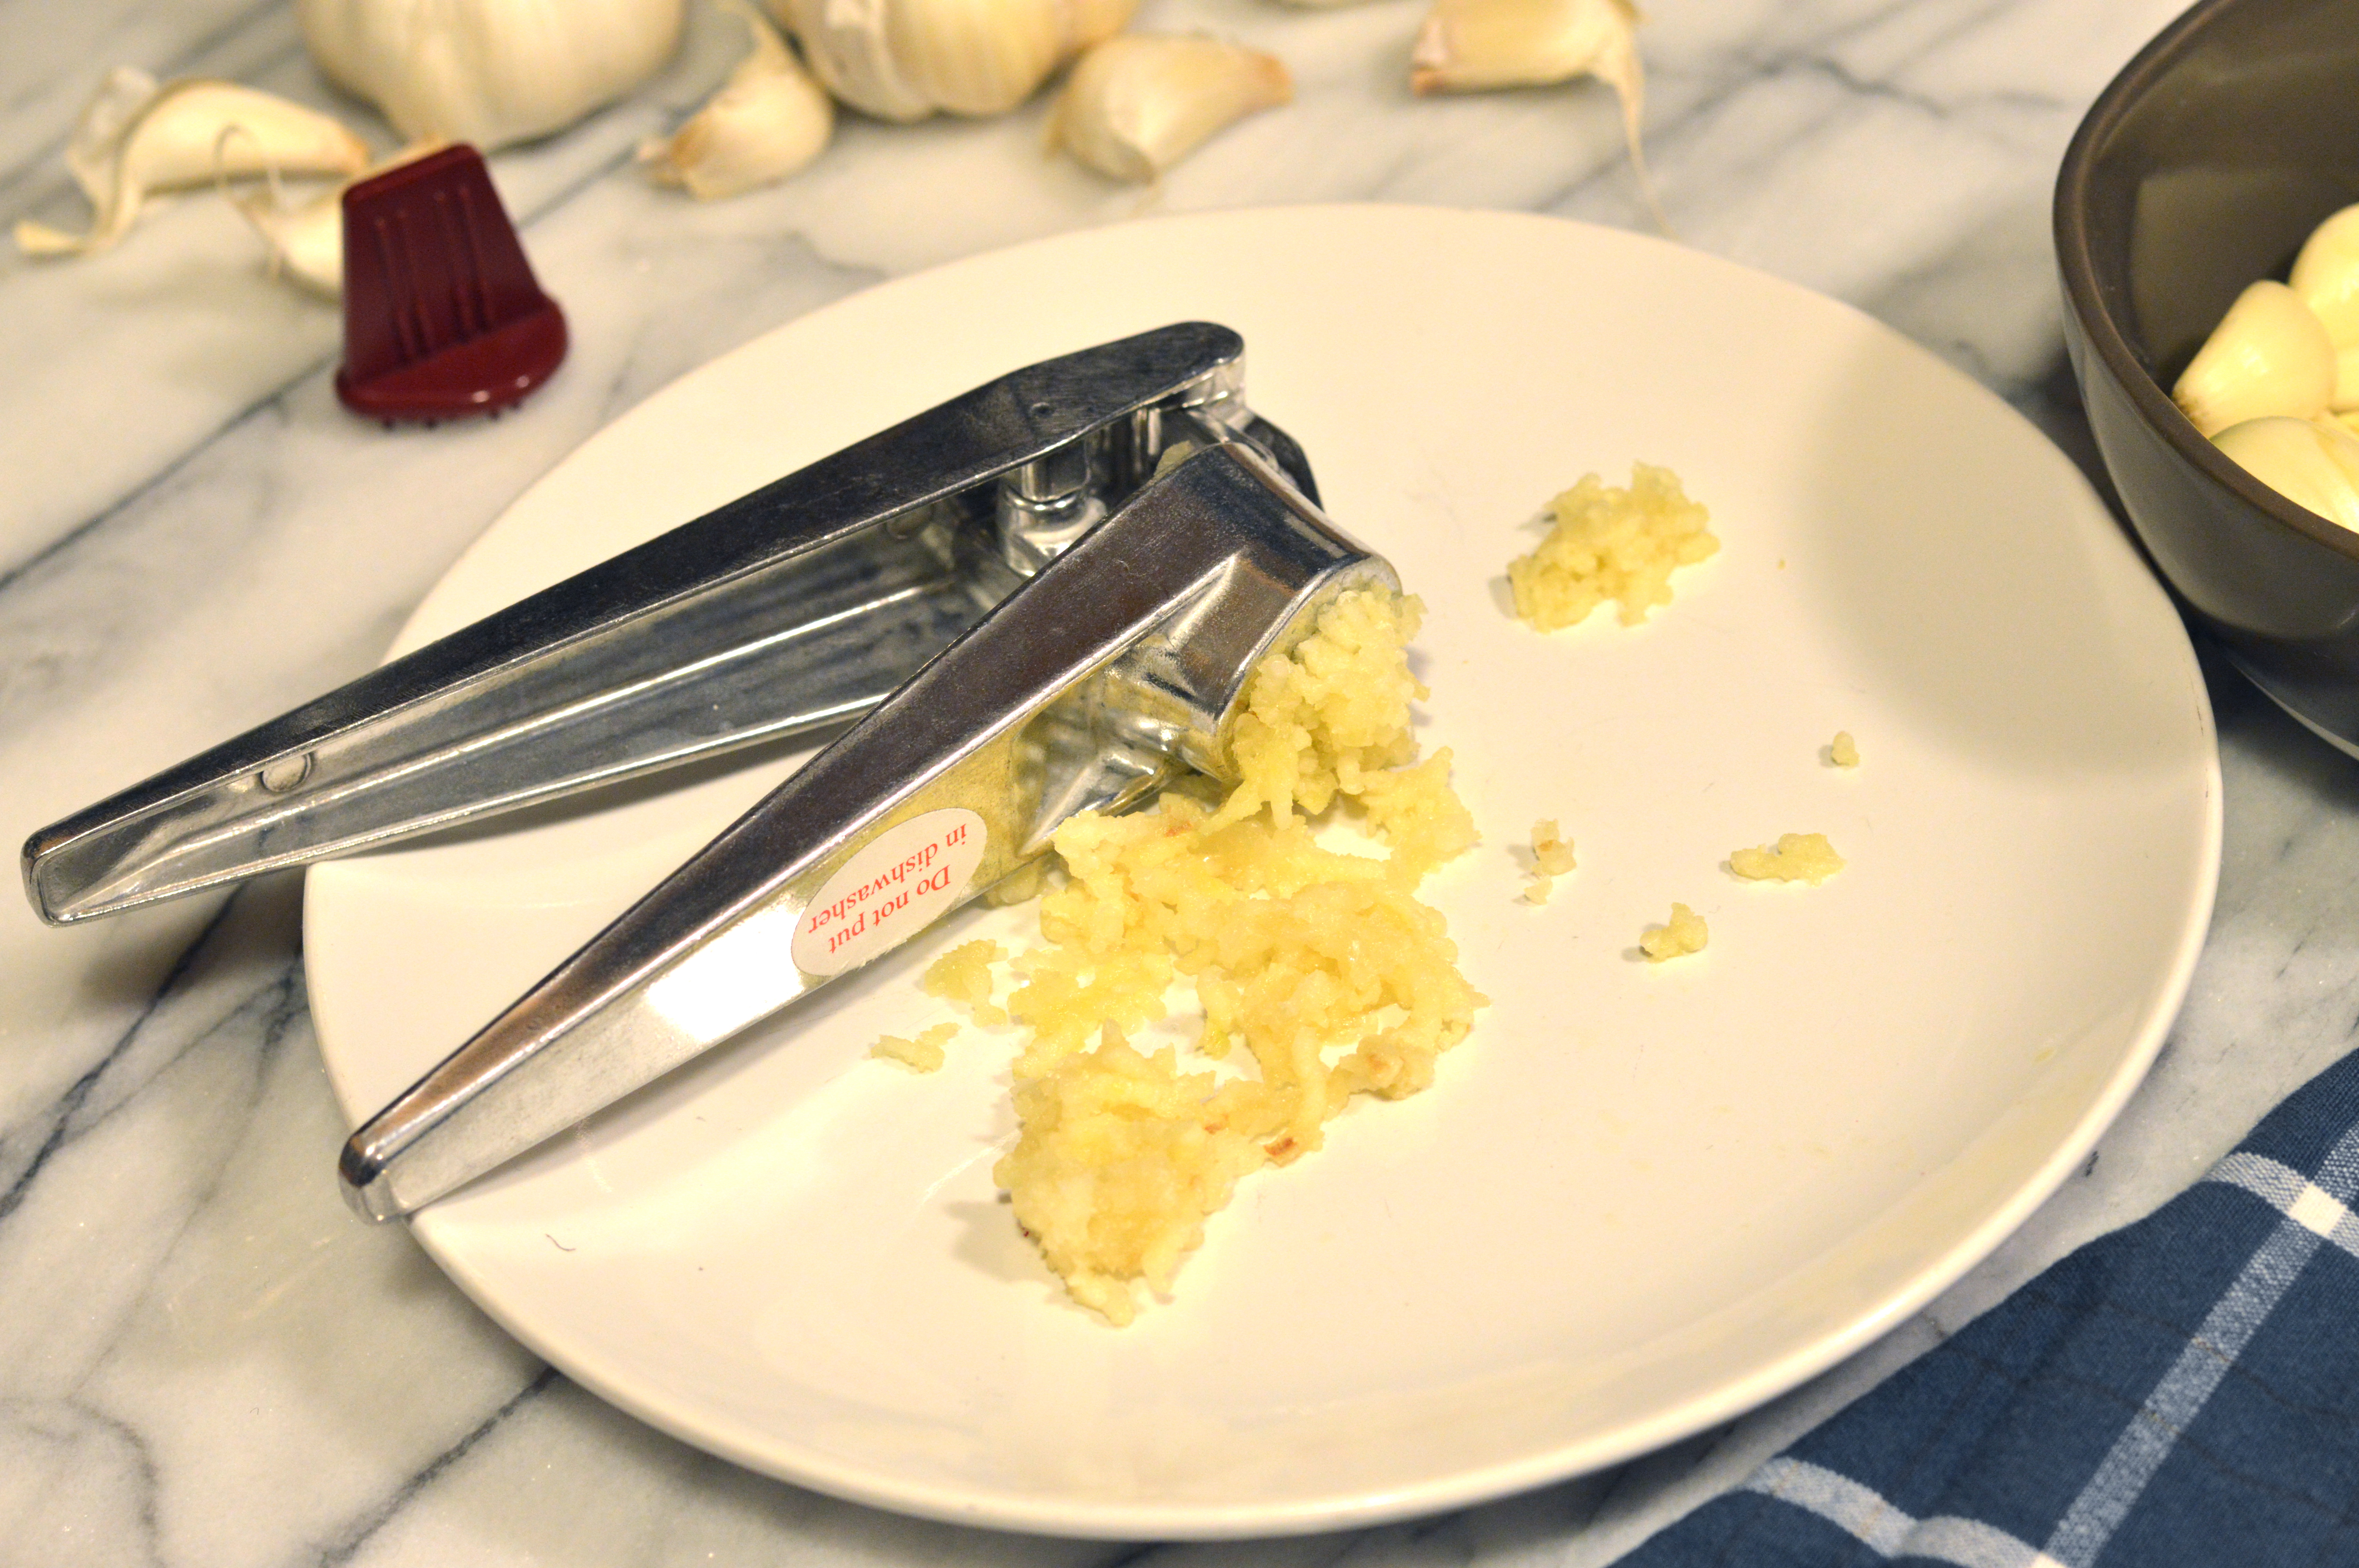
This press is as simple as they come. It can handle both peeled and unpeeled cloves with no trouble at all. It’s made of sturdy food grade aluminum and has a deep hopper with holes at the bottom, and a piston that pushes the garlic through it. One issue I noticed is that the piston doesn’t reach all the way to the bottom of the hopper, so if you’re only doing one or two cloves you lose a bit of your garlic.
Since it’s aluminum it is definitely not dishwasher safe so it must be washed by hand. It’s hard to reach the inside of the hopper to clean it, but it comes with a handy little cleaning tool that helps push any leftover garlic back through for removal. Even with the cleaning tool though, you’ll still need to fish the remaining garlic out of the hopper with a butter knife, and if you ever misplace or lose this piece it would be really difficult to clean.
For the price, I think this press is a great option, but it’s definitely not what I would consider a “forever” tool.

Next I tried out an Oxo Good Grips garlic press, available here for $17.garlic press testing | Brooklyn Homemaker
This press is probably one of the better selling presses in the store. It features soft non-slip curved handles that feel really comfortable in your hands. It’s simple enough to use, but I felt that bit more force was needed than some of the other models I tested. It can handle unpeeled cloves, but that requires even more force. One really nice feature is that the large hopper fits really large cloves, or even multiple small cloves at once, which some of the other presses couldn’t handle. Unfortunately, this press also doesn’t quite reach the bottom of the hopper and leaves some garlic behind.
It is dishwasher safe, and the cleaning tool that pushes garlic back through the holes is attached to the back of the handle, so there’s no way you’ll lose it. Even with this tool, you’ll still need to use something like a butter knife to get out the remaining garlic.

Next up was the Susi3 press by Zyliss for $18, available here.garlic press testing | Brooklyn Homemaker
This press could easily handle peeled or unpeeled cloves with little force. Again though, If only doing one or two cloves, this press didn’t really push as much garlic through the hopper as I would have liked. It’s both lightweight and sturdy, and the curved handles feel comfortable in your hand. It also comes with a cleaning tool that attaches to the handle but removes for cleaning. It has long spikes to really help push the garlic back through the holes so the remaining garlic comes out really easily. On the other side of the cleaning tool there are three spikes to help get at any stubborn pieces that might want to stick around. The packaging says that it is dishwasher safe but “handwashing is recommended”. I don’t have a dishwasher to test it, but I’m guessing that it probably wouldn’t stand up to repeated and frequent travels through the dishwasher.

Next I tried out the Harold Import’s “World’s Greatest” garlic press & slicer, available here for $20.garlic press testing | Brooklyn Homemaker
This press actually ended up being one of my favorites. It can handle both peeled and unpeeled cloves, but I noticed a little extra force was needed with unpeeled cloves which, every once in a while, caused the garlic to shoot out of the press. It was better at getting more garlic through the press than some of the others, but it still left a little bit behind. One of the reasons I like this press so much is that beyond being a press, it also doubles as a garlic slicer, giving you nice thin evenly sliced garlic. To use the slicer function the clove needs to be peeled, but it leaves no garlic behind at all.
Another really great feature is that this tool has a press that actually swivels out of the hopper to make it more accessible for easy cleaning. This feature is more common in pricier garlic presses, so it’s nice to see it in this price range. It also comes with a handy cleaning tool that attaches to the inside of the arm, and slides out when needed. The slicer side can be a little trickier to clean but was easy enough with the help of the cleaning tool.
I really liked how versatile and easy to use and clean this press is, and would definitely consider it my favorite budget choice.

After that, I tried the Easy Squeeze press by Kuhn Ricon, which can be found here for $25.garlic press testing | Brooklyn Homemaker
I thought this press was nice and efficient and really got a lot of crushed garlic out of each clove, but I found that it didn’t work all that well with unpeeled garlic. It has a handy plastic blade that slides across the press to help remove the crushed garlic, and was the only press I tested that had this feature. The major bonus here is that the press mechanism is almost identical to presses almost twice the price, but the one negative, in my opinion, is that the lightweight plastic construction feels a bit flimsy.
This press is dishwasher safe, and the press also swivels for easy access during cleaning.

Next up was the Kuhn Ricon Epicurean press, available here for $40.garlic press testing | Brooklyn Homemaker
This is one of the more high end presses we carry at Whisk. The price may seem a bit rich for some, but after using it you’ll know that you get what you pay for. It’s really very easy to use and very little force is needed to squeeze your garlic through. It makes easy work of both peeled and unpeeled cloves, and it’s very efficient at getting almost all of the garlic through, leaving very little behind. It’s sturdy and strong, made completely of stainless steel. and features curved handles that fit the shape of a hand. The press mechanism also swivels out for super easy cleaning, and the remaining garlic loosened up and came out on its own when rinsed under hot water.
At this price i feel like I’m allowed to be just a bit nit-picky, so my one (tiny) complaint is that it’s a bit heavy and may feel a bit awkward in small hands. Overall though, this press is super sturdy, efficient, easy to use, easy to clean, and is a really solid choice.

The last traditional press I tested is made by Rosle, and goes for $45 heregarlic press testing | Brooklyn Homemaker
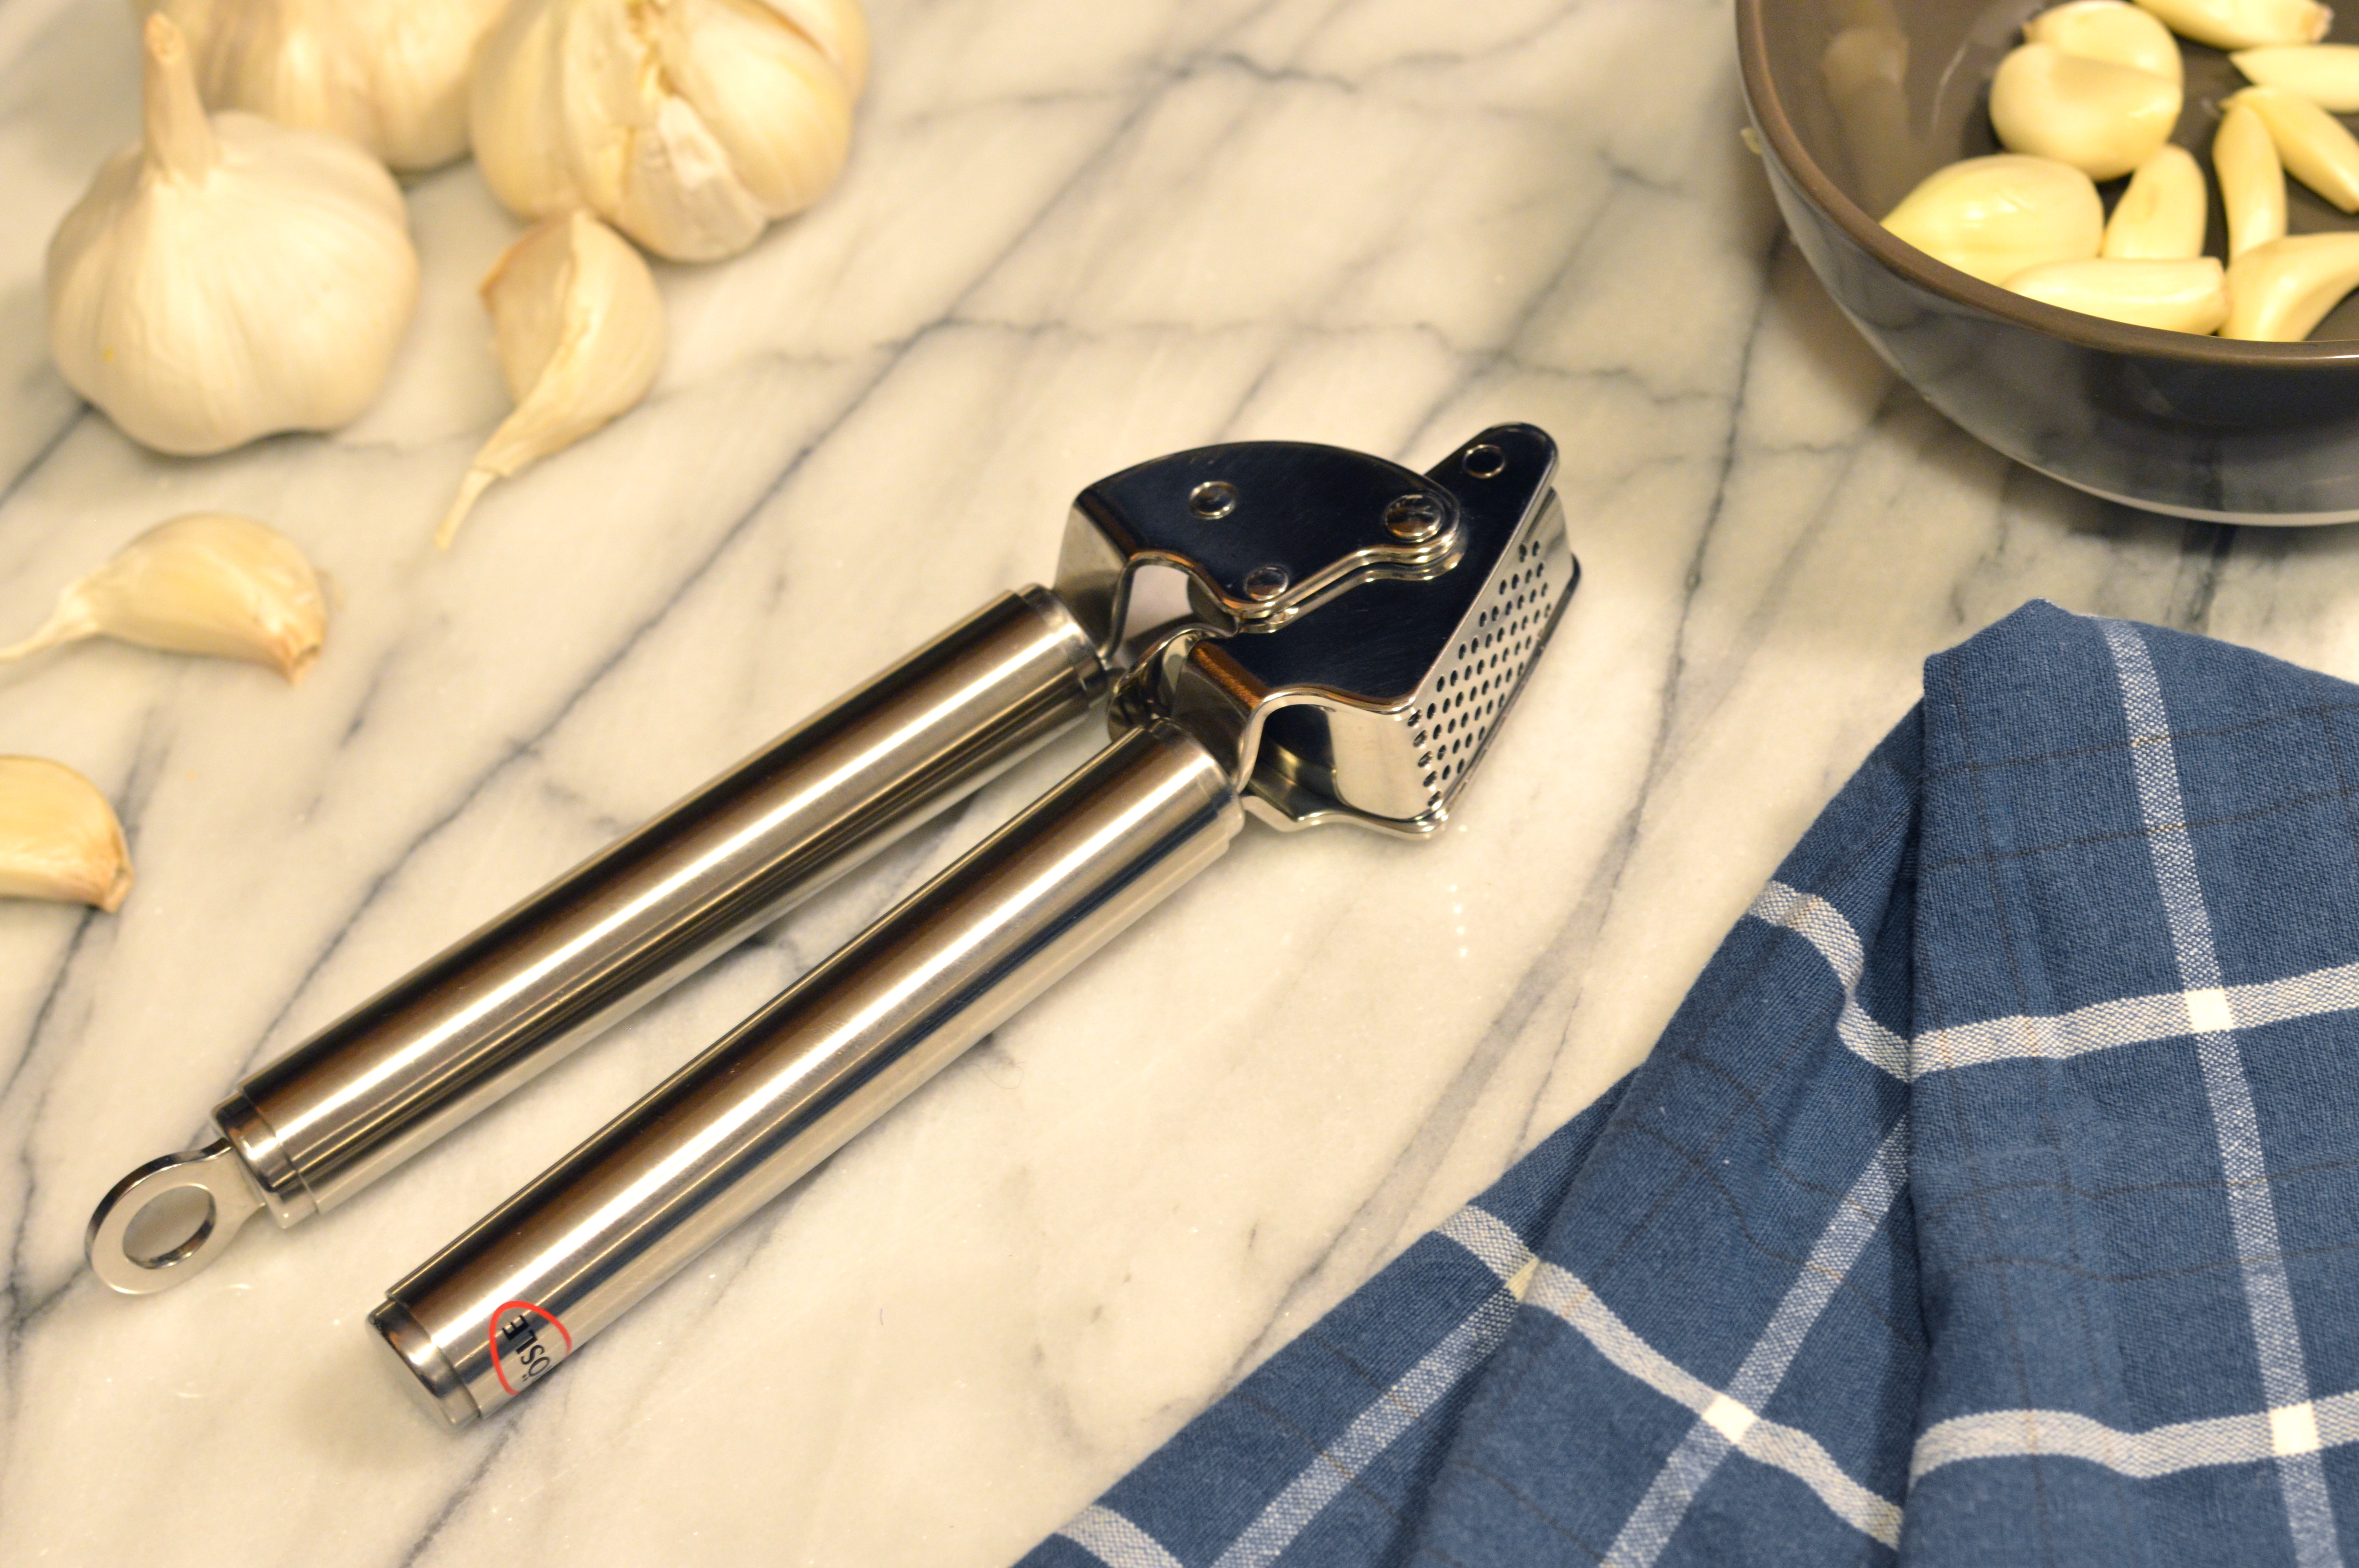
Much like the Kuhn Ricon Epicurean model, this press is very easy to use, and can handle peeled or unpeeled cloves with very little force at all. For extra leverage, there’s a small dimple feature that clicks into place when fully depressed, which makes sure the maximum amount of garlic is pressed out with as little effort as possible. Made of 18/10 stainless steel, this press is super sturdy and strong but feels lighter and less bulky than the Epicurean press. It doesn’t have the ergonomic curved handle design but it will fit into any hand easily. It’s also very easy to clean with a swiveling press mechanism that rinses off with little effort. The best thing about this press is that Rosle is so sure of the quality of their products that they come with a lifetime warranty. The stainless steel construction means it should never break, but if it does, they’ll replace it for you. If the smart and attractive design and maximum ease and efficiency isn’t enough for you, the warrantee definitely should sweeten the deal. This is the last garlic press you’ll ever need to buy, and after I finished my research, this was the press I purchased for myself.

With the presses out of the way, I moved on to some more garlic related tools.
Next I sampled the Chef’n garlic slicer, for $12 heregarlic press testing | Brooklyn Homemaker
This tool works sort of like a pepper mill. You put your peeled garlic inside, close the spring loaded press over it, and twist. It can be a little bit confusing to get it working, as the interlocking top and spring loaded mechanism inside aren’t exactly intuitive. It also really only works well with thin, small cloves. Once you get it going though, it works with little force by twisting the top clockwise. The garlic is pushed across the blades and comes out paper thin. This slicer gets your cloves much thinner than the Harold Import press and slicer, but of course, it doesn’t double as a press. It’s really easy to clean, but you have to be careful of the sharp blades.  It might not be completely necessary for all kitchens, but if you’re serious about super thin sliced garlic, and don’t mind working only with small cloves, it’s a pretty handy tool to have.

The last tool I tested is called a garlic rocker, by Joseph Josesph, for $15 heregarlic press testing | Brooklyn Homemaker
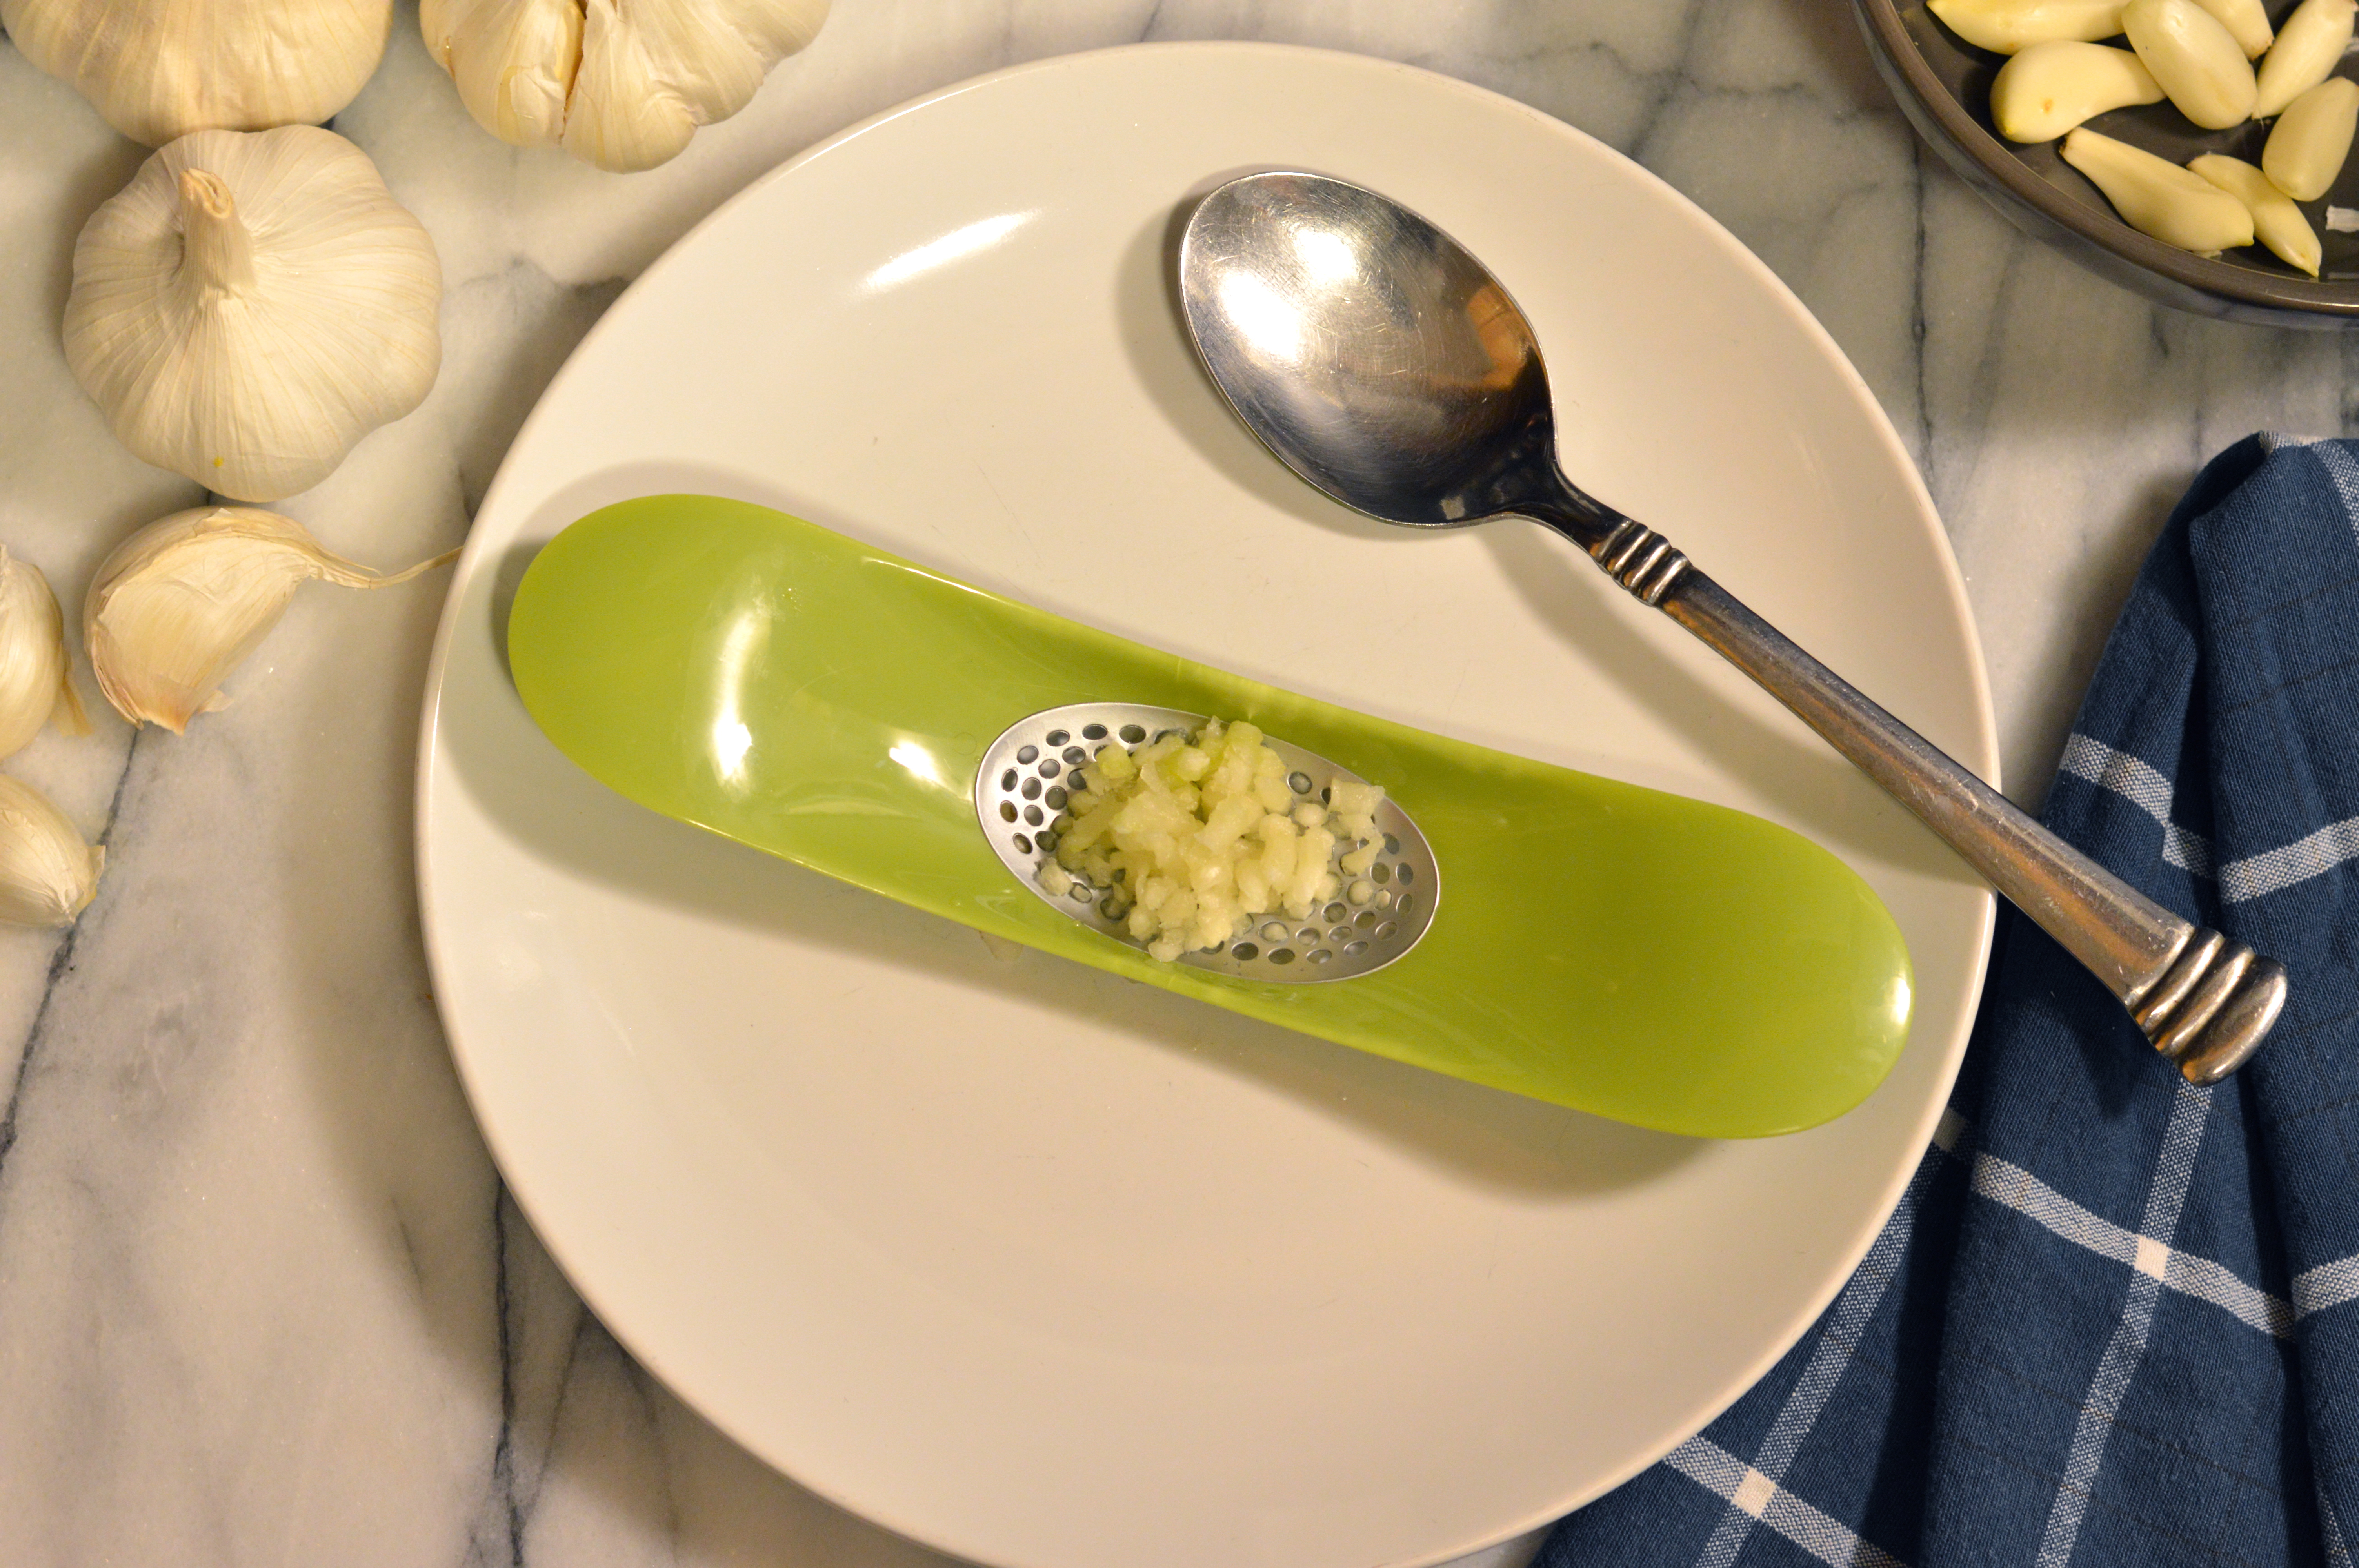
This tool produces a similar result to a traditional garlic press, but instead of pressing the garlic through the press with a piston, you rock the blades over a peeled clove while pushing down on the tool’s wide handles. Once the garlic comes through the holes you simply scrape it out with a spoon. The benefits to this tool are that it’s small and stores easily, and you’re able to get almost the whole clove through with little waste. It’s also very easy to clean since there’s no hopper to worry about. I will say though, that some force is needed to push down on the garlic, and can be a bit awkward to use. I wouldn’t recommend this tool for anyone with weak arms or arthritis. I would also say you wouldn’t want to use this on delicate counter surfaces.

So there you have it folks!
If you’re in the market for a garlic press, or you’re looking to upgrade, I hope you find all this information useful.  I think I’ve reviewed a nice selection of different presses in different price ranges, and I hope I’ve made it easier for you to make an informed decision. I think that among these choices there is a tool for anyone with any budget. Of course, I’m only one man, and these thoughts and opinions are mine alone, so some people may feel differently about some of these options. I’ve tried to be as unbiased and honest as possible, and I would like to mention that none of the companies that make these tools have paid me for anything I’ve said here.

chocolate peanut butter whoopie pies

Russell had oral surgery a few days ago and immediately developed quite a sweet tooth. Nothing like eating cookies and ice cream after spending hundreds on dental work! He was craving chocolate and peanut butter and asked me to make some buckeyes that I used to make when I worked for a cupcake shop. I thought it might be more fun to put a peanut buttery twist on traditional whoopie pies, and made a batch of chocolate peanut butter whoopie pies to satisfy his craving. Needless to say, they really hit the spot.

chocolate peanut butter whoopie pies | Brooklyn Homemaker

In case you’ve been living under a rock somewhere, a whoopie pie is a sandwich cookie made up of two cake-like cookies with a creamy filling between them. Whoopie pies are very popular in the Northeast and New England and, depending on the region, they sometimes go by the names black moon, gob, bob, or “BFO” for Big Fat Oreo. Although they probably originated in the Northeast, they’ve spread throughout the US in the past few decades and are well-known and well-loved all over the country. Traditionally they’re made of some kind of rich chocolate cake and filled with a creamy white vanilla or marshmallow filling. In recent years new varieties have popped up, including red velvet or pumpkin with cream cheese filling, or chocolate with fillings like peanut butter, mint, or caramel buttercream.

chocolate peanut butter whoopie pies | Brooklyn Homemaker

The history of the whoopie pie is something of a mystery. Many regions lay claim to their origins, but there is not enough evidence to prove any one area as their true birthplace. Handheld filled sandwich cakes were popular in Victorian era Europe, and whoever really invented the whoopie pie mostly likely borrowed the idea from these European treats. Victorian sandwich cakes were usually made of sponge cake filled with jam or cream, and were often cut into small slices or slivers and served with tea. Whatever their origins, America’s whoopie pies are decidedly less refined.

chocolate peanut butter whoopie pies | Brooklyn Homemaker

Many people agree that whoopie pies were invented by the Amish of Pennsylvania dutch country. The popular belief in this area is that these cookies were invented in Amish and Pennsylvania German culture and the recipe was passed down through generations without leaving any official paper trail. The legend has it that an Amish homemaker probably used some leftover cake batter to make cookies for her children, topped them with some buttercream, and liked the results so much that she shared the recipe with the surrounding community. The claim is that Amish mothers would pack the cookies into their children’s lunch bags and, on finding them, the kids would shout “Whoopie!”
Today these cookies are commonly sold in Amish country stores and farm stands throughout Pennsylvania and no trip to this region is complete without indulging on a traditional Amish whoopie pie.

chocolate peanut butter whoopie pies | Brooklyn Homemaker

The Berwick Cake Co. in Boston, Massachusetts also claims to have invented this treat. They claim to have started selling whoopie pies in the 1920s or 30, but the oldest printed reference to Berwick making whoopie pies is a newspaper ad from 1950.  Although the bakery closed years ago, the brick building still has the words “Whoopee! Pies” painted on its side. Whether Berwick invented them or not, many people believe they have commercial, rather than Amish, origins. These people believe that a production bakery probably used up some leftover cake batter and came up with a handheld cake by baking the batter on a pan like a cookie.

chocolate peanut butter whoopie pies | Brooklyn Homemaker

The state of Maine also lays a claim to the origins of the whoopie pie. Labadie’s bakery in Lewiston, Maine claims to have been making the confectionery since 1925, but many others think that the idea probably made its way to Maine from another state. Some people believe that the cookie traveled with some Amish groups that left Pennsylvania and moved to Maine. Others say that the whoopie pie came to Maine in the 1930s when a cook book featuring a recipe for a whoopie pie with marshmallow cream filling was published and distributed in New England by the Durkee Mower Company, the manufacturer of Marshmallow Fluff.
Whether whoopie pies were invented in Maine or not, the people of Maine take this cookie very seriously.  In 2011, the Maine State Legislature entertained the idea of naming the whoopie pie the official state dessert, but ultimately decided to name it the “Official State Treat”, choosing wild Maine blueberry pie as the state dessert instead.

chocolate peanut butter whoopie pies | Brooklyn Homemaker

The size of whoopie pies varies greatly depending on the region as well. Especially in Pennsylvania, some whoopie pies are huge sandwich sized confections that can feed two or more people. Other areas produce individual sized cookies, and recently some areas have started making bite sized mini whoopie pies.
The whoopie pies I made aren’t the huge Pennsylvania style, but they’re not the bite-sized variety either. I used a #24 portion scoop, about 3 tablespoons, and my pies ended up being about the serving size of a cupcake. This recipe made 12 finished sandwich cookies for me, but depending on the size you make them, your yield may be much different from mine. If you do decide you want to make your cookies a different size, you may need to adjust your cooking time by a few minutes.

chocolate peanut butter whoopie pies | Brooklyn Homemaker

This recipe produces a deep dark & chocolatey cookie. The addition of a healthy dose of coffee adds even more depth to the dark chocolate notes, and the combination of brown sugar, oil and buttermilk give it a wonderful chewy, moist and pillowy soft texture. Even without the filling, this cookie is phenomenal, and I “accidentally” baked an odd number of cookies and was forced, against my will I might add, to eat one on its own.
The real star here though is the peanut butter buttercream. It’s ultra smooth and creamy, just a little bit salty, a little more sweet, and crazy peanut buttery. It might be a bit too soft and loose to serve on super hot summer days, but this time of year it’s perfect. Briefly refrigerating the finished whoopie pies will help set the filling so it doesn’t smoosh out the sides when you bite down. The combination of these rich chocolate cakes with the sweet smooth creamy peanut buttery goodness of this filling is better than you can even imagine. Are you drooling yet? I  am.

chocolate peanut butter whoopie pies | Brooklyn Homemaker

Chocolate Peanut Butter Whoopie Pies

  • Servings: approximately 12 cookies
  • Print
Adapted from Baked Explorations

3½ cups all-purpose flour
¼ teaspoon salt
1¼ teaspoons baking powder
1¼ teaspoons baking soda
¾ cup dark unsweetened cocoa powder
2 teaspoons instant espresso powder
1/2 cup hot coffee
2 cups firmly packed light brown sugar
3/4 cups peanut or canola oil
1 large egg, room temperature
1 teaspoon pure vanilla extract
1/2 cup buttermilk, room temperature, shaken

Preheat oven to 350° F.  Line 2 baking sheets with parchment paper.
In a large bowl, whisk together the flour, salt, baking powder, and baking soda, and set aside.
In another large bowl, whisk together the cocoa and espresso powder. Add the hot coffee and 1/2 cup hot water and whisk until both powders are completely dissolved.
In a medium bowl, stir the brown sugar and oil together. Add this to the cocoa mixture and whisk until combined. Add the egg, vanilla and buttermilk and whisk until smooth. Using a rubber spatula to gently fold the dry ingredients into the wet ingredients. Make sure to scrape down the sides and the bottom of the bowl as you fold.
Use a portion scoop with to drop heaping tablespoons of the dough onto the prepared baking sheets about 1-inch apart. Bake for 10 to 15 minutes, until the cookies are just starting to crack on top and a toothpick inserted into the center of a cookie comes out clean. Let the cookies cool completely on the pans while you make the filling (recipe below).
Turn half of the cookies so the flat side faces up, and distribute the filling evenly between the overturned cookies using a portion scoop, piping bag, or icing spatula. Top the buttercream with another cookie and press down gently so the filling spreads to the edges of the cookies. Refrigerate for at least 30 minutes to set the filling, and let the cookies come back to room temperature for 30 minutes before serving. Whoopie pies will keep for up to 3 days in the fridge, on a parchment-lined baking sheet covered with plastic wrap.

Peanut Butter Buttercream

1 cup creamy peanut butter
12 tablespoons (1 1/2 sticks) unsalted butter, softened
1 1/4 cups confectioners’ sugar

With the paddle attachment of a stand mixer, cream the softened butter and peanut on high-speed until completely blended and smooth. Add sugar and, on low-speed, mix until combined. Turn up to high and beat until fluffy.

grapefruit bars

Well folks. Guess what…
I’m a man obsessed. I have yet another citrus recipe to share with you.

grapefruit bars | Brooklyn Homemaker

First though, I would like to mention that Brooklyn Homemaker received enough nominations in theKitchn’s The Homies to make it into the finals for “best daily read” cooking blog! Woohoo!!! I only started writing this blog about six months ago, and at that time I never imagined that I would come so far so quickly. I hate to sound like I’m bragging, but I feel like my writing style and photography skills, as well as my understanding of blogging and my idea of what I want Brooklyn Homemaker to be, have grown and improved so so much. There’s still a lot of room for improvement, but I’m at a place where I feel very pleased with the direction of this blog and excited for what it will become in the future.

If you are as big a fan of Brooklyn Homemaker as I am, and you’re as excited about the future of the blog as I am, please take a moment to vote for me in The Homies for “best daily read”. TheKitchn does make you create an account, but they make it very easy, and you can even sign in through facebook. Please choose Brooklyn Homemaker from the list of ten finalists at the top of the page HERE. Being such a young blog, I honestly cannot believe that I’m holding my own against blogs that have been around for years and have thousands of readers. It is such a huge honor to have made it into the finals and no matter what the outcome, I will be thrilled to have done so well. Being one of the ten finalists has brought in so many new readers, and I couldn’t be happier about it. If you’re new here, welcome! I’m glad you’re here, and I hope you’ll keep coming back!

grapefruit bars | Brooklyn Homemaker

Okay. Enough about me, let’s get back to the recipe.

Although we’re facing another cold front, the weather in Brooklyn actually warmed up for a brief moment over the weekend. Unsurprisingly though, my nagging citrus craving didn’t subside one bit. This time around I thought something bright and sweet and unmistakably citrus-y might do the trick to help me snap out of it. For over a week now I’ve been thinking about trying to make grapefruit curd, but I hadn’t yet because I couldn’t decide what I’d do with it. I love citrus curd but if I’m making it fresh I usually like to use it to fill a cake or serve with brunch or some such thing. Homemade curd tastes one bajillion times better than the store-bought stuff, but it isn’t nearly as shelf stable, so if I don’t have a plan to use it up pretty quickly, I generally don’t think it’s worth the trouble.

grapefruit bars | Brooklyn Homemaker

I toyed with the idea of making a grapefruit cake, but decided that if I were going to do that I’d want to make the famous Brown Derby grapefruit cake, which doesn’t actually call for grapefruit curd. Maybe some other time. After racking my brain a bit longer it finally hit me, I’d make lemon bars but with grapefruit instead. Since you don’t have to pre-cook the curd on the stove top it’s actually even simpler, but with very similar (delicious) results. I consulted with my dream woman, idol, and friend-in-my-head, Ina Garten, for the recipe, and made some tweaks and substitutions to turn her more traditional lemon bars into grapefruit bars instead.

grapefruit bars | Brooklyn Homemaker

Though her recipe is truly wonderful and worked perfectly with the grapefruit substitution, I wish I’d read some of the comments before I got started. I ended up having to make two batches to perfect this recipe, and I learned a few important things from the first, failed, attempt. The first batch wasn’t actually a true fail though. They were pretty decent, but they weren’t GREAT, and I wasn’t sure they were worth sharing here. So, rather than accepting defeat, or worse, blogging about a recipe I wasn’t that happy with, I decided to give it another shot the next day, and had MUCH better results.

grapefruit bars | Brooklyn Homemaker

In the name of learning, here’s what I did wrong the first time around. In an attempt to make for more attractive photos, I tried to make the first batch in a pretty white ceramic baking dish, but the pan was slightly smaller than the recommended 9×13 called for in the recipe. This already makes for a thick bar, and the smaller pan ended up making them even thicker. They took much longer to set than expected, baked kind of unevenly, and resulted in a slightly overcooked and muted flavor instead of the bright citrus-forward flavor I was hoping for. After reading some of the comments, I learned that a lot of people said they like a thinner bar and used a larger pan, like a 10×15 or a baker’s half sheet to spread the bars out, which apparently works really well. Making the bars even thicker than they already were though, was definitely not a wise decision on my part. Another thing I learned from reading the comments, again too late for the first batch, is that the filling shouldn’t be mixed together until the very last minute. If mixed too early, the acid in the citrus juice can affect the texture of the raw eggs, effectively cooking the eggs before they’re baked, and giving the cooked filling a rubbery “off” texture.

grapefruit bars | Brooklyn Homemaker

But here’s the good news! The second time around these bars were everything I was hoping they would be and more! The grapefruit really makes for a wonderful and interesting twist on the traditional lemon bar. I think lemon bars are delicious, but the super tart, super sweet flavor can sometimes seem a little one note and end up tasting like sour candy rather than a homemade baked treat. In addition to the tart and sweet flavors, the grapefruit juice adds some bitterness and depth that pairs really well with the buttery shortbread crust. They’re such a great little twist on the traditional lemon bars. They have all of that sweet and tart flavor you’re expecting but with just a hint of grapefruity bitterness. The curd filling is soft and sweet and ever-so-slightly gooey, and the buttery shortbread adds just enough crispness and bite to really bring another layer of texture and interest to the experience. SO. GOOD.

grapefruit bars | Brooklyn Homemaker

I hope you’ll give these bars a shot. Don’t let my initial mistakes scare you, this recipe is actually really simple and easy. If you learn from my mistakes and use the right size (or larger) pan, and be patient enough not to mix the filling too early, you’ll be thrilled with the results. Especially, obviously, if you’re a big grapefruit fan like I am. If you’re someone, also like me, who likes to try to get yourself prepared and ready ahead of time, you could always zest and juice your citrus ahead and could even mix the sugar in with the zest and juice. Just make sure you don’t mix the eggs in until you’re ready to bake. Okay? Now go preheat that oven. It’s cold outside again and you need something tropical-ish in your life.

grapefruit bars | Brooklyn Homemaker

Grapefruit Bars

  • Servings: 20-40 bars, depending on how you cut them
  • Print
adapted from The Barefoot Contessa Cookbook

crust:
1/2 pound (2 sticks) unsalted butter, at room temperature
1/2 cup granulated sugar
2 cups flour
1/4 teaspoon kosher salt

filling:
6 large eggs at room temperature
3 cups granulated sugar
2 tablespoons grated citrus zest (from 2 lemons and 1 large grapefruit)
1/4 cup freshly squeezed lemon juice (from 1-2 lemons)
3/4 cup freshly squeezed grapefruit juice (from 1 large grapefruit)
1 cup flour
Confectioners’ sugar, for dusting

Preheat the oven to 350 degrees F.
For the crust, cream the butter and sugar together in the bowl of an electric mixer with the paddle attachment until light and fluffy. Add the flour and salt and mix on low until just combined. Gather the dough together into a ball, and with floured hands, flatten the dough and press it into a 9 by 13 inch baking pan, building up a 1/2-inch edge on all sides. Chill in the refrigerator for at least 15 minutes.
Bake the crust for 15 to 20 minutes, until very lightly browned. Leave the oven on and let the crust cool slightly while you make the filling. Resist the urge to make the filling ahead, and wait until the crust comes out of the oven.
In a large bowl, whisk together the sugar, citrus zest, citrus juices, and eggs. Add flour and whisk until well combined, making sure there are no lumps. Pour the filling over the crust and bake for 30 to 35 minutes, until the filling is just set. Let cool to room temperature before cutting.
Cut into triangles and, with a sieve or dredger, dust with confectioners’ sugar.

braised chicken thighs with white wine, lemon, & capers

I may or may not have already said this, but this weather is starting to get me a little down. It’s hard to maintain a happy attitude and healthy energy level when it’s always cold and windy and slushy and wet and disgusting outside.

braised chicken thighs with white wine, lemon, & capers | Brooklyn Homemaker

I also may or may not have already said this, but I’ve totally been craving citrus like crazy lately. I normally like to at least attempt to eat seasonally, eating tomatoes at the end of the summer, apples in the fall, and asparagus in the spring, and generally avoiding the stuff shipped in from Peru for the rest of the year. I am certainly not fanatical about it, but most produce honestly just tastes better when it’s fresh and local instead of traveling from across the country or across the world. At this point in winter though, all those good intentions go straight out the window. When I can smell spring coming around the corner I can’t take it anymore and want nothing more than fresh bright summery foods, especially the tropical-ish flavors of citrus. So, you’ll have to forgive me (or maybe thank me) for doing another citrus recipe, this one with lemon, after just doing a soup with a healthy dose of lime.

braised chicken thighs with white wine, lemon, & capers | Brooklyn Homemaker

We recently got the unfortunate news that one of our close friends is moving away to London, so we wanted to have her for dinner to say farewell. I knew I wanted to make something really special, so I thought a rich hearty braised chicken dish was just the ticket. Although I totally love spending my day off braising a roast or stew, sometimes you just need something to come together a little faster. Chicken thighs are a really great way to make it seem like you slaved over a hot stove for half the day, when in reality you threw it together in just over an hour. Chicken thighs are also really inexpensive, packed with amazing flavor, and almost always come out juicy and tender.  This meal browns for about 15 minutes on the stove and then spends another 45 minutes in the oven. Including prep time, the whole shebang can be on your plate and in your mouth in 90 minutes or less.

Another little trick to make a meal feel like it cooked all day is to use really bold flavors. I thought the combination of fresh thyme, whole cloves of garlic, and salty capers would be perfect here. To cut the briney saltiness of the capers and the fattiness of the chicken, a healthy dose of crisp white wine and the zest of a whole lemon help make this dish taste really special. I think that the bright citrus-y notes of Sauvignon Blanc work really well, but you can use whatever  you like to drink or whatever you already have in the house.

braised chicken thighs with white wine, lemon, & capers | Brooklyn Homemaker braised chicken thighs with white wine, lemon, & capers | Brooklyn Homemaker braised chicken thighs with white wine, lemon, & capers | Brooklyn Homemaker

I adapted this recipe from one I found in Food & Wine, and while the recipe was amazing and I made only a few small changes, there was something about it that I found a bit strange. The original recipe said to use a large cast iron skillet to cook the entire meal. While the size and shape of a large skillet would lend well to this dish, I would never recommend slow cooking acidic meals in seasoned cast iron. Since this only cooks for an hour it’s not the end of the world, but acidic ingredients like wine and lemon can eat away at the seasoning in cast iron, which can not only negatively affect the function of your pan, but can also give your meal a slight metallic taste. The best option for this dish would be a large enameled skillet or enameled dutch oven without the lid. If you don’t have enameled cookware, you can also use a high-walled heavy stainless steel skillet, or any non-reactive, oven-safe and stovetop-safe pan that’s large enough.

Whatever you choose to cook this dish, you’ll be so glad that you made it. It has such a wonderfully rich and robust flavor. The wine adds a subtle sweetness and, along with the lemon, a bright fruitiness. The garlic, capers, and thyme add an earthy richness and a depth that tastes like it took several hours to build. After only an hour of cooking, the chicken thighs are tender, moist, and practically slide off the bone. Is your mouth watering yet?

braised chicken thighs with white wine, lemon, & capers | Brooklyn Homemaker

Depending on how many you’re feeding and the size of your chicken pieces, you can use between 4 and 8 thighs. Larger thighs should be plenty for one person, but if your thighs are small you might want to serve two pieces per person. Either way, the remaining ingredients can be left in the same amounts. You’ll just have a little extra sauce if you make fewer pieces. The sauce is amazing, so I promise it won’t go to waste. You can serve this with whatever you like, but I thought it paired perfectly with Basmati rice and roasted broccoli, with a little slice of fresh lemon and a glass (or bottle) of white wine. I just tossed the broccoli with olive oil, lemon, and salt and pepper, and roasted it on a parchment lined sheet pan at the same time that the chicken braised.

braised chicken thighs with white wine, lemon, & capers | Brooklyn Homemaker

Braised Chicken Thighs with White Wine, Lemon, & Capers

  • Servings: 4+ depending on size and number of thighs
  • Print
adapted from Food & Wine

4-8 bone-in chicken thighs with skin (depending on how many you’re feeding)
Salt and pepper to taste
3-4 tablespoons flour
2 tablespoons unsalted butter
6 or 7 peeled garlic cloves
1 1/2 cups dry white wine (I used Sauvignon Blanc)
1 1/2 cups chicken stock, preferably homemade
1 lemon
5-6 sprigs of fresh thyme
1 tablespoon capers, drained
1 bay leaf

Preheat the oven to 375°. Season the chicken with salt and pepper and dust with flour. In a large dutch oven or ovenproof skillet (not raw cast iron), melt the butter. Add the chicken, skin side down first, and cook over high heat until browned, turning over once, for a total of 12 to 14 minutes. Transfer the chicken to a plate, add the garlic cloves and cook over low heat until softened, about 5 minutes.  Add the wine and thyme, turn heat up to high, and boil until reduced by half, about 5 minutes.  Peel the zest (avoiding the white pith) of the lemon using a vegetable peeler. Try to pull the largest strips possible. Add the lemon zest, stock, capers and bay leaf and bring back up to a boil. Return the chicken to the pan, skin side up. Transfer the pan, uncovered, to the oven and braise for 45 minutes, or until the meat is fork tender.
Remove the pan from the oven, transfer the chicken to a plate, and tent with foil. Transfer the pan to the stovetop and boil over high heat until the sauce is slightly reduced, about 5 minutes. Discard the thyme, bay leaf and lemon zest, and spoon the sauce over the chicken to serve.