When I was young my mom came up with an idea for my sister and I to make homemade christmas gifts without spending a lot of money. She made up a batch of dough, we rolled it out, and cut out cute Christmas shapes with cookie cutters. This wasn’t cookie dough though, it was salt dough. At the time I didn’t know the name of it, or even what was in it, but I knew we weren’t supposed to eat it. I can only imagine how hard that was for me at seven years old. Salt dough is very simple to make, basically just flour, salt and water, and when you bake it it becomes very hard and will last forever if you keep it dry and clean.

Before we baked our “cookies”, we poked holes in the tops of each shape with a straw. After they came out of the oven we painted them with brightly colored craft paint, and strung through a piece of ribbon. Mom painted our names and the dates on the backs of each of them, and we had personalized handmade Christmas ornaments that we gave away to our family as gifts. My grandmother had those ornaments hanging on her tree each and every year until she stopped putting it up when we went away to college.

It turns out that salt dough has been around for centuries and can be traced back to ancient Egypt. Flour and water is mixed with salt as a preservative and the dough can be worked with kind of like clay. Then it’s baked at a low temperature for long enough to remove all the moisture and harden the finished product. Some people use salt dough to make elaborate sculptures and creations, but most people use it for children’s crafts. The dough is easy to make, easy to work with, non-toxic, and can be made from things most people already have at home.

At work last year we were coming up with ideas for our Christmas window and I thought it might be fun to make a grown-up version of these ornaments. We sell a lot of bakeware so I thought it would be really cute to have pretty sugar cookie snowflakes hanging in the window. I wanted them to look as real as possible, so I used real royal icing and sprinkles to decorate them. They came out beautiful and I packed them up in boxes and took them to work with me.
To my dismay, much of the detailed royal icing piping started to flake off of the cookies when we tried to hang them. I’m not exactly sure what went wrong but I’m certain it had something to do with the super high salt content. We still had enough in tact that we were still able to use them in the window, and the display was absoultely beautiful. No one would have guessed that there had been any problems, but I learned a valuable lesson. Real royal icing on salt dough fake cookies is a big fat NO.

This year I decided to give salt dough another go, but knew I should look for a better “icing” solution. I wanted to recreate the look and texture of royal icing, but using a more permanent medium. My first thought was puff paint. In the 90s you couldn’t walk down the street without tripping over a tube of puff paint, but in 2013 it seems like it’s impossible to find. I’m sure that big craft stores sell it, but I don’t have a car and couldn’t get to a craft store. I tried using some white caulk that I had leftover from my kitchen backsplash project, but the consistency was too thick and it was difficult to work with. After that I decided to try calling the local art supply store and see if they had any suggestions. They pointed me toward a product called light molding paste, which has almost the same consistency as frosting. I tried using it as is, piping it from a pastry bag with small round tip (or writing tip) and it piped out really nicely. Sprinkles and glitter stuck to it really well too, and I got some really nice results using it. The only issue I had was that it’s slightly thicker than royal icing, more like frosting, and doesn’t smooth out the way royal icing does. Since molding paste is water soluble, I tried thinning it out just slightly with water to get a thinner consistency.
I’m so glad I called that art store. This stuff was perfect. It was very easy to thin out to the consistency I wanted, and piped just like the real thing. It was easy to work with, and simple soap and water cleaned it up with no trouble. It dried nice and hard too and stayed stuck to the salt dough with no problems. I’m assuming that puff paint would probably work well too- but this stuff was truly ideal. I’d definitely recommend it if you want to try this project yourself. You can find it at any art supply store and they have it at the big craft stores too. I used Golden brand, and it’s important that you get the light molding paste. Since I didn’t completely cover my ornaments I didn’t use much either. I bought the smallest container the store had, and after decorating probably about 30+ ornaments I still have half a jar left.
Since I wanted my ornaments to look like gingerbread cookies and not sugar cookies, I decided to color the dough. I could have used food color or paint, but I wanted to try to achieve a more natural molasses and spice kind of brown color. I also thought that it would be great if the finished ornaments had a nice gingerbready smell, so I decided to use spices to color my dough. In my test batch I used ginger, nutmeg, clove and cinnamon. It smelled amazing in the oven, but after a long slow bake they didn’t smell like much after they cooled. I noticed that the best gingerbread color came from the cinnamon, so when I made the next batch I skipped the other spices all together. You can use more or less depending on how dark you’d like the dough, but cinnamon is really all you need to get the color right. My advise would be to use the cheapest cinnamon money can buy. Go to the dollar store and buy the flavorless stuff you’d never actually want to bake with. Don’t waste the good stuff on these. You need a lot of it to get the color right, and you’re never going to get to eat these “cookies”.
I also noticed in my test batch that in the first half hour of baking the salt comes to the surface of the dough, bleaching out the exposed surface and fading the color I worked so hard to get right. The side that was facing down and wasn’t exposed to the air was fine though, and once most of the moisture had baked off they could be flipped and continued baking didn’t bleach the other side. So, when I made my second batch I baked them with the side I wanted to decorate facing down. Bingo!
You should totally do that too.

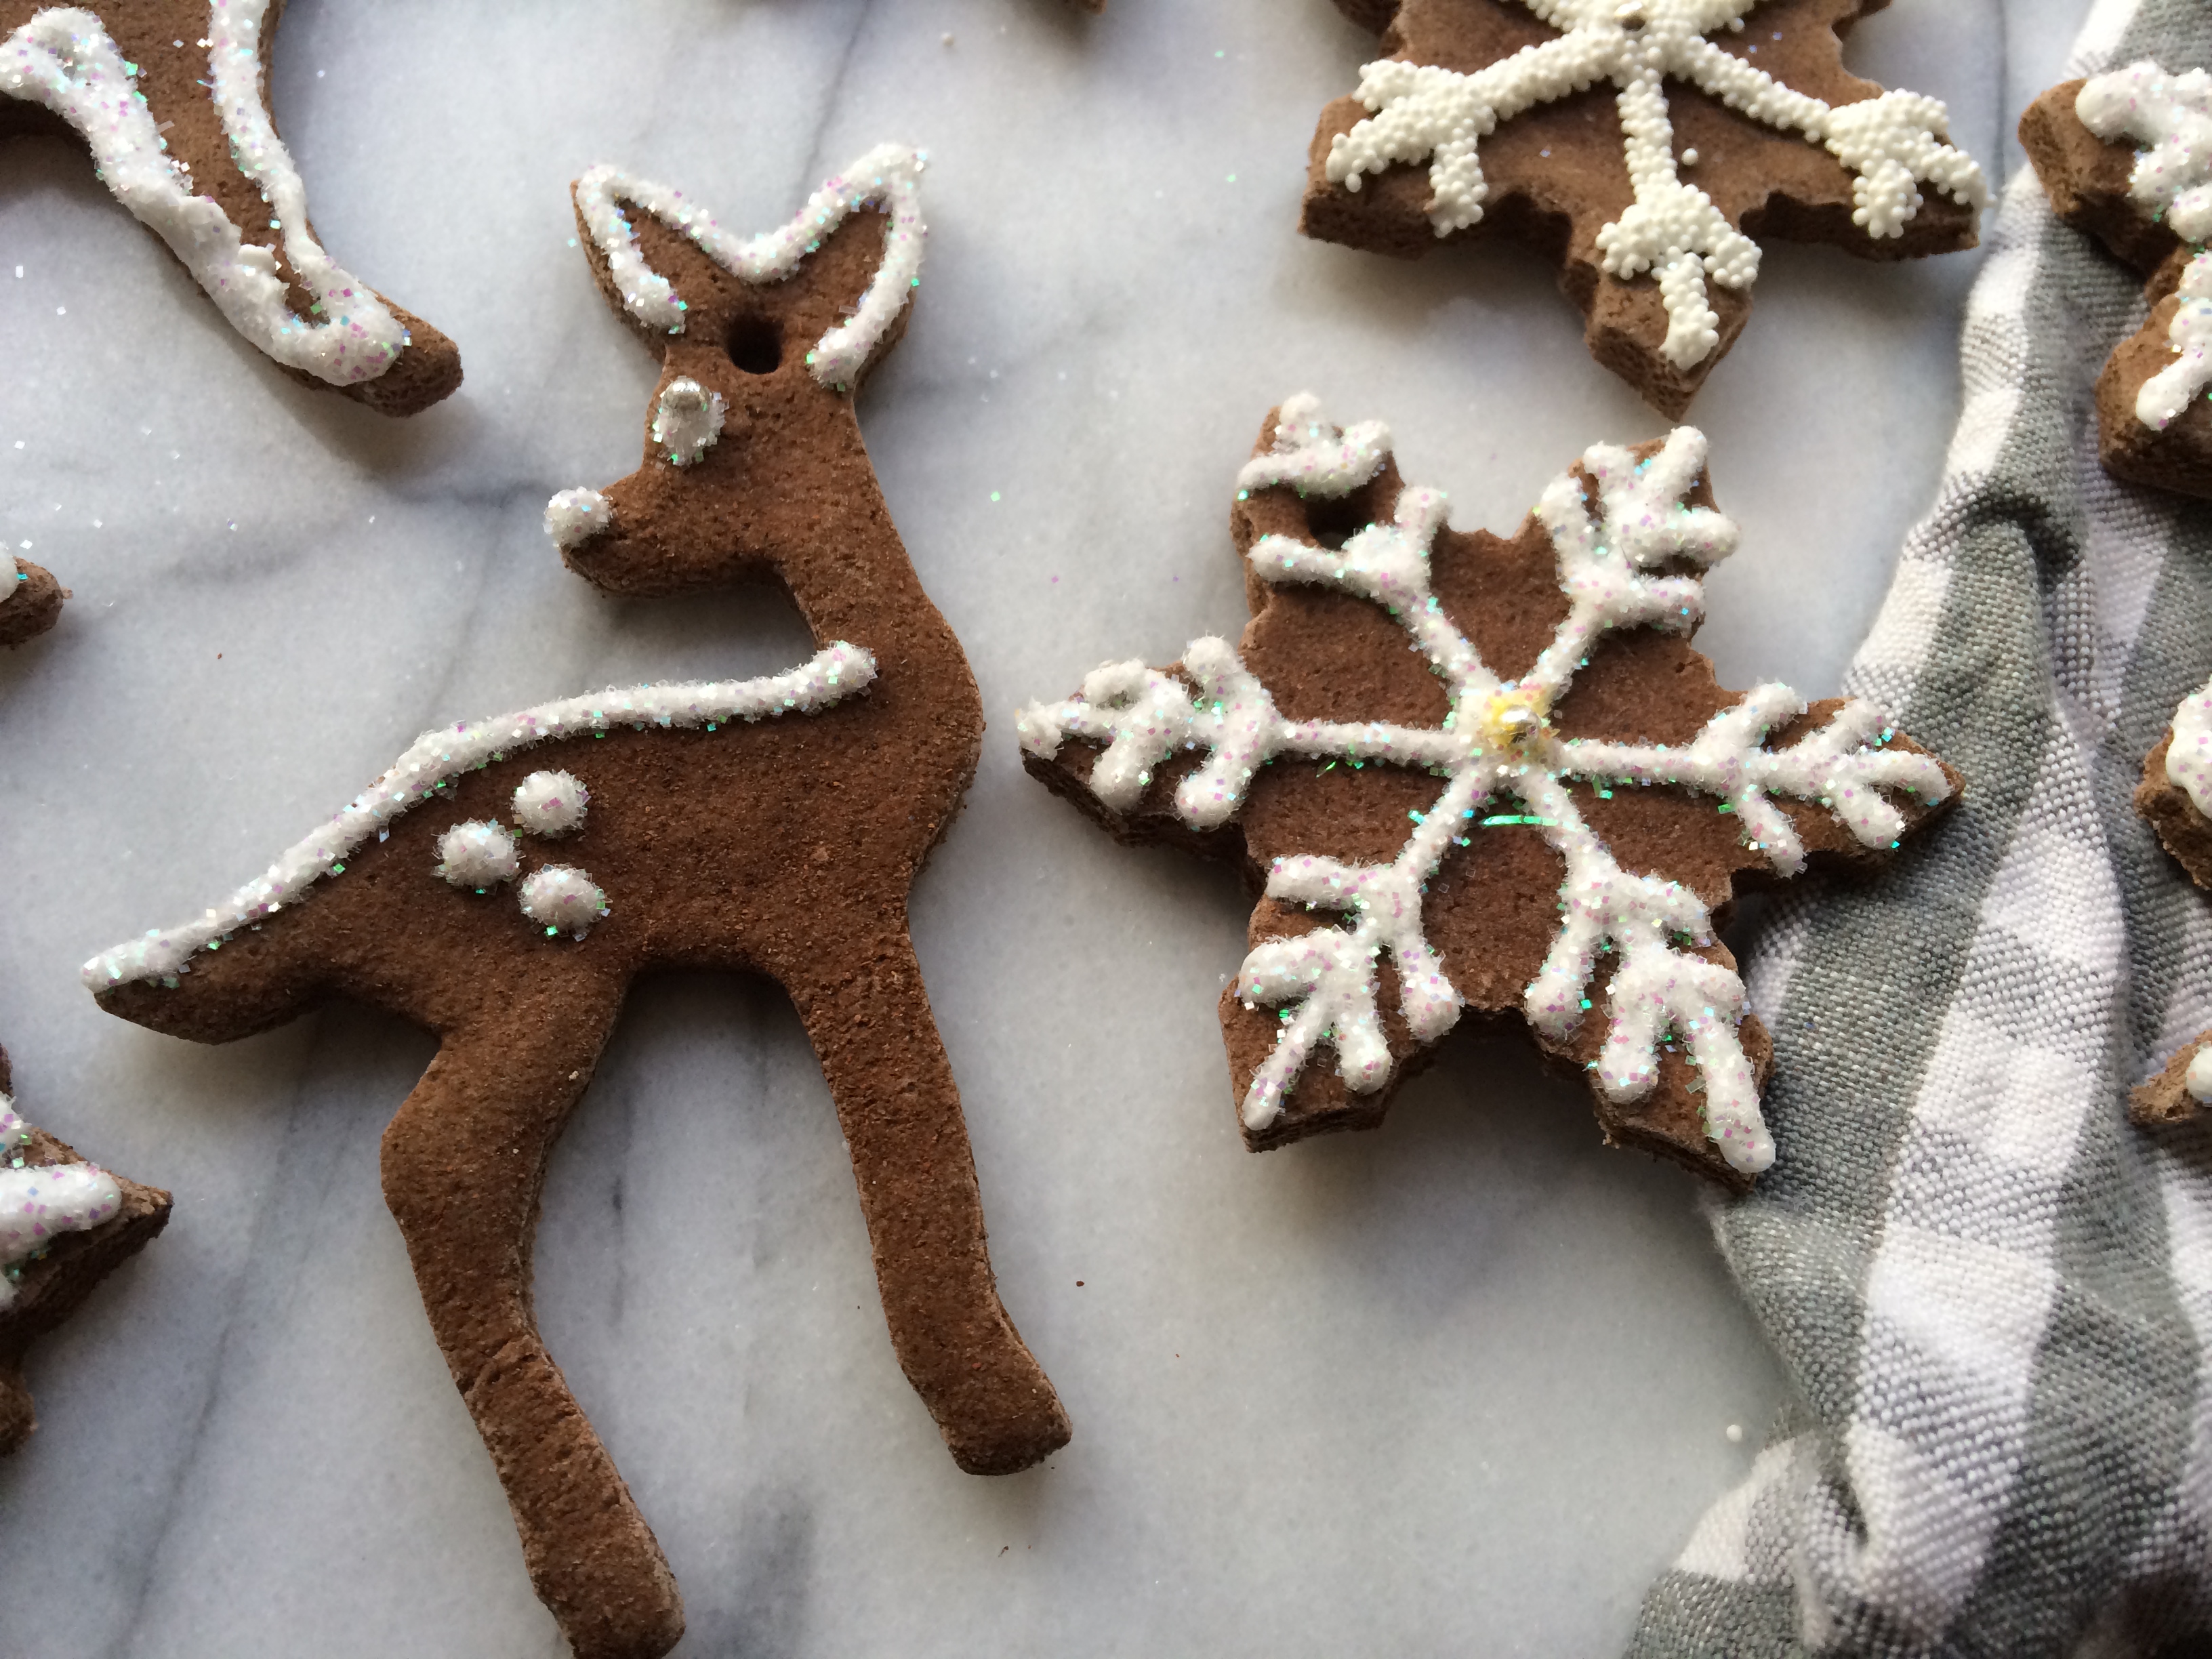
To decorate the ornaments I fitted a disposable pastry bag with a Wilton #3 tip and filled it with my thinned light molding paste. Then I piped out a thin even line and made some designs. Some ornaments were just outlined, others got lines and dots, some had intricate snowflake designs, but you can do whatever you like. If you’ve never used a piping bag and pastry tip, I’d definitely recommend some practice before you dive into this project. This is permanent so you want them to be pretty near perfect. I promise it’s not as scary as you might think. Just twist the top of the bag closed so your “icing” doesn’t squeeze out the top when you put pressure on the bag. Then hold your tip a small distance from your ornament and squeeze the bag with slight and even pressure. Patience and practice. You could also just “frost” your ornaments instead without thinning the molding paste and they would still look realistic and pretty.
Before the molding paste dried I covered the ornaments with glitter, nonpareils & dragees. I found a glitter that looked similar to a product I’ve seen in a cake decorating store- so the cookies still look very realistic. I worked with a just a few ornaments at a time to make sure the molding paste didn’t dry before I put the glitter on it. Then I just shook the glitter off and set the finished ornament on a tray to dry. I completely covered each ornament in glitter, and was able to re-use the leftover glitter for the next batch of ornaments, over and over until I was finished.
Word of warning: Glitter is pretty but it’s also the devil. There is glitter everywhere. I’ve vacuumed, mopped, rinsed, showered, and scrubbed multiple times and I still see glitter everywhere. It on my floors, in the rug, on the counters, even on me. It’s been days and I still catch customers at work looking at me funny and realize I have glitter in my beard.

I couldn’t be happier with the results.
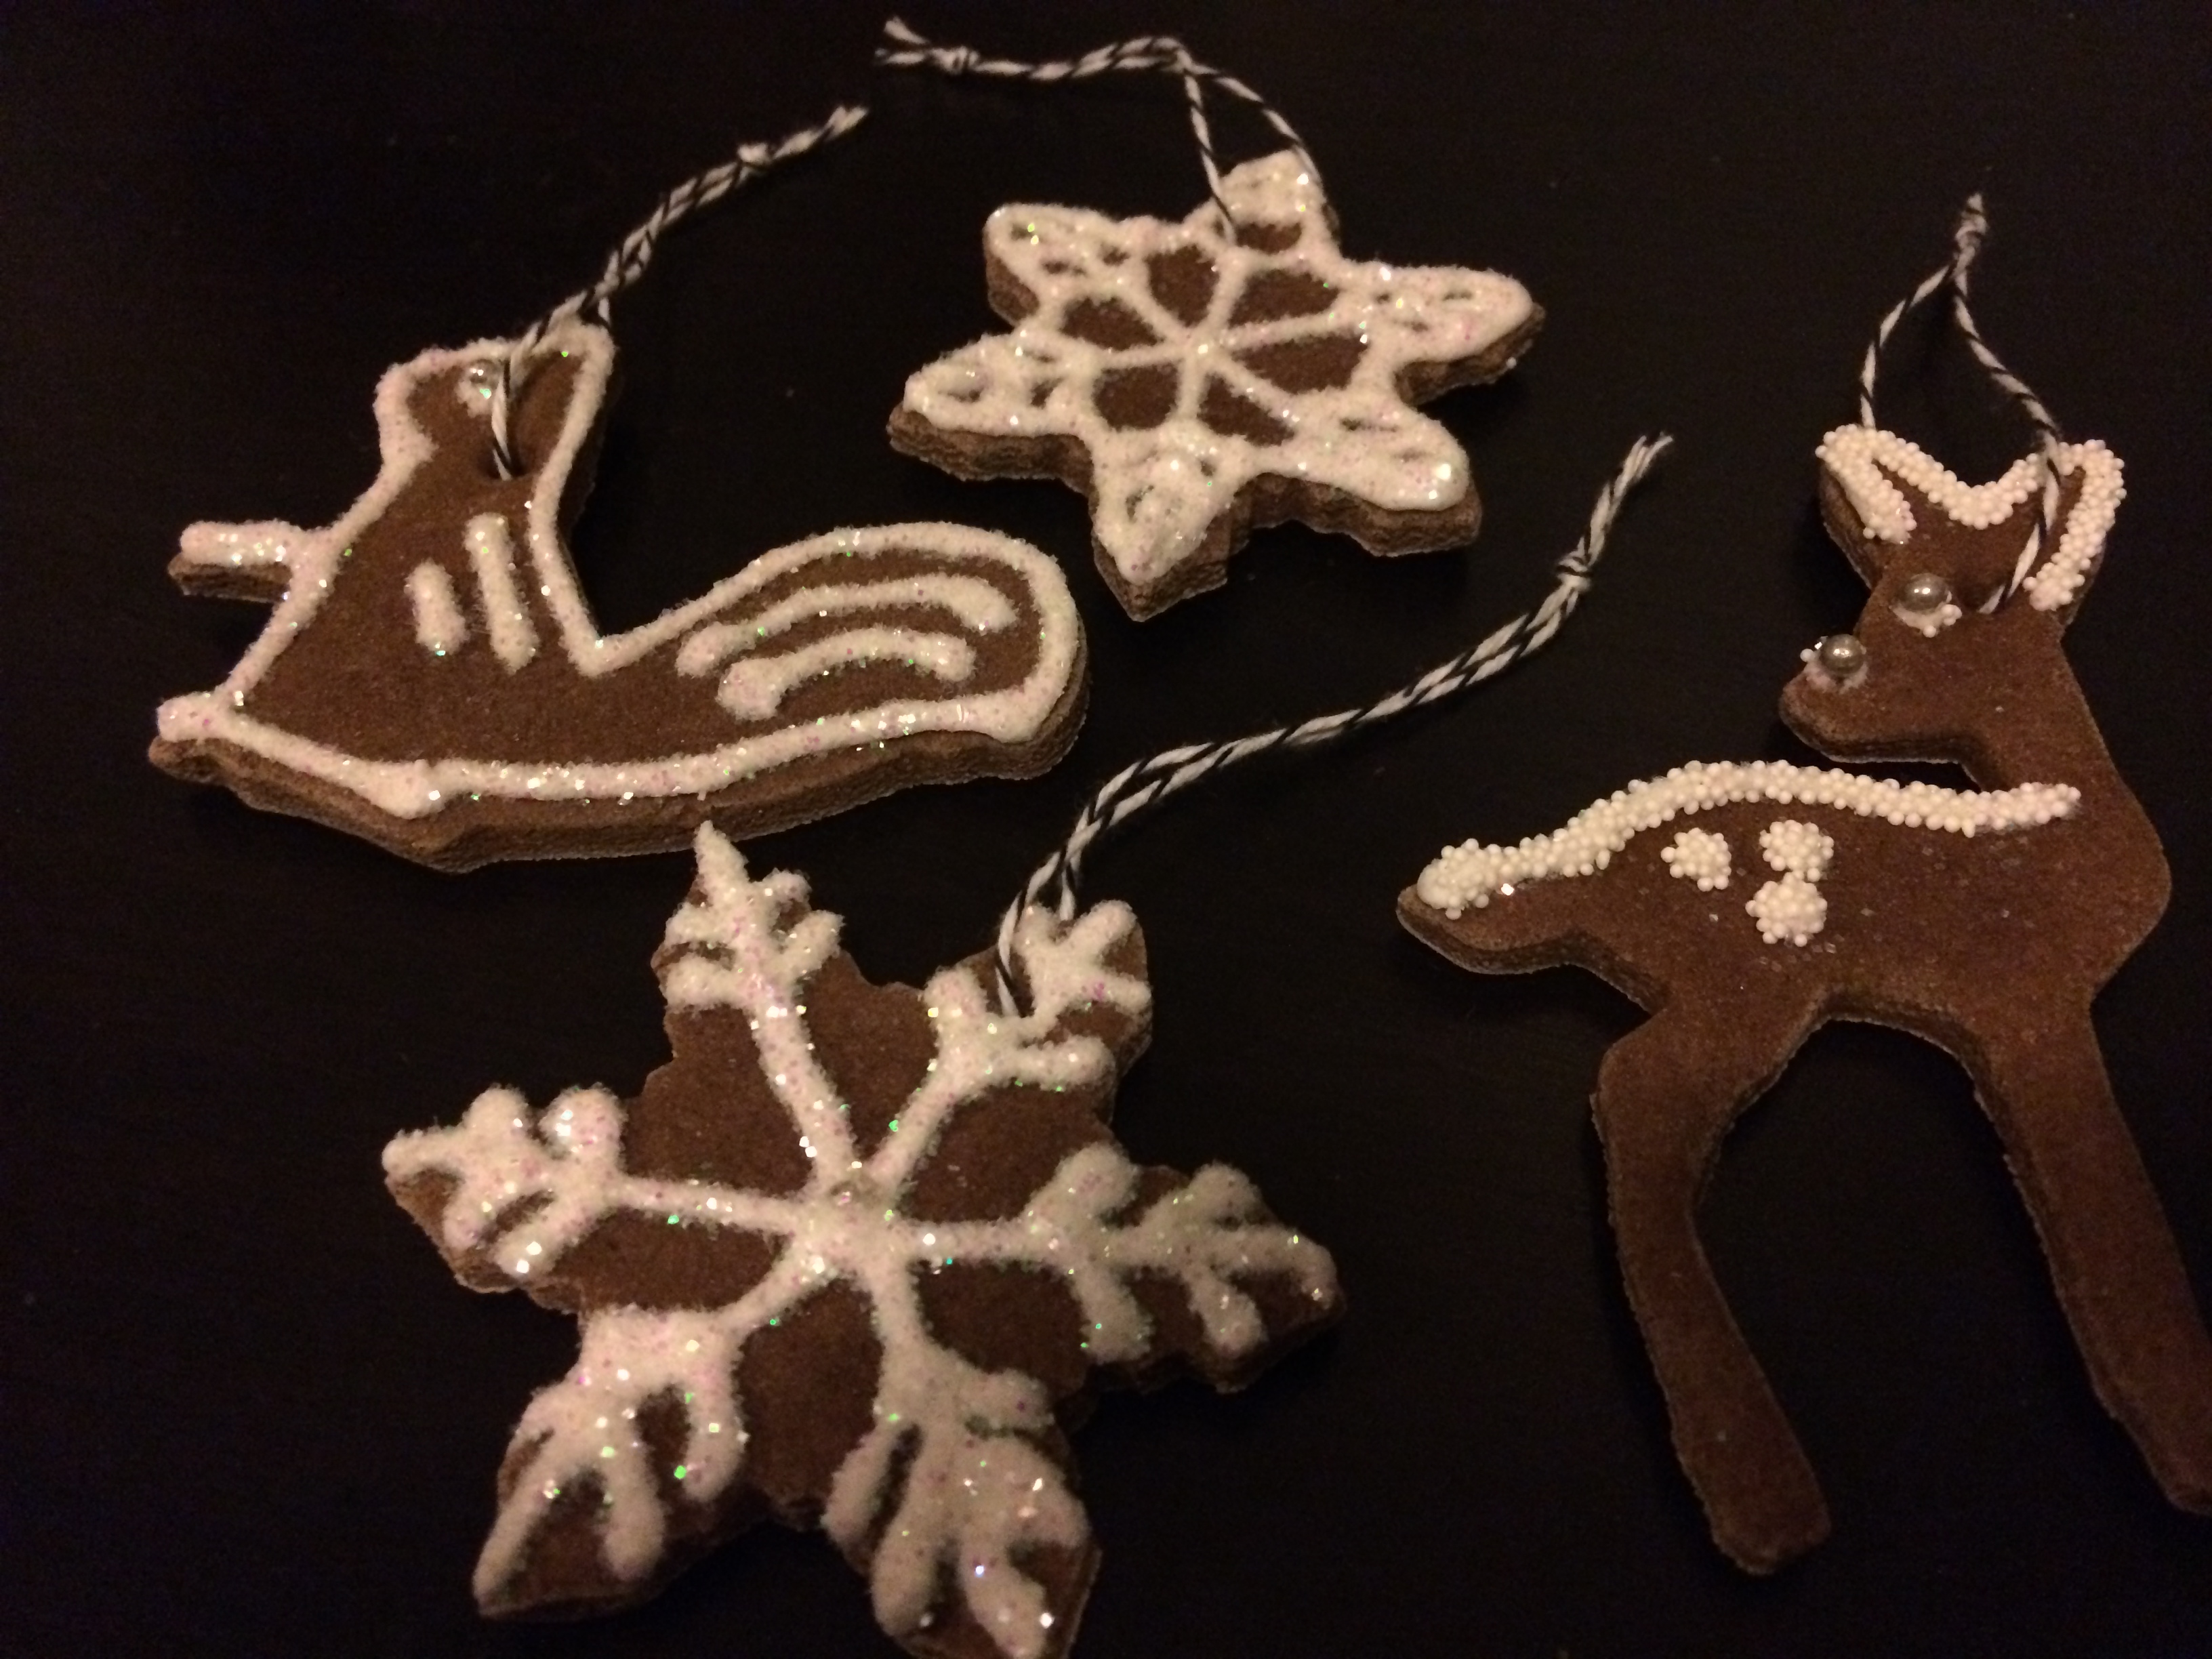
They came out beautiful. They really do look very similar to the real thing, and they look gorgeous on my tree. I’m really glad that I went with white decorations for them too. I’m sure that adding some color to the molding paste would be easy and the results would be beautiful, but these simple white ornaments go perfectly with our apartment. The white pops against the brown “cookies”, and they look chic, timeless and modern all at once. These photos don’t do them justice when the lights are on. They’re all sparkly and stuff!
You should definitely give this a try. Your Christmas tree will thank you. And then you will thank me. (You’re welcome.)

Gingerbread Salt Dough Ornaments
1/2 cup salt
1/2 cup water
4-6 tablespoons cinnamon, or more, depending on how dark you want your dough
Preheat oven to 250 degrees. Mix all ingredients together in a medium bowl. If you want plain (non-gingerbread) dough, or want to color the dough, leave out the cinnamon. Knead the dough a few times on a lightly floured surface to be sure it’s well mixed and has a smooth consistency. Knead in more cinnamon if you want a darker color or more flour if dough feels too sticky. Lightly coat with flour (or cinnamon) and roll dough out to about 1/8 to 1/4 inch thick. These “cookies” will not rise at all- so make them as thick as you’d like the finished product to be. Cut into desired shapes, and cut a small hole with a straw or piping tip. Transfer to a parchment lined baking sheet, making sure the side you want to decorate is face down. Bake for 2-3 hours or until completely dry.
Allow the ornaments to cool completely. Using a pastry bag with a small writing tip, pipe on desired design with light molding paste. Puff paint should also work well for this. Decorate with glitter, small beads, or whatever you like. If you’re only using this for one season, sprinkles and candies work too. Allow “icing” to dry completely, for at least 4 hours. If desired, spray with a matte sealer and let dry according to directions. String some ribbon or bakers twine, tie a knot or bow and you’re ready to decorate!
*Update: This didn’t happen to my ornaments, but one reader said her ornaments bubbled up in the oven. I read up on it and learned that this can happen if they dry too fast or if the oven temp is too high, so I’d suggest getting an oven thermometer to be sure your oven doesn’t go above 250. To be extra careful, you may even want to try baking them at a 225 for a longer period of time.

So cute! I love them.
LikeLike
These really do bring back memories. Don’t forget to put names and dates on some of them with permanent marker. Let’s see, there is Russell, Doris, Betty Lou, and of course, Tux!
LikeLike
Beautiful! We made some 30 or so years ago if the moisture didn’t get them they would still be alive! We painted them with watercolors, what would you recommend for future projects?
LikeLike
I think that the best way to keep them beautiful for a good long time would be to seal them with a spray on matte sealer or varnish. This will help keep them same from moisture damage for years.
LikeLike
I love these! So festive.
LikeLiked by 1 person
I made salt dough ornaments with my mom, and I’ve continued the tradition with my kids. Your ornaments are beautiful and I’m so impressed by all the effort you put into making them! It’s such a lovely tradition. Great post!
LikeLiked by 1 person
Thank you!
LikeLike
I love this, thank you for sharing. Mine turned white as they dried out. Have you got any tip tp prevent this ? i’d like to keep them brown !
LikeLiked by 1 person
I found that the side that was facing up and exposed to air during baking turned white but the side baked down stayed (mostly) brown and that was the side i decorated. I think thats just the nature of salt dough though and may be unavoidable.
If you want a darker color all over you could try spray paint- they make this dappled “stone” paint in brown that i think would look similar to gingerbread
LikeLike
Thanks for your answer ! i’ll try ! I did not know your blog and visited it a little bit…OMG…as French, I really appreciated all the pictures and recipes…Keep on doing it !
LikeLiked by 1 person
Thank you!
LikeLike
Making these tonight! I’ll post the finished product(s).
LikeLiked by 1 person
So great! I hope they came out really beautiful!
LikeLike
I’m glad this post came after Christmas… Look GREAT and would have felt stressed if I hadn’t mad them this year!
LikeLiked by 1 person
These are so beautiful!! I have done salt dough ornaments before, and even done the cinnamon ones, but it’s been a couple years, and I remember I had an awful time getting the ratio right when I tried doing cinnamon and applesauce– they just wouldn’t stick together! I am going to try this recipe this year! I make an ornament with my students at school (I teach German) each year and this will be a great choice this year. I think I will look for puff paint as it will be easier for the students to manage but the light molding paste sounds ingenious! Thanks for a great post!
LikeLiked by 1 person
How fun! I hope your students love them!
LikeLike
Reblogged this on Adventures and Musings of an Arch Druidess.
LikeLiked by 1 person
Thank you for a beautiful, thought-out, and very useful blog post! I love this.
I used your recipe for gingerbread houses because I’m doing a bunch of them for a party and I didn’t want to go through all the effort with real gingerbread when no one eats the things anyway.
I just thought I’d let you know that I lessened the salt to flour ratio (about 3/10 instead of 1/2) and the dark color stayed beautifully for both sides.
LikeLiked by 1 person
How much water did you use if you changed the ratio of salt to flour?
LikeLiked by 1 person
Hi Vinita
I’ve only tried the recipe as written above so I’m not sure how much water you’d need to use if any changes are made to ratios
LikeLike
I am using your recipe to “Green” Plymouth Church this year! Can’t wait!
LikeLiked by 1 person
Great detailed article! Your decorations are adorable! I’m looking forward to using this recipe to make some little gingerbread ornaments ☺
LikeLiked by 1 person
Thank you so much! I hope you love them!
LikeLike
Such georgous faux gingerbread ornaments. These would look lovely on top of broen paper wrapped gifts with a twig of holly leaf /berries or a small bow tie glued near the reindeer neck. Also, would make a special gift name tag that could be saved and hung on the tree next year. Ir place a batch on a platter near the tree just waiting for Santa.
LikeLiked by 1 person
All such lovely ideas! I might just have to try a few myself!
LikeLike
Thank you so much sharing your story and recipe. I teach young children and this will be a perfect project for them to do with their families and make some Christmas memories.
LikeLiked by 1 person
Thank you Anita! This is the perfect craft project for kids!
LikeLike
They are puffing up in the oven! What could we have done wrong???
LikeLiked by 1 person
Hi Rebekah!
I’m so sorry to hear they’re puffing up! I’ve read that this can happen if they dry out too fast or if the oven temp is too high, but to be honest this didn’t happen to mine and this is the first time I’ve heard this from a reader, so I’m not 100% sure what causes it. I wish I could be more help!
If you don’t mind the puffy look I’m sure they’ll still be completely adorable once they’re decorated, but they might be a little bit more fragile than normal. If you want to try to make them again, I’d suggest lowering the oven temperature by maybe 25 or 50 degrees and giving them some extra time to dry.
Tux
LikeLike
Oooh wonderful article. I’m planning to make some salt dough ornaments with my 11 year old this weekend and will definitely be adding the cinnamon. I’m also thinking these would make fab personalised gifts for the teachers at her school. Have you ever tried adding the glitter to the dough before baking to get the sparkle? I’m toying with this idea having read about it on another blog :D
LikeLiked by 1 person
I’m so sorry I just realized I never replied to your comment! I haven’t tried adding glitter, but they bake at such a low temperature that I think it should be fine.
LikeLike
Lol, no worries. Adding the glitter into the dough worked out really well and my girls are delighted with their finished ornaments :D
LikeLiked by 1 person
Thanks for the gingerbread cookie ornament How To.
I will ask… Can I use Food Coloring in the Light Molding Paste ?
Gotta make green army little men.
Toy soldiers and Trumpets. Blue and pink Angels.
And Scotty dogs. (Black) I will likely use Outline rather than filled in.
LikeLiked by 1 person
I have to admit that I haven’t tried adding food color, but I think it should work just fine. Good luck! Let me know how they turn out!
LikeLike
Thank you SO much for this wonderful tutorial post. I was able to use this for my daisy Girl Scout troop to decorate their own ornaments. It was a real treat for them. Merry Christmas!
LikeLiked by 1 person
Tried this tonight. Worked great. Used fine tip white puff paint and it worked perfectly. Also added some molasses for color. Not sure if that will change the longevity, but helped darken after 6 tbsp cinnamon wasn’t enough.
LikeLiked by 1 person
Hey there love this idea and will be trying it for my homemade tree decorations 😁 what are the specifics for the temperature of the oven fan assisted? Also is it 225 degrees Celsius or Fahrenheit? Many thanks for this post glad I came across it 👍🏻🙂
LikeLiked by 1 person
Hello Christopher,
Thank you for your message. Unfortunately I have no experience with fan assisted ovens so I’m not sure I’m able to answer your question. I can tell you though, that they bake at 225 Fahrenheit.
I hope they turn out beautifully for you!
LikeLiked by 1 person
Thank you I hope so as well xx will send photos if it allows me too 🙂🙂 thankfully in the UK we still have some puff paint 🤣 but would white glue gun glue do as well? 😊
Looking forward to a homemade Christmas this year 😁 popcorn garlands can’t wait 😀
LikeLiked by 1 person
i made these last year and the were fun, easy, and gorgeous! i lost your recipe and almost cried! happy to have found it again! i cant wait to make more this year. they turned out so beautiful. thank you so much for sharing!
LikeLiked by 1 person
Thank you so much for this super sweet comment! It makes me so happy to hear you’re enjoying these ornaments so much
LikeLike
Regarding the dough that bubbled… the baker wasn’t using self-rising flour, were they?
Mine are in the oven now. I’m hoping for good results.
LikeLiked by 1 person
It’s actually pretty common for that to happen if they’re dried at too high of a temperature. Steam builds up in the middle of the “cookie” and can’t escape because the outside edges are already dried out and hard but there’s still moisture in the middle. They bubble up almost like a pita, with a hollow pocket inside.
But this shouldn’t happen if you’re sure your oven doesn’t run hot and you follow the recipe and resist turning up the oven.
Good luck! I hope they turn out great for you!
LikeLike
if I don’t bake them, will it work anyway?
LikeLiked by 1 person
Hi silvia,
The dough would be too wet not to bake. It needs to be baked to dry it out. If you gave a dehydrator you could try using that if you really don’t want to bake them, but I’m not sure how it’d turn out as I haven’t tried that.
Good luck
LikeLike
Loved this craft. I made these with my eight and nine year old kids using puff paint and they turned out so cute!! We dried them in our food dehydrator for four hours at the highest setting instead of baking. The kids are so excited to start giving them out as gifts next month.
LikeLiked by 1 person
Hi Brittany, I’m so glad to hear you and your kids loved this so much! Using your dehydrator is such a great idea!!
Thanks for taking the time to comment and let me know!
LikeLike
Your ornaments are just beautiful, and I really appreciate all of your research and advice. Thank you so much. I purchased (rice) wafer papers in several Christmas patterns. My idea is to adhere papers to the cooled salt dough ornaments to give as gifts next year. Do you think that thinned modeling paste could be used to “frost” the cookies lightly as a surface to adhere to the wafer paper?
LikeLiked by 1 person
Hi Ellen, I love your idea! I haven’t tried anything like this before and have never worked with wafer paper myself, so I honestly can’t say for certain that it would work but I don’t see why it wouldn’t. I hope it works out! Let me know how it goes!
Thanks again, and good luck!
Tux
LikeLike
Thanks so much for your reply and for your support! I will certainly let you know (and see!) how they come out : )
LikeLike