cookies

dark chocolate dipped hazelnut & olive oil shortbread cookies

Back in my 20s, when I was single, I tended to hang out almost exclusively with other single people.

dark chocolate dipped hazelnut and olive oil shortbread cookies | Brooklyn Homemaker

If one of my friends would start dating someone seriously we would try to maintain our friendship, but we’d usually start to drift apart as they hung out with their partner, or with other couples, more often than their single friends. I always quietly resented those friends, and their partners, for falling out of touch and drifting from me and my desire to blow three days worth of tips in one night of debauchery. Why would anyone chose to stay in with popcorn and netflix when they could hang out with me, bar hopping and getting embarrassingly sloppy until the bars closed, when we could try to find some cheap mexican food to gorge on before falling asleep with our clothes on? What could be more fun?

dark chocolate dipped hazelnut and olive oil shortbread cookies | Brooklyn Homemaker

Now that I’m on the other side of that situation, married and in a relationship for several years, I’m starting to understand. It might have something to do with being a few years older, or the fact that I work mornings now, or that I have two dogs to get home to, but the very idea of staying out past midnight and paying for drinks at a bar rather than drinking at home has me yawning wide and worrying about my bank balance.

dark chocolate dipped hazelnut and olive oil shortbread cookies | Brooklyn Homemaker

I mean, it’s not as if I don’t have any unattached friends, it’s just that more and more couples have made their way into my social circle. Call it maturity, or call it geriatric old age, but I’ve reached the phase of my life where nights out on the town are fewer and farther between, while socializing and entertaining at home happens more and more often. Part of the appeal of hanging out with other couples is that they tend to be just as willing (and eager) to have drinks, dinner, and visits in each others homes.

dark chocolate dipped hazelnut and olive oil shortbread cookies | Brooklyn Homemaker

One of our closest friend-couples are in the process of organizing a DIY wedding. Last year when they were early in the planning stages, we had them over for brunch to discuss their ideas and pass down some of the supplies we had leftover from our own wedding. It was actually during that brunch that I served the Aunt Sassy Cake that was the inception of Brooklyn Homemaker, largely thanks to their insistence and enthusiasm.  Little by little, we’ve been helping them with certain aspects of their wedding along the way, and I might even be planning to bake a few little things for their big day.

dark chocolate dipped hazelnut and olive oil shortbread cookies | Brooklyn Homemaker

When they asked if I’d be interested in coming over to help out with some DIY craft projects for the wedding, I was all over it. I love doing that sort of stuff anyway, but I was especially into the idea of hanging out for the day. There would also be wine.

While the setting may have changed as I’ve gotten older, my inability to practice self control has not. I may, just may, have consumed a few too many glasses of wine and done a lot more drunken gum flapping than actual crafting.

dark chocolate dipped hazelnut and olive oil shortbread cookies | Brooklyn Homemaker

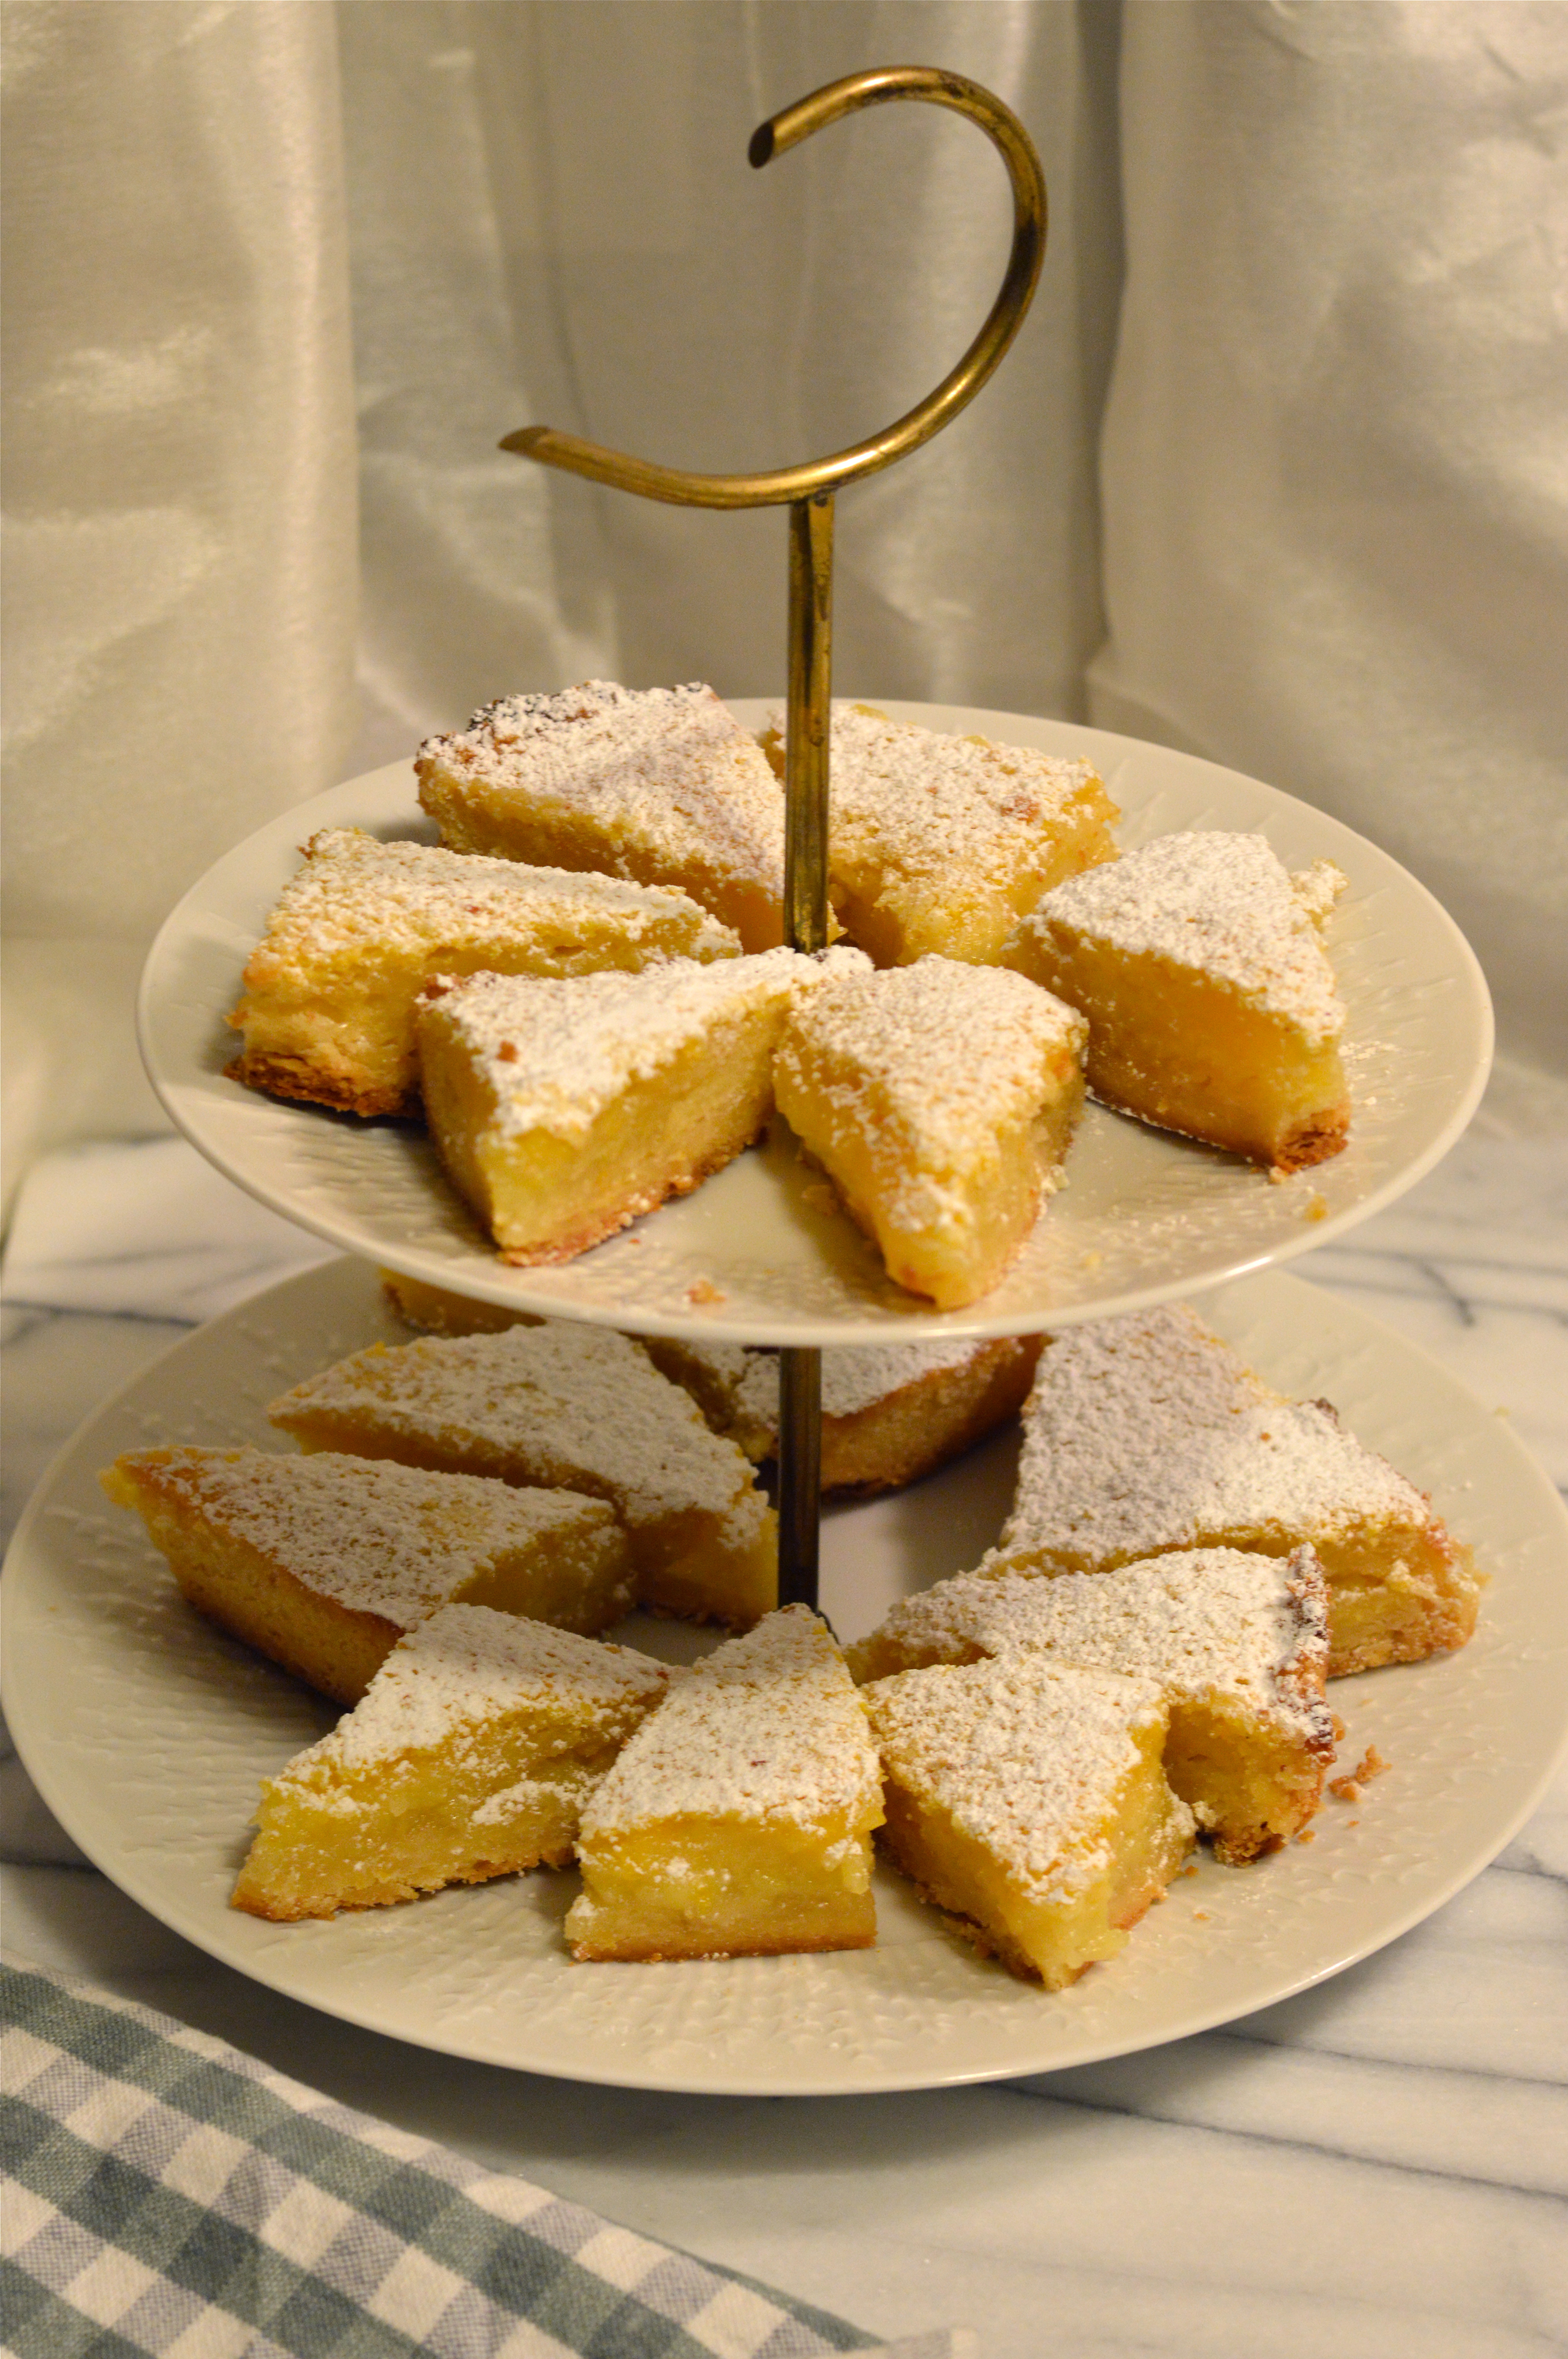
There’s something in my DNA that dictates I must always arrive to a party, no matter how big or small, with something homemade and delicious. So, I asked if I could bring some cookies along, as if the answer might actually be anything other than yes.

My original thought was something like a simple chocolate chip cookie, but when I learned that one of their crafting friends is vegan, I started brainstorming. It’s no secret that I love a challenge.

dark chocolate dipped hazelnut and olive oil shortbread cookies | Brooklyn Homemaker

As much as I adore butter and bacon, I really love to make the occasional vegan recipe. The one thing I don’t like though, is using vegan substitutes for things that are innately un-vegan. Egg substitutes and margarine are not things that you’re likely to ever find in my refrigerator. The way I see it, if you want eggs and butter, eat eggs and butter; and if you want to avoid them, avoid them without substituting impostors that look, taste, and smell vaguely similar.

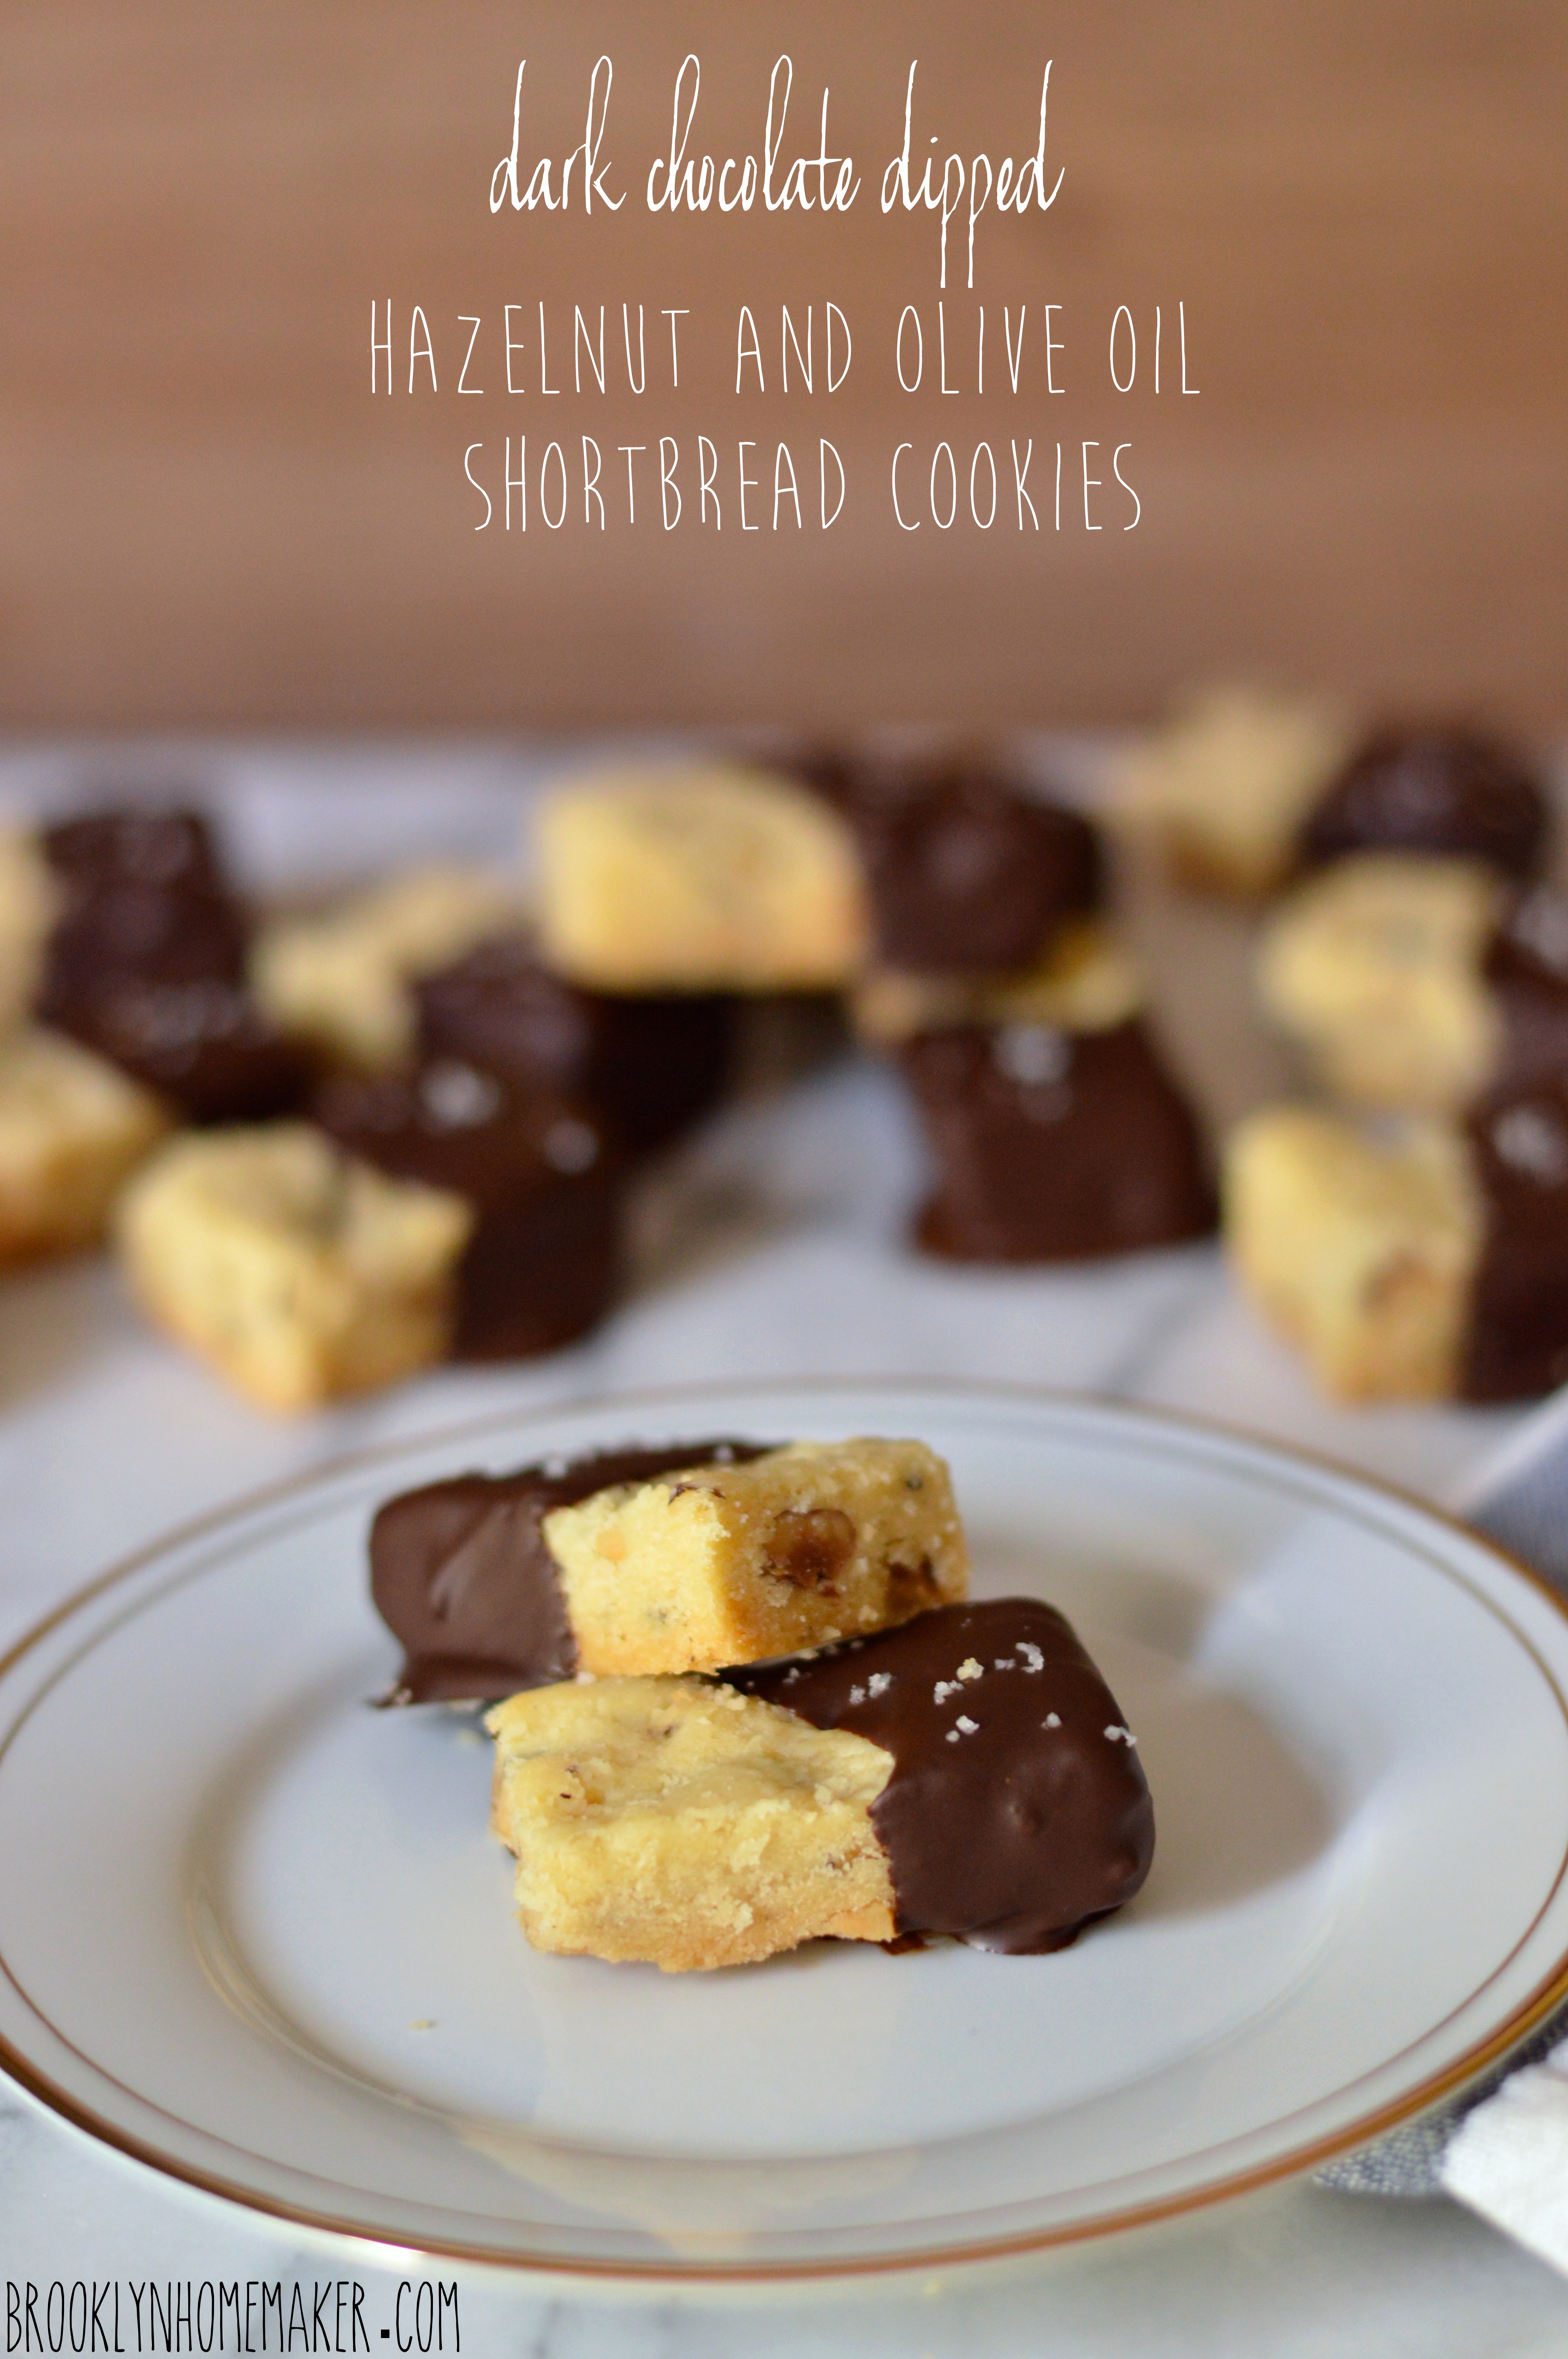
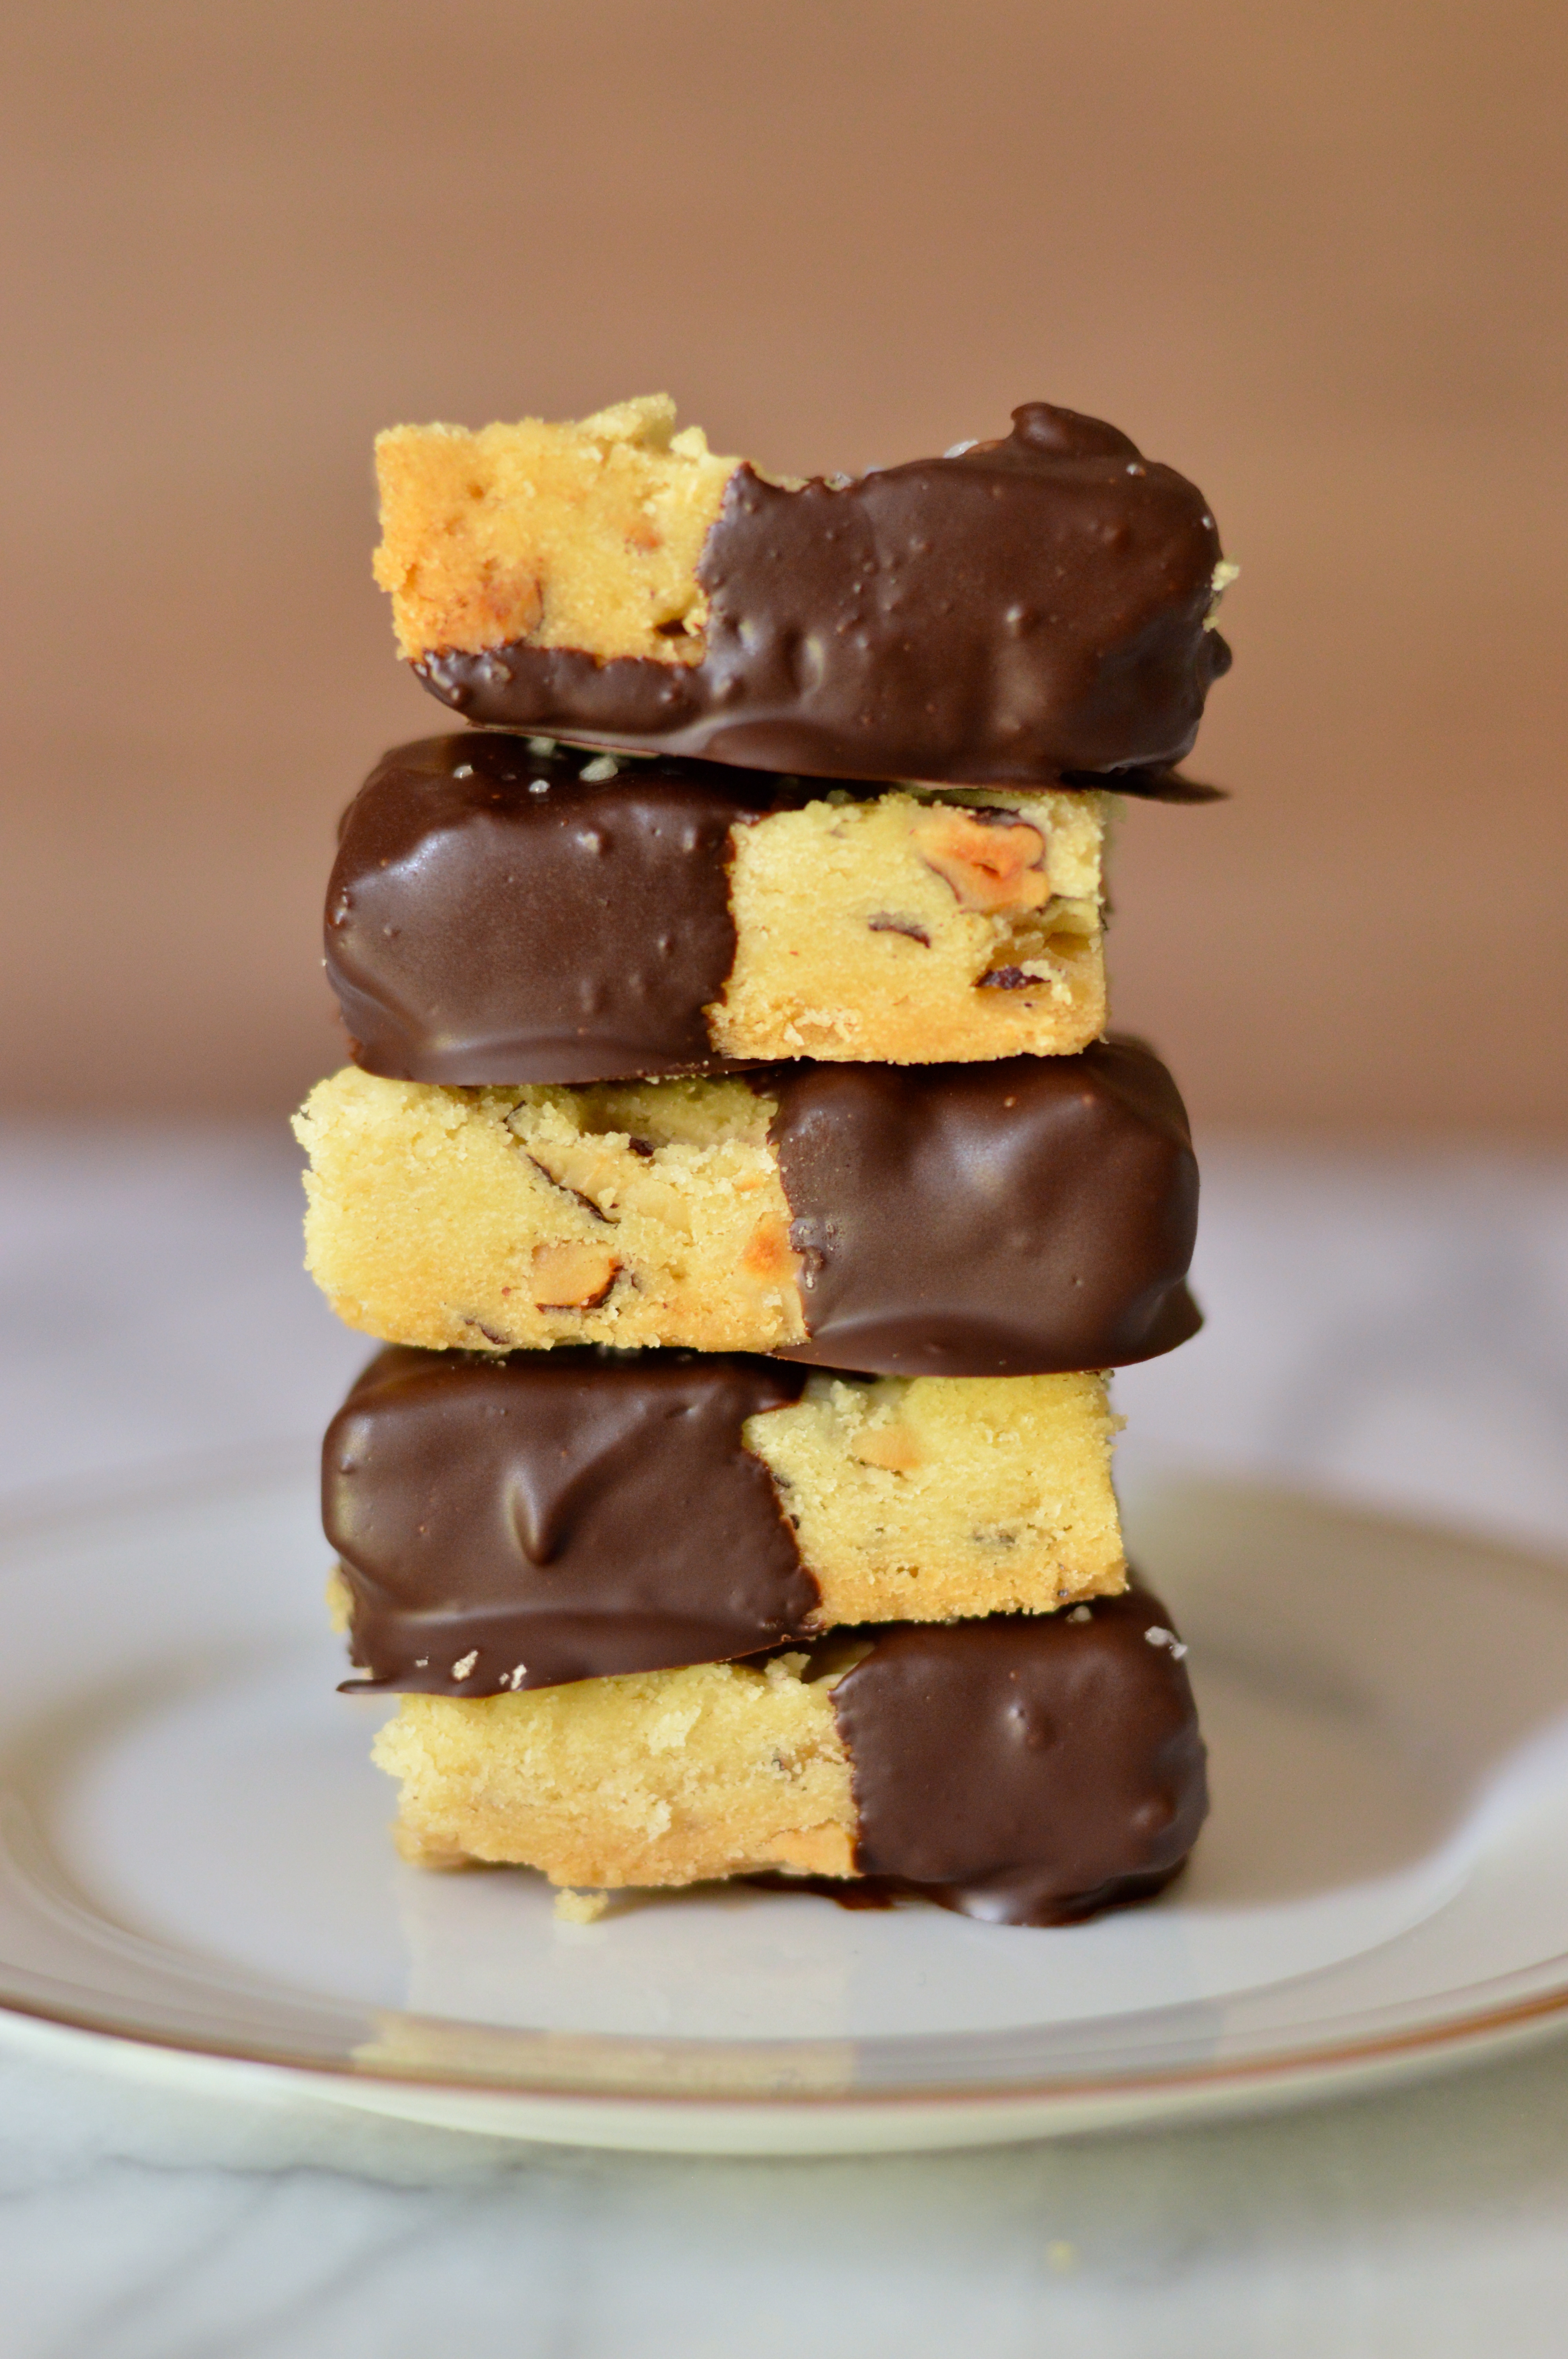
So when I started thinking of a vegan cookie recipe, I immediately thought I wanted to try using olive oil in place of butter. I knew a simple shortbread would be perfect to highlight the choice of olive oil, and from there my mind went straight to sea salt, crunchy nuts, and dark chocolate.

dark chocolate dipped hazelnut and olive oil shortbread cookies | Brooklyn Homemaker

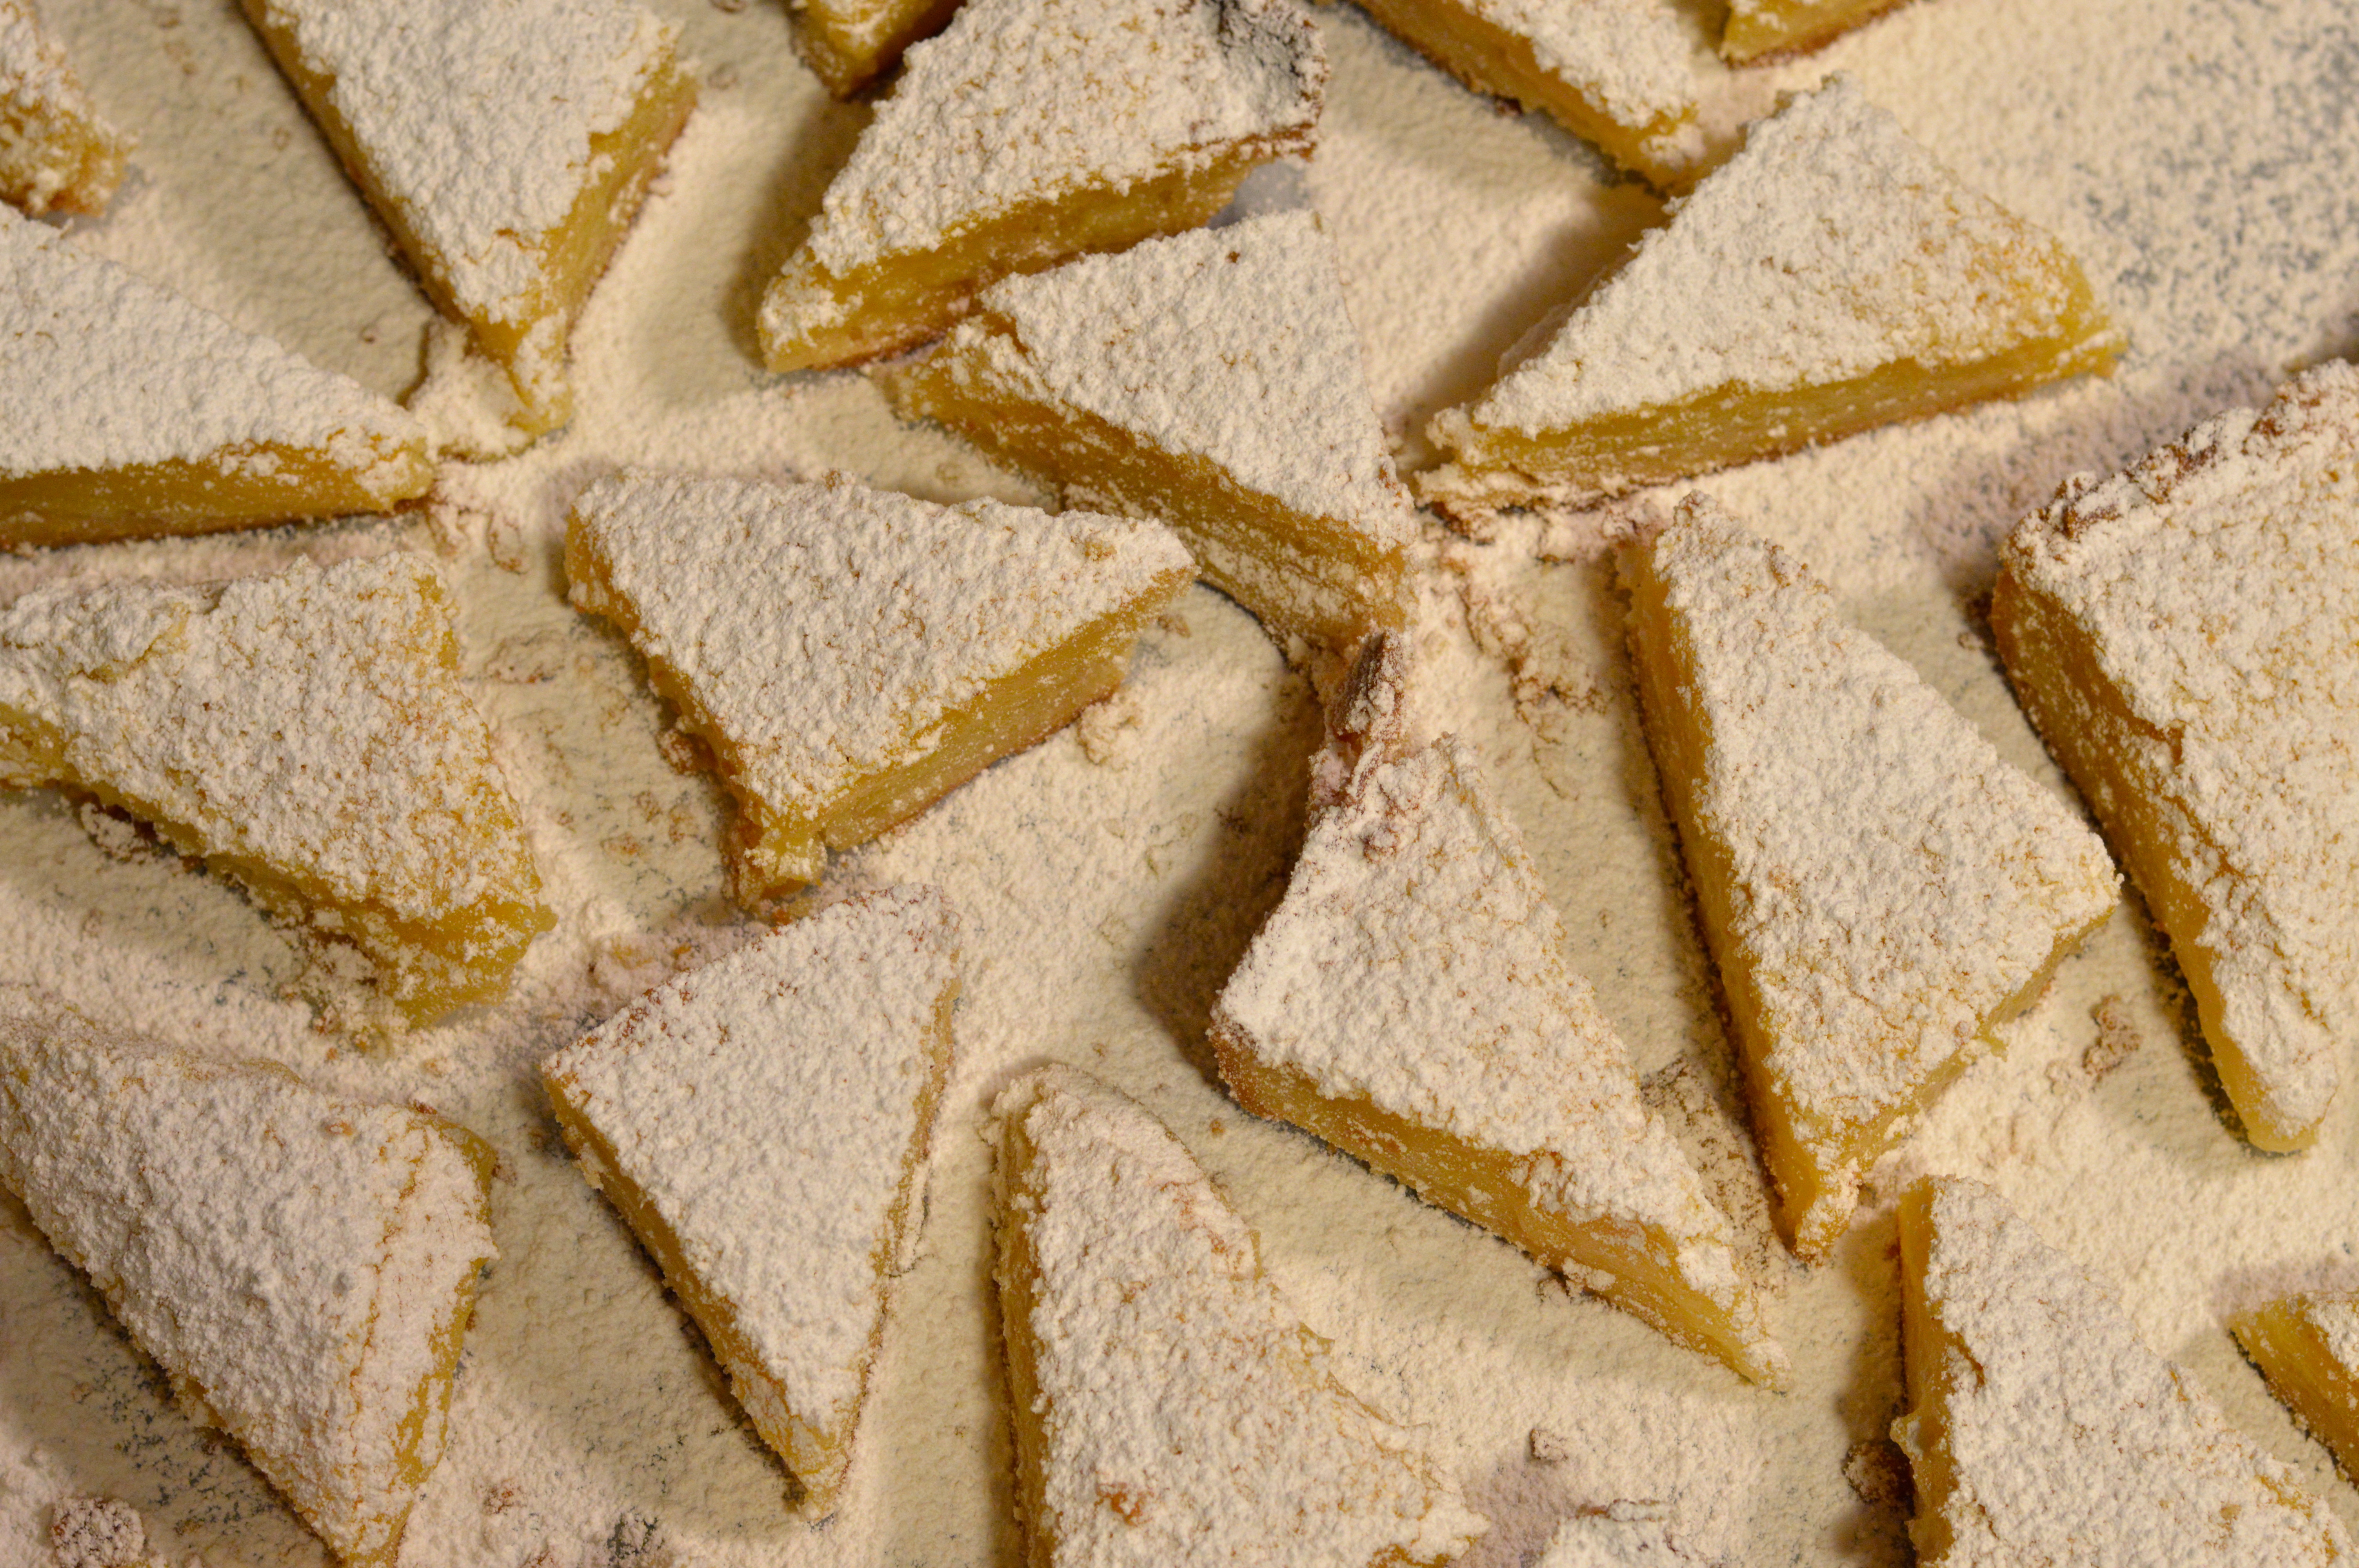
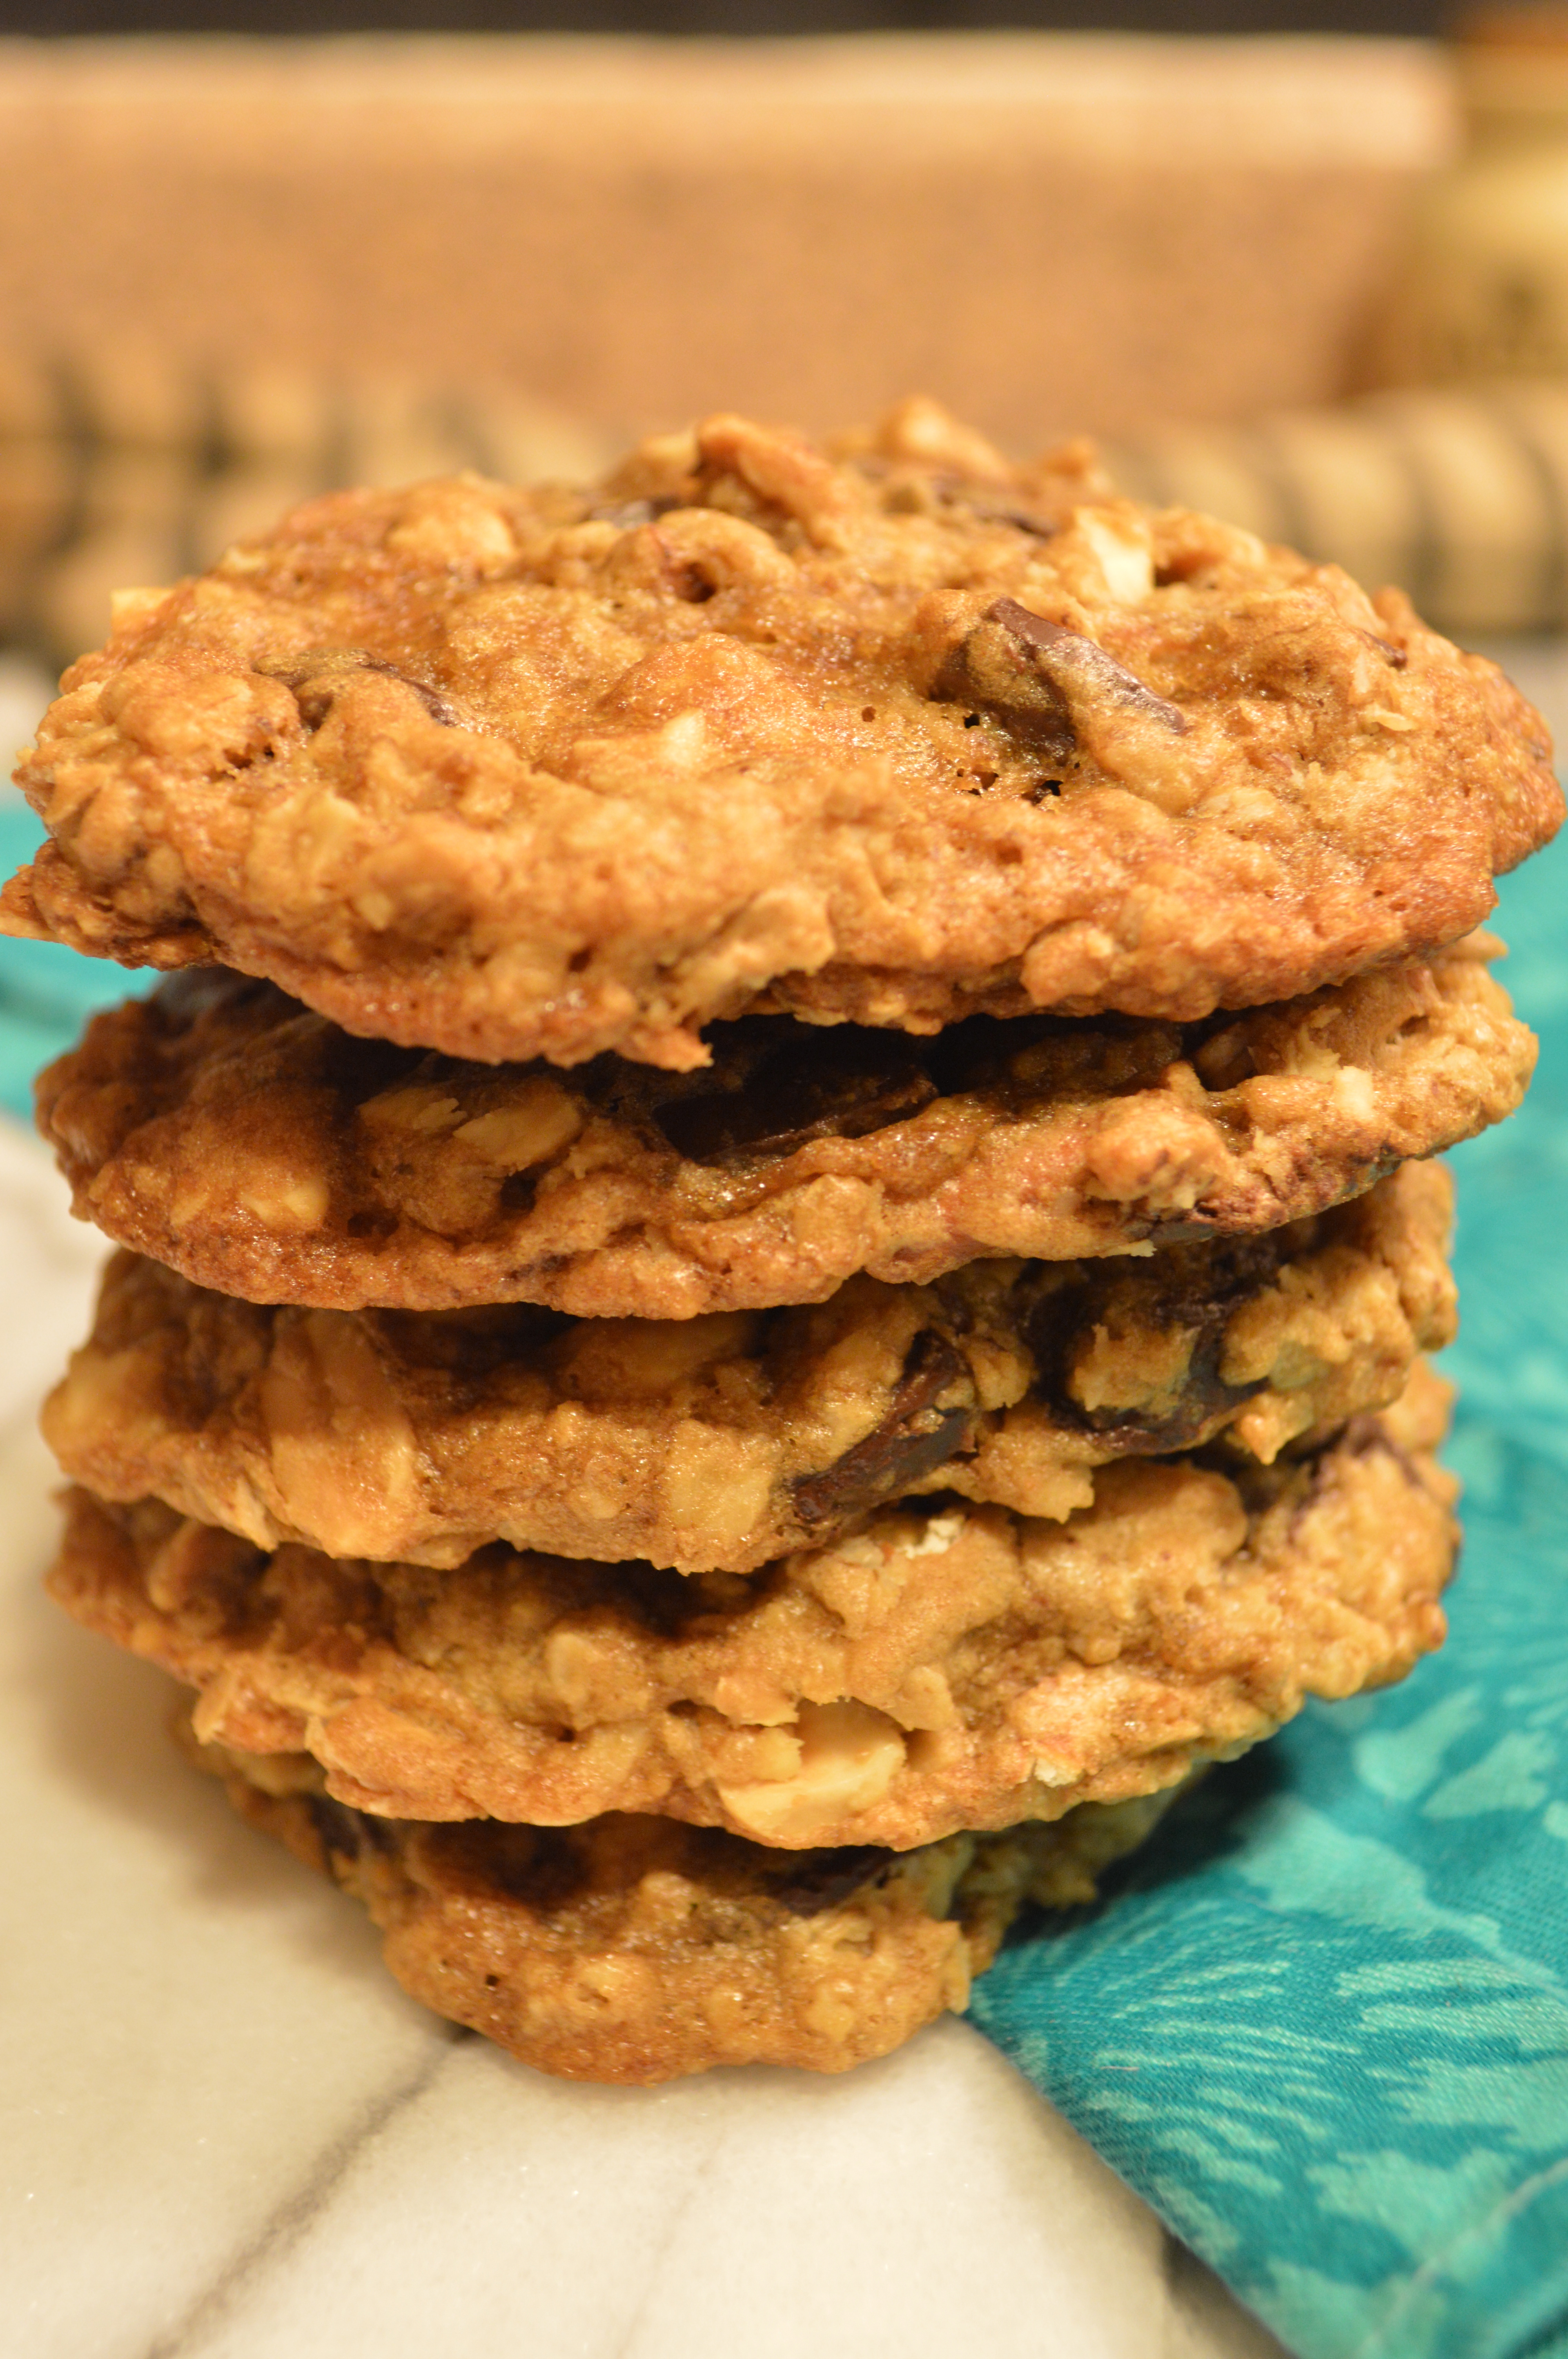
My instincts paid off, and these purdy little cookies were a hit. There’s something so wonderful about a shortbread cookie made with olive oil. While the amount of sugar in these cookies is restrained and subtle, it’s presence completely transforms the olive oil to give the cookie a bright, light, and fruity quality.  The shortbread has a perfectly crisp texture, with a nice hint of crunch from the toasted hazelnuts. The cherry on the sundae is the coating of bitter dark chocolate and tiny sprinkling of fleur de sel. You gotta love a sweet treat with a healthy hint of salt.

Even though there were only a few of us crafting, and this recipe makes 3 dozen little cookies, there was little more than a few crumbs left at the end of the night.

dark chocolate dipped hazelnut and olive oil shortbread cookies | Brooklyn Homemaker

Dark Chocolate Dipped Hazelnut & Olive Oil Shortbread Cookies

  • Servings: 36 cookies
  • Print
3 cups all purpose flour
1 cup confectioners (powdered) sugar (for a sweeter cookie use 1 1/4 cups)
1 teaspoon coarse kosher salt
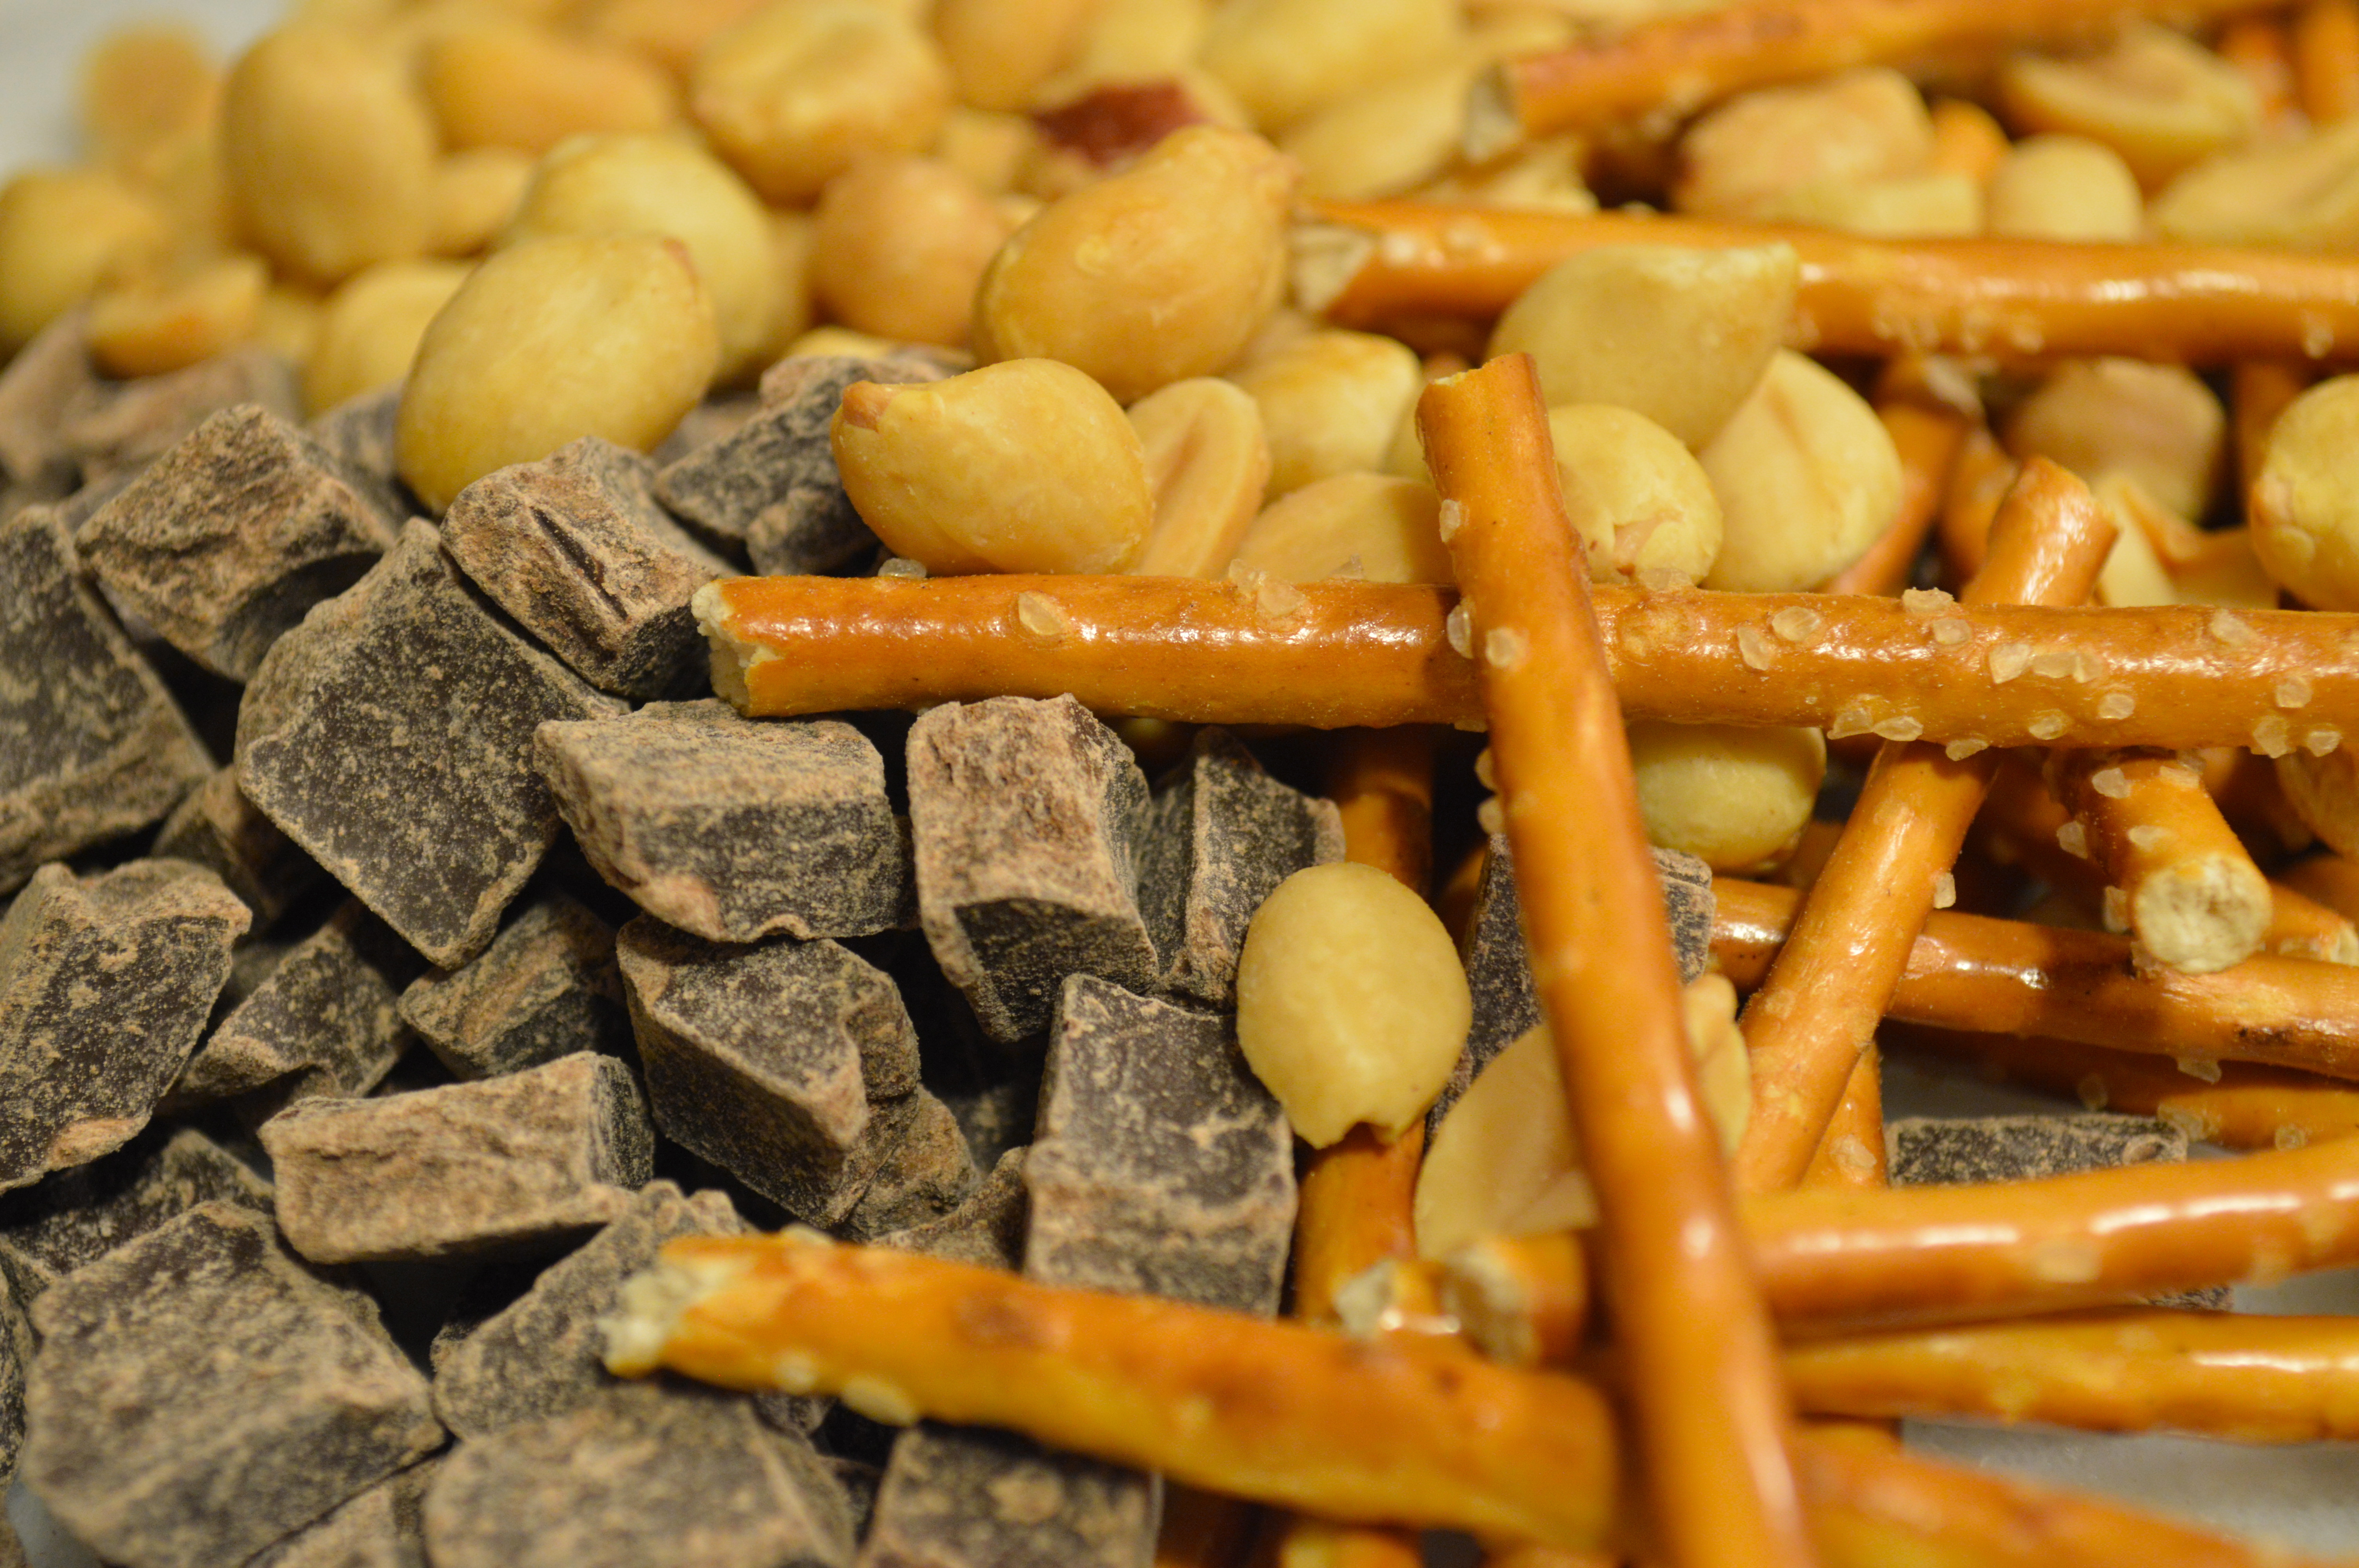
1 cup hazelnuts, roughly chopped
1 cup + 1 tbsp good quality extra virgin olive oil, divided
8-10 oz good quality dark chocolate, roughly chopped
1/2 teaspoon fleur de sel (or coarse kosher salt)

Preheat the oven to 350 degrees Fahrenheit.
Toast chopped hazelnuts on a parchment lined baking sheet for about 5 minutes, or until they smell nice and nutty and look slightly oily. Turn oven down to 325 degrees.

In a medium-sized mixing bowl, whisk together the flour, sugar, salt, and hazelnuts. Pour in 1 cup olive oil and stir until all of the dry mixture is incorporated. Brush a 9×13 baking pan with remaining olive oil, and use your fingers to press the dough down in an even layer. Prick the surface of the dough all over with a fork (try to create an even pattern). Bake until it is just beginning to turn slightly golden around the edges (keep a close eye on it), about 40 to 50 minutes.
Remove from oven and let the pan cool for 20 minutes. Do not let them cool completely before slicing! Using a very sharp knife, slice the shortbread into 6 rows of 6 rectangles. Then let the cookies cool completely before using a small spatula to remove them from the pan. Resist the urge to remove them before they’re totally cooled, or they’ll crumble to bits.

Transfer cookies to a parchment lined sheet pan, cooling rack, or countertop. Using a double boiler, or 15 second bursts in the microwave, melt dark chocolate until smooth and shiny. Dip cooled cookies, one at a time, in chocolate. I thought it looked nicer to just dip half the cookie, but you can do what you like best. Before chocolate sets sprinkle each cookie with a few grains of fleur de sel or coarse kosher salt. Transfer back to parchment and let chocolate set completely before removing and serving. (I used the refrigerator to speed this up.)

chocolate peanut butter whoopie pies

Russell had oral surgery a few days ago and immediately developed quite a sweet tooth. Nothing like eating cookies and ice cream after spending hundreds on dental work! He was craving chocolate and peanut butter and asked me to make some buckeyes that I used to make when I worked for a cupcake shop. I thought it might be more fun to put a peanut buttery twist on traditional whoopie pies, and made a batch of chocolate peanut butter whoopie pies to satisfy his craving. Needless to say, they really hit the spot.

chocolate peanut butter whoopie pies | Brooklyn Homemaker

In case you’ve been living under a rock somewhere, a whoopie pie is a sandwich cookie made up of two cake-like cookies with a creamy filling between them. Whoopie pies are very popular in the Northeast and New England and, depending on the region, they sometimes go by the names black moon, gob, bob, or “BFO” for Big Fat Oreo. Although they probably originated in the Northeast, they’ve spread throughout the US in the past few decades and are well-known and well-loved all over the country. Traditionally they’re made of some kind of rich chocolate cake and filled with a creamy white vanilla or marshmallow filling. In recent years new varieties have popped up, including red velvet or pumpkin with cream cheese filling, or chocolate with fillings like peanut butter, mint, or caramel buttercream.

chocolate peanut butter whoopie pies | Brooklyn Homemaker

The history of the whoopie pie is something of a mystery. Many regions lay claim to their origins, but there is not enough evidence to prove any one area as their true birthplace. Handheld filled sandwich cakes were popular in Victorian era Europe, and whoever really invented the whoopie pie mostly likely borrowed the idea from these European treats. Victorian sandwich cakes were usually made of sponge cake filled with jam or cream, and were often cut into small slices or slivers and served with tea. Whatever their origins, America’s whoopie pies are decidedly less refined.

chocolate peanut butter whoopie pies | Brooklyn Homemaker

Many people agree that whoopie pies were invented by the Amish of Pennsylvania dutch country. The popular belief in this area is that these cookies were invented in Amish and Pennsylvania German culture and the recipe was passed down through generations without leaving any official paper trail. The legend has it that an Amish homemaker probably used some leftover cake batter to make cookies for her children, topped them with some buttercream, and liked the results so much that she shared the recipe with the surrounding community. The claim is that Amish mothers would pack the cookies into their children’s lunch bags and, on finding them, the kids would shout “Whoopie!”
Today these cookies are commonly sold in Amish country stores and farm stands throughout Pennsylvania and no trip to this region is complete without indulging on a traditional Amish whoopie pie.

chocolate peanut butter whoopie pies | Brooklyn Homemaker

The Berwick Cake Co. in Boston, Massachusetts also claims to have invented this treat. They claim to have started selling whoopie pies in the 1920s or 30, but the oldest printed reference to Berwick making whoopie pies is a newspaper ad from 1950.  Although the bakery closed years ago, the brick building still has the words “Whoopee! Pies” painted on its side. Whether Berwick invented them or not, many people believe they have commercial, rather than Amish, origins. These people believe that a production bakery probably used up some leftover cake batter and came up with a handheld cake by baking the batter on a pan like a cookie.

chocolate peanut butter whoopie pies | Brooklyn Homemaker

The state of Maine also lays a claim to the origins of the whoopie pie. Labadie’s bakery in Lewiston, Maine claims to have been making the confectionery since 1925, but many others think that the idea probably made its way to Maine from another state. Some people believe that the cookie traveled with some Amish groups that left Pennsylvania and moved to Maine. Others say that the whoopie pie came to Maine in the 1930s when a cook book featuring a recipe for a whoopie pie with marshmallow cream filling was published and distributed in New England by the Durkee Mower Company, the manufacturer of Marshmallow Fluff.
Whether whoopie pies were invented in Maine or not, the people of Maine take this cookie very seriously.  In 2011, the Maine State Legislature entertained the idea of naming the whoopie pie the official state dessert, but ultimately decided to name it the “Official State Treat”, choosing wild Maine blueberry pie as the state dessert instead.

chocolate peanut butter whoopie pies | Brooklyn Homemaker

The size of whoopie pies varies greatly depending on the region as well. Especially in Pennsylvania, some whoopie pies are huge sandwich sized confections that can feed two or more people. Other areas produce individual sized cookies, and recently some areas have started making bite sized mini whoopie pies.
The whoopie pies I made aren’t the huge Pennsylvania style, but they’re not the bite-sized variety either. I used a #24 portion scoop, about 3 tablespoons, and my pies ended up being about the serving size of a cupcake. This recipe made 12 finished sandwich cookies for me, but depending on the size you make them, your yield may be much different from mine. If you do decide you want to make your cookies a different size, you may need to adjust your cooking time by a few minutes.

chocolate peanut butter whoopie pies | Brooklyn Homemaker

This recipe produces a deep dark & chocolatey cookie. The addition of a healthy dose of coffee adds even more depth to the dark chocolate notes, and the combination of brown sugar, oil and buttermilk give it a wonderful chewy, moist and pillowy soft texture. Even without the filling, this cookie is phenomenal, and I “accidentally” baked an odd number of cookies and was forced, against my will I might add, to eat one on its own.
The real star here though is the peanut butter buttercream. It’s ultra smooth and creamy, just a little bit salty, a little more sweet, and crazy peanut buttery. It might be a bit too soft and loose to serve on super hot summer days, but this time of year it’s perfect. Briefly refrigerating the finished whoopie pies will help set the filling so it doesn’t smoosh out the sides when you bite down. The combination of these rich chocolate cakes with the sweet smooth creamy peanut buttery goodness of this filling is better than you can even imagine. Are you drooling yet? I  am.

chocolate peanut butter whoopie pies | Brooklyn Homemaker

Chocolate Peanut Butter Whoopie Pies

  • Servings: approximately 12 cookies
  • Print
Adapted from Baked Explorations

3½ cups all-purpose flour
¼ teaspoon salt
1¼ teaspoons baking powder
1¼ teaspoons baking soda
¾ cup dark unsweetened cocoa powder
2 teaspoons instant espresso powder
1/2 cup hot coffee
2 cups firmly packed light brown sugar
3/4 cups peanut or canola oil
1 large egg, room temperature
1 teaspoon pure vanilla extract
1/2 cup buttermilk, room temperature, shaken

Preheat oven to 350° F.  Line 2 baking sheets with parchment paper.
In a large bowl, whisk together the flour, salt, baking powder, and baking soda, and set aside.
In another large bowl, whisk together the cocoa and espresso powder. Add the hot coffee and 1/2 cup hot water and whisk until both powders are completely dissolved.
In a medium bowl, stir the brown sugar and oil together. Add this to the cocoa mixture and whisk until combined. Add the egg, vanilla and buttermilk and whisk until smooth. Using a rubber spatula to gently fold the dry ingredients into the wet ingredients. Make sure to scrape down the sides and the bottom of the bowl as you fold.
Use a portion scoop with to drop heaping tablespoons of the dough onto the prepared baking sheets about 1-inch apart. Bake for 10 to 15 minutes, until the cookies are just starting to crack on top and a toothpick inserted into the center of a cookie comes out clean. Let the cookies cool completely on the pans while you make the filling (recipe below).
Turn half of the cookies so the flat side faces up, and distribute the filling evenly between the overturned cookies using a portion scoop, piping bag, or icing spatula. Top the buttercream with another cookie and press down gently so the filling spreads to the edges of the cookies. Refrigerate for at least 30 minutes to set the filling, and let the cookies come back to room temperature for 30 minutes before serving. Whoopie pies will keep for up to 3 days in the fridge, on a parchment-lined baking sheet covered with plastic wrap.

Peanut Butter Buttercream

1 cup creamy peanut butter
12 tablespoons (1 1/2 sticks) unsalted butter, softened
1 1/4 cups confectioners’ sugar

With the paddle attachment of a stand mixer, cream the softened butter and peanut on high-speed until completely blended and smooth. Add sugar and, on low-speed, mix until combined. Turn up to high and beat until fluffy.

grapefruit bars

Well folks. Guess what…
I’m a man obsessed. I have yet another citrus recipe to share with you.

grapefruit bars | Brooklyn Homemaker

First though, I would like to mention that Brooklyn Homemaker received enough nominations in theKitchn’s The Homies to make it into the finals for “best daily read” cooking blog! Woohoo!!! I only started writing this blog about six months ago, and at that time I never imagined that I would come so far so quickly. I hate to sound like I’m bragging, but I feel like my writing style and photography skills, as well as my understanding of blogging and my idea of what I want Brooklyn Homemaker to be, have grown and improved so so much. There’s still a lot of room for improvement, but I’m at a place where I feel very pleased with the direction of this blog and excited for what it will become in the future.

If you are as big a fan of Brooklyn Homemaker as I am, and you’re as excited about the future of the blog as I am, please take a moment to vote for me in The Homies for “best daily read”. TheKitchn does make you create an account, but they make it very easy, and you can even sign in through facebook. Please choose Brooklyn Homemaker from the list of ten finalists at the top of the page HERE. Being such a young blog, I honestly cannot believe that I’m holding my own against blogs that have been around for years and have thousands of readers. It is such a huge honor to have made it into the finals and no matter what the outcome, I will be thrilled to have done so well. Being one of the ten finalists has brought in so many new readers, and I couldn’t be happier about it. If you’re new here, welcome! I’m glad you’re here, and I hope you’ll keep coming back!

grapefruit bars | Brooklyn Homemaker

Okay. Enough about me, let’s get back to the recipe.

Although we’re facing another cold front, the weather in Brooklyn actually warmed up for a brief moment over the weekend. Unsurprisingly though, my nagging citrus craving didn’t subside one bit. This time around I thought something bright and sweet and unmistakably citrus-y might do the trick to help me snap out of it. For over a week now I’ve been thinking about trying to make grapefruit curd, but I hadn’t yet because I couldn’t decide what I’d do with it. I love citrus curd but if I’m making it fresh I usually like to use it to fill a cake or serve with brunch or some such thing. Homemade curd tastes one bajillion times better than the store-bought stuff, but it isn’t nearly as shelf stable, so if I don’t have a plan to use it up pretty quickly, I generally don’t think it’s worth the trouble.

grapefruit bars | Brooklyn Homemaker

I toyed with the idea of making a grapefruit cake, but decided that if I were going to do that I’d want to make the famous Brown Derby grapefruit cake, which doesn’t actually call for grapefruit curd. Maybe some other time. After racking my brain a bit longer it finally hit me, I’d make lemon bars but with grapefruit instead. Since you don’t have to pre-cook the curd on the stove top it’s actually even simpler, but with very similar (delicious) results. I consulted with my dream woman, idol, and friend-in-my-head, Ina Garten, for the recipe, and made some tweaks and substitutions to turn her more traditional lemon bars into grapefruit bars instead.

grapefruit bars | Brooklyn Homemaker

Though her recipe is truly wonderful and worked perfectly with the grapefruit substitution, I wish I’d read some of the comments before I got started. I ended up having to make two batches to perfect this recipe, and I learned a few important things from the first, failed, attempt. The first batch wasn’t actually a true fail though. They were pretty decent, but they weren’t GREAT, and I wasn’t sure they were worth sharing here. So, rather than accepting defeat, or worse, blogging about a recipe I wasn’t that happy with, I decided to give it another shot the next day, and had MUCH better results.

grapefruit bars | Brooklyn Homemaker

In the name of learning, here’s what I did wrong the first time around. In an attempt to make for more attractive photos, I tried to make the first batch in a pretty white ceramic baking dish, but the pan was slightly smaller than the recommended 9×13 called for in the recipe. This already makes for a thick bar, and the smaller pan ended up making them even thicker. They took much longer to set than expected, baked kind of unevenly, and resulted in a slightly overcooked and muted flavor instead of the bright citrus-forward flavor I was hoping for. After reading some of the comments, I learned that a lot of people said they like a thinner bar and used a larger pan, like a 10×15 or a baker’s half sheet to spread the bars out, which apparently works really well. Making the bars even thicker than they already were though, was definitely not a wise decision on my part. Another thing I learned from reading the comments, again too late for the first batch, is that the filling shouldn’t be mixed together until the very last minute. If mixed too early, the acid in the citrus juice can affect the texture of the raw eggs, effectively cooking the eggs before they’re baked, and giving the cooked filling a rubbery “off” texture.

grapefruit bars | Brooklyn Homemaker

But here’s the good news! The second time around these bars were everything I was hoping they would be and more! The grapefruit really makes for a wonderful and interesting twist on the traditional lemon bar. I think lemon bars are delicious, but the super tart, super sweet flavor can sometimes seem a little one note and end up tasting like sour candy rather than a homemade baked treat. In addition to the tart and sweet flavors, the grapefruit juice adds some bitterness and depth that pairs really well with the buttery shortbread crust. They’re such a great little twist on the traditional lemon bars. They have all of that sweet and tart flavor you’re expecting but with just a hint of grapefruity bitterness. The curd filling is soft and sweet and ever-so-slightly gooey, and the buttery shortbread adds just enough crispness and bite to really bring another layer of texture and interest to the experience. SO. GOOD.

grapefruit bars | Brooklyn Homemaker

I hope you’ll give these bars a shot. Don’t let my initial mistakes scare you, this recipe is actually really simple and easy. If you learn from my mistakes and use the right size (or larger) pan, and be patient enough not to mix the filling too early, you’ll be thrilled with the results. Especially, obviously, if you’re a big grapefruit fan like I am. If you’re someone, also like me, who likes to try to get yourself prepared and ready ahead of time, you could always zest and juice your citrus ahead and could even mix the sugar in with the zest and juice. Just make sure you don’t mix the eggs in until you’re ready to bake. Okay? Now go preheat that oven. It’s cold outside again and you need something tropical-ish in your life.

grapefruit bars | Brooklyn Homemaker

Grapefruit Bars

  • Servings: 20-40 bars, depending on how you cut them
  • Print
adapted from The Barefoot Contessa Cookbook

crust:
1/2 pound (2 sticks) unsalted butter, at room temperature
1/2 cup granulated sugar
2 cups flour
1/4 teaspoon kosher salt

filling:
6 large eggs at room temperature
3 cups granulated sugar
2 tablespoons grated citrus zest (from 2 lemons and 1 large grapefruit)
1/4 cup freshly squeezed lemon juice (from 1-2 lemons)
3/4 cup freshly squeezed grapefruit juice (from 1 large grapefruit)
1 cup flour
Confectioners’ sugar, for dusting

Preheat the oven to 350 degrees F.
For the crust, cream the butter and sugar together in the bowl of an electric mixer with the paddle attachment until light and fluffy. Add the flour and salt and mix on low until just combined. Gather the dough together into a ball, and with floured hands, flatten the dough and press it into a 9 by 13 inch baking pan, building up a 1/2-inch edge on all sides. Chill in the refrigerator for at least 15 minutes.
Bake the crust for 15 to 20 minutes, until very lightly browned. Leave the oven on and let the crust cool slightly while you make the filling. Resist the urge to make the filling ahead, and wait until the crust comes out of the oven.
In a large bowl, whisk together the sugar, citrus zest, citrus juices, and eggs. Add flour and whisk until well combined, making sure there are no lumps. Pour the filling over the crust and bake for 30 to 35 minutes, until the filling is just set. Let cool to room temperature before cutting.
Cut into triangles and, with a sieve or dredger, dust with confectioners’ sugar.

cowboy cookies

You probably don’t know this, but there’s a big sports thing happening tomorrow. It’s called the Super Bowl.

cowboy cookies | Brooklyn Homemaker

I’m not at all a sports fan, especially when it comes to football, but I sure as hell am a food fan. The Super Bowl is an event that manages to combine food and sports in a big way. Actually, it’s the only sporting event I can think of that inspires people to go completely crazy when it comes to food. Some people put more effort into their Super Bowl spread than they do Thanksgiving dinner, and for the past week or more there have been recipes for chicken wings and dips and sandwiches and all kinds of indulgences coming at me from all angles. The 7 layer dip has turned into a 40 layer dip, and the cold cut tray has been replaced by the “snackadium.” If you’re not already in the know, a snackadium is a football-stadium-shaped buffet with sandwiches, chips, pretzels, chicken wings, et al as the stands, guacamole as the playing field, and other dips as the end zones. I mean, I love buffalo wings as much as the next guy, but the idea of spending that much time, money and effort on a sandwich platter is ludicrous to me. Especially since I don’t even care about watching the game. I’ll save that effort for Thanksgiving, thankyouverymuch.

cowboy cookies | Brooklyn Homemaker

The one and only time I’ve tried to get involved in the chaos was when I was really young. So young in fact, that I can’t even remember who was playing that year. I think it must have been 1994, the second year in a row that the Buffalo Bills played, and lost, against the Dallas Cowboys. Since I grew up in upstate New York, the Bills playing in the Super Bowl was a big deal. I remember though, that that that year I was rooting for the Cowboys because they had prettier cheerleaders. That’s how my gay little head worked back then (and still does). The one thing I definitely can remember about that year is that all the men in my family were really excited and I wanted to participate in any way that I could. So, instead of learning more about football and getting excited about the actual game, I decided to make a cake with my grandmother. In the spirit of the snackadium that wouldn’t even be invented for at least another decade, I wanted my cake to look like a football field. We colored the icing green, used a squeeze tube of white icing gel to make lines on the field, and used appropriately colored m&ms as the players.

cowboy cookies | Brooklyn Homemaker

I was beaming with pride when we piled into the truck, cake in hand, to go to dad’s friend’s house to watch the game. As you can probably imagine, my dad’s friends were not half as interested in my cake as they were the snoozefest happening on the TV. Try as I might, I couldn’t get into the game itself, and was bored to tears. There are too many weird rules in football for me to be able grasp what was supposed to be going on, and trying to make sense of this game made me sleepy. The evening wasn’t a total loss for me though, there was cake to eat after all.

cowboy cookies | Brooklyn Homemaker

Fast forward twenty years, and all the hype is getting to me again. Every day on TV we’re inundated with game day recipes and snackadium how-to’s. Even the food section of Pinterest is getting in on the action. So, even though I have no intention of watching the game (There are SVU and Sex in the City marathons on), I decided to give in and make something salty, indulgent, and decidedly unhealthy. Russell is out of his mind and doesn’t like chicken wings, so I figured I’d go for something sweet. I found exactly what I was looking for in one of my favorite cookbooks, Baked Explorations, written by the owners of Baked in Red Hook.

Cowboy cookies!

DSC_0095

These cookies have it all! Chocolate, sweet, salty, crunchy, chewy. They’re pretty darned amazing. These are basically gussied up oatmeal cookies, but they’re crazy good and chock full of all kinds of fun stuff. I understand that there are a lot of different versions of this cookie, some with peanut butter, some with coconut, some with pecans or walnuts. To be honest though, I’ve never had any of those versions. This is my first crack at a cowboy cookie, but I think this recipe is perfect without being over the top. These cookies have chocolate chunks, salty pretzels, crunchy roasted peanuts, and even coffee!!!  I added the peanuts to the recipe myself because I recently had some “cowboy bark” that encased chocolate cookies, peanuts and pretzels together in chocolate. Wowzah. So I thought they’d be welcome addition to this crazy mix.

cowboy cookies | Brooklyn Homemaker

I was kind of wondering exactly why they were called “cowboy cookies” and I tried to find the origins of this cookie, but wasn’t really able to find any history. The one thing I was able to turn up is the idea that they’re basically a cookie version of trail mix. Whatever the origins are, I’m glad that someone thought this cookie up.

If you’re making these cookies for a crowd, you can make them ahead, but be careful. You’re going to want to eat them all before anyone shows up. I’ve said this before, but using a cookie scoops makes baking cookies so much easier. It makes your cookies look more professional because they’ll be perfectly round and will all be the same size, and they’ll also bake more evenly. I used a #24 scoop for this recipe, which works out to be about 3 tablespoons of dough per cookie.

DSC_0031

Cowboy Cookies

  • Servings: makes about 32 cookies
  • Print
Adapted from Baked Explorations

1 3/4 cups all-purpose flour
1 tsp baking soda
1 tsp baking powder
1/2 tsp salt
2 cups rolled oats
14 tbsp (1 3/4 sticks) unsalted butter, softened
3/4 cup granulated sugar
1 cup dark brown sugar, firmly packed
1 large egg
1 large egg yolk
1 tsp vanilla extract
1 tsp instant Espresso powder
2 cups semi-sweet chocolate chips
1 cup roasted peanuts
1 cup salted pretzel sticks, broken into tiny pieces but not crushed into dust.

In a medium bowl, whisk together the flour, baking soda, baking powder, and salt. Add the oats and stir to combine.
In the bowl of a standing mixer fitted with the paddle attachment , beat the butter and sugars together until smooth and creamy. Add the egg and egg yolk, beating until the mixture looks light and fluffy. Scrape down the sides and the bottom of the bowl, add the vanilla, and beat for 5 seconds. Dissolve the espresso powder  in 1/4 cup hot water and add it to the bowl, mixing until combined.
Add half of the dry ingredients and mix for 15 seconds. Add the remaining dry ingredients and beat until just incorporated. Scrape down the sides and bottom of the bowl and fold in the chocolate chips, peanuts and pretzel pieces. Cover the bowl tightly and refrigerate the dough for at least 4 hours.

Preheat the oven to 350˚F. Line two baking sheets with parchment paper.
Use a cookie scoop to get 3 tablespoon-size balls (I used a #24 portion scoop) and place the dough balls onto the prepared baking sheet about 1 inch apart. Use the palm of your hand to press the dough down lightly; don’t smash the cookie-you just want to slightly flatten the ball.
Bake for 11 to 13 minutes, rotating the pans halfway through the baking time, until the edges of the cookies are golden brown or just start to darken.
Set the pan on a wire rack for 10 minutes to cool. Use a spatula to transfer the cookies on the rack to cool completely. They can be stored in an airtight container for up to 3 days.