pumpkin streusel coffee cake

If you live in the northeast, or anywhere in the U.S. for that matter, you’ve probably noticed something if you’ve been outside lately.

pumpkin streusel coffee cake | Brooklyn Homemaker

It’s pumpkin season!!!

pumpkin streusel coffee cake | Brooklyn Homemaker

Even though the weather still feels relatively summery here in NYC, there are pumpkins EVERYWHERE lately! Grocery stores, farm stands, corner bodegas, hardware stores, front porches, brownstone stoops, even apartment windows. Some of them are being nestled just so amidst colorful pots of hardy mums, while others are getting carved up into jack-o-lanterns with big toothy grins. You just can’t step out the front door without seeing a bunch of big orange squash all over the place.

pumpkin streusel coffee cake | Brooklyn Homemaker

And guess what! Pumpkins aren’t just decorative, they’re also pretty damn tasty! Canned or cubed, roasted or boiled, baked into pies and cakes or simmered into stews and curries. Gimme! Gimme! Gimme!

pumpkin streusel coffee cake | Brooklyn Homemaker

Pumpkin’s so adaptable and so universally loved this time of year that a huge part of the blogging community is coming out today to share their favorite pumpkin recipes in the Virtual Pumpkin Party! This pumpkin recipe sharing event has been hosted by Sara from Cake over Steak since 2015. Head over to her blog to see this year’s full list of links and check out all the drool inducing pumpkin recipes that speak to the versatility of the pumpkin, along with the limitless creativity of the blogging world.

pumpkin streusel coffee cake | Brooklyn Homemaker

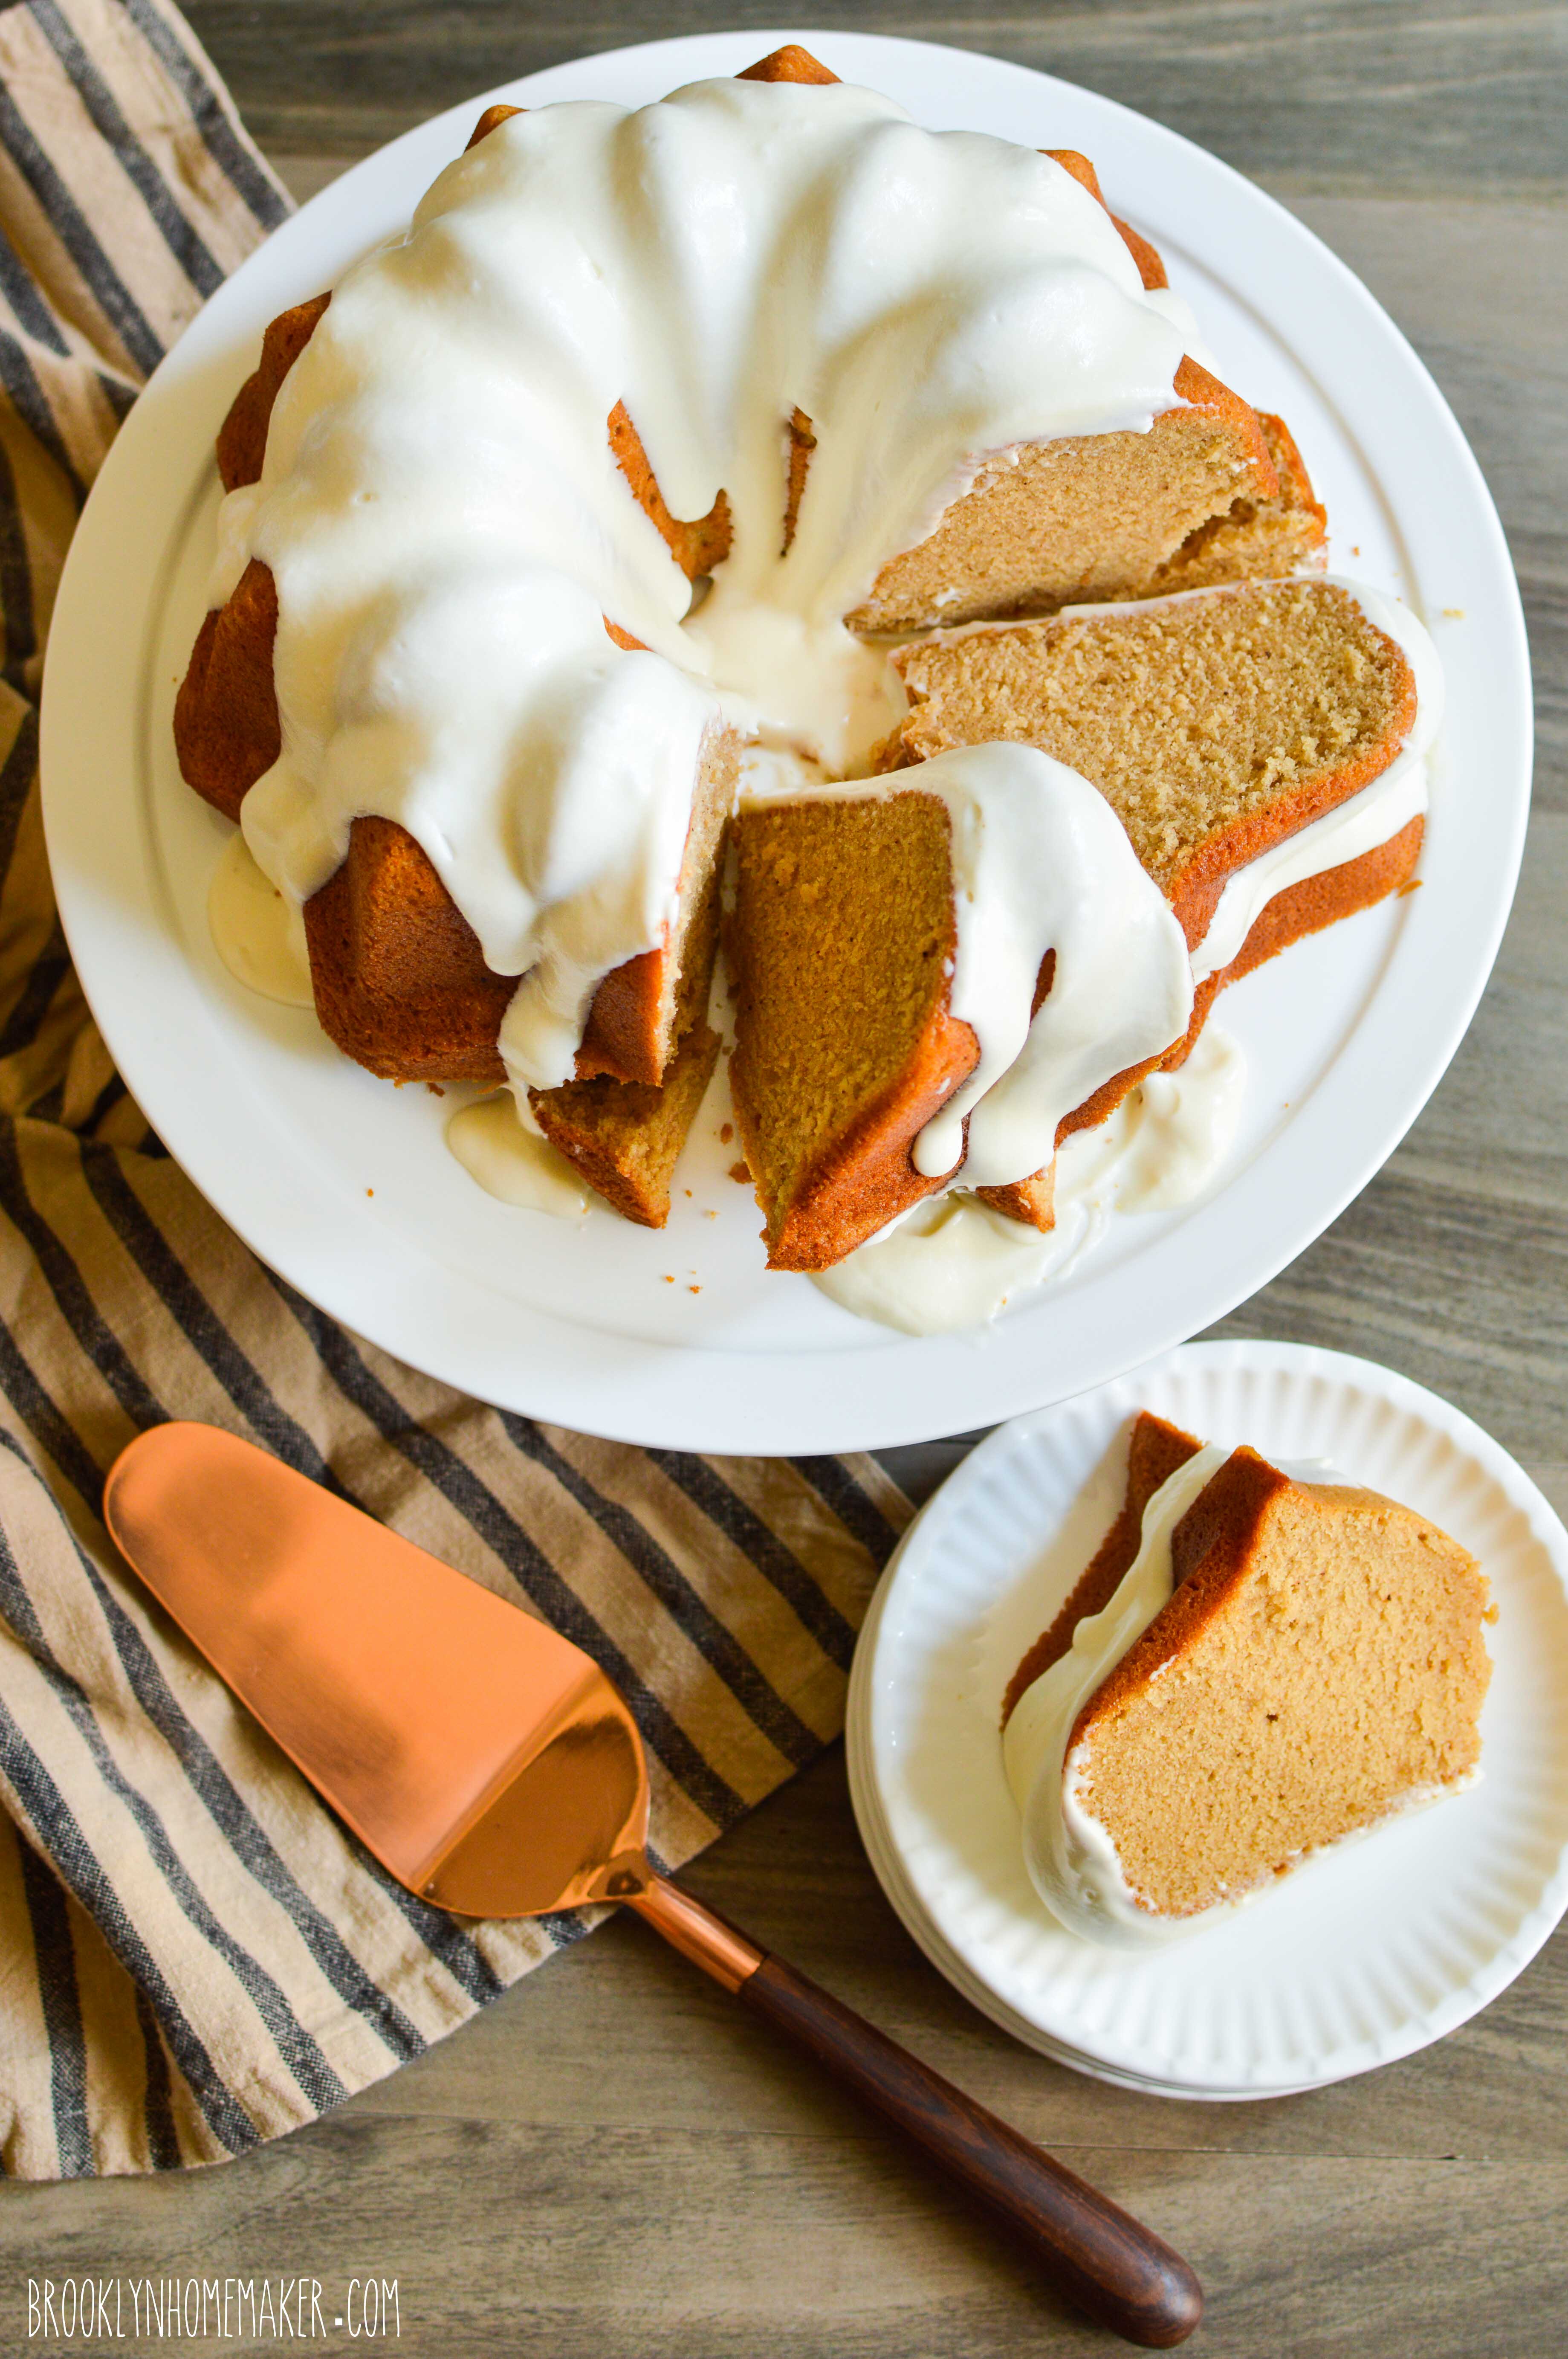
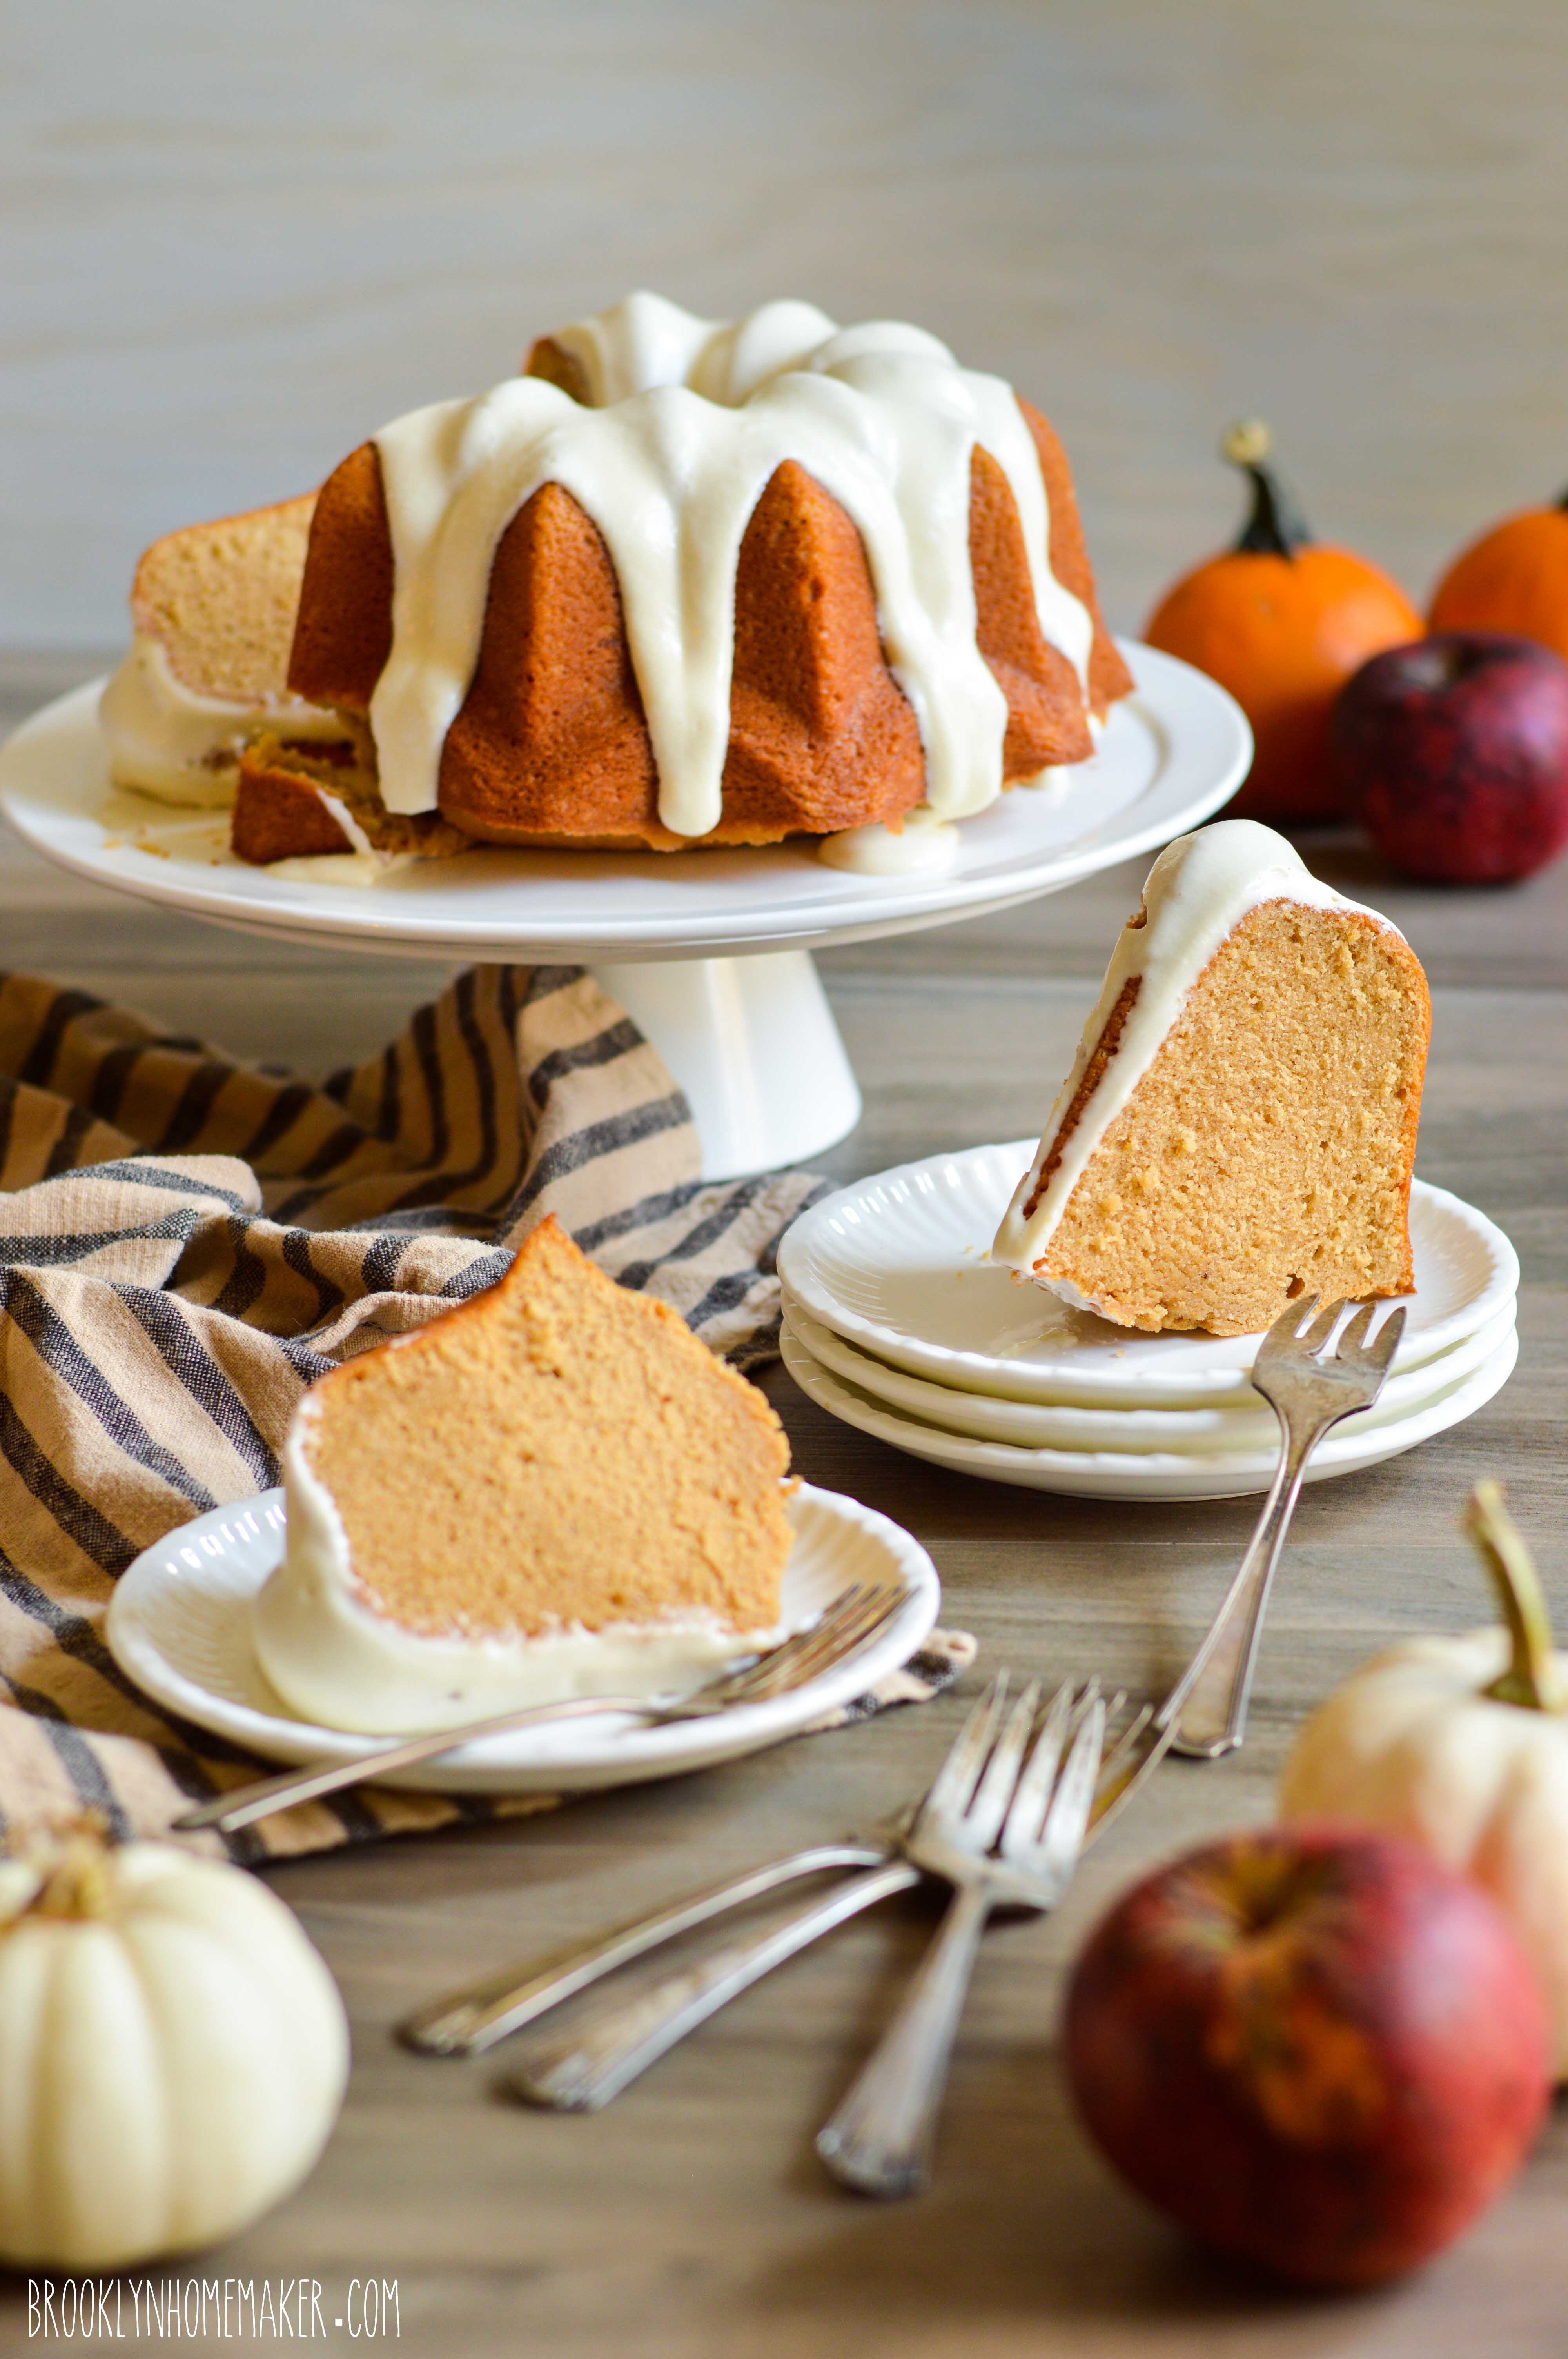
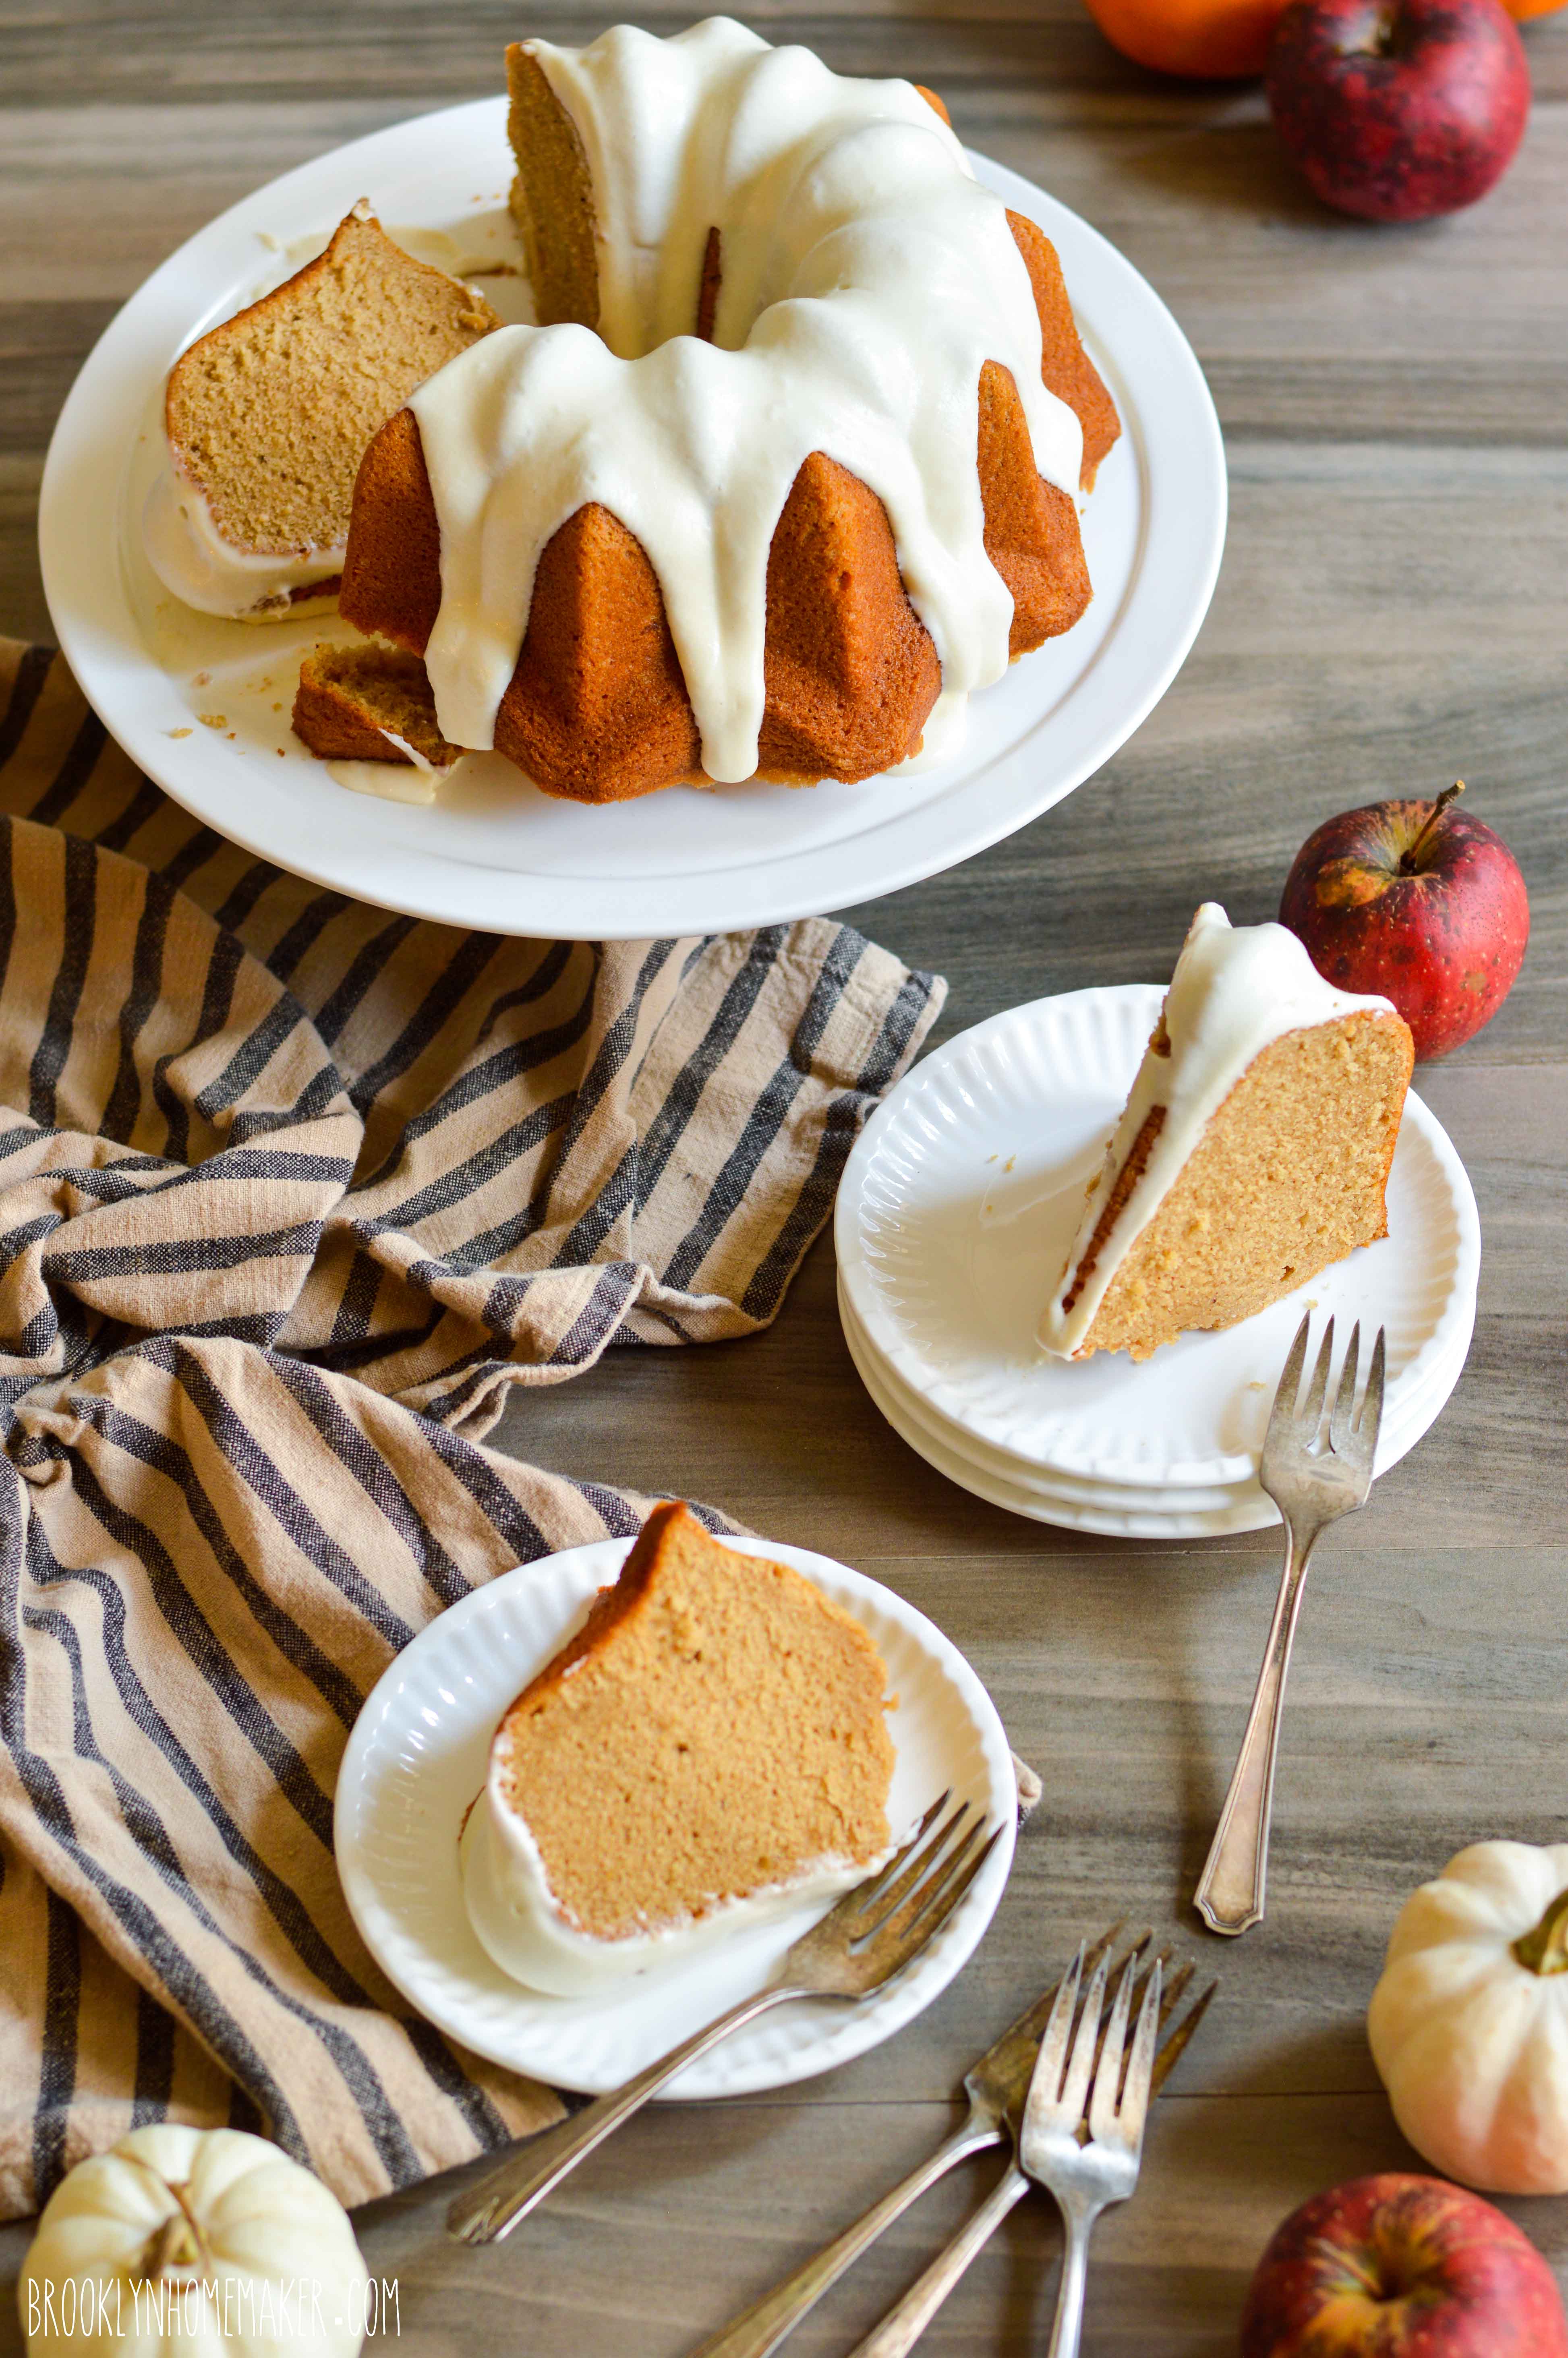
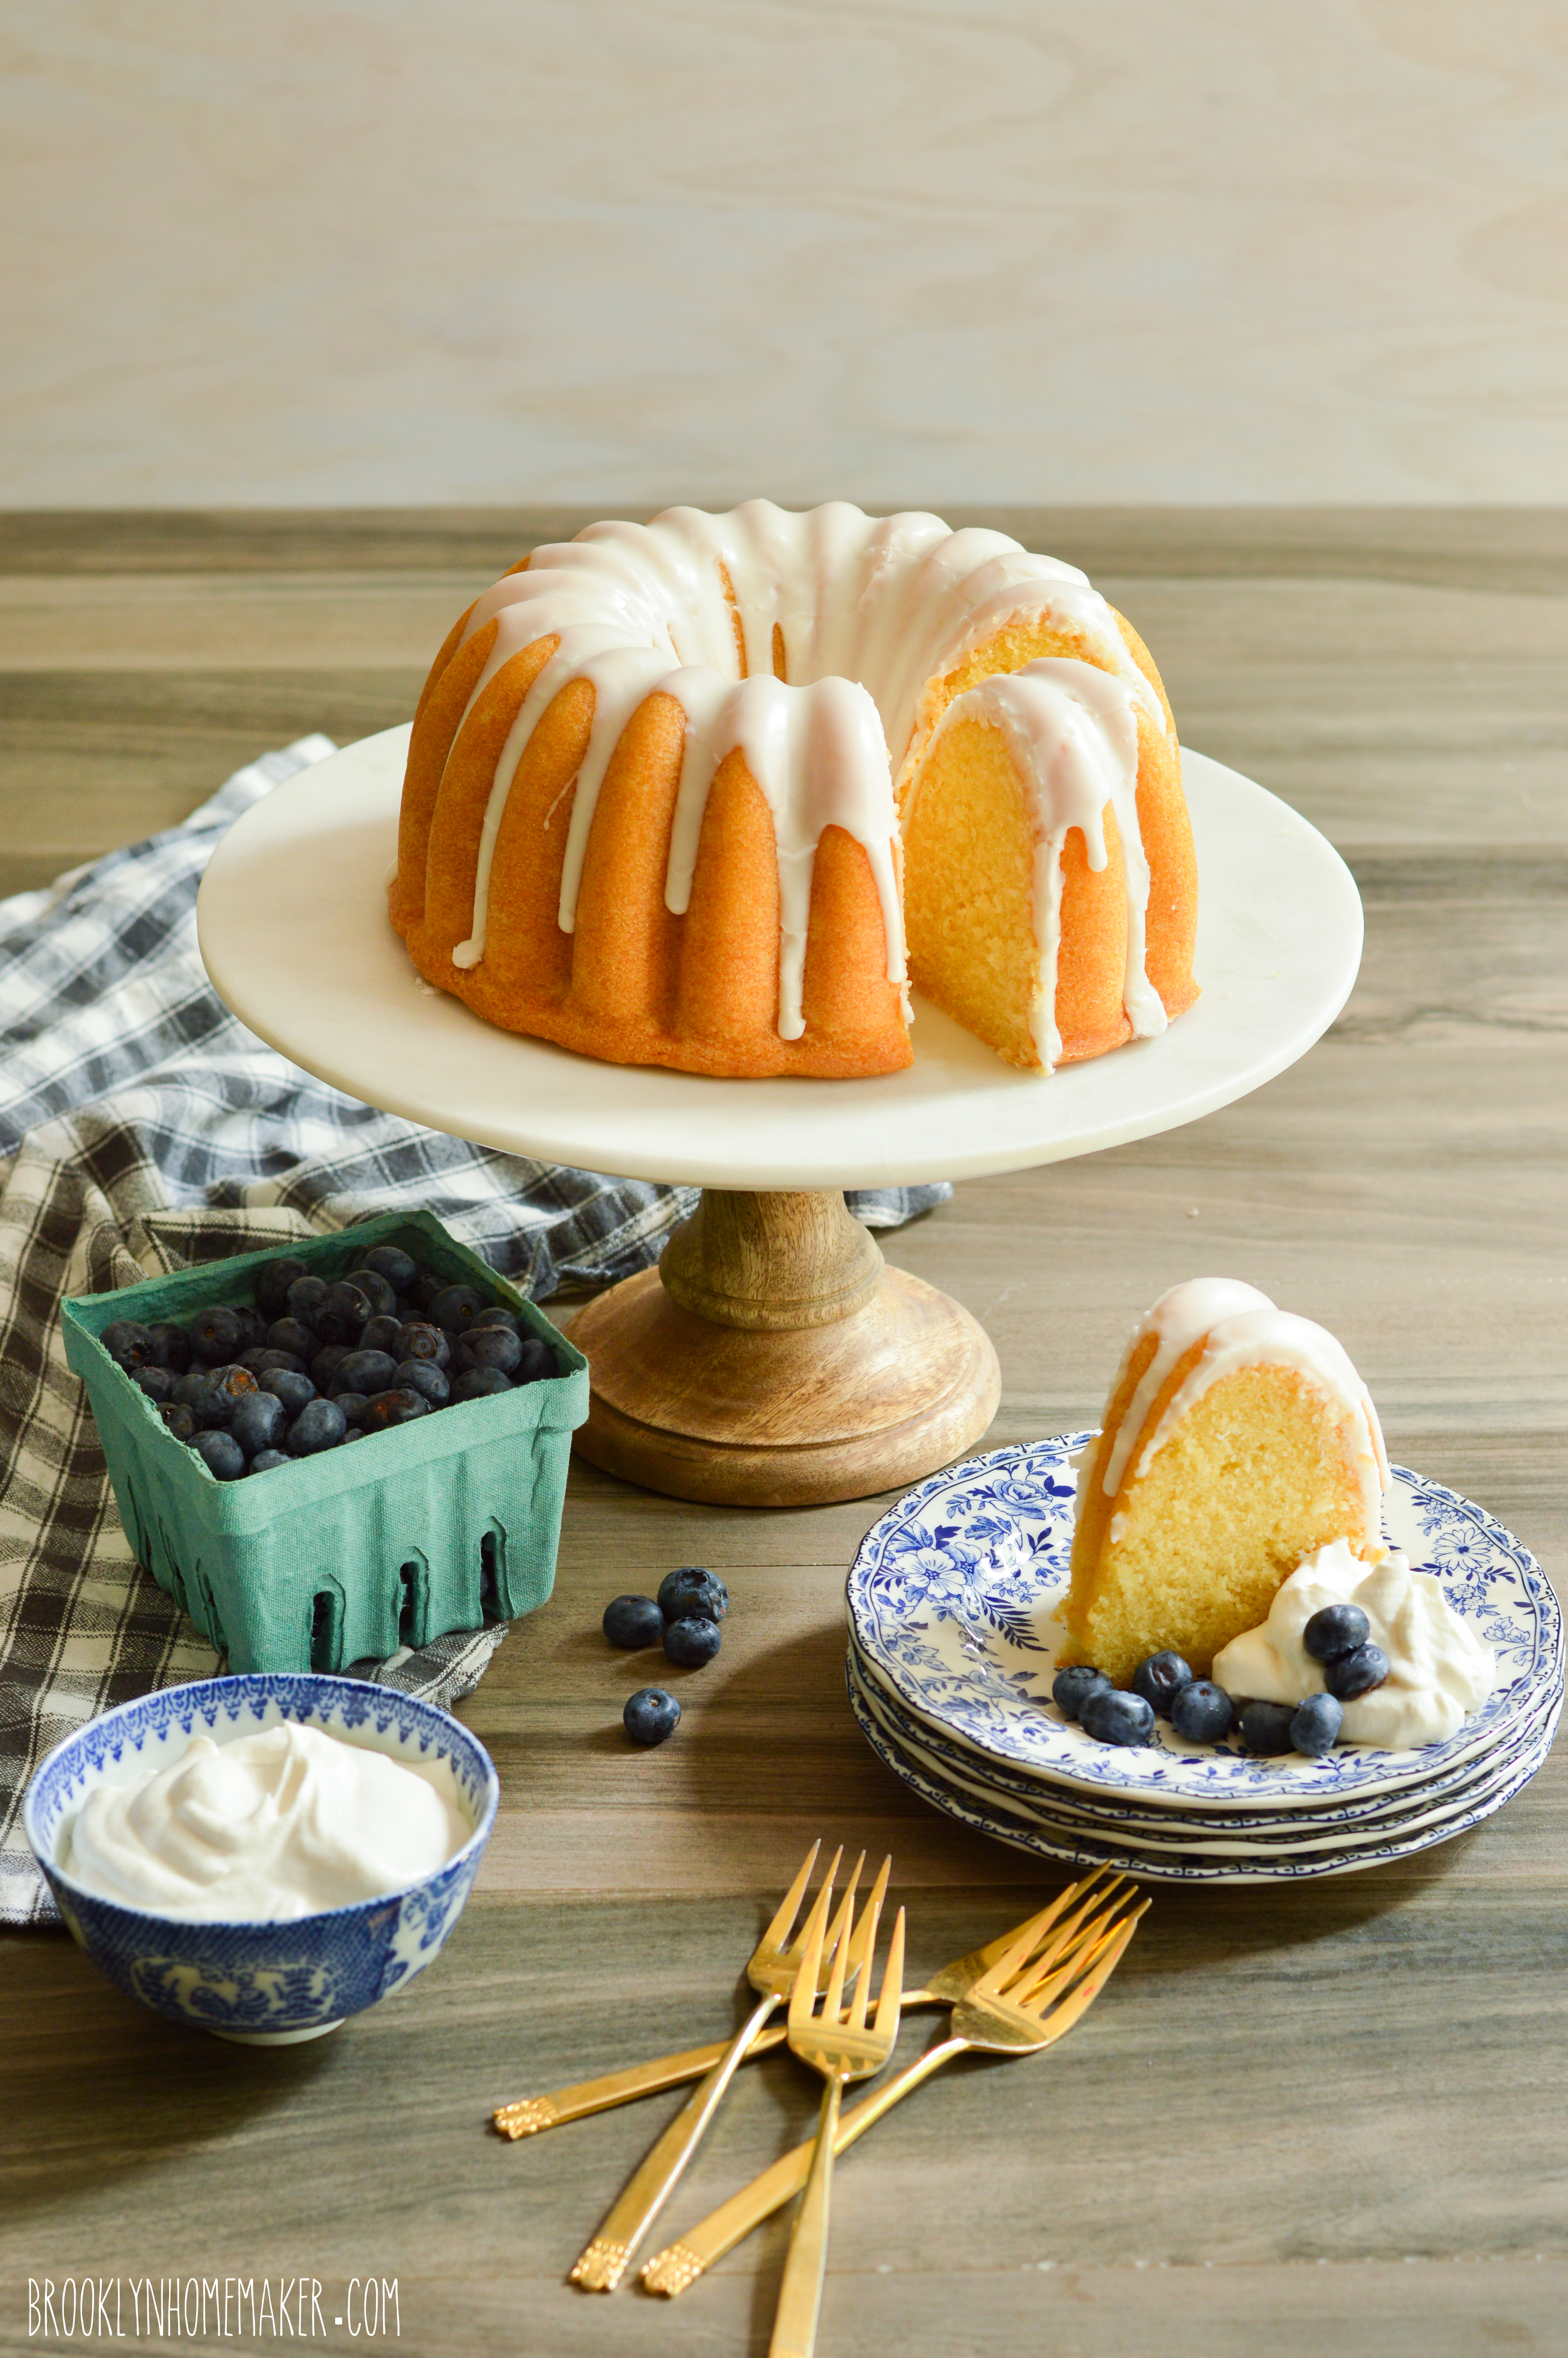
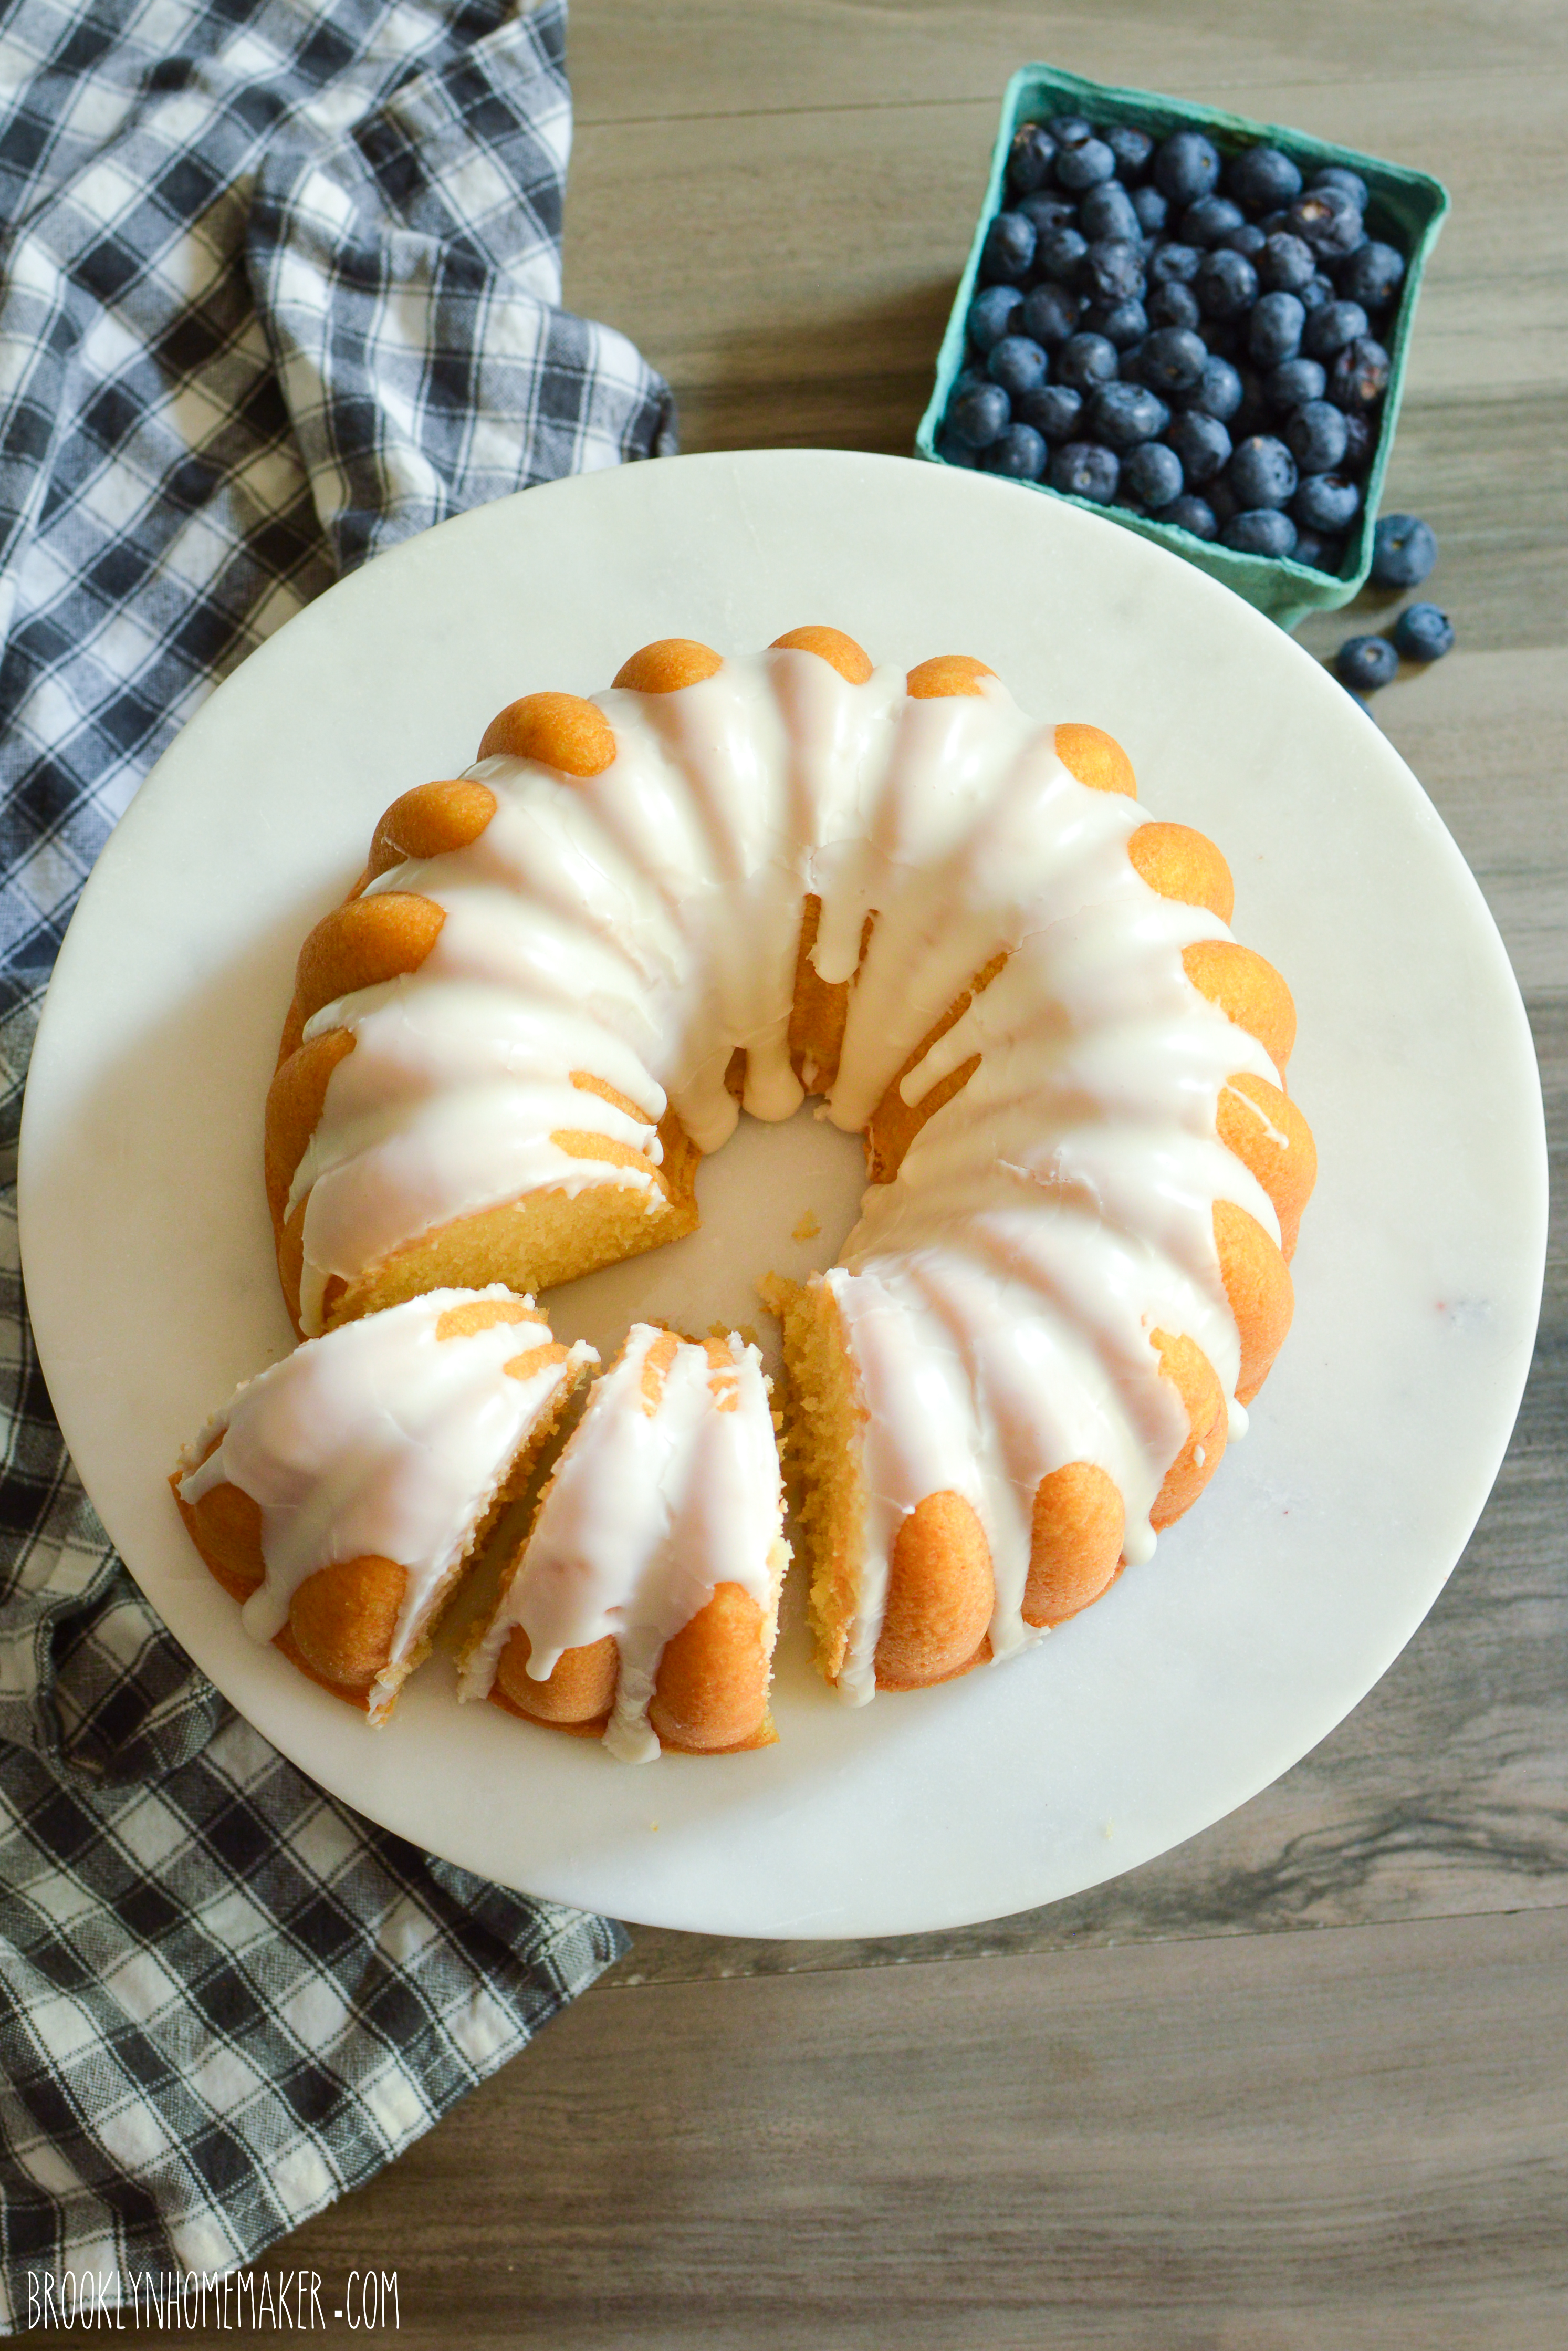
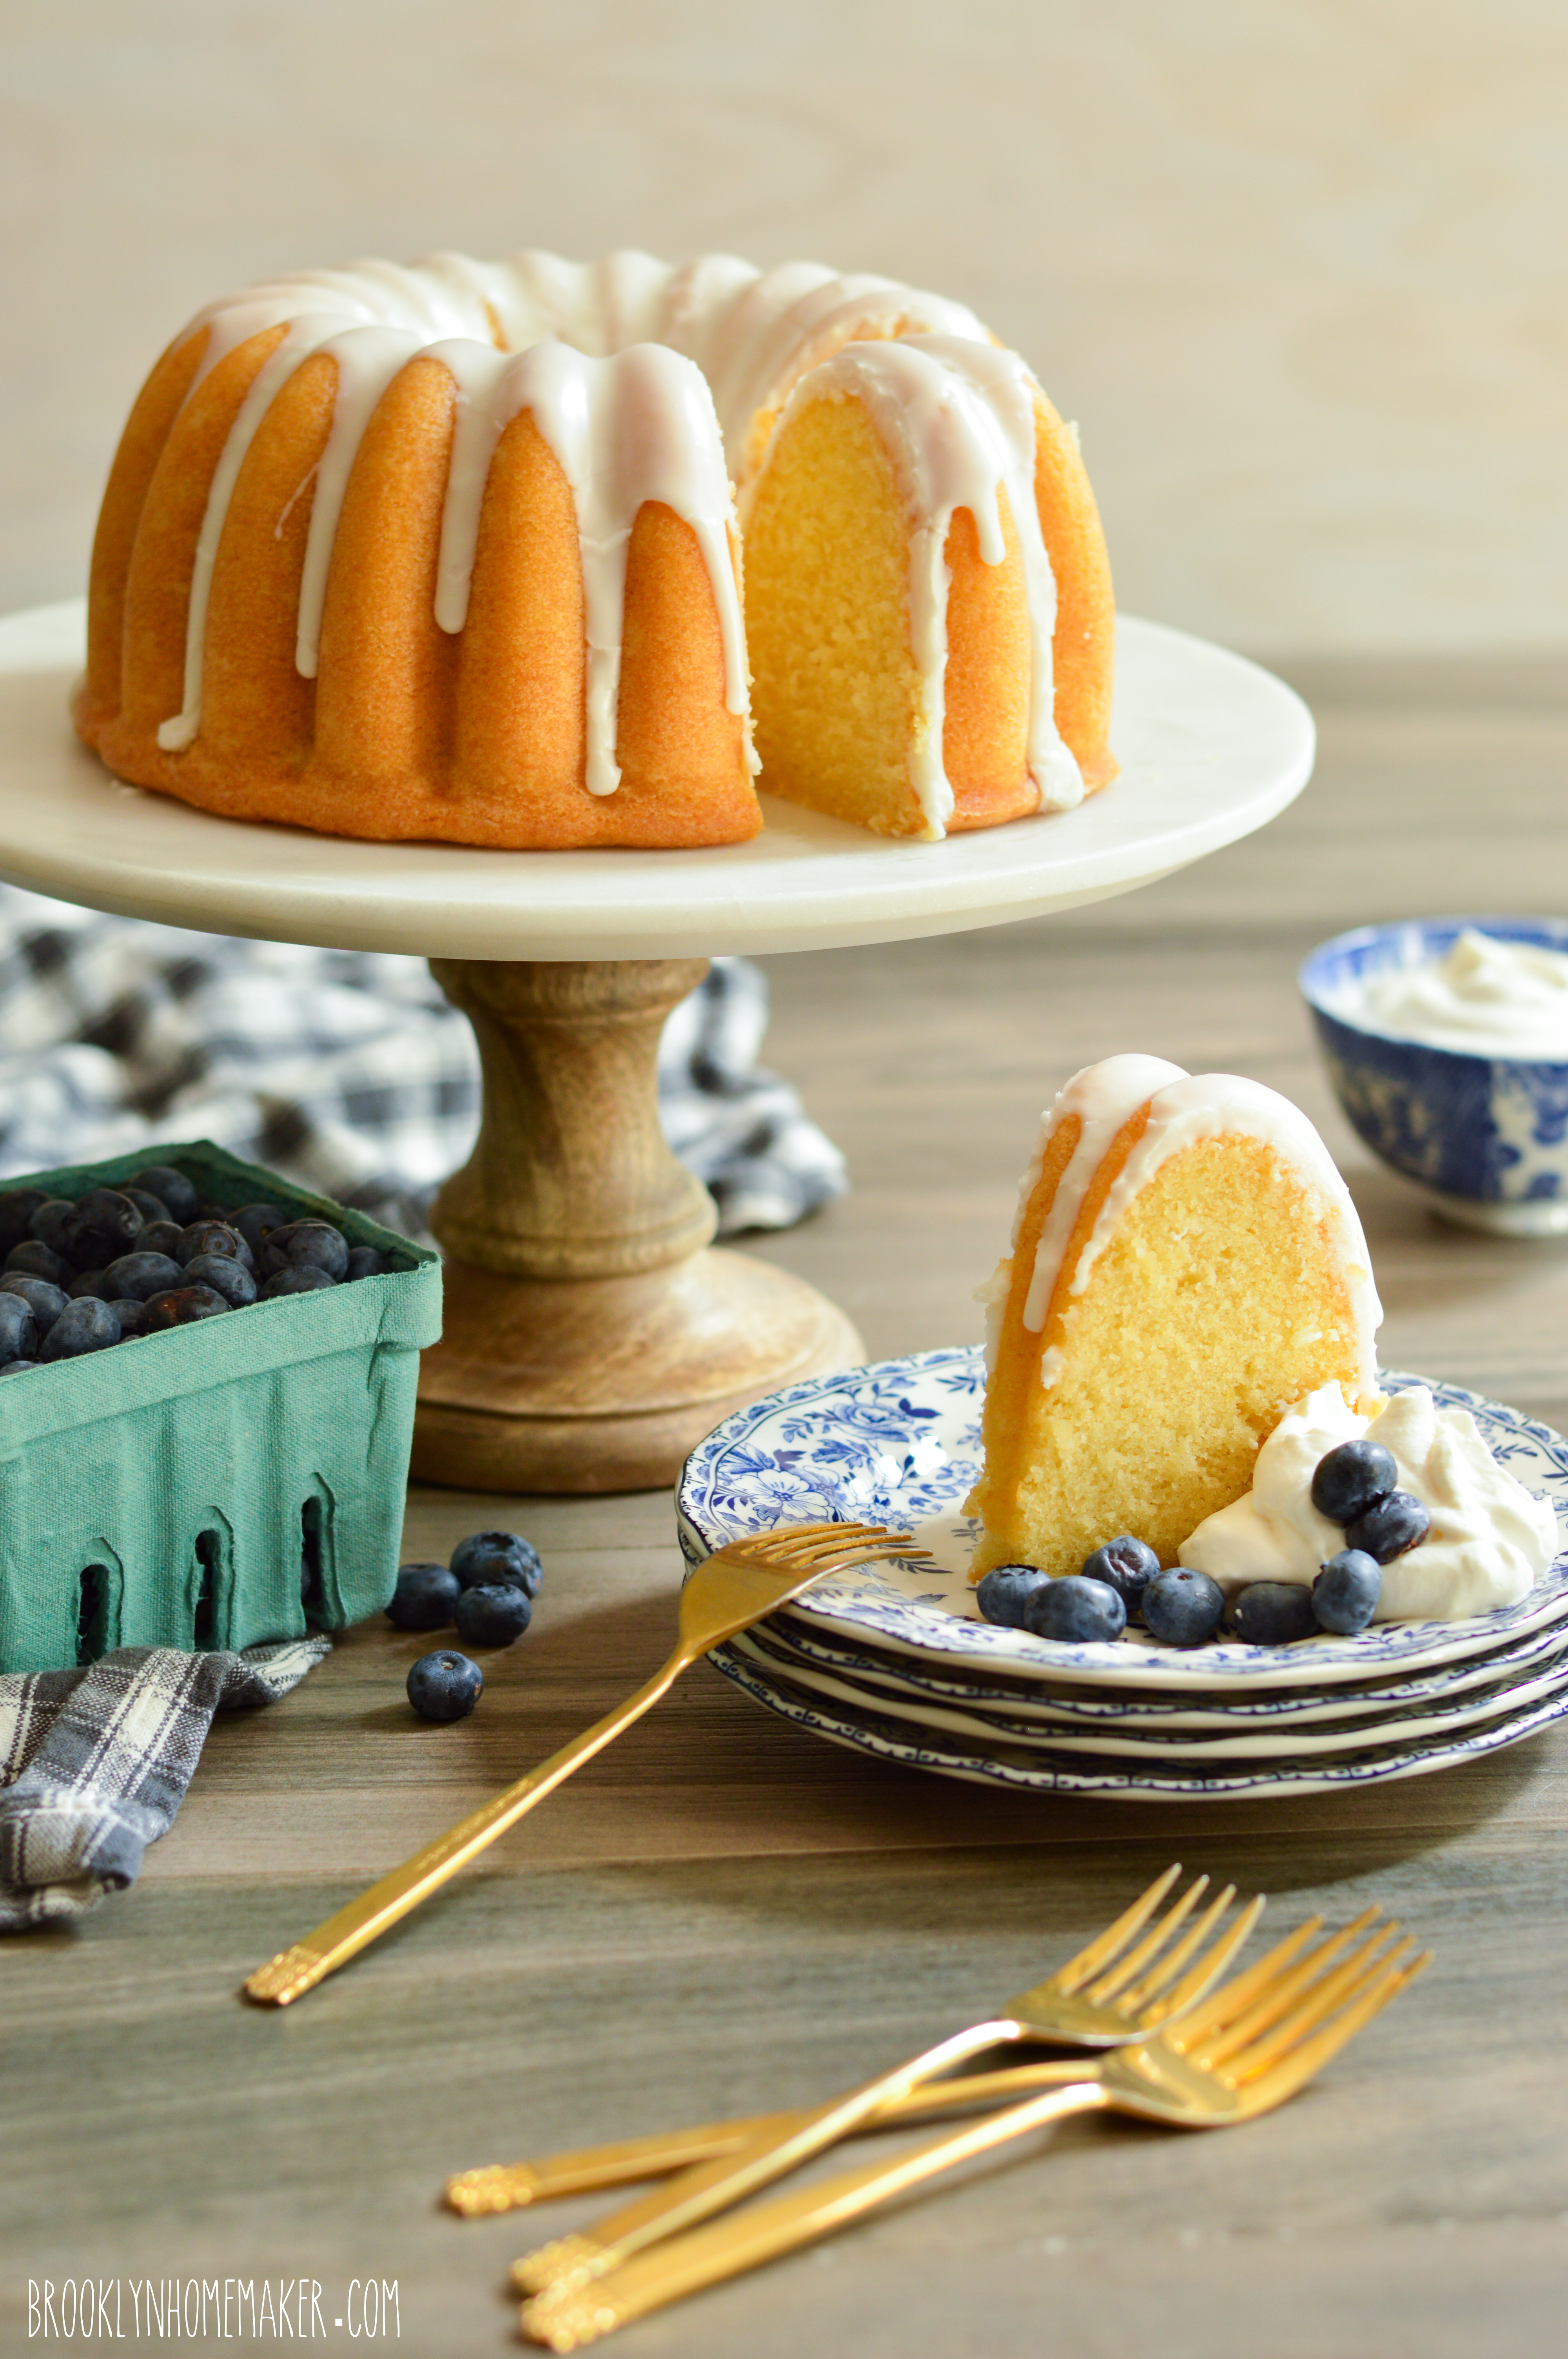
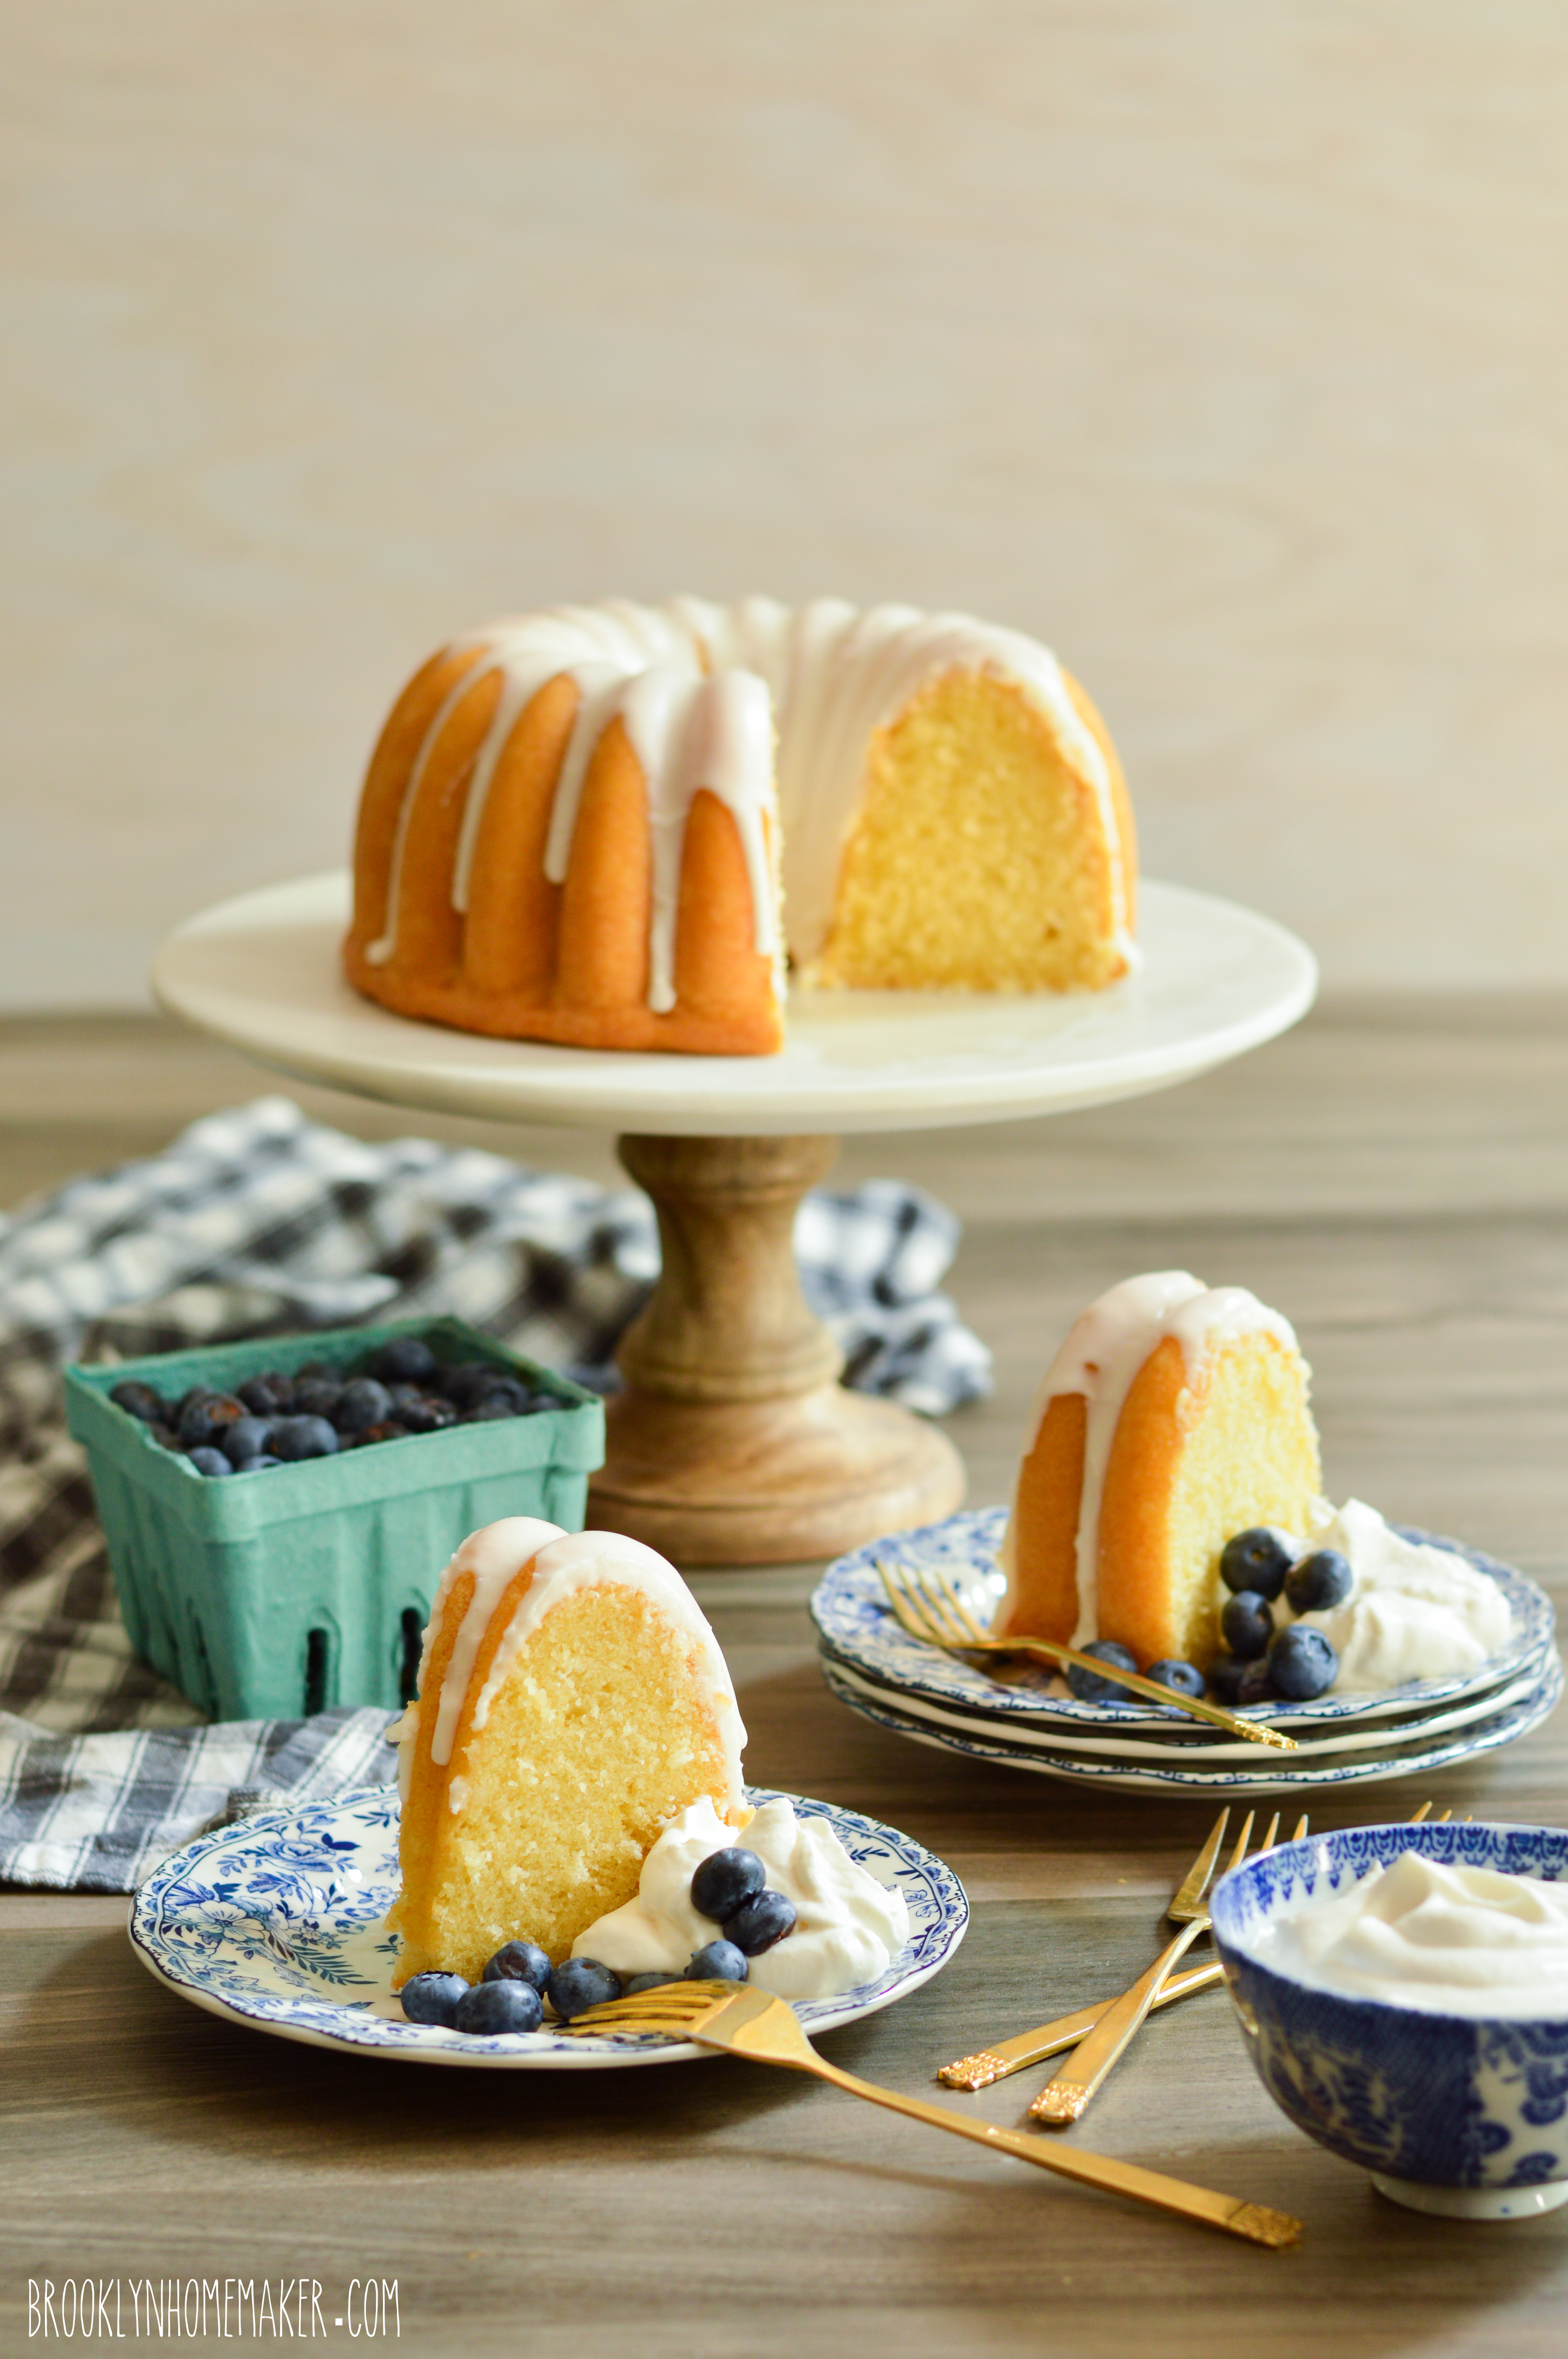
Speaking of versatility and creativity, I decided that the Virtual Pumpkin Party was the perfect opportunity for me to take my spice cake bundt recipe out for a spin and really show you what she can do. I could have just made the pumpkin purée substitution and baked a simple, yet delicious bundt cake, but I knew that I could take this recipe even further. If you’ve been reading this blog long enough you’ve probably already noticed that I’m actually a curmudgeonly old lady living in the body of a 34-year-old gay man. So, true to form, I decided to use my humble spice cake recipe as the base for a show stopping coffee cake.  A layer of toasted pecans and brown sugar, and a topping of buttery crunchy streusel may seem simple enough, but they seriously transform this cake.

pumpkin streusel coffee cake | Brooklyn Homemaker

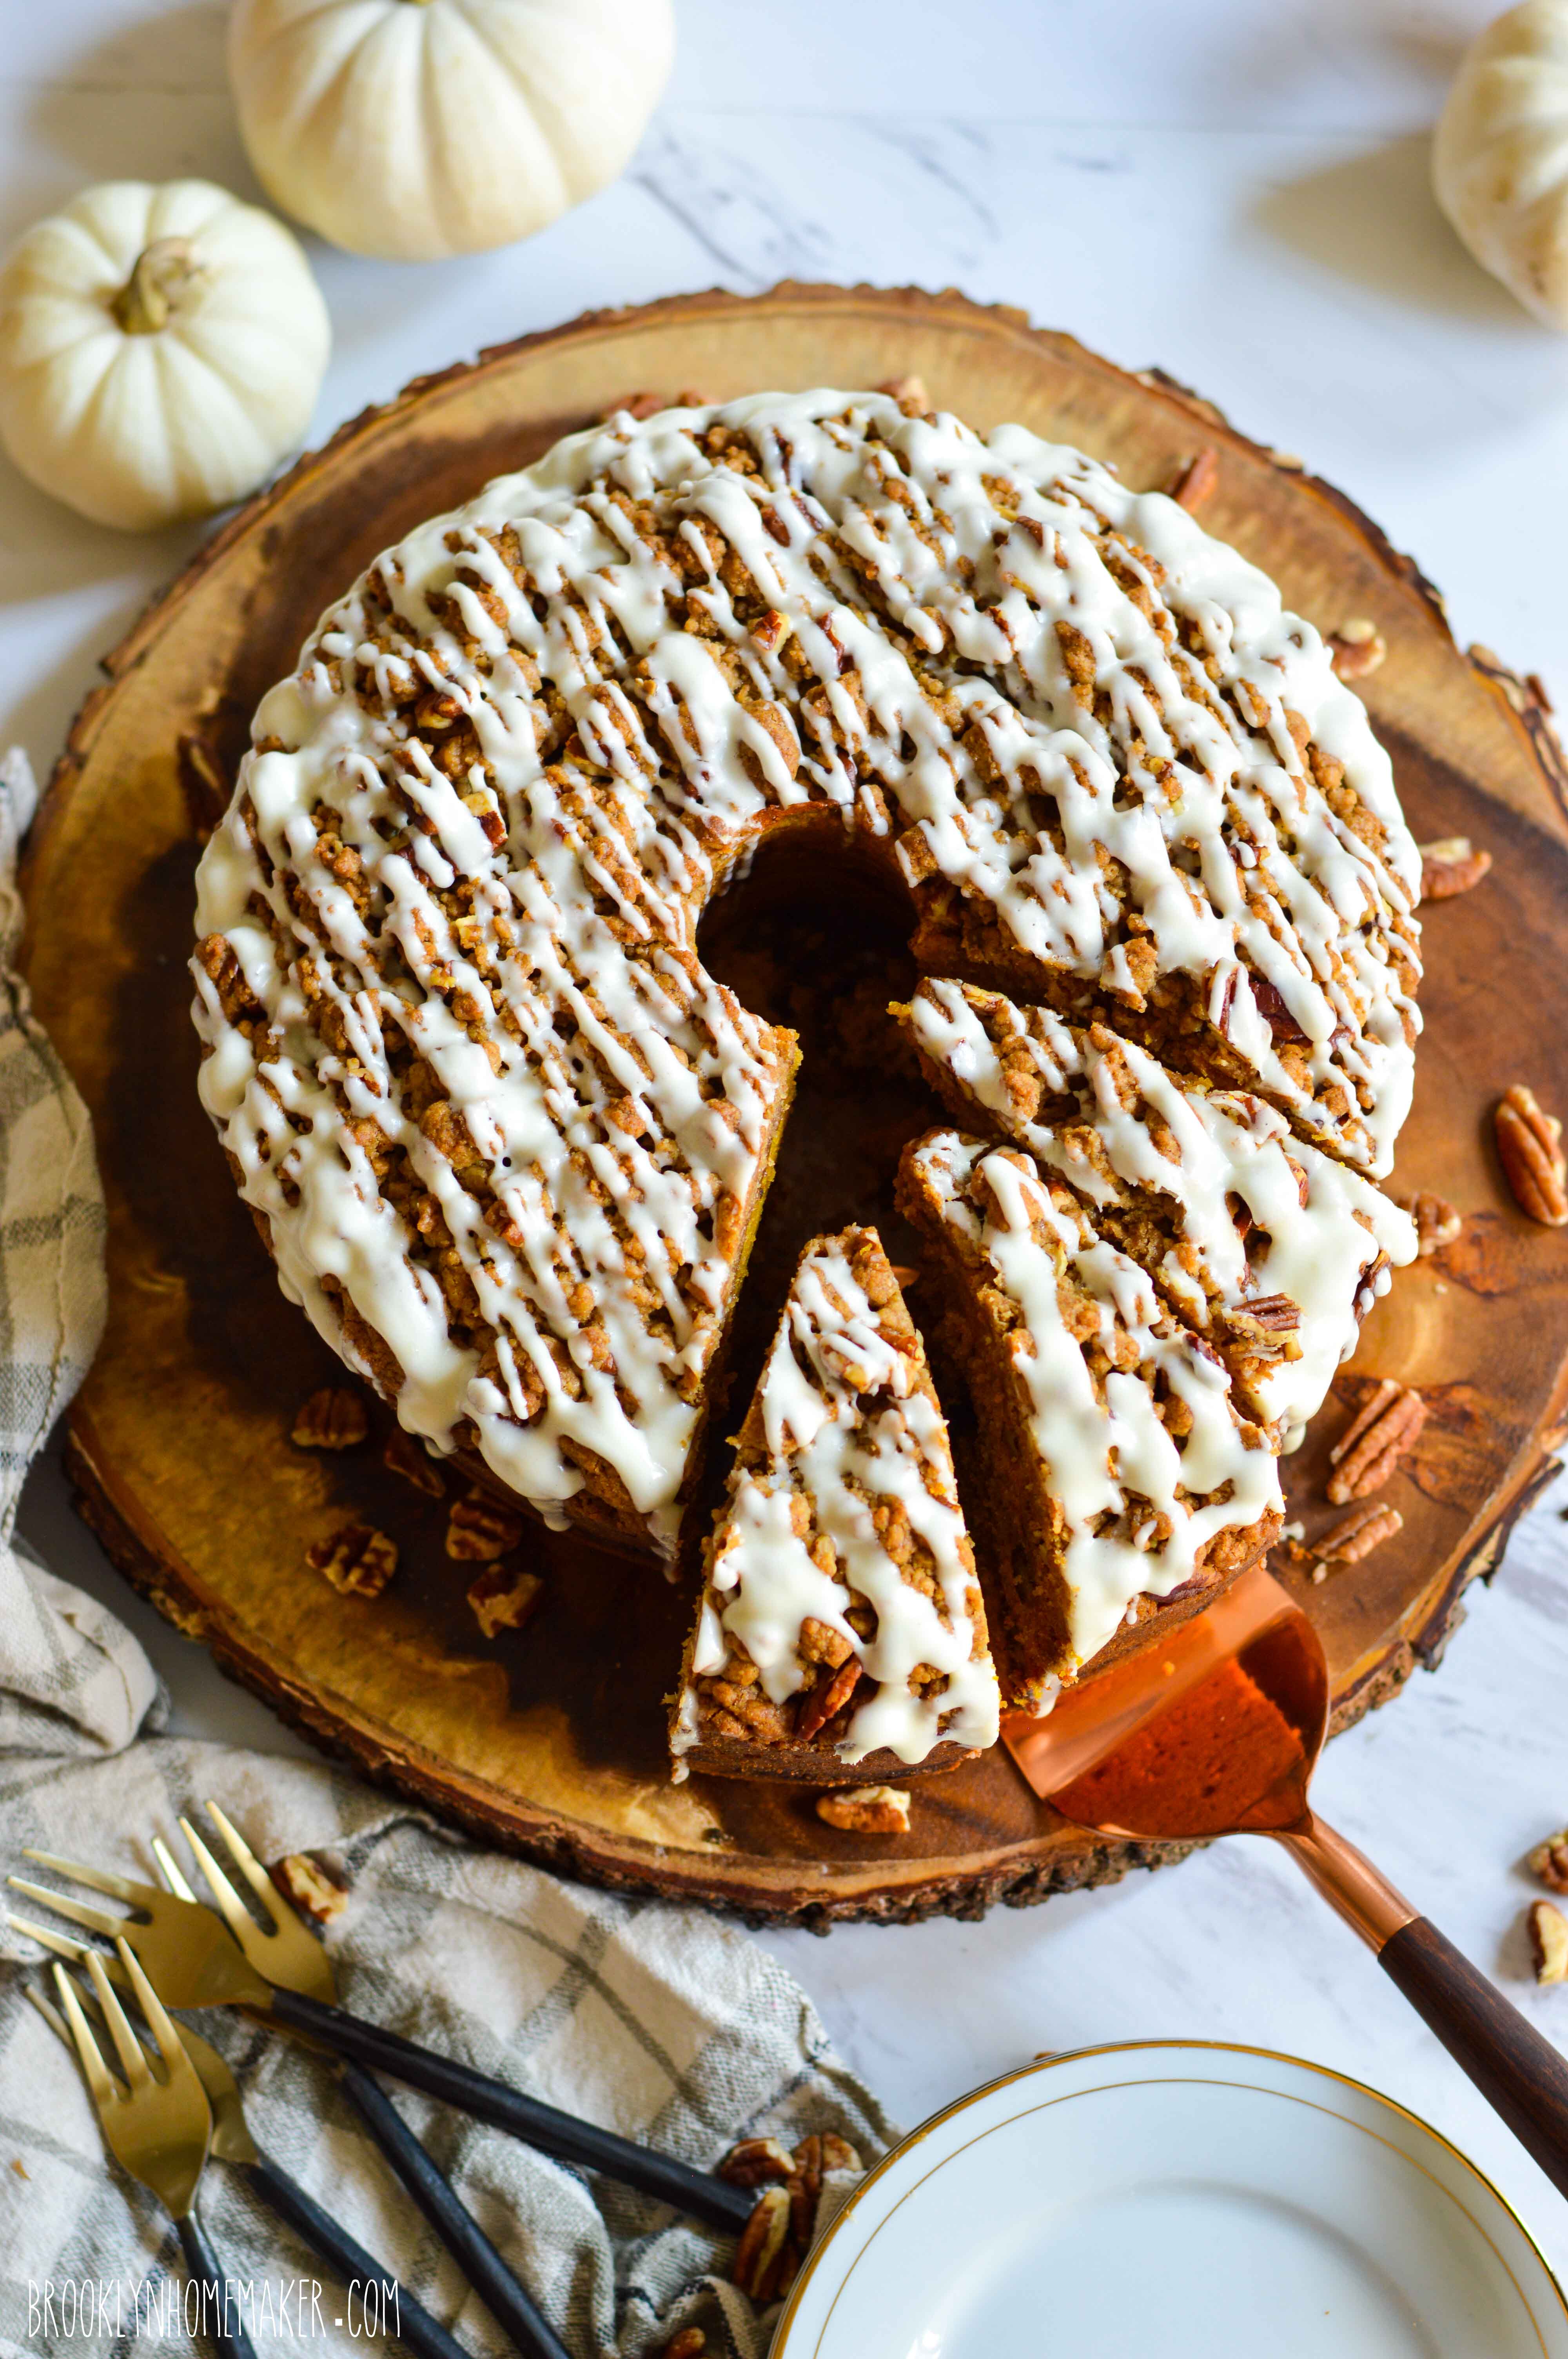
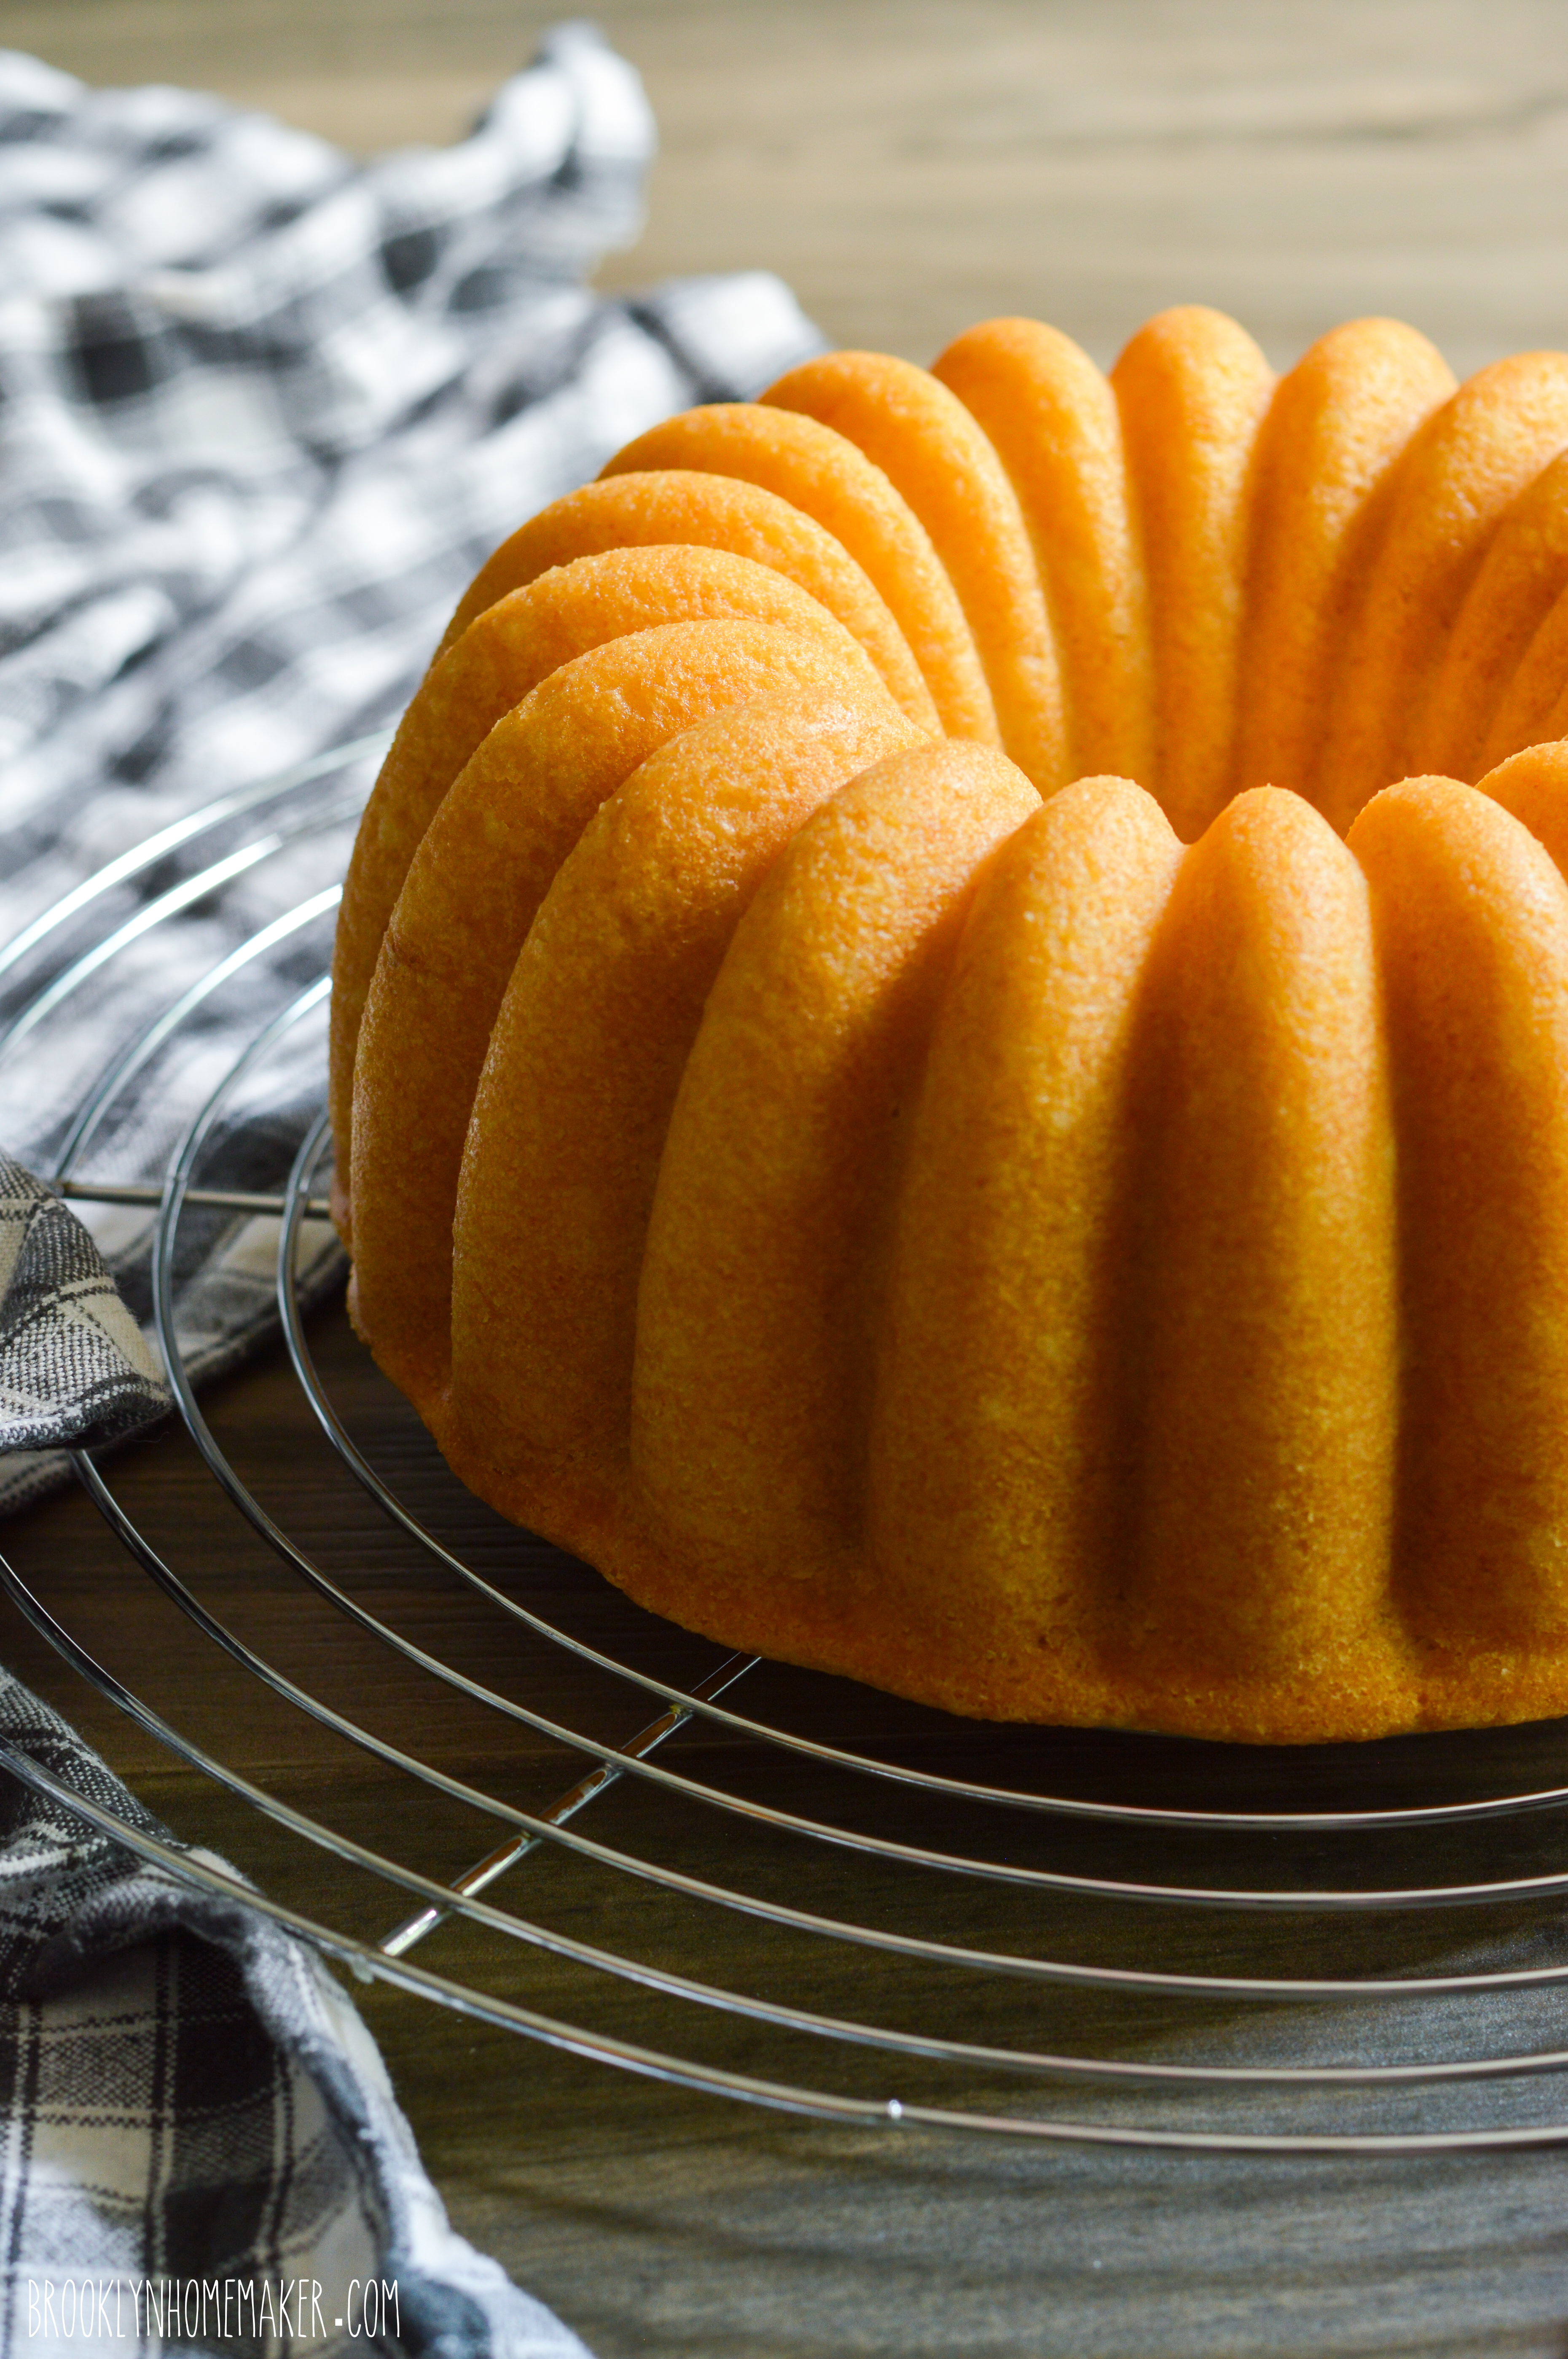
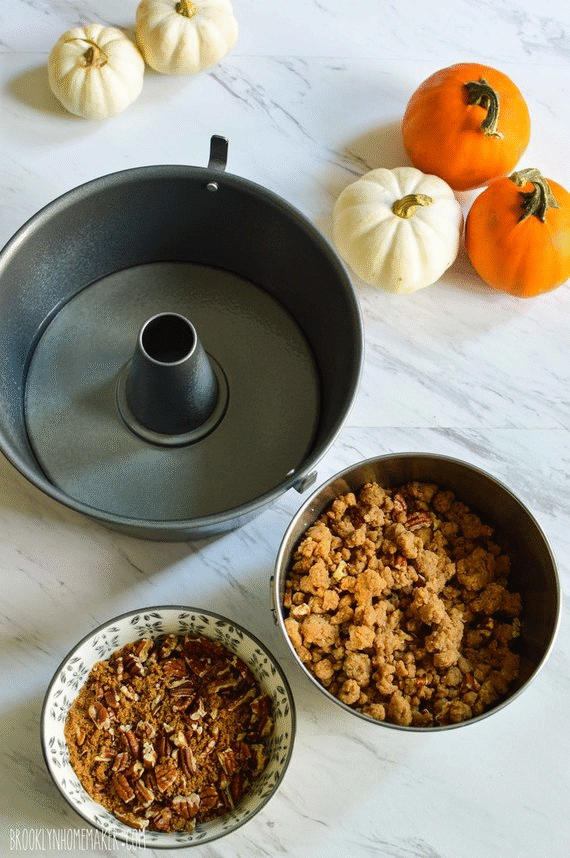
The only slight change I made to the base recipe was to add just a bit more oil. The additional ingredients and thick layer of streusel mean this cake has to bake a long time before it’s fully cooked inside, and the extra oil helps keep the bottom and sides of the cake from drying out before the interior is done. I also decided to bake the cake in an angel food pan rather than a bundt pan, because bundts are meant to be turned out of the pan and served upside down, but I wanted that gorgeous streusel topping to be the star of the show. If you don’t have an angel food pan though, just bake it in a bundt pan and serve it with the streusel side up!

pumpkin streusel coffee cake | Brooklyn Homemaker

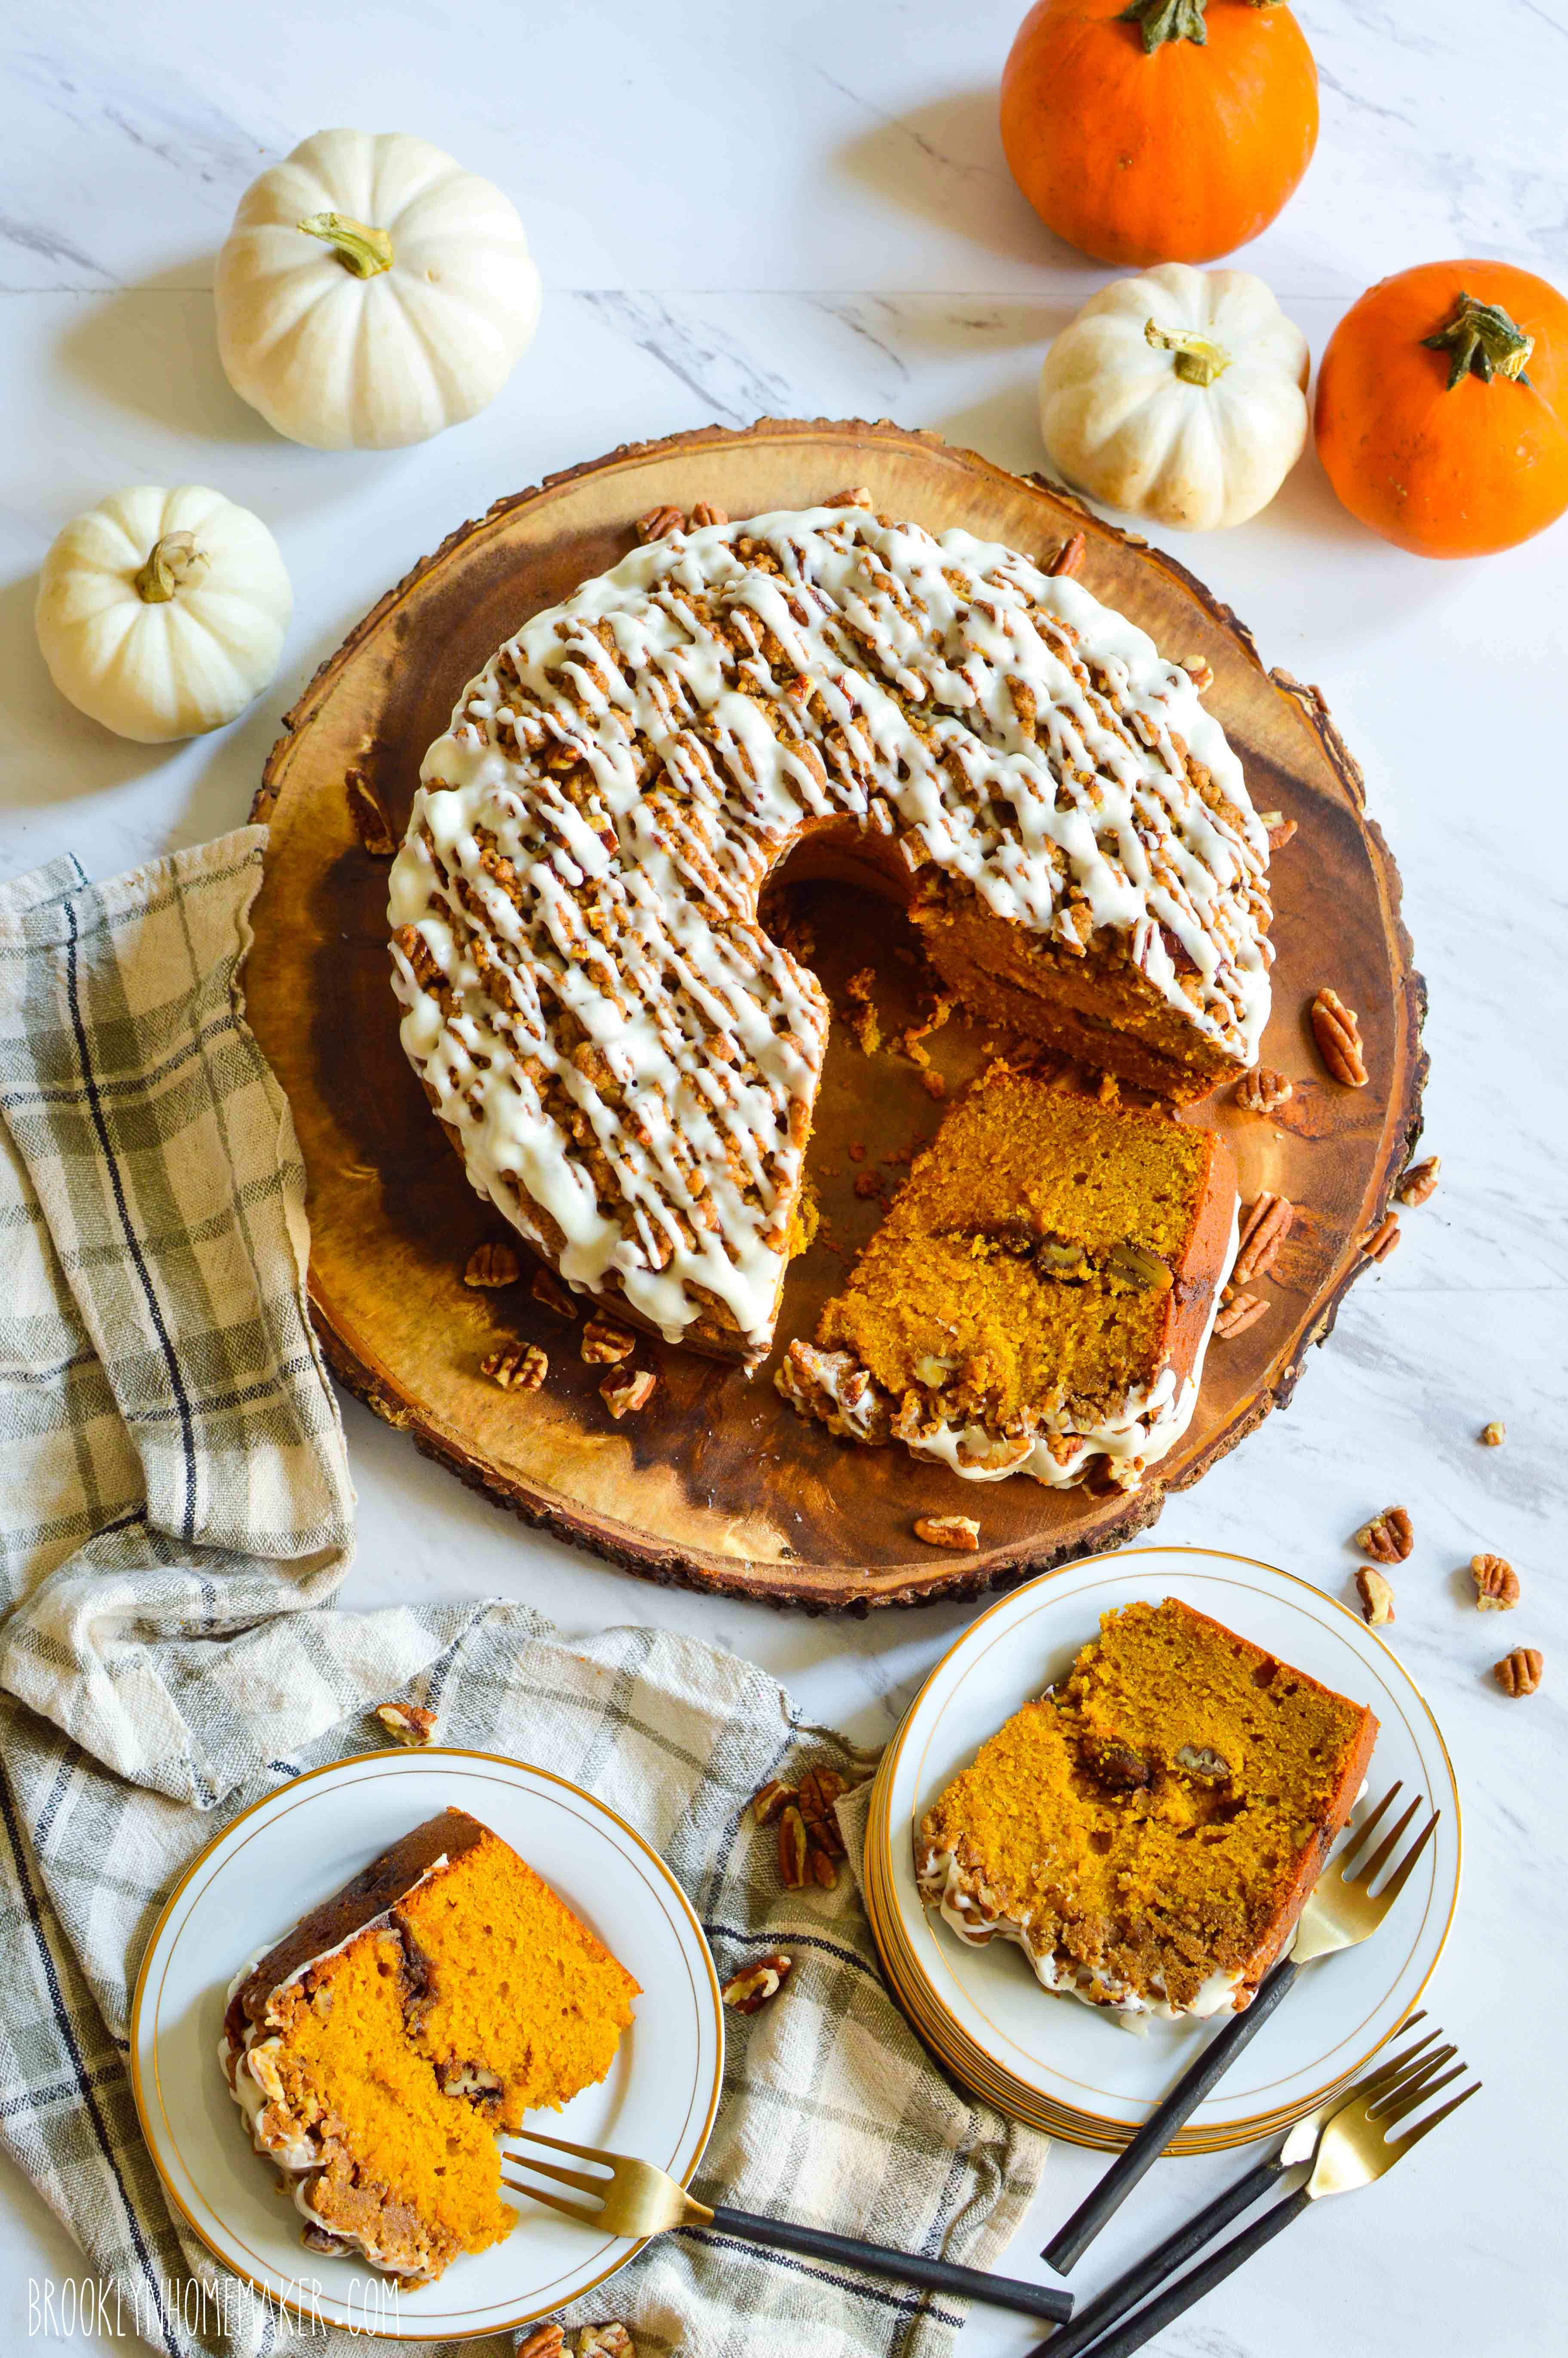
This cake is dense and rich and packed with heavenly, homey fall flavors. The cake itself is almost like a rich spiced pumpkin bread, the filling adds a lovely bit of toasty nutty texture, and the streusel is crunchy and buttery and salty in the best possible way. A light drizzle of cream cheese glaze adds just a touch of extra sweetness and a bit of creamy tang. I could go on, but I’m sure you get the picture. Now go preheat the oven already.

pumpkin streusel coffee cake | Brooklyn Homemaker

Pumpkin Streusel Coffee Cake

Streusel:
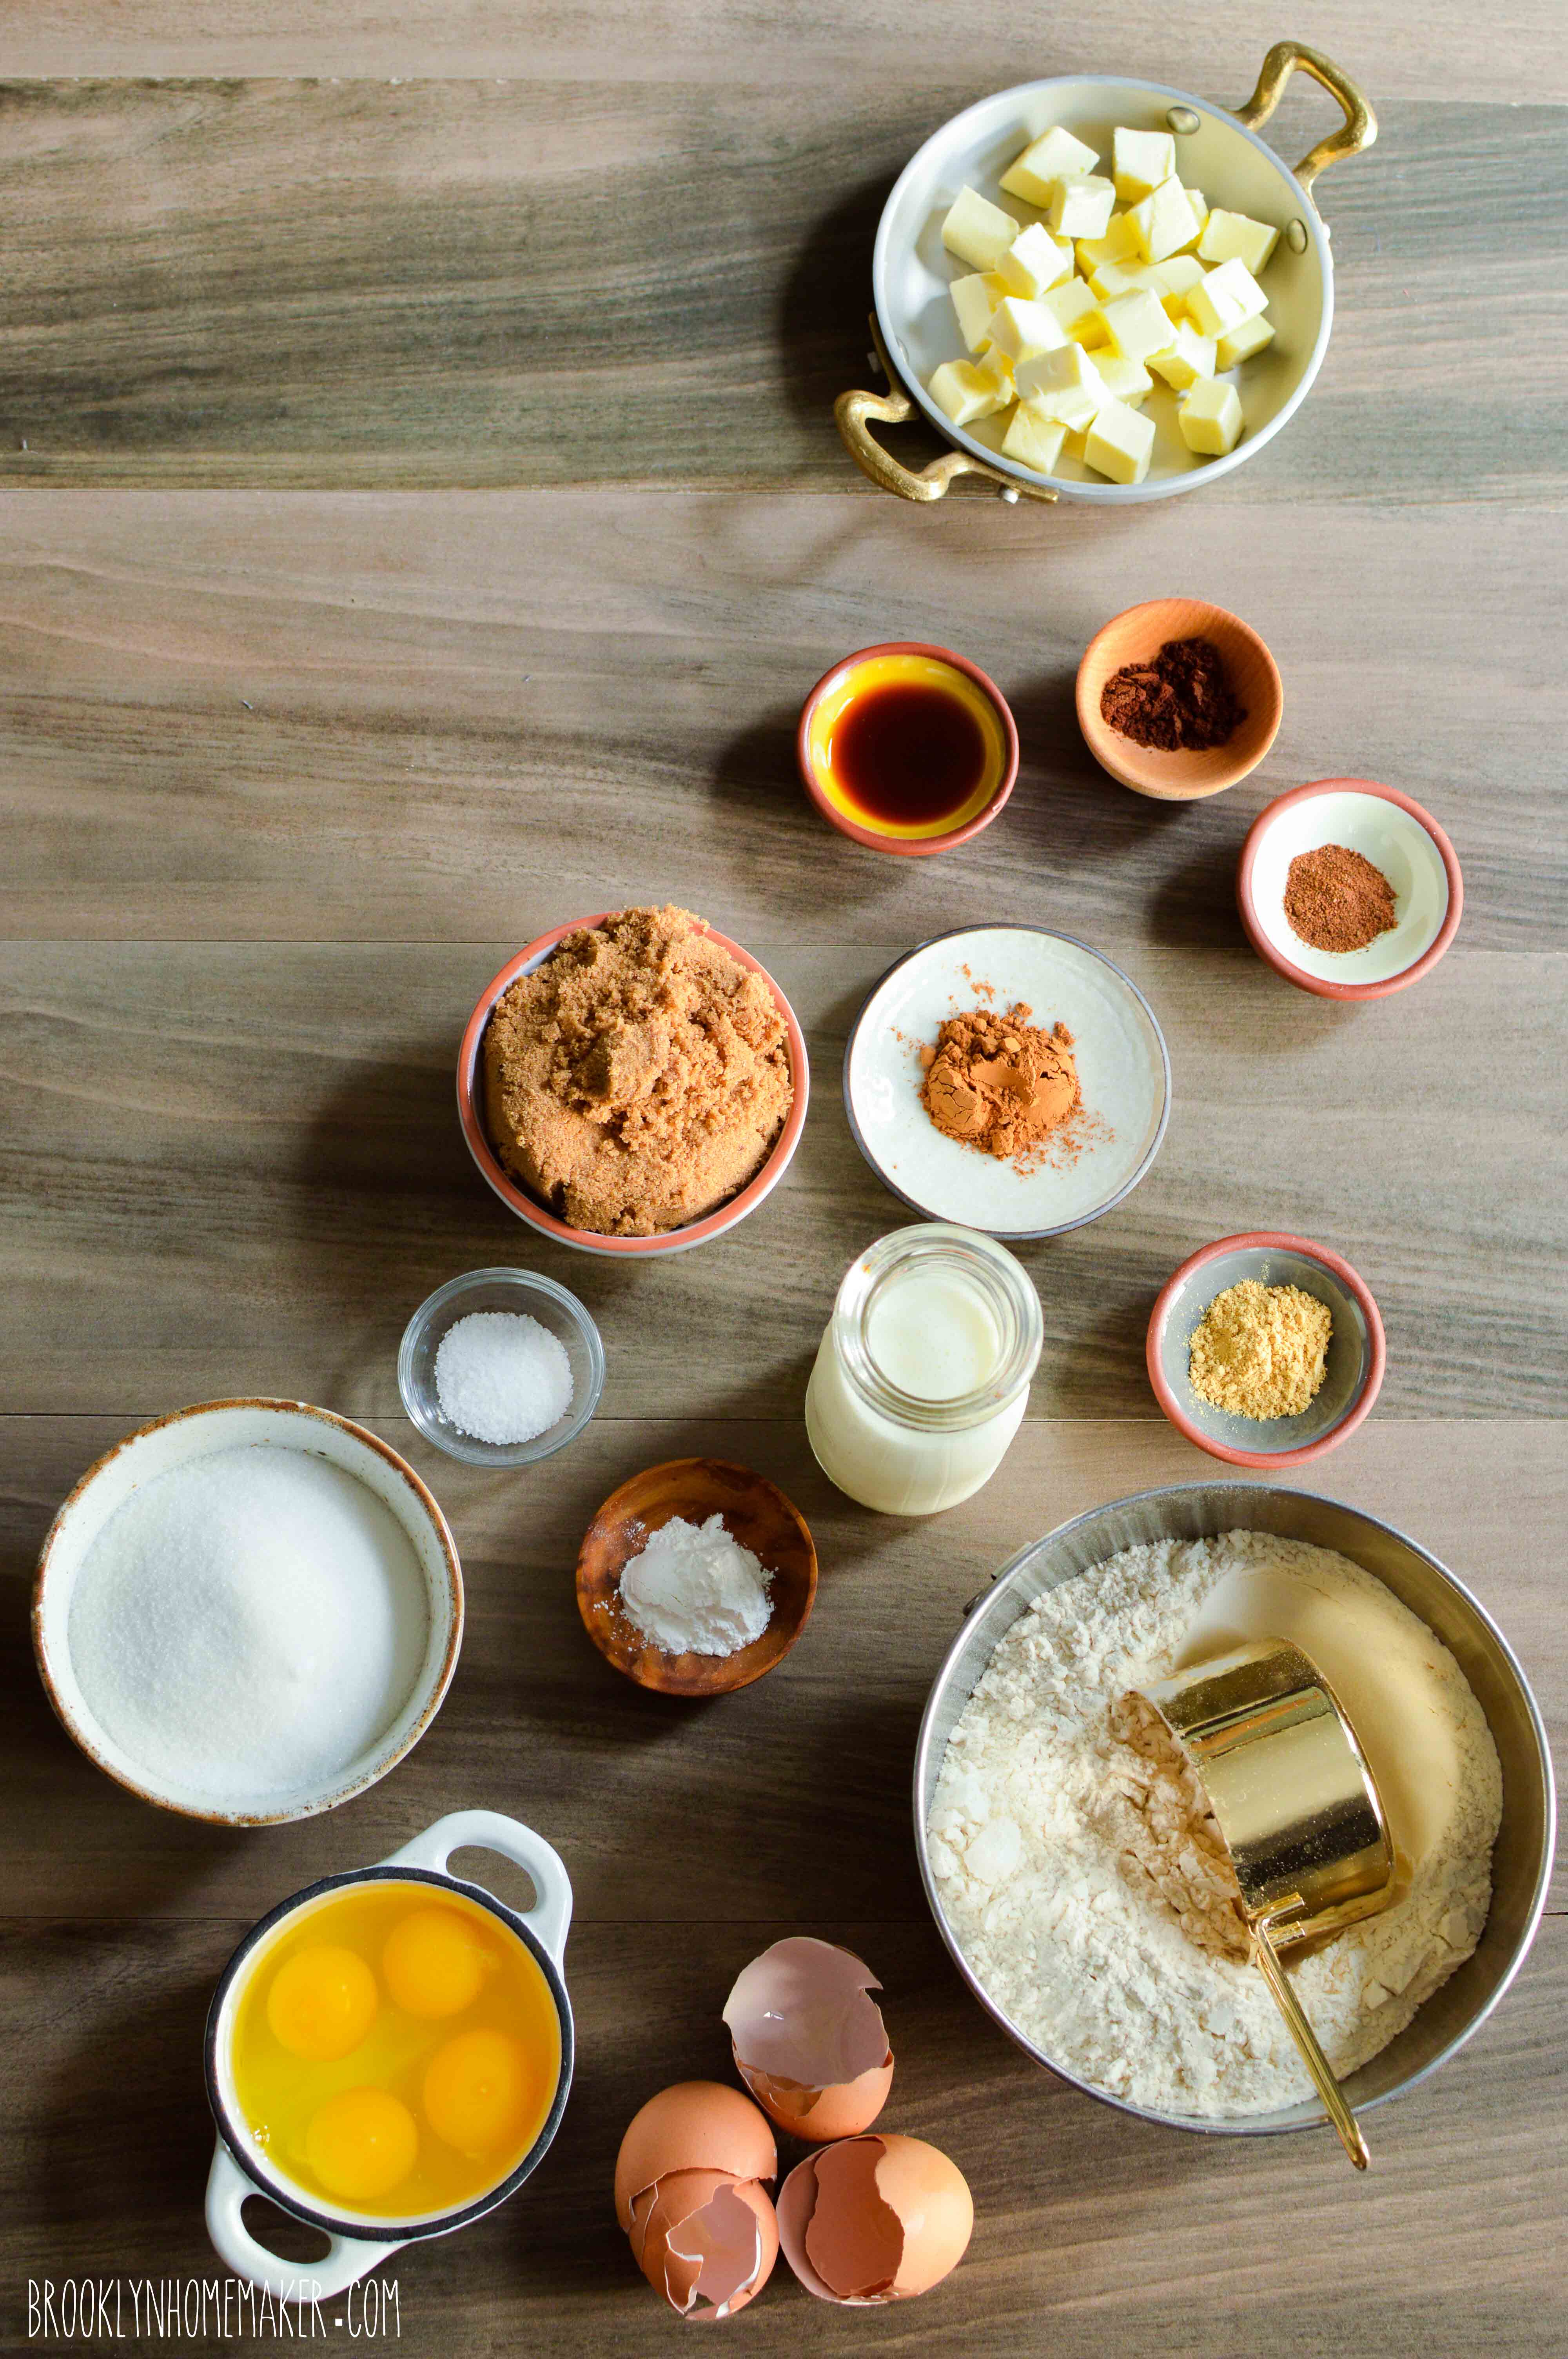
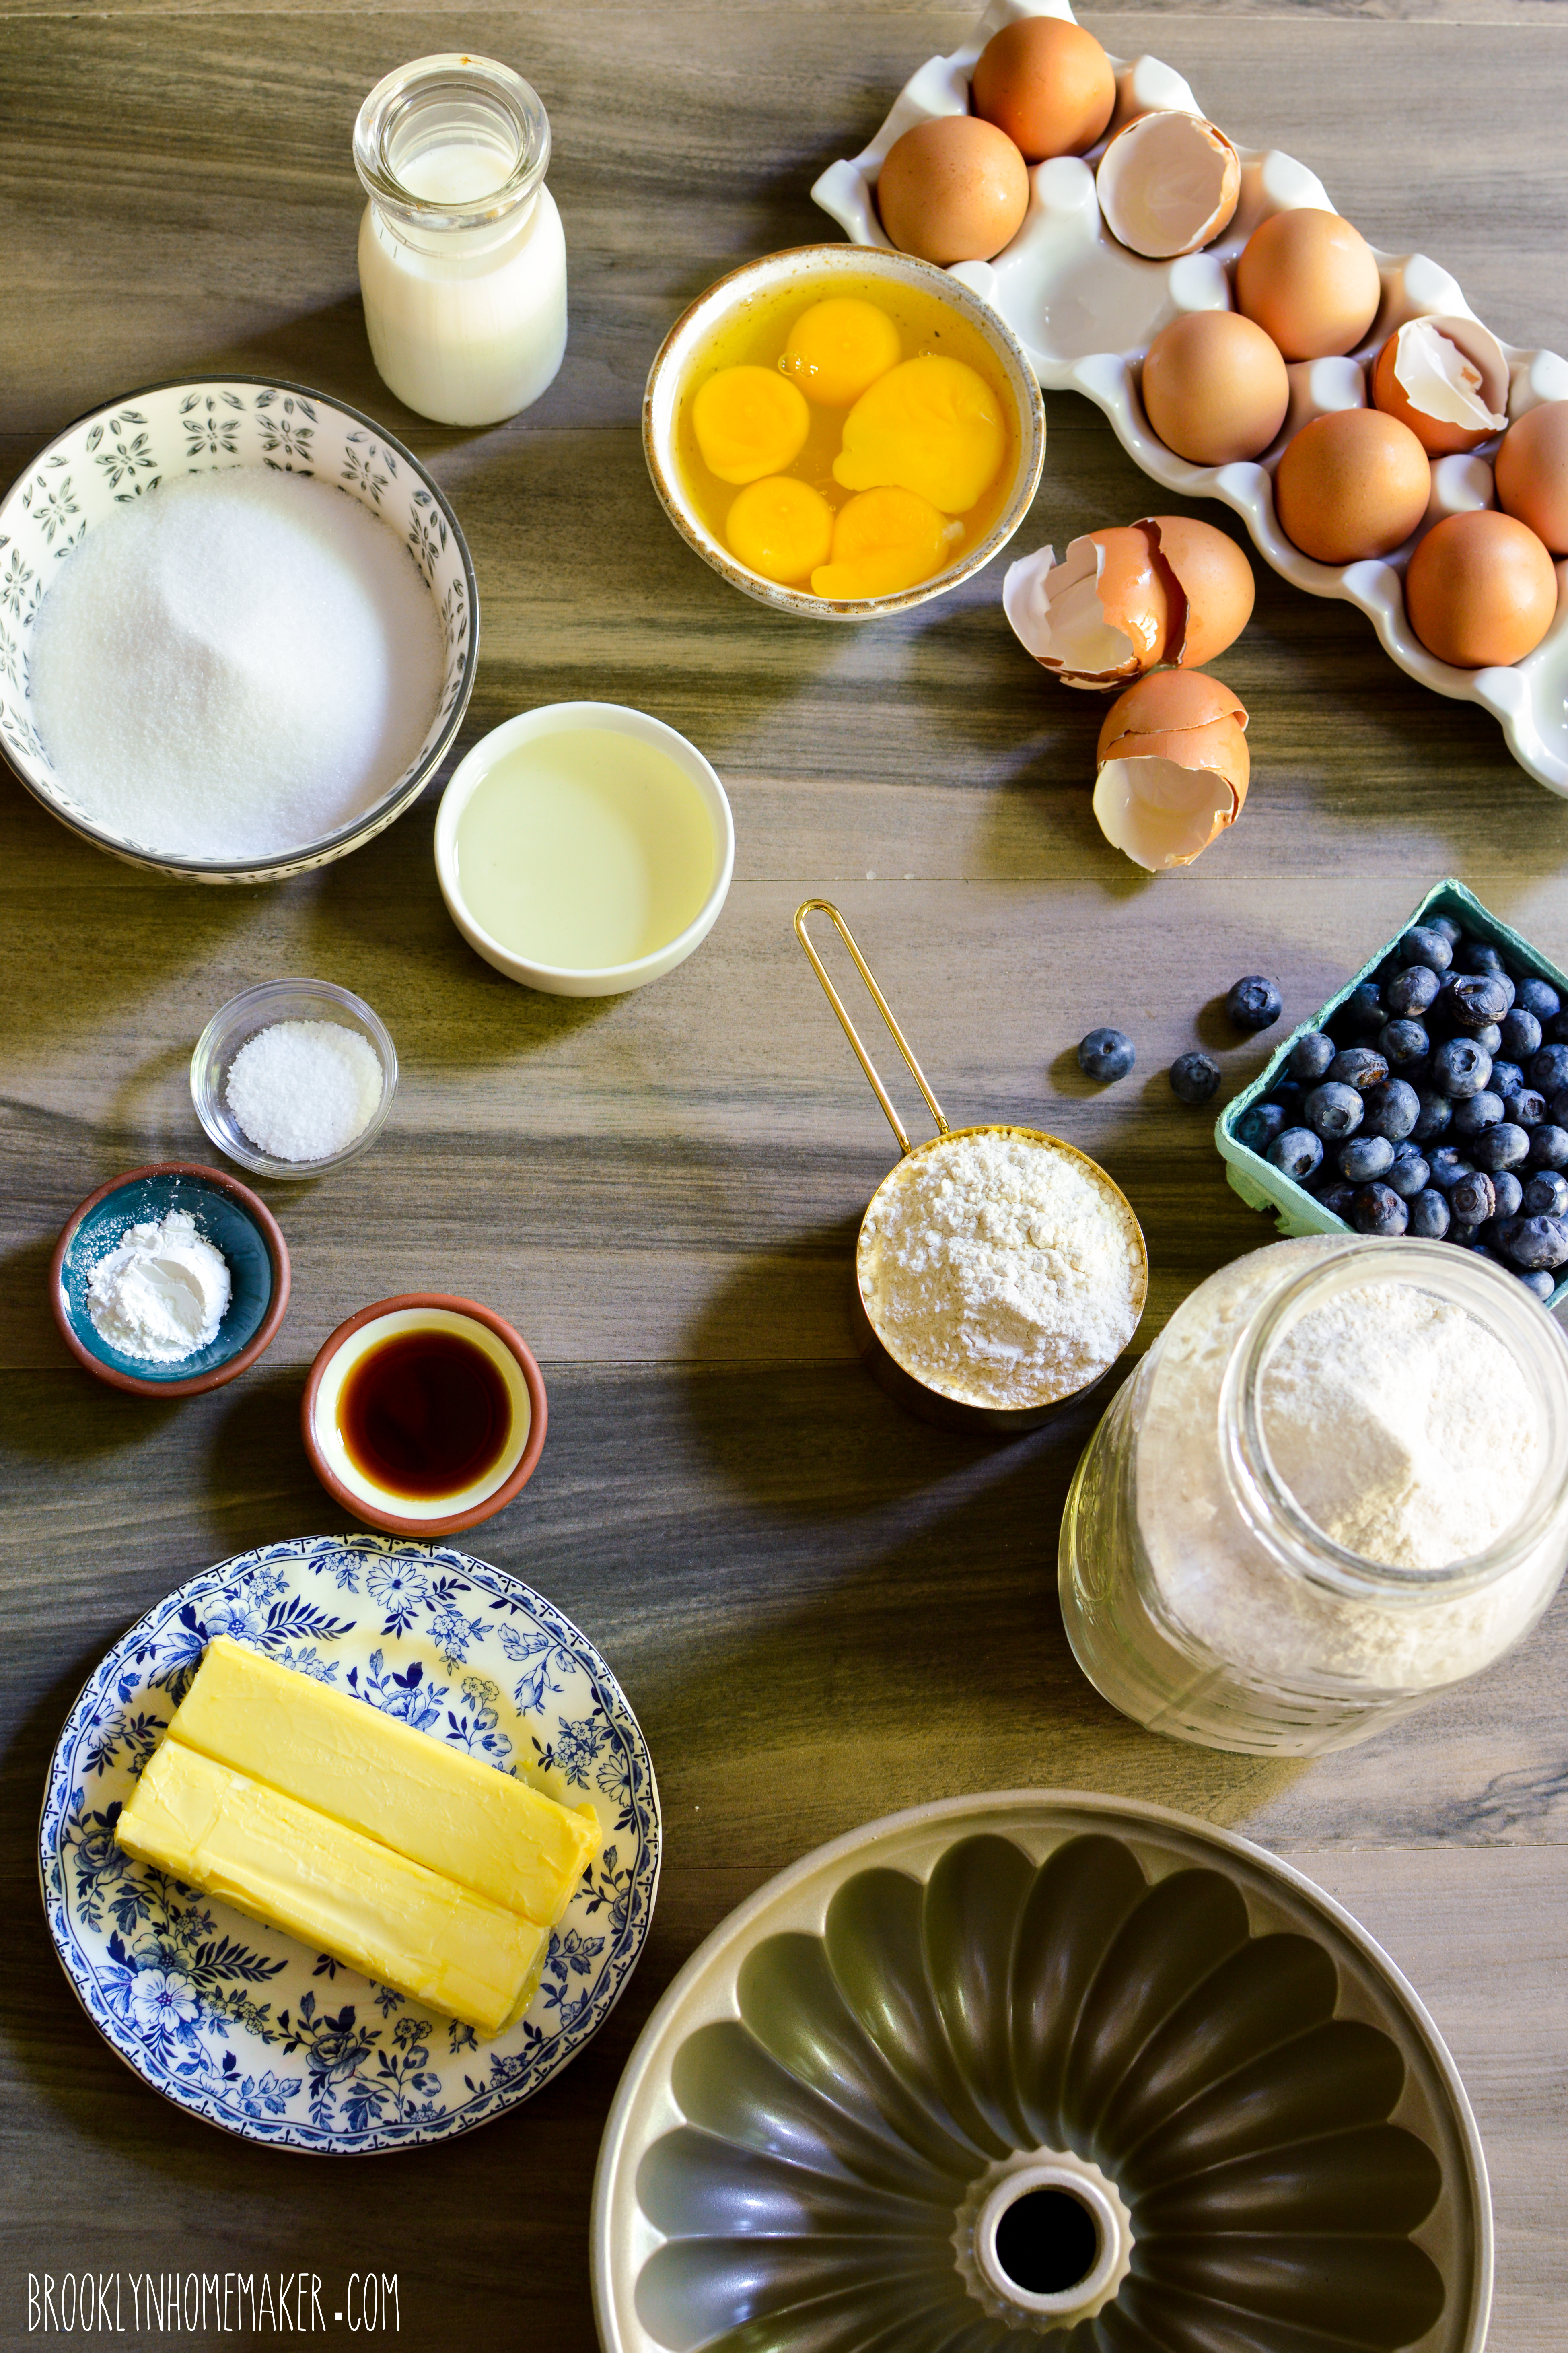
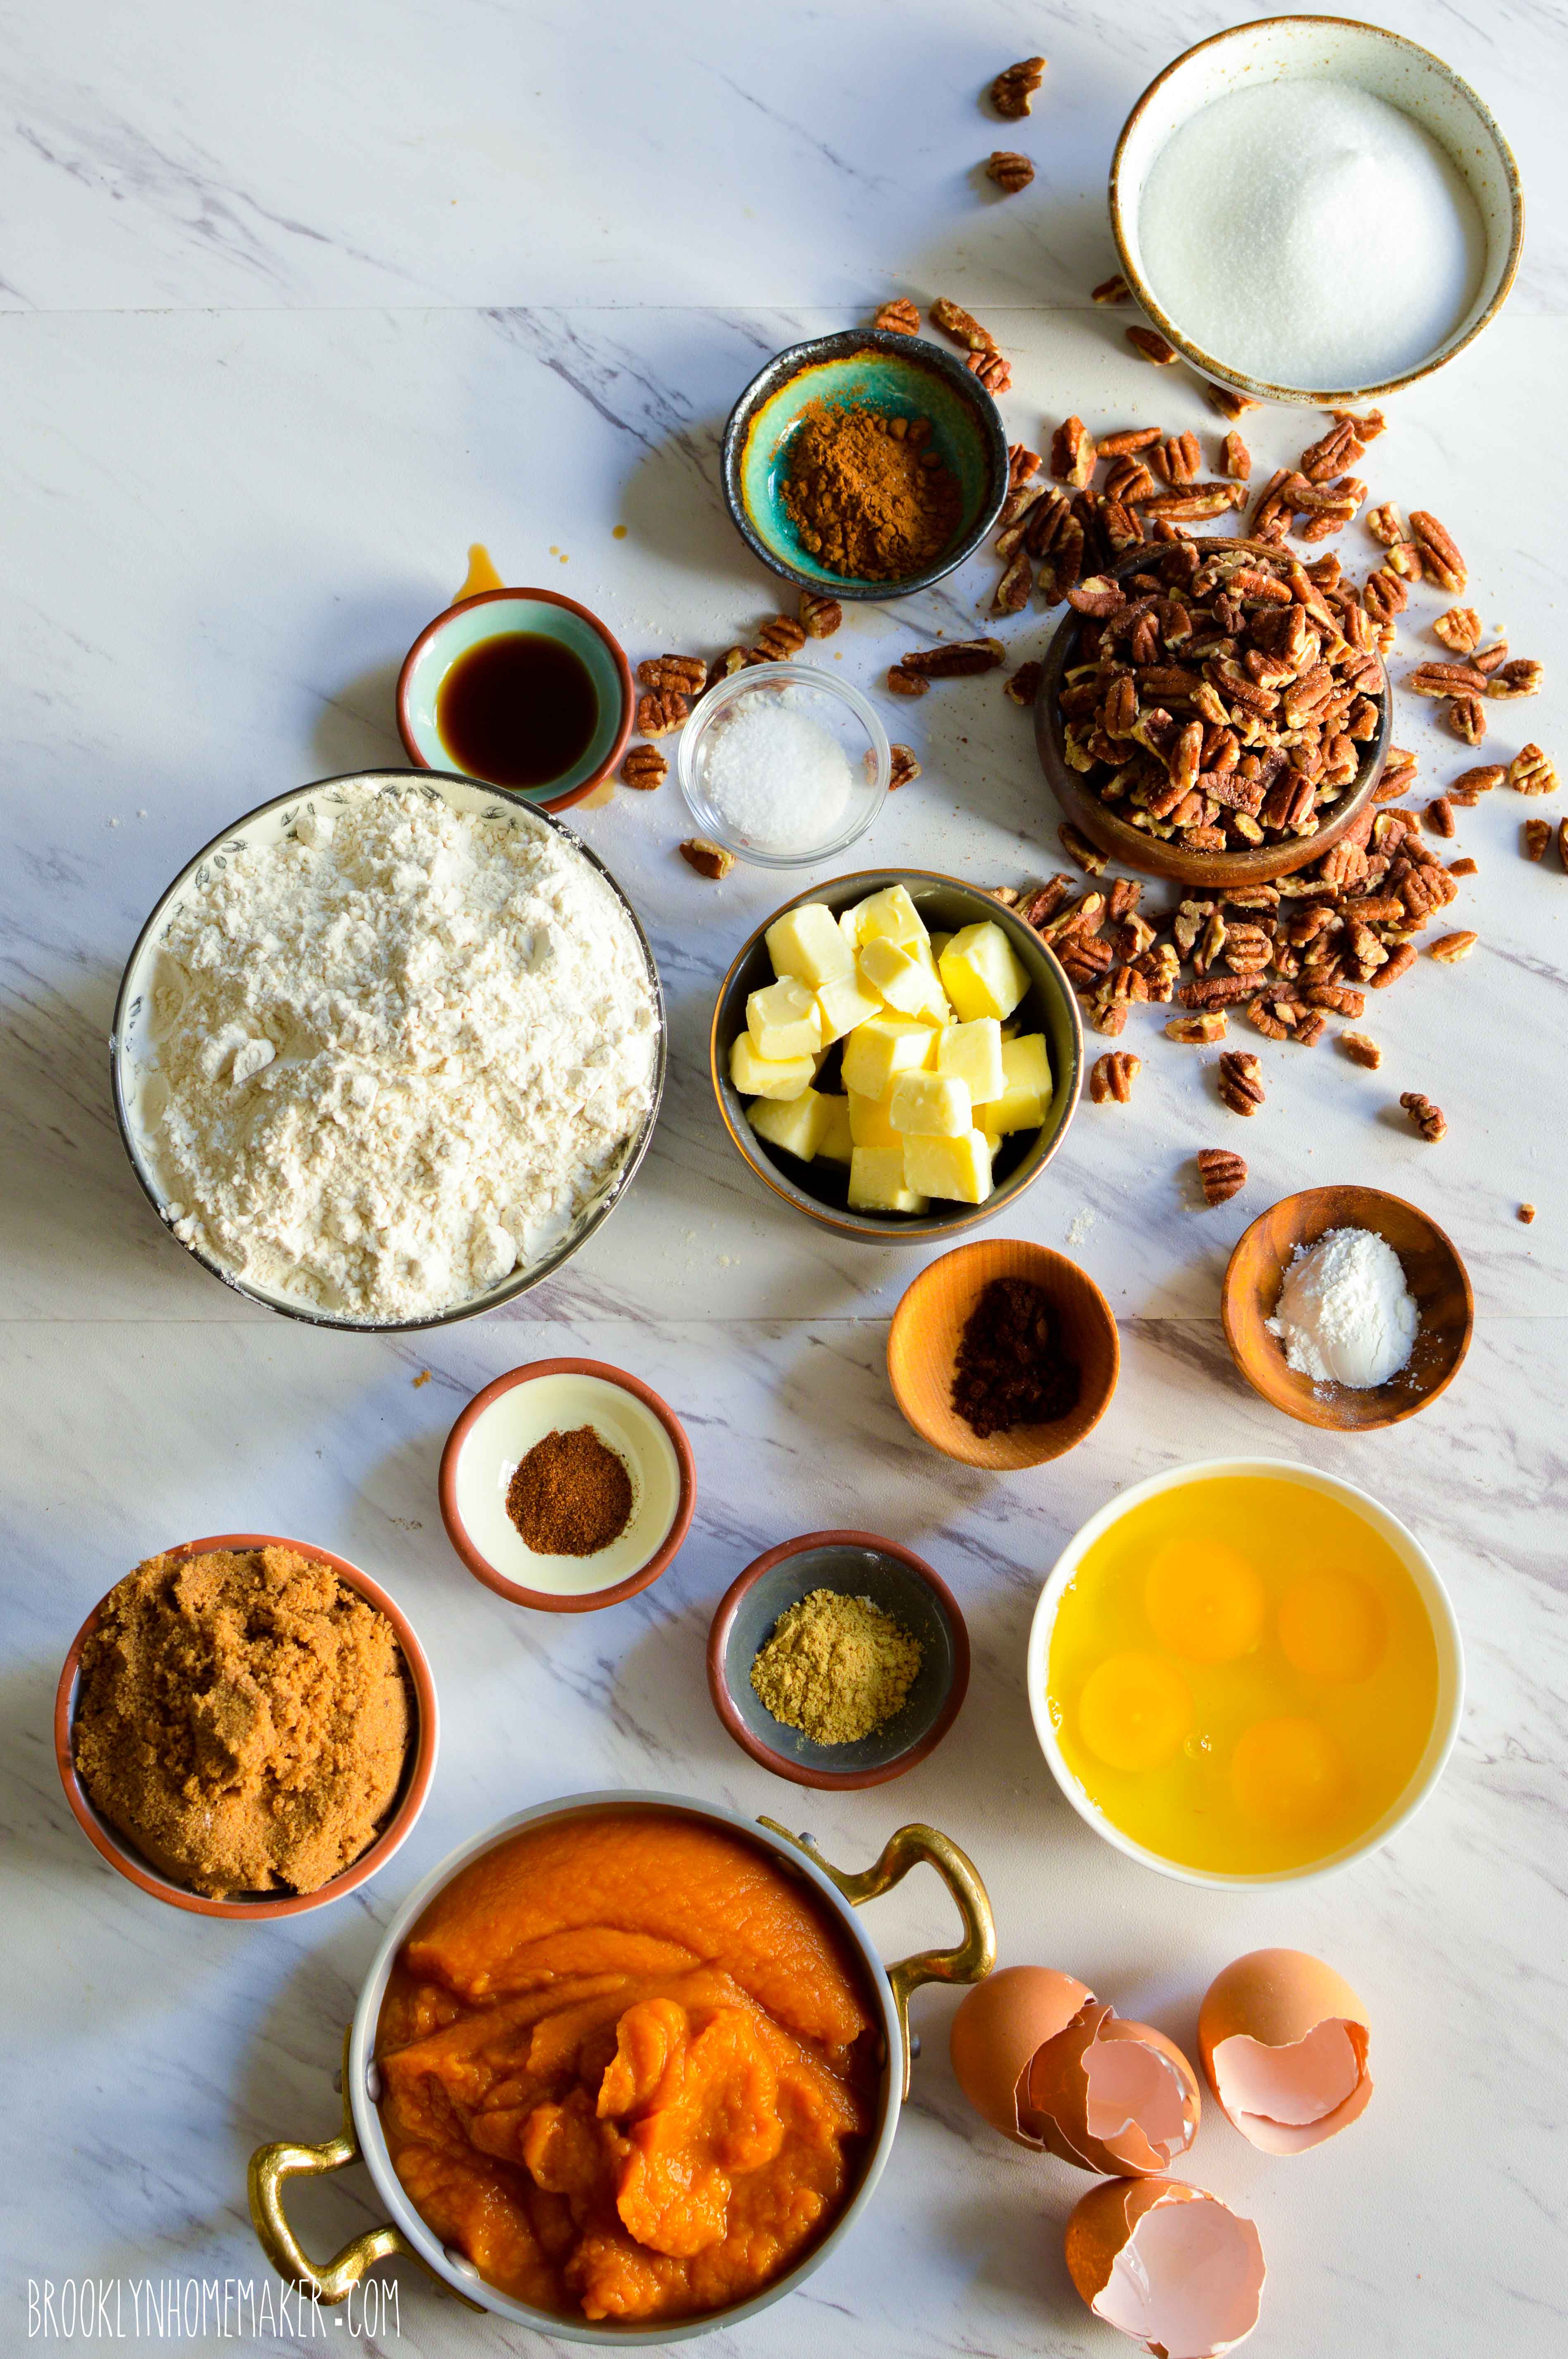
1/2 cup roughly chopped pecans
1 2/3 cups flour
3/4 cup brown sugar
1 teaspoon salt
1 teaspoon ground cinnamon
1/2 teaspoon espresso powder (optional)
1 1/2 sticks (12 tablespoons) cold unsalted butter, cut into cubes

Filling:
1 cup roughly chopped pecans
1/4 cup brown sugar
1/2 teaspoon ground cinnamon
1/2 teaspoon espresso powder (optional)

Cake:
3 cups flour
2 teaspoons baking powder
1 teaspoon salt
1 1/2 teaspoons ground cinnamon
1 1/2 teaspoons ground ginger
1/2 teaspoon ground cloves
1/2 teaspoon ground nutmeg
1/2 cup (1 stick) unsalted butter, softened
1 cup granulated sugar
1 cup dark brown sugar, firmly packed
4 large eggs
3/4 cup peanut oil (or vegetable or canola oil)
2 teaspoons vanilla extract
1 3/4 cup (1 15oz can) canned pumpkin puree (not pumpkin pie filling)

Preheat oven to 350F.
Coat a large angel food pan with a removable bottom with butter and flour, or baking spray that includes flour. Refrigerate until ready to use.

Toast the pecans for the filling and the streusel together on a sheet pan for about 6 to 8 minutes or until fragrant. Let the nuts cool before making the streusel.

To make the streusel:
Put the flour, brown sugar, salt, cinnamon, espresso powder, and cold butter in the bowl of a stand mixer fitted with the paddle attachment. Mix the streusel slowly on low-speed just until it begins to clump together, which should take between 5 and 10 minutes depending on how cool everything is. Add the 1/2 cup of cooled toasted pecans and mix until well-distributed, about a minute.
Transfer the streusel to a small bowl, cover, and refrigerate.

To make the filling:
Mix the pecans, brown sugar, cinnamon, and espresso powder together with a fork in a small bowl. Set aside.

To make the cake:
Whisk flour, baking powder, salt, cinnamon, ginger, cloves, & nutmeg together in a bowl and set aside.
In the bowl of a stand mixer fitted with the paddle attachment, beat the butter, sugar, & brown sugar together on high-speed until light and fluffy, about three minutes. Scrape down the sides of the bowl and add the eggs, one at a time, scraping between additions. In a small bowl or measuring cup, stir together oil, vanilla, & pumpkin purée. In the bowl with the butter and sugars, alternate additions of the flour and pumpkin mixtures at low-speed, beginning and ending with flour. Mix just until combined and do not overwork the batter. Scrape down the sides of the bowl to make sure all ingredients are well incorporated.

Pour about half the batter into the prepared pan and smooth out the top. Sprinkle the filling over the batter in an even layer, then top with remaining batter and smooth out. Firmly pound the pan against the countertop several times to tap out any air bubbles, then add the topping in an even layer. Bake in the center of the oven for 65 to 70 minutes, or until a toothpick or cake tester comes out clean from the center of the cake.

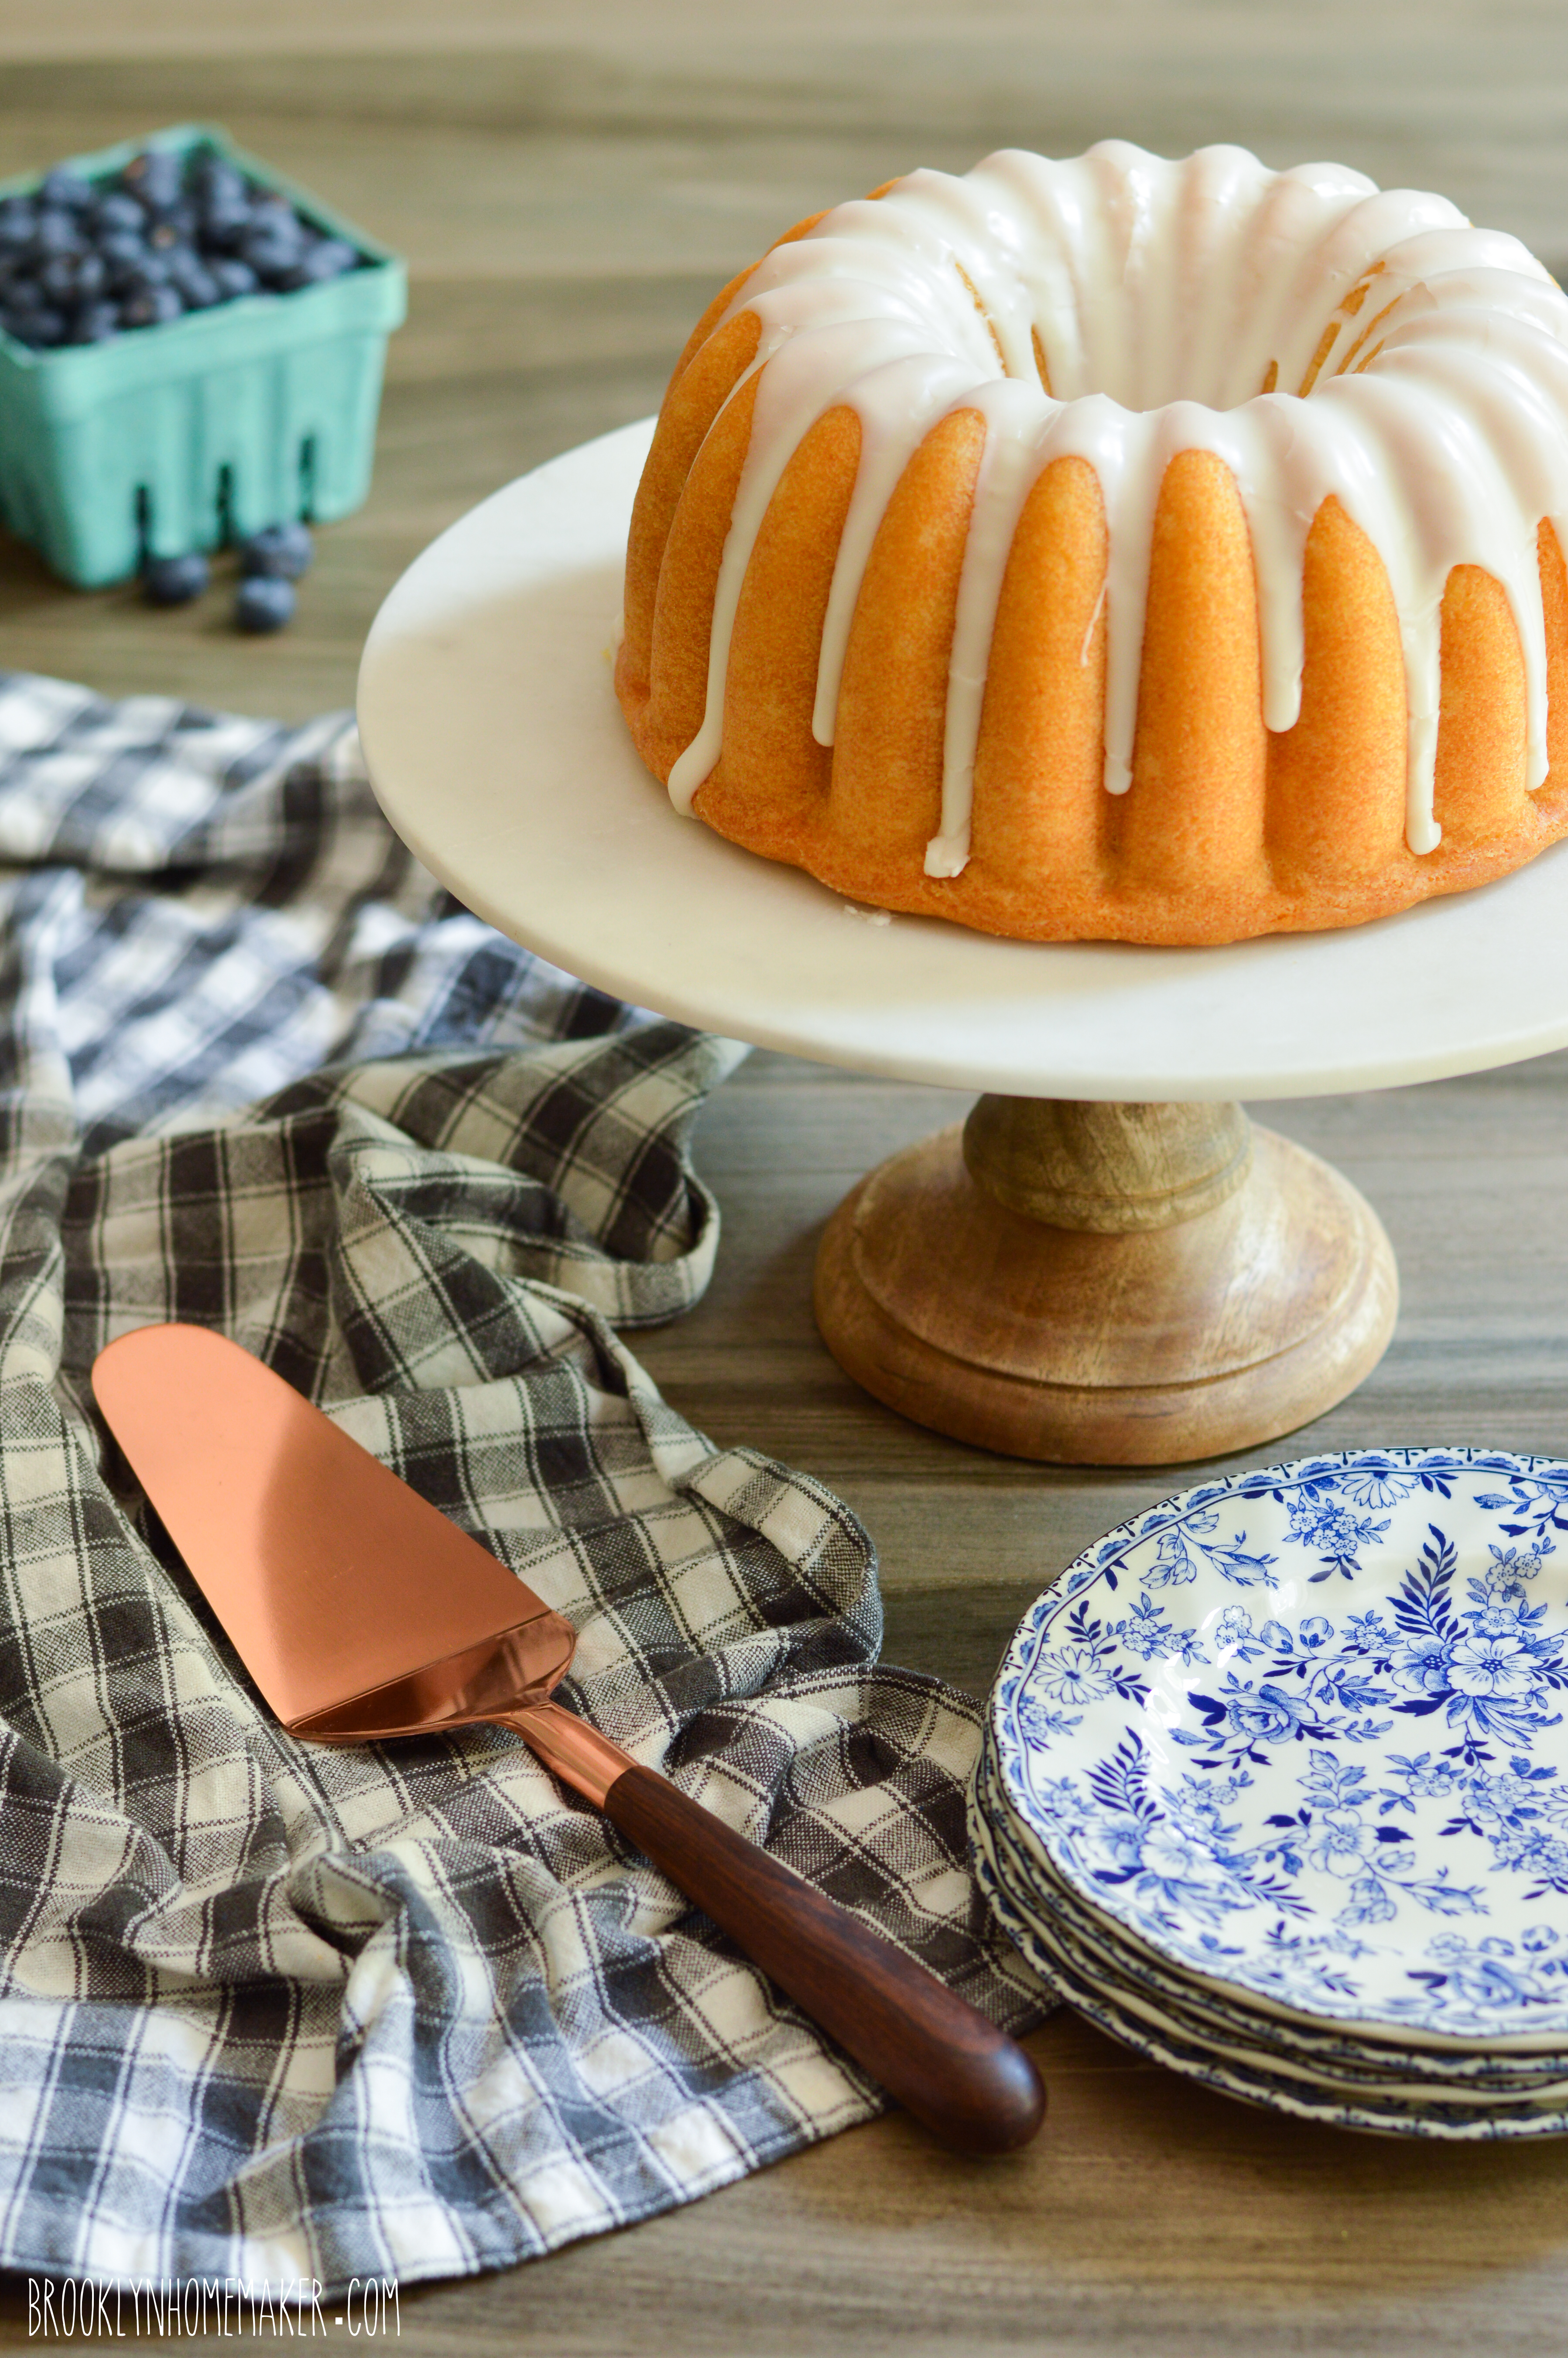
Transfer the pan to a wire rack to cool completely. Once cool, remove the cake from the pan and drizzle with cream cheese glaze (recipe below) if desired.

Cake should keep, in an air tight container at room temperature, for about 3 or 4 days.

Cream Cheese Bundt Glaze: 
4 ounces (1/2 package) cream cheese, at room temperature
1 cup powdered sugar
1 teaspoon vanilla extract
4 to 8 tablespoons milk

In the bowl of a stand mixer, beat the cream cheese until it’s soft and smooth and light. Add the powdered sugar, vanilla, and 3 tablespoons of milk and blend until there are no lumps. If necessary, add more milk, a tablespoon at a time, beating after each addition until the glaze reaches the desired drizzle-able consistency. It should be about the consistency of thin melted ice cream to drizzle correctly.

Place a tray under cake and cooling rack to catch any drips. I used a small squeeze bottle to get a thin even line of drizzle and let some of the streusel show through. You could also do this by cutting a small hole in a sandwich bag, or you could make your life easier and just pour the glaze over the whole top of the cake.

This recipe will probably make more glaze than you need, but it’s tough to make a smaller batch with an electric mixer, and without a mixer it won’t come out as creamy and smooth.
It’s great though, so I promise you won’t be sad that you’ll have extra.

Advertisement

basic bundt series: spice cake

Hey guess what!
It’s finally officially fall, y’all!

basic bundt series | spice cake | Brooklyn Homemaker

I’ve said it before and I’ll say it again (and again and again and again).

Fall is absolutely my favorite time of year. It’s clearly, obviously, indisputably the best season ever, and if you don’t agree with me, you’re wrong.
I told you it was indisputable okay?
The only negative thing I could ever say about fall, if I had to come up with something, is that it doesn’t last nearly long enough.

basic bundt series | spice cake | Brooklyn Homemaker

Cooler weather means we can finally turn off the air conditioner and open up the windows. It means layered clothing, and finally giving up on the “beach body” I’m never going to have. It means beautiful brightly colored foliage, falling leaves, crisp fresh air, and spending as much time outdoors as possible before it’s too late.

It also means all of my favorite foods are back in season. Squash and pumpkins and root veggies and soups and stews and braises and apples and pears and fresh sweet cider and sugar-coated cider doughnuts and everything infused with warm homey baking spices.

basic bundt series | spice cake | Brooklyn Homemaker

Now, I’m well aware that Martha Stewart thinks pumpkin spice is for basic bitches only, but I also happen to know that she has a thing for a well baked spice cake. And hey, this is the basic bundt series after all, so why not embrace the basic and just go for it?

Basic or not, the classic combination of cinnamon, ginger, nutmeg, & clove will never go out of style. I mean, can you think of any better flavor to usher in the best season of the year?

No.
You can’t.

basic bundt series | spice cake | Brooklyn Homemaker

Anyways, not to toot my own horn or anything (toot toot), but this is one seriously delicious freaking cake!

It’s tender and moist with a soft delicate crumb, a refined subtle sweetness, and the perfect amount of spice. I tested this recipe half a dozen times to get it juuuust right, and I seriously couldn’t be happier with the results. My coworkers, for that matter, couldn’t have been happier that I baked so many cakes to get the recipe just right either. The poor dears.

basic bundt series | spice cake | Brooklyn Homemaker

My favorite thing about this recipe though, is just how versatile it is.

The whole idea behind the basic bundt series was to come up with simple and straightforward, but completely flawless, cake recipes that can either be baked and enjoyed as is, or gussied up and personalized with a few easy additions or substitutions.

basic bundt series | spice cake | Brooklyn Homemaker

When I did my recipe testing this time around, I didn’t just play with the spice levels to perfect them, I also experimented with different “liquid” ingredients to change the flavor profile. I started with and perfected a simple buttermilk-based spice cake, but then I tried swapping the buttermilk for other ingredients like unsweetened applesauce, grated fresh apples, and canned pumpkin puree.

Without changing a single other ingredient, swapping out the buttermilk for something else produces an entirely new and distinctly different cake! I promise that I’ve tried and tested all of these substitutions and they’re all equally delicious and perfectly spiced.
The pumpkin version was definitely a favorite with my (decidedly basic) coworkers.

basic bundt series | spice cake | Brooklyn Homemaker

The endless variations you can put on this recipe don’t have to stop with swapping out the buttermilk either. This cake is just screaming for a cup of toasted walnuts or pecans, or a bit of buttery streusel. Even changing the glaze could make a difference in the flavor profile. I decided that a tangy cream cheese glaze would pair perfectly with any one of the buttermilk, apple, or pumpkin versions of the cake; but I think that a thick caramel glaze would be heavenly too. You could also do a bourbon glaze, or maybe even just sprinkle the cake with cinnamon and granulated sugar.

No matter what variation you choose to bake though, this perfectly spiced basic bundt is sure to satisfy the basic bitch in all of us this fall.

basic bundt series | spice cake | Brooklyn Homemaker

Spice Cake Bundt

3 cups flour
2 teaspoons baking powder
1 teaspoon salt
1 1/2 teaspoons ground cinnamon
1 1/2 teaspoons ground ginger
1/2 teaspoon ground cloves
1/2 teaspoon ground nutmeg
1/2 cup (1 stick) unsalted butter, at room temperature
1 cup granulated sugar
1 cup dark brown sugar, firmly packed
4 large eggs
1/2 cup peanut oil (or vegetable or canola oil)
2 teaspoons vanilla extract
1 1/4 cup buttermilk *see note below for alternatives

Preheat oven to 350F.
Butter and flour a 10 to 12 cup bundt pan (or spray with a baking spray that includes flour), and refrigerate while preparing the cake.

Whisk flour, baking powder, salt, cinnamon, ginger, cloves, & nutmeg together in a bowl and set aside. In the bowl of a stand mixer fitted with the paddle attachment, beat the butter, sugar, & brown sugar together on high speed until light and fluffy, about three minutes. Scrape down the sides of the bowl and add the eggs, one at a time, scraping between additions. In a small bowl or measuring cup, stir together oil, vanilla, & buttermilk (or substitution). In the bowl with the butter and sugars, alternate additions of the flour and buttermilk mixtures at low speed, beginning and ending with flour. Mix just until combined and do not overwork the batter. Scrape down the sides of the bowl to make sure all ingredients are well incorporated.

Pour the batter into the prepared bundt pan, smooth out the top, and firmly pound the pan against the countertop several times to tap out any air bubbles. Bake in the center of the oven for 50 to 55 minutes, or until a toothpick or cake tester comes out clean from the center of the cake.

Transfer the pan to a wire rack to cool for about 20 to 30 minutes before turning the cake out onto the rack to cool completely. Once cool, drizzle with cream cheese glaze (recipe below) if desired. Cake should keep, in an air tight container at room temperature, for about 3 or 4 days.

*baker’s note:
Changing the flavor profile of this cake couldn’t be simpler.
Just omit the buttermilk completely, and substitute with one of the following:

  • 1 1/2 cups unsweetened applesauce
  • an entire 15 oz can (1 3/4 cups) of pumpkin puree (not pumpkin pie filling)
  • 2 cups grated baking apples, well packed (peeled and cored before grating)

The applesauce cake should bake for the same time, and the pumpkin and grated apple cakes may take about 5 extra minutes or so.

Cream Cheese Bundt Glaze: 
4 ounces (1/2 package) cream cheese, at room temperature
1 cup powdered sugar
1 teaspoon vanilla extract
3 to 6 tablespoons milk

In the bowl of a stand mixer, beat the cream cheese until it’s soft and smooth and light. Add the powdered sugar, vanilla, and 3 tablespoons of milk and blend until there are no lumps. If necessary, add more milk, a tablespoon at a time, beating after each addition until the glaze reaches the desired drizzle-able consistency. It should be about the consistency of melted ice cream to drizzle correctly.

Place a tray under cake and cooling rack to catch any drips. Pour glaze over cake and let the glaze work its way down the side, gently tapping the tray on the counter to smooth it out if necessary.

basic bundt series: buttermilk pound cake

Hi there friends! Long time no see!

basic bundt series | buttermilk pound cake | Brooklyn Homemaker

As you’ve probably noticed, I’ve basically dropped off the face of the planet recently. Ever since diving head first into the renovations of Maxwell’s last summer, I’ve been posting less and less frequently and lately I’ve been thinking a lot about what I want out of my lil’ ol blog and how much time and energy I want to put into it. Things have definitely calmed down now that Maxwell’s is up and running (and doing pretty darned well, thanks for asking), but rather than jumping from that project right back into blogging the way I used to, I’ve been taking some time for myself lately and trying to enjoy the summer.

We recently bought a car (it’s used guys, we’re not that bougie) and after 10 full years in Brooklyn, the city suddenly seems sooo much smaller and more accessible than it used to. Rather than staying home to bake and photograph fruit pies on a beautiful Summer days, we’ve been piling in the car and taking field trips to parks, beaches, stores, and points of interest that are a real pain in the arse to reach by subway or bus. We’ve even taken the dogs up to the Hudson Valley for a few little hiking trips, and went to the Adirondacks for a long weekend in Lake Placid for my birthday. Hence, for the first time ever, I didn’t post any cake recipe for my birthday this year.

basic bundt series | buttermilk pound cake | Brooklyn Homemaker

I’m really not trying to gloat here guys, I just want to let you know that even though I haven’t been posting nearly as frequently lately, you’re still on my mind.

Like, a lot.

basic bundt series | buttermilk pound cake | Brooklyn Homemaker

I got into blogging because I love food, especially baking and historic recipes and random food trivia; but as it turns out, blogging is A LOT of work and actually pretty pricey as hobbies go. Taking a little time for myself has given me some new perspective and helped me realize that I can’t keep up with the pace that I initially set for myself, and that’s okay. I need and deserve a life outside of blogging and I can’t beat myself up if I fall behind on posting. As much as I’d love to post constantly, life gets in the way. I’m sure you understand.

basic bundt series | buttermilk pound cake | Brooklyn Homemaker

Anyway, worrying about all this actually of made me want to stay away entirely, but with every letter I type I feel a weight being lifted off my shoulders and it’s honestly helping me remember how much I loved doing this in the first place. I know I could have just made the decision to step back on my own and just quietly moved on with my life, but if I’m not oversharing can I really even call myself a blogger at all? I mean… Probably not right?

Long story short, I guess what I’m trying to say here is that you’re probably going to see less of me around here going forward, but that doesn’t mean I don’t love you.

basic bundt series | buttermilk pound cake | Brooklyn Homemaker

One thing that really helped me get back into the swing of things and re-discover my love for This Old Blog™ was baking one of my absolute favorite things in the whole wide world, the magnificent, magical bundt cake!

I’m sure that you know by now that I have an unnatural love for bundt cakes. A love that may even be illegal in certain states.
While I absolutely relish the interesting & creative challenges thrown my way by the #bundtbakers group over the past few years, I’ve been thinking lately that I’d really like to spend some time perfecting some simpler, easier, more traditional bundt cakes with a broader appeal and a more familiar flavor profile.

I still plan on getting jiggy with the #bundtbakers every now and again, but for the first time in several years I’d like to share some cakes that don’t necessarily fit in with their creative themes.

basic bundt series | buttermilk pound cake | Brooklyn Homemaker

I’m hoping to eventually follow this post up with a an entire series of bundt cake recipes featuring simple, familiar flavors; vanilla, lemon, chocolate, spice, etc.
The basic bundt series.

Get it?

To kick the whole thing off, I thought I’d go with the simplest, and most potentially versatile cake that I could think of. The plain ol’ pound cake. Butter. Eggs. Buttermilk. Vanilla.
Heaven.

basic bundt series | buttermilk pound cake | Brooklyn Homemaker

This cake is delicately sweet and super buttery. Since the butter is the standout flavor in this recipe, I’d recommend springing for the best you can find. I promise it’s worth the extra buck or two.

Because I use buttermilk rather than sour cream, this recipe is a little lighter and more delicate than some other pound cakes you may have had, but I actually prefer it this way. As a cake rather than a loaf, sliced thick and served with fresh fruit, I think the lighter crumb is just the ticket.
In the Summer a big thick slice of pound cake is heaven with fresh whipped cream and macerated strawberries or fresh ripe blueberries.

If you want to kick this cake up to the next level though, feel free to experiment a little!
This recipe is the perfect base for almost any flavor you could want to pair with it. Add a few tablespoons of your favorite booze to add another layer of flavor. Toss in a cup of fresh (or frozen) berries to make a fruity, summery pound cake. Instead of fruit, why not stir in a cup of chocolate chips and some chopped walnuts? Or infuse the butter (or buttermilk) with tea leaves, lavender flowers, fresh herbs, or dried spices. You could even stir some fresh citrus zest into the sugar before creaming it into the butter.
Once you get the basics down, the skies the limit folks!

basic bundt series | buttermilk pound cake | Brooklyn Homemaker

buttermilk pound cake bundt

1 cup (2 sticks) best quality unsalted butter, at room temperature
1/4 cup peanut oil (or vegetable oil)
1 1/2 cups sugar
5 large eggs
2 1/2 cups all purpose flour
2 teaspoons baking powder
1 1/2 teaspoons salt
3/4 cup buttermilk
1 tablespoon vanilla extract

Preheat oven to 325 F. Butter and lightly flour a 10-12 cup bundt pan. Tap out excess flour. Refrigerate pan until ready for use.

Beat butter in the bowl of a stand mixer until very light, about a minute or two. Scrape the sides of the bowl with a silicone spatula and add oil and beat until smooth and combined. Add sugar and beat until fluffy and pale, about 3 minutes.
Add eggs, 1 at a time, mixing just until combined.
In a separate bowl, whisk together flour, baking powder and salt. Mix vanilla into buttermilk.
Alternate additions of the flour and buttermilk mixtures to the butter, beginning and ending with flour. Scrape the bowl after each addition. Do not over-mix.

Pour batter into prepared pan, leaving at least an inch from the top of the pan. Tap the pan on the counter several times to smooth out the batter and remove any air bubbles.
Bake for about 55 minutes, give or take 5 minutes, or until a toothpick or cake tester comes out clean from the center of the cake. Depending on the size and shape of your pan though, this time may change. I’d recommend checking on your cake around the 40 minute mark just to be sure it doesn’t overcook.

Cool for 30 minutes on a wire rack before turning out of pan. Turn out onto the rack and cool completely before glazing.

Best Simple Bundt Cake Glaze:
1 1/2 cups powdered sugar
1 teaspoon vanilla extract
2 to 2 1/2 tablespoons half & half

Mix sugar, vanilla, and 2 tablespoons half & half together in a small bowl. Mix until completely smooth and free of lumps. You want the glaze to be very thick so it doesn’t slide right off the cake, but it does need to be liquid enough that it pours smoothly. If necessary, thin the glaze out with more half & half, adding only about 1/2 a teaspoon at a time to avoid thinning it too much.

Pour the glaze in a steady stream over the center of the cake. Place a pan under the rack just in case the glaze drips. Let the glaze harden for at least 30 minutes before slicing.

Cake can be store, tightly covered at room temperature, for about 3 days.

Cash me outside

If you follow me on instagram, you probably noticed I was spending A LOT of time out in our backyard this spring.

urban outdoor space | Brooklyn Homemakerurban outdoor space | Brooklyn Homemakerurban outdoor space | Brooklyn Homemaker urban outdoor space | Brooklyn Homemaker

As soon as the weather turned warm and things started turning green, I was out there every night. You may have even been sick of all the pictures and videos of our yard, usually with smoke pouring out of my charcoal grill and string lights hanging overhead. Sorry not sorry.

I grew up in cow and corn country in Upstate New York, so I was always outdoors in nice weather, and even though I live in Brooklyn now my love for the outdoors is just as strong. We were lucky enough to find an apartment with outdoor space years ago, but if you’ve been reading for a long while now, you’ll remember that the space out back was a little, well, rough around the edges when we first moved in.
A few years back I posted about the progress we’d made so far, which felt monumental at the time, but looking back at pictures seems pretty meager compared to how things look now. Up until that point we’d spent every Summer clearing out debris and weeds and sick unhealthy plants. It took a long time to get everything clean and tidy before we could even begin planting anything new or making the space livable and attractive.

That post was basically the beginning of when we were able to finally start planting, and since then things have changed quite a bit so I thought you might enjoy a little update.  I’ve planted plenty in the past few years, figured out what plants do well and which ones don’t, and added some fancy-pants new outdoor furniture to boot.

urban outdoor space | Brooklyn Homemakerurban outdoor space | Brooklyn Homemakerurban outdoor space | Brooklyn Homemakerurban outdoor space | Brooklyn Homemaker

I know I also mentioned this in my last gardening post too, but just to refresh your memory, we have a big evil mulberry tree out there that makes the yard a disgusting unusable mess for anywhere from 4 to 6 weeks out of every summer. The tree is too tall and the berries fall too far to make collecting them possible, so instead they just splatter into a juicy mulberry paste that attracts flies and ants and birds (and bird poo) and eventually turns moldy and stinky and awful. And guess what. We’re in the midst of berry season proper right now, so I haven’t been back there for a good three weeks. The photos in this post were taken a few weeks ago, just before it started.
Even when the tree isn’t dropping the got-damned berries, instead it’s shading most of the yard and sucking up all the moisture in the soil. As if the berries weren’t enough to deal with, that tree is the source of two little words that have made my life very difficult over the past few years.
Dry.
Shade.

It’s incredibly difficult to find plants that thrive in dry shade. Most shade plants are moisture lovers, and most drought-tolerant plants love lots of sunshine. So, after years of experimenting, I’ve basically learned that Hostas are my best friend if I want the yard to look green and lush. I know they’re kind of boring, but there are so many different colors and shapes and sizes available these days that even a yard filled with Hostas can look interesting and modern. I’d actually already figured this out before my last yard post, but at that point I’d only gotten around to planting few of them. These days they’re all over the place.

Bleeding Hearts and Coral Bells seem to do well back there too, so I’ve started mixing them in between the Hostas. There’s one little corner of the yard that gets a few hours of decent light, so I have some orange day lilies planted there, but they haven’t flowered yet and so far they just look like overgrown grass. Because I like to live dangerously, this spring I also decided to test the limits of the sunshine back there, and planted a sun-loving Forsythia against the fence. Fingers crossed!

urban outdoor space | Brooklyn Homemakerurban outdoor space | Brooklyn Homemaker

To mix in some color and texture, I like to fill pots with hardy annuals like wax begonias and I always do a few herbs in one of the big galvanized buckets we added a few years ago too. Sometimes they don’t get enough sun and don’t last the whole summer, but they’re nice while they last and so far they seem to be doing well this year.
Early in the spring I usually try some pansies too for some color and life while the hostas are just barely poking out of the ground, but they don’t really last once the weather turns hot and I’ll need to replace them with something else mid-summer. They looked great in the photo below, but they’re already starting to look pretty scraggly.

For the first time ever this year, I mulched a good portion of the beds to try to keep them moist and healthy during the hot dry spells we always seem to get in Brooklyn summers. Not only do I hope it’ll keep the plants happier, it also went a long way in making the yard feel so much more “finished” and attractive. We went with brown mulch so it doesn’t really “read” in photos all that well, but I promise it looks great in person, especially compared to bare dirt. Getting the heavy, wet, stinky bags of mulch out there meant carrying them all by hand through our apartment and out our bedroom window, and we needed about 30 bags for the area we mulched, but it was well worth the effort in the end and I really wish we’d done it sooner!

urban outdoor space | Brooklyn Homemakerurban outdoor space | Brooklyn Homemakerurban outdoor space | Brooklyn Homemaker

When we first moved in there was an old swing in the yard, and a rotting old wooden table left by one of the previous tenants. We moved the swing into the back of the yard this spring, and the table has since fallen apart. I re-used the legs to build the red coffee table you’ll notice in some of these photos, but I don’t know how much longer that old wood will hold out. The paint is peeling pretty badly so I’m hoping new paint will protect it and help it last a few more years.
I just need to decide on a color…
Any suggestions?

Almost half of the yard space is covered in concrete and works as a patio area for us. When we first moved in I was disappointed that there wasn’t more space for planting, but now that I know how challenging it is to get plants to thrive in our dry shade conditions, I’m actually relieved that we have more space for entertaining and lounging.
That’s why we decided to make a pretty serious investment in outdoor furniture this year. Russell got me an outdoor sectional for my birthday, and it all kind of snowballed from there. Upgrading from the old two-seater swing made me suddenly realize how much more comfortable our outdoor space could be if we were willing to put the time and money into it, so I kind of went a little overboard with the online shopping. We’d gotten the dining table a few years ago but never really got around to finding chairs to go with it, so that was my next mission. Then came the throw pillows, and a deck box to store all the cushions and pillows in. Then we just stumbled on those black and grey club chairs one day and we had to have them! Luckily everything was (relatively) reasonably priced.
In case you’re interested, the sectional, dining chairs, and deck box are from Wayfair. Unfortunately the sectional and chairs don’t seem to be available right now. The outdoor throw pillows and big grey club chairs are from Target, and the dining table and lanterns are from Ikea.

urban outdoor space | Brooklyn Homemakerurban outdoor space | Brooklyn Homemakerurban outdoor space | Brooklyn Homemaker urban outdoor space | Brooklyn Homemakerurban outdoor space | Brooklyn Homemaker urban outdoor space | Brooklyn Homemaker urban outdoor space | Brooklyn Homemakerurban outdoor space | Brooklyn Homemakerurban outdoor space | Brooklyn Homemaker
Things are looking a little more full and lush since I’ve taken these photos because we’ve had a lot of rain lately, so once the berries stop dropping I’ll get out there to clean up the mess and start barbecuing again! You’re more than welcome to live vicariously through my instagram stories, but my life really isn’t all that exciting so I’d suggest trying to find someone a little more interesting to follow!

Who knows, if things look different enough maybe I’ll give you another glimpse into our yard in another couple years.