triple blueberry layer cake

Well look at me, another fancy ass layer cake!

triple blueberry layer cake | Brooklyn Homemaker

I generally try to reserve these “celebration” cakes for special occasions, namely my blogging anniversary or my birthday or Russell’s, mostly because they’re a whole mess more complicated than bundts or simpler “everyday” cakes, but also because I really don’t need all this cake in my house on the regular.

triple blueberry layer cake | Brooklyn Homemaker

Only about a month after my own birthday though, another special occasion came up that was a huge deal and really called for a seriously fancy ass cake.

triple blueberry layer cake | Brooklyn Homemaker

Last week my grandfather turned 90 years old!!!

To celebrate, we had a little reunion with 4 generations of grandpa’s family and it could not have been a more perfect day. It was so great to see everyone, especially some cousins I hadn’t seen in maybe a decade or more. There was even a sidewalk snail race thanks to the tupperware full of snails my little nephew found in my sister’s garden the day before.

Of course, it being my family, we definitely overdid it with the food. We did a pot-luck style bbq with all the traditional sides; bratwurst, hot dogs & burgers, German potato salad, baked beans, pasta salad, veggies, cheese & crackers, deviled eggs, watermelon & a fruit tray. My grandma spent the better part of the day going around telling everyone to eat more because we’d never get through everything. I brought my favorite coleslaw, and of course, I was in charge of dessert.

triple blueberry layer cake | Brooklyn Homemaker

To be honest, I can’t even imagine living to 90 years old, especially looking as great and remaining as active as grandpa is at his age.

Although he definitely needs more help around the house than he used to, he and my grandma still live in the country on their own and he still keeps a garden and a small fruit orchard.

A few years ago he had to give up on the gigantic strawberry patch he used to have because he couldn’t bend down to pick them all, but since then he’s planted a couple dozen blueberry bushes, all different varieties so they ripen at different points in the summer, and now blueberries are his favorite!

triple blueberry layer cake | Brooklyn Homemaker

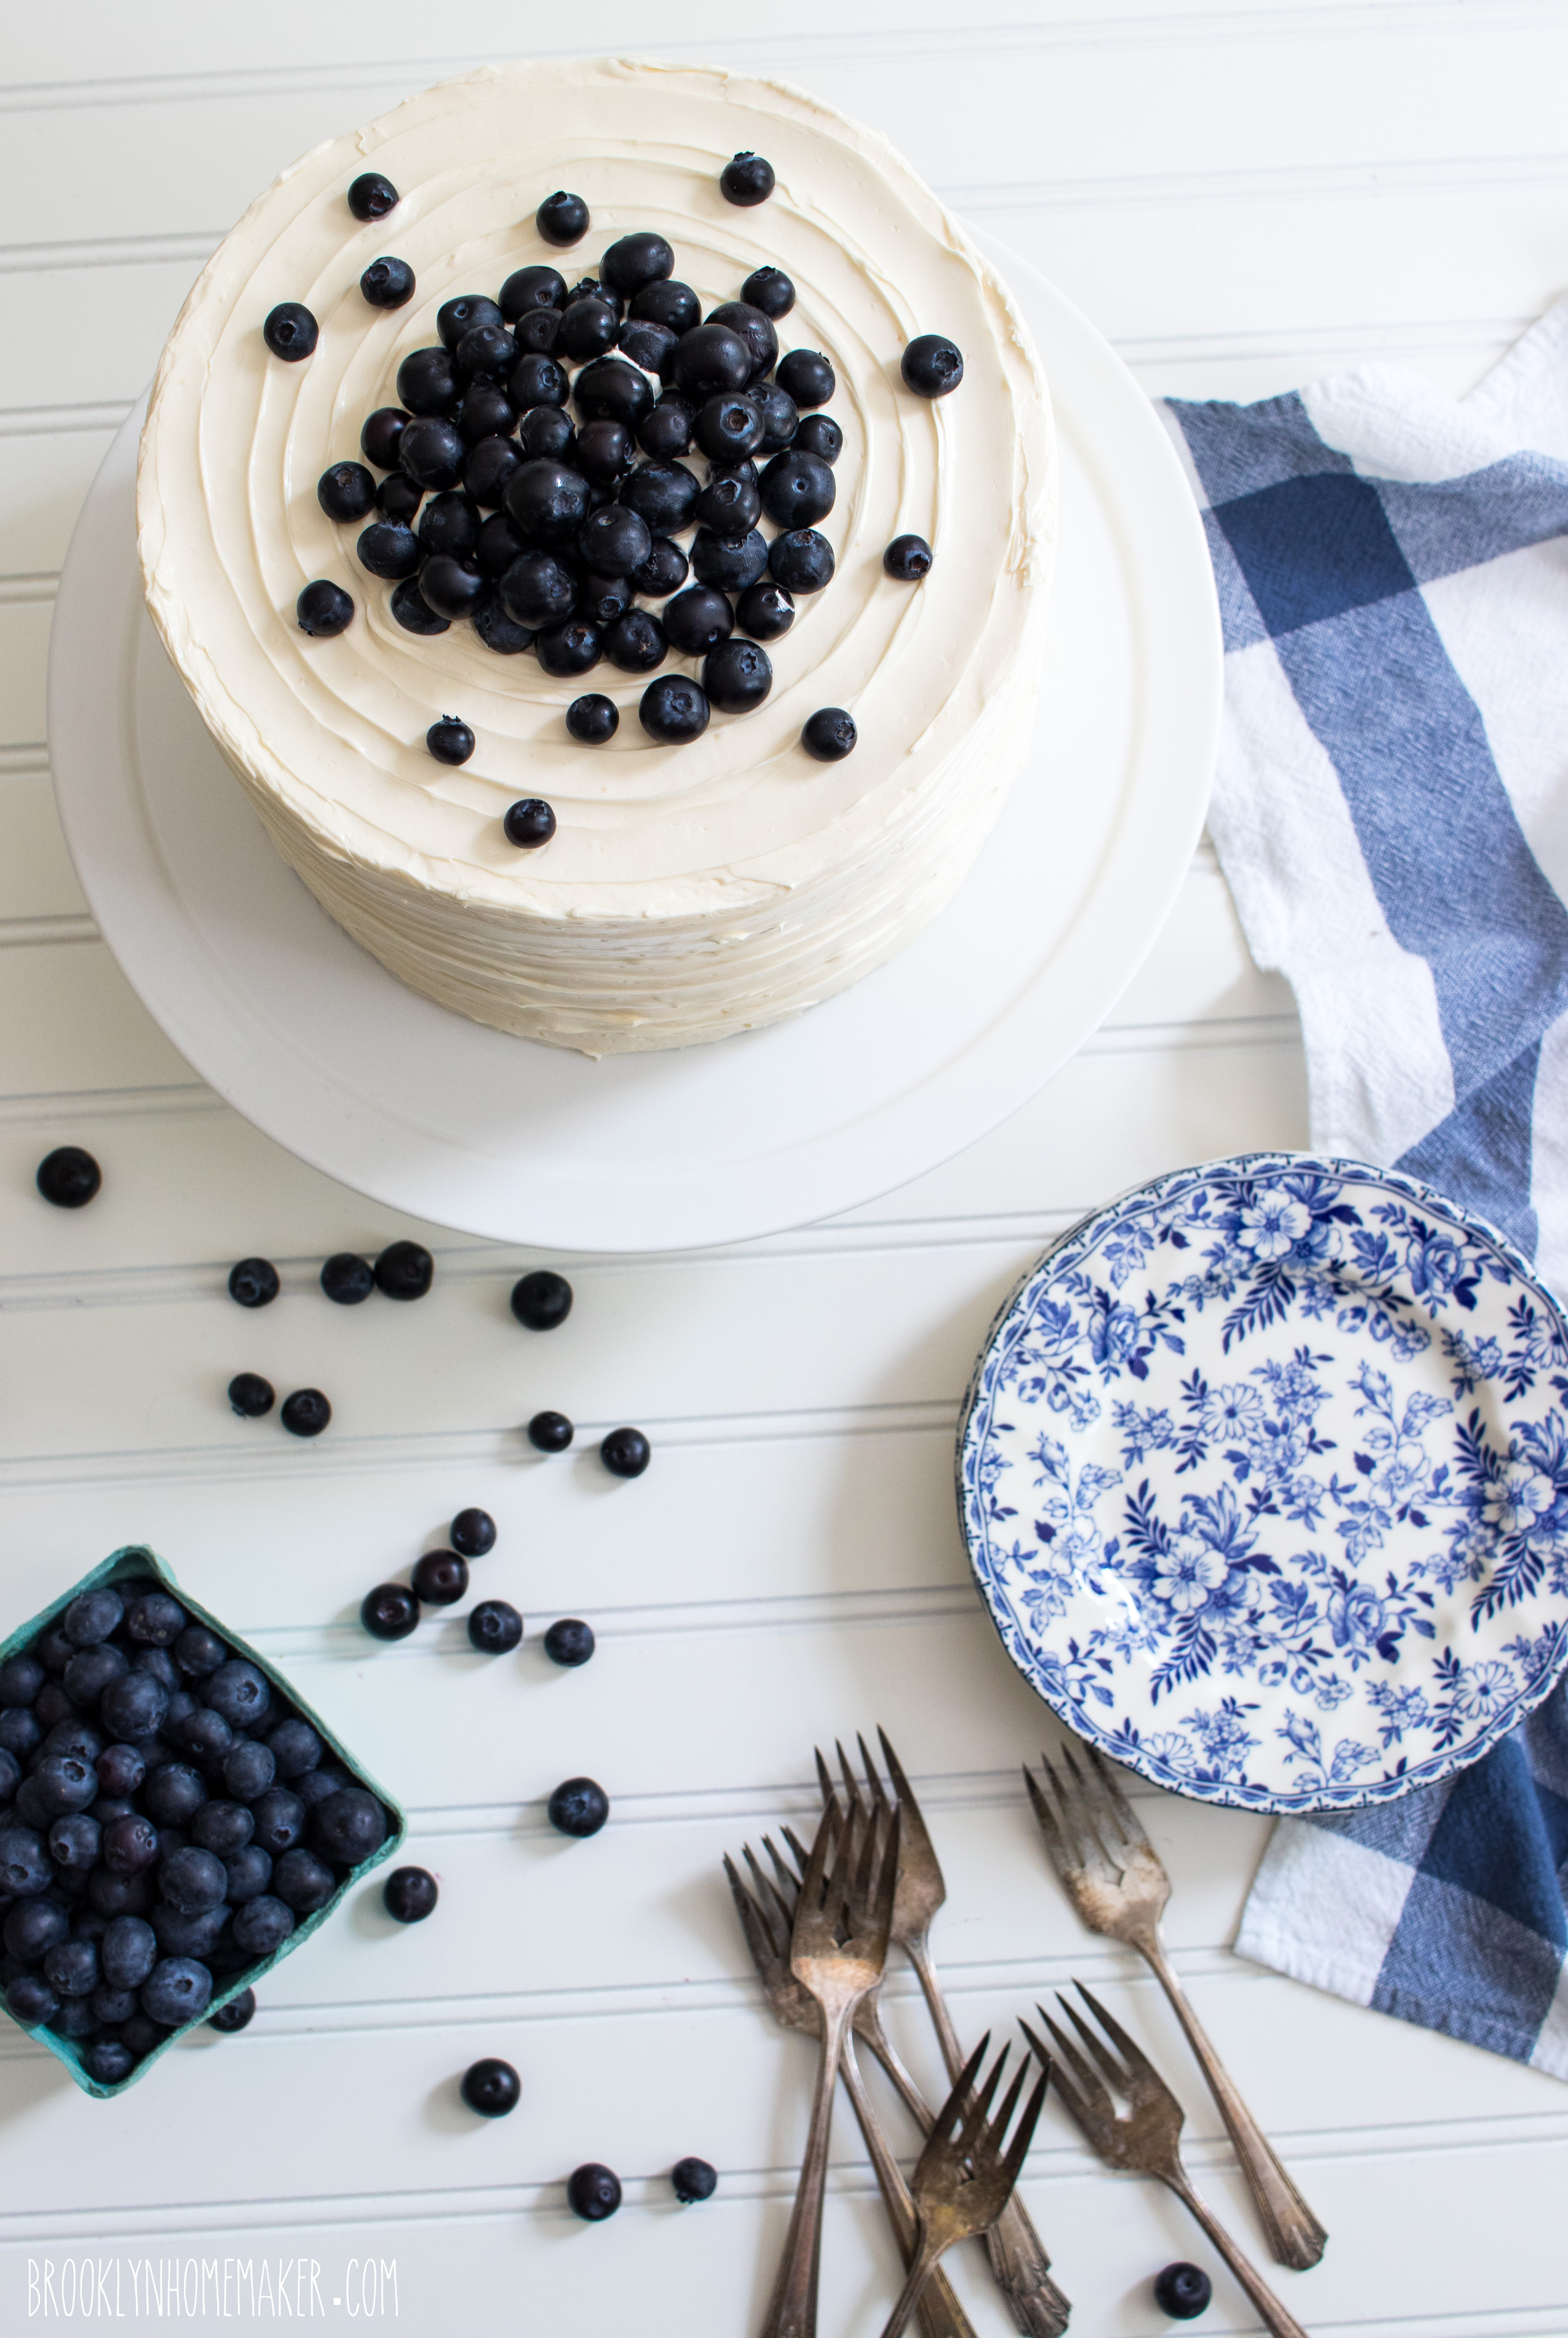
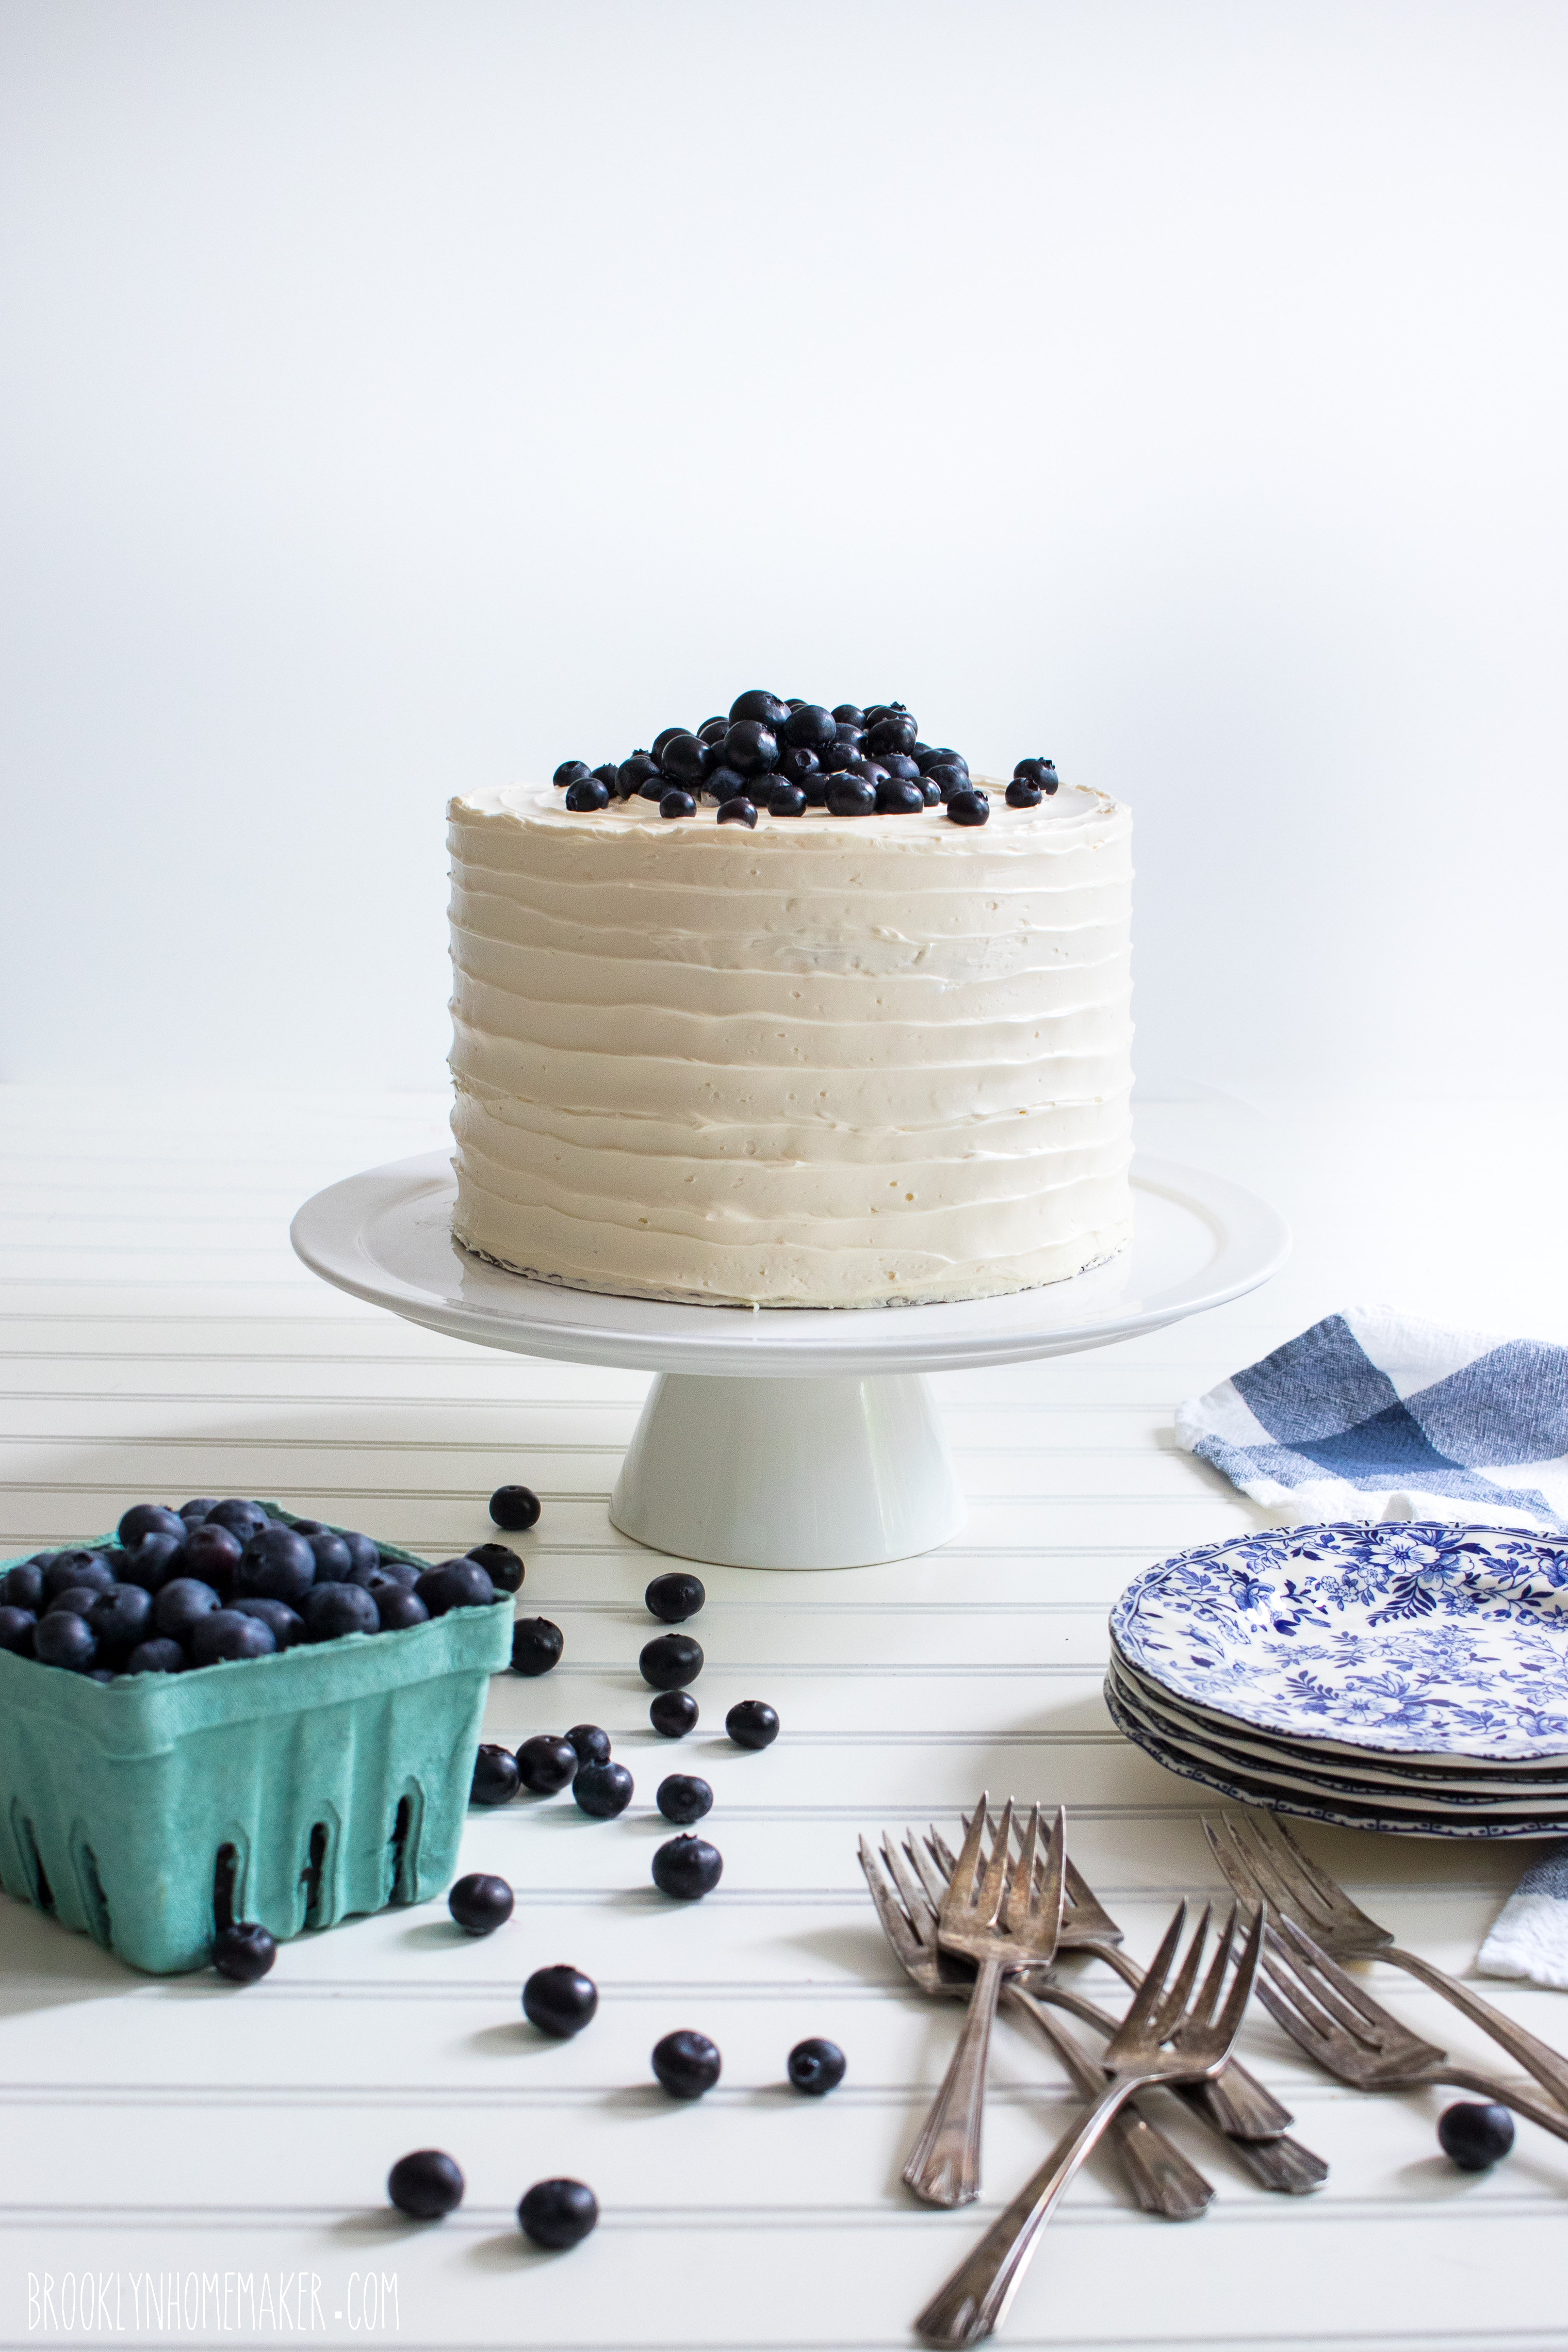
So, I knew blueberry cake was the way to go for grandpa’s 90th!

Grandpa loves blueberry pie, so I made a fresh blueberry jam/pie filling to use between the layers of cake, and then for a brighter, fresher blueberry flavor, I decided to use freeze dried blueberries in the actual cake recipe. When you use freeze dried fruit, it retains much of the freshness of actual fresh fruit, but it’s completely dry so it doesn’t water down your batter. I ground the berries into a powder in the food processor and then mixed that into part of the batter, swirling that in to the remaining plain batter like marble cake.

At first I considered adding lemon zest to the icing, but opted for simple vanilla to avoid competing with the blueberry flavor. Last but not least, the cake was topped with a mound of fresh blueberries, both for flavor, and so that people could tell it was a berry cake even though the icing was solid white.

triple blueberry layer cake | Brooklyn Homemaker

The cake was a HUGE hit. Usually a quiet, stoic German man, complements don’t come super easily from my grandpa, but he must have come over to compliment and thank me for this cake at least 5 times. Nice and moist and not to sweet. His cousin even came over to shake my hand because he liked it so much!

This cake is SUPER blueberry-y. The freeze dried blueberries really come through, and just like grandpa said, the cake is moist and tender and just sweet enough. The blueberry filling tastes just like blueberry pie filling or homemade jam, and the vanilla Swiss meringue buttercream is delicately sweet, smooth and silky, and definitely lets the blueberry filling shine without anything competing with it.

If you love blueberries, you HAVE to make this cake y’all!

triple blueberry layer cake | Brooklyn Homemaker

Triple Blueberry Layer Cake

  • Servings: 12 to 16-ish
  • Print
Blueberry Vanilla Swirl Yellow Cake
makes three 8-inch layers

3 1/3 cups all purpose flour (plus 1 tablespoon for blueberries)
1 1/4 teaspoons salt
1 tablespoon baking powder
1/2 cup (1 stick) unsalted butter, room temperature
3/4 cup peanut oil or vegetable oil
2 1/4 cup granulated sugar
4 large eggs
2 1/2 teaspoons vanilla extract
1 1/2 cups buttermilk
1.2 oz bag freeze dried blueberries (about 1 cup)

Preheat oven to 350 degrees.
Line the bottoms of three 8″ cake pans with parchment paper. No need to butter and flour the pans. *see note
In a medium bowl, whisk flour, baking powder, and salt until well combined.
In the bowl of a stand mixer with the paddle attachment, cream butter and sugar on high for about 3 minutes, or until pale and fluffy. Reduce speed and add oil, then the eggs, one at a time, fully incorporating after each addition. Add vanilla until just combined.
Alternate adding flour mixture and buttermilk, beginning and ending with flour (3 additions of flour and 2 of milk), fully incorporating after each addition.
Add 1 tablespoon of flour & freeze dried blueberries to a food processor and pulse into a fine powder. Its okay if there are a few small chunks left, but get it as fine as possible.
Divide about 1/2 to 2/3 of the batter evenly between the three pans. Mix the freeze dried blueberry powder into the remaining 1/3 to 1/2 of the batter and fold in to combine. Divide blueberry batter between the three pans by dotting the tops of the cakes, then use a small spatula or knife to swirl it in.
Bake for 30-35 minutes or until a toothpick or cake tester inserted into the center comes out clean. If using bake-even strips, they may need a few additional minutes.
Transfer pans to a wire rack to cool for 30 minutes. Invert cakes onto rack, peel off parchment, and let cool completely.
If the cakes domed in the oven, you’ll want to slice the very tops of the cakes off to make each layer completely flat and level for a more professional look. You can do this using a very sharp bread knife, or a cake leveler.
If you’re not assembling cakes right away, individually wrap each layer tightly in plastic wrap to prevent drying. Layers can be stored in the refrigerator for a day or two, or frozen (wrapped in plastic wrap first, then aluminum foil) for up to two weeks. You may want to consider brushing the layers with simple syrup if you’re refrigerating or freezing them.

*baker’s note: Not buttering or flouring your cake pans actually helps the cakes keep their shape better when cooling and helps prevent the outer edges of the cakes from overcooking. The parchment will allow the bottoms to release from the pans easily, but you may need to run a knife or a toothpick around the outside edge before turning out of the pans.

Blueberry “Jam” Filling:
(You may also use store bought blueberry jam)
18 oz Fresh Blueberries (about 4 cups)
2 cups sugar
pinch of salt
3 tablespoons corn starch

Reserve about 1/2 cup of the blueberries for the decoration/topping of the cake. Pulse the remaining 3 1/2 cups berries in a food processor just to break them up a bit. Don’t puree them. You can also mash them up with a potato masher instead.
Add the blueberries to a large heavy pot or sauce pan, and stir in the sugar, salt, & cornstarch. The mixture will boil up a lot so a large pot is important.
Bring the mixture to a rolling boil over medium-high to high heat, stirring occasionally, and boil for 15 minutes or until reduced and thickened.
Transfer to a heat safe bowl or container and refrigerate until ready for use. If it’s a bit thinner than normal jam, that’s fine.

Vanilla Swiss Meringue Buttercream Icing:
Adapted from “Layered” by Tessa Huff
3/4 cup fresh egg whites (not pasteurized egg whites)
1 1/2 cups sugar
pinch of salt
2 cups (4 sticks) unsalted butter, at room temperature (cut into 1 tablespoon slices)
2 1/2 teaspoons pure vanilla extract

Place the egg whites, sugar, & salt in a very clean bowl of a stand mixer and whisk them together by hand to combine. Fill a medium saucepan with an inch or two of water and bring to a simmer over medium to medium-high heat. Place the mixer bowl over the saucepan to create a double boiler. Be sure that the bottom of the bowl doesn’t directly touch the water, and that the water doesn’t reach a full boil.
Heat the egg whites until they register 160F on a candy thermometer, whisking regularly to avoid cooking the whites. As soon as they’re at the correct temperature, carefully attach the mixer bowl to the stand mixer and add the whisk attachment.
Beat the egg whites on high speed for 8 to 10 minutes until they hold stiff peaks and the outside of the bowl is cooled to room temperature. Stop the mixer and swap the whisk attachment for the paddle.
On low speed, add the butter, a few tablespoons at a time, waiting for it to incorporate before adding more. Once all the butter is mixed in, add the vanilla extract and mix in to incorporate. Turn the mixer up to medium-high and beat until the buttercream is smooth and silky, about 3 to 5 minutes.
If the mixture starts to look curdled, just keep beating. It’ll come together.
If the whites were still too warm when the butter was added and the buttercream is too thin and soupy, refrigerate the bowl in 10 minute bursts until it’s cool (but not cold) and beat again until smooth.

Assemble cake:
Place the first cake layer on an 8″ cardboard cake round, serving plate, or cake stand. Using a cake round will make it easier to ice and decorate, especially if you have a revolving turntable for decorating (I use a lazy suzan, but you can also just spin your plate or cake stand while you work).

Fit a piping bag with a large round or star tip and fill with a cup or two of the Swiss meringue buttercream. Pipe a thick dam of icing around the outside of the cake to contain the blueberry filling. This will ensure that the filling stays in place and doesn’t squish out when the layers are stacked.

Place about half of the filling in the center of the cake and spread it smooth and even using an icing spatula. Add the next layer of cake, looking from directly over the top and from eye level at the cake to make sure each layer is directly one above the other, rotating the cake to be certain. Repeat the same procedure with the buttercream dam and the other half of the filling, then add the third and final layer of cake and check for straightness again. Using about half of the remaining icing, crumb coat your cake (If you have any icing left in the piping bag, empty it out and use that too). Starting with the top of the cake, spread the icing thin and work some of it down the sides of the cake to completely cover the whole thing in a thin, smooth, even coat of icing. This first layer of icing seals the cake and keeps crumbs from being visible in the outer layer of icing. It may seem like unnecessary trouble, but it really is worth it to get a smooth professional finish on the icing.

Place the cake in the refrigerator for about 30 minutes to an hour to help set the icing and firm up the cake.
Reserve about 1/4 cup of icing for decorating (optional), and spread the remaining buttercream over the whole cake the same way you did the crumb coat. Start by smoothing the top and slowly working the icing down the sides to cover the cake completely. Try to get the icing as completely smooth as possible with straight sides and a flat, level top. I use a long offset icing spatula. If desired, once the icing is smooth, you can use the tip of a small icing spatula or butter knife to create a swirl in the top & sides. Make a small smooth mound in the center of the top of the cake with the reserved 1/4 cup of icing, and cover the mound as completely as possible with the reserved fresh blueberries so it looks like a heaping pile of blueberries. (If you tried to just make an actual heaping pile of blueberries, they’d roll off the top of the cake) If you have some blueberries left, dot them around the mound so they look like they spilled away.

Refrigerate the cake again for at least another 30 minutes to set the icing before covering or serving.

This cake will keep well in a cake saver at room temperature for a day or two if the weather is not too hot or humid. Otherwise, cover tightly and store in the refrigerator for up to 3 days.

If refrigerating, bring cake to room temperature at least two hours before serving.

Advertisement

s’mores layer cake

You guys. I did it again.

s'mores layer cake | Brooklyn Homemaker

I baked my own birthday cake.

s'mores layer cake | Brooklyn Homemaker

I know that some people gasp in horror or baulk at the very idea of such a thing. On one’s birthday, one is supposed to just sit back and enjoy the day without having to lift a finger.
But, you know what, one thing that I enjoy even more than eating cakes, is baking cakes! Especially if doing so means that I get to share them with people I love.
And guess what else. I could never find a cake in a bakery that would be as good as a cake that I could bake myself, and even if I found one, I couldn’t afford it!
So, tradition be damned, I bake my own birthday cakes.
And I like it!

s'mores layer cake | Brooklyn Homemaker

As my birthday was approaching, the weather finally started to warm up here in New York after what felt like an endless grey & chilly spring. To celebrate both the arrival of warm weather and my advanced age, we decided to invite a bunch of friends and have a big festive bbq in our suddenly green backyard.

s'mores layer cake | Brooklyn Homemaker

I plotted and planned out my menu, scouring the internet for recipes for sides, salads, mains, and options for vegetarians. Russell even asked his family from San Diego to ship us a box of avocados from their own avocado tree, so that we could offer our guests a big ol’ bowl of the freshest guacamole in Brooklyn.
Of course, I knew that I wanted my birthday cake to be the pièce de résistance. It’s been so long since I’ve done a big festive layer cake that I also wanted to come up with something that I hadn’t really ever done before.

s'mores layer cake | Brooklyn Homemaker

Nothing says Summer quite like s’mores.
Amirite?

Especially for a bbq or a backyard party, there’s clearly nothing better to round out an evening. I still love them to this day (duh), but it’s almost impossible not to think of childhood when eating them. Even though these days I’m usually making them over the leftover embers from my charcoal grill, they instantly transport me to campfires in the woods of upstate New York, with multiple marshmallows skewered on gnarled sticks found on the ground or ripped from a low-hanging branch.

s'mores layer cake | Brooklyn Homemaker

Of course, like any good fat kid, when I was young I was super impatient to heat up those marshmallows as quickly as possible so I could get those s’mores into my face on the double. I learned pretty early on though, that the chalky texture and acrid flavor of that burnt sugar shell isn’t actually all that pleasant, even when sandwiched between melty chocolate and crisp graham crackers.

So, at a younger age than most kids (or adults for that matter), I figured out that slow and steady wins the race when it comes to building s’mores. A slow roast, with a steady rotation far from the flames, produces a vastly superior marshmallow with a soft, gooey center and a delicate toasty caramelized crust. The last time I went camping with my sister and her kids, my nephews actually poked fun at me for how long I take to toast my marshmallows. What can I say, I’m a perfectionist. Or neurotic. Potato, Potahto.

s'mores layer cake | Brooklyn Homemaker

I suppose that slow and steady toasting is sort of a metaphor for building this cake. I’m not going to sugar coat things (lol) and tell you that this is an “easy” or “quick” recipe for novice bakers. It takes time and effort and has multiple steps and components. It’s basically four recipes in one, with 3 layers of cake, a flavored icing, a multi-step filling, a ganache drizzle, decorations on top, and long set of assembly instructions.

If you’re patient and determined though, and have a fair understanding of layer cake construction, all the effort definitely pays off in the end. I promise you that this cake is seriously incredible.

s'mores layer cake | Brooklyn Homemaker

Unfortunately my birthday bbq never actually happened. Just as my excitement about the party was reaching it’s peak, the weather forecast started showing rain in the future. I tried not to panic and just kept telling myself that the weather changes so quickly in New York that by the weekend the forecast could be completely different.

I went ahead with planning and recipe testing my cake, but once I was sure that the recipe was solid and all the elements really worked together, I was also sure that it was time to start cancelling on our guests. A few nights before the big day I was home alone and actually started to pout and feel sorry for myself. I’d put all this work in for nothing and I had no clue what I’d end up doing on my birthday. After a few minutes though, I snapped out of it and decided that bbq or no bbq, I was going to have a good time.

I already had an amazing cake recipe, and after all that work to perfect it, I needed to show it off. I invited a small group of close friends to brunch not far from our place, and told everyone that afterward we’d be heading back to our apartment for cake and Cards Against Humanity. And guacamole!

s'mores layer cake | Brooklyn Homemaker

Multiple people took one bite and their faces lit up and told me that it actually tasted like real s’mores, almost as if they weren’t expecting something that looks so pretty to also actually taste great too. They clearly underestimated me!
Russell even told me, repeatedly, that it’s one of the best desserts I’ve ever made, and kept going back into the bowl to steal stray spoonfuls of the marshmallow filling while I was stacking the layers. Actually my mom did the same exact thing when I was trying out the filling recipe for the first time!

The layers of cake are moist, tender, and richly chocolatey thanks to double dutch cocoa, strong coffee, and real butter. The toasted marshmallow filling is made from actual marshmallows rather than marshmallow spread, so it genuinely has the rich flavor and gooey texture of a warm marshmallow right off the stick. Once the layers are stacked, everything gets enrobed in a velvety swiss meringue buttercream loaded with graham cracker crumbs and just a hint of cinnamon. As if all that weren’t enough, rich dark chocolate ganache is the… umm… icing on the cake. In addition to the cocoa flavor from the devil’s food layers, the ganache adds that melty chocolate flavor you know and expect from s’mores. The only thing missing here is the camp fire and the sticks!

I promise you that this show-stopping cake really does taste as good as it looks. Better even!
If you’re up for the challenge, it’s definitely worth the effort.

s'mores layer cake | Brooklyn Homemaker

S'mores Layer Cake

  • Servings: 16 to 24-ish
  • Print
Devil’s Food Cake
makes three 8-inch layers

butter and flour (or baking spray) for pans
1 1/2 cups unsweetened natural cocoa powder (I used Double Dutch Process)
1 1/2 cups hot brewed coffee (or hot water if preferred)
3 1/4 cups cake flour
1 1/4 teaspoons coarse salt
1 teaspoon baking powder
1 teaspoon baking soda
1 cup (2 sticks) unsalted butter, melted and slightly cooled
1 cups peanut oil or vegetable oil
1 cup granulated sugar
1 1/4 cup packed brown sugar
4 large eggs
4 teaspoons vanilla extract
1 cup buttermilk

Preheat oven to 350 degrees.

Butter three 8 inch round cake pans, line bottoms with parchment paper, butter paper, and dust pans with flour.
Whisk together cocoa powder and coffee (or hot water) until smooth and set aside.
Sift together flour, salt, baking powder, and baking soda; set aside.
Beat melted butter, oil, and sugars together on medium-low speed until combined.
Add eggs, one at a time, beating after each addition.
Beat in vanilla and cocoa mixture. Reduce speed to low.
Add flour mixture in three batches, alternating with buttermilk and beginning and ending with flour. Beat until just combined.
Divide batter evenly between the three pans, and bake until a toothpick or cake tester inserted into centers comes out clean, 40 to 45 minutes.

Transfer pans to a wire rack to cool for 30 minutes. Invert cakes onto rack, peel off parchment, and let cool completely.
To achieve a perfectly flat, professional looking cake, you’ll want to slice the very tops of the cakes off to make each layer completely flat and level. You can do this using a very sharp bread knife, or a cake leveler.

If you’re not assembling cakes right away, individually wrap each layer tightly in plastic wrap to prevent drying. Layers can be stored in the refrigerator for a day or two, or frozen (wrapped in plastic wrap first, then aluminum foil) for up to two weeks.

Graham Cracker Swiss Meringue Buttercream Icing:
Adapted from “Layered” by Tessa Huff
3/4 cup egg whites (I used pasteurized egg whites from a carton)
1 1/2 cups sugar
2 cups (4 sticks) unsalted butter, at room temperature (cut into 1 tablespoon slices)
2 teaspoons pure vanilla extract
1 cup graham cracker crumbs
1/2 teaspoon ground cinnamon

Place the egg whites and sugar in a very clean bowl of a stand mixer and whisk them together by hand to combine. Fill a medium saucepan with an inch or two of water and bring to a simmer over medium to medium-high heat. Place the mixer bowl over the saucepan to create a double boiler. Be sure that the bottom of the bowl doesn’t directly touch the water, and that the water doesn’t reach a full boil.
Heat the egg whites until they register 160F on a candy thermometer, whisking regularly to avoid cooking the whites. As soon as they’re at the correct temperature, carefully attach the mixer bowl to the stand mixer and add the whisk attachment.
Beat the egg whites on high speed for 8 to 10 minutes until they hold stiff peaks and the outside of the bowl is cooled to room temperature. Stop the mixer and swap the whisk attachment for the paddle.
On low speed, add the butter, a few tablespoons at a time, waiting for it to incorporate before adding more. Once all the butter is mixed in, add the vanilla extract and mix in to incorporate. Turn the mixer up to medium-high and beat until the buttercream is smooth and silky, about 3 to 5 minutes.
If the mixture starts to look curdled, just keep beating. It’ll come together.
If the whites were still too warm when the butter was added and the buttercream is too thin and soupy, refrigerate the bowl in 10 minute bursts until it’s cool (but not cold) and beat again until smooth.
Once smooth, add the graham cracker crumbs and cinnamon and beat in to incorporate.

Toasted Marshmallow Filling:
10 oz mini marshmallows
1 stick unsalted butter
1/3 cup heavy cream
1 cup powdered sugar

Line a sheet pan with parchment paper and spray the paper with cooking spray or rub with butter. Reserve 1/2 cup of mini marshmallows, and spread the rest on the tray in a single layer.
Toast the marshmallows under the broiler in your oven, rotating the pan if necessary to promote even browning. Keep a close eye on the pan, as this should only take a few minutes but the exact time will depend on the strength of your broiler and how close the pan is to it. The marshmallows should mostly be a dark toasty brown, but not burned. Watch them like a hawk through the oven door.
Let the marshmallows cool to room temperature before proceeding, and they should peel off the greased parchment in one single sticky layer.

Place the toasted marshmallows in a medium saucepan along with the unsalted butter. Heat over medium to medium-high heat, stirring regularly, until the marshmallows are all melted and completely combined with the butter.

Transfer the marshmallow mixture to the bowl of a stand mixer and beat in heavy cream and powdered sugar. Transfer the bowl to the refrigerator and let cool completely, then beat again to loosen the mixture up a little. The mixture will be a bit stiff and sticky, but should be soft enough to spread.

Glossy Ganache Drizzle:
4 oz good quality dark chocolate (60% works well)
1/2 cup + 2 tablespoons heavy cream
1 tablespoon honey
pinch salt

Chop chocolate into small, easily melted pieces and place in a heat proof bowl.
Heat heavy cream, honey, & salt in a small saucepan (or microwave save bowl) just until it comes to a light boil, and immediately pour directly over chocolate. Wait 2 to 3 minutes before stirring until completely smooth and melted and free of lumps. If the mixture seems very hot still it may melt the icing as you pour it so wait a few minutes for it to cool slightly. Do not let it get too cool or it will not drizzle nicely and may look messy.

*Do not make the ganache until the cake is completely iced and ready to decorate.

Decorations: (optional)
Remaining 1/2 cup mini marshmallows
Broken pieces of graham crackers

Toast the remaining mini marshmallow on a sprayed or buttered parchment lined baking sheet in the same way they were toasted for the marshmallow filling. Try to space them out on the pan so they don’t all touch, and toast them to a lighter brown than you did for the filling. It’ll be easier to decorate with individual marshmallows, and they’ll melt less if they’re only lightly toasted.
You probably won’t use the whole 1/2 cup, but it’s nice to have more than you’ll need so you can choose the nicest looking ones.

Assemble cake: 
Place the first cake layer on an 8″ cardboard cake round, serving plate, or cake stand. Using a cake round will make it easier to ice and decorate, especially if you have a revolving turntable for decorating (I use a lazy suzan, but you can also just spin your plate or cake stand while you work).

Fit a piping bag with a large round or star tip and fill with a cup or two of the graham cracker buttercream. Pipe a thick dam of icing around the outside of the cake to contain the marshmallow filling. This will ensure that the filling stays in place and doesn’t squish out when the layers are stacked.

Place half of the toasted marshmallow filling in the center of the cake and spread it smooth and even using an icing spatula. Add the next layer of cake, looking from directly over the top and from eye level at the cake to make sure each layer is directly one above the other, rotating the cake to be certain. Repeat the same procedure with the buttercream dam and the other half of the marshmallow filling, then add the third and final layer of cake and check for straightness again. Using about half of the remaining icing, crumb coat your cake (If you have any icing left in the piping bag, empty it out and use that too). Starting with the top of the cake, spread the icing thin and work some of it down the sides of the cake to completely cover the whole thing in a thin, smooth, even coat of icing. This first layer of icing seals the cake and keeps crumbs from being visible in the outer layer of icing. It may seem like unnecessary trouble, but it really is worth it to get a smooth professional finish on the icing.

Place the cake in the refrigerator for about 30 minutes to an hour to help set the icing and firm up the cake.
Spread the remaining buttercream over the whole cake the same way you did the crumb coat. Start by smoothing the top and slowly working the icing down the sides to cover the cake completely. Try to get the icing as completely smooth as possible with straight sides and a flat, level top. I use a long offset icing spatula. Refrigerate the cake again for at least another 30 minutes (or up to a day).

Make your ganache just before you’re ready to remove the cake from the fridge.

It’s not necessary, but I find it easier to get an even, professional looking drizzle with a squeeze bottle. Slowly add the ganache just around the outer edge of the top of the cake so that it drips in some places. Slowly rotate the cake to do the entire outside edge. Once you’re happy with the amount of drizzle coming down the sides, fill in the center of the top of the cake with ganache, smoothing it flat with a clean icing spatula before the ganache sets.

If you’d like to add decorations to the top of the cake, be sure to add them before the ganache sets.

This cake will keep well in a cake saver at room temperature for a day or two if the weather is not too hot or humid. Otherwise, cover tightly and store in the refrigerator for up to 3 days.

If refrigerating, bring cake to room temperature at least two hours before serving.

basic bundt series: chocolate bundt cake

Hey there! Remember me?

basic bundt series | chocolate bundt cake | Brooklyn Homemaker

If you follow me on instagram, you probably already know from my stories that I have been a busy busy BUSY little bee. If you don’t follow me, btw, what the hell man?

Not cool.

basic bundt series | chocolate bundt cake | Brooklyn Homemaker

In the months since the holidays, I designed and renovated another hair shop with my husband and wonderful amazing mother, and now Maxwell’s has a second location in Crown Heights, Brooklyn. It’s taken every ounce of strength in my being not to call it “Maxwell’s 2, Electric Boogaloo”. Sadly for me, but more appropriately, Russell decided to keep the same name, Maxwell’s for Hair, or Maxwell’s Crown Heights if you need to keep the two locations straight.
It’s absolutely nuts, but you guys, we’re a chain! (Oh Spud!)

I also moved into a new position at work, which is amazing and exciting and perfect for me, but getting used to the new role has taken a lot out of me, which is another reason that I’ve been MIA on this end.

Oh yeah, and I decided to paint our bedroom, which basically turned into redecorating the entire room from floor to ceiling. I’ve brought some of you along with me on this journey via instagram stories, but just to re-cap, I painted the walls, painted the ceiling, got new bedding, added a bunch of purdy new potted plants, and after an exhaustive search, decided on new curtains.
If I can get my shit together maybe I’ll post about it, because there have actually been even more changes in there since I last blogged about my apartment, but who am I kidding?
No promises.

basic bundt series | chocolate bundt cake | Brooklyn Homemaker

Thankfully, things are beginning to calm down around here and it feels like, at least temporarily, life is getting back to normal. The new shop is doing well, I’m adjusting to the new position, and the bedroom is like 93% done.

basic bundt series | chocolate bundt cake | Brooklyn Homemaker

I also got a new oven for Christmas which has not seen nearly enough action, so now that things are calming down I’m hoping to get back into baking much more regularly. Just in time to get back into the kitchen, Nordic Ware released a stunning new bundt pan that you know I just HAD to have.

Their Brilliance pan is modern yet timeless, perfectly elegant, and absolutely gorgeous. I’ve said it time and time again, but on top of being beautiful, Nordic Ware bundt pans are sturdy, heavy-duty, ultra-non-stick, and unbelievably durable. You know I bake a butt load of bundts y’all, so trust me, these pans hold up well to a beating!

They’re also a family owned company that still makes their beautiful bundt pans right here in the good ol’ U.S. of A. The bundt pan is by far their most famous and popular product, and no one makes bundt pans as well as they do.

basic bundt series | chocolate bundt cake | Brooklyn Homemaker

I’ve been trying to perfect a chocolate bundt for a good long while now to share as part of my Basic Bundt Series. I’m always looking for bundt recipes that are classic and simple, relatively easy to prepare, impossibly delicious on their own, but also customizable with a few simple changes or substitutions.

After more recipe testing than I’d like to admit (it’s written all over my waistline), I’ve finally perfected the most amazing chocolate bundt cake the world (or at least my mouth) has ever known!

It’s perfectly moist and tender, with rich chocolate flavor thanks to the addition of both dutch process cocoa and mini chocolate chips, and has a nice depth from the addition of both coffee and brown sugar. It’s also just sweet enough without being cloying, and the best part? No stand mixer! The whole thing can be thrown together with a big bowl, a whisk, and a silicone spatula!

basic bundt series | chocolate bundt cake | Brooklyn Homemaker

A coworker of mine described the flavor of this cake as “Oreos dipped in milk” which honestly might be the highest praise any of my cakes have ever received.

Ever.

Part of that “Oreo” flavor definitely comes from using dutch process cocoa, which is darker and richer, more chocolatey and less cocoa-y, than traditional baking cocoa. It’s definitely worth looking for, but if you can’t find it, don’t worry! This cake will still be incredibly moist and delicious and chocolatey, if just a bit lighter in color and less Oreo-like in flavor.

basic bundt series | chocolate bundt cake | Brooklyn Homemaker

I went with a basic white glaze because I thought it would contrast nicely against the deep dark brown of the cake, and I honestly didn’t think any more chocolate was necessary. If you wanted to though, you could certainly go for a ganache or cocoa glaze instead.

In terms of customization, the sky’s the limit with this basic chocolate cake. One of my favorite ways to jazz it up is to zest an orange or two into the granulated sugar before mixing it in with the dry ingredients, and then swapping out the brewed coffee for some fresh squeezed orange juice!
You could also swap out the mini chocolate chips for a cup of fresh raspberries or halved pitted cherries to add some summer brightness.
If you wanted a more powerful coffee flavor you could also mix a couple teaspoons of espresso powder in with the coffee, or make a glaze with a coffee liqueur. Speaking of adding liqueur to the glaze, why not go nuts with some Amaretto or Frangelico, or even go all out with bourbon or rum?

Gussied up and personalized, or un-fussed with and made as written, this chocolate cake is a definite crowd pleaser y’all!

basic bundt series | chocolate bundt cake | Brooklyn Homemaker

Chocolate Bundt Cake

1 cup hot brewed coffee
3/4 cup dutch process cocoa powder (plus more for pan) *see note
1 stick (8 tablespoons) unsalted butter (plus more for pan)
1/2 cup peanut (or vegetable) oil
3/4 cup buttermilk
2 teaspoons real vanilla extract
2 eggs
1 cup brown sugar
1 cup granulated sugar
2 1/2 cups all-purpose flour
1 1/4 teaspoons coarse kosher salt
1/2 teaspoon baking soda
1 teaspoon baking powder
3/4 cup mini chocolate chips (optional) **see note

Preheat the oven to 350F.
Brush (or spray) a 10 to 12 cup bundt pan with softened butter (or oil), and add a few tablespoons of cocoa powder. Shake the cocoa around the pan until evenly distributed, and tap out any excess.

In a large measuring cup or microwave safe bowl, combine the coffee and cocoa powder and whisk out any lumps. If the coffee is still very hot, add the stick of butter and stir until melted or, if necessary, microwave it just until the butter is melted. Whisk in oil, buttermilk, and vanilla to cool the mixture down a bit before adding the eggs. Then add the eggs and brown sugar and whisk until well blended and free of lumps.

In a separate bowl, whisk together granulated sugar, flour, salt, & baking soda and powder. Make a well in the center of the flour and pour in the liquid ingredients. With a silicone spatula, stir just until there are no visible streaks of dry flour left. Then stir in the mini chocolate chips if using, just until evenly distributed.

Pour batter into the prepared pan, not more than 3/4 of the way up the sides. If using a 12 cup pan, all the batter will fit. In a 10 cup pan, you may want to reserve just a tiny bit to avoid a mess in your oven. Bake in the center of the oven for 50 to 55 minutes, or until the cake no longer jiggles, and the top springs back when gently pressed with a fingertip. You could try a toothpick or cake tester but the melted chocolate chips may give you a false reading.

Cool for about 30 minutes on a wire rack before turning out of pan. Turn out onto the rack and cool completely before glazing.

Best Simple Bundt Cake Glaze:
1 1/2 cups powdered sugar
1 teaspoon vanilla extract
2 to 2 1/2 tablespoons half & half

Mix sugar, vanilla, and 2 tablespoons half & half together in a small bowl. Mix until completely smooth and free of lumps. You want the glaze to be very thick so it doesn’t slide right off the cake, but it does need to be liquid enough that it pours smoothly. If necessary, thin the glaze out with more half & half, adding only about 1/4 a teaspoon at a time to avoid thinning it too much.

Place a sheet pan under the cooling rack to catch any drips, and pour the glaze in a steady stream over the cake.. Let the glaze harden for at least 30 minutes before slicing.

Cake can be stored, tightly covered at room temperature, for about 3 days.

cooks notes:
* I use a dutch process cocoa for a deep, rich chocolate flavor, but if you can’t find it, regular cocoa powder will work.
** If you use regular size chocolate chips or chunks, they’ll likely sink to the bottom of the pan and could cause the cake to stick. The minis however, are light enough to stay evenly distributed throughout the batter as it bakes.

ginger pinchies

Have you guys decided which cookies you’ll be baking for the holidays yet? Have you narrowed it down to just one recipe, or are you making a few different kinds?

ginger pinchies | Brooklyn Homemaker

When I was little my grandma would always have a big tray of homemade cookies on the counter every Christmas, and it was always so much fun to choose which kind to try first. Being the chubby little dough boy that I was, by the time we were done opening presents you better believe that I’d tried each and every recipe she had on that platter, sampling a few of them more than once, you know, just to be sure.

ginger pinchies | Brooklyn Homemaker

This year I signed up for a cookie swap at work and I couldn’t be more excited about it. I’ve always wanted to host one myself but never thought enough of my friends would be interested to make it work. This year though, one of my coworkers suggested it and to my surprise, so many people signed up that I’m actually worried about how many batches I’m going to have to make. The more people who sign up though, the more varieties of cookies I’ll have for my holiday spread this year. An embarrassment of riches y’all!

Originally my plan was some kind of spicy gingerbread cutouts, but after Nordic Ware reached out to me to ask if I’d be interested in a project they’re working on with the Minnesota Historical Society, I might just have to change my plans!

ginger pinchies | Brooklyn Homemaker

To celebrate their Scandinavian American roots this holiday season, Nordic Ware joined forces with the Minnesota Historical Society and Mill City Museum to help them promote a special holiday cookbook they’ve just released.

Nordic Ware has been a major part of Minnesota’s heritage and history since 1946, and they’re still a family owned company!  The Minnesota Historical Society helps preserve Minnesota’s past, shares the state’s stories and connects people with history in meaningful ways. They play an important role in Minnesota’s historic preservation, education and tourism; and provide the public with award-winning programs, exhibitions and events. Part of the historical society, The Mill City Museum was built into the ruins of what was once the world’s largest flour mill, located in Minneapolis on the historic Mississippi Riverfront. They teach their visitors about the intertwined histories of the flour industry, the Mississippi river, and the city of Minneapolis.

ginger pinchies | Brooklyn Homemaker

Written by self proclaimed Nordic food geek and meatball historian Patrice M. Johnson, and published by Minnesota Historical Society Press; Jul: Swedish American Holiday Traditions focuses on the Christmas food traditions of Swedish Americans in the Midwest.

From smörgåsbord and St. Lucia processions, to Christmas Eve gatherings with family and friends, Swedish Americans are linked through the generations by a legacy of meatballs and lutfisk. Throughout the Midwest where Swedish immigrants settled, holiday dishes placed on the julbord (Christmas table) tell stories about who they are, where they come from, and where they are heading.

In exploring Swedish American holiday customs, Johnson begins with her own family’s Christmas Eve gathering, which involves a combination of culinary traditions: allspice-scented meatballs, Norwegian lefse served Swedish style (warm with butter), and the American interloper, macaroni and cheese. Just as she tracks down the meanings behind why her family celebrates as it does, she reaches into the lives and histories of other Swedish Americans with their own stories, their own versions of traditional recipes, their own joys of the season. The result is a fascinating exploration of the Swedish holiday calendar and its American translation.

ginger pinchies | Brooklyn Homemaker

Jul is full of recipes that are perfect for holiday celebrations, even if you don’t have Swedish or Scandinavian roots.  The are tons of mouth-watering recipes for celebratory savory dishes, drinks, and desserts, but I went straight for the cookies when I was deciding which recipe to try out and share. Coming from a German American family, I share the author’s love for heavily spiced holiday treats and it didn’t take me long to zero in on a fun and unusual recipe for spice cookies she calls “Ginger Pinchies”.

These two-tone cookies were named after Johnson’s cat Pinchy, and inspired by her daughter’s love of ginger and her aunt’s well-worn copy of a Swedish Tabernacle Church Cookbook. Although they’re rolled up differently, the recipe is similar to a traditional pinwheel cookie. Rather than chocolate though, the dark part is a ginger-heavy spiced molasses dough and the light is perfumed with fresh citrus zest and a touch of vanilla. It reminds me so much of an Old-Fashioned marble cake recipe that I found in an old cookbook from the 1940s, which I made into this stunning holiday bundt a couple years ago!

ginger pinchies | Brooklyn Homemaker

Reading that this recipe was a 2015 Minnesota State Fair Gold Medal Flour Cookie Contest Blue Ribbon Winner was all  I needed to see to know this was the one for me.

The results are in y’all, these cookies are amazing! The light part is citrusy and delicate, soft and chewy, and I absolutely love the contrast with the rich and spicy molasses dough. Taken all in one bite they balance perfectly, and because I’m a nerd I also tried eating each dough separately in small bites to see how I liked them on their own. Just perfect! Thanks to my new Nordic Ware half sheet pans, the cookies baked up perfectly tender with delicately and evenly browned bottoms. While dark non-stick pans can sometimes overheat and burn the bottoms of cookies, these professional grade pans heat evenly and consistently producing perfectly baked cookies every time!

These cookies are absolutely ideal for your holiday spread, and they’ll be great for my cookie swap. You should definitely check out this cookbook for yourself, but so you don’t have to wait to make these cookies, I’ve shared the recipe below.

ginger pinchies | Brooklyn Homemaker

Ginger Pinchies

  • Servings: makes 16 cookies
  • Print
recipe from Jul: Swedish American Holiday Traditions
1/2 cup (1 stick) butter, softened
1/2 cup sugar
1 egg yolk, beaten
3 tablespoons milk
1 1/2 cups plus 1 tablespoon all-purpose flour (divided)
1/2 teaspoon baking powder
1/2 teaspoon salt
1 teaspoon vanilla extract
zest of 1 orange (about 1/2 teaspoon)
zest of 1 lemon (about 1/2 teaspoon)
2 tablespoons molasses
1 teaspoon ground ginger (or 2 to 3 tablespoons grated fresh ginger)
3/4 teaspoon cinnamon
1/2 teaspoon cloves
1/4 teaspoon allspice
pinch nutmeg
pinch cayenne

Use a stand mixer with paddle or a hand mixer to beat butter on low speed for about 30 seconds. Gradually add sugar and bead on medium speed until fluffy, about 3 to 4 minutes. Turn mixer to low and add egg yolk and milk and mix well. In a small bowl, whisk together 1 1/2 cups flour, baking powder, and salt. Gradually add flour mixture and continue beating until dough forms.

Divide dough in half (there will be just over 2 cups total) Add half of the dough back to the mixing bowl along with vanilla, orange zest, and lemon zest. Mix until incorporated. Form dough into a ball and wrap in plastic wrap. Set aside. Place remaining dough in mixing bowl along with remaining 1 tablespoon flour, molasses, ginger, cinnamon, cloves, allspice, nutmeg, & cayenne. Mix until incorporated. Dough will be very soft. Form dough into a ball and wrap in plastic. Chill both dough balls at least 30 minutes. (I froze mine for 30 minutes)

Place parchment paper over work surface and roll each dough ball into a 1/4-inch-thick, 8×5-inch rectangle. (It’s important to try to get as close to a rectangle as possible, rather than an oval shape, so that your finished cookie log isn’t hollow at the ends.) Place one dough rectangle over the other, aligning the dough as perfectly as possible. Starting at one of the narrow ends of the dough, use the parchment to help you gently roll the dough into a spiral, stopping a little more than halfway up the rectangle. Flip the dough upside down and roll the other end into a spiral so that the dough resembles and S-shaped log. Wrap in clean plastic wrap and chill at least an hour. (Again, I froze mine)

Preheat oven to 350 degrees and line baking sheets with parchment paper. Slice chilled dough into 1/4-inch-thick slices for about 16 S-shaped cookies. (I sliced my log in half, then into quarters, then sliced each quarter into 4 slices to get 16 evenly sliced cookies) Place on prepared baking sheets about 1 to 2 inches apart. Bake for 8 to 10 minutes or until evenly browned on the bottom. Cool on rack.