fruit

apple cider boulevardier

Do you guys need a drink?

Cuz I need a drink.

apple cider boulevardier | Brooklyn Homemaker

This week, and really this entire election cycle, has been a complete emotional whirlwind and I think we’re probably all ready for a nice stiff cocktail right about now.

And boy oh boy have I got a cocktail for you today.

apple cider boulevardier | Brooklyn Homemaker

A few months ago I discovered the “Boulevardier”, and I fell head over heels in love. (Don’t tell Russell).
If you’ve not heard of a Boulevardier, it’s basically just like a Negroni, but with whiskey instead of gin.

If it sounds like I’m speaking a foreign tongue and you have no idea what I’m saying, a Negroni is a classic cocktail, which first appeared in print in 1919, consisting of gin, campari, and sweet vermouth. They’re strong, herbaceous, floral, and rather bitter in a really refreshing way. The bitterness of Campari can be a bit of an acquired taste, but if you are a fan of apéritifs or digestifs you’d probably really enjoy it. Orson Welles said of the Negroni, “The bitters are excellent for your liver, the gin is bad for you. They balance each other.”
Smart man. It’s all about balance.

The thing is, I personally find the combination of gin and Campari a bit overpowering, so when I first tasted a Boulevardier, which substitutes bourbon for the gin, I was ecstatic and have been a huge fan ever since. It’s a strong cocktail, but the bitterness encourages sipping rather than chugging, which is never a bad thing!

apple cider boulevardier | Brooklyn Homemaker

We recently hosted the official opening part for Maxwell’s, and when I was planning the cocktail menu I decided to share my new love for the Boulevardier with all of our friends and neighbors. Like I said though, this is a pretty strong cocktail, and while we wanted everyone to have a nice time, we weren’t really trying to get all our friends wasted in the shop! Also, knowing that Campari can sometimes be an acquired taste, I was looking for a way to sweeten it up a little and mellow out the bitterness to make the cocktail appeal to a larger audience.

Since I was also making one of my favorite cakes for the party, and I was already buying fresh apple cider anyway, I thought I’d see if a splash of cider would help cut the bitterness, sweeten things up, and water things down.
Worked like a charm!
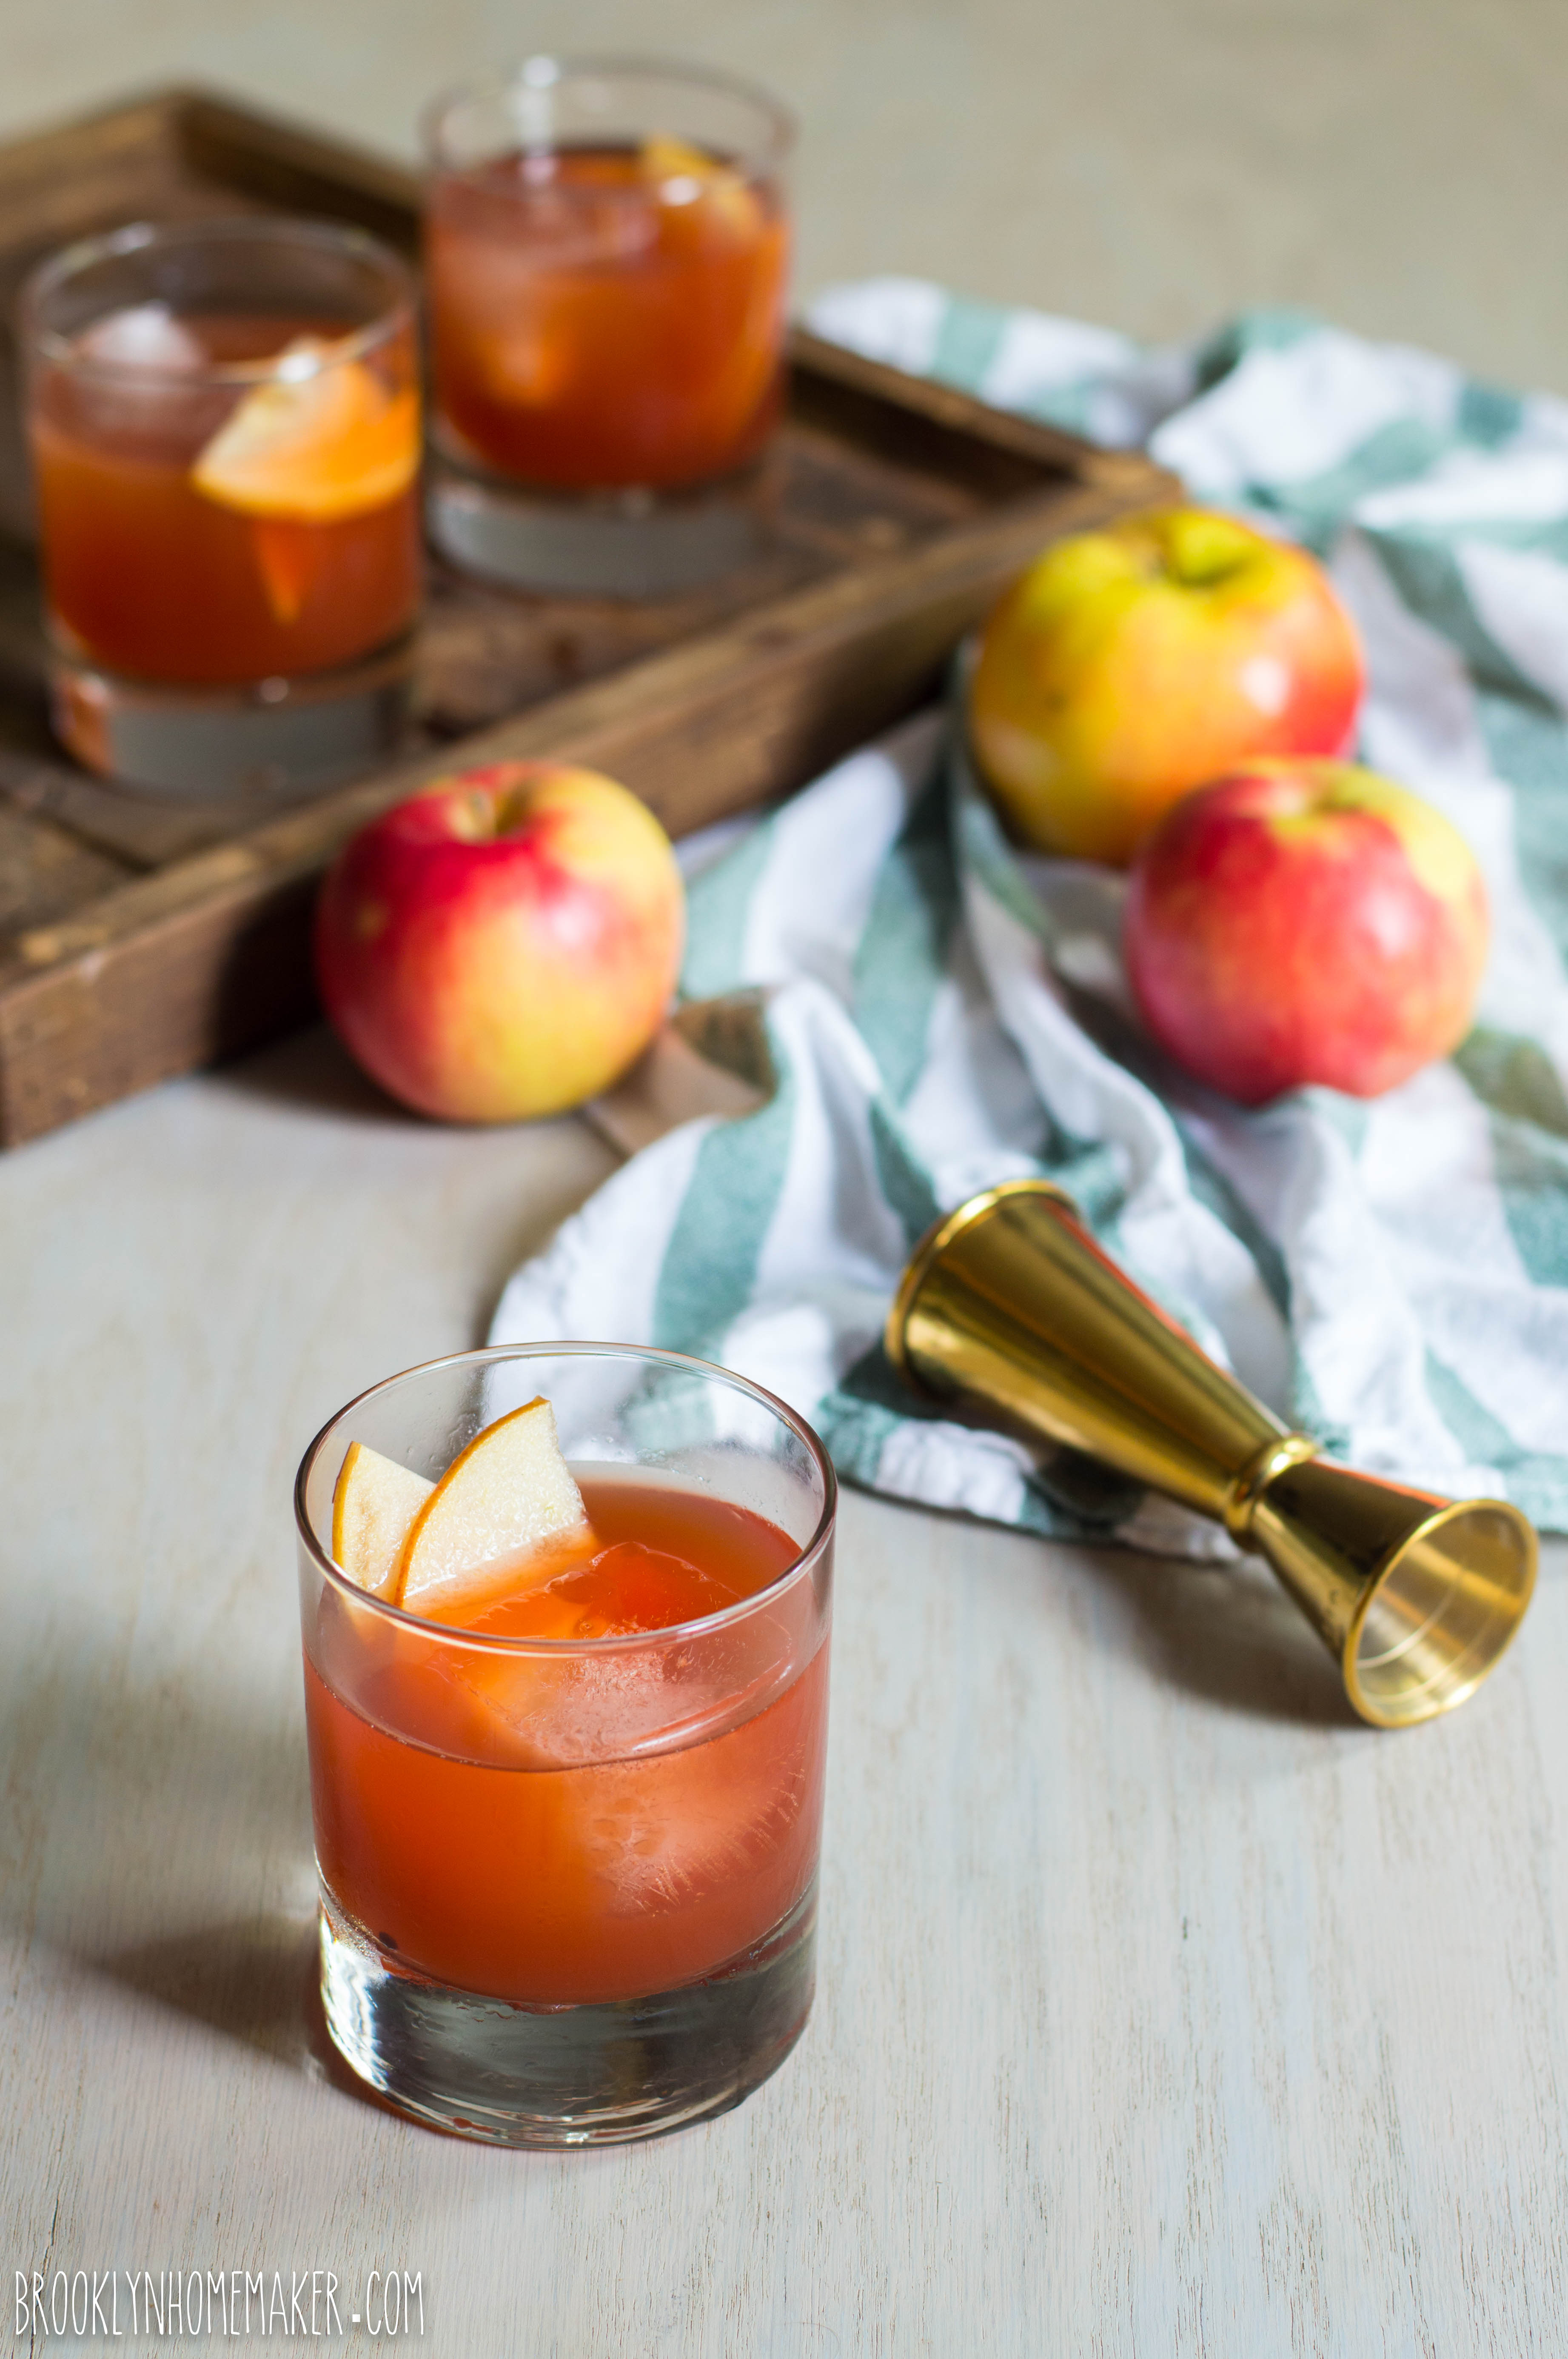
The cider mellows out the intensity of the Campari and makes this a delicious, autumnal, beautiful cocktail that everyone absolutely loved! I also decided to garnish the drink with some very thinly sliced apple rather than the traditional orange peel. So good!

apple cider boulevardier | Brooklyn Homemaker

I know that many people outside of the US are not very familiar with apple cider as we know it here in the northeast, so to explain, it’s basically nothing more than freshly pressed, unfiltered apple juice. If you can’t find fresh apple cider where you live, you could definitely substitute apple juice in a pinch. If you can get fresh cider though, I really think it has a superior flavor that’s a bit less cloying with a more intense apple-y richness.

apple cider boulevardier | Brooklyn Homemaker

Now, if this cocktail sounds good to you, but the idea of peeling yourself off the couch and putting pants on doesn’t, I’d like to offer you another way to put the ingredients for this drink into your hands.
Enter Drizly.com.
Drizly is similar to the food delivery websites that are so popular in larger cities right now, (Russell and I would probably starve to death without Seamless) but instead of food, Drizly delivers alcohol!

You have to be 21 (obvi), and you have to live within one of their delivery windows, but if both those things are true for you, the sky’s the limit! You can have any and all of your favorite hooch delivered right to your front door with the click of a button!
I mean, talk about a dream come true!

You can get the bourbon, Campari, and sweet vermouth you’ll need to make your very own boulevardier, and in some areas, you can even have the cider delivered! (I had to go to the store for that though, what a buzz kill!)

apple cider boulevardier | Brooklyn Homemaker

So, what are you waiting for?
You really have no excuse not to make yourself a fancy ass apple cider Boulevardier. It’s the perfect grown up cocktail for fall, and did I mention that Thanksgiving is only a few weeks away?

This drink is strong but not too strong, sweet but not too sweet, bitter but not too bitter, with a wonderfully warm, herbaceous, bright, and fruity flavor.

It doesn’t get much better than that, unless of course you have all the booze delivered to your front door without changing out of your PJs. Which you can.

apple cider boulevardier | Brooklyn Homemaker

Apple Cider Boulevardier

  • Servings: 1 cocktail
  • Print
1 1/2 oz. bourbon
3/4 oz. Campari
3/4 oz. Sweet Vermouth
1 1/2 oz. fresh apple cider
Ice
Thin apple slices for garnish

Place bourbon, campari, sweet vermouth, and apple cider into a cocktail shaker with plenty of ice. Shake just until well mixed and cold. Strain into a rocks glass, and serve with more ice.

Garnish with a slice or two of fresh, thinly sliced apple.


nectarines and cream icebox cake

Why hello there friends! Remember me???

nectarines and cream icebox cake | Brooklyn Homemaker

Yes it’s me! Tux!

I’m back! (well, sort of.)

nectarines and cream icebox cake | Brooklyn Homemaker

Russell and I are still plugging away at the project I mentioned in my last post, and while we’re (hopefully) nearing the finish line, we’ve still got plenty of work to do so I’m not exactly back for good. I just happened to get a little down time recently and I couldn’t bare to stay away from you for one more second!

I’ve missed you guys SO MUCH that I jumped at the opportunity to get back in the kitchen when I finally had a moment to myself. We’ve been so completely consumed with our project in the past few months that my poor kitchen has felt almost as neglected as all of you probably have.

nectarines and cream icebox cake | Brooklyn Homemaker

As it turns out though, my little bit of down time just happened to fall smack dab in the middle of our SECOND heat wave in the past couple months. For almost two weeks the daily weather forecast included “Excessive Heat Warnings”, and the city even set up “cooling stations” for the sick and elderly without air conditioning to be able to escape (and survive) the oppressive daytime temperatures.

To make matters even worse, unlike my brown-lawned family upstate, we’ve also had plenty of rain (and thunder and lightning) here in Brooklyn so along with the heat we’ve also had plenty of soupy, steamy, thick, and swampy humidity. In other words, we’ve just been sweating our butts off here in Brooklyn!

nectarines and cream icebox cake | Brooklyn Homemaker

As you can imagine, that meant that turning the oven on to bake a cake has been sort of out of the question.

nectarines and cream icebox cake | Brooklyn Homemaker

With actual baking off the table, my first thought was to make some kind of ice cream or frozen something-or-other to help cool us off and keep me as far as possible from the oven. It didn’t take me long to realize though, that I hadn’t thought far enough ahead and my ice cream maker bowl requires overnight freezing before I could even get started.
I briefly considered popsicles but I couldn’t seem to get inspired. What I really wanted to do was bakeor at least make something that felt as homey and satisfying as something fresh from the oven. I’d been out of the kitchen and away from my oven for so long that my head kept going back to the idea of a fruity crisp or crumble or skillet cake.

Then it suddenly hit me!

Icebox cake!

nectarines and cream icebox cake | Brooklyn Homemaker

If you’re not familiar with an icebox cake, the concept is fairly simple. You layer thin crisp cookies with whipped cream and let the whole thing set up in the refrigerator (or icebox as it were). While the cake sets up, moisture is pulled from the whipped cream, softening the cookies and firming the cream until the whole thing is transformed into a dreamy, wonderful, lick-the-plate-clean dessert with a perfectly cake-like sliceable texture.

The original recipe has been around since the first world war and was most likely inspired by similar desserts like the Charlotte or the Trifle. The first icebox cakes were made with thin chocolate wafer cookies that are increasingly difficult to find (Smitten Kitchen has a recipe if you want to make your own), but these days you can basically make them with any thin, crisp cookies you like.
The filling options these days are just as limitless as the cookies, so I knew I’d find a way to make something bright and summery and satisfying.

nectarines and cream icebox cake | Brooklyn Homemaker

I wish I had some sepia-colored story about the nostalgic icebox cakes my grandmother used to make me as a boy growing up in the countryside in 1764, but the truth is that I’d never even tasted icebox cake until I made one with gingersnaps and maple cream this past December.

Even though I didn’t grow up with them, they feel every bit as homey and comforting as the bundt cakes that I actually did grow up eating in grandma’s kitchen in the country. While they’re relatively new to me, I would bet that a few more icebox cakes will turn up on the pages of Brooklyn Homemaker in the years to come. They just have that folksy days-of-yore feeling that lets me wistfully imagine joyful, touching family moments that never actually happened.

Not to mention they’re also freakin’ delicious, and crazy simple to put together.
If you can whip cream and open a box of cookies, you can make an icebox cake. They’re actually much simpler than I myself would normally go for, and the last time I made one I went the extra mile and made my own gingersnaps as the base of the cake. (You know I’m a glutton for punishment.)

This time around though, I wanted to take it easy, keep it simple, and highlight the other ingredients I wanted to feature in this simple summery creation.

nectarines and cream icebox cake | Brooklyn Homemaker

Russell and I signed up for a CSA from Local Roots earlier this summer, but of course that was before we knew how busy we were about to get. We’ve been loving every ounce of fresh, local, seasonal produce, but it can sometimes be a challenge to find uses for everything without letting anything go to waste.

We’ve been getting pounds and pounds of white nectarines in the past few weeks, so I really wanted to do something special with them. What could be better than giving them the peaches and cream treatment with vanilla wafer cookies and mascarpone thickened whipped cream?

Nectarines and peaches are so similar in flavor and texture that you could substitute peaches without affecting the flavor of the recipe much at all. The white nectarines we had from our CSA though had a crisper, slightly more acidic zing to them than a standard peach, which I thought was a nice compliment to the richness of the cream. Honestly though, you could swap them out for strawberries or cherries and this cake would still be a little summery slice of heaven.

nectarines and cream icebox cake | Brooklyn Homemaker

Nectarines and Cream Icebox Cake

2 lbs nectarines (or peaches), peeled, pitted, and roughly chopped
3/4 cup sugar
pinch of salt
2 tablespoons orange liqueur, such as Cointreau (optional) *see note
2 1/2 cups cold heavy cream
8 oz mascarpone at room temperature
Two 11 oz packages of vanilla wafer cookies, such as Nilla Wafers

Combine roughly chopped nectarines with sugar, salt, and orange liqueur in a medium bowl. Stir to combine and macerate for at least 15 to 20 minutes.

Meanwhile, in the bowl of an electric mixer fitted with the whisk attachment, whip the heavy cream on high just until it begins to thicken and form soft peaks. Add the mascarpone and beat on low speed until almost smooth, about 30 seconds. Scrape down the sides and fold to incorporate. Add the macerated chopped nectarines and beat on low for 30 to 60 seconds and scrape down the sides and fold again. Increase the speed to medium high and beat until the mixture is thick and holds firm peaks, another 30 to 60 seconds. Do NOT over-beat or the cream can become waxy and the mascarpone can become grainy.

On an 8″ cake board, or a cake stand or serving plate, arrange a layer of vanilla wafer cookies into three tight circles. I used 19 cookies per layer, with 1 cookie in the center, then one circle of 6 cookies and another circle of 12, but that’ll depend on the size of the cookie you use. Once you’ve arranged your first layer of cookies, place about a cup of cream over them and smooth it out with an offset icing spatula. Spread the cream almost to the outer edge, leaving just a small edge of cookies showing. Arrange another layer of cookies, trying to alternate the layers so they appear staggered above one another. Repeat another layer of cream and then another layer of cookies, again and again until you have as many layers as you desire or until you run out of cookies or cream. Finish the top of the cake with a final layer of cream. My cake was 8 layers tall, but again, this may depend on the size of the cookies you use.

If you have a cookie or two left over, garnish the cake by crumbling them in the center of the top if desired.

Try to delicately tent the cake with plastic wrap or cover with a large inverted bowl or cake dome before transferring to the refrigerator to set up.
Place cake to refrigerator for an absolute minimum of 6 hours (but ideally 12 to 24 hours) before serving. This cake will continue to improve the longer you can wait. As it sets, the cream will get firmer as the cookies get softer, and the flavors will distribute more evenly. Patience is a virtue!

Once set, the cake can be sliced and served much like a regular cake. If possible, it’s best to use a sharp serrated knife with a gentle sawing motion to avoid smooshing the cake and to get the best looking slices possible. Really though, you could dish it into bowls with a spoon if you wanted, and everyone would love it just as much.
Cake can be stored in the fridge in an airtight container for 3 or 4 days.

*Note:
Peach schnapps would be great too if you have it, or you could also substitute rum or bourbon for a bit of extra warmth.
If you’d prefer to keep it completely non-alcoholic, a teaspoon or two of orange blossom water or rose water would be a lovely substitution. That stuff is potent though so start with just a little and taste to see if you’d like to add more.

chocolate tuxedo cake with strawberry mascarpone icing

Like sands through the hourglass, so are the days of our lives.

chocolate tuxedo cake with strawberry mascarpone icing | Brooklyn Homemaker

Forgive me.

My mother watched a lot of soaps when I was growing up.

chocolate tuxedo cake with strawberry mascarpone icing | Brooklyn Homemaker

What I’m trying to say is, time is marching on and I’m officially older now than I was when I wrote my last post.

About two weeks ago I celebrated my birthday.

chocolate tuxedo cake with strawberry mascarpone icing | Brooklyn Homemaker

Those of you who’ve been reading along with me for a bit probably know that I look at my birthday as an excuse to make a big ass fancy layer cake.
I’ve heard it all before about how I’m not “supposed to” bake my own birthday cake, but the fact of the matter is that I enjoy baking a good cake almost as much as I enjoy eating one. A grocery store birthday cake pales in comparison to what I can bake myself, and I’d rather bake my own cake than shell out good money for something I’m not going to love.

I bake so many bundt cakes around here that I also relish the opportunity to go all out with sky high layers of cake stacked up with fillings and icings and glazes and decorations and candles, so that kind of seals the deal for me. I bake my own birthday cake, and I like it. So there.

chocolate tuxedo cake with strawberry mascarpone icing | Brooklyn Homemaker

You’ll also know, if you’ve been reading along with me for a while, that I have a tendency to get inside my own head and overthink things. Like seriously overthink things.

To that end, I’ll be the first to confess that I’ve been planning this cake for at least 6 months. Initially I was thinking about posting this cake, or at least a version of it, around Christmas. When that didn’t work out I thought I’d make it for Russell’s birthday in January. That didn’t end up happening either, so I’ve been sitting on the idea ever since.

chocolate tuxedo cake with strawberry mascarpone icing | Brooklyn Homemaker

My initial thought was a high contrast black and white cake with layers of deep dark chocolate cake, bright white icing, and glossy dark chocolate ganache. In some circles on the internet this contrasting black on white on black cake is called a “Tuxedo Cake”. Considering my name is Tux, I was all over that business.

Thing is, something magical happened along the way that made me rethink the white in my “tuxedo”.

chocolate tuxedo cake with strawberry mascarpone icing | Brooklyn Homemaker

A few months ago some friends came to visit us, one of whom happens to be from England and also happened to be celebrating a birthday while he was here. Before his wife finished the sentence, “Tomorrow’s his birth…”, I was in the kitchen preheating the oven.

They were out of the house a lot while they were here, off doing the tourist circuit, and since I didn’t know exactly when they’d be around I opted for cupcakes rather than a big formal layer cake. Since I was baking cupcakes, and since our friend is British, I wanted to go for a kind of American kid’s birthday party theme.
I decided to reimagine my funfetti cake recipe as cupcakes, but wanted to skip the American buttercream frosting and go for something a bit more subtle and a bit less sugary. I thought I’d adapt the mascarpone icing from the gingersnap icebox cake I made last December, but add some strawberries to it to make it fit better with the funfetti cake.
(Have I mentioned that I have a tendency to overthink things sometimes?)

To concentrate the flavor of the strawberries and make them less watery I decided to cook them down a bit with some sugar before mixing them into the icing.
At first I worried that I’d cooked the strawberries too long and was disappointed that they ended up tasting kind of jammy rather than super fresh like I’d hoped, but I forged ahead anyway and once I’d mixed them into the mascarpone and whipped cream…
HOLY SHIT.

chocolate tuxedo cake with strawberry mascarpone icing | Brooklyn Homemaker

Where do I begin?

This icing basically tastes like the freshest, creamiest strawberry ice cream you’ve ever had, but with the texture of fluffy whipped cream. It’s stable enough to be used as a cake icing as well, and just sweet enough to bring out the sweetness of the strawberries without being overly sugary or cloying.

After one bite, all of my big birthday cake plans changed.

My black and white tuxedo cake would be getting a chichi pink makeover.

chocolate tuxedo cake with strawberry mascarpone icing | Brooklyn Homemaker

As much as I’d like to, you can’t have an entire birthday party and serve nothing but cake, so with the cake as the pièce de résistance we decided to have a barbecue. An amazing sustainably sourced organic butcher recently opened near us, so we got a bunch of homemade bratwurst for the grill and called the whole shindig a “sausage party”.

Still on our German kick after our recent trip to Berlin, we went all out with German potato salad, and gurkensalit (cucumber salad), sauerkraut, and whole grain german mustard. I even drank beer for the night! (I usually stick to wine or whiskey).

The food was a huge hit, and while the bratwurst put up a good fight trying to be the star of the (sausage) party, my foppish pink tuxedo cake definitely stole the show!

chocolate tuxedo cake with strawberry mascarpone icing | Brooklyn Homemaker

The tender layers of devil’s food cake are nothing less than super rich and incredibly moist slices of dark chocolate heaven. The strawberry mascarpone icing is ethereally fluffy and impossibly creamy, and even though the strawberries are cooked down, the icing tastes bright and fresh and summery. The dark chocolate ganache is velvety and perfectly rich and bittersweet, with a lovely glossy finish thanks to a touch of honey.

To top it all off and make it feel even fancier and ever-so-slightly gaudy, I added some white candy beads in varying sizes to the top of the shiny dark ganache. You don’t have to if you don’t want to, but why on earth wouldn’t you want to?

chocolate tuxedo cake with strawberry mascarpone icing | Brooklyn Homemaker

Chocolate Tuxedo Cake with Strawberry Mascarpone Icing and Glossy Ganache

  • Servings: 16 to 24-ish
  • Print
Devil’s Food Cake
adapted from Brooklyn Homemaker
makes three 8-inch layers

butter and flour for pans
1 1/2 cups unsweetened natural cocoa powder (I used Double Dutch Process)
1 1/2 cups hot water (or hot brewed coffee for a richer flavor)
3 1/4 cups cake flour
1 1/4 teaspoons coarse salt
1 teaspoon baking powder
1 teaspoon baking soda
1 cup (2 sticks) unsalted butter, melted and slightly cooled
1 cups peanut oil or vegetable oil
1 cup granulated sugar
1 1/4 cup packed brown sugar
4 large eggs
4 teaspoons vanilla extract
1 cup buttermilk

Preheat oven to 350 degrees.

Butter three 8 inch round cake pans, line bottoms with parchment paper, butter paper, and dust pans with flour.
Whisk together cocoa powder and hot water (or coffee) until smooth and set aside.
Sift together flour, salt, baking powder, and baking soda; set aside.
Beat melted butter, oil, and sugars together on medium-low speed until combined.
Add eggs, one at a time, beating after each addition.
Beat in vanilla and cocoa mixture. Reduce speed to low.
Add flour mixture in three batches, alternating with buttermilk and beginning and ending with flour. Beat until just combined.
Divide batter between pans, and bake until a cake tester inserted into centers comes out clean, 40 to 45 minutes.

Transfer pans to a wire rack to cool for 30 minutes. Invert cakes onto rack, peel off parchment, and let cool completely.
To achieve a perfectly flat, professional looking cake, you’ll want to slice the very tops of the cakes off to make each layer completely flat and level. You can do this using a very sharp bread knife, or a cake leveler.

If you’re not assembling cakes right away, individually wrap each layer tightly in plastic wrap to prevent drying. Layers can be stored in the refrigerator for a day or two, or frozen (wrapped in plastic wrap first, then aluminum foil) for up to two weeks.

Simple Syrup: (optional)
1/2 cup water
1/2 cup sugar

Combine both ingredients in a small saucepan and heat over high heat, stirring until sugar dissolves completely. Remove from heat and cool completely.

Strawberry Mascarpone Icing:
1 lb ripe strawberries
3/4 cup sugar
3 cups cold heavy cream
1 tablespoon vanilla extract
8 oz mascarpone cheese
pinch of salt

Hull and finely chop strawberries and place in a medium saucepan with sugar. Stir to combine and once the strawberries begin to give off liquid, transfer pan to the stovetop over medium high heat. Bring to a rolling boil and reduce to a low boil. Cook for about 30 minutes, stirring occasionally, until thick and syrupy and reduced by about half.
Transfer to a heatproof bowl, cover and refrigerate until completely cool. You can place it in the freezer if you’re in a hurry, but stir often and don’t let it actually freeze.
If preferred, you can substitute 1 1/2 cups good quality store bought strawberry jam to save yourself some time.

Whip cream with a mixer on high just until stiff peaks form. Add vanilla, salt, mascarpone, and strawberry mixture and beat until well combined and mixture stiffens back up. This should only take about 30 to 60 seconds. Don’t over mix or the mascarpone can become grainy. If you’re not using your icing right away you can store it in the refrigerator, but you may want to whip it for another 30 seconds just before icing the cake.

Glossy Ganache Drizzle:
4 oz good quality dark chocolate (60% works well)
1/2 cup + 2 tablespoons heavy cream
1 tablespoon honey
pinch salt

Chop chocolate into small, easily melted pieces and place in a heat proof bowl.
Heat heavy cream, honey, & salt in a small saucepan just until it comes to a light boil, and immediately pour directly over chocolate. Wait 2 to 3 minutes before stirring until completely smooth and melted and free of lumps. If the mixture seems very hot still it may melt the icing as you pour it so wait a few minutes for it to cool slightly. Do not let it get too cool or it will not drizzle nicely and may look messy.

*Do not make the ganache until the cake is completely iced and ready to decorate.

Decorations: (optional)
Various sizes of white candy beads, including:
white sixlets
white candy pearls (sometimes called dragees)
white nonpareils

Assemble cake: 
Place the first cake layer on an 8″ cardboard cake round, serving plate, or cake stand. Using a cake round will make it easier to ice and decorate, especially if you have a revolving turntable for decorating (I use a lazy suzan, but you can also just spin your plate or cake stand while you work).

Using a squeeze bottle or pastry brush, evenly distribute 2 or 3 tablespoons of simple syrup over the top of the cake layer. This step isn’t completely necessary but helps ensure the cake stays incredibly moist. It’s especially helpful if you’re using cake you stored in the fridge or freezer for a few days, or if you plan to wait a day or two before serving the cake.

Once the syrup has absorbed into the cake, place about 2 cups or so of icing on the first layer and spread it smooth and even using an icing spatula. It’s okay if it spreads out past the edge of the cake layer a bit. Add the next layer of cake, looking from directly over the top and from eye level at the cake to make sure each layer is directly one above the other, rotating the cake to be certain. Repeat with the simple syrup and icing again, then add the third and final layer and repeat again. Using the same amount of icing as before, start with the top of the cake but spread the icing thinner and work some of it down the sides of the cake to completely cover the whole cake in a thin, smooth, even coat of icing. This first layer of icing is called the crumb coat, and it seals the cake and keeps crumbs from being visible in the outer layer of icing.

Place the cake in the refrigerator for about 30 minutes to help set the icing and firm up the cake.
After 30 minutes top the cake with about 3 to 4 cups more icing and spread it over the whole cake the same way you did the crumb coat. Start by smoothing the top and slowly work the icing down the sides to cover the cake completely. Try to get the icing as completely smooth as possible with straight sides and a flat, level top. You may have some icing left over, and I couldn’t blame you if you ate some of it with a spoon. Refrigerate the cake again for another 30 minutes (or up to a day).

Make your ganache just before you’re ready to remove the cake from the fridge.

I find it easier to get an even, professional looking drizzle by slowly pouring the ganache just around the outer edge of the top of the cake, while slowing rotating the cake. Once you’re happy with the amount of drizzle coming down the sides, use the remaining ganache to fill in the center of the top of the cake, smoothing it flat with a clean icing spatula before the ganache sets.

If you’d like to add decorations to the top of the cake, be sure to add them before the ganache sets. I used a mix a mix of multiple sizes of white candy beads, about 2 to 3 tablespoons of each, starting with the largest size and finishing with the smallest.

This cake will keep well in a cake saver at room temperature for a day or two if the weather is not too hot or humid. Otherwise, cover tightly and store in the refrigerator for up to 3 days.

If refrigerating, bring cake to room temperature at least an hour before serving.

Pork & apple stew

The internet is a seriously amazing place when you stop and think about it.

pork and apple stew | Brooklyn Homemaker

It’s hard to even remember what life was like before we had the world wide web, before smart phones, and before free public wifi. Back when you’d have to wait until you got home to look up the useless bar trivia we now have answers to at the click of a button. Way back when you had to consult actual cook books to find recipes, rather than finding pages and pages of search results for even the most obscure cuisines.

pork and apple stew | Brooklyn Homemaker

I have shelves sagging with cookbooks, but most of them spend more time collecting dust than helping me cook. These days I rely on the internet to provide me with drool-worthy recipes and endless culinary inspiration. Most of the time, even when a recipe sounds mind-blowingly delicious, I like to make a few changes here and there to suit my taste. Increase this, substitute that, omit the other. You know. I’m sure you do the same, at least some of the time.

pork and apple stew | Brooklyn Homemaker

In my ceaseless internet exploration I recently stumbled across a recipe for pork and apple stew from Better Homes and Gardens that I just HAD to try.
To that end, I thought I’d do something a little different today.

Please head over to Better Homes and Garden’s blog, Delish Dish for the rest of this post and to find the original recipe and see the changes I made to it.

pork and apple stew | Brooklyn Homemaker

This post was written in partnership with Better Homes & Gardens.
Tux Loerzel and Brooklyn Homemaker were not compensated for this post.