holidays

roasted pear and walnut spice cake bundt #bundtbakers

Whoa. I just realized that I haven’t baked a bundt cake since April.

roasted pear and walnut spice cake bundt | Brooklyn Homemaker

This has been one hell of a year, both personally with the Maxwell’s build out and opening, and for the country as a whole. This election cycle really has consumed me, chewed me up and spit me out, and just when I thought it would all finally be over, it seems like we’re in for even more struggle and strife.

While things may feel a little disheartening right now, life must go on, and getting back into the kitchen and revving up the ol’ stand mixer certainly helps me feel centered and whole again.

roasted pear and walnut spice cake bundt | Brooklyn Homemaker

I’m so so thrilled that Lauren from Sew You Think You Can Cook chose pears as our inspiration for the #bundtbakers this month. Thank you so much Lauren! Not only do I absolutely love pears on their own, there’s also something especially cozy and satisfying about baking with fall fruit pear-ed (har har) with warm homey spices.

With Thanksgiving only a week away, a pear bundt cake is just what the doctor ordered.

roasted pear and walnut spice cake bundt | Brooklyn Homemaker

I have a confession to make though.
I haven’t always liked pears.

My grandfather has always had several fruit and nut trees on his property, and when I was little I thought pears were absolutely disgusting. I don’t know if it was the grainy texture, or the thick sandy skin, or what, but to be perfectly honest I didn’t care for a lot of the bounty of grandpa’s garden.

I was truly a child of the 80’s, and a lot of my culinary influence during my formative years came from spending time in my grandmother’s kitchen. She is a product of her generation, and Grandma’s food philosophy came from the atomic-age desire for shiny, new, packaged convenience foods rather than the back-to-earth approach many of us prefer today. As a kid in Grandma’s kitchen, packaged food was celophane-wrapped, sterilized heaven to me, and I couldn’t get enough of it. Give me a box of doughnuts, a bag of chips, a can of soup, a bottle of soda, and a grilled cheese sandwich made with plastic-wrapped processed “cheese food”, bagged sliced white bread, and margarine from a tub.
Who wants to have to pick and wash fresh fruits and vegetables from outside with all the dirt and bees and bugs, when the fridge is stocked with Cool Whip and Velveeta that’s clean and delicious and ready to eat?

roasted pear and walnut spice cake bundt | Brooklyn Homemaker

Not me.
That’s who.

I did like Grandpa’s strawberries and plums, but even the strawberries had to be scrubbed and sliced and covered in sugar before I deemed them edible.

roasted pear and walnut spice cake bundt | Brooklyn Homemaker

Obviously my tastes have changed over the years, and as an adult I’ll take a ripe juicy pear, still warm from the sun, over a tub of chemically Cool Whip any day of the week.

As a kid, trips to my grandparents house filled me with excitement because I knew the cupboards were bursting with store-bought chips and cookies and doughnuts. These days I still get excited when I get to visit my grandparents, but now it’s because I know grandpa will load me up with sagging grocery bags filled with dirty bell peppers, lopsided butternut squash, fuzzy warm peaches, or sun-ripened tomatoes when I get ready to leave.

roasted pear and walnut spice cake bundt | Brooklyn Homemaker

When I was planning my bundt for this month, I knew that I really wanted the pears to be the stars of the show. My first instinct was to chop or cube or grate them just like apples into a traditional spice cake for flavor and added moisture, but somehow that didn’t seem like it was “enough”. My pears deserved better than playing second fiddle to cinnamon.

Determined to leave the pears whole (or at least halved) inside the cake, I decided to poach them in a bourbon ginger syrup. They smelled like heaven in the poaching liquid and I couldn’t help myself from sneaking spoonfuls of batter from the pan before it went into the oven. I was congratulating myself on a job well done before the cake even started to rise, and I couldn’t wait to get it out of the oven and see the autumnal perfection I’d come up with.

Aaaaaaand…

It was an absolute disaster.

The pears soaked up too much moisture in the poaching liquid, releasing it back into the cake to create a jiggly bundt with the weirdest almost blubbery texture I’ve ever had the misfortune to put in my mouth. As the cake cooled it sagged and the cake separated from the pears and slumped into a wobbly mess on the plate.

So, back to the drawing board. I knew I’d need a thicker, denser batter, and I obviously needed to find a way to pull moisture out of the pears before baking them into the cake. With poaching out of the question, I decided to try dry roasting the pears so they’d be tender but slightly dried out before going into the batter. Thankfully, it worked out beautifully and I think the pears are almost as happy about it as I am.

roasted pear and walnut spice cake bundt | Brooklyn Homemaker

You’ll want to use the smallest pears you can find for this recipe, because if they’re too big or tall they’ll take up too much room in the pan. They might cause the batter to run over in the oven, or could stick out the top of the cake and cause it to sit unevenly when plated. I also think that Bosc pears are the only variety firm and sturdy enough to stand up to being roasted, handled, and baked in this way without turning to mush or falling apart.

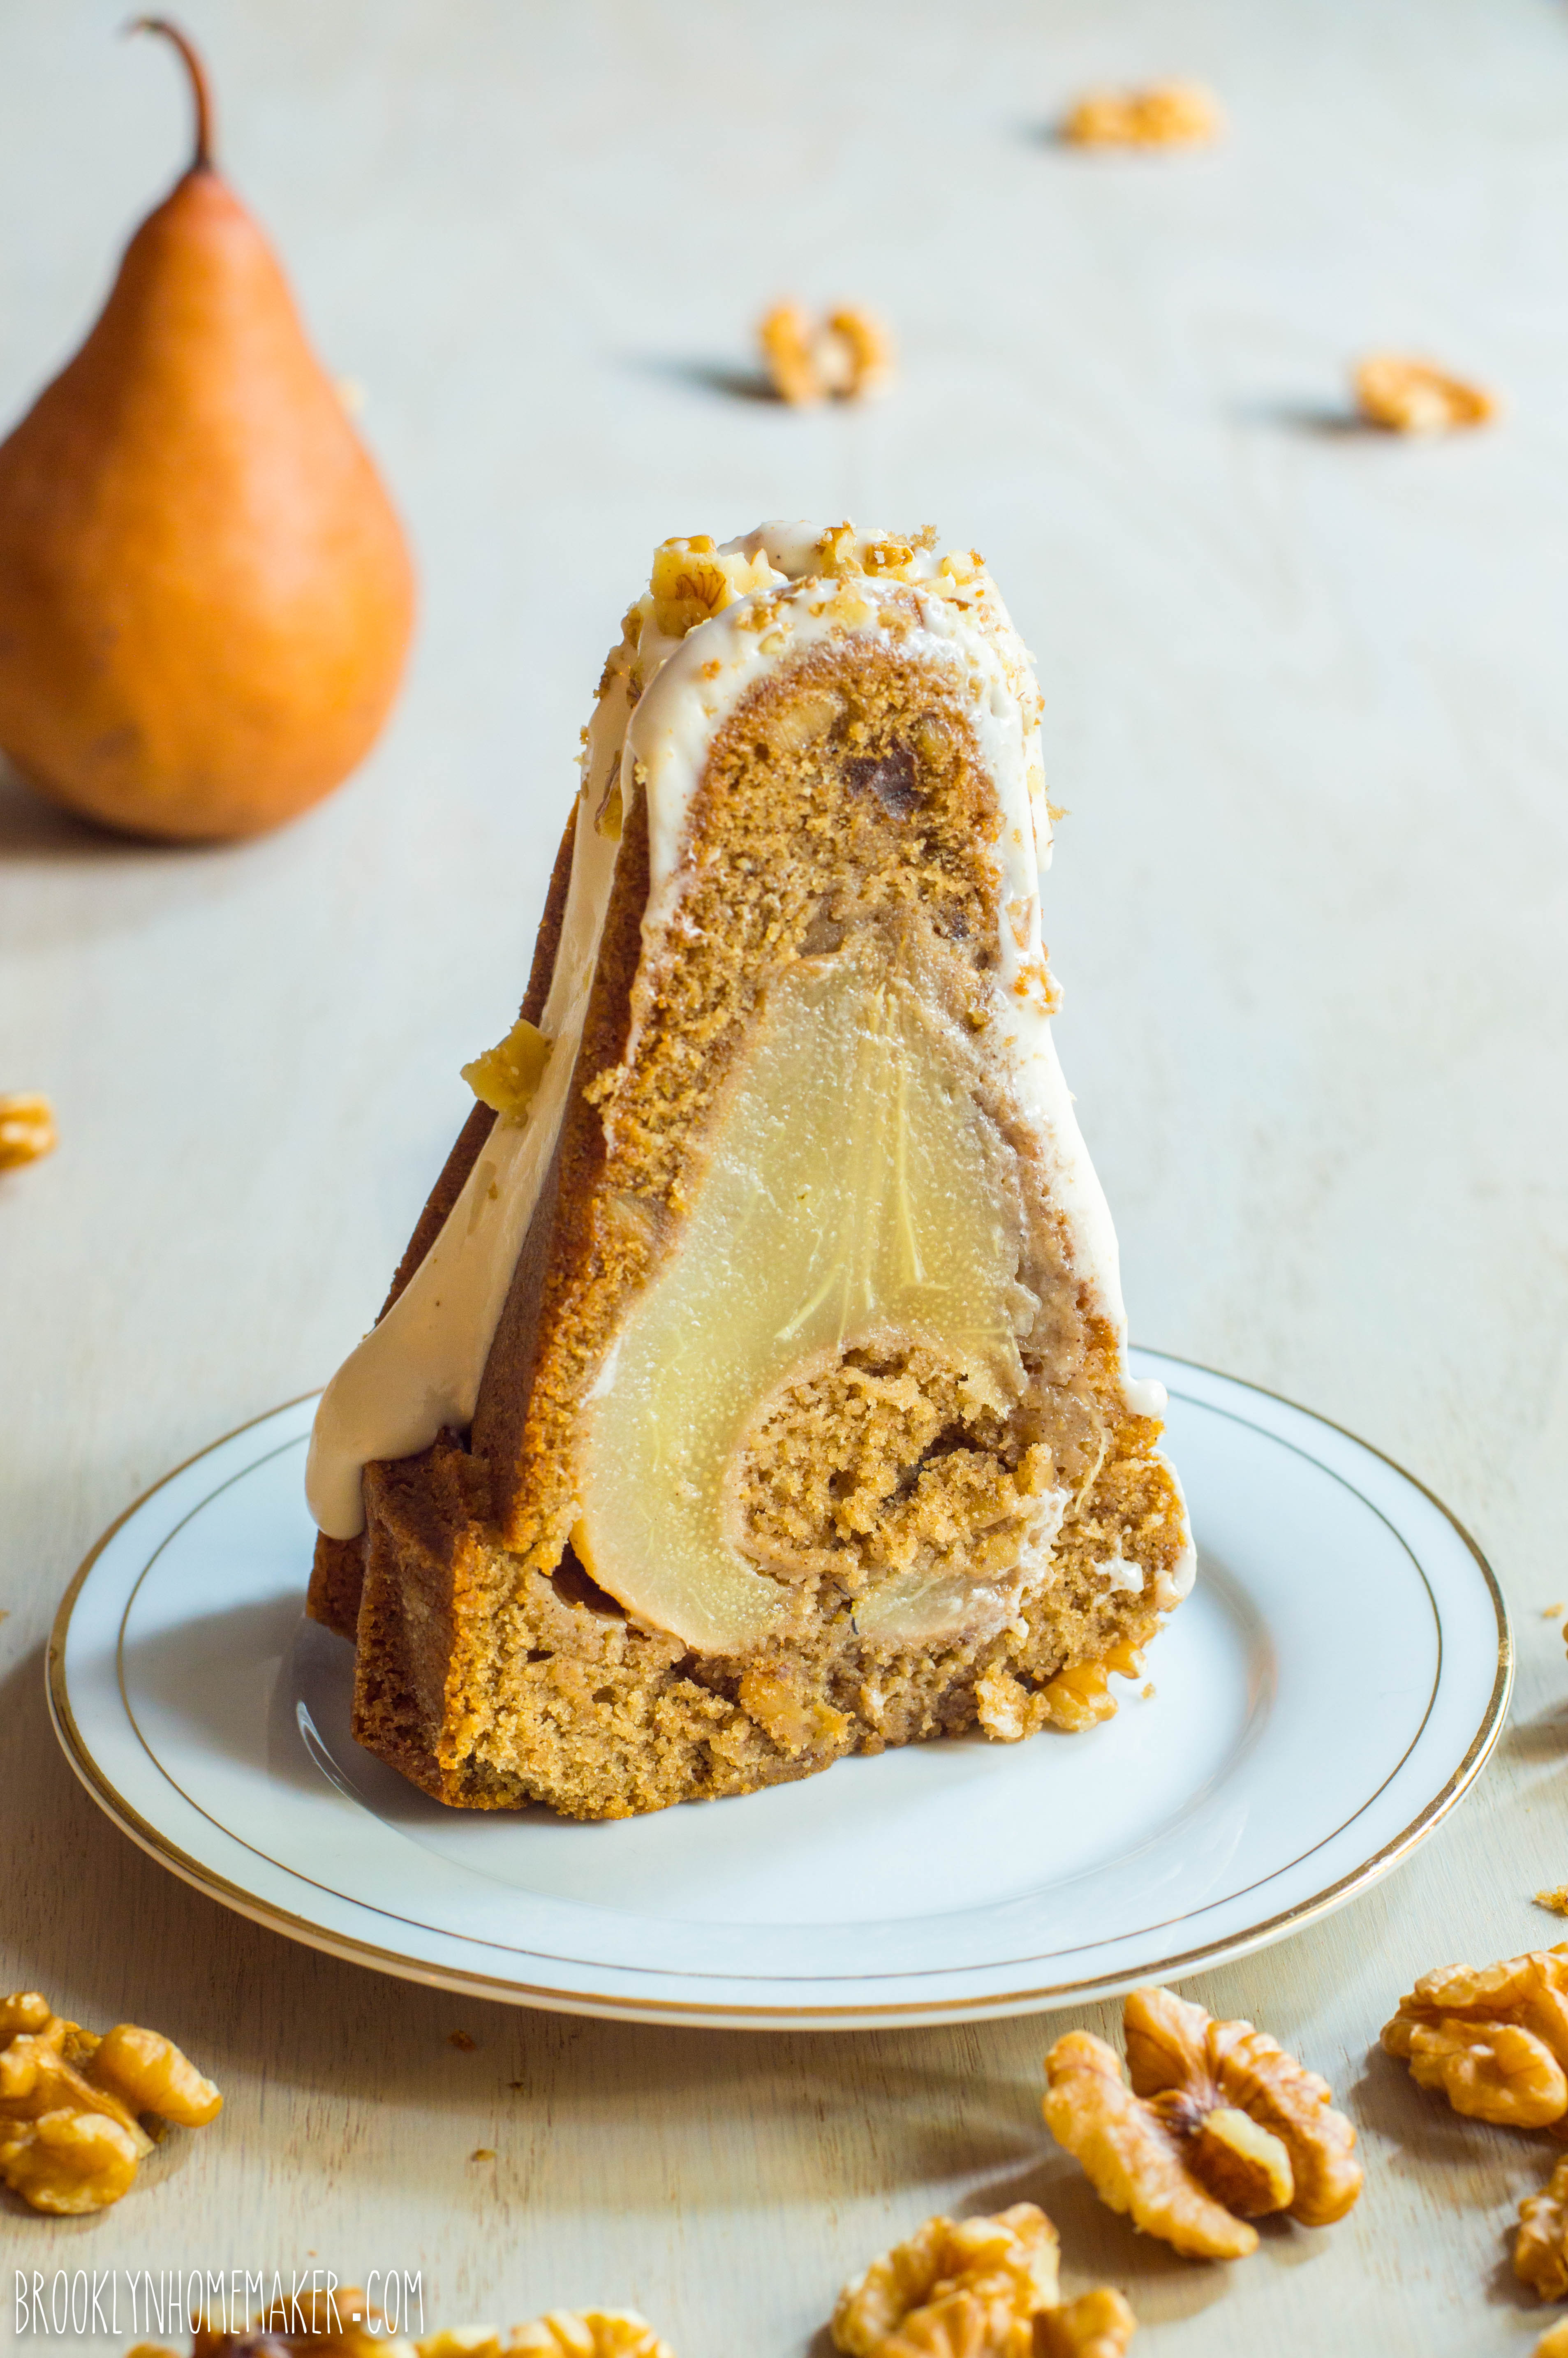
The bit of extra effort in roasting the pears and toasting the walnuts really pays off when you slice down into the cake to reveal a perfect cross-section of a whole pear (depending on where you slice).
And the flavor? Fuggitaboudit. Warm spices, tender roasted pears, crunchy toasted walnuts, buttery tender brown sugar spice cake, and a thick and tangy cream cheese glaze.
I mean. Come on.

This is basically THE perfect fall cake, and it would make an excellent addition to your Thanksgiving spread to boot. If you’re looking for even more fall inspiration and pear-y wonderfulness, make sure you scroll down past the recipe to see what the other #bundtbakers came up with this month!

roasted pear and walnut spice cake bundt | Brooklyn Homemaker

Roasted Pear and Walnut Spice Cake

  • Servings: 8 to 12-ish
  • Print
4 to 5 small firm Bosc pears, depending on the size of your pan
1 1/4 cups chopped walnuts
2 1/4 cups all-purpose Flour
1 teaspoon baking powder
1/4 teaspoon baking soda
1 teaspoon salt
1 tablespoon cinnamon
2 teaspoons ginger
1 teaspoons cardamom (optional)
1/2 teaspoon nutmeg
1/2 teaspoon cloves
1 cup buttermilk
2 teaspoons vanilla extract
1 cup (16 tablespoons) unsalted butter, softened
1 1/2 cups dark brown sugar, packed
3 large eggs

Cream Cheese Glaze:
4 ounces (1/2 package) cream cheese, softened
1 cup powdered sugar
1 teaspoon vanilla extract
2 to 4 tablespoons milk

Preheat the oven to 350°F. Lightly butter and flour a 10 to 12 cup bundt pan, refrigerate.

Peel pears, slice in half, and scoop out seeds with a melon baller or spoon. Place cut side up on a parchment lined baking sheet and bake for 20 minutes. Flip and bake 15 minutes more. Remove from oven and set aside to cool.

Spread walnuts in an even layer on a small baking sheet and toast for 5 to 8 minutes, or until they smell toasty. Do not let them burn. Set aside to cool. Reserve 1/4 cup for topping the cake.

Whisk flour, baking powder, baking soda, salt, & spices together in a bowl. Set aside. Mix vanilla into buttermilk and set aside.
In a the bowl of and electric mixer, beat together the butter and brown sugar until light and fluffy, about 3 to 5 minutes. Add the eggs one at a time, beating for a minute or two and scraping the sides and bottom of the bowl between additions.
Alternate additions of flour and buttermilk, mixing on low just until combined, and scraping the bowl between each addition. Start and end with flour so there are 3 additions of flour and 2 of buttermilk. Stir in 1 cup walnuts until evenly distributed.

Pour about 3/4 of the batter into the prepared pan, and tap the pan on the counter to remove air bubbles. Push pear halves into the batter, top side facing down into the bottom of the pan, arranging them so the cut halves face each other as a whole pear. Arrange pears so they’re evenly spaced around the pan. Spread remaining batter over the top, leaving at least half an inch of room for the cake to rise so it doesn’t overflow in the oven. It’s okay if the pears stick out of the batter a bit, as the cake should rise around them. Bake for 50 to 55 minutes, until a cake tester or toothpick inserted in the center comes out clean.
Remove the cake from the oven, and cool in the pan for 30 minutes before turning it out onto a rack to cool completely.

While the cake cools, make the glaze.
In the bowl of a stand mixer, beat the cream cheese until it’s fluffy and smooth. Add the powdered sugar, vanilla, and 4 tablespoons of milk and blend until there are no lumps. If necessary, add more milk, a tablespoon at a time, beating after each addition until the glaze reaches the desired drizzle-able consistency. It should be about the consistency of thick melted ice cream to drizzle correctly.

Place a tray under cake and cooling rack to catch any drips. Pour glaze over cake and let the glaze work its way down the side, tapping the tray on the counter if necessary. Top with toasted walnuts.

Well covered in an airtight container, this cake should keep at room temperature about 2 days, or longer in the fridge. Just make sure to serve it at room temperature if you refrigerate it.

roasted pear and walnut spice cake bundt | Brooklyn Homemaker

The bundt bakers really outdid themselves this month, and all these perfect pear cakes have my mouth watering like crazy!

BundtBakers
 .
You can see all our of lovely Bundts by following our Pinterest board. Updated links for all of our past events and more information about #BundtBakers, can be found on our home page.
Advertisement

apple cider boulevardier

Do you guys need a drink?

Cuz I need a drink.

apple cider boulevardier | Brooklyn Homemaker

This week, and really this entire election cycle, has been a complete emotional whirlwind and I think we’re probably all ready for a nice stiff cocktail right about now.

And boy oh boy have I got a cocktail for you today.

apple cider boulevardier | Brooklyn Homemaker

A few months ago I discovered the “Boulevardier”, and I fell head over heels in love. (Don’t tell Russell).
If you’ve not heard of a Boulevardier, it’s basically just like a Negroni, but with whiskey instead of gin.

If it sounds like I’m speaking a foreign tongue and you have no idea what I’m saying, a Negroni is a classic cocktail, which first appeared in print in 1919, consisting of gin, campari, and sweet vermouth. They’re strong, herbaceous, floral, and rather bitter in a really refreshing way. The bitterness of Campari can be a bit of an acquired taste, but if you are a fan of apéritifs or digestifs you’d probably really enjoy it. Orson Welles said of the Negroni, “The bitters are excellent for your liver, the gin is bad for you. They balance each other.”
Smart man. It’s all about balance.

The thing is, I personally find the combination of gin and Campari a bit overpowering, so when I first tasted a Boulevardier, which substitutes bourbon for the gin, I was ecstatic and have been a huge fan ever since. It’s a strong cocktail, but the bitterness encourages sipping rather than chugging, which is never a bad thing!

apple cider boulevardier | Brooklyn Homemaker

We recently hosted the official opening part for Maxwell’s, and when I was planning the cocktail menu I decided to share my new love for the Boulevardier with all of our friends and neighbors. Like I said though, this is a pretty strong cocktail, and while we wanted everyone to have a nice time, we weren’t really trying to get all our friends wasted in the shop! Also, knowing that Campari can sometimes be an acquired taste, I was looking for a way to sweeten it up a little and mellow out the bitterness to make the cocktail appeal to a larger audience.

Since I was also making one of my favorite cakes for the party, and I was already buying fresh apple cider anyway, I thought I’d see if a splash of cider would help cut the bitterness, sweeten things up, and water things down.
Worked like a charm!
The cider mellows out the intensity of the Campari and makes this a delicious, autumnal, beautiful cocktail that everyone absolutely loved! I also decided to garnish the drink with some very thinly sliced apple rather than the traditional orange peel. So good!

apple cider boulevardier | Brooklyn Homemaker

I know that many people outside of the US are not very familiar with apple cider as we know it here in the northeast, so to explain, it’s basically nothing more than freshly pressed, unfiltered apple juice. If you can’t find fresh apple cider where you live, you could definitely substitute apple juice in a pinch. If you can get fresh cider though, I really think it has a superior flavor that’s a bit less cloying with a more intense apple-y richness.

apple cider boulevardier | Brooklyn Homemaker

Now, if this cocktail sounds good to you, but the idea of peeling yourself off the couch and putting pants on doesn’t, I’d like to offer you another way to put the ingredients for this drink into your hands.
Enter Drizly.com.
Drizly is similar to the food delivery websites that are so popular in larger cities right now, (Russell and I would probably starve to death without Seamless) but instead of food, Drizly delivers alcohol!

You have to be 21 (obvi), and you have to live within one of their delivery windows, but if both those things are true for you, the sky’s the limit! You can have any and all of your favorite hooch delivered right to your front door with the click of a button!
I mean, talk about a dream come true!

You can get the bourbon, Campari, and sweet vermouth you’ll need to make your very own boulevardier, and in some areas, you can even have the cider delivered! (I had to go to the store for that though, what a buzz kill!)

apple cider boulevardier | Brooklyn Homemaker

So, what are you waiting for?
You really have no excuse not to make yourself a fancy ass apple cider Boulevardier. It’s the perfect grown up cocktail for fall, and did I mention that Thanksgiving is only a few weeks away?

This drink is strong but not too strong, sweet but not too sweet, bitter but not too bitter, with a wonderfully warm, herbaceous, bright, and fruity flavor.

It doesn’t get much better than that, unless of course you have all the booze delivered to your front door without changing out of your PJs. Which you can.

apple cider boulevardier | Brooklyn Homemaker

Apple Cider Boulevardier

  • Servings: 1 cocktail
  • Print
1 1/2 oz. bourbon
3/4 oz. Campari
3/4 oz. Sweet Vermouth
1 1/2 oz. fresh apple cider
Ice
Thin apple slices for garnish

Place bourbon, campari, sweet vermouth, and apple cider into a cocktail shaker with plenty of ice. Shake just until well mixed and cold. Strain into a rocks glass, and serve with more ice.

Garnish with a slice or two of fresh, thinly sliced apple.


dark chocolate & oreo mini skull cakes

When I was a kid, Halloween was my absolute favorite holiday.

dark chocolate & oreo mini skull cakes | Brooklyn Homemaker

I mean, I’ve always loved Thanksgiving too, for the food of course, but as a young kid Halloween was the freakin’ best. Turkey and pumpkin pie are great and all but costumes and candy, and running around at night like a little lunatic with fake vampire teeth? Grandma’s cornbread dressing couldn’t hold a candle…

I’ve had countless costumes over the years, but I’ll never forget an especially uncomfortable year dressed as Frankenstein with tons of sticky green makeup and itchy stick-on eyebrows and neck bolts. After that, the simpler and more elegant Dracula was definitely my go to.
Each year I’d get a new costume complete with fangs, cape, and gold medallion, and as a young gay boy I already had all the crisp white button downs and black dress pants that were required but not included with the costume.  (No jeans and T-shirt for this little sissy boy!)
I think it really was the dressed up, fancy man aspect of Dracula that appealed to me most year after year, and it wasn’t until I found my grandma’s old wig in her bathroom closet that the appeal started to wear off…

dark chocolate & oreo mini skull cakes | Brooklyn Homemaker

These days I usually spend most of the month of October thinking up all sorts of witty, hysterical costumes that I could wear, but never do. The last time I dressed up was for work, about 4 years ago. I’d just started working at Whisk slinging fancy kitchen gear, and we all came up with this hilarious plan to come to work dressed as a Food Network star.
Group costumes are the best! What could go wrong?!?!

A few days later I show up to work in full Ina Garten regalia, and oops! Everyone either forgot or didn’t have time to get their costumes together.  One person, who usually works from home, loved the idea and actually did come in for an hour or two dressed as Alton Brown (essentially dressed as an older, nerdier version of himself) to take pictures, but everyone else either didn’t dress up or threw something else together at the last minute.
As I stood there working my full shift in an oversized navy blouse, huge clip on pearl earrings, lipstick, and an itchy bob wig; I vowed never again to be duped by allure of an amazing group costume idea.

I haven’t dressed up since.
Womp Womp.

dark chocolate & oreo mini skull cakes | Brooklyn Homemaker

Even though I’m too old for trick-or-treating and haven’t put on a costume in years, I really do still have a special place in my heart for Halloween.

I like to imagine that some day in the future I’ll be the type of adult who’s famous among his circle of friends for hosting amazing costume parties that are talked about for years to come. Basically I dream of one day throwing Halloween parties just like the ones on Roseanne, complete with decorations so elaborate and costumes so perfectly spot-on that everyone I know will try, and fail, to one-up me year after year.
By the way, am I the only one who’s ever wondered how the lower middle class Connor family, who always seemed to have trouble paying their bills on time, came up with all the money for their costumes and decorations?
I guess it doesn’t matter, but, like, that stuff ain’t cheap!

dark chocolate & oreo mini skull cakes | Brooklyn Homemaker

With all my dreams of Halloween entertaining one-upmanship, the minute I saw this adorable haunted skull cakelet pan, I knew that I HAD to have it.

You all know I love Nordic Ware. I’ve told you more than once twice three times (a lady), but after finally having a chance to use this pan you’ll have to excuse me as I wax poetic once again.

Nordic Ware has been making exceptional cookware and bakeware right here in the US for 70 years now, and even after all this time they’re still a family owned company. The bundt pan is by far their most famous and most popular product, but they also specialize in all sorts of elaborate and festively shaped baking pans. No one can compare to their quality and selection, and ALL of their pans are sturdy, heavy duty, ultra-non-stick, and unbelievably durable.
I should know! I put their pans through the ringer!

dark chocolate & oreo mini skull cakes | Brooklyn Homemaker

There is so much detail in these little skulls that I was worried it wouldn’t read once the cakes were baked, or that I’d have problems getting the cakes out cleanly from all the intricate details face and teeth. At this point I should have known that I had no need to worry. These little cakes released like a dream and all that detail came across with amazing definition in the finished cakes.

There’s actually so much detail in these little cakes, that even though I tried decorating them in several ways, I found that my favorite cakes were the simplest, with just a double coat of thin sugary glaze. Of course you can decorate them however you choose, but I really think the simpler, the better. In fact, as much as I love the creepy look of the bright red chocolate candy eyes, I worry that even they take away from the scary perfection of the little cakes as they were straight out of the pan.

dark chocolate & oreo mini skull cakes | Brooklyn Homemaker

The recipe below, simply adapted from my favorite chocolate bundt cake recipe, makes 12 mini skulls, or 2 pans worth. If you only have 1 pan, make sure you wash the pan really well between batches. I also recommend that you dry it well and throw it in the fridge or freezer for a few minutes before reapplying the butter and cocoa. Otherwise the pan will be warm from being washed and the butter will melt and make a mess when you try to dust it with cocoa.
If you don’t have this pan at all, you can get it here, or you can just make this recipe in one 10 cup bundt pan. It won’t be as scary to look at, but it’ll certainly taste just as chocolatey and delicious!

By the way, if you’ve never tried this trick before, using cocoa powder works just as well as flour to prevent the cakes from sticking to the pan, but helps the cakes look extra dark and chocolatey, rather than the dusty uneven look flour sometimes gives to the outside of chocolate cakes.

dark chocolate & oreo mini skull cakes | Brooklyn Homemaker

The flavor of these little cakes is deep dark chocolate perfect with a super tender and moist crumb. Thanks to that simple powdered sugar glaze, these little cakes almost taste like a reeeeeally good moist chocolate doughnut.

The Oreos, complete with cream (don’t use boxed crumbs!), add a really nice touch, especially if you leave some in nice big chunks so they don’t melt and disappear into the batter. Essentially you just want to put them in a plastic bag and crush ’em up with your hands or whack at them with a rolling-pin until there are no whole cookies left, but you still have lots of bigger pieces.

Now tell me, what kid (or adult) could resist a super moist chocolate cake filled with oreo cookie crumbs? Especially one in the shape of a cute-yet-terrifying little skull???

dark chocolate & oreo mini skull cakes | Brooklyn Homemaker

Dark Chocolate & Oreo Mini Skull Cakes

adapted from Joy the Baker

For the Cake:
1 1/4 cups strong hot coffee
3/4 cup Dutch process cocoa powder (I used “Double Dutch Cocoa“) plus extra for pan
2 1/2 cups sugar
1 1/4 teaspoons kosher salt
2 teaspoons baking soda
2 whole eggs
1 egg yolk
1 1/4 cups buttermilk
1 cup peanut oil or any neutral vegetable oil
2 teaspoons vanilla extract
3 cups all-purpose flour
2 cups (about 1 package) roughly crushed oreos (NOT oreo cookie crumbs, you want the cream too)

For the Glaze:
2 cups powdered sugar
1/4 cup milk
1 teaspoon vanilla extract

For decorating (all optional):
Red M&Ms
Sanding or decorating sugar (black, red, or silver)
white mini nonpareils
More crushed Oreos

Place an oven rack in the center of the oven and preheat to 350 degrees F.
Brush a skull cakelet pan (* see note) with softened butter, and dust with cocoa powder, tapping out any excess.

Whisk coffee and cocoa together in a bowl together until free of lumps and set aside.
In the bowl of a stand mixer with a whisk attachment, mix together sugar, salt, baking soda, eggs and egg yolk on low for just one minute. Add the buttermilk, oil and vanilla extract and mix on low again for another minute.
Add the flour and mix on medium speed for 2 minutes more. Add the cocoa mixture and mix on medium speed for 3 minutes. Finally, stir in the roughly crushed Oreos just until evenly distributed throughout. The batter will seem quite loose and liquid, it’s supposed to, don’t worry.
Pour half of the batter into the prepared cake pan, filling each cavity about 3/4 of the way up. This recipe makes two pans worth of batter. If you have two pans, you can bake them both at once, or once the first batch is out of the pan you can wash, dry, and cool the pan in the fridge before reapplying butter and cocoa and baking the remaining batter.
Bake for 20-30, or until a cake tester or toothpick inserted in the cake comes out clean.

Let the cake cool for at least 15 minutes before inverting onto a cooling rack.

To make the glaze:
Whisk the powdered sugar, milk, and vanilla together in a medium bowl until smooth and free of lumps.

To glaze and decorate:
After some trial and error I found that the easiest way to glaze the cakelets was to pick up them up by the base and dip them into the glaze like a doughnut. Remove from the glaze, let drip dry, and turn over to dry on a cooling rack. I actually liked the look of the glaze best when the cakes were glazed twice. If you want to double glaze, wait for the first coat to dry five minutes or so before dipping again.
If you’d like to decorate with sanding sugar, crushed Oreos, or mini nonpareils, sprinkle them over the cakes before your final coat of glaze has dried. If desired, add red chocolate candies in the eye sockets.

*Note: If you don’t have a skull cakelet pan this recipe makes 1 (less spooky but equally delicious) bundt cake in a 10 cup bundt pan. A bundt will need to bake for about 55 to 65 minutes .

holiday milk punch

I realize how snobby this will probably sound, but I’ve never been a fan of store bought eggnog.

holiday milk punch | Brooklyn Homemaker

I guess it’s because I was spoiled my whole life by my mother’s eggnog. Every year we’d have a big family Christmas party and she’d spend the whole day making cocktail sauce and big bowls of shrimp, layering trays of her famous taco dip, and whipping up two huge punch bowls full of her Christmas eggnogs (one them regular, the other chocolate, both spiked with plenty of hooch).

She used to save a little for us before adding the booze when we were really little, and when we finally reached double digits we were allowed just a tiny cup of the same nog as the adults.

When I was still pretty young I didn’t really like the taste of the adult version, but it was so thick and rich and heavy that even when I was old enough to actually enjoy the alcohol I couldn’t have more than a cup or two before feeling full to the point of bursting.

holiday milk punch | Brooklyn Homemaker

Right after college I decided to host a holiday soiree of my very own, and I thought a big batch of mom’s homemade eggnog would be just the ticket. It was every bit as rich and delicious as I remembered, but it was my first and last time making it. Once was enough for me to decide that it took too much time and effort to make something so heavy that people wanted only one or two cups. Of course, everyone loved it, but they all moved on to something else later in the night, and half of it went to waste.

holiday milk punch | Brooklyn Homemaker

Just before Christmas in the first year that Russell and I lived together I spotted a recipe on Smitten Kitchen that piqued my interest.

I’ve never been a huge fan of milk as a beverage on it’s own. I don’t even usually eat cookies with milk, and reserve it only for cereal instead. There was bourbon in this milk punch recipe though so I was willing to give it a shot.

It’s so much lighter, and so much simpler to make, that I honestly didn’t expect it to hold a candle to homemade eggnog. To my surprise though, I absolutely loved it! It’s doesn’t really taste like eggnog; it’s not nearly as rich and custardy and, well, eggy; but it does have a sort of similar flavor profile. A bit of milk, a bit of cream, a bit of sugar, a bit of vanilla, and a bit of nutmeg; all topped off with enough booze to make it taste exceedingly festive.

holiday milk punch | Brooklyn Homemaker

I was in love.

I may actually even like this better than eggnog. I mean, I still think homemade eggnog is the bee’s knees, but this is just as festive and you don’t want a nap after one glass!

I wouldn’t exactly call milk punch healthy, but I would say that it’s a heck of a lot healthier than eggnog. Much less fat and a bit less cream, and no raw eggs to worry about. You’d never know it though. This stuff is TASTY!

holiday milk punch | Brooklyn Homemaker

Recipes for versions of milk punch (very different versions from this one) actually date back to colonial times. Benjamin Franklin even had his own recipe that’s been making the rounds on the internet lately.

These days recipes similar to this one are very popular in the South, especially in New Orleans where it’s often served with breakfast or brunch. There’s even a scene in the film “The Help” where a milk punch is being prepared before a meeting of the ladies bridge club.

holiday milk punch | Brooklyn Homemaker

The first time I tried milk punch I made it with bourbon, following Smitten Kitchen’s recipe to a T.

Just before I decided to share it here with all of you though, I saw an an article about a taste test for the best hooch to use for eggnog. After tasting some nog spiked with various spirits, straight or in combination, they found that a mix of rum and brandy had the best, most quintessentially “holiday” flavor.

While I absolutely love bourbon 365 days a year, I decided that I could let rum and brandy have their turn for this holiday recipe. I’m so glad that I did, because it somehow made my milk punch taste even more similar to a homemade eggnog. Even if you’d still prefer bourbon though, this recipe is nice and strong, as any holiday cocktail should be.

If you have time, I’d recommend freezing your milk punch for a few hours until it gets slushy. It has a thicker, almost milkshake like texture this way, and it means you can make it ahead of your guests and take it out whenever they arrive. You can even make it a day ahead and keep it in the freezer, but you’ll need to stir it up and let it sit out for a bit if it freezes through.
The second best method would be to shake it in a cocktail shaker with lots of ice until it gets super cold and frothy. For an even easier presentation, you could simply serve it in a punch bowl with plenty of ice, or even a frozen milk ice ring. Either way, just finish it with a sprinkle of fresh nutmeg and you’re in holiday heaven!

holiday milk punch | Brooklyn Homemaker

Holiday Milk Punch

  • Servings: 6 to 10, depending on size
  • Print
adapted from Smitten Kitchen

4 cups whole milk
1 cup heavy cream *see note
1 cup good dark rum (not spiced rum)
1/2 cup brandy (or cognac) **see note
1 cup powdered sugar
1 tablespoon vanilla extract
Freshly grated nutmeg, for garnish.

In a pitcher, whisk together milk, heavy cream, rum, brandy, sugar and vanilla.
This can be served a few ways. You can serve very well chilled in an icy punch bowl, or shaken with ice until frothy and frigid. My favorite way though, is to freeze it until slushy. This will take 3 to 4 hours, but you can leave it in there up to a day. Stir before serving it in chilled glasses, finished with a few gratings of fresh nutmeg.

notes:

*For a thinner, healthier version use more milk and less cream. For a thicker, richer version use more cream and less milk, equalling 5 cups total.

** You can use more brandy and less rum if desired, or all brandy, all rum, or even all bourbon. I think 1 1/2 cups of alcohol total offers the best flavor, but you can do less if you don’t like as much hair on your chest.