cocoa

s’mores layer cake

You guys. I did it again.

s'mores layer cake | Brooklyn Homemaker

I baked my own birthday cake.

s'mores layer cake | Brooklyn Homemaker

I know that some people gasp in horror or baulk at the very idea of such a thing. On one’s birthday, one is supposed to just sit back and enjoy the day without having to lift a finger.
But, you know what, one thing that I enjoy even more than eating cakes, is baking cakes! Especially if doing so means that I get to share them with people I love.
And guess what else. I could never find a cake in a bakery that would be as good as a cake that I could bake myself, and even if I found one, I couldn’t afford it!
So, tradition be damned, I bake my own birthday cakes.
And I like it!

s'mores layer cake | Brooklyn Homemaker

As my birthday was approaching, the weather finally started to warm up here in New York after what felt like an endless grey & chilly spring. To celebrate both the arrival of warm weather and my advanced age, we decided to invite a bunch of friends and have a big festive bbq in our suddenly green backyard.

s'mores layer cake | Brooklyn Homemaker

I plotted and planned out my menu, scouring the internet for recipes for sides, salads, mains, and options for vegetarians. Russell even asked his family from San Diego to ship us a box of avocados from their own avocado tree, so that we could offer our guests a big ol’ bowl of the freshest guacamole in Brooklyn.
Of course, I knew that I wanted my birthday cake to be the pièce de résistance. It’s been so long since I’ve done a big festive layer cake that I also wanted to come up with something that I hadn’t really ever done before.

s'mores layer cake | Brooklyn Homemaker

Nothing says Summer quite like s’mores.
Amirite?

Especially for a bbq or a backyard party, there’s clearly nothing better to round out an evening. I still love them to this day (duh), but it’s almost impossible not to think of childhood when eating them. Even though these days I’m usually making them over the leftover embers from my charcoal grill, they instantly transport me to campfires in the woods of upstate New York, with multiple marshmallows skewered on gnarled sticks found on the ground or ripped from a low-hanging branch.

s'mores layer cake | Brooklyn Homemaker

Of course, like any good fat kid, when I was young I was super impatient to heat up those marshmallows as quickly as possible so I could get those s’mores into my face on the double. I learned pretty early on though, that the chalky texture and acrid flavor of that burnt sugar shell isn’t actually all that pleasant, even when sandwiched between melty chocolate and crisp graham crackers.

So, at a younger age than most kids (or adults for that matter), I figured out that slow and steady wins the race when it comes to building s’mores. A slow roast, with a steady rotation far from the flames, produces a vastly superior marshmallow with a soft, gooey center and a delicate toasty caramelized crust. The last time I went camping with my sister and her kids, my nephews actually poked fun at me for how long I take to toast my marshmallows. What can I say, I’m a perfectionist. Or neurotic. Potato, Potahto.

s'mores layer cake | Brooklyn Homemaker

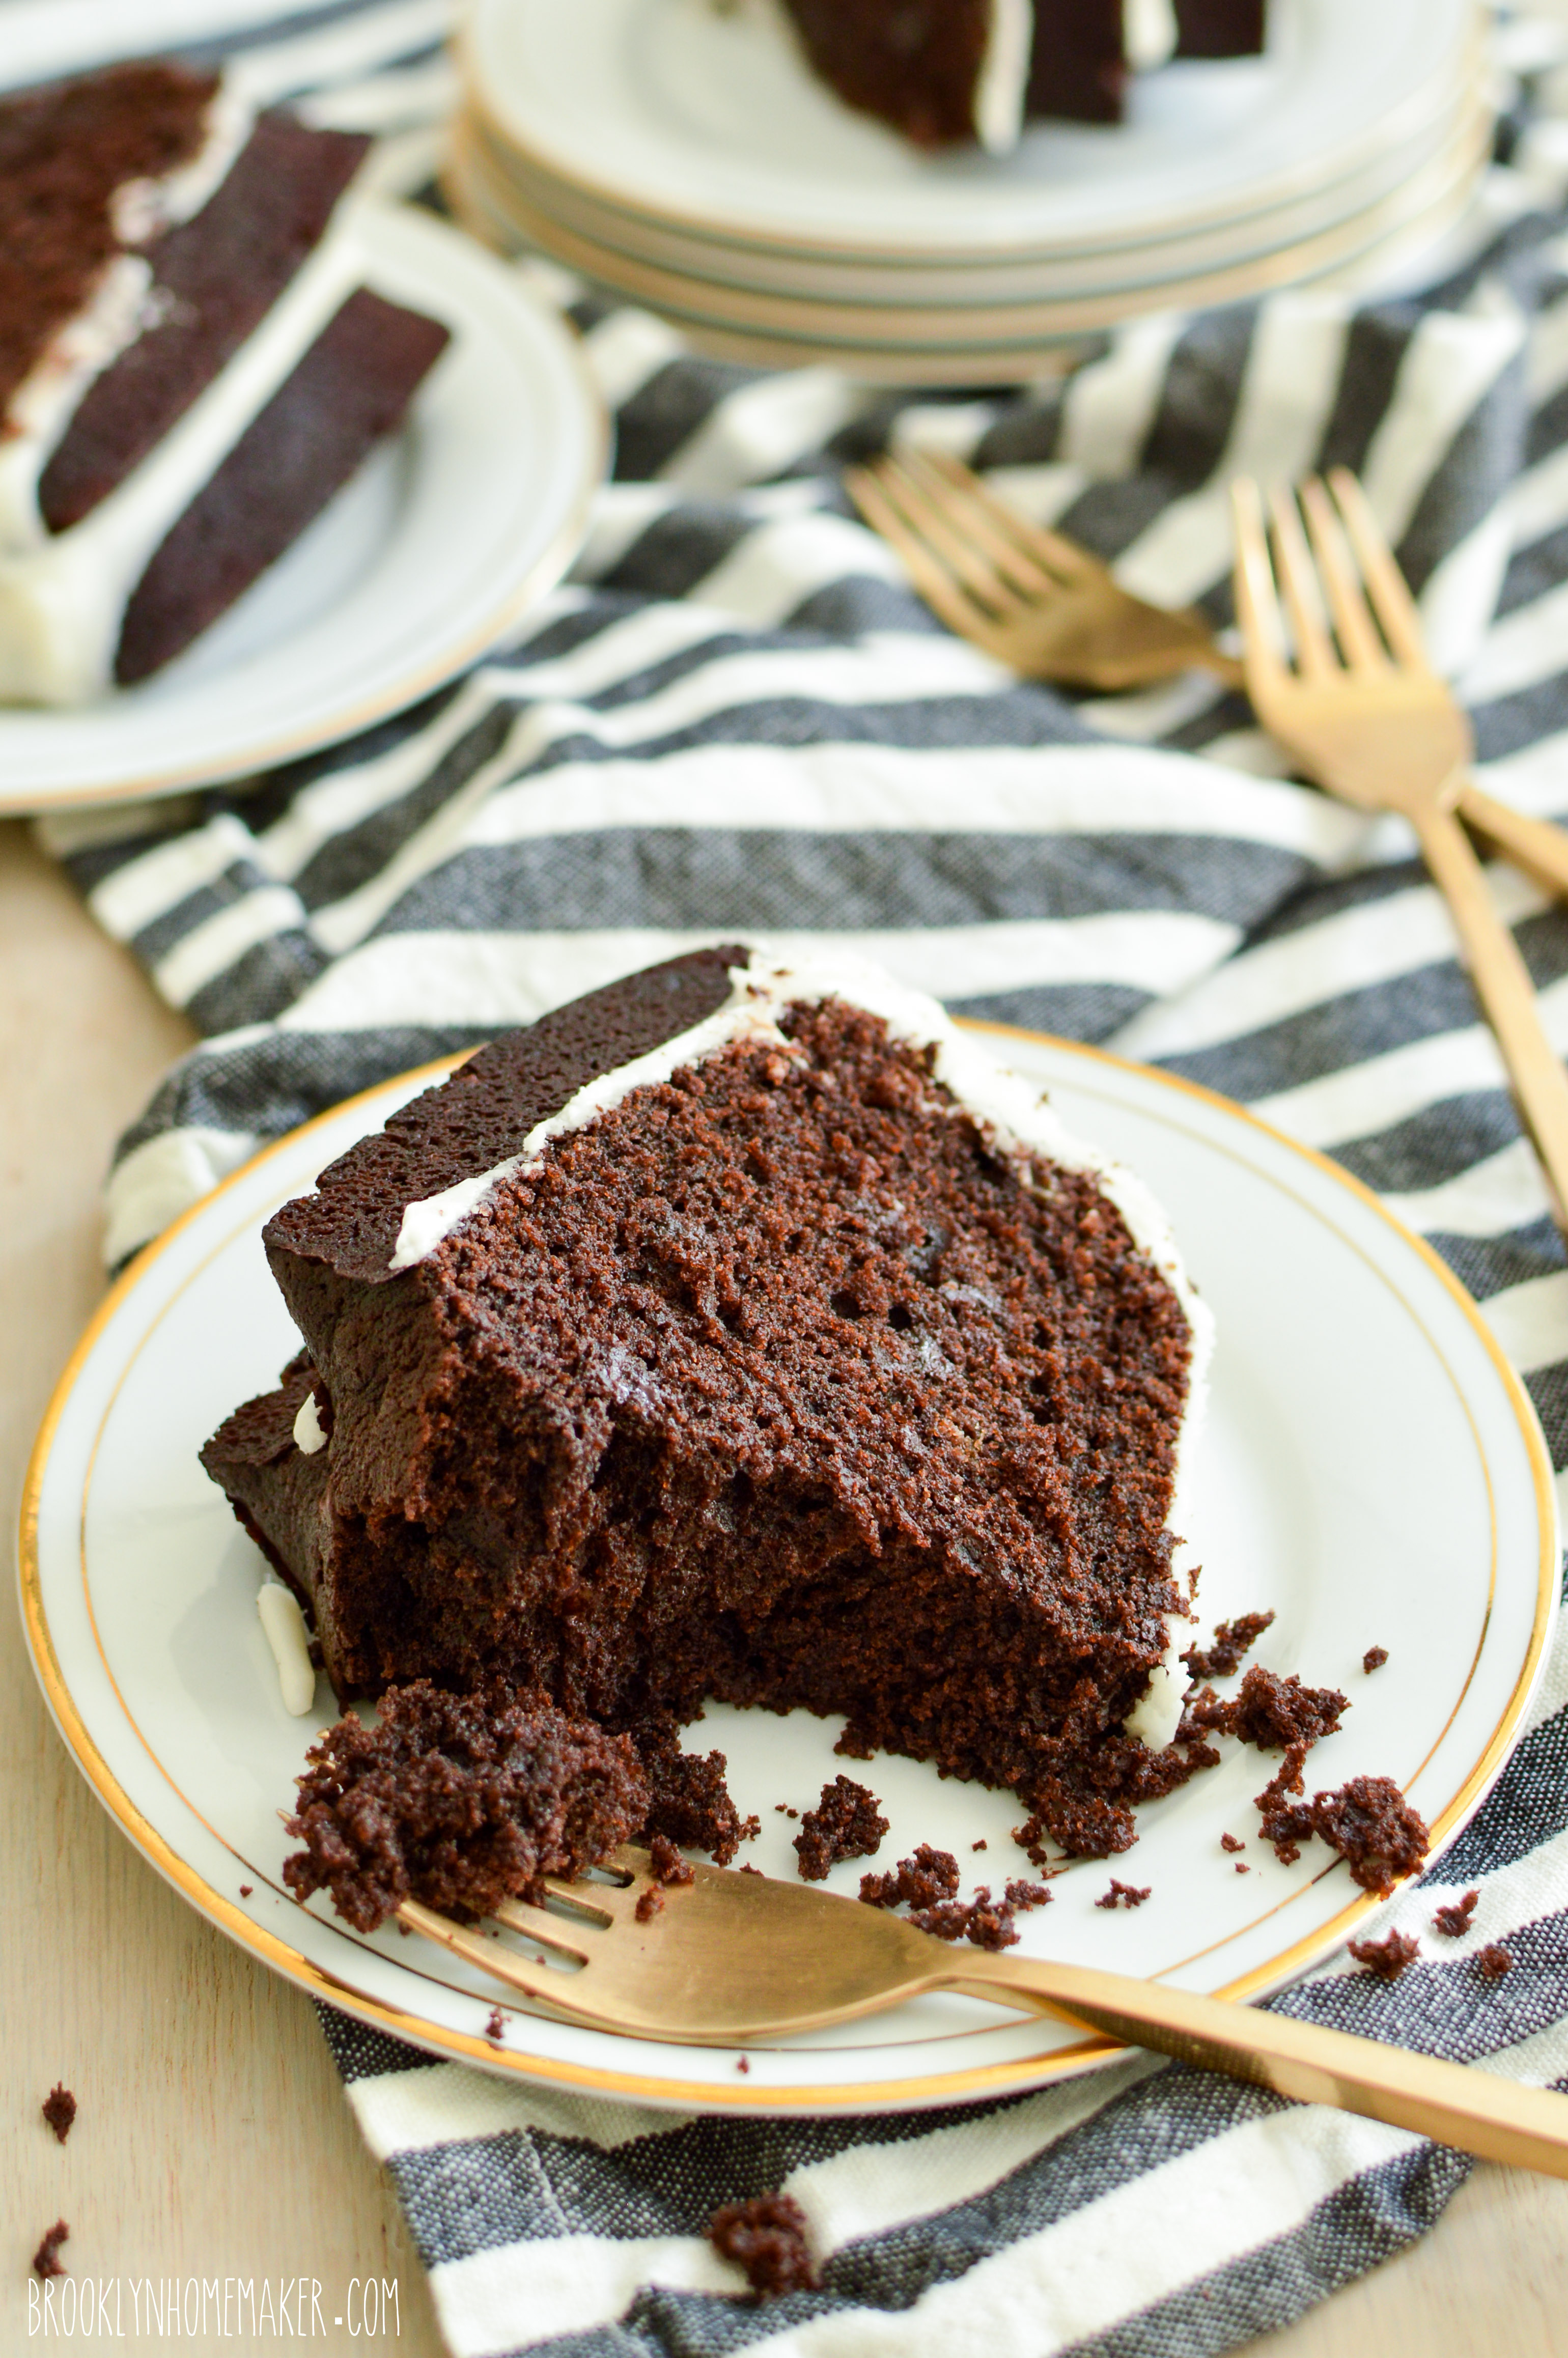
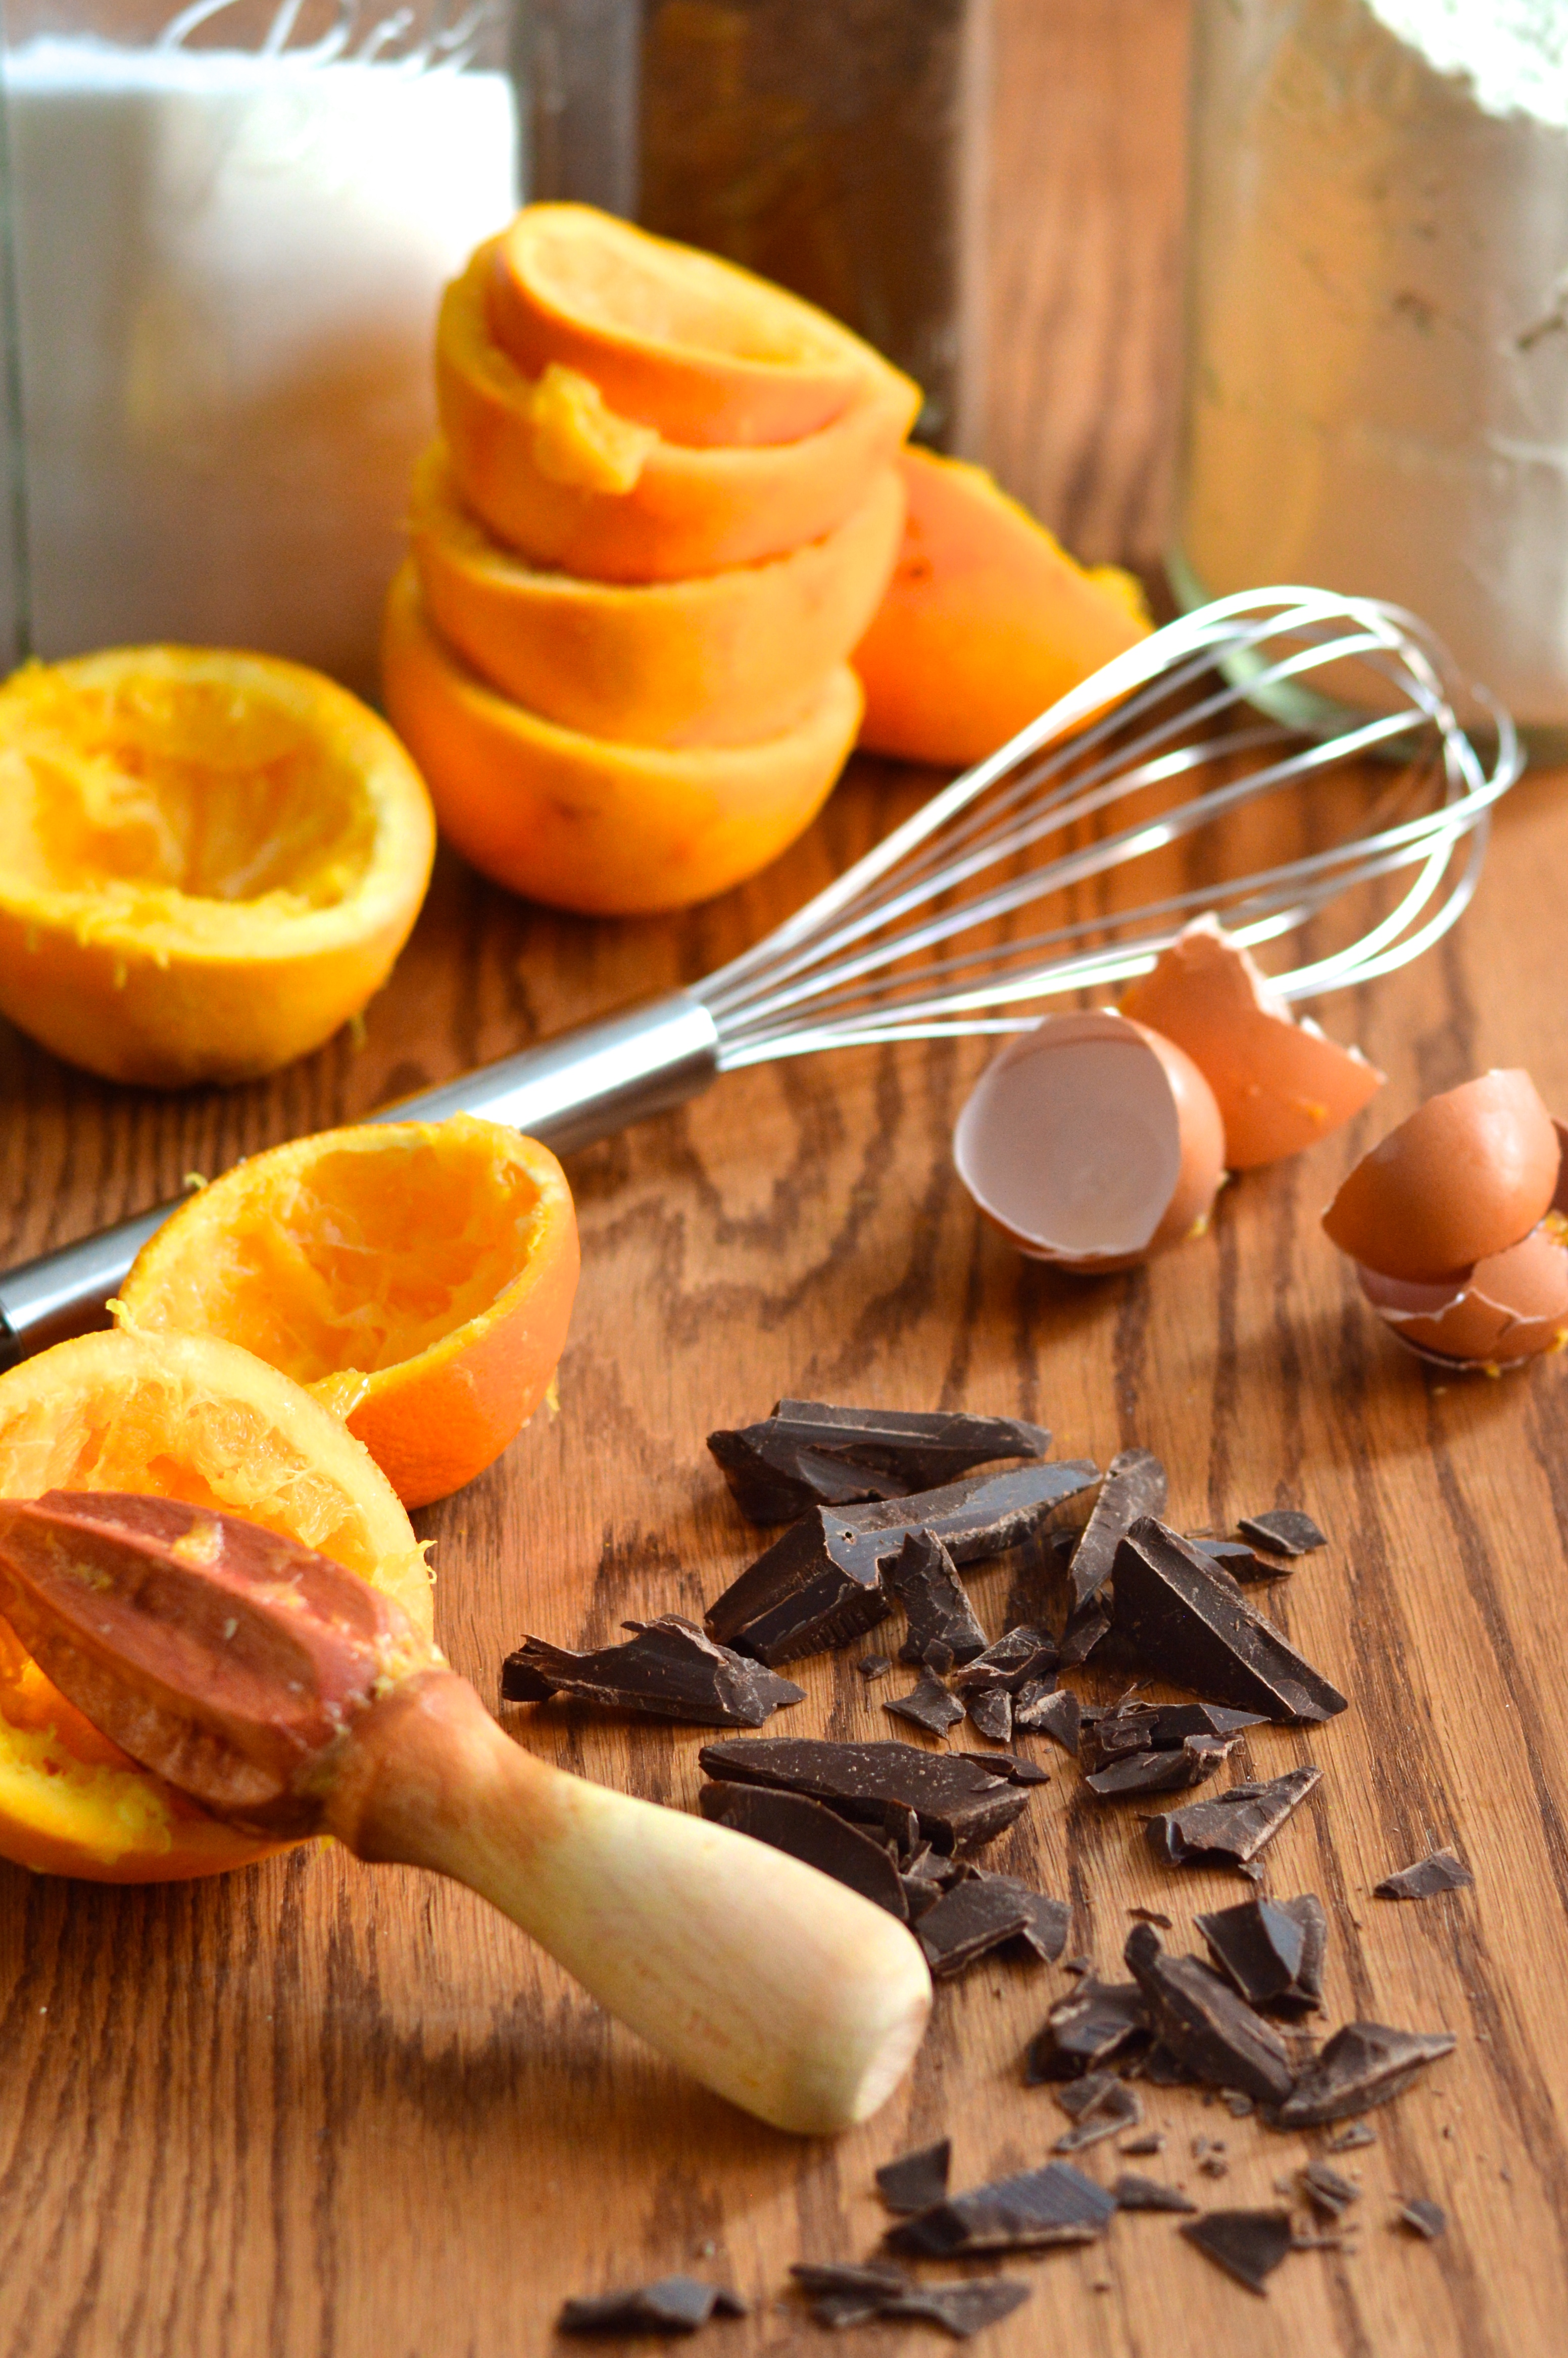
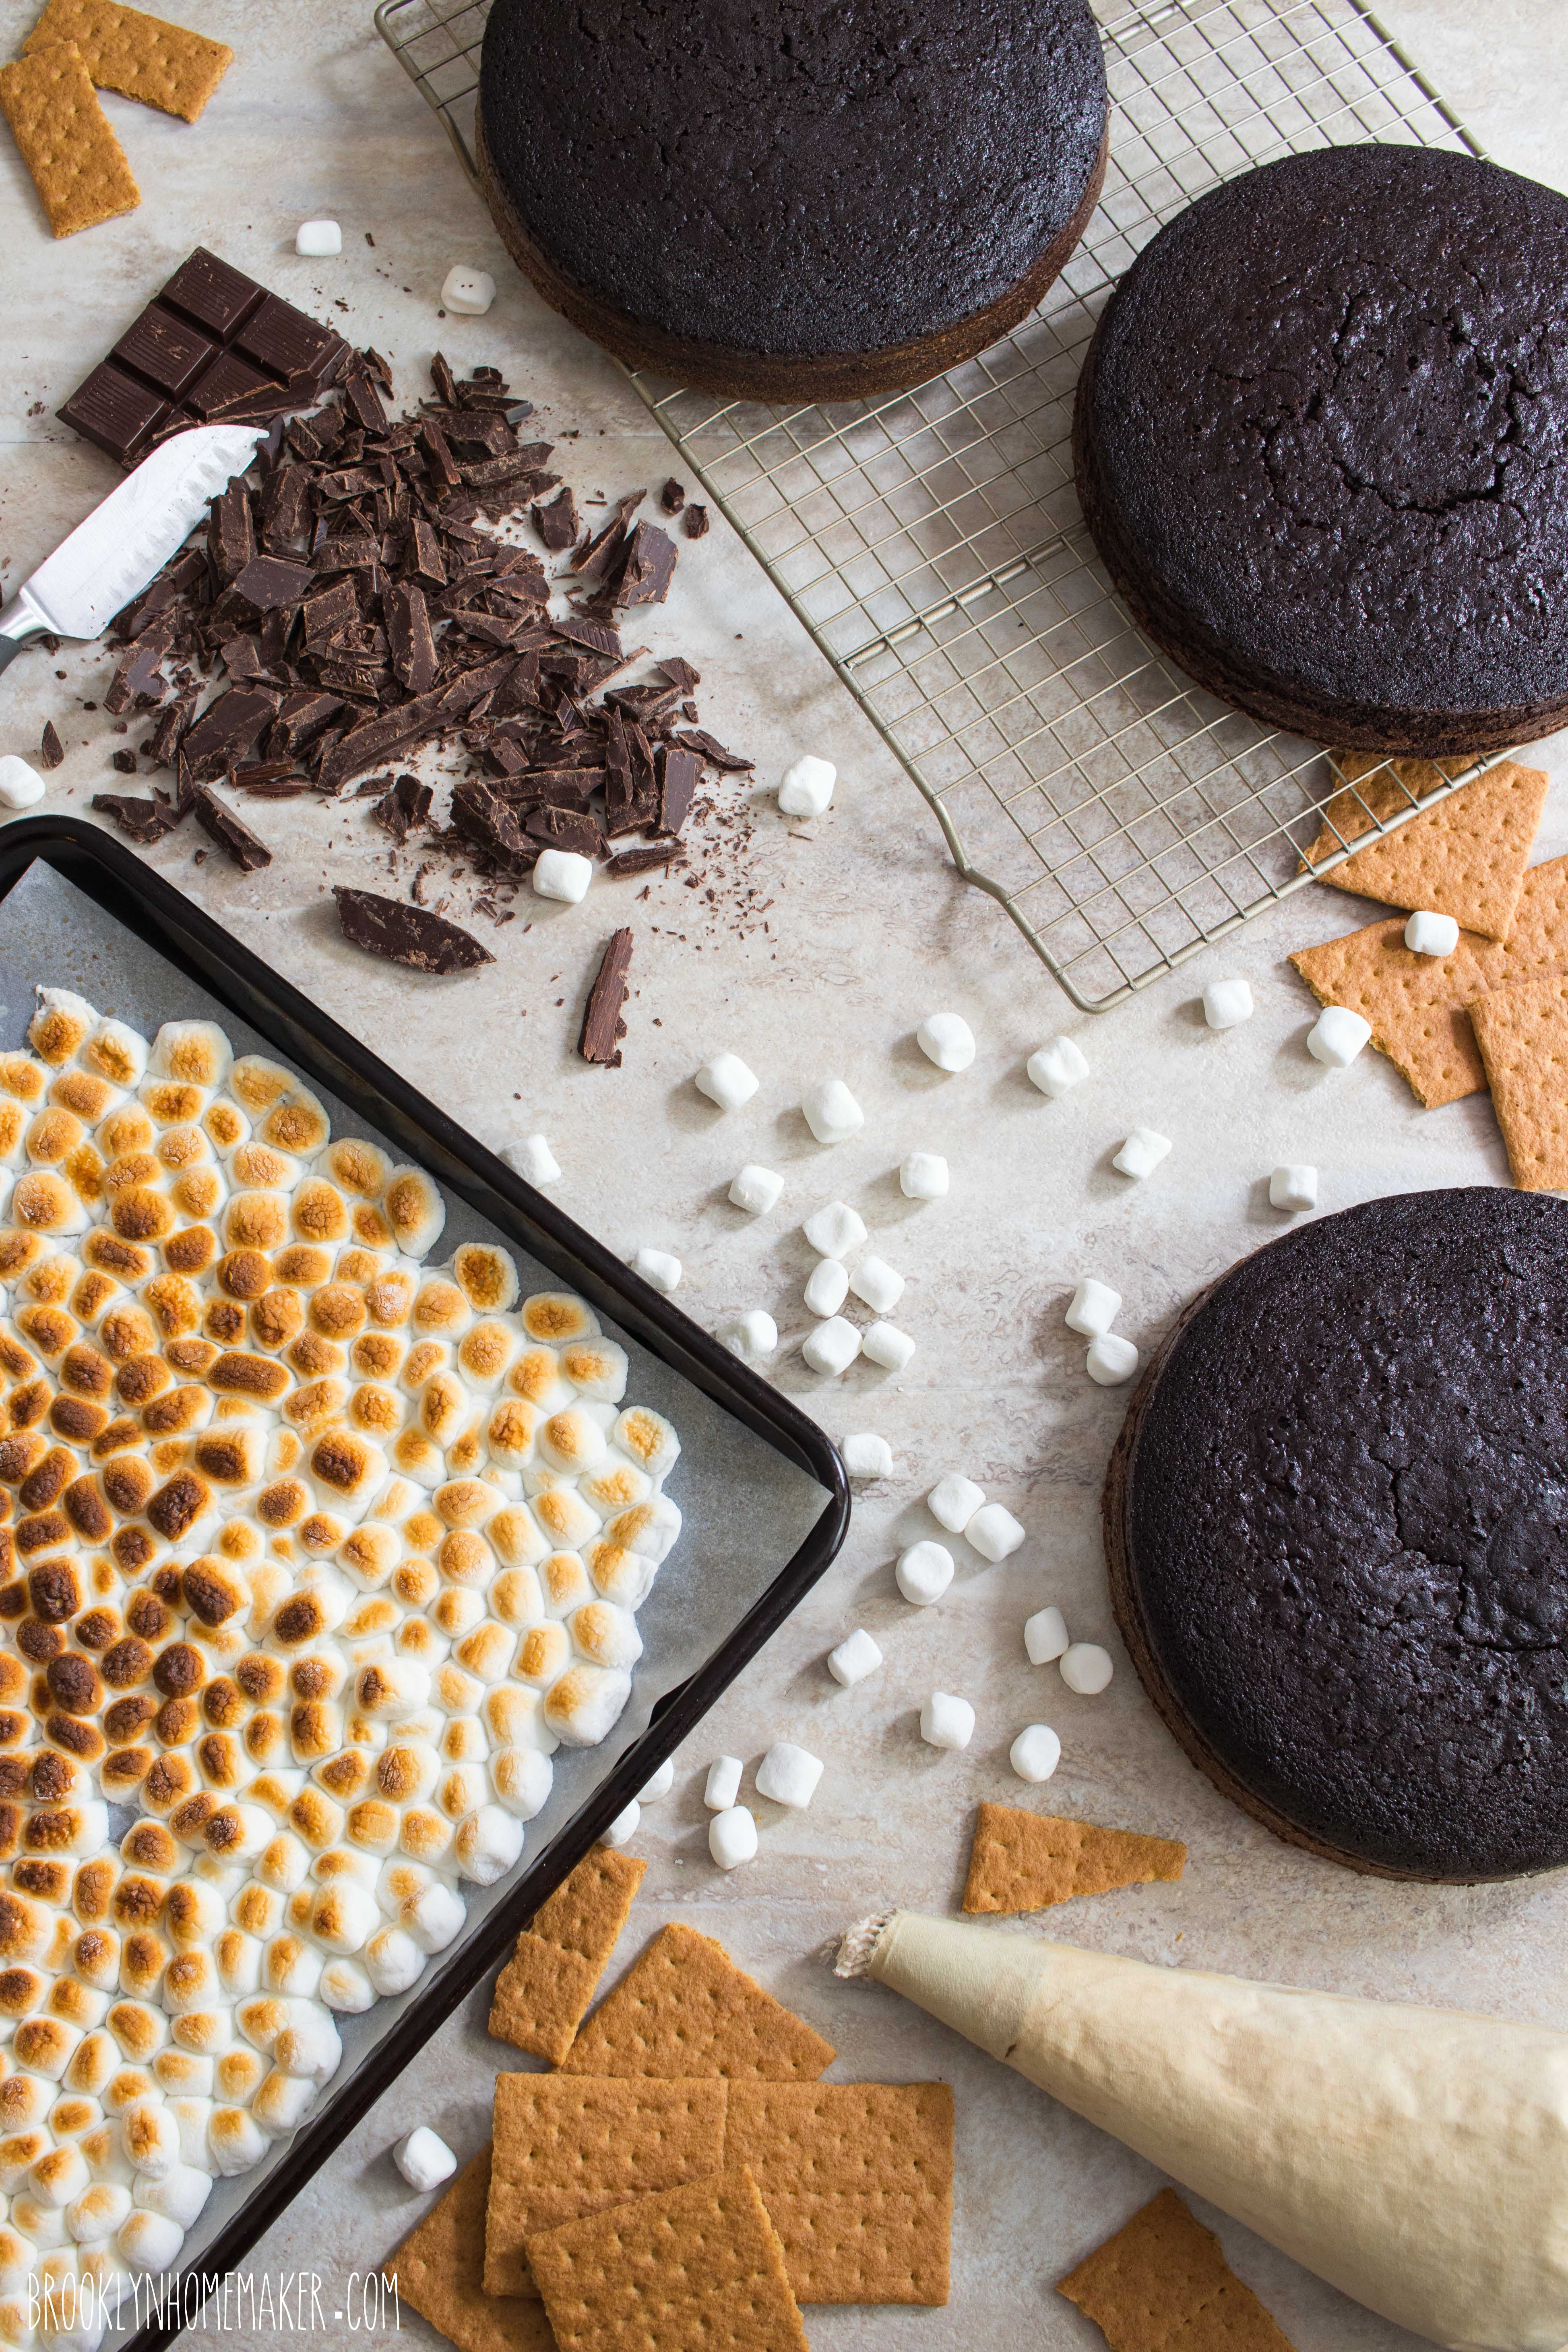
I suppose that slow and steady toasting is sort of a metaphor for building this cake. I’m not going to sugar coat things (lol) and tell you that this is an “easy” or “quick” recipe for novice bakers. It takes time and effort and has multiple steps and components. It’s basically four recipes in one, with 3 layers of cake, a flavored icing, a multi-step filling, a ganache drizzle, decorations on top, and long set of assembly instructions.

If you’re patient and determined though, and have a fair understanding of layer cake construction, all the effort definitely pays off in the end. I promise you that this cake is seriously incredible.

s'mores layer cake | Brooklyn Homemaker

Unfortunately my birthday bbq never actually happened. Just as my excitement about the party was reaching it’s peak, the weather forecast started showing rain in the future. I tried not to panic and just kept telling myself that the weather changes so quickly in New York that by the weekend the forecast could be completely different.

I went ahead with planning and recipe testing my cake, but once I was sure that the recipe was solid and all the elements really worked together, I was also sure that it was time to start cancelling on our guests. A few nights before the big day I was home alone and actually started to pout and feel sorry for myself. I’d put all this work in for nothing and I had no clue what I’d end up doing on my birthday. After a few minutes though, I snapped out of it and decided that bbq or no bbq, I was going to have a good time.

I already had an amazing cake recipe, and after all that work to perfect it, I needed to show it off. I invited a small group of close friends to brunch not far from our place, and told everyone that afterward we’d be heading back to our apartment for cake and Cards Against Humanity. And guacamole!

s'mores layer cake | Brooklyn Homemaker

Multiple people took one bite and their faces lit up and told me that it actually tasted like real s’mores, almost as if they weren’t expecting something that looks so pretty to also actually taste great too. They clearly underestimated me!
Russell even told me, repeatedly, that it’s one of the best desserts I’ve ever made, and kept going back into the bowl to steal stray spoonfuls of the marshmallow filling while I was stacking the layers. Actually my mom did the same exact thing when I was trying out the filling recipe for the first time!

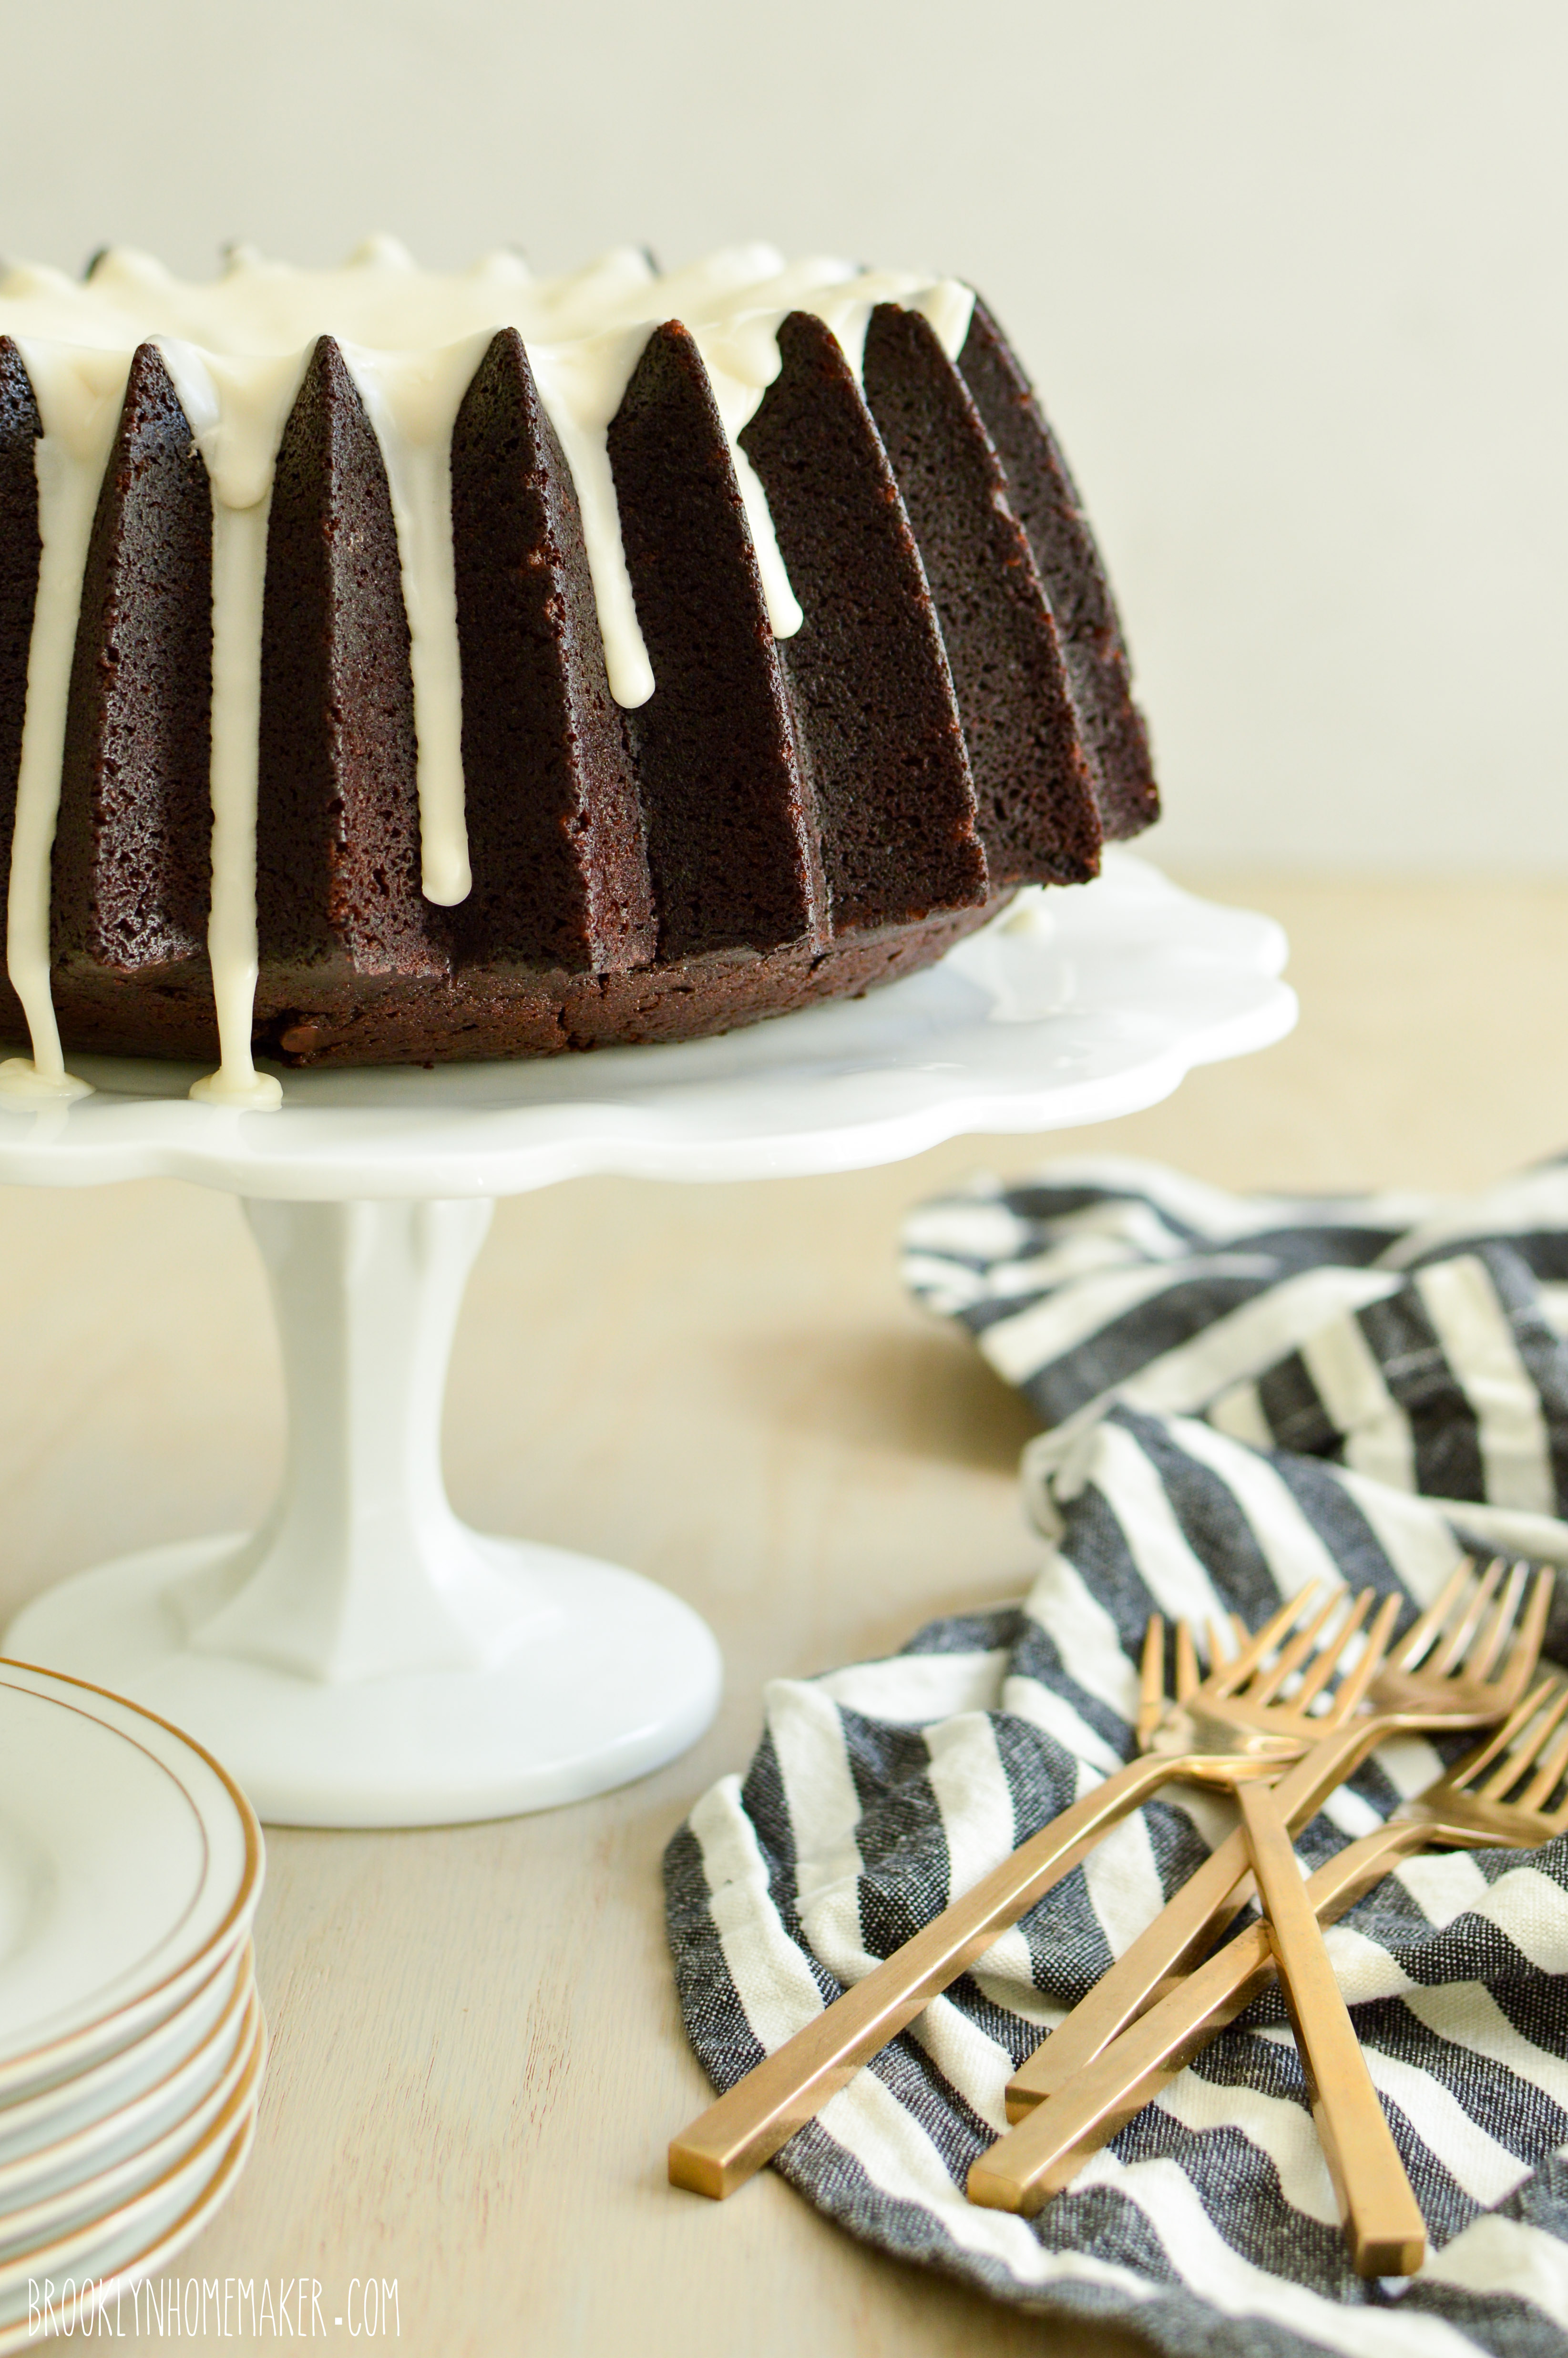
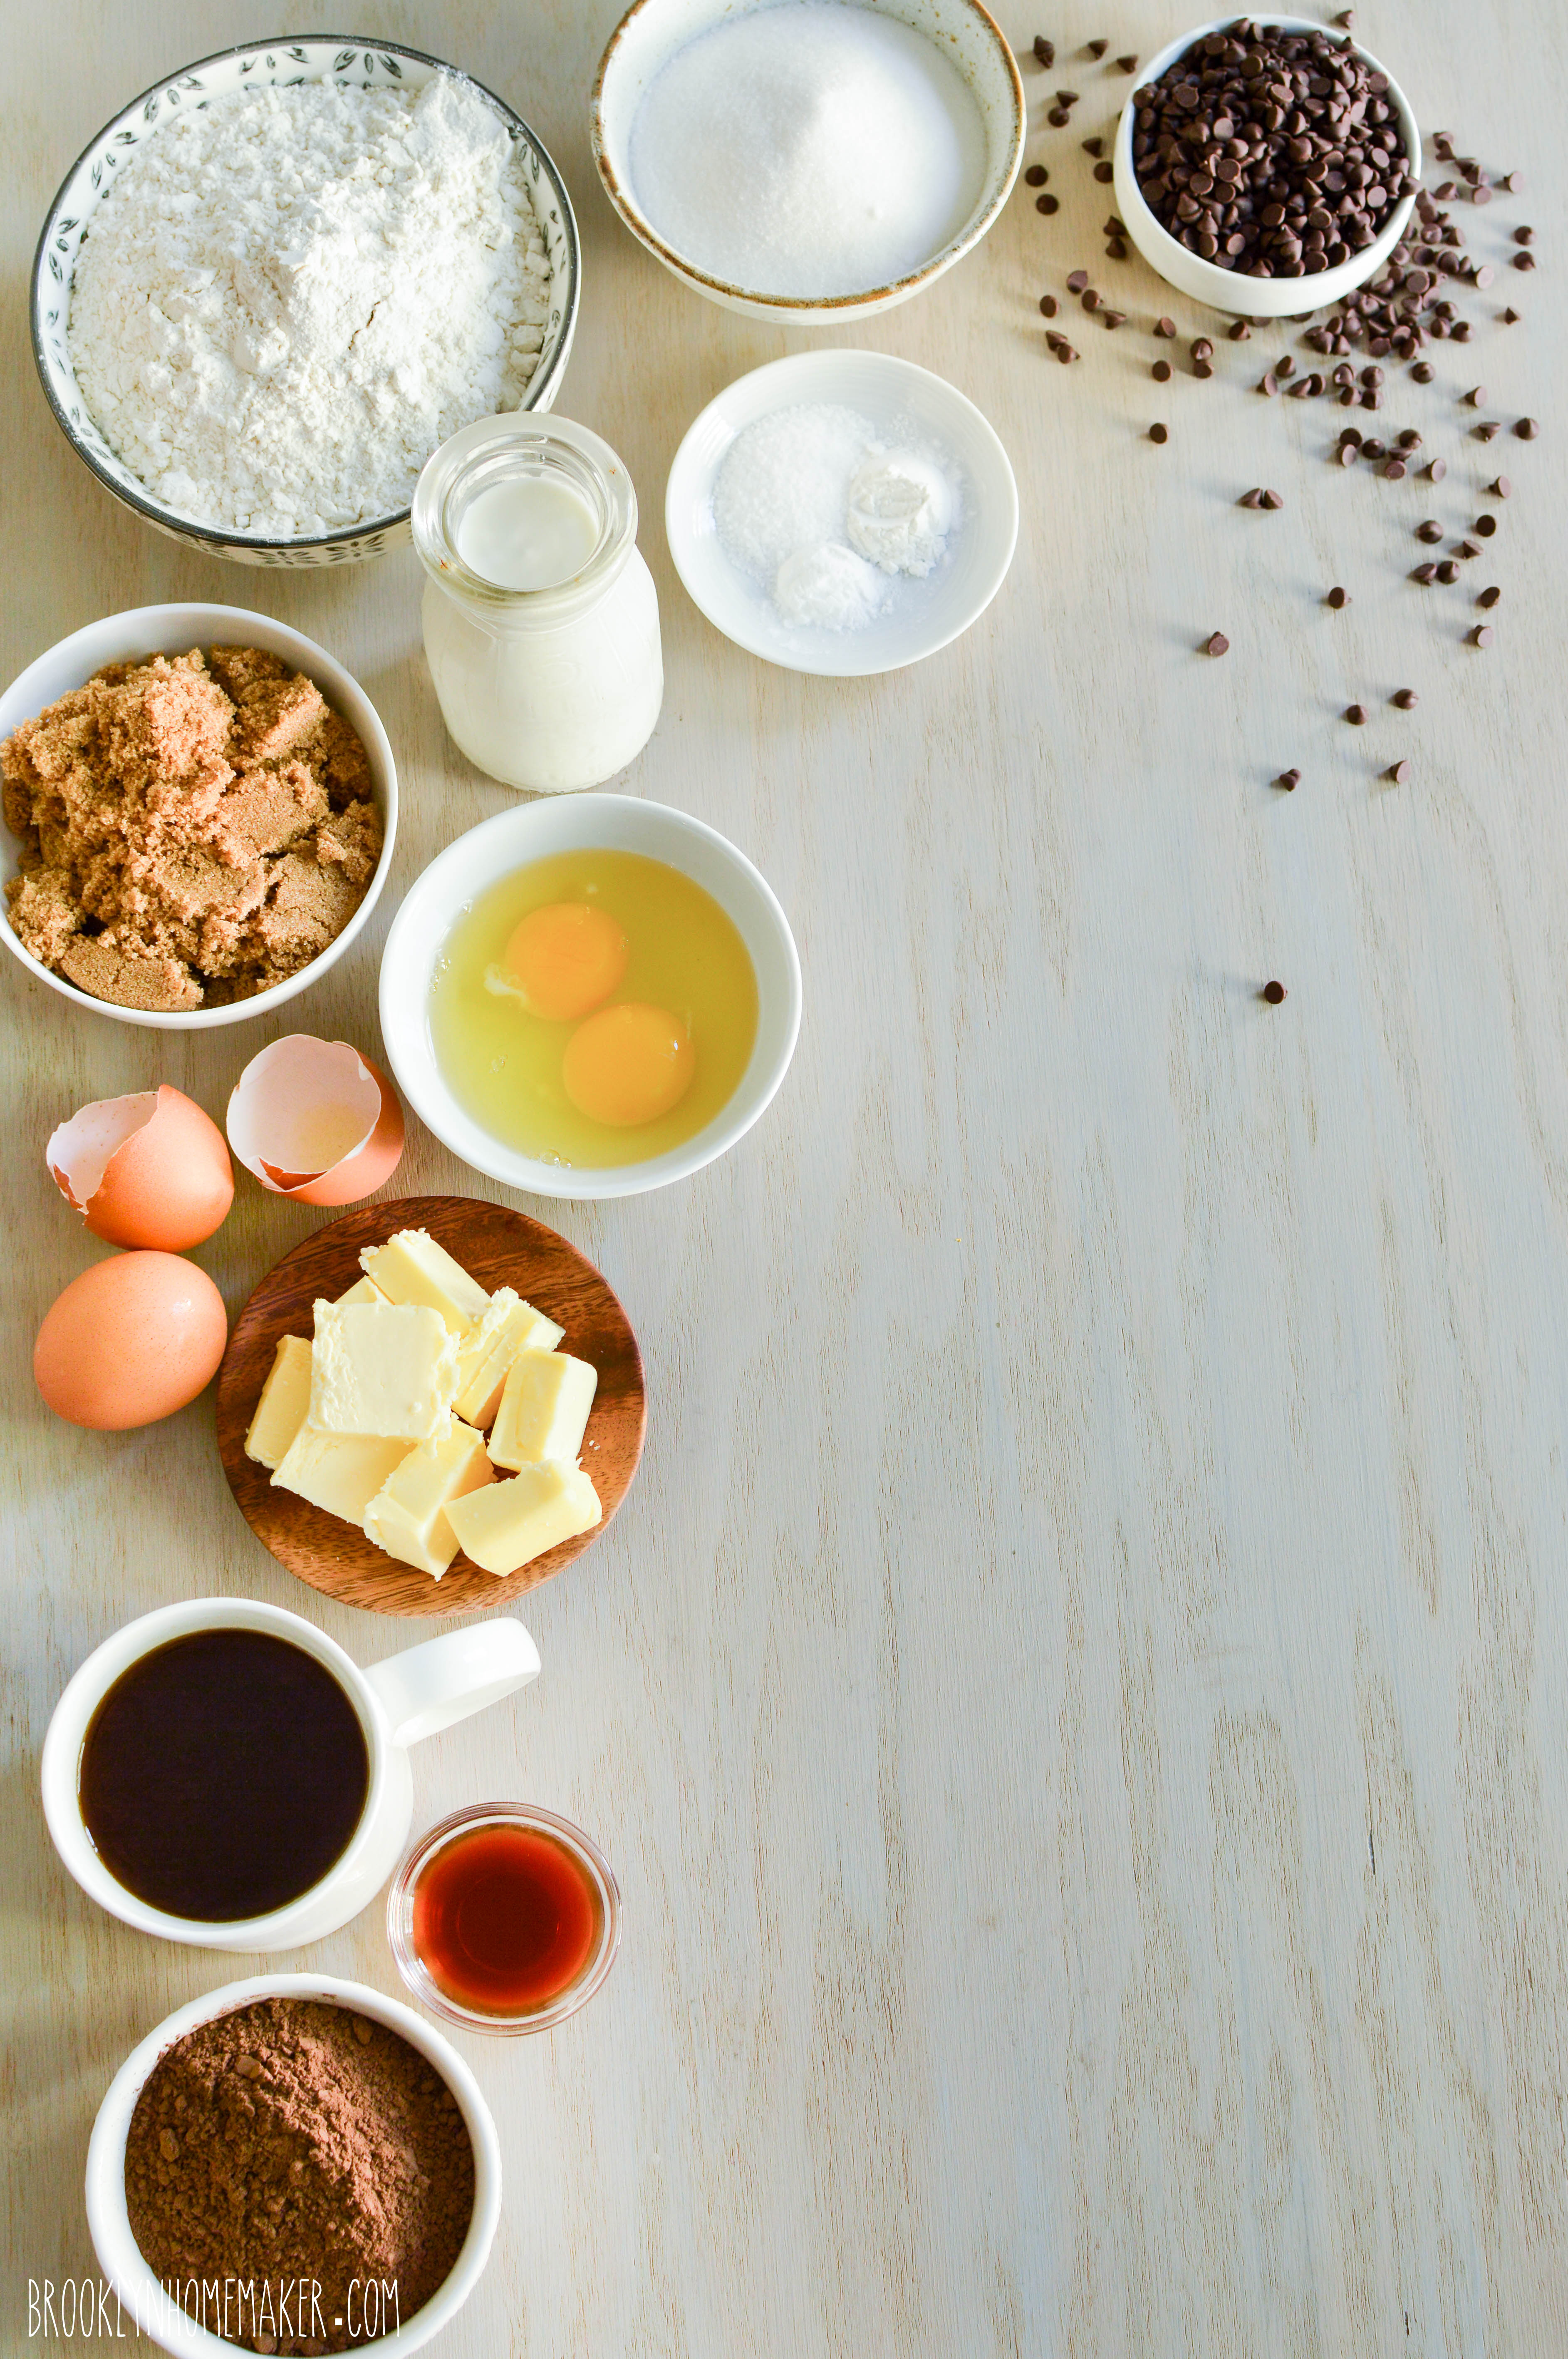
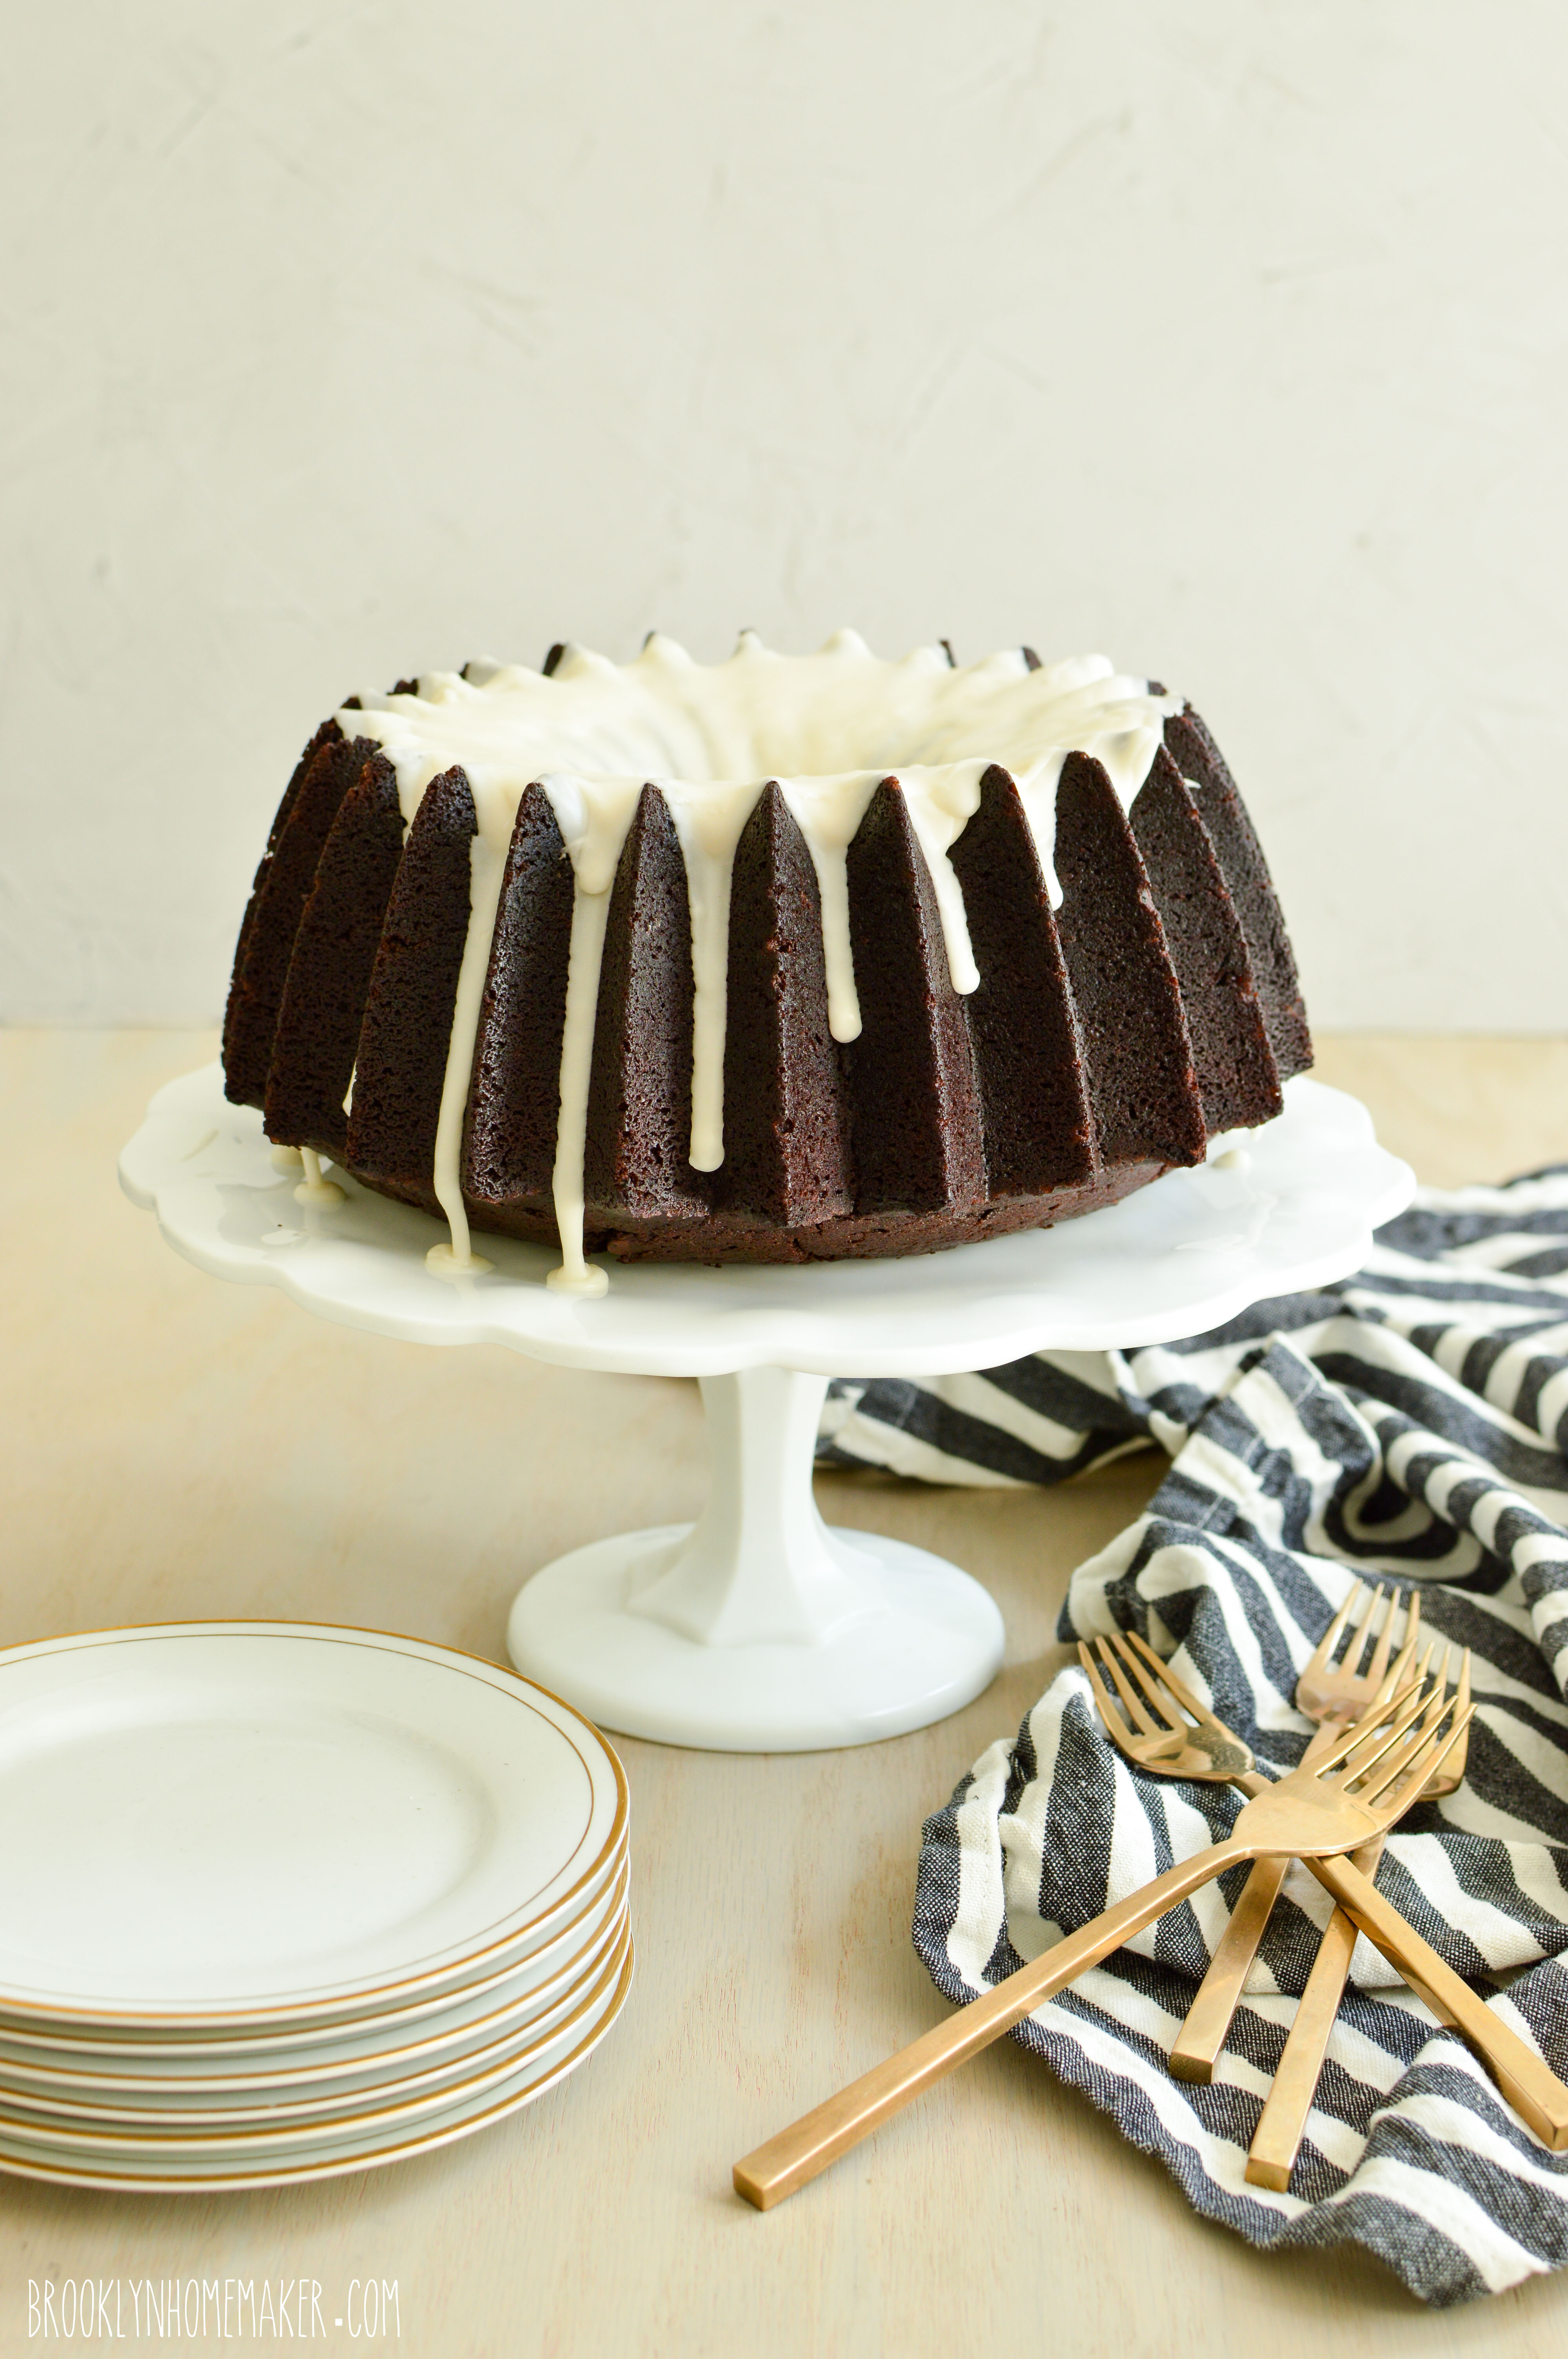
The layers of cake are moist, tender, and richly chocolatey thanks to double dutch cocoa, strong coffee, and real butter. The toasted marshmallow filling is made from actual marshmallows rather than marshmallow spread, so it genuinely has the rich flavor and gooey texture of a warm marshmallow right off the stick. Once the layers are stacked, everything gets enrobed in a velvety swiss meringue buttercream loaded with graham cracker crumbs and just a hint of cinnamon. As if all that weren’t enough, rich dark chocolate ganache is the… umm… icing on the cake. In addition to the cocoa flavor from the devil’s food layers, the ganache adds that melty chocolate flavor you know and expect from s’mores. The only thing missing here is the camp fire and the sticks!

I promise you that this show-stopping cake really does taste as good as it looks. Better even!
If you’re up for the challenge, it’s definitely worth the effort.

s'mores layer cake | Brooklyn Homemaker

S'mores Layer Cake

  • Servings: 16 to 24-ish
  • Print
Devil’s Food Cake
makes three 8-inch layers

butter and flour (or baking spray) for pans
1 1/2 cups unsweetened natural cocoa powder (I used Double Dutch Process)
1 1/2 cups hot brewed coffee (or hot water if preferred)
3 1/4 cups cake flour
1 1/4 teaspoons coarse salt
1 teaspoon baking powder
1 teaspoon baking soda
1 cup (2 sticks) unsalted butter, melted and slightly cooled
1 cups peanut oil or vegetable oil
1 cup granulated sugar
1 1/4 cup packed brown sugar
4 large eggs
4 teaspoons vanilla extract
1 cup buttermilk

Preheat oven to 350 degrees.

Butter three 8 inch round cake pans, line bottoms with parchment paper, butter paper, and dust pans with flour.
Whisk together cocoa powder and coffee (or hot water) until smooth and set aside.
Sift together flour, salt, baking powder, and baking soda; set aside.
Beat melted butter, oil, and sugars together on medium-low speed until combined.
Add eggs, one at a time, beating after each addition.
Beat in vanilla and cocoa mixture. Reduce speed to low.
Add flour mixture in three batches, alternating with buttermilk and beginning and ending with flour. Beat until just combined.
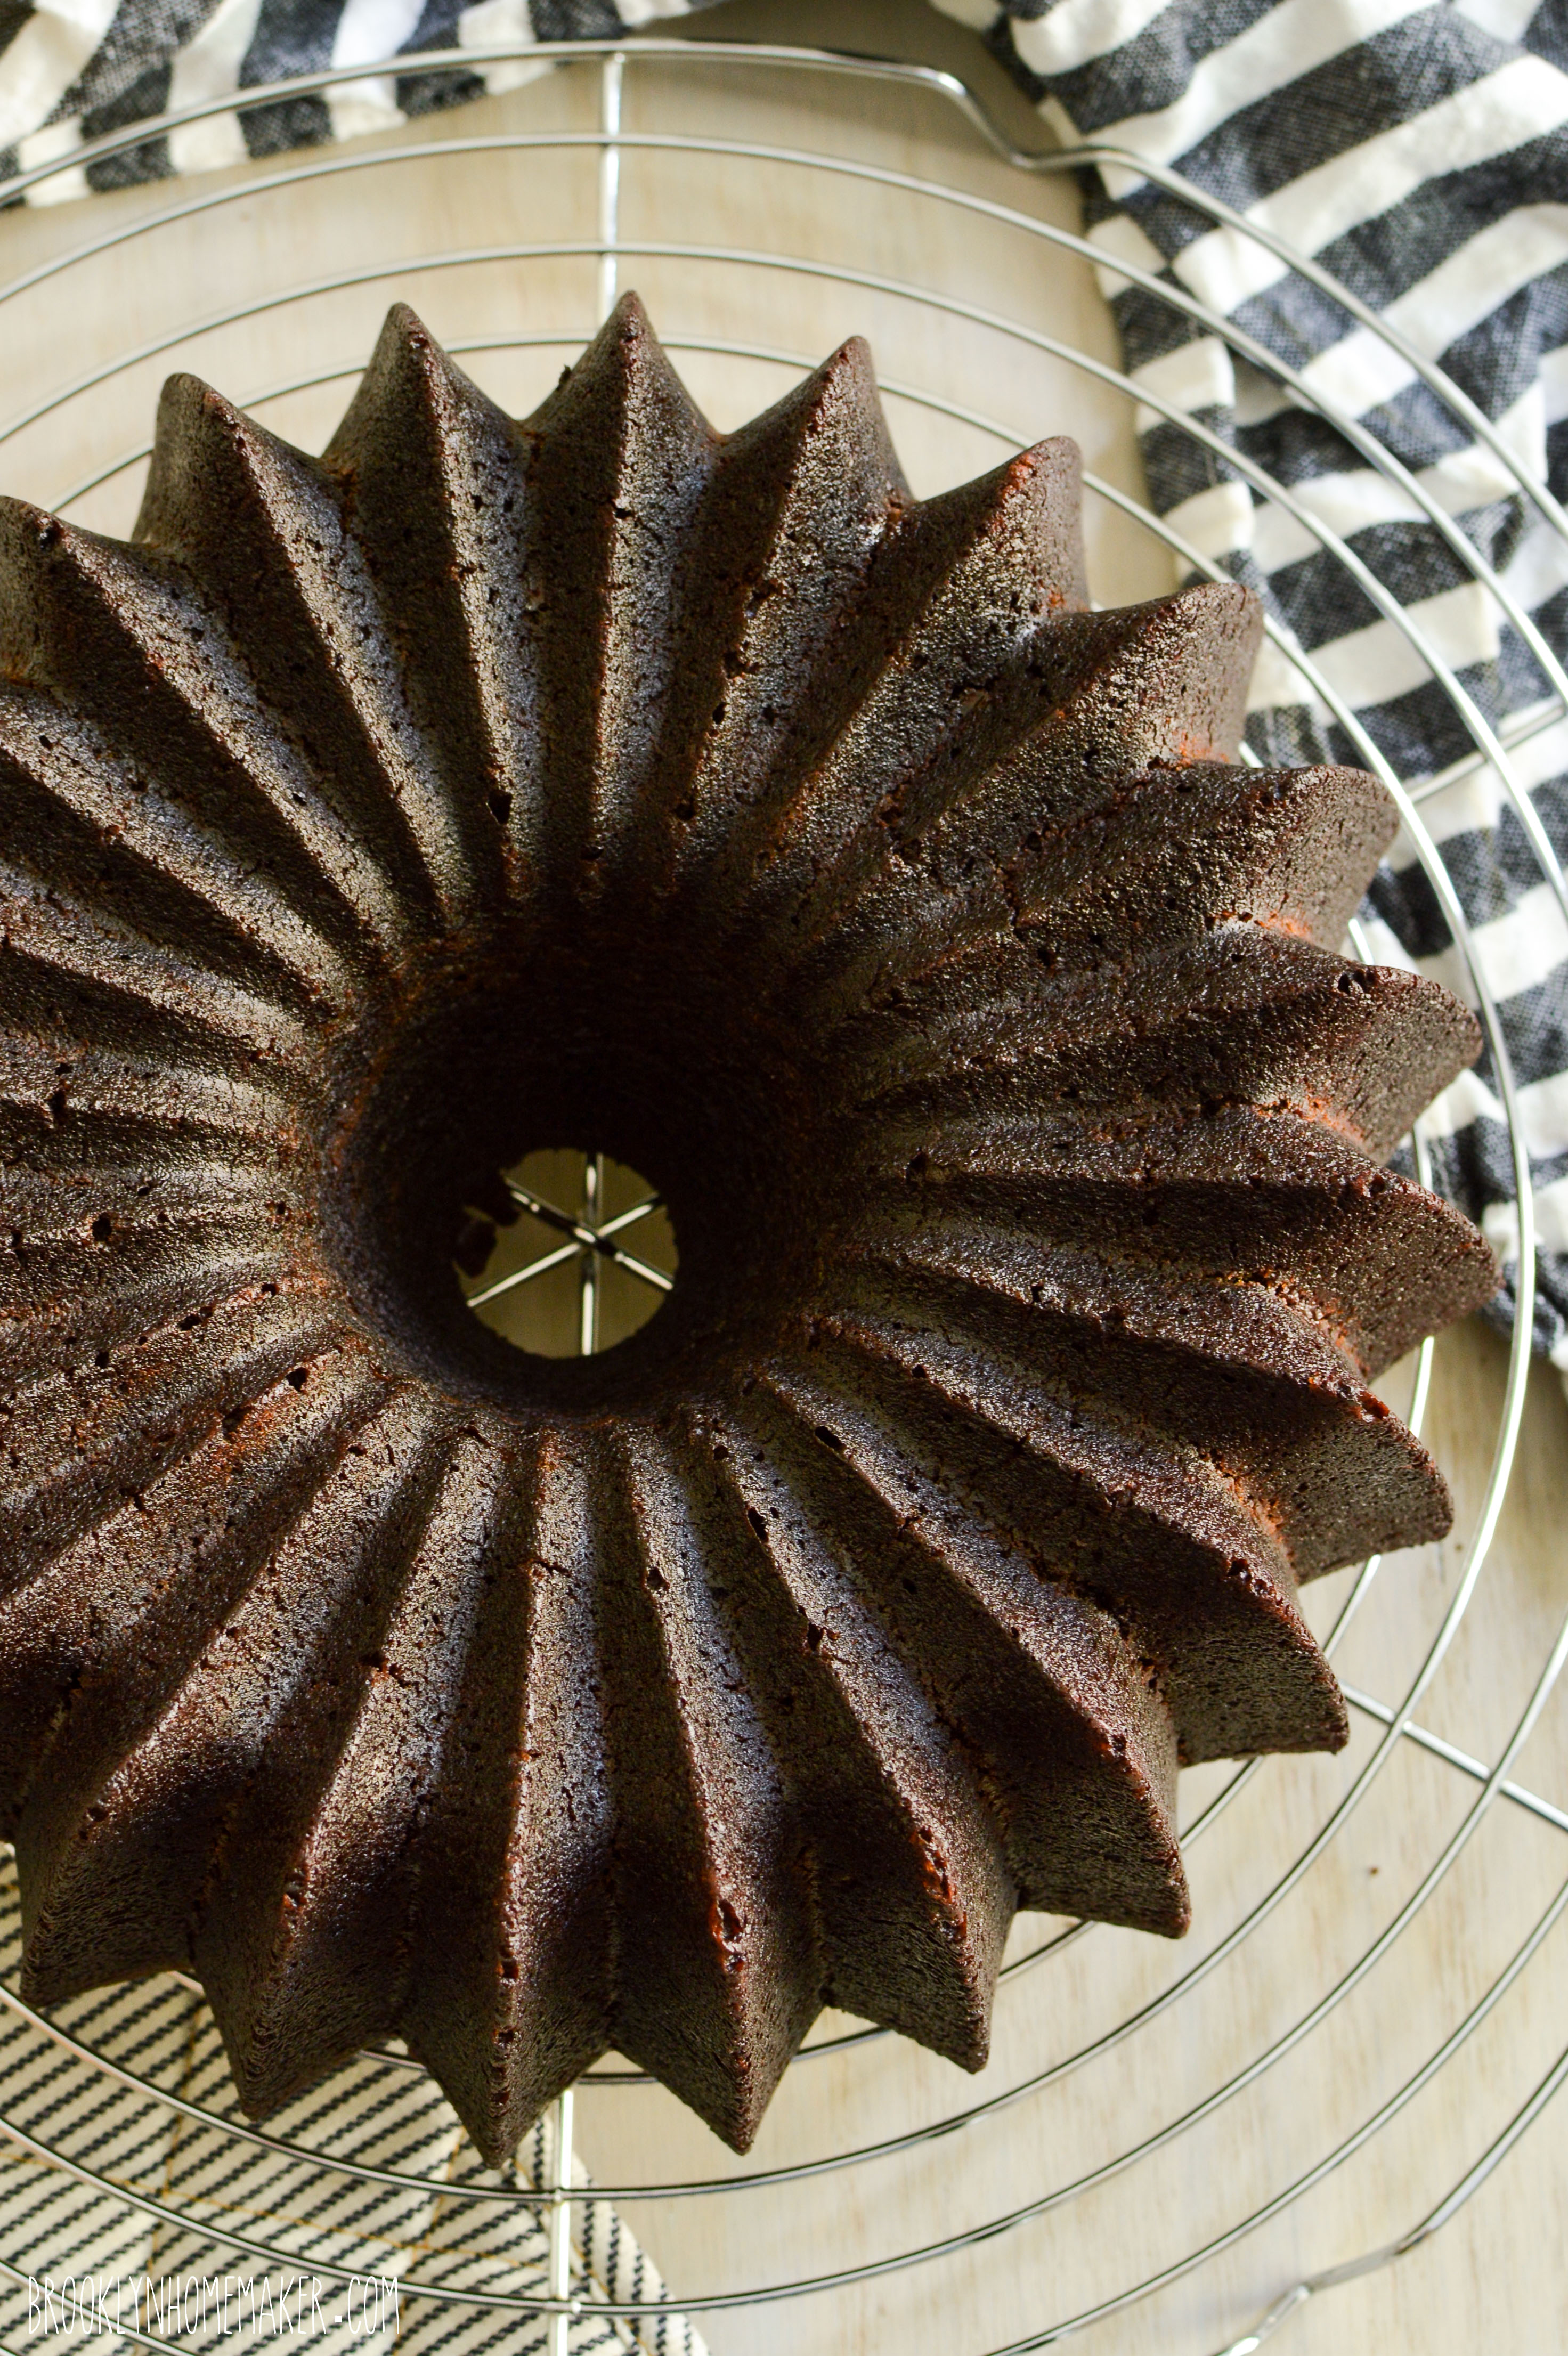
Divide batter evenly between the three pans, and bake until a toothpick or cake tester inserted into centers comes out clean, 40 to 45 minutes.

Transfer pans to a wire rack to cool for 30 minutes. Invert cakes onto rack, peel off parchment, and let cool completely.
To achieve a perfectly flat, professional looking cake, you’ll want to slice the very tops of the cakes off to make each layer completely flat and level. You can do this using a very sharp bread knife, or a cake leveler.

If you’re not assembling cakes right away, individually wrap each layer tightly in plastic wrap to prevent drying. Layers can be stored in the refrigerator for a day or two, or frozen (wrapped in plastic wrap first, then aluminum foil) for up to two weeks.

Graham Cracker Swiss Meringue Buttercream Icing:
Adapted from “Layered” by Tessa Huff
3/4 cup egg whites (I used pasteurized egg whites from a carton)
1 1/2 cups sugar
2 cups (4 sticks) unsalted butter, at room temperature (cut into 1 tablespoon slices)
2 teaspoons pure vanilla extract
1 cup graham cracker crumbs
1/2 teaspoon ground cinnamon

Place the egg whites and sugar in a very clean bowl of a stand mixer and whisk them together by hand to combine. Fill a medium saucepan with an inch or two of water and bring to a simmer over medium to medium-high heat. Place the mixer bowl over the saucepan to create a double boiler. Be sure that the bottom of the bowl doesn’t directly touch the water, and that the water doesn’t reach a full boil.
Heat the egg whites until they register 160F on a candy thermometer, whisking regularly to avoid cooking the whites. As soon as they’re at the correct temperature, carefully attach the mixer bowl to the stand mixer and add the whisk attachment.
Beat the egg whites on high speed for 8 to 10 minutes until they hold stiff peaks and the outside of the bowl is cooled to room temperature. Stop the mixer and swap the whisk attachment for the paddle.
On low speed, add the butter, a few tablespoons at a time, waiting for it to incorporate before adding more. Once all the butter is mixed in, add the vanilla extract and mix in to incorporate. Turn the mixer up to medium-high and beat until the buttercream is smooth and silky, about 3 to 5 minutes.
If the mixture starts to look curdled, just keep beating. It’ll come together.
If the whites were still too warm when the butter was added and the buttercream is too thin and soupy, refrigerate the bowl in 10 minute bursts until it’s cool (but not cold) and beat again until smooth.
Once smooth, add the graham cracker crumbs and cinnamon and beat in to incorporate.

Toasted Marshmallow Filling:
10 oz mini marshmallows
1 stick unsalted butter
1/3 cup heavy cream
1 cup powdered sugar

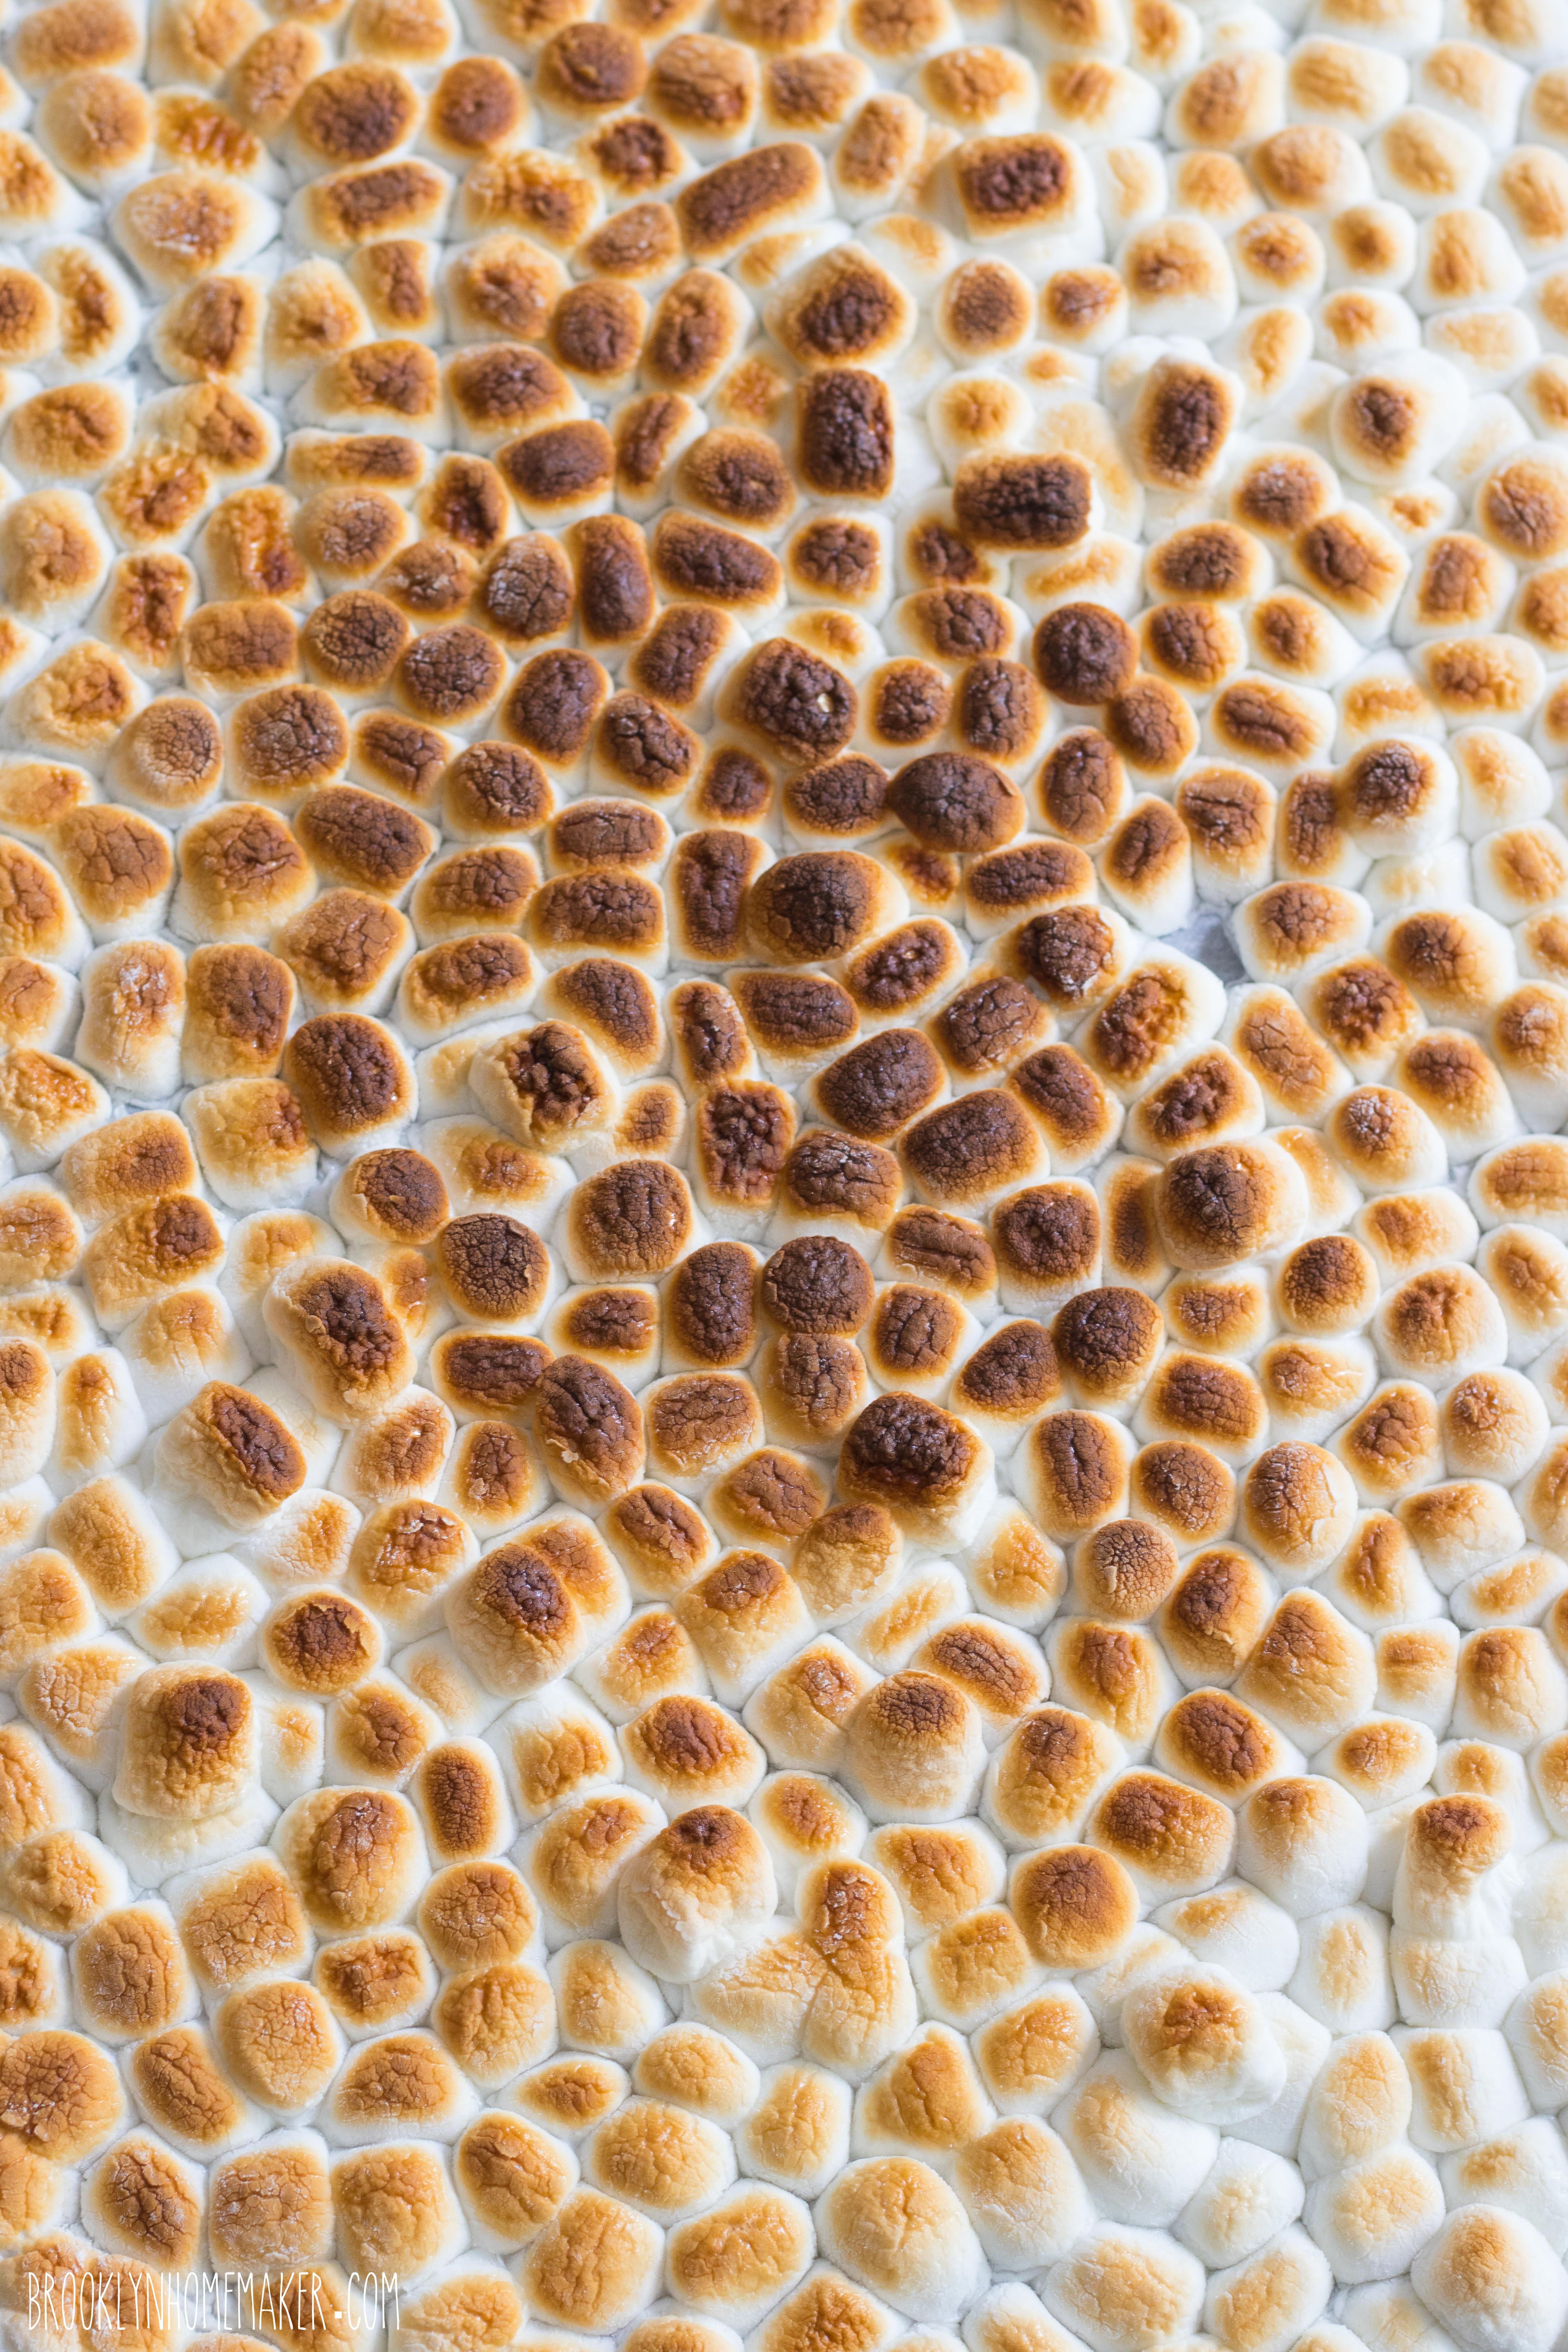
Line a sheet pan with parchment paper and spray the paper with cooking spray or rub with butter. Reserve 1/2 cup of mini marshmallows, and spread the rest on the tray in a single layer.
Toast the marshmallows under the broiler in your oven, rotating the pan if necessary to promote even browning. Keep a close eye on the pan, as this should only take a few minutes but the exact time will depend on the strength of your broiler and how close the pan is to it. The marshmallows should mostly be a dark toasty brown, but not burned. Watch them like a hawk through the oven door.
Let the marshmallows cool to room temperature before proceeding, and they should peel off the greased parchment in one single sticky layer.

Place the toasted marshmallows in a medium saucepan along with the unsalted butter. Heat over medium to medium-high heat, stirring regularly, until the marshmallows are all melted and completely combined with the butter.

Transfer the marshmallow mixture to the bowl of a stand mixer and beat in heavy cream and powdered sugar. Transfer the bowl to the refrigerator and let cool completely, then beat again to loosen the mixture up a little. The mixture will be a bit stiff and sticky, but should be soft enough to spread.

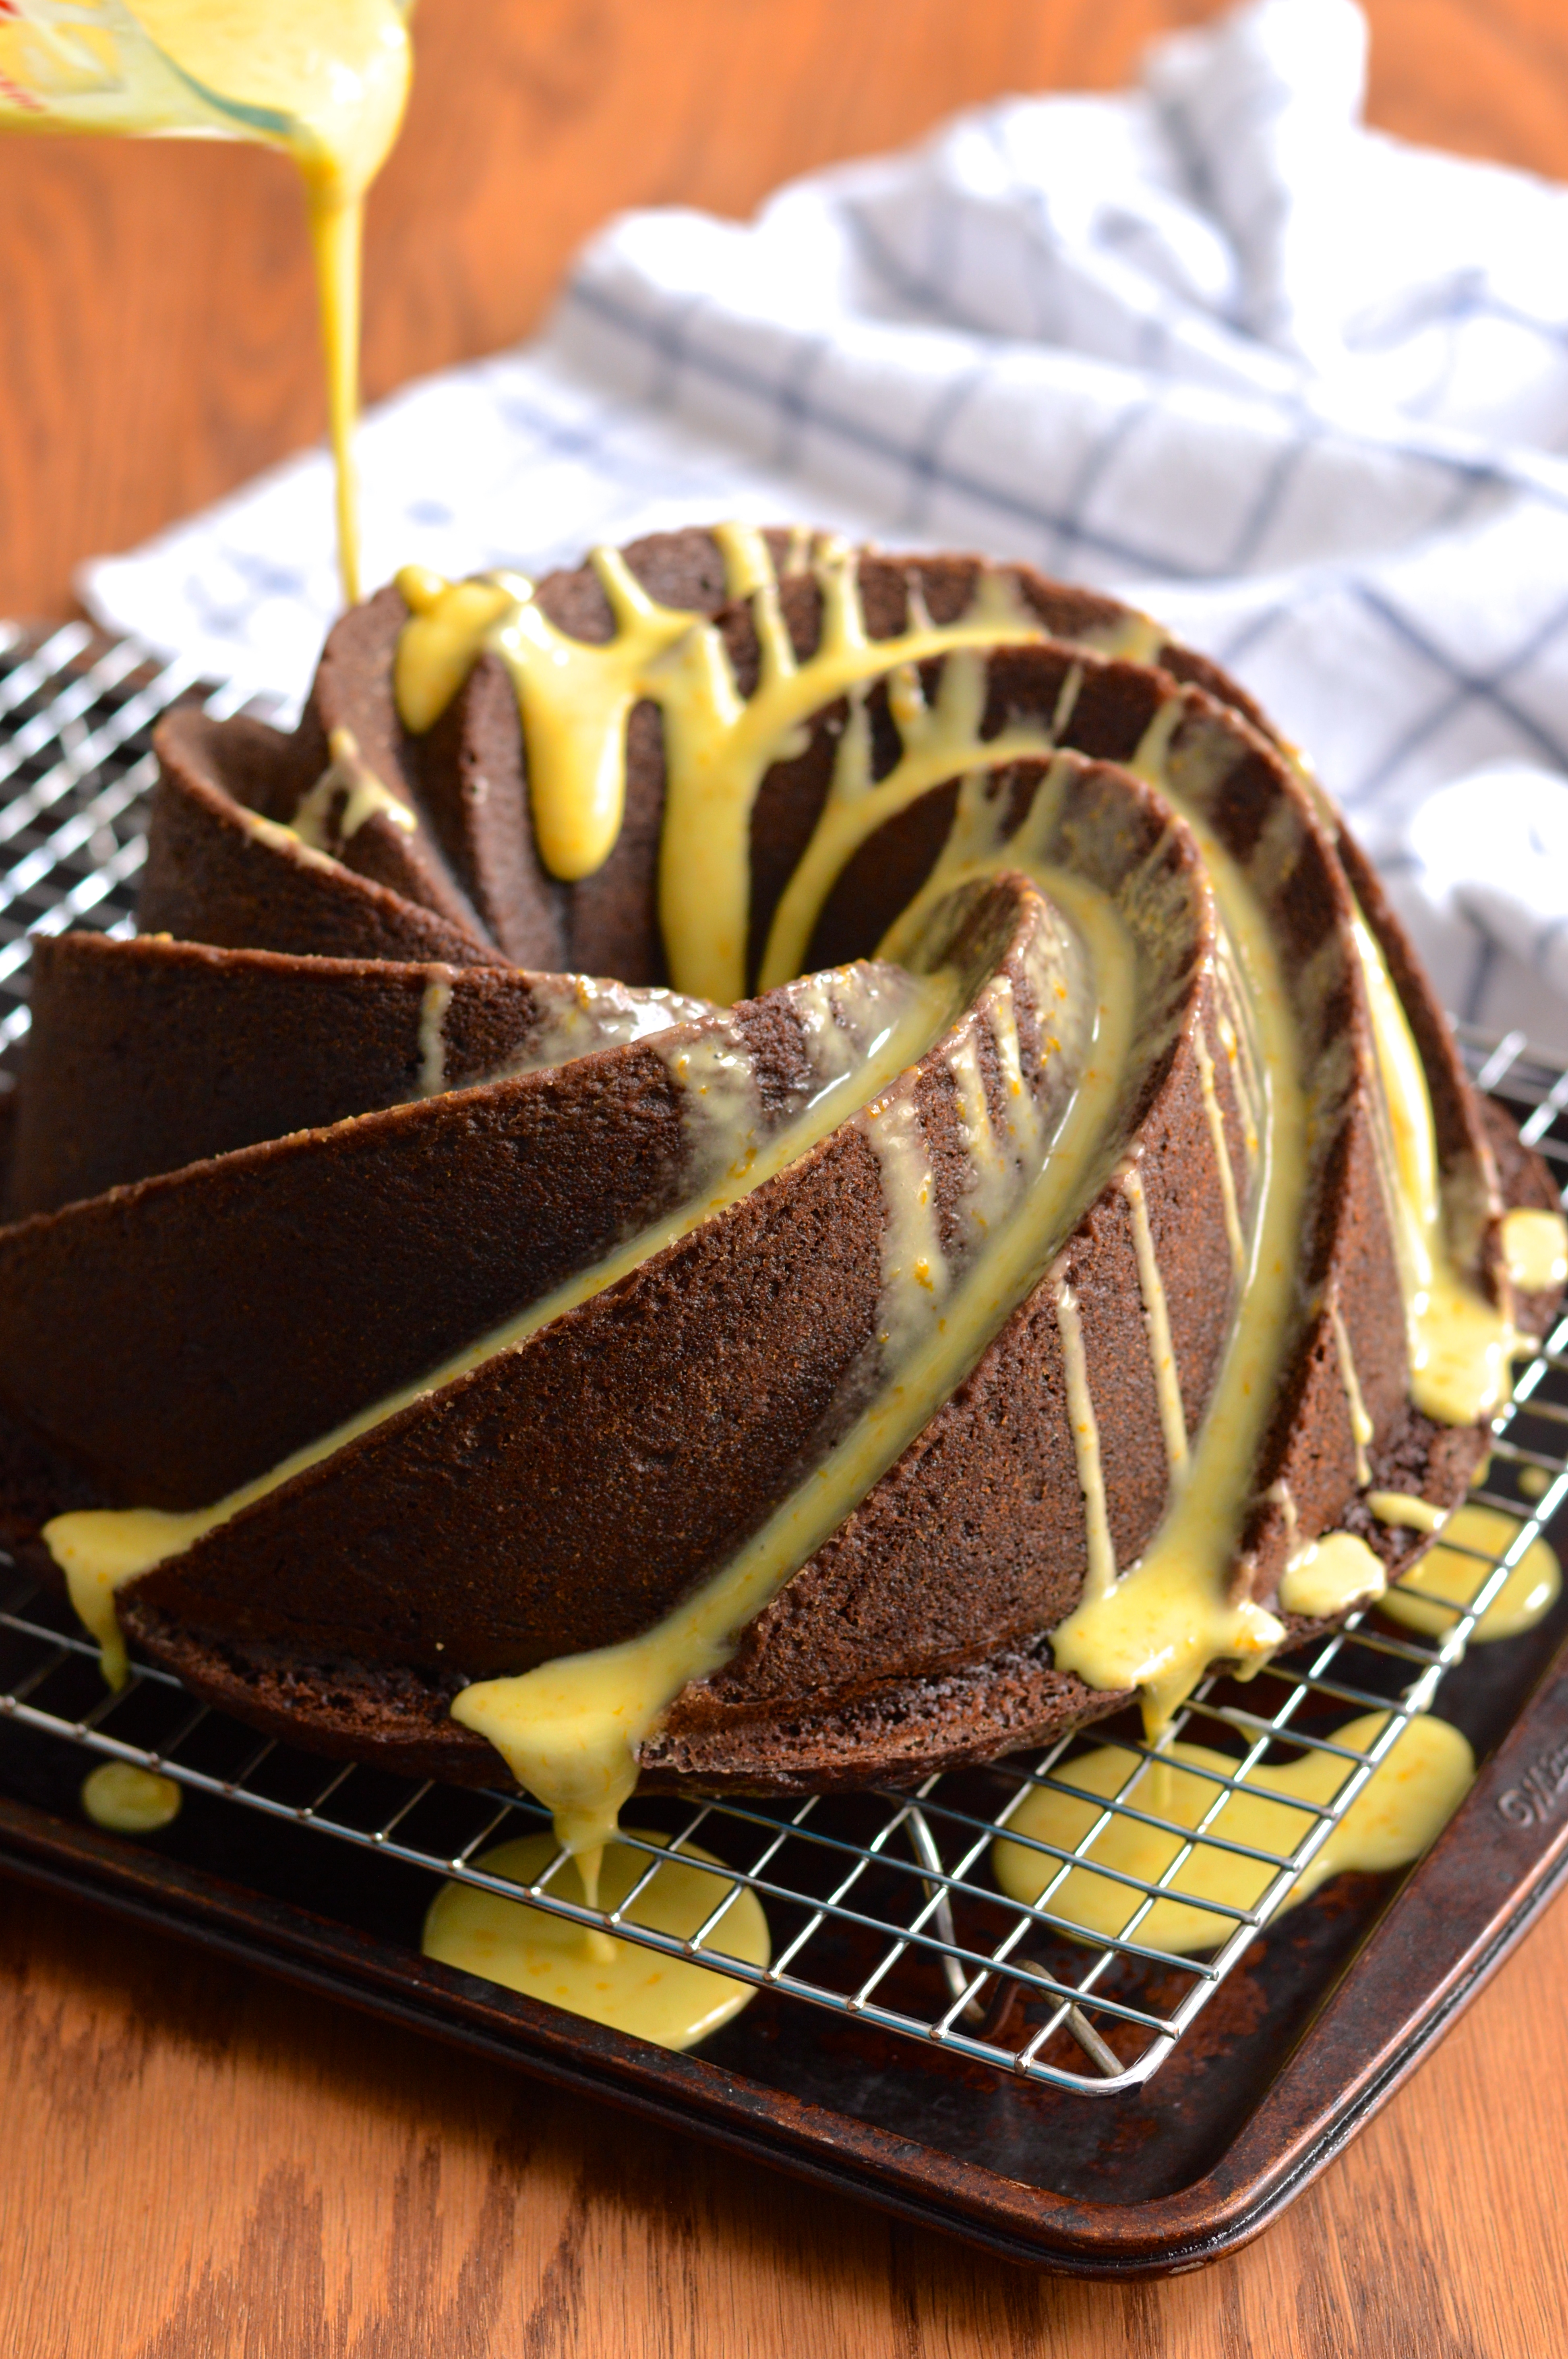
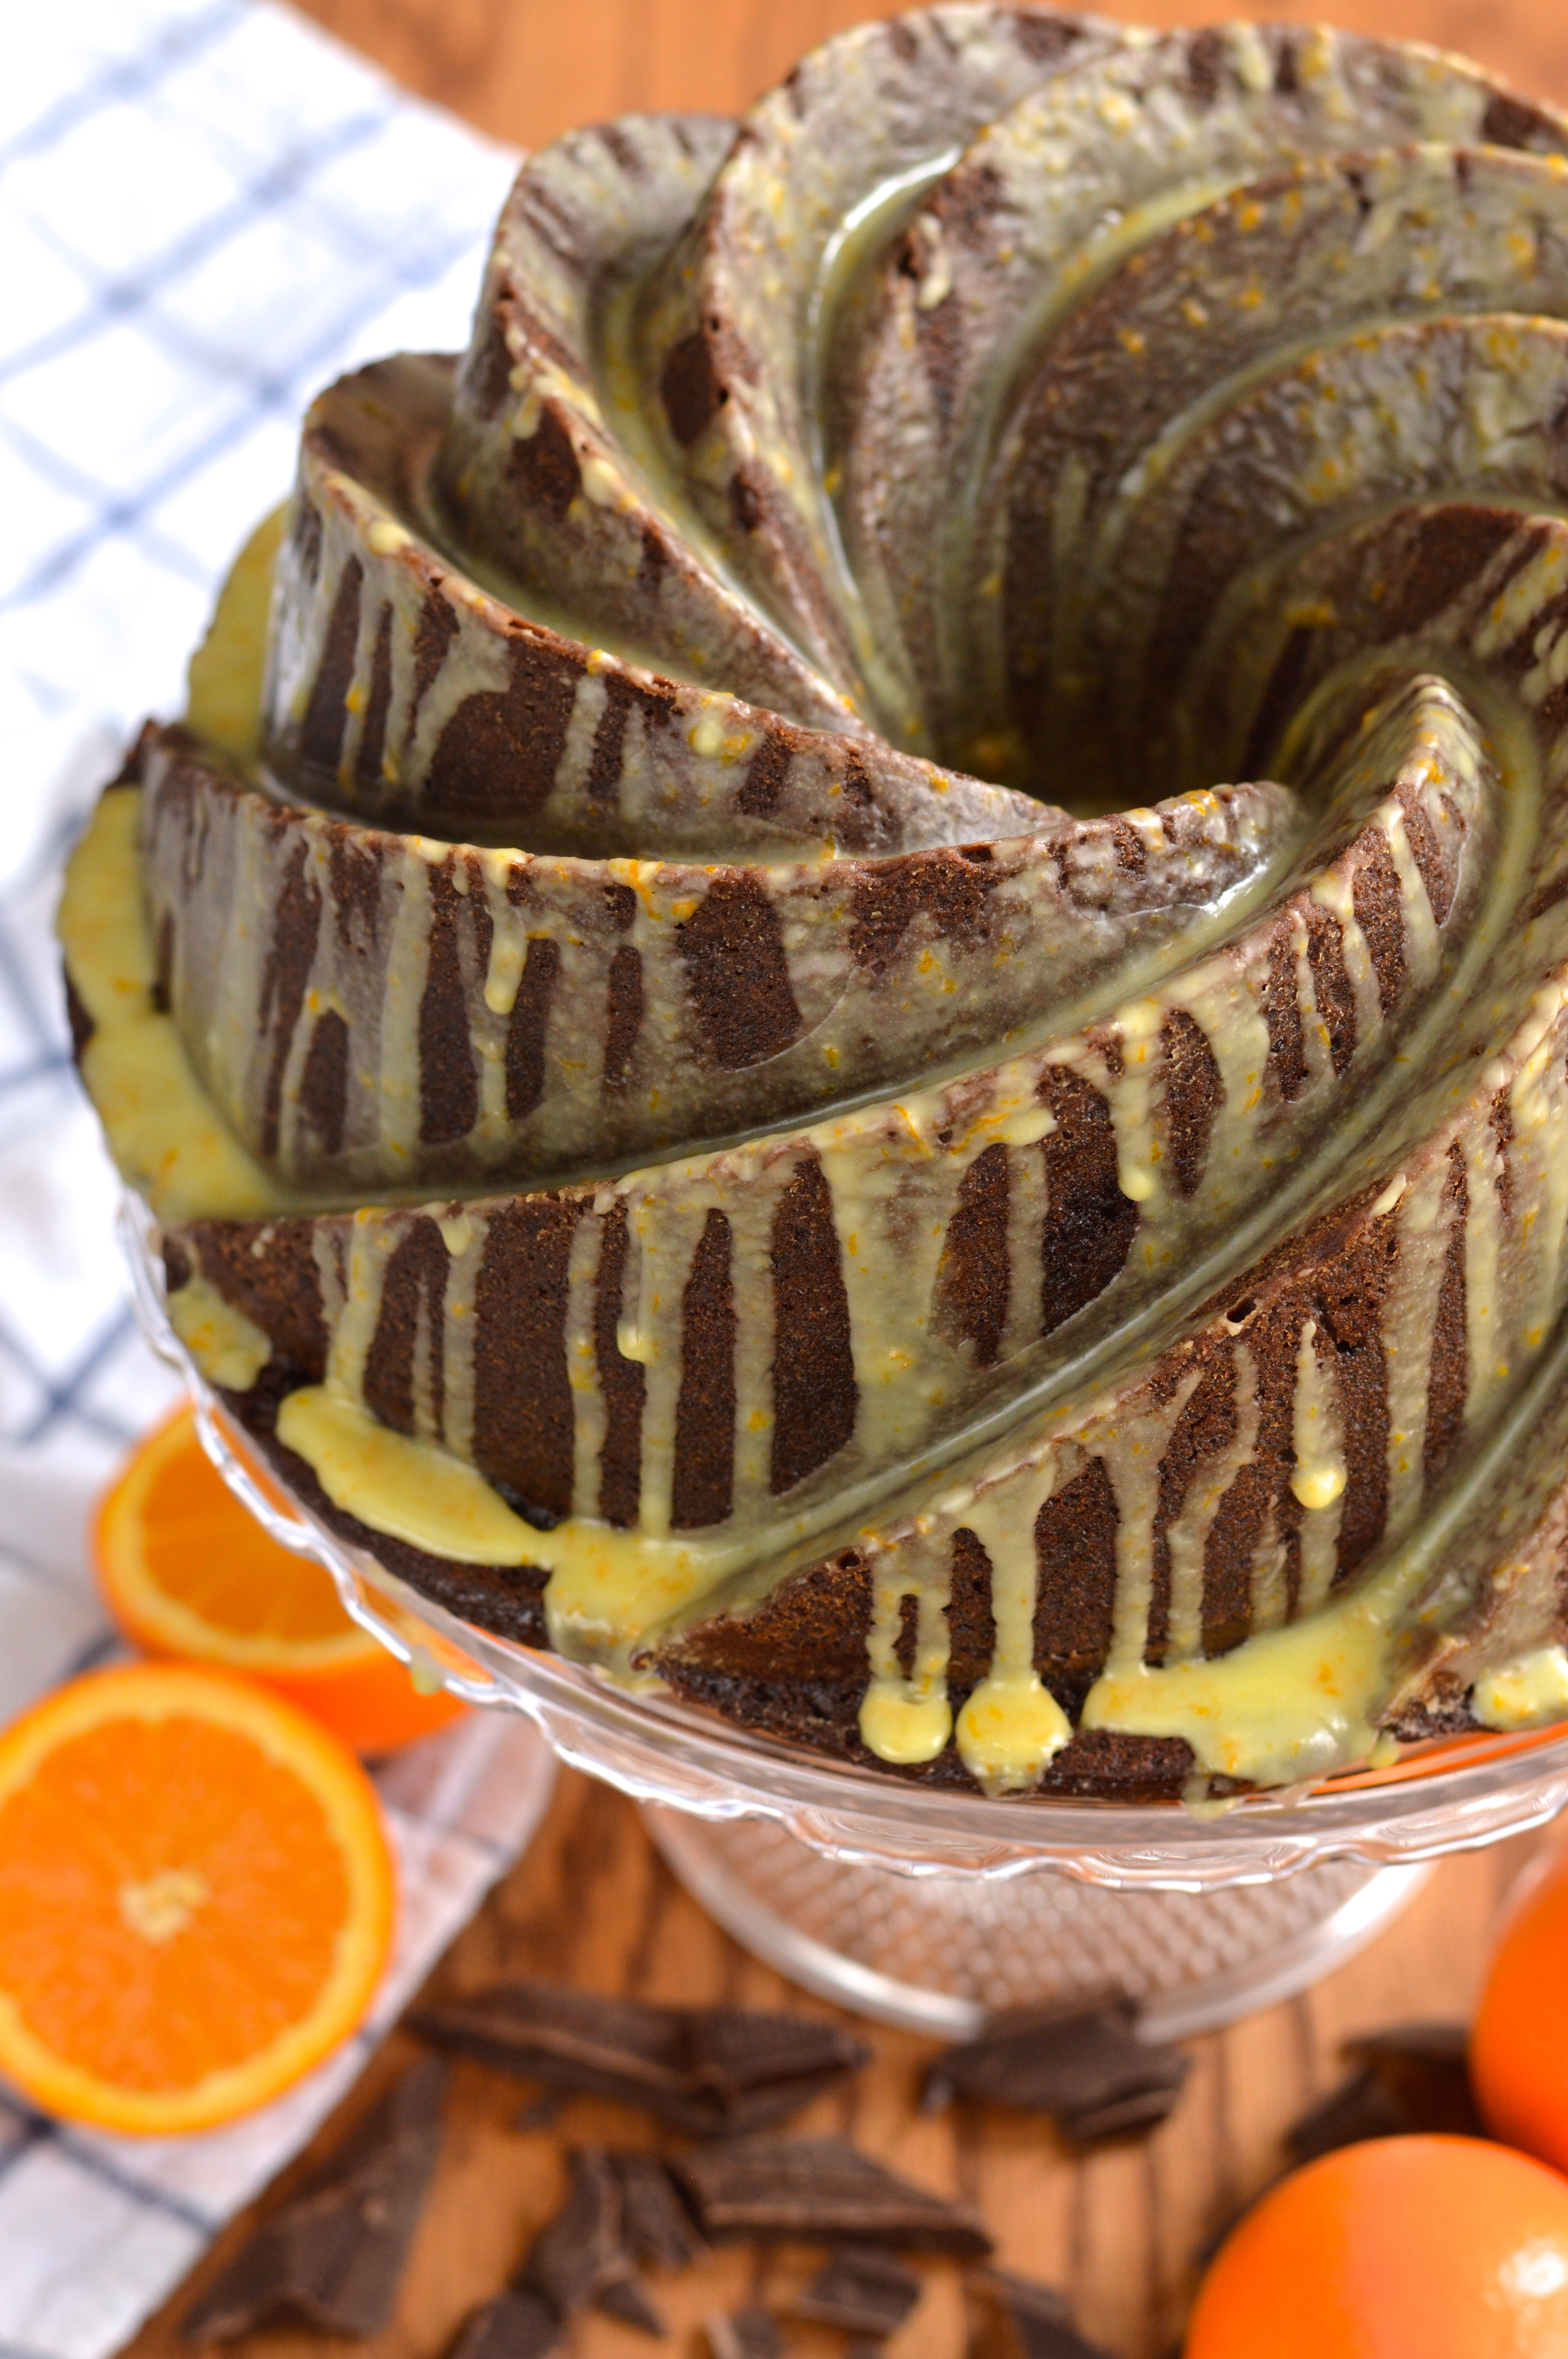
Glossy Ganache Drizzle:
4 oz good quality dark chocolate (60% works well)
1/2 cup + 2 tablespoons heavy cream
1 tablespoon honey
pinch salt

Chop chocolate into small, easily melted pieces and place in a heat proof bowl.
Heat heavy cream, honey, & salt in a small saucepan (or microwave save bowl) just until it comes to a light boil, and immediately pour directly over chocolate. Wait 2 to 3 minutes before stirring until completely smooth and melted and free of lumps. If the mixture seems very hot still it may melt the icing as you pour it so wait a few minutes for it to cool slightly. Do not let it get too cool or it will not drizzle nicely and may look messy.

*Do not make the ganache until the cake is completely iced and ready to decorate.

Decorations: (optional)
Remaining 1/2 cup mini marshmallows
Broken pieces of graham crackers

Toast the remaining mini marshmallow on a sprayed or buttered parchment lined baking sheet in the same way they were toasted for the marshmallow filling. Try to space them out on the pan so they don’t all touch, and toast them to a lighter brown than you did for the filling. It’ll be easier to decorate with individual marshmallows, and they’ll melt less if they’re only lightly toasted.
You probably won’t use the whole 1/2 cup, but it’s nice to have more than you’ll need so you can choose the nicest looking ones.

Assemble cake: 
Place the first cake layer on an 8″ cardboard cake round, serving plate, or cake stand. Using a cake round will make it easier to ice and decorate, especially if you have a revolving turntable for decorating (I use a lazy suzan, but you can also just spin your plate or cake stand while you work).

Fit a piping bag with a large round or star tip and fill with a cup or two of the graham cracker buttercream. Pipe a thick dam of icing around the outside of the cake to contain the marshmallow filling. This will ensure that the filling stays in place and doesn’t squish out when the layers are stacked.

Place half of the toasted marshmallow filling in the center of the cake and spread it smooth and even using an icing spatula. Add the next layer of cake, looking from directly over the top and from eye level at the cake to make sure each layer is directly one above the other, rotating the cake to be certain. Repeat the same procedure with the buttercream dam and the other half of the marshmallow filling, then add the third and final layer of cake and check for straightness again. Using about half of the remaining icing, crumb coat your cake (If you have any icing left in the piping bag, empty it out and use that too). Starting with the top of the cake, spread the icing thin and work some of it down the sides of the cake to completely cover the whole thing in a thin, smooth, even coat of icing. This first layer of icing seals the cake and keeps crumbs from being visible in the outer layer of icing. It may seem like unnecessary trouble, but it really is worth it to get a smooth professional finish on the icing.

Place the cake in the refrigerator for about 30 minutes to an hour to help set the icing and firm up the cake.
Spread the remaining buttercream over the whole cake the same way you did the crumb coat. Start by smoothing the top and slowly working the icing down the sides to cover the cake completely. Try to get the icing as completely smooth as possible with straight sides and a flat, level top. I use a long offset icing spatula. Refrigerate the cake again for at least another 30 minutes (or up to a day).

Make your ganache just before you’re ready to remove the cake from the fridge.

It’s not necessary, but I find it easier to get an even, professional looking drizzle with a squeeze bottle. Slowly add the ganache just around the outer edge of the top of the cake so that it drips in some places. Slowly rotate the cake to do the entire outside edge. Once you’re happy with the amount of drizzle coming down the sides, fill in the center of the top of the cake with ganache, smoothing it flat with a clean icing spatula before the ganache sets.

If you’d like to add decorations to the top of the cake, be sure to add them before the ganache sets.

This cake will keep well in a cake saver at room temperature for a day or two if the weather is not too hot or humid. Otherwise, cover tightly and store in the refrigerator for up to 3 days.

If refrigerating, bring cake to room temperature at least two hours before serving.

Advertisement

basic bundt series: chocolate bundt cake

Hey there! Remember me?

basic bundt series | chocolate bundt cake | Brooklyn Homemaker

If you follow me on instagram, you probably already know from my stories that I have been a busy busy BUSY little bee. If you don’t follow me, btw, what the hell man?

Not cool.

basic bundt series | chocolate bundt cake | Brooklyn Homemaker

In the months since the holidays, I designed and renovated another hair shop with my husband and wonderful amazing mother, and now Maxwell’s has a second location in Crown Heights, Brooklyn. It’s taken every ounce of strength in my being not to call it “Maxwell’s 2, Electric Boogaloo”. Sadly for me, but more appropriately, Russell decided to keep the same name, Maxwell’s for Hair, or Maxwell’s Crown Heights if you need to keep the two locations straight.
It’s absolutely nuts, but you guys, we’re a chain! (Oh Spud!)

I also moved into a new position at work, which is amazing and exciting and perfect for me, but getting used to the new role has taken a lot out of me, which is another reason that I’ve been MIA on this end.

Oh yeah, and I decided to paint our bedroom, which basically turned into redecorating the entire room from floor to ceiling. I’ve brought some of you along with me on this journey via instagram stories, but just to re-cap, I painted the walls, painted the ceiling, got new bedding, added a bunch of purdy new potted plants, and after an exhaustive search, decided on new curtains.
If I can get my shit together maybe I’ll post about it, because there have actually been even more changes in there since I last blogged about my apartment, but who am I kidding?
No promises.

basic bundt series | chocolate bundt cake | Brooklyn Homemaker

Thankfully, things are beginning to calm down around here and it feels like, at least temporarily, life is getting back to normal. The new shop is doing well, I’m adjusting to the new position, and the bedroom is like 93% done.

basic bundt series | chocolate bundt cake | Brooklyn Homemaker

I also got a new oven for Christmas which has not seen nearly enough action, so now that things are calming down I’m hoping to get back into baking much more regularly. Just in time to get back into the kitchen, Nordic Ware released a stunning new bundt pan that you know I just HAD to have.

Their Brilliance pan is modern yet timeless, perfectly elegant, and absolutely gorgeous. I’ve said it time and time again, but on top of being beautiful, Nordic Ware bundt pans are sturdy, heavy-duty, ultra-non-stick, and unbelievably durable. You know I bake a butt load of bundts y’all, so trust me, these pans hold up well to a beating!

They’re also a family owned company that still makes their beautiful bundt pans right here in the good ol’ U.S. of A. The bundt pan is by far their most famous and popular product, and no one makes bundt pans as well as they do.

basic bundt series | chocolate bundt cake | Brooklyn Homemaker

I’ve been trying to perfect a chocolate bundt for a good long while now to share as part of my Basic Bundt Series. I’m always looking for bundt recipes that are classic and simple, relatively easy to prepare, impossibly delicious on their own, but also customizable with a few simple changes or substitutions.

After more recipe testing than I’d like to admit (it’s written all over my waistline), I’ve finally perfected the most amazing chocolate bundt cake the world (or at least my mouth) has ever known!

It’s perfectly moist and tender, with rich chocolate flavor thanks to the addition of both dutch process cocoa and mini chocolate chips, and has a nice depth from the addition of both coffee and brown sugar. It’s also just sweet enough without being cloying, and the best part? No stand mixer! The whole thing can be thrown together with a big bowl, a whisk, and a silicone spatula!

basic bundt series | chocolate bundt cake | Brooklyn Homemaker

A coworker of mine described the flavor of this cake as “Oreos dipped in milk” which honestly might be the highest praise any of my cakes have ever received.

Ever.

Part of that “Oreo” flavor definitely comes from using dutch process cocoa, which is darker and richer, more chocolatey and less cocoa-y, than traditional baking cocoa. It’s definitely worth looking for, but if you can’t find it, don’t worry! This cake will still be incredibly moist and delicious and chocolatey, if just a bit lighter in color and less Oreo-like in flavor.

basic bundt series | chocolate bundt cake | Brooklyn Homemaker

I went with a basic white glaze because I thought it would contrast nicely against the deep dark brown of the cake, and I honestly didn’t think any more chocolate was necessary. If you wanted to though, you could certainly go for a ganache or cocoa glaze instead.

In terms of customization, the sky’s the limit with this basic chocolate cake. One of my favorite ways to jazz it up is to zest an orange or two into the granulated sugar before mixing it in with the dry ingredients, and then swapping out the brewed coffee for some fresh squeezed orange juice!
You could also swap out the mini chocolate chips for a cup of fresh raspberries or halved pitted cherries to add some summer brightness.
If you wanted a more powerful coffee flavor you could also mix a couple teaspoons of espresso powder in with the coffee, or make a glaze with a coffee liqueur. Speaking of adding liqueur to the glaze, why not go nuts with some Amaretto or Frangelico, or even go all out with bourbon or rum?

Gussied up and personalized, or un-fussed with and made as written, this chocolate cake is a definite crowd pleaser y’all!

basic bundt series | chocolate bundt cake | Brooklyn Homemaker

Chocolate Bundt Cake

1 cup hot brewed coffee
3/4 cup dutch process cocoa powder (plus more for pan) *see note
1 stick (8 tablespoons) unsalted butter (plus more for pan)
1/2 cup peanut (or vegetable) oil
3/4 cup buttermilk
2 teaspoons real vanilla extract
2 eggs
1 cup brown sugar
1 cup granulated sugar
2 1/2 cups all-purpose flour
1 1/4 teaspoons coarse kosher salt
1/2 teaspoon baking soda
1 teaspoon baking powder
3/4 cup mini chocolate chips (optional) **see note

Preheat the oven to 350F.
Brush (or spray) a 10 to 12 cup bundt pan with softened butter (or oil), and add a few tablespoons of cocoa powder. Shake the cocoa around the pan until evenly distributed, and tap out any excess.

In a large measuring cup or microwave safe bowl, combine the coffee and cocoa powder and whisk out any lumps. If the coffee is still very hot, add the stick of butter and stir until melted or, if necessary, microwave it just until the butter is melted. Whisk in oil, buttermilk, and vanilla to cool the mixture down a bit before adding the eggs. Then add the eggs and brown sugar and whisk until well blended and free of lumps.

In a separate bowl, whisk together granulated sugar, flour, salt, & baking soda and powder. Make a well in the center of the flour and pour in the liquid ingredients. With a silicone spatula, stir just until there are no visible streaks of dry flour left. Then stir in the mini chocolate chips if using, just until evenly distributed.

Pour batter into the prepared pan, not more than 3/4 of the way up the sides. If using a 12 cup pan, all the batter will fit. In a 10 cup pan, you may want to reserve just a tiny bit to avoid a mess in your oven. Bake in the center of the oven for 50 to 55 minutes, or until the cake no longer jiggles, and the top springs back when gently pressed with a fingertip. You could try a toothpick or cake tester but the melted chocolate chips may give you a false reading.

Cool for about 30 minutes on a wire rack before turning out of pan. Turn out onto the rack and cool completely before glazing.

Best Simple Bundt Cake Glaze:
1 1/2 cups powdered sugar
1 teaspoon vanilla extract
2 to 2 1/2 tablespoons half & half

Mix sugar, vanilla, and 2 tablespoons half & half together in a small bowl. Mix until completely smooth and free of lumps. You want the glaze to be very thick so it doesn’t slide right off the cake, but it does need to be liquid enough that it pours smoothly. If necessary, thin the glaze out with more half & half, adding only about 1/4 a teaspoon at a time to avoid thinning it too much.

Place a sheet pan under the cooling rack to catch any drips, and pour the glaze in a steady stream over the cake.. Let the glaze harden for at least 30 minutes before slicing.

Cake can be stored, tightly covered at room temperature, for about 3 days.

cooks notes:
* I use a dutch process cocoa for a deep, rich chocolate flavor, but if you can’t find it, regular cocoa powder will work.
** If you use regular size chocolate chips or chunks, they’ll likely sink to the bottom of the pan and could cause the cake to stick. The minis however, are light enough to stay evenly distributed throughout the batter as it bakes.

dark chocolate & oreo mini skull cakes

When I was a kid, Halloween was my absolute favorite holiday.

dark chocolate & oreo mini skull cakes | Brooklyn Homemaker

I mean, I’ve always loved Thanksgiving too, for the food of course, but as a young kid Halloween was the freakin’ best. Turkey and pumpkin pie are great and all but costumes and candy, and running around at night like a little lunatic with fake vampire teeth? Grandma’s cornbread dressing couldn’t hold a candle…

I’ve had countless costumes over the years, but I’ll never forget an especially uncomfortable year dressed as Frankenstein with tons of sticky green makeup and itchy stick-on eyebrows and neck bolts. After that, the simpler and more elegant Dracula was definitely my go to.
Each year I’d get a new costume complete with fangs, cape, and gold medallion, and as a young gay boy I already had all the crisp white button downs and black dress pants that were required but not included with the costume.  (No jeans and T-shirt for this little sissy boy!)
I think it really was the dressed up, fancy man aspect of Dracula that appealed to me most year after year, and it wasn’t until I found my grandma’s old wig in her bathroom closet that the appeal started to wear off…

dark chocolate & oreo mini skull cakes | Brooklyn Homemaker

These days I usually spend most of the month of October thinking up all sorts of witty, hysterical costumes that I could wear, but never do. The last time I dressed up was for work, about 4 years ago. I’d just started working at Whisk slinging fancy kitchen gear, and we all came up with this hilarious plan to come to work dressed as a Food Network star.
Group costumes are the best! What could go wrong?!?!

A few days later I show up to work in full Ina Garten regalia, and oops! Everyone either forgot or didn’t have time to get their costumes together.  One person, who usually works from home, loved the idea and actually did come in for an hour or two dressed as Alton Brown (essentially dressed as an older, nerdier version of himself) to take pictures, but everyone else either didn’t dress up or threw something else together at the last minute.
As I stood there working my full shift in an oversized navy blouse, huge clip on pearl earrings, lipstick, and an itchy bob wig; I vowed never again to be duped by allure of an amazing group costume idea.

I haven’t dressed up since.
Womp Womp.

dark chocolate & oreo mini skull cakes | Brooklyn Homemaker

Even though I’m too old for trick-or-treating and haven’t put on a costume in years, I really do still have a special place in my heart for Halloween.

I like to imagine that some day in the future I’ll be the type of adult who’s famous among his circle of friends for hosting amazing costume parties that are talked about for years to come. Basically I dream of one day throwing Halloween parties just like the ones on Roseanne, complete with decorations so elaborate and costumes so perfectly spot-on that everyone I know will try, and fail, to one-up me year after year.
By the way, am I the only one who’s ever wondered how the lower middle class Connor family, who always seemed to have trouble paying their bills on time, came up with all the money for their costumes and decorations?
I guess it doesn’t matter, but, like, that stuff ain’t cheap!

dark chocolate & oreo mini skull cakes | Brooklyn Homemaker

With all my dreams of Halloween entertaining one-upmanship, the minute I saw this adorable haunted skull cakelet pan, I knew that I HAD to have it.

You all know I love Nordic Ware. I’ve told you more than once twice three times (a lady), but after finally having a chance to use this pan you’ll have to excuse me as I wax poetic once again.

Nordic Ware has been making exceptional cookware and bakeware right here in the US for 70 years now, and even after all this time they’re still a family owned company. The bundt pan is by far their most famous and most popular product, but they also specialize in all sorts of elaborate and festively shaped baking pans. No one can compare to their quality and selection, and ALL of their pans are sturdy, heavy duty, ultra-non-stick, and unbelievably durable.
I should know! I put their pans through the ringer!

dark chocolate & oreo mini skull cakes | Brooklyn Homemaker

There is so much detail in these little skulls that I was worried it wouldn’t read once the cakes were baked, or that I’d have problems getting the cakes out cleanly from all the intricate details face and teeth. At this point I should have known that I had no need to worry. These little cakes released like a dream and all that detail came across with amazing definition in the finished cakes.

There’s actually so much detail in these little cakes, that even though I tried decorating them in several ways, I found that my favorite cakes were the simplest, with just a double coat of thin sugary glaze. Of course you can decorate them however you choose, but I really think the simpler, the better. In fact, as much as I love the creepy look of the bright red chocolate candy eyes, I worry that even they take away from the scary perfection of the little cakes as they were straight out of the pan.

dark chocolate & oreo mini skull cakes | Brooklyn Homemaker

The recipe below, simply adapted from my favorite chocolate bundt cake recipe, makes 12 mini skulls, or 2 pans worth. If you only have 1 pan, make sure you wash the pan really well between batches. I also recommend that you dry it well and throw it in the fridge or freezer for a few minutes before reapplying the butter and cocoa. Otherwise the pan will be warm from being washed and the butter will melt and make a mess when you try to dust it with cocoa.
If you don’t have this pan at all, you can get it here, or you can just make this recipe in one 10 cup bundt pan. It won’t be as scary to look at, but it’ll certainly taste just as chocolatey and delicious!

By the way, if you’ve never tried this trick before, using cocoa powder works just as well as flour to prevent the cakes from sticking to the pan, but helps the cakes look extra dark and chocolatey, rather than the dusty uneven look flour sometimes gives to the outside of chocolate cakes.

dark chocolate & oreo mini skull cakes | Brooklyn Homemaker

The flavor of these little cakes is deep dark chocolate perfect with a super tender and moist crumb. Thanks to that simple powdered sugar glaze, these little cakes almost taste like a reeeeeally good moist chocolate doughnut.

The Oreos, complete with cream (don’t use boxed crumbs!), add a really nice touch, especially if you leave some in nice big chunks so they don’t melt and disappear into the batter. Essentially you just want to put them in a plastic bag and crush ’em up with your hands or whack at them with a rolling-pin until there are no whole cookies left, but you still have lots of bigger pieces.

Now tell me, what kid (or adult) could resist a super moist chocolate cake filled with oreo cookie crumbs? Especially one in the shape of a cute-yet-terrifying little skull???

dark chocolate & oreo mini skull cakes | Brooklyn Homemaker

Dark Chocolate & Oreo Mini Skull Cakes

adapted from Joy the Baker

For the Cake:
1 1/4 cups strong hot coffee
3/4 cup Dutch process cocoa powder (I used “Double Dutch Cocoa“) plus extra for pan
2 1/2 cups sugar
1 1/4 teaspoons kosher salt
2 teaspoons baking soda
2 whole eggs
1 egg yolk
1 1/4 cups buttermilk
1 cup peanut oil or any neutral vegetable oil
2 teaspoons vanilla extract
3 cups all-purpose flour
2 cups (about 1 package) roughly crushed oreos (NOT oreo cookie crumbs, you want the cream too)

For the Glaze:
2 cups powdered sugar
1/4 cup milk
1 teaspoon vanilla extract

For decorating (all optional):
Red M&Ms
Sanding or decorating sugar (black, red, or silver)
white mini nonpareils
More crushed Oreos

Place an oven rack in the center of the oven and preheat to 350 degrees F.
Brush a skull cakelet pan (* see note) with softened butter, and dust with cocoa powder, tapping out any excess.

Whisk coffee and cocoa together in a bowl together until free of lumps and set aside.
In the bowl of a stand mixer with a whisk attachment, mix together sugar, salt, baking soda, eggs and egg yolk on low for just one minute. Add the buttermilk, oil and vanilla extract and mix on low again for another minute.
Add the flour and mix on medium speed for 2 minutes more. Add the cocoa mixture and mix on medium speed for 3 minutes. Finally, stir in the roughly crushed Oreos just until evenly distributed throughout. The batter will seem quite loose and liquid, it’s supposed to, don’t worry.
Pour half of the batter into the prepared cake pan, filling each cavity about 3/4 of the way up. This recipe makes two pans worth of batter. If you have two pans, you can bake them both at once, or once the first batch is out of the pan you can wash, dry, and cool the pan in the fridge before reapplying butter and cocoa and baking the remaining batter.
Bake for 20-30, or until a cake tester or toothpick inserted in the cake comes out clean.

Let the cake cool for at least 15 minutes before inverting onto a cooling rack.

To make the glaze:
Whisk the powdered sugar, milk, and vanilla together in a medium bowl until smooth and free of lumps.

To glaze and decorate:
After some trial and error I found that the easiest way to glaze the cakelets was to pick up them up by the base and dip them into the glaze like a doughnut. Remove from the glaze, let drip dry, and turn over to dry on a cooling rack. I actually liked the look of the glaze best when the cakes were glazed twice. If you want to double glaze, wait for the first coat to dry five minutes or so before dipping again.
If you’d like to decorate with sanding sugar, crushed Oreos, or mini nonpareils, sprinkle them over the cakes before your final coat of glaze has dried. If desired, add red chocolate candies in the eye sockets.

*Note: If you don’t have a skull cakelet pan this recipe makes 1 (less spooky but equally delicious) bundt cake in a 10 cup bundt pan. A bundt will need to bake for about 55 to 65 minutes .

chocolate orange bundt cake #bundtbakers

Have I ever mentioned the fact that I LOVE chocolate?

chocolate orange bundt cake | Brooklyn Homemaker

Well, it’s true.
I do.

chocolate orange bundt cake | Brooklyn Homemaker

I know that it’s probably hard to believe, but you’re going to have to get used to the idea.

chocolate orange bundt cake | Brooklyn Homemaker

When I found out that Tanya of Dessert Stalking had chosen chocolate as the theme for this month’s #bundtbakers, I was over the moon. Thank you Tanya!!! I’ve made a lot of bundts in this group, but this whole time I’ve only made one other chocolate cake. It’s a cryin shame is what it is, and I promise that I’m appropriately ashamed.

chocolate orange bundt cake | Brooklyn Homemaker

I usually prefer dark chocolate over milk or white, but to be honest I’ll take any and all of the above given the opportunity. I’m the kind of person who keeps a dark chocolate bar (or two) hidden in a drawer in my night stand just in case of emergencies. I only need a few squares at a time when I need my fix, but when I need it, I really need it.

I know I inherited that trait from my mom, who’s secret chocolate stash is kept in the drawers of her vanity. When I first found out about it I couldn’t believe that she would dare to withhold chocolate from me and have the audacity to keep some for herself. These days, I get it.

chocolate orange bundt cake | Brooklyn Homemaker

When I was trying to decide on a chocolate bundt to make this month I was totally overwhelmed by the possibilities. There are just too many delicious things you can do with chocolate and I couldn’t even begin to narrow it down.

Every time I’d think of something, my mind kept wanting to wander back to a chocolate orange bundt that I made when I was just getting this blog off it’s feet. That cake was so moist and tender and brightly flavored and super duper chocolatey that it might just be one of my favorite bundts I’ve ever made.

chocolate orange bundt cake | Brooklyn Homemaker

Now, I don’t want to get into the habit of repeating recipes around here, but I knew this cake deserved to be revisited. I originally made it way back in the beginning, back before I’d found out about and joined up with the #bundtbakers gang, back when I was still using an iphone to take my photos, and most importantly, back when I didn’t really have many readers other than my mother. Not only is this recipe new to the bundt bakers, but I also think it deserves to be highlighted with better photos and to be seen and shared with as many people as possible, which simply wasn’t the case the first time around.

I’ve done this with a small handful of my other favorite recipes from the first few months of Brooklyn Homemaker, and I saw no reason not to revisit this one too. So, chocolate orange bundt cake it was.

chocolate orange bundt cake | Brooklyn Homemaker

I made a few minor adjustments to the original recipe from back in 2013, but for the most part little has changed. This cake is rich and dark and sublimely chocolatey with an assertive cocoa flavor backed up with soft and melty morsels of finely chopped dark chocolate. The orange zest and juice in the recipe, along with the orange glaze poured over the top, elevate this cake and give it a boost of sweet fruity brightness that can be unusual with chocolate cakes. The crumb is soft and tender, and the cake is so moist that it stays perfectly delicious for several days if covered well. I took half of the cake to work with me and my coworkers devoured it and raved about how wonderful it was. One of them loved it so much that she took a slice home to her roommate, and has been asking me ever since when I’d be posting the recipe so she could try it herself.

If you’re into chocolate, this is a cake you really gotta try. If you’re not, you need your head examined.

chocolate orange bundt cake | Brooklyn Homemaker

Another thing you gotta do if you’re into chocolate is make sure to scroll down past the recipe to check out all the other mouth-watering, craving-satisfying, unbelievable chocolatey creations the other bundt bakers came up with this month. I myself can barely handle all this chocolate in one place.

chocolate orange bundt cake | Brooklyn Homemaker

Chocolate Orange Bundt Cake

adapted from Joy the Baker

For the Cake:
1 1/4 cups orange juice
zest of 3 large oranges
3/4 cup Dutch process cocoa powder
2 1/4 cups sugar
1 1/4 teaspoons kosher salt
2 teaspoons baking soda
2 whole eggs
1 egg yolk
1 1/4 cups buttermilk
1 cup peanut oil (or other neutral vegetable oil)
1 1/2 teaspoons vanilla extract
2 1/2 cups all-purpose flour, sifted
1 cup finely chopped dark chocolate or mini chocolate chips

For the Glaze:
2 cups confectioners’ sugar
1/4 cup fresh orange juice
zest of one orange

Place an oven rack in the center of the oven and preheat to 350 degrees F.
Generously butter and flour a 10 to 12 cup Bundt pan and set aside.

Whisk orange juice and cocoa powder in a small saucepan and bring to a simmer, whisking frequently. Remove from heat and let come to room temperature.

In the bowl of a stand mixer with a whisk attachment, mix together the sugar and orange zest until the zest is well distributed and has turned the sugar orange. Add the salt, eggs and egg yolk and mix on low for about 1 minute. Add the buttermilk, oil and vanilla extract and mix on low again for another minute.

Add the flour and baking soda and mix on medium speed for 2 minutes.  Add the cooled cocoa mixture and mix on medium speed for 3 minutes.  Mix in chopped chocolate on low. The batter will be very loose.  Pour into the prepared cake pan and bake for 55-65, or until a cake tester or toothpick inserted in the cake comes out clean.

Let the cake cool in the pan for about 20 minutes before inverting onto a rack to cool completely.

make the glaze:
Whisk confectioner’s sugar, orange juice and zest until free of lumps. I like to do this in a glass measuring cup with a spout so you can pour the glaze easily.

Place a sheet pan under the rack with the completely cooled cake. Pour the glaze over the Bundt cake, covering it completely. If you have leftover glaze pour it from the pan back into the measuring cup and go back in for another coat. Transfer to a cake plate or platter by gently sliding the cake off the rack, use a thin spatula to help lift it if necessary. Leave at room temperature until ready to serve. The glaze will harden and form a sort of candy shell and keep the cake nice and moist.

chocolate orange bundt cake | Brooklyn Homemaker

It’s probably a good thing that I’m not able to taste all of these cakes because I’d probably eat until I burst given the chance. All this chocolate sure has me drooling guys!!!

BundtBakers

.
Interested in learning more about us? #BundtBakers is a group of Bundt loving bakers who get together once a month to bake Bundts with a common ingredient or theme. We take turns hosting each month and choosing the theme/ingredient. You can see all our of lovely Bundts by following our Pinterest board right here. Links are also updated after each event on the BundtBaker home page here.

If you are a food blogger and would like to join us, just send an email with your blog URL to foodlustpeoplelove@gmail.com. If you are just a lover of Bundt baking, you can find all of our recipe links by clicking our badge above or on our group Pinterest board.