Desserts

blueberry buttermilk bundt cake

Okay. I think it’s officially safe to call it spring without fearing that it’ll snow tomorrow.

blueberry buttermilk bundt cake | Brooklyn Homemaker

Russell and I, along with our pups, have been spending a TON of time out in our little yarden lately. We plan to do a lot of entertaining back there this summer, so we’ve been trying to get the space lookin’ purdy and comfortable. As I said in my last post, we didn’t have stairs to get out there until the end of last summer, so now that we do, we really want to make the most of the space. I also mentioned in my last post that there used to be a big picnic table back there when we moved in, but it was really poorly built and rickety, and the heavy snowfalls this past winter finally caused its demise.

blueberry buttermilk bundt cake | Brooklyn Homemaker

For a while now we’ve been looking into getting a new table to replace it, and over the weekend we actually went and got one! A while ago we found a nice large (and relatively affordable) outdoor table at Ikea but we didn’t end up buying it because it was too big for us to get home. We don’t have a vehicle so trying to transport a big ol’ table takes some serious planning. Shipping would essentially double the price, renting a car in the city is outrageously expensive, and as soon as you utter the word, “IKEA”, car services and taxis see $$$ signs and find fun new ways to charge extra.

blueberry buttermilk bundt cake | Brooklyn Homemaker

We have some friends who have a truck, but at first we thought it was too big a favor to ask of them. If you’ve never been to the Ikea in Brooklyn, or driven home from it, let me tell you, it’s a serious ordeal. Basically it’s like asking someone to drive you into the center of hell and back. As much as I love Ikea, the Ikea in Brooklyn (especially on a weekend) is a total madhouse filled with pushy grumpy humans who would happily gouge your eyes out if it meant they got their swedish meatballs before you did. After much hemming and hawing, we finally we decided to swallow our pride, cross our fingers, and just ask them. Miraculously, they actually said YES!

blueberry buttermilk bundt cake | Brooklyn Homemaker

We knew that this big favor deserved a BIG thank you, so we decided that the best thing to do was to fill their bellies with something wonderful. Since the weather somehow seems to be getting warmer and warmer, I thought a nice summery blueberry bundt cake would be just the thing.

blueberry buttermilk bundt cake | Brooklyn Homemaker

I know I’ve said this before, but I really do LOVE bundt cakes. Perfectly impressive and elegant without being too much hassle or fuss. I think it might be their retro 1950s ladies-society-club kind of feeling that I find so charming about them. Or maybe it’s because they remind me of my grandmother. Do I really need a reason?

blueberry buttermilk bundt cake | Brooklyn Homemaker

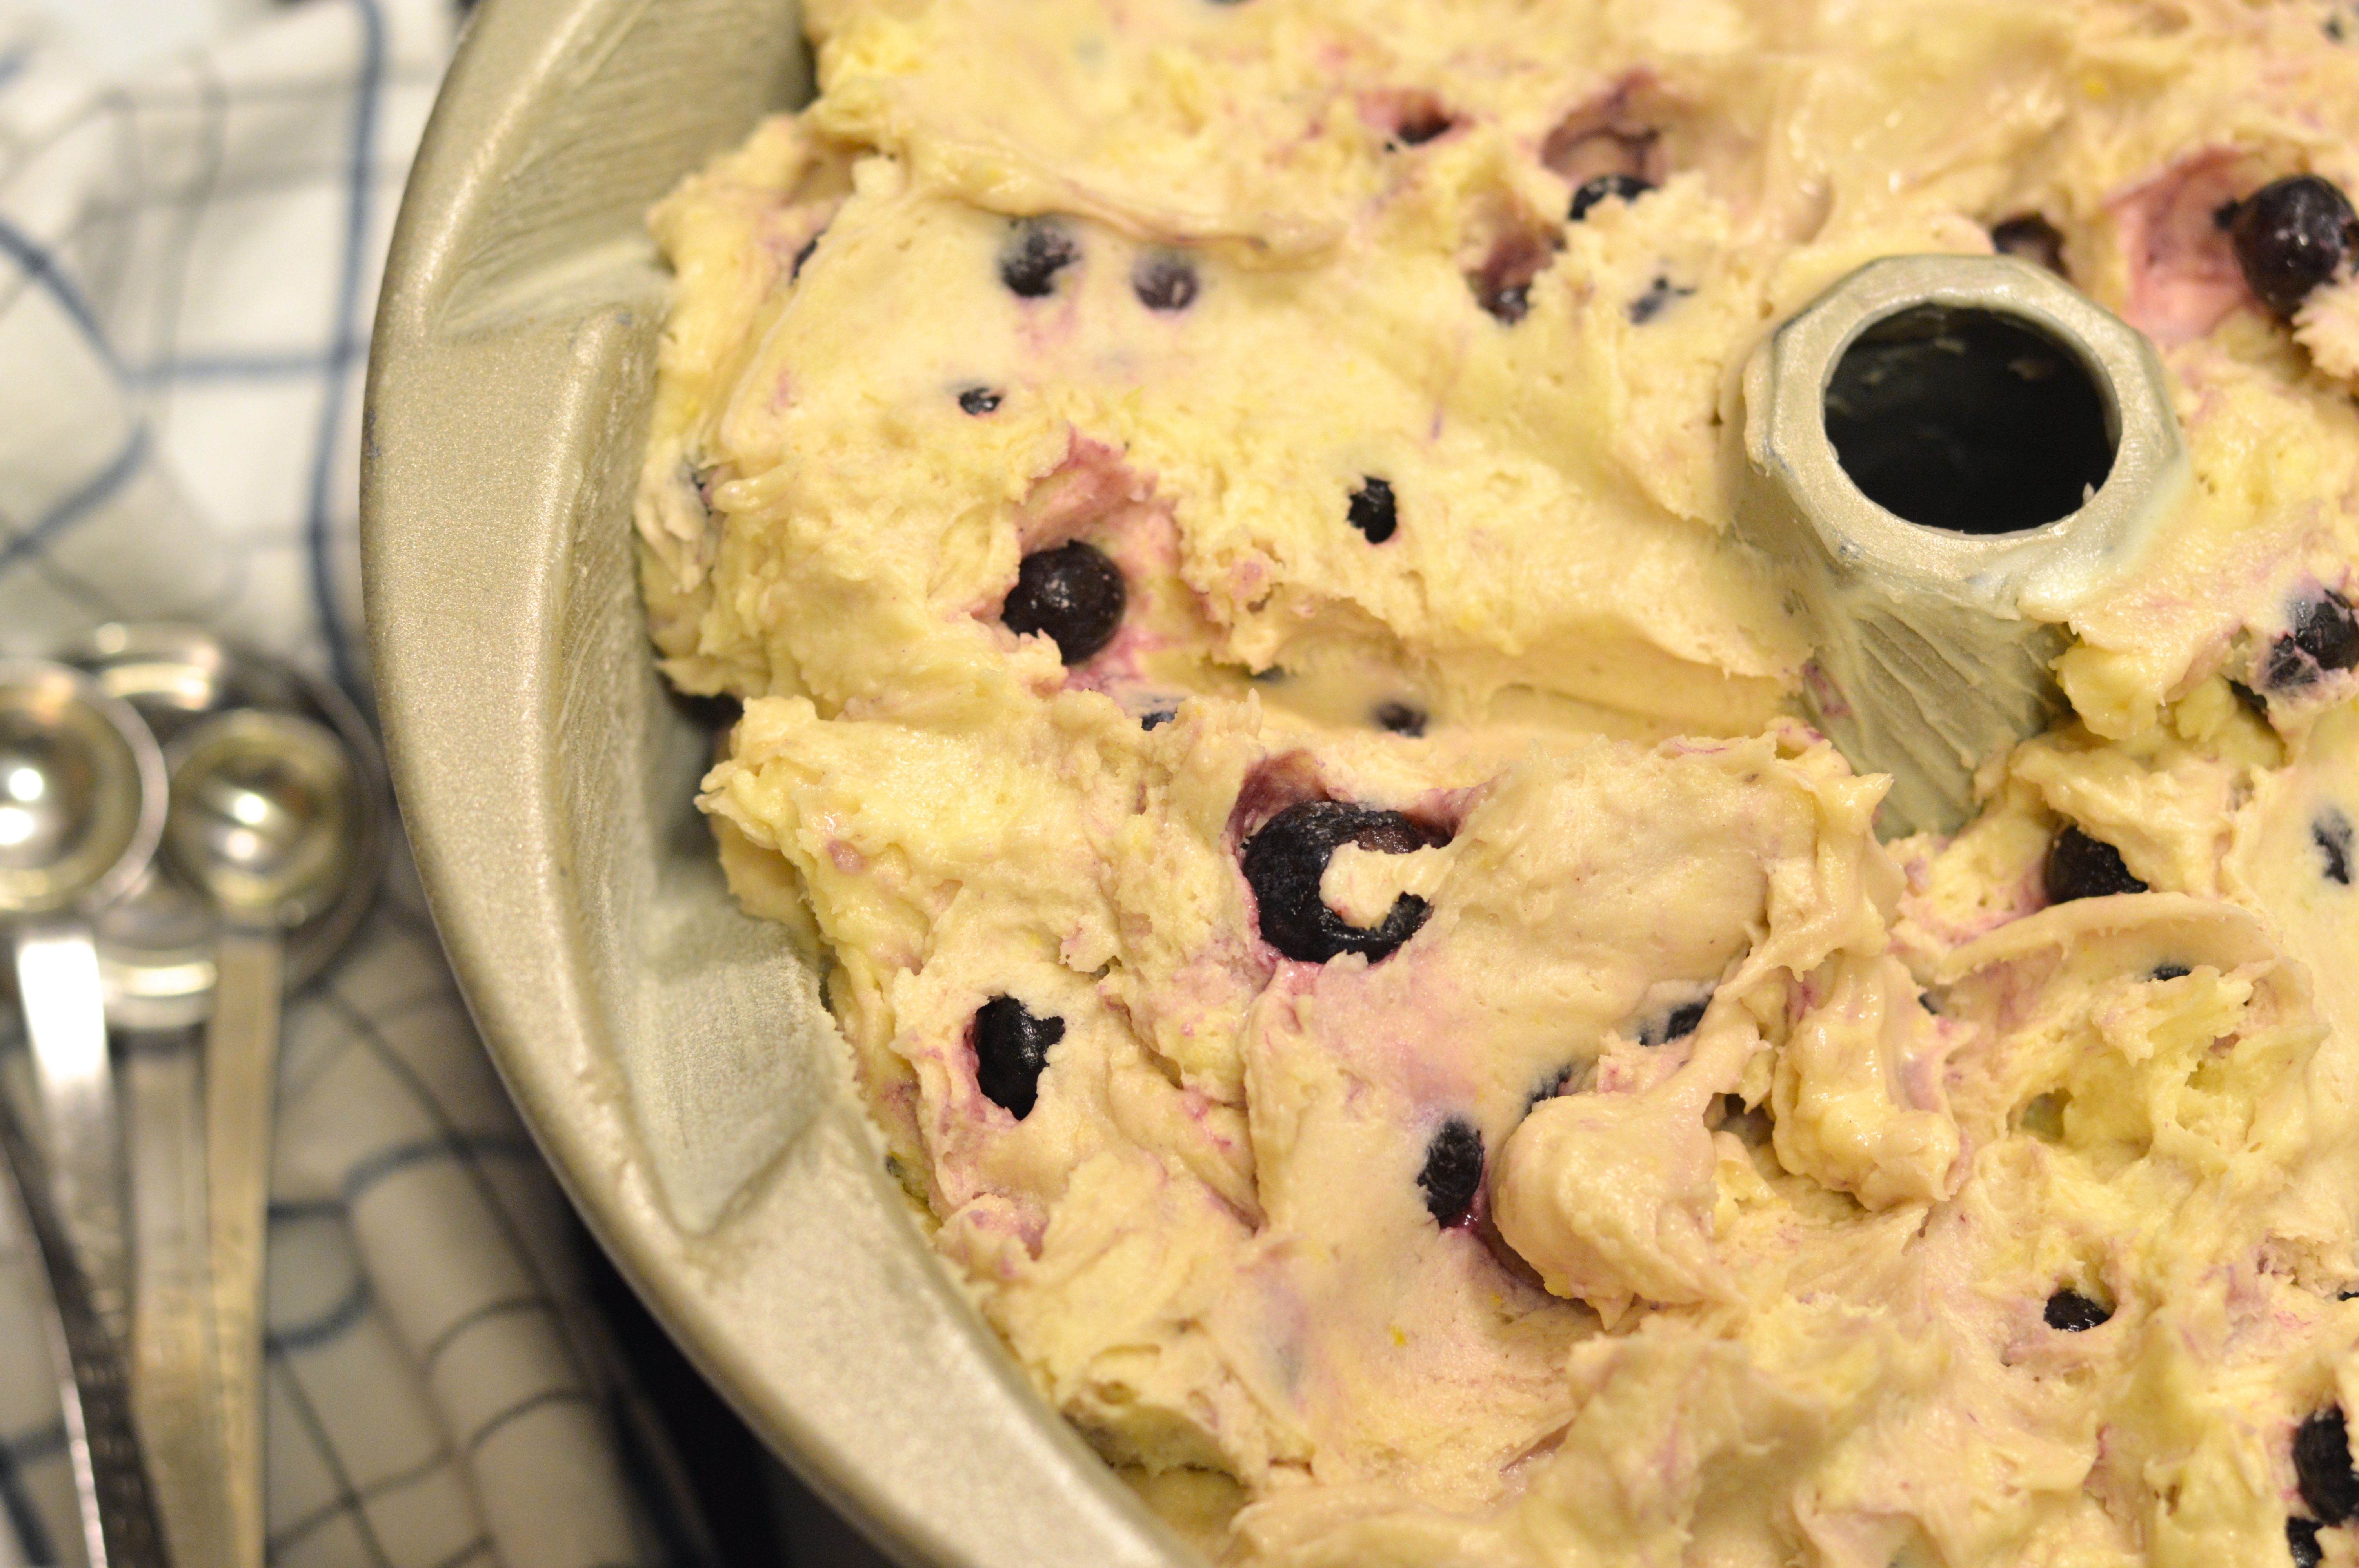
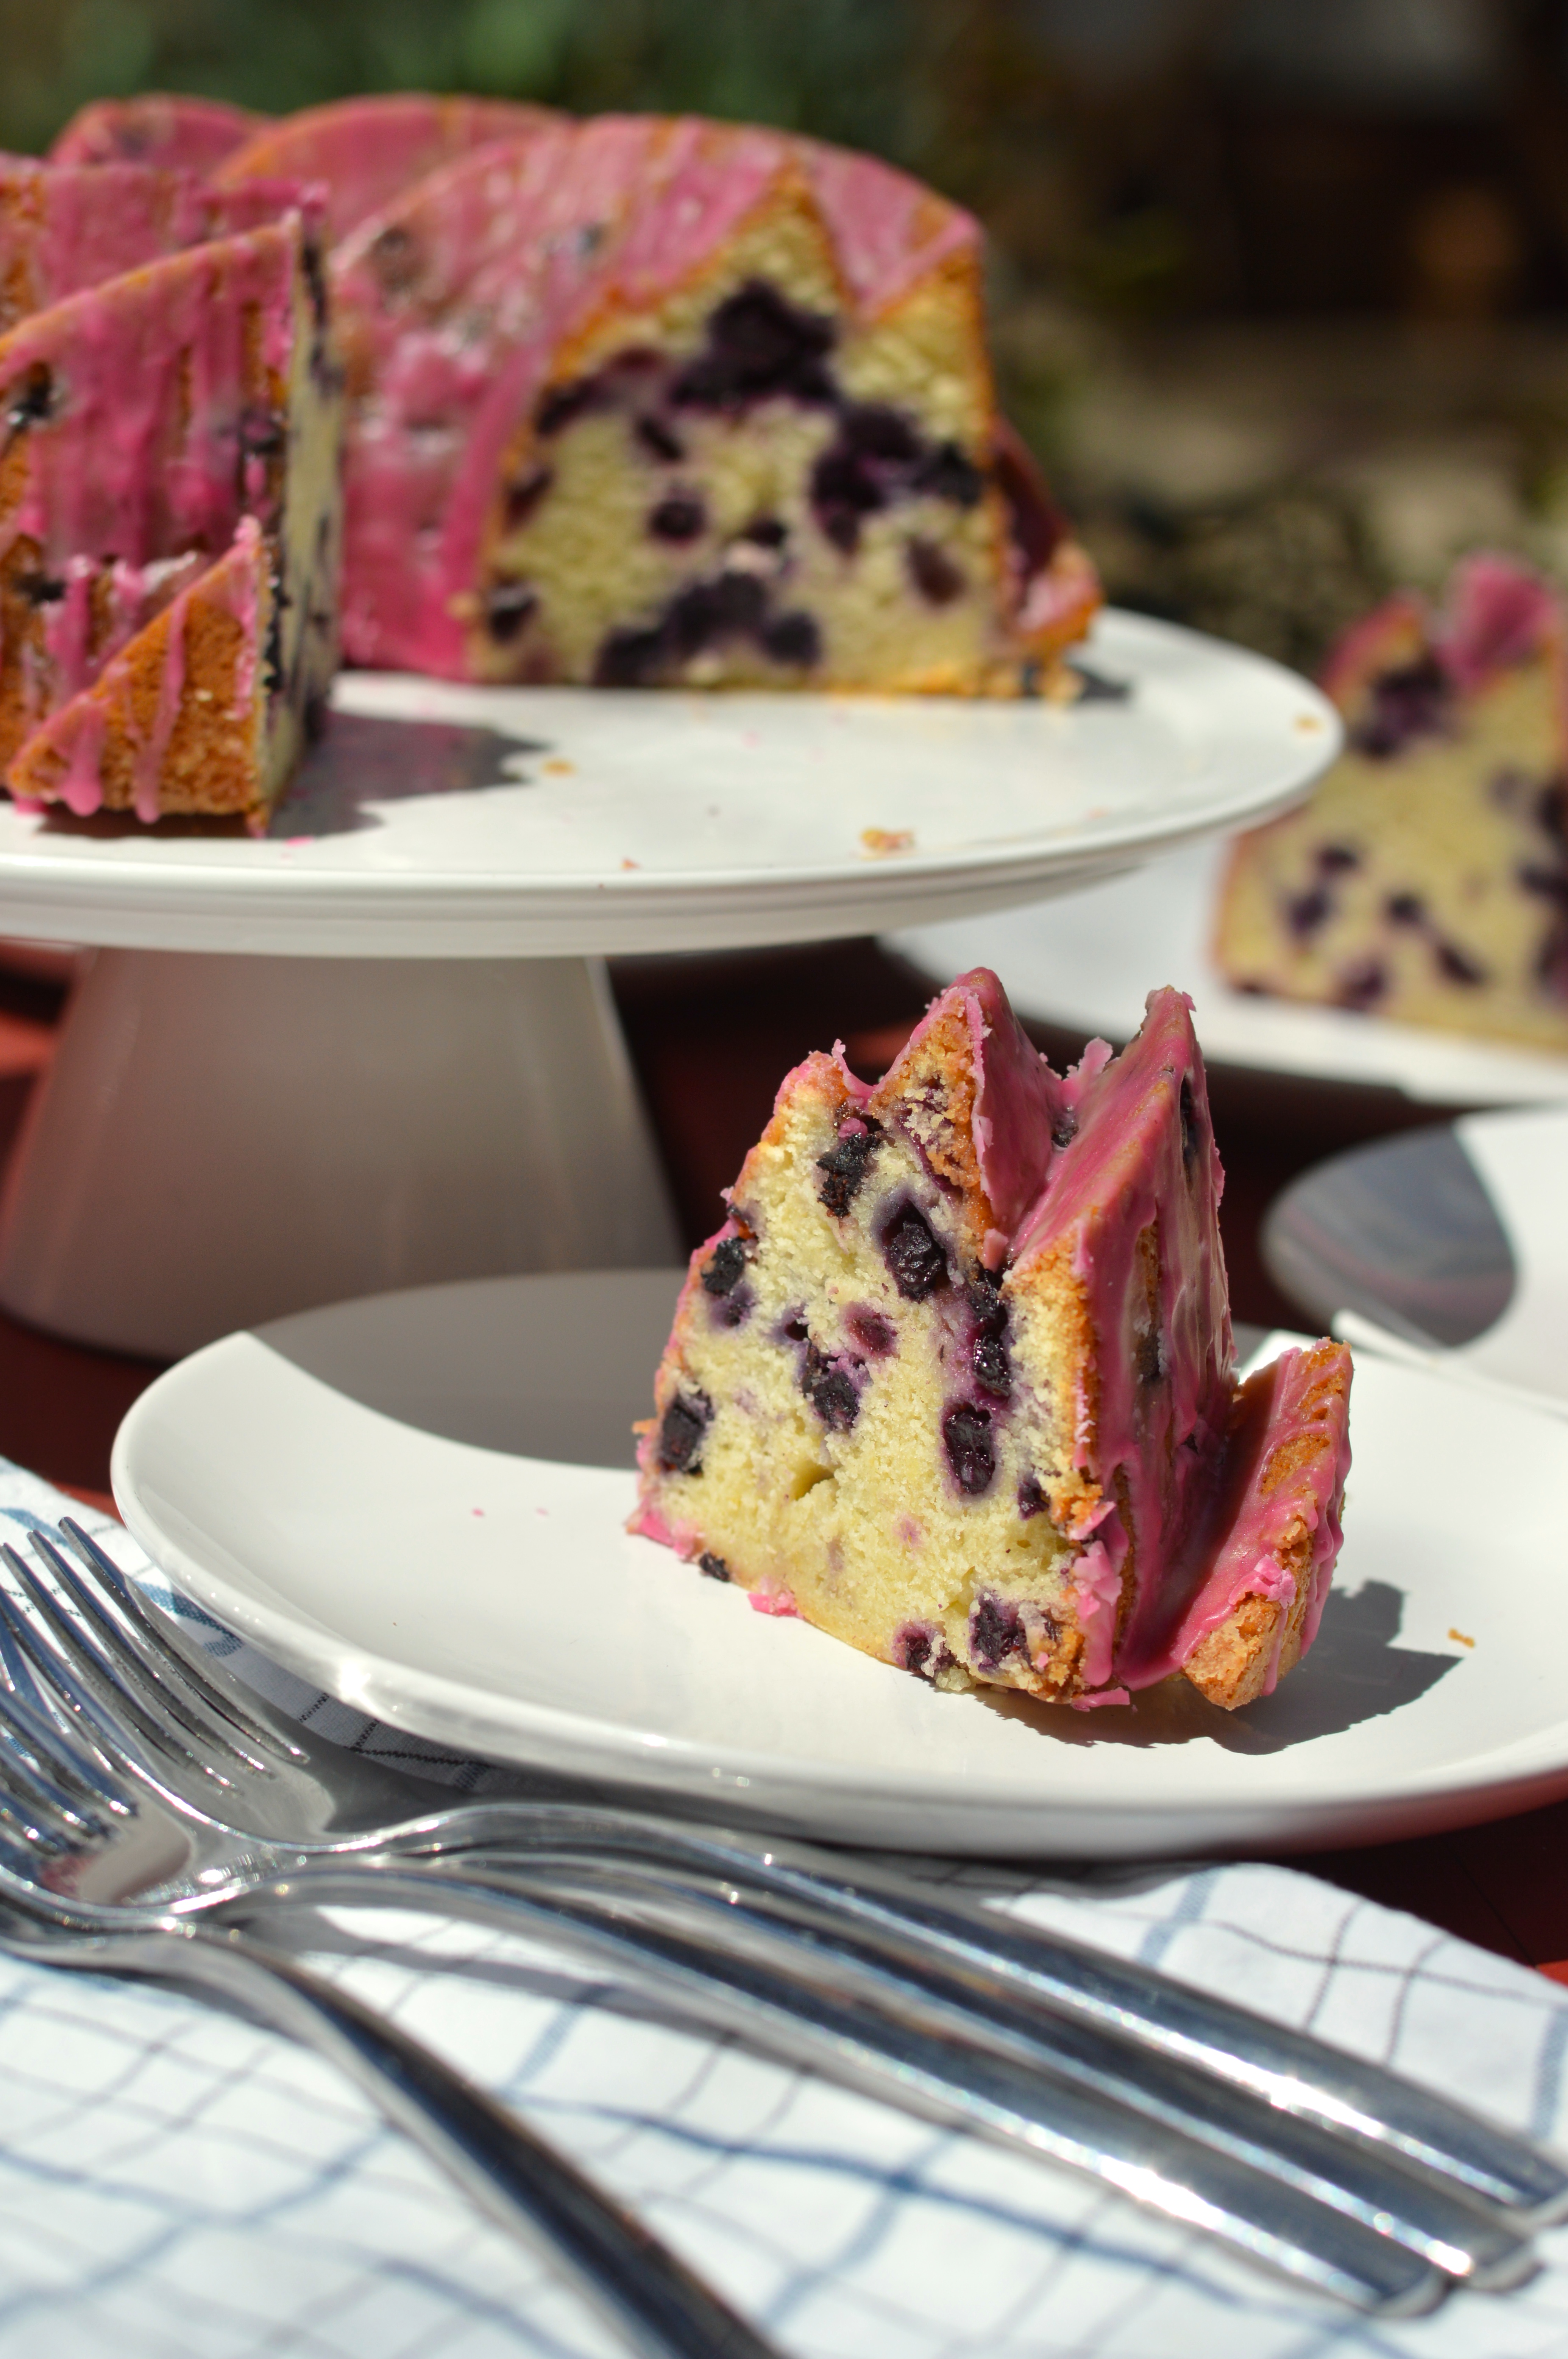
I know it’s technically still Spring, but I just decided to dive straight into Summer with this cake. Unfortunately the markets aren’t as ahead of schedule as my appetite so I had a hard time finding fresh blueberries that weren’t a gazillion dollars. I suppose I could have tweaked my recipe a bit and used another berry, but I’m a taurus and my mind was set on blueberries. I ended up using frozen ones and was a little worried about how it’d come out, but they actually worked really well. I mixed them into the batter while they were still frozen so they wouldn’t be get mushy, and tossed them in a little flour first to make sure they were evenly distributed throughout the cake. You’ll want to do this step even with fresh berries, btw.

blueberry buttermilk bundt cake | Brooklyn Homemaker

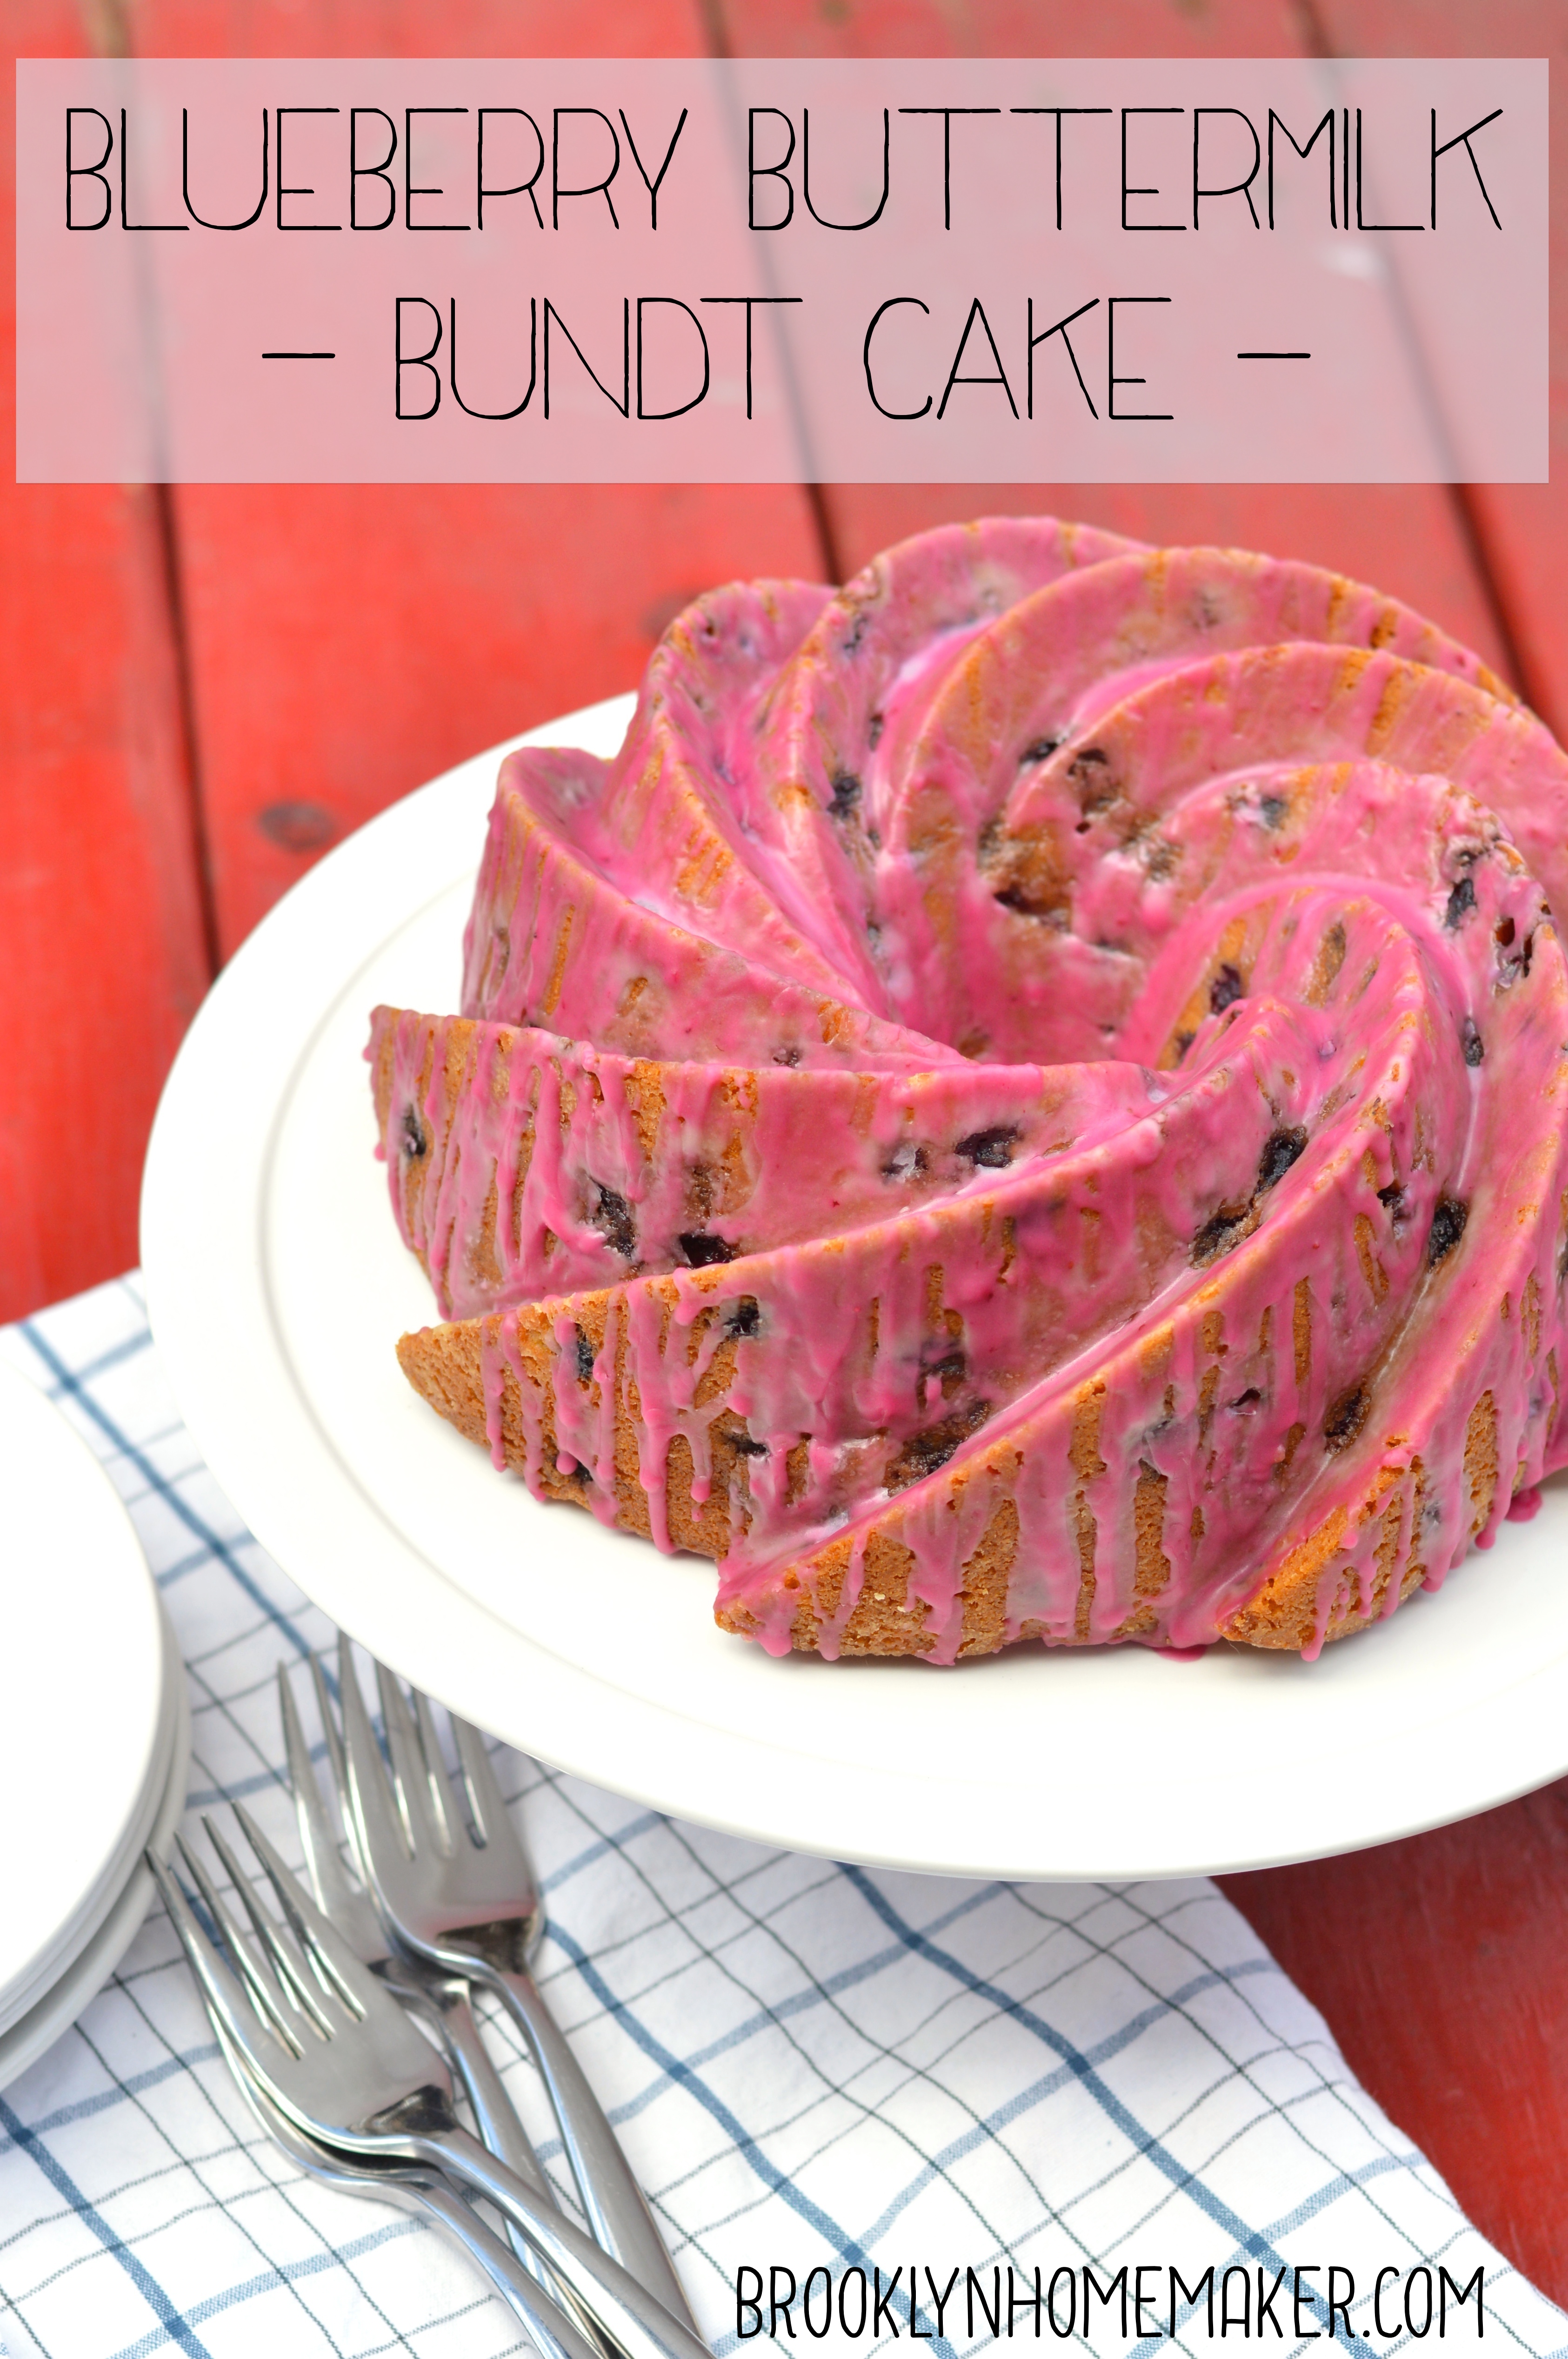
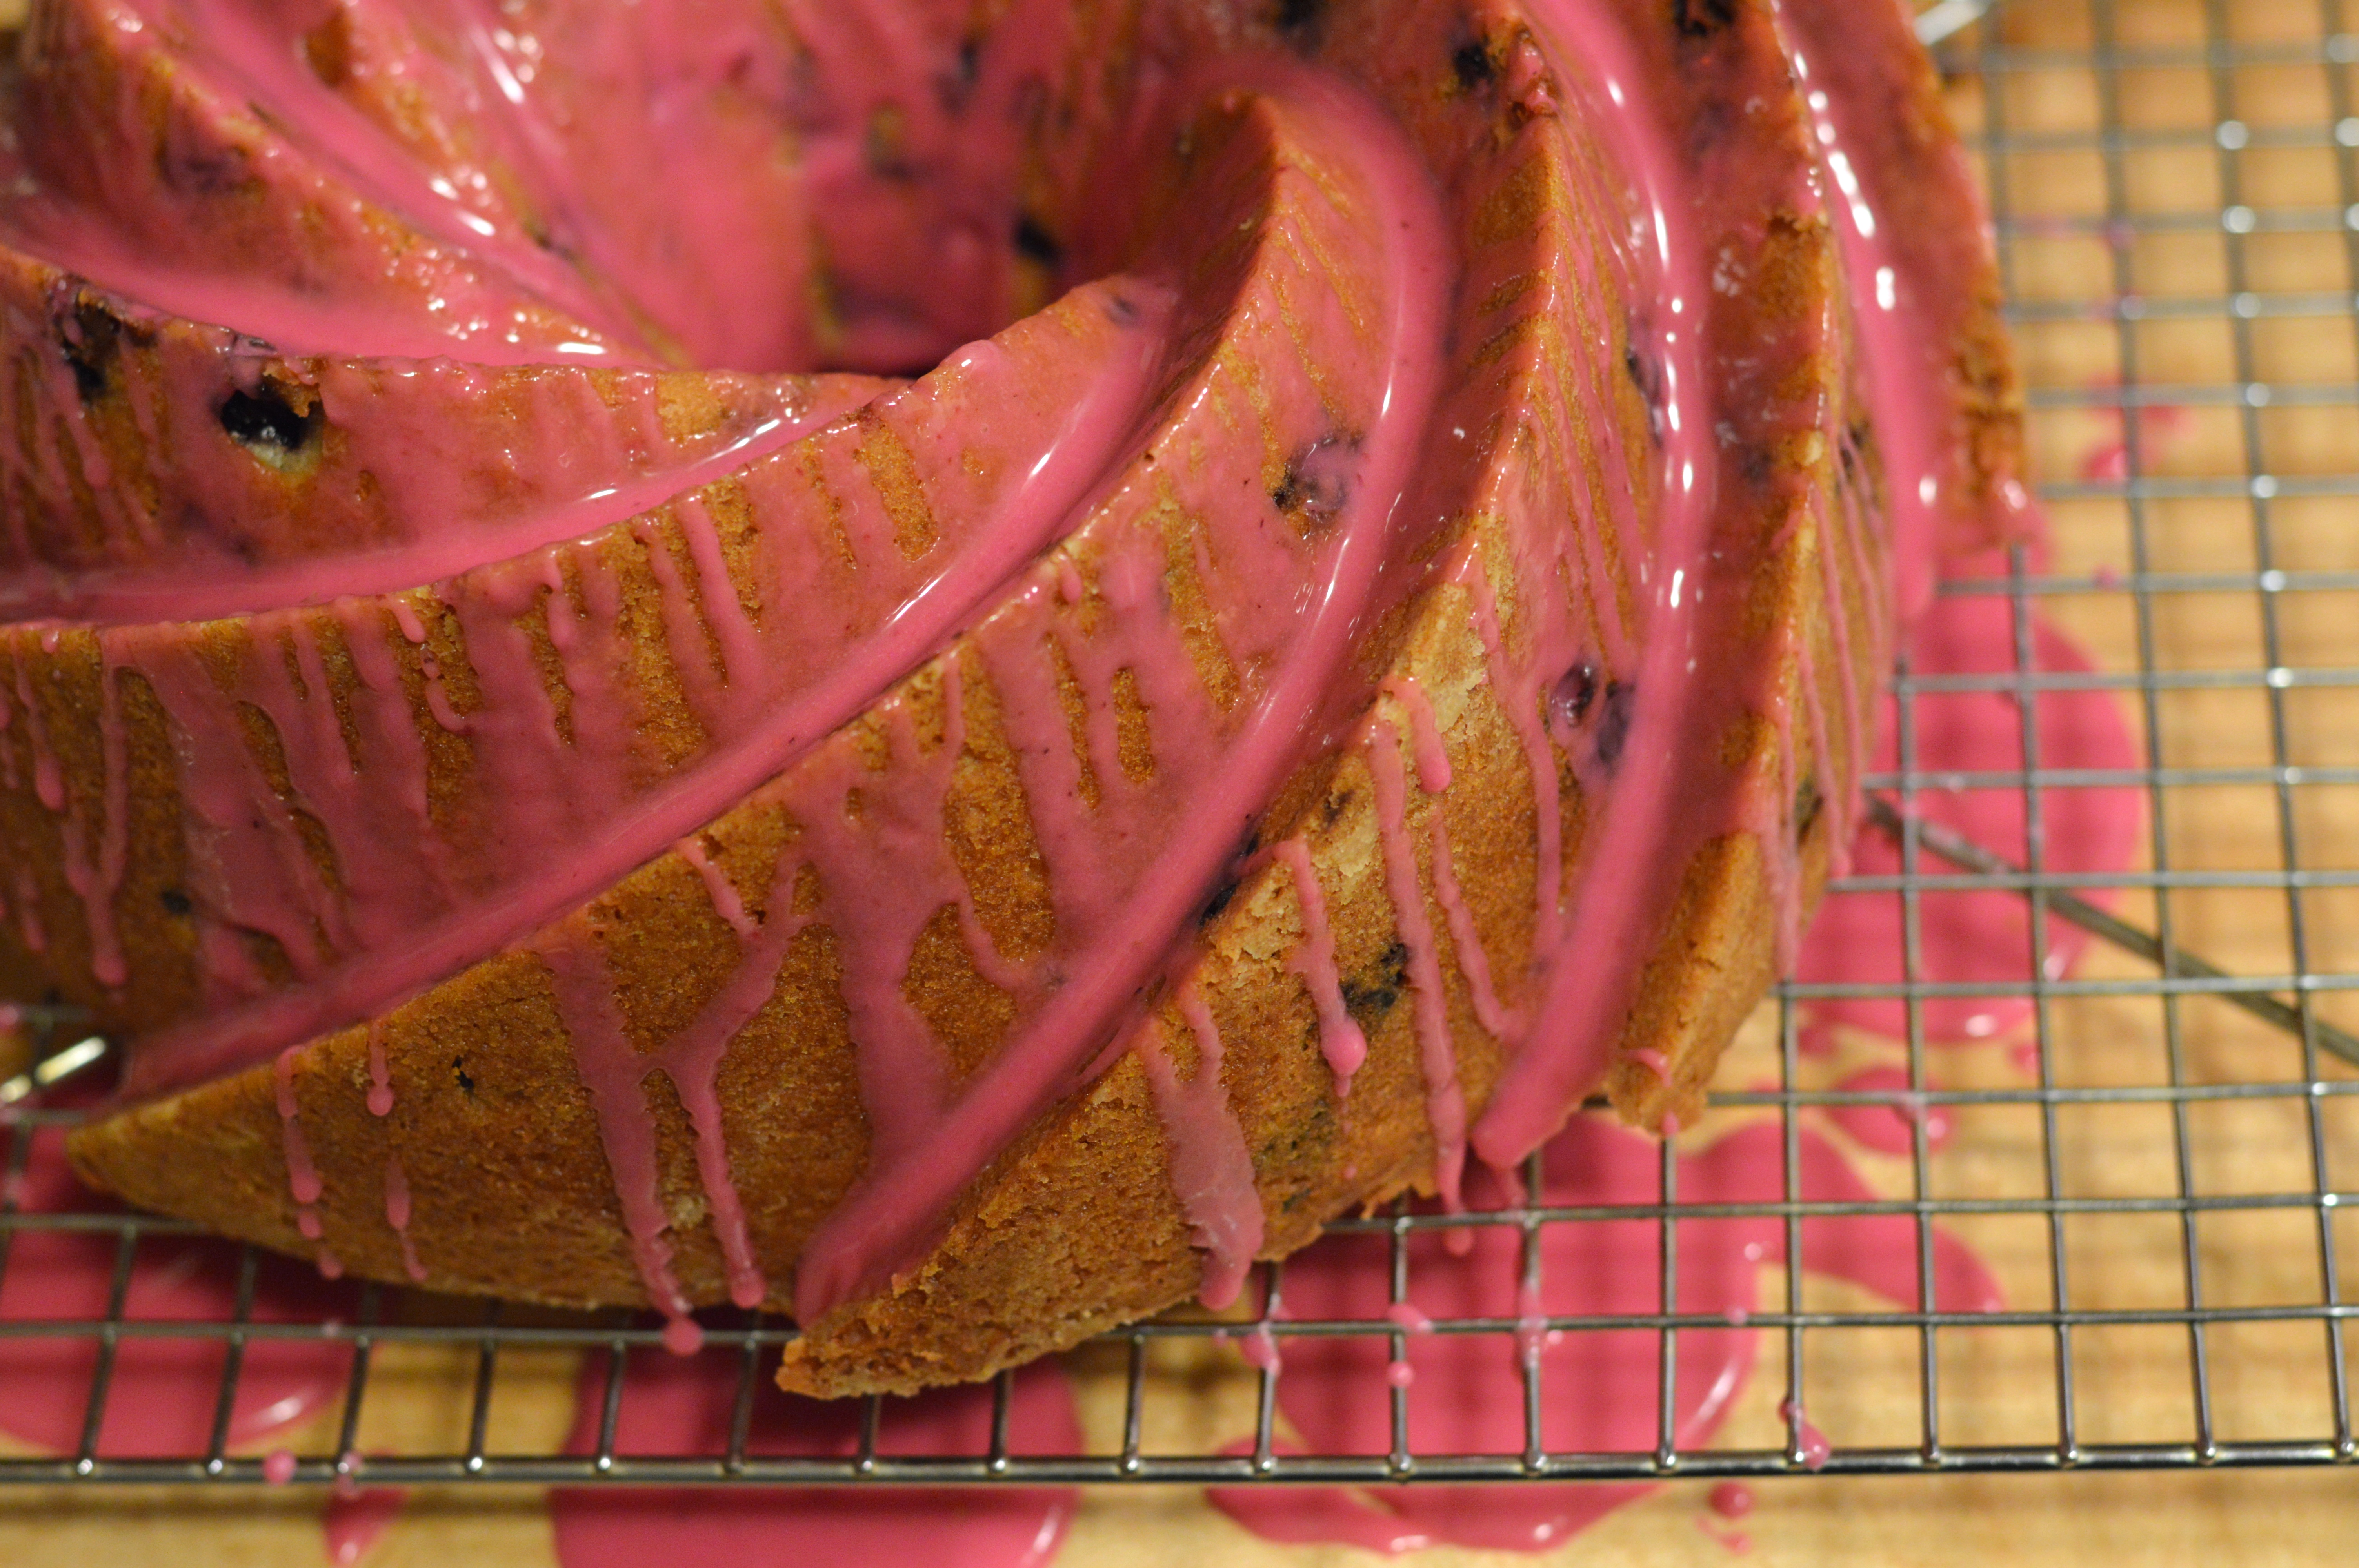
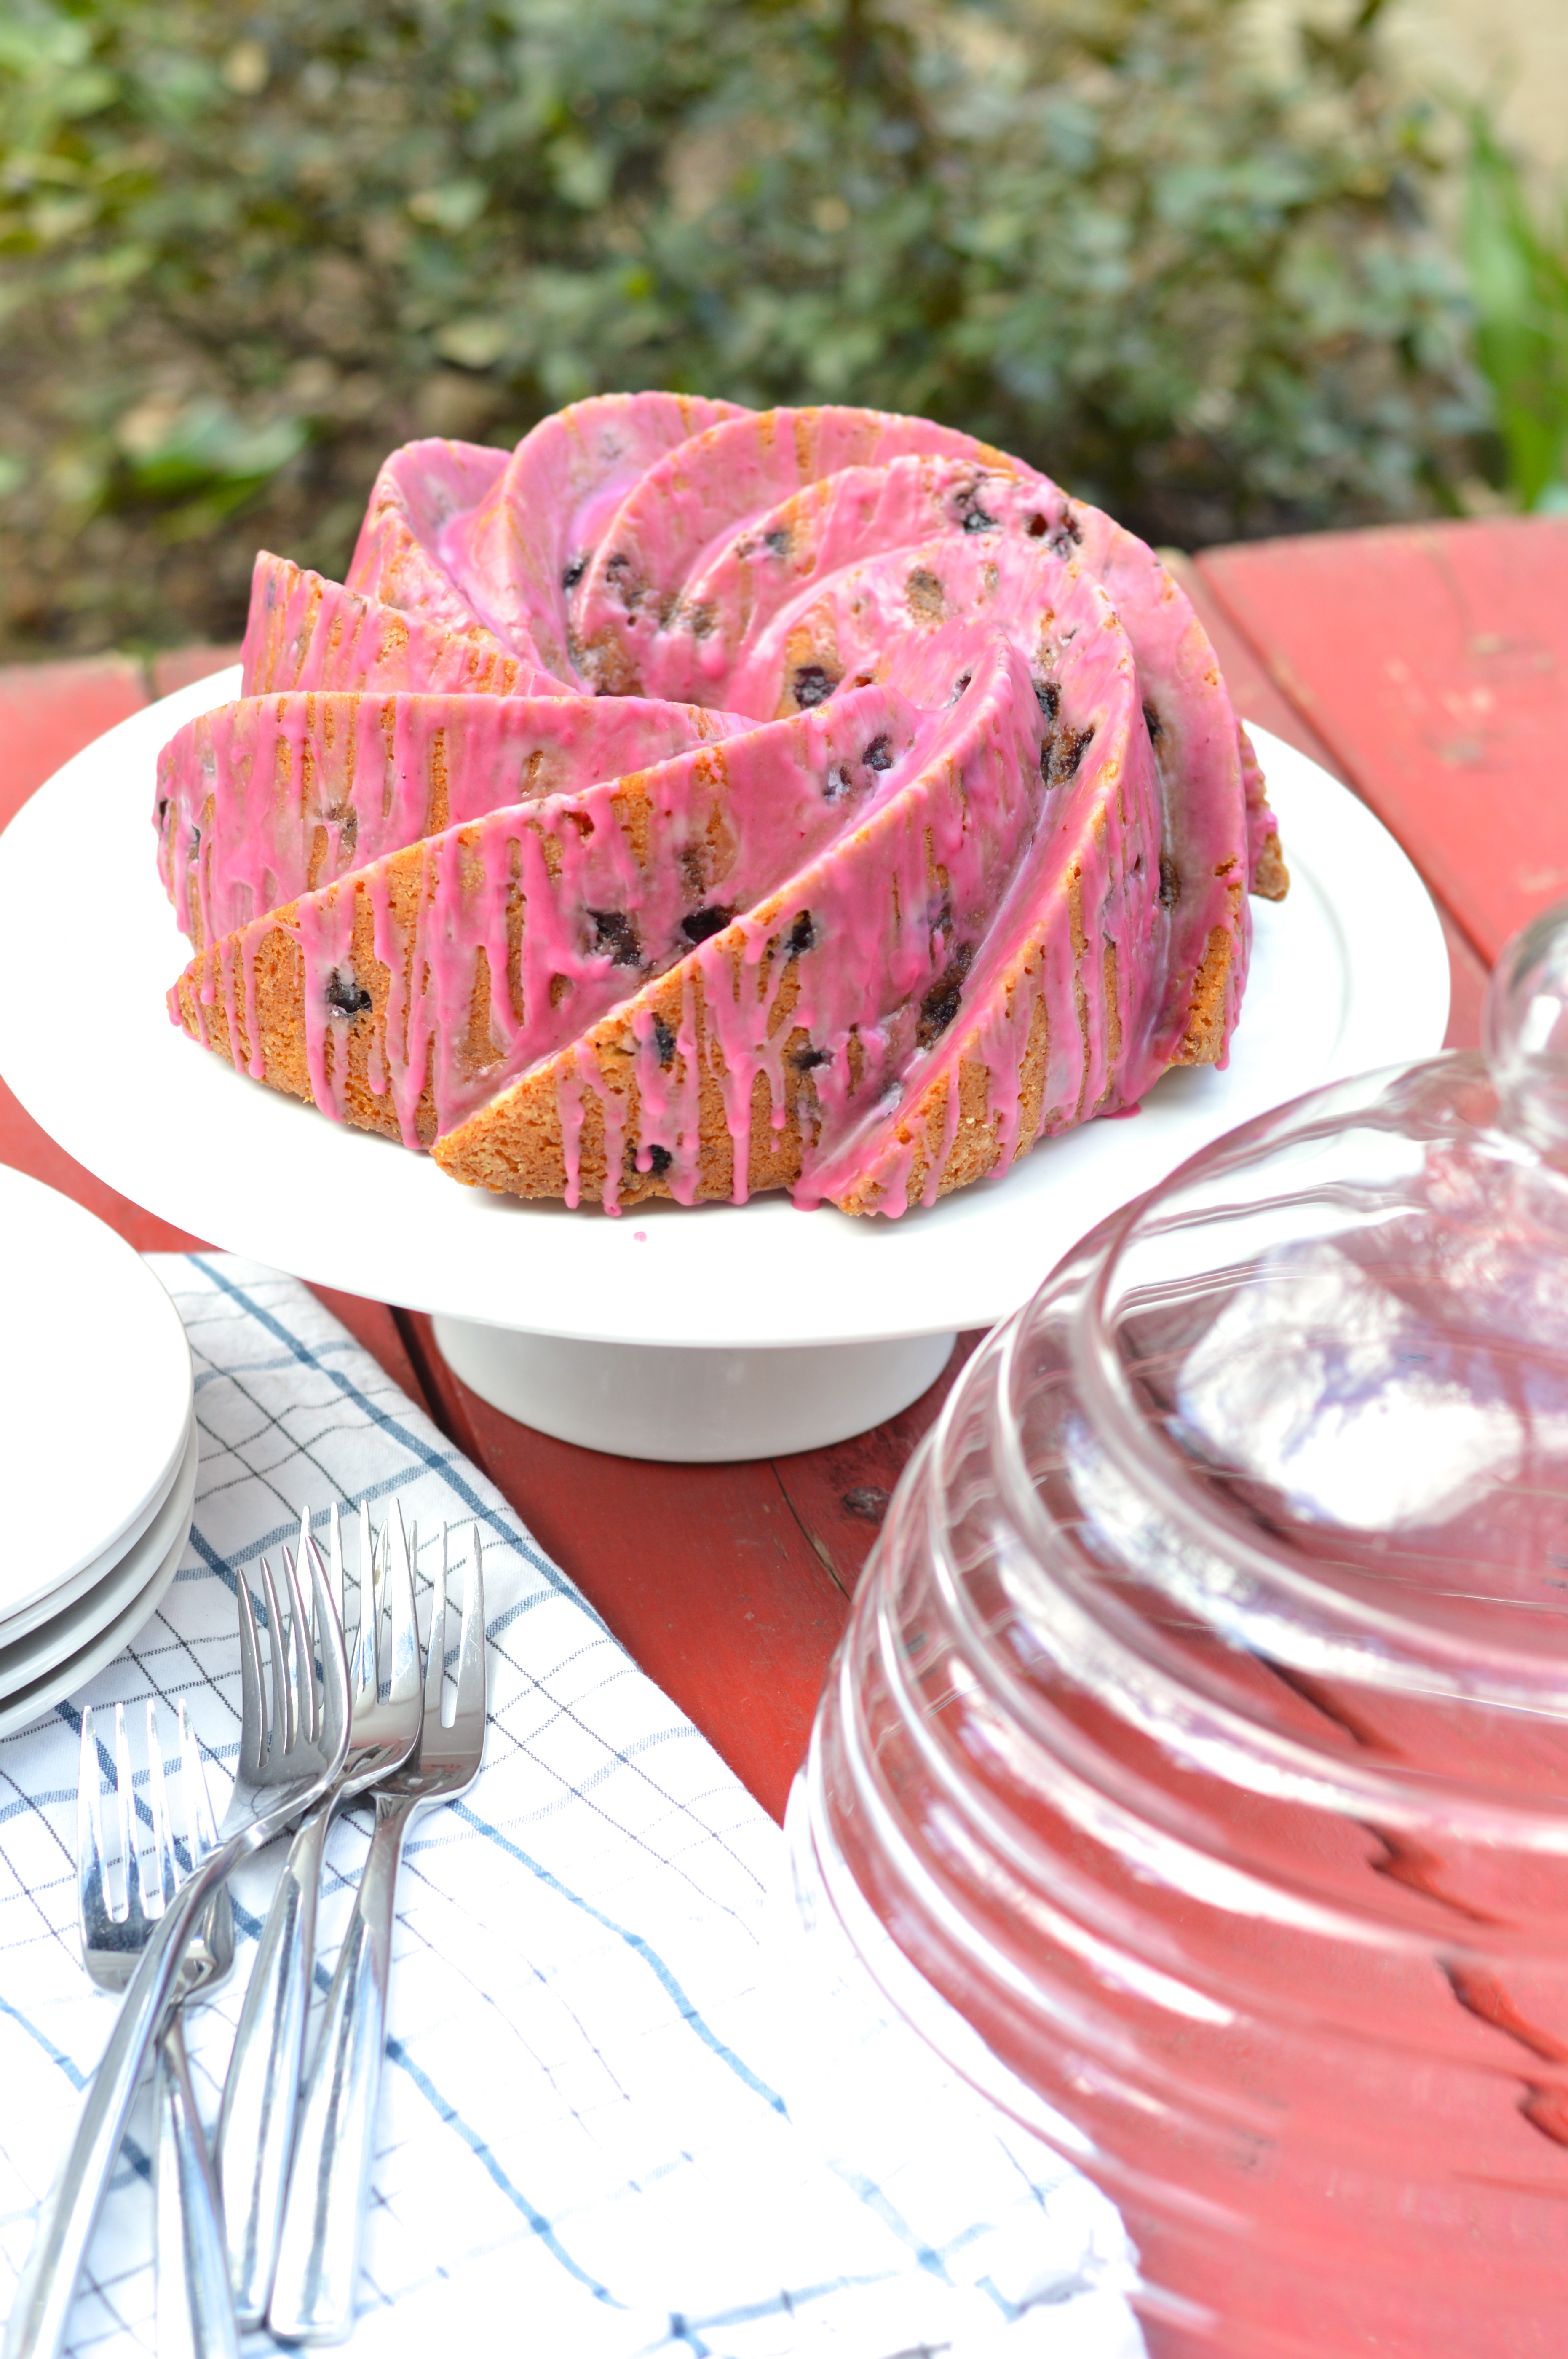
Not to toot my own horn, but this cake is freakin’ incredible. It’s crazy moist, super delicious, and wonderfully tender. It’s a bit like a pound cake, but not quite as dense, and is full of ripe berry sweetness without being cloyingly sugary. The berries are juicy little flavor bombs that practically burst when punctured with your fork. The tang from the buttermilk pairs perfectly with the lemon, which is the ideal complement to the flavor of the blueberries, and the blueberry lemon glaze is the cherry on the sundae. Can you believe the color of that glaze by the way? I knew the blueberries would give the glaze some color, but I wasn’t expecting it to be such a bright vibrant pink!
Pretty and tasty! The total package!

blueberry buttermilk bundt cake | Brooklyn Homemaker

This cake is sure to be a hit at your next picnic or barbecue. If you’re like me, I’m sure you’re going to want to invent some occasion to have people over, just to have a reason to make this cake. I promise your friends won’t mind.

blueberry buttermilk bundt cake | Brooklyn Homemaker

blueberry buttermilk bundt cake

adapted from Smitten Kitchen

Cake:
2 1/2 cups all-purpose flour, plus extra for dusting pan and berries
2 teaspoons baking powder
1 teaspoon fine sea salt or table salt
1/2 teaspoon vanilla extract
3/4 cup buttermilk
juice of 1 lemon (about 2 tablespoons)
Zest of 2 lemons
1 3/4 cups granulated sugar
1 cup (2 sticks) unsalted butter, at room temperature
3 large eggs, at room temperature
2 1/2 cups blueberries (fresh or frozen)

Glaze:
2 1/2 cups confections’ sugar (or more, if desired)
Juice of 1 lemon (about 2 tablespoons)
1/2 cup blueberries (fresh or frozen)

Preheat oven to 350°F. Generously butter and flour a 10-cup Bundt pan.*see note.
In a medium bowl, whisk or sift flour, baking powder and salt together and set aside.
Add lemon juice and vanilla to buttermilk and set aside.
In the bowl of a stand mixer, mix sugar and lemon zest until well combined to scent the sugar. Add the softened butter and beat until light and fluffy, about 3 to 5 minutes. With the mixer on a low speed, add your eggs one at a time, scraping down the bowl between each addition. Alternate three additions of flour and two additions buttermilk, beginning and ending with flour, scraping the bowl between additions. Do not over-mix. Toss the blueberries with about 2 tablespoons of flour to coat, and gently fold them into the cake batter. The batter will be very thick so don’t worry if the berries squish a little.
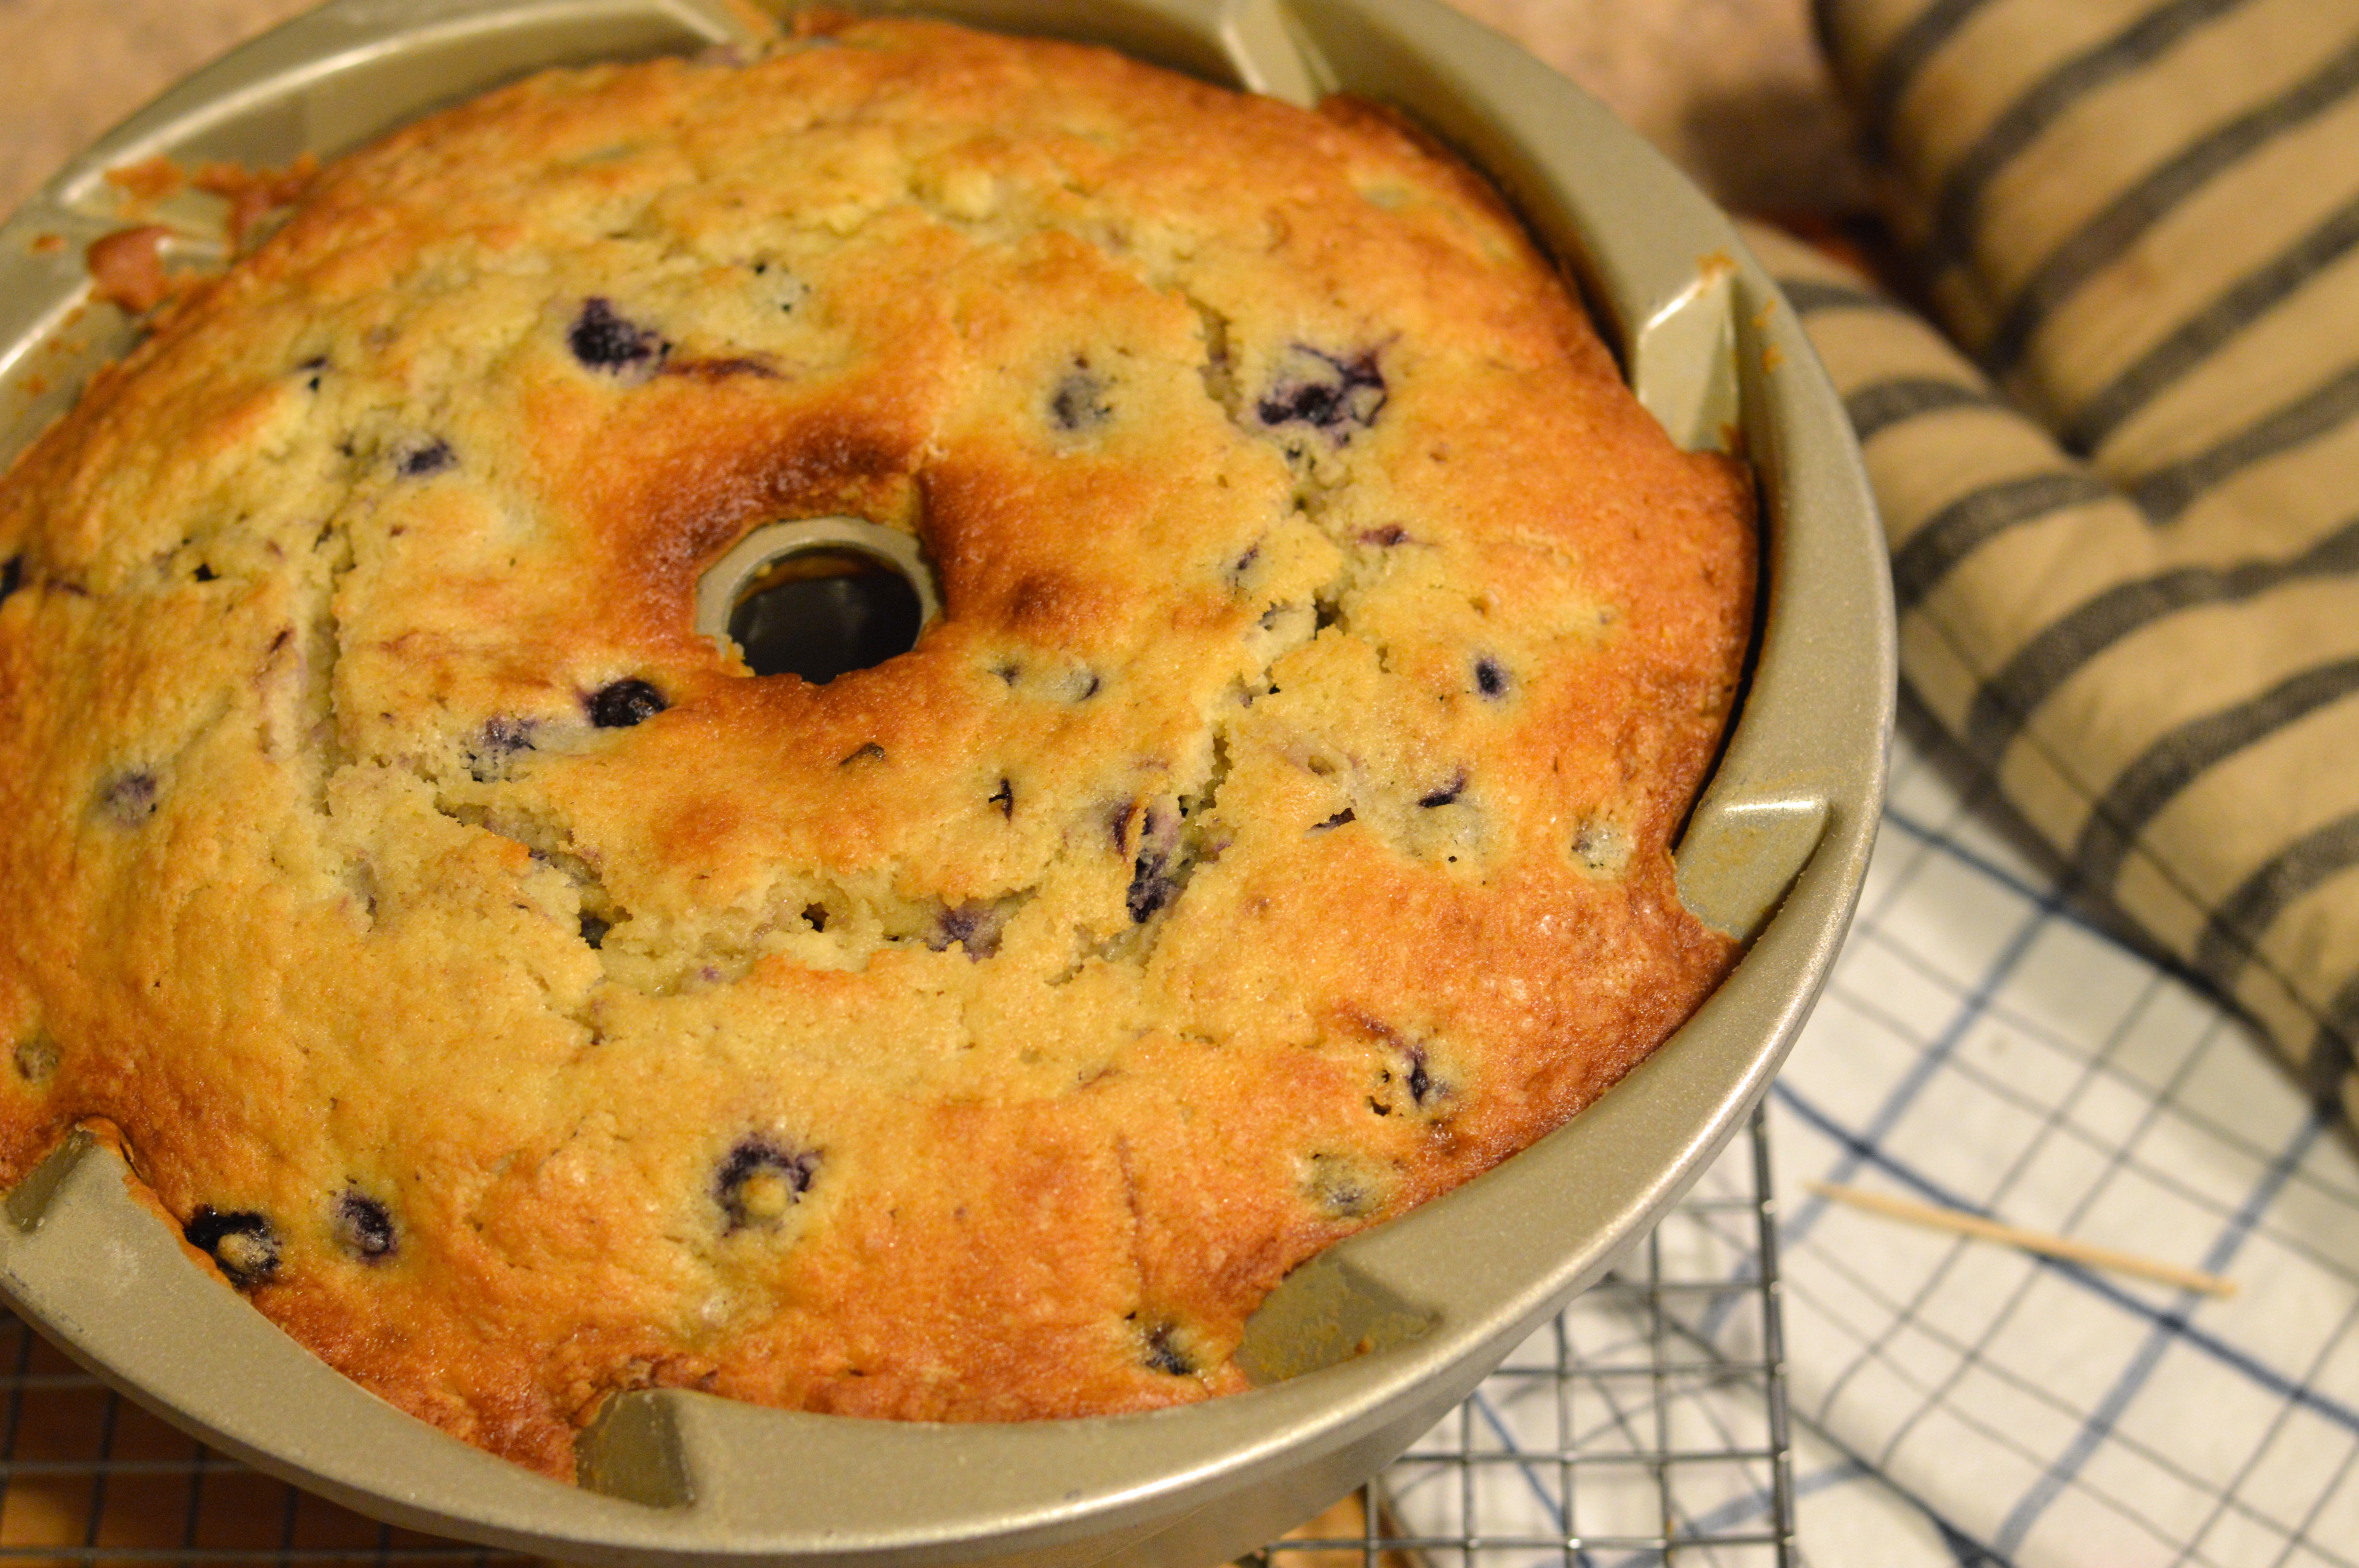
Spread batter in the pan and smooth the top. Bake for 55 to 60 minutes, rotating the cake 180 degrees after 30 (to make sure it browns evenly). If using frozen berries, you may need to add 5 to 10 minutes more. The cake is done as soon as a cake tester or toothpick comes out clean. Set cake pan on a wire rack to cool for 30 minutes, and invert cake onto rack to cool the rest of the way.
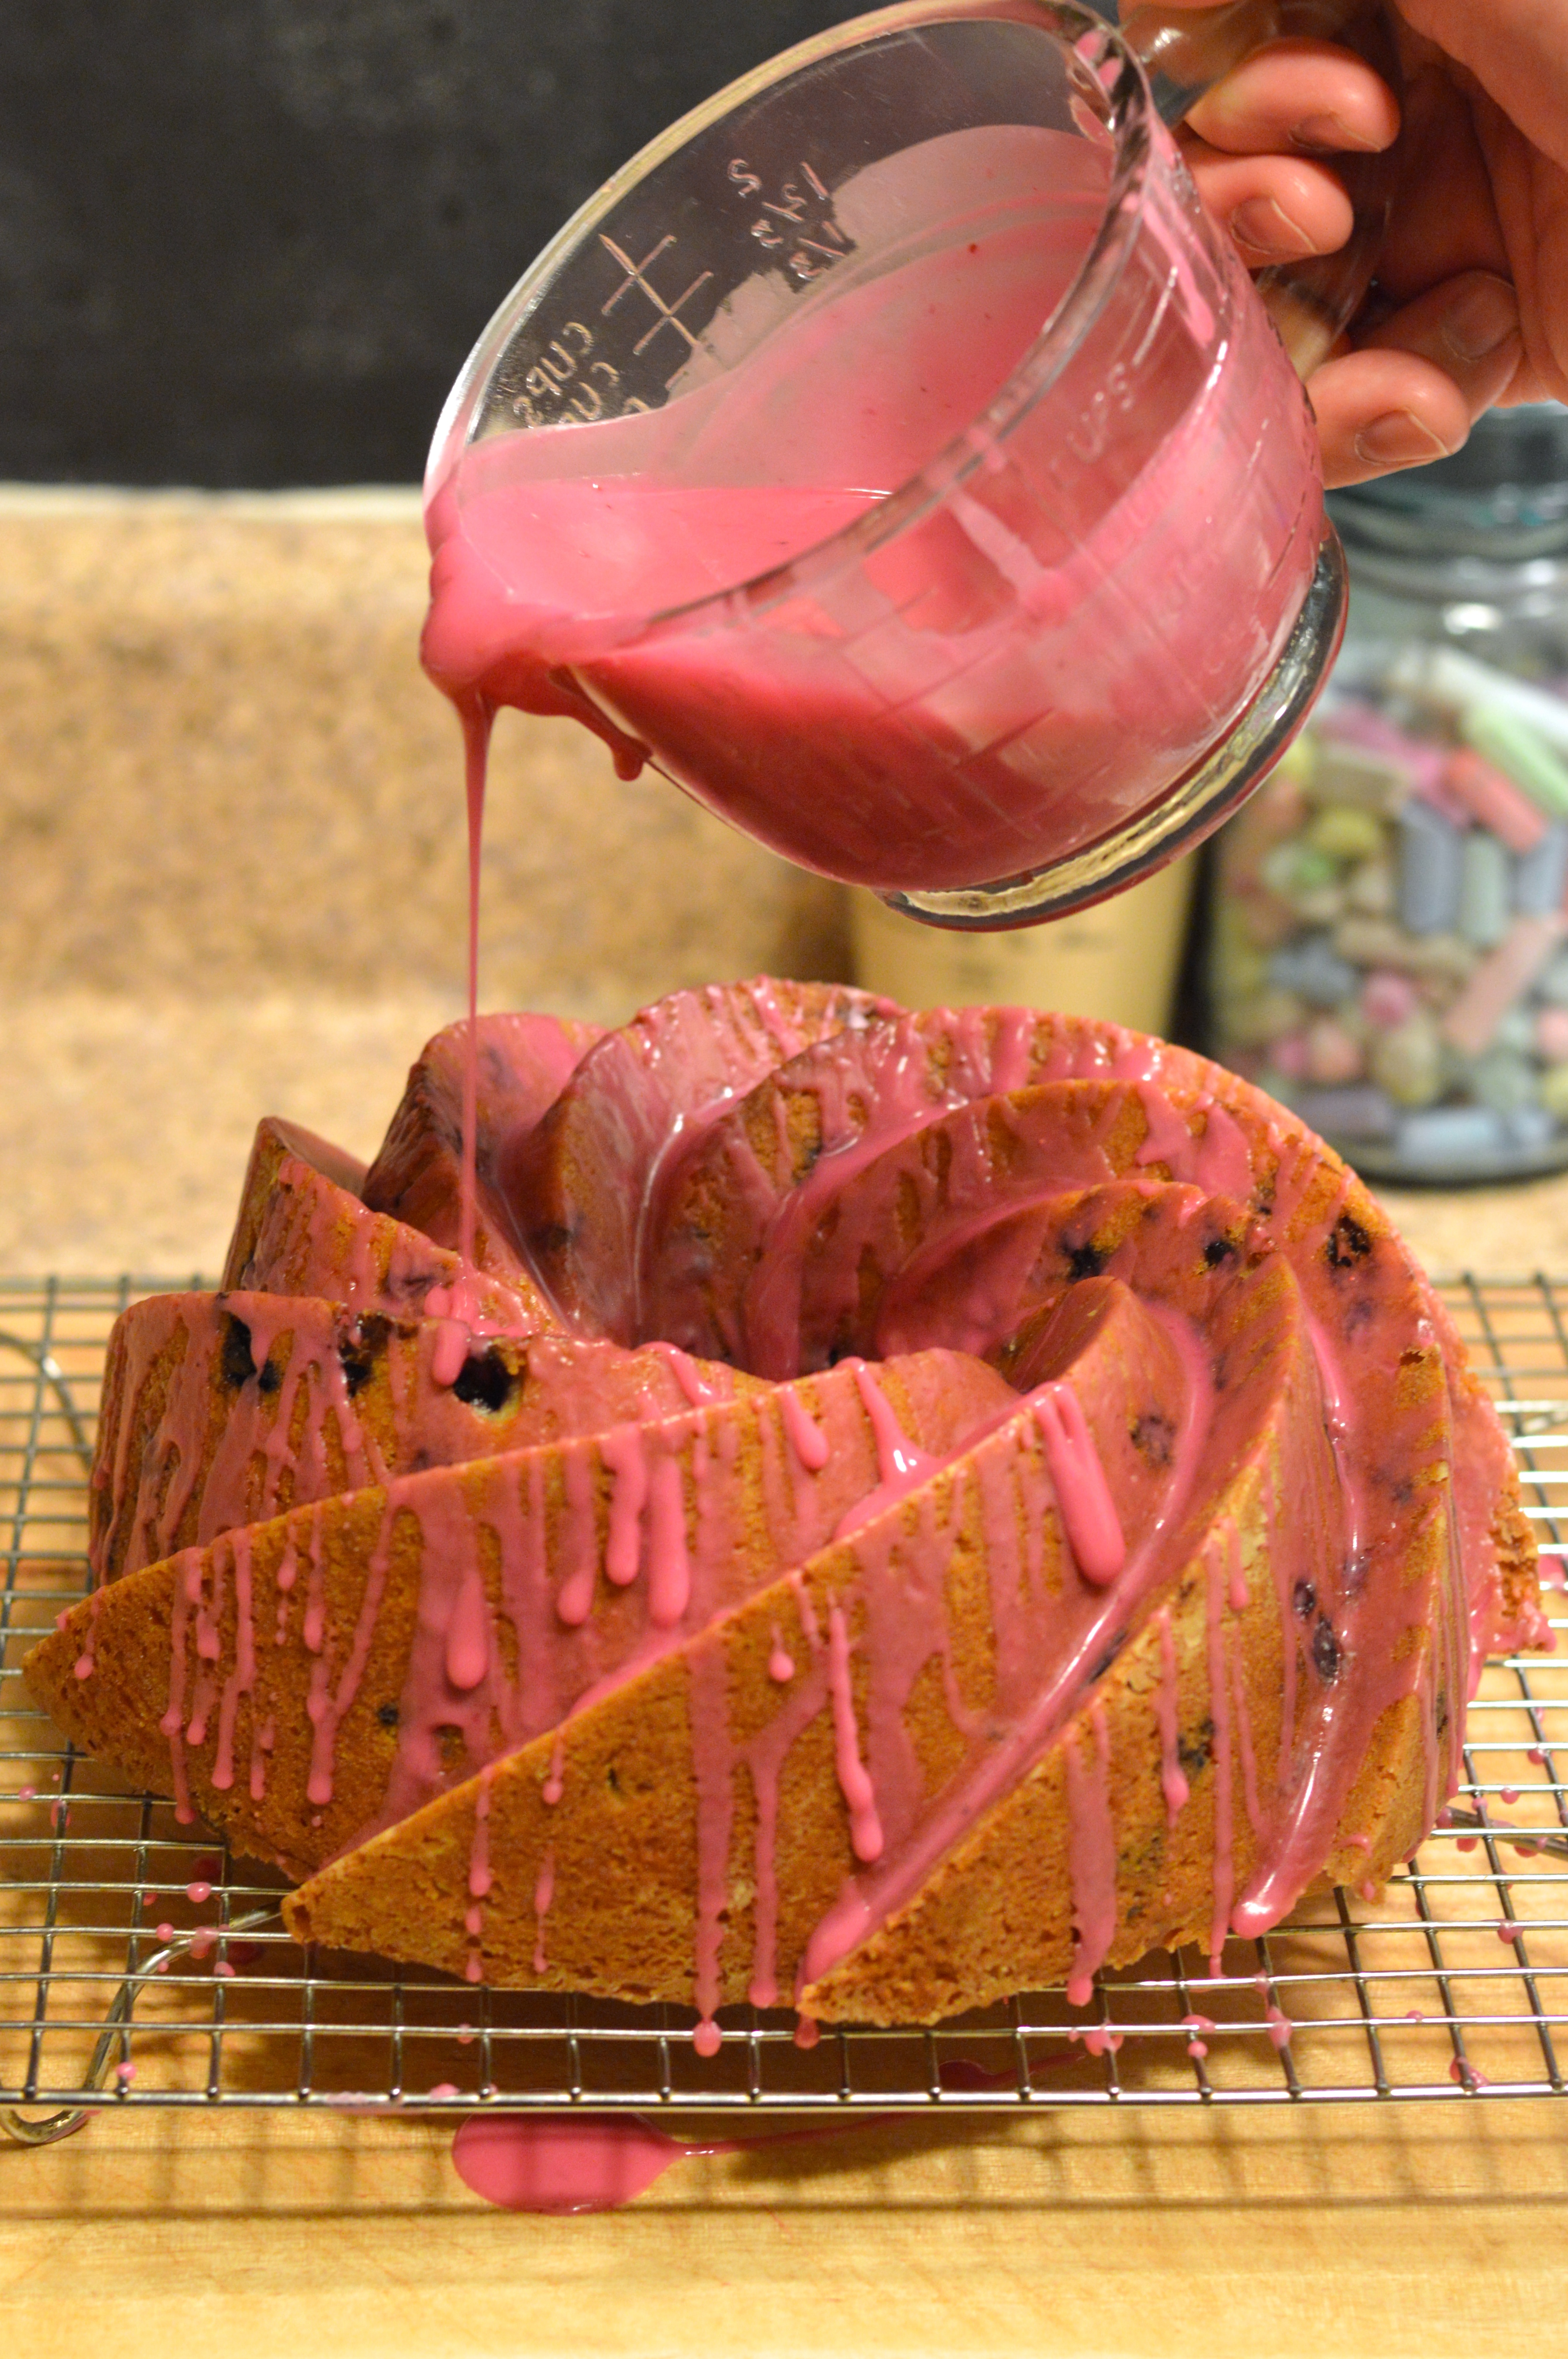
When the cake is completely cool, prepare the glaze. Mash the blueberries in the lemon juice with a fork or potato masher. Press through a sieve or fine mesh strainer to remove the skins and get out the maximum amount of juice. Add the powdered sugar to the juice and whisk until smooth. Add more sugar if you like a thicker glaze.
Place cooling rack and cake into a clean jelly roll pan or baking sheet to catch any glaze that drips off the sides. Pour glaze over cake, letting it trickle and drip down the sides. If desired, you can collect any excess glaze in the baking sheet and pour another coat. Let the glaze set for at least 15 minutes before serving. Cake can be stored, covered, at room temperature for 3 to 4 days.

*To prevent sticking, I coat every inch of the pan with softened butter using a pastry brush, and then dust the inside with flour and tap out the excess. Refrigerating your pan while you prepare the cake will help firm the butter for extra insurance.

brooklyn blackout cake

I recently went upstate to help my mom out with her new house, and while I was home I took a break to go visit my grandparents.

the rich, dark history of brooklyn blackout cake | Brooklyn Homemaker

My grandfather is a man of few words, and usually contributes little more to dinner table chats than some talk about his vegetable garden. One topic that always gets him talking a blue streak though, is World War II. I don’t know about you, but I think war-time stories are actually pretty fascinating, so when the conversation turned to what life was like for he and his family back then, I was thrilled.

My grandfather was born in Germany in a farming community where he and his family worked building homes and barns for the neighboring farmers. During the war when food was rationed, items like sugar, chocolate, & coffee became rare luxuries that were extremely hard to come by for civilians. Fortunately, my grandfather had family living in the US who would send care packages with items they could trade with their neighbors to help them get by. When my grandfather was fourteen years old his father refused to join the nazi party and was sent away to work in a ball bearing factory in Schweinfurt. This left my grandfather, the oldest child in a large family, in charge. He told me that real coffee was so hard to come by, and in such high demand, that their local butcher once traded them 150 lbs of beef for just one pound of coffee! They grew a lot of their own vegetables, but didn’t usually get to eat much meat, so those coffee care packages meant more to their family than most of us can even understand. After the war my grandfather and many of his siblings moved to the US and settled in upstate New York, where I grew up.

When I heard Grandpa’s story, it reminded me of another story from World War II that I recently read about, the story of the Brooklyn Blackout Cake. I’ve actually been thinking about making this cake and sharing the story with you for a while now, but until my visit home I hadn’t had the inspiration I needed to take on this iconic cake.

the rich, dark history of brooklyn blackout cake | Brooklyn Homemaker

A mix of dutch-process and ultra-dutch black cocoa

In the U.S., just as in Germany, food was being rationed during the war and items like sugar, coffee, & chocolate were hard to come by. Chocolate was especially in short supply because much of what was produced at that time was reserved for the war effort and sent to the front. In Brooklyn, the Rockwood chocolate factory was so busy making chocolate for the war that they became the second-largest chocolate maker in the country, second only to Hershey’s. Rockwood’s government contracts made up so much of their business in fact, that about a decade or so after the war ended and the contracts expired, the company went out of business.

the rich, dark history of brooklyn blackout cake | Brooklyn Homemaker

Workers in the Brooklyn Navy Yard, only a few blocks from the chocolate factory, were surrounded by the constant smell of chocolate drifting over from Rockwood, which was a huge tease since they had such limited access to chocolate bars. At the peak of the war, the Brooklyn Navy Yard was one of the most important naval warship building yards in the U.S., and employed over 70,000 people working in shifts 24 hours a day. The navy yard was so important to the war effort that enemy U-boats would sneak through the waters around New York hoping to sink some of the completed ships as they sailed out.

Battleships usually left the yard at night under the cover of darkness, but New York’s bright lights served as an accidental backdrop to the black silhouette of moving ships. After a few tankers were sunk in New York Harbor in January of 1942, the Civilian Defense Corps decided action needed to be taken to protect the ships. Temporary blackout drills were common in European cities to protect them from air raids, but in June 1942 much of New York, especially Brooklyn, went through a permanent ‘dim-out’ that lasted through to the end of the war. City lights were turned off, windows were covered with heavy material, and vehicles drove at night without headlights or street lamps, all to make sure no light could be seen from enemy U-boats. Even the lights of Time’s Square and the Coney Island amusement park went dark through the war. 

the rich, dark history of brooklyn blackout cake | Brooklyn Homemaker

During Brooklyn’s blackout era, there was another chocolate confection maker near the Navy Yard, and this one was open to the public. Ebinger’s Bakery opened their first store in 1898 and soon swelled to a baking institution with 54 locations throughout Brooklyn and Queens. They made all of their treats from scratch daily, and gave their shops an air of authenticity by hiring shop girls with German accents. Before the war they were selling a pudding-filled three-tiered dark chocolate cake, but when the Civilian Defense Corps instituted their lights out policy, Ebinger’s decided to name their cake the “Brooklyn Blackout Cake” to show their support for the city they called home. Whether it was the deep dark chocolate-on-chocolate flavor, or their close proximity to the Navy Yard where workers were constantly smelling chocolate they couldn’t have, the cake was a huge hit. The name stuck well after the war and the cake became an iconic confection, well-known all over the country even though the Ebinger’s chain never left New York. 

the rich, dark history of brooklyn blackout cake | Brooklyn Homemaker

Unfortunately, a few decades later, Ebinger’s fell victim to a consumer obsession with diets and health, poor business management, and the country’s fascination with convenient supermarket shopping. The short shelf life and unhealthy ingredients in their home-baked treats couldn’t compete, and Ebinger’s went out of business on August 27, 1972. Their secret family recipes were never released, and though many have tried to replicate them, no one knows the exact details of those original recipes.

the rich, dark history of brooklyn blackout cake | Brooklyn Homemaker

Since they went bust more than a decade before I was born, I’ve never actually tasted a genuine Ebinger’s Brooklyn Blackout Cake. If you’re looking for the real, true, authentic recipe, you’ve come to the wrong place. Many bakeries and blogs have tried their best to come up with a close approximation, but since I’ve never tasted the real thing, I decided I was within my rights to take some liberties.
According to food historian Molly O’Neill, a true Brooklyn Blackout Cake consists of “…three layers of devil’s food cake sandwiching a dark chocolate pudding with chocolate frosting and sprinkled with chocolate cake crumbs.” I followed her guideline, but went ahead and used my own recipes for the three components.

the rich, dark history of brooklyn blackout cake | Brooklyn Homemaker

I used my favorite recipe for Devil’s Food Cake but, in place of natural cocoa, I substituted a mix of dutch-process cocoa and ultra-dutched black cocoa to give the cake a deep dark “blackout” flavor. If you’re not familiar with black cocoa, it’s what’s used in Oreos to give them their iconic dark chocolate flavor. It can sometimes be a bit overpowering in a cake though, so I mixed it with dutch-process cocoa to mellow it out a bit. The end result is an impossibly chocolatey cake that is literally black in color. If you don’t have or can’t find black cocoa (available here), feel free to just use dutch-process cocoa. I’m positive you’ll have amazing results either way. 

the rich, dark history of brooklyn blackout cake | Brooklyn Homemaker

For the pudding filling, I decided to add some espresso powder to deepen the chocolate flavor, and to bring a bit of coffee into the cake that I was inspired to bake by my grandfather’s story. If you’re not a coffee fan you could leave it out, but together with the other components, you get just a subtle hint of coffee that backs up the dark chocolatiness of the rest of the cake. To top it all off, I iced the cake with a thick, rich dark chocolate ganache. Then I covered the sides of the cake with crumbs while leaving most of the top clean to show off a swirled design in the icing.

the rich, dark history of brooklyn blackout cake | Brooklyn Homemaker

When making a layer cake, especially one consisting of more than two layers, I think it’s really important to level each layer of cake before assembly. I think it makes for a much more professional looking, impressive, and beautiful cake. I also like that you get an opportunity to taste the cake before serving to be certain no mistakes were made. Luckily, in this recipe, the excess cake gets put to good use too.

the rich, dark history of brooklyn blackout cake | Brooklyn Homemaker

To be perfectly honest, this cake is a LOT of work. Ebinger’s was making this in commercial production bakeries with lots of help, but making this yourself is a bit of an undertaking. If you’re up for the challenge though, the end result is unbelievably delicious, incredibly moist, and outrageously chocolatey. If you are as big of a fan of chocolate as I am, you’ll go crazy for this cake.

the rich, dark history of brooklyn blackout cake | Brooklyn Homemaker

Brooklyn Blackout Cake


Black Devil’s Food Cake
makes three 8-inch layers

butter and flour for pans
3/4 cups dutch process cocoa powder
3/4 cups ultra-dutched black cocoa powder *see note
1 1/2 cups hot water
3 1/4 cups cake flour
1 1/4 teaspoons coarse salt
1 teaspoon baking powder
1 teaspoon baking soda
2 cups peanut oil or vegetable oil
1 cup granulated sugar
1 1/4 cup packed brown sugar
4 large eggs
4 teaspoons vanilla extract
1 cup buttermilk

Preheat oven to 350 degrees. Butter three 8 inch round cake pans, line bottoms with parchment paper, butter paper, and dust pans with flour. Whisk together cocoa powders and hot water until smooth.

Sift together flour, salt, baking powder, and baking soda; set aside. Beat oil and sugars together on medium-low speed until combined.
Add eggs, one at a time, beating after each addition. Beat in vanilla and cocoa mixture. Reduce speed to low. Add flour mixture in two batches, alternating with buttermilk and beginning and ending with flour. Beat until just combined.
Divide batter between pans, and bake until a cake tester inserted into centers comes out clean, 40 to 45 minutes. Transfer pans to a wire rack to cool for 15 minutes. Invert cakes onto rack, peel off parchment, and let cool completely.

*if you don’t have (or can’t find) black cocoa, you can just use all dutch-process instead (for a total of 1 1/2 cups cocoa)

Chocolate Pudding Filling

1/2 cup sugar
2 tablespoons cornstarch
1/4 teaspoon salt
2 teaspoons espresso powder
1-1/2 cups whole milk
3 ounces good dark chocolate, chopped
1 teaspoon vanilla extract

In a small heavy saucepan, mix sugar, cornstarch, espresso powder and salt. Whisk in milk. Cook and stir over medium heat until thickened and bubbly. Reduce heat to low; cook and stir 2 minutes longer. Remove from heat and stir in chocolate until melted. Transfer to a bowl; stir in vanilla. Cool slightly, stirring occasionally. Press plastic wrap onto surface of pudding. Refrigerate, covered, at least 2 hours or until cold.

Chocolate Ganache Icing

1 1/2 cup heavy cream
1/4 cup sugar
1/4 teaspoon kosher salt
12 oz good dark chocolate, chopped
2 teaspoons vanilla

Heat cream, sugar, and salt over medium heat until just on the verge of boiling. Place chopped chocolate in a heat proof bowl and pour hot cream over it making sure all chocolate is submerged. Let sit for 2 or 3 minutes, and whisk until completely smooth and incorporated. Add vanilla and whisk well. Cover and cool until thick and spreadable. You can try to speed this up in the refrigerator, but check it frequently and be careful not to let it get too cold or it won’t be spreadable.

To assemble cake, make sure all layers, filling & icing are cool or cold. Remove the domed tops of the cake layers with a cake leveler or sharp bread knife. With clean hands, crumble up reserved cake domes into fine, relatively even crumbs, and reserve for decorating use. Place one layer on a cake plate, serving plate, or cake board. Evenly spread half of the pudding over the first layer. Top with another layer and remaining pudding. Top with third layer.

With an icing spatula, spread a thin layer of ganache over top and sides of cake, trying not to squish the pudding out from between the layers. This should take about 1/3 of your ganache. Be sure to fill in any gaps between layers and make the sides and top smooth and flat as possible. This thin layer of icing is referred to as the “crumb coat” and is meant to seal in any crumbs so they’re not seen in your final layer of icing. Refrigerate cake for 15 minutes. Spread most (or all) of remaining ganache evenly over top and sides of cake, trying to get as smooth a surface as possible. If desired, reserve some ganache for piped decoration, otherwise, slather it all on. Press the crumbs against sides of the cake until the sides are well covered. You can decorate the top with a swirl design using a small icing spatula, leave it flat and smooth, pipe a border or design, or cover the top with more crumbs.

This cake is at it’s best the day it’s baked, but can be covered and refrigerated for up to 2 days. If refrigerated, it will need to come up to room temperature before serving.

chocolate peanut butter whoopie pies

Russell had oral surgery a few days ago and immediately developed quite a sweet tooth. Nothing like eating cookies and ice cream after spending hundreds on dental work! He was craving chocolate and peanut butter and asked me to make some buckeyes that I used to make when I worked for a cupcake shop. I thought it might be more fun to put a peanut buttery twist on traditional whoopie pies, and made a batch of chocolate peanut butter whoopie pies to satisfy his craving. Needless to say, they really hit the spot.

chocolate peanut butter whoopie pies | Brooklyn Homemaker

In case you’ve been living under a rock somewhere, a whoopie pie is a sandwich cookie made up of two cake-like cookies with a creamy filling between them. Whoopie pies are very popular in the Northeast and New England and, depending on the region, they sometimes go by the names black moon, gob, bob, or “BFO” for Big Fat Oreo. Although they probably originated in the Northeast, they’ve spread throughout the US in the past few decades and are well-known and well-loved all over the country. Traditionally they’re made of some kind of rich chocolate cake and filled with a creamy white vanilla or marshmallow filling. In recent years new varieties have popped up, including red velvet or pumpkin with cream cheese filling, or chocolate with fillings like peanut butter, mint, or caramel buttercream.

chocolate peanut butter whoopie pies | Brooklyn Homemaker

The history of the whoopie pie is something of a mystery. Many regions lay claim to their origins, but there is not enough evidence to prove any one area as their true birthplace. Handheld filled sandwich cakes were popular in Victorian era Europe, and whoever really invented the whoopie pie mostly likely borrowed the idea from these European treats. Victorian sandwich cakes were usually made of sponge cake filled with jam or cream, and were often cut into small slices or slivers and served with tea. Whatever their origins, America’s whoopie pies are decidedly less refined.

chocolate peanut butter whoopie pies | Brooklyn Homemaker

Many people agree that whoopie pies were invented by the Amish of Pennsylvania dutch country. The popular belief in this area is that these cookies were invented in Amish and Pennsylvania German culture and the recipe was passed down through generations without leaving any official paper trail. The legend has it that an Amish homemaker probably used some leftover cake batter to make cookies for her children, topped them with some buttercream, and liked the results so much that she shared the recipe with the surrounding community. The claim is that Amish mothers would pack the cookies into their children’s lunch bags and, on finding them, the kids would shout “Whoopie!”
Today these cookies are commonly sold in Amish country stores and farm stands throughout Pennsylvania and no trip to this region is complete without indulging on a traditional Amish whoopie pie.

chocolate peanut butter whoopie pies | Brooklyn Homemaker

The Berwick Cake Co. in Boston, Massachusetts also claims to have invented this treat. They claim to have started selling whoopie pies in the 1920s or 30, but the oldest printed reference to Berwick making whoopie pies is a newspaper ad from 1950.  Although the bakery closed years ago, the brick building still has the words “Whoopee! Pies” painted on its side. Whether Berwick invented them or not, many people believe they have commercial, rather than Amish, origins. These people believe that a production bakery probably used up some leftover cake batter and came up with a handheld cake by baking the batter on a pan like a cookie.

chocolate peanut butter whoopie pies | Brooklyn Homemaker

The state of Maine also lays a claim to the origins of the whoopie pie. Labadie’s bakery in Lewiston, Maine claims to have been making the confectionery since 1925, but many others think that the idea probably made its way to Maine from another state. Some people believe that the cookie traveled with some Amish groups that left Pennsylvania and moved to Maine. Others say that the whoopie pie came to Maine in the 1930s when a cook book featuring a recipe for a whoopie pie with marshmallow cream filling was published and distributed in New England by the Durkee Mower Company, the manufacturer of Marshmallow Fluff.
Whether whoopie pies were invented in Maine or not, the people of Maine take this cookie very seriously.  In 2011, the Maine State Legislature entertained the idea of naming the whoopie pie the official state dessert, but ultimately decided to name it the “Official State Treat”, choosing wild Maine blueberry pie as the state dessert instead.

chocolate peanut butter whoopie pies | Brooklyn Homemaker

The size of whoopie pies varies greatly depending on the region as well. Especially in Pennsylvania, some whoopie pies are huge sandwich sized confections that can feed two or more people. Other areas produce individual sized cookies, and recently some areas have started making bite sized mini whoopie pies.
The whoopie pies I made aren’t the huge Pennsylvania style, but they’re not the bite-sized variety either. I used a #24 portion scoop, about 3 tablespoons, and my pies ended up being about the serving size of a cupcake. This recipe made 12 finished sandwich cookies for me, but depending on the size you make them, your yield may be much different from mine. If you do decide you want to make your cookies a different size, you may need to adjust your cooking time by a few minutes.

chocolate peanut butter whoopie pies | Brooklyn Homemaker

This recipe produces a deep dark & chocolatey cookie. The addition of a healthy dose of coffee adds even more depth to the dark chocolate notes, and the combination of brown sugar, oil and buttermilk give it a wonderful chewy, moist and pillowy soft texture. Even without the filling, this cookie is phenomenal, and I “accidentally” baked an odd number of cookies and was forced, against my will I might add, to eat one on its own.
The real star here though is the peanut butter buttercream. It’s ultra smooth and creamy, just a little bit salty, a little more sweet, and crazy peanut buttery. It might be a bit too soft and loose to serve on super hot summer days, but this time of year it’s perfect. Briefly refrigerating the finished whoopie pies will help set the filling so it doesn’t smoosh out the sides when you bite down. The combination of these rich chocolate cakes with the sweet smooth creamy peanut buttery goodness of this filling is better than you can even imagine. Are you drooling yet? I  am.

chocolate peanut butter whoopie pies | Brooklyn Homemaker

Chocolate Peanut Butter Whoopie Pies

  • Servings: approximately 12 cookies
  • Print
Adapted from Baked Explorations

3½ cups all-purpose flour
¼ teaspoon salt
1¼ teaspoons baking powder
1¼ teaspoons baking soda
¾ cup dark unsweetened cocoa powder
2 teaspoons instant espresso powder
1/2 cup hot coffee
2 cups firmly packed light brown sugar
3/4 cups peanut or canola oil
1 large egg, room temperature
1 teaspoon pure vanilla extract
1/2 cup buttermilk, room temperature, shaken

Preheat oven to 350° F.  Line 2 baking sheets with parchment paper.
In a large bowl, whisk together the flour, salt, baking powder, and baking soda, and set aside.
In another large bowl, whisk together the cocoa and espresso powder. Add the hot coffee and 1/2 cup hot water and whisk until both powders are completely dissolved.
In a medium bowl, stir the brown sugar and oil together. Add this to the cocoa mixture and whisk until combined. Add the egg, vanilla and buttermilk and whisk until smooth. Using a rubber spatula to gently fold the dry ingredients into the wet ingredients. Make sure to scrape down the sides and the bottom of the bowl as you fold.
Use a portion scoop with to drop heaping tablespoons of the dough onto the prepared baking sheets about 1-inch apart. Bake for 10 to 15 minutes, until the cookies are just starting to crack on top and a toothpick inserted into the center of a cookie comes out clean. Let the cookies cool completely on the pans while you make the filling (recipe below).
Turn half of the cookies so the flat side faces up, and distribute the filling evenly between the overturned cookies using a portion scoop, piping bag, or icing spatula. Top the buttercream with another cookie and press down gently so the filling spreads to the edges of the cookies. Refrigerate for at least 30 minutes to set the filling, and let the cookies come back to room temperature for 30 minutes before serving. Whoopie pies will keep for up to 3 days in the fridge, on a parchment-lined baking sheet covered with plastic wrap.

Peanut Butter Buttercream

1 cup creamy peanut butter
12 tablespoons (1 1/2 sticks) unsalted butter, softened
1 1/4 cups confectioners’ sugar

With the paddle attachment of a stand mixer, cream the softened butter and peanut on high-speed until completely blended and smooth. Add sugar and, on low-speed, mix until combined. Turn up to high and beat until fluffy.

grapefruit bars

Well folks. Guess what…
I’m a man obsessed. I have yet another citrus recipe to share with you.

grapefruit bars | Brooklyn Homemaker

First though, I would like to mention that Brooklyn Homemaker received enough nominations in theKitchn’s The Homies to make it into the finals for “best daily read” cooking blog! Woohoo!!! I only started writing this blog about six months ago, and at that time I never imagined that I would come so far so quickly. I hate to sound like I’m bragging, but I feel like my writing style and photography skills, as well as my understanding of blogging and my idea of what I want Brooklyn Homemaker to be, have grown and improved so so much. There’s still a lot of room for improvement, but I’m at a place where I feel very pleased with the direction of this blog and excited for what it will become in the future.

If you are as big a fan of Brooklyn Homemaker as I am, and you’re as excited about the future of the blog as I am, please take a moment to vote for me in The Homies for “best daily read”. TheKitchn does make you create an account, but they make it very easy, and you can even sign in through facebook. Please choose Brooklyn Homemaker from the list of ten finalists at the top of the page HERE. Being such a young blog, I honestly cannot believe that I’m holding my own against blogs that have been around for years and have thousands of readers. It is such a huge honor to have made it into the finals and no matter what the outcome, I will be thrilled to have done so well. Being one of the ten finalists has brought in so many new readers, and I couldn’t be happier about it. If you’re new here, welcome! I’m glad you’re here, and I hope you’ll keep coming back!

grapefruit bars | Brooklyn Homemaker

Okay. Enough about me, let’s get back to the recipe.

Although we’re facing another cold front, the weather in Brooklyn actually warmed up for a brief moment over the weekend. Unsurprisingly though, my nagging citrus craving didn’t subside one bit. This time around I thought something bright and sweet and unmistakably citrus-y might do the trick to help me snap out of it. For over a week now I’ve been thinking about trying to make grapefruit curd, but I hadn’t yet because I couldn’t decide what I’d do with it. I love citrus curd but if I’m making it fresh I usually like to use it to fill a cake or serve with brunch or some such thing. Homemade curd tastes one bajillion times better than the store-bought stuff, but it isn’t nearly as shelf stable, so if I don’t have a plan to use it up pretty quickly, I generally don’t think it’s worth the trouble.

grapefruit bars | Brooklyn Homemaker

I toyed with the idea of making a grapefruit cake, but decided that if I were going to do that I’d want to make the famous Brown Derby grapefruit cake, which doesn’t actually call for grapefruit curd. Maybe some other time. After racking my brain a bit longer it finally hit me, I’d make lemon bars but with grapefruit instead. Since you don’t have to pre-cook the curd on the stove top it’s actually even simpler, but with very similar (delicious) results. I consulted with my dream woman, idol, and friend-in-my-head, Ina Garten, for the recipe, and made some tweaks and substitutions to turn her more traditional lemon bars into grapefruit bars instead.

grapefruit bars | Brooklyn Homemaker

Though her recipe is truly wonderful and worked perfectly with the grapefruit substitution, I wish I’d read some of the comments before I got started. I ended up having to make two batches to perfect this recipe, and I learned a few important things from the first, failed, attempt. The first batch wasn’t actually a true fail though. They were pretty decent, but they weren’t GREAT, and I wasn’t sure they were worth sharing here. So, rather than accepting defeat, or worse, blogging about a recipe I wasn’t that happy with, I decided to give it another shot the next day, and had MUCH better results.

grapefruit bars | Brooklyn Homemaker

In the name of learning, here’s what I did wrong the first time around. In an attempt to make for more attractive photos, I tried to make the first batch in a pretty white ceramic baking dish, but the pan was slightly smaller than the recommended 9×13 called for in the recipe. This already makes for a thick bar, and the smaller pan ended up making them even thicker. They took much longer to set than expected, baked kind of unevenly, and resulted in a slightly overcooked and muted flavor instead of the bright citrus-forward flavor I was hoping for. After reading some of the comments, I learned that a lot of people said they like a thinner bar and used a larger pan, like a 10×15 or a baker’s half sheet to spread the bars out, which apparently works really well. Making the bars even thicker than they already were though, was definitely not a wise decision on my part. Another thing I learned from reading the comments, again too late for the first batch, is that the filling shouldn’t be mixed together until the very last minute. If mixed too early, the acid in the citrus juice can affect the texture of the raw eggs, effectively cooking the eggs before they’re baked, and giving the cooked filling a rubbery “off” texture.

grapefruit bars | Brooklyn Homemaker

But here’s the good news! The second time around these bars were everything I was hoping they would be and more! The grapefruit really makes for a wonderful and interesting twist on the traditional lemon bar. I think lemon bars are delicious, but the super tart, super sweet flavor can sometimes seem a little one note and end up tasting like sour candy rather than a homemade baked treat. In addition to the tart and sweet flavors, the grapefruit juice adds some bitterness and depth that pairs really well with the buttery shortbread crust. They’re such a great little twist on the traditional lemon bars. They have all of that sweet and tart flavor you’re expecting but with just a hint of grapefruity bitterness. The curd filling is soft and sweet and ever-so-slightly gooey, and the buttery shortbread adds just enough crispness and bite to really bring another layer of texture and interest to the experience. SO. GOOD.

grapefruit bars | Brooklyn Homemaker

I hope you’ll give these bars a shot. Don’t let my initial mistakes scare you, this recipe is actually really simple and easy. If you learn from my mistakes and use the right size (or larger) pan, and be patient enough not to mix the filling too early, you’ll be thrilled with the results. Especially, obviously, if you’re a big grapefruit fan like I am. If you’re someone, also like me, who likes to try to get yourself prepared and ready ahead of time, you could always zest and juice your citrus ahead and could even mix the sugar in with the zest and juice. Just make sure you don’t mix the eggs in until you’re ready to bake. Okay? Now go preheat that oven. It’s cold outside again and you need something tropical-ish in your life.

grapefruit bars | Brooklyn Homemaker

Grapefruit Bars

  • Servings: 20-40 bars, depending on how you cut them
  • Print
adapted from The Barefoot Contessa Cookbook

crust:
1/2 pound (2 sticks) unsalted butter, at room temperature
1/2 cup granulated sugar
2 cups flour
1/4 teaspoon kosher salt

filling:
6 large eggs at room temperature
3 cups granulated sugar
2 tablespoons grated citrus zest (from 2 lemons and 1 large grapefruit)
1/4 cup freshly squeezed lemon juice (from 1-2 lemons)
3/4 cup freshly squeezed grapefruit juice (from 1 large grapefruit)
1 cup flour
Confectioners’ sugar, for dusting

Preheat the oven to 350 degrees F.
For the crust, cream the butter and sugar together in the bowl of an electric mixer with the paddle attachment until light and fluffy. Add the flour and salt and mix on low until just combined. Gather the dough together into a ball, and with floured hands, flatten the dough and press it into a 9 by 13 inch baking pan, building up a 1/2-inch edge on all sides. Chill in the refrigerator for at least 15 minutes.
Bake the crust for 15 to 20 minutes, until very lightly browned. Leave the oven on and let the crust cool slightly while you make the filling. Resist the urge to make the filling ahead, and wait until the crust comes out of the oven.
In a large bowl, whisk together the sugar, citrus zest, citrus juices, and eggs. Add flour and whisk until well combined, making sure there are no lumps. Pour the filling over the crust and bake for 30 to 35 minutes, until the filling is just set. Let cool to room temperature before cutting.
Cut into triangles and, with a sieve or dredger, dust with confectioners’ sugar.