Desserts

nusstaler

What is it about cookies that makes them the (un)official dessert of the holiday season?

nusstaler | chocolate dipped hazelnut shortbread | Brooklyn Homemaker

With all the baking people are doing this time of year, and with all the desserts that fit the bill for the holidays, why the humble cookie? You got your cakes, your tarts, your pies, your puddings and custards, your candies, and all manner of other sweet treats that feel just as festive and celebratory.

Perhaps cookies take the cake because they’re so sharable. Because they’re such a social dessert. Even though they’re essentially single serving, homemade cookies are always best eaten with friends and family.

nusstaler | chocolate dipped hazelnut shortbread | Brooklyn Homemaker

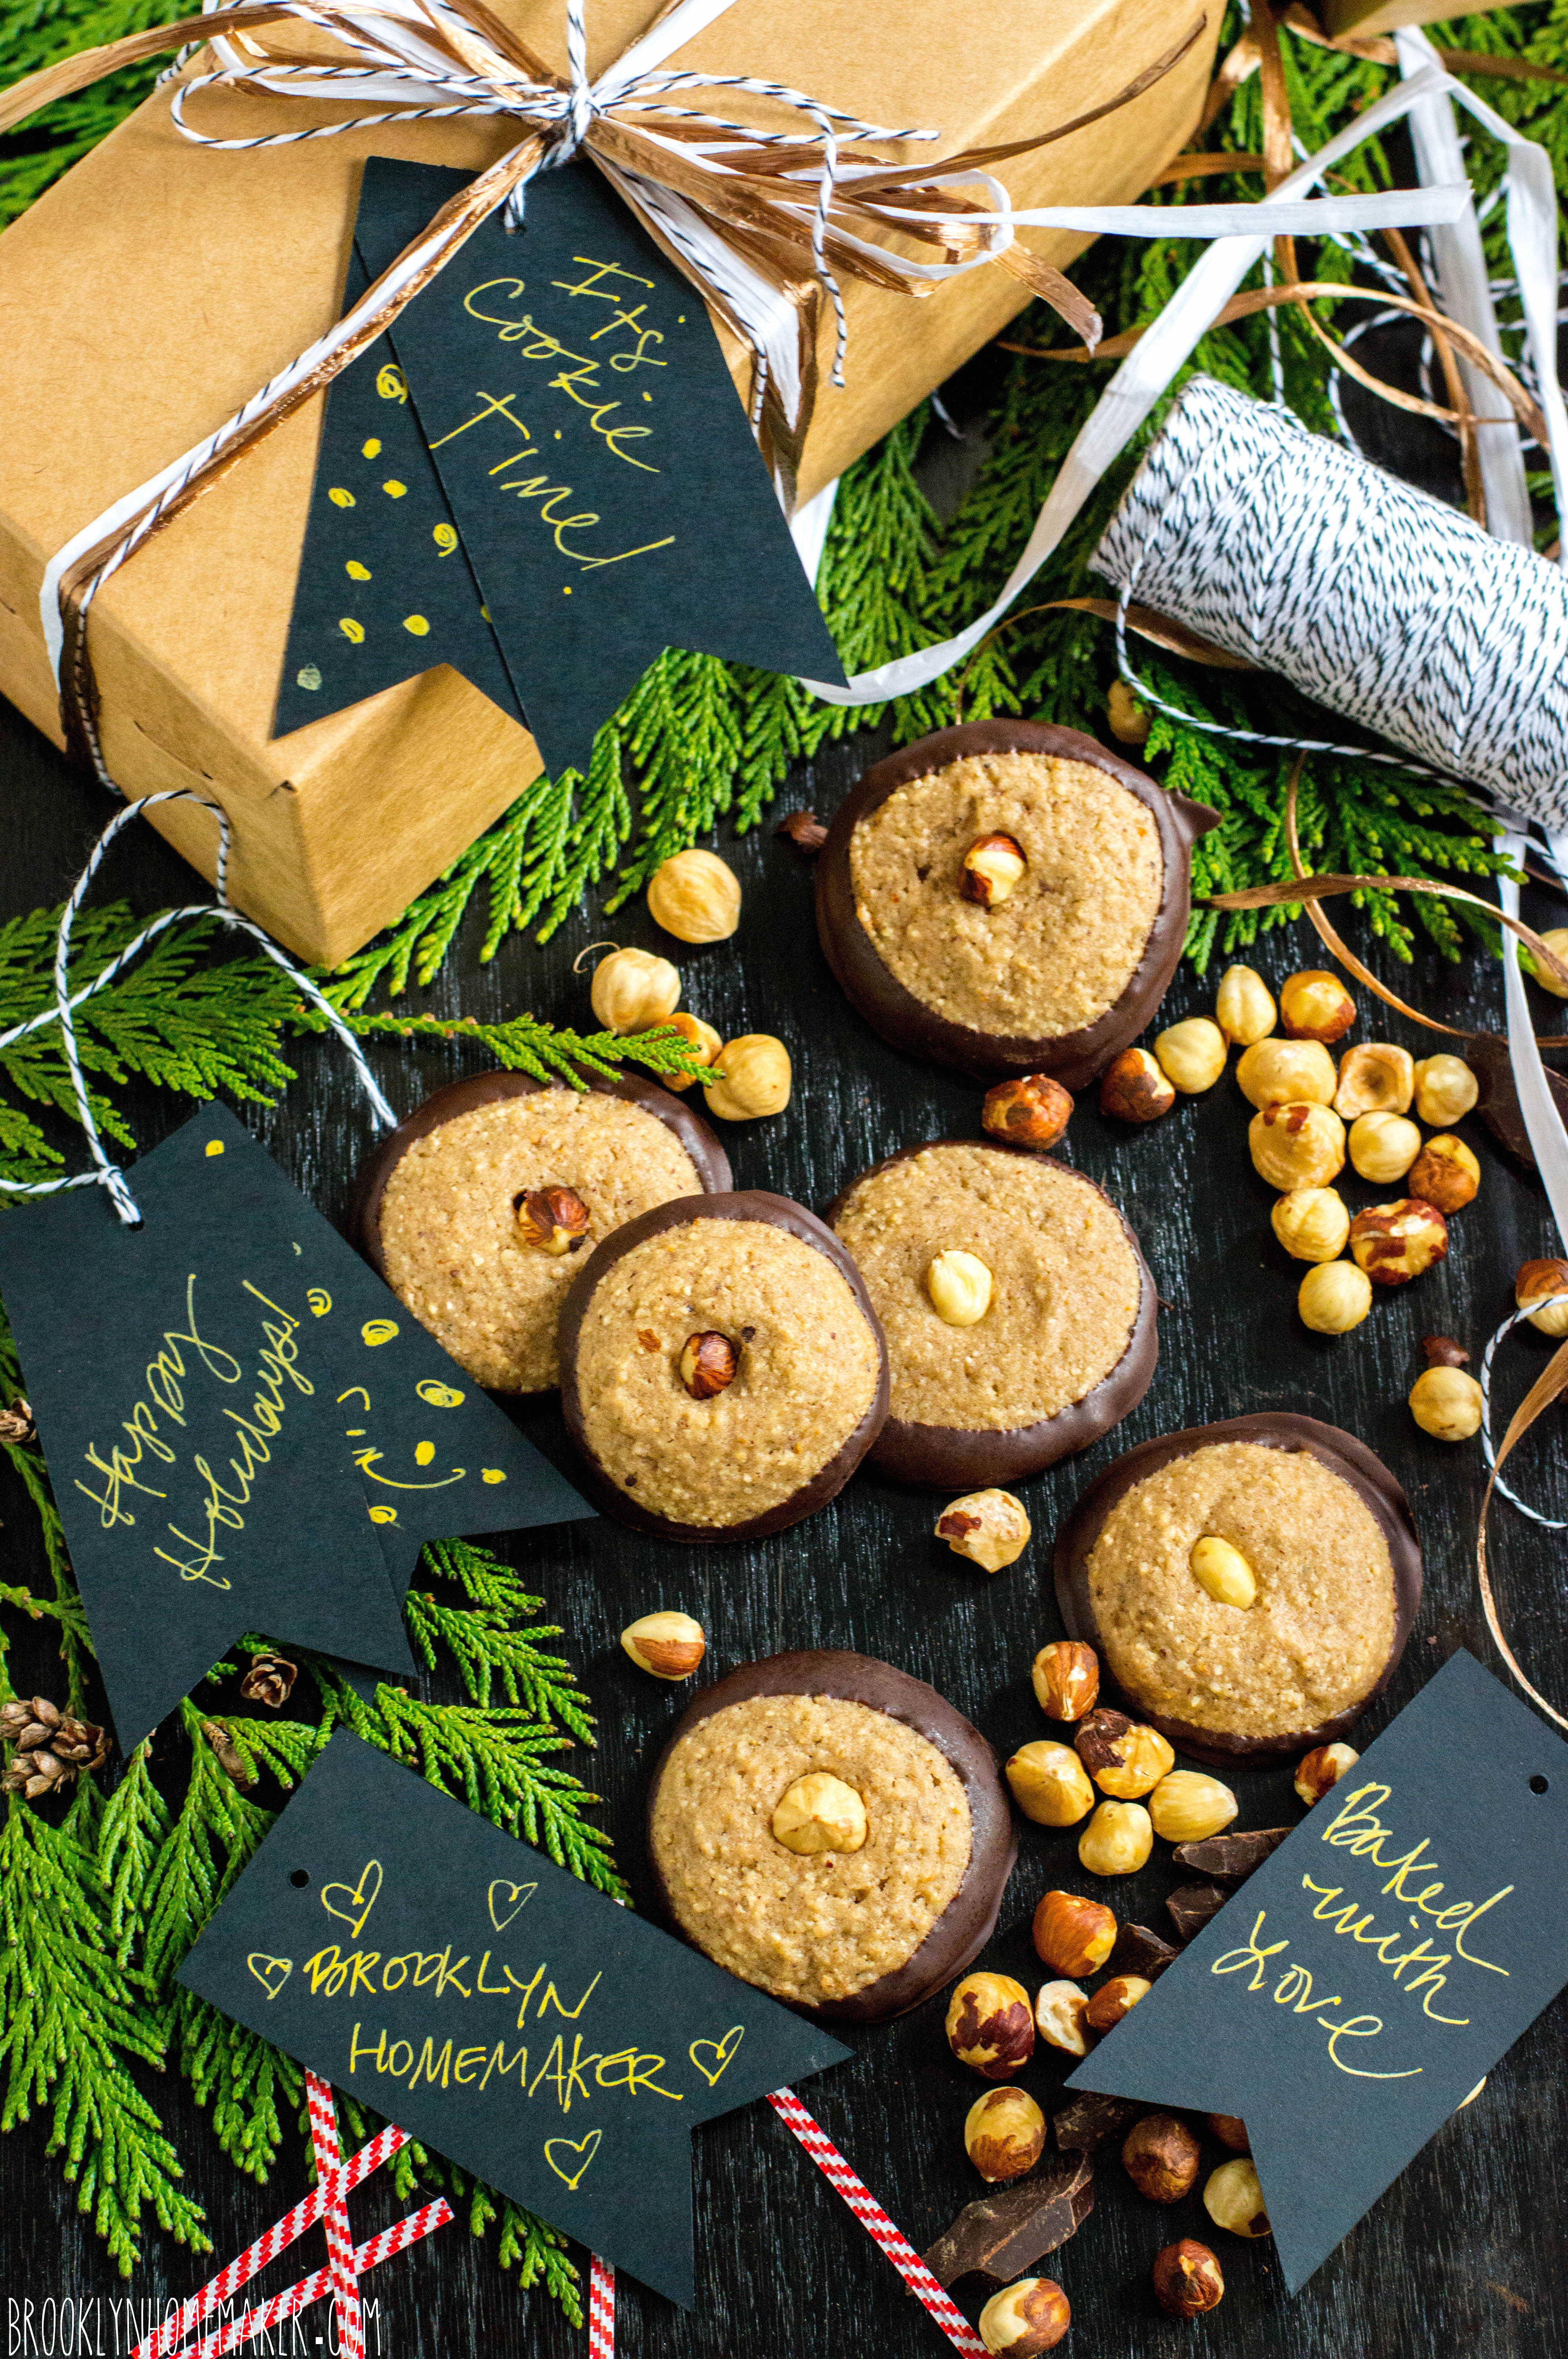
Maybe it’s because they make such excellent gifts. Unlike cakes and pies, cookies keep well at room temperature for a long while, so they store, pack, and ship well. A batch of cookies that comes out of an oven in New York City can be enjoyed by a California grandmother just a few days later.

nusstaler | chocolate dipped hazelnut shortbread | Brooklyn Homemaker

Maybe it’s because they’re so customizable and widely varied. Spiced cookies, iced cookies, soft cookies, crunchy cookies, chewy cookies, thin cookies, thick cookies, sandwich cookies, stuffed cookies, cutout cookies, chocolate cookies, nutty cookies, fruity cookies, oaty cookies, buttery cookies, olive oil cookies, endless kinds of cookies!

Fill a tray to overflowing will all of your favorites, and it’s an instant party!

nusstaler | chocolate dipped hazelnut shortbread | Brooklyn Homemaker

A cookie swap is a great way to make sure your holiday party has that obligatory cookie platter, without being stuck in the kitchen for days to roll and cut and decorate fifteen different recipes.

If you’re not familiar with the idea of a cookie swap, each person bakes up a huge batch of one recipe, and then everyone gets together and swaps everything. You show up with a boatload of own your recipe, but leave with half a dozen of several different cookies to share with your family. It’s like a baker’s dream party. A pre-holiday-party holiday party!

nusstaler | chocolate dipped hazelnut shortbread | Brooklyn Homemaker

While I absolutely love the idea of a cookie swap, I’ve never actually been to one! Thankfully, most food bloggers love to bake (and eat) cookies just as much as I do, and a few years ago two of my favorite bloggers decided to get creative with the cookie swap concept.

the Great Food Blogger Cookie Swap 2015

Thanks to Love & Olive Oil and The Little Kitchen, we now have the Great Food Blogger Cookie Swap! Food bloggers from across the nation and across the globe get to interact and share cookies with each other from the comforts of home. We’re assigned three blogs to send our cookies to, and three blogs send cookies our way. It’s like secret santa by mail, but with homemade cookies!

It’s a great way to meet new bloggers and taste some seriously delicious cookies. It’s also a great cause, as donations are collected for participating, and all proceeds benefit Cookies for Kid’s Cander, a national non-profit organization committed to funding new therapies used in the fight against pediatric cancer.

nusstaler | chocolate dipped hazelnut shortbread | Brooklyn Homemaker

Coming up with a cookie recipe worthy of sharing with other food bloggers was a job I took extremely seriously.  We’ve already established that I’m a bit of an over achiever, so I found the infinite number of cookie recipes out there pretty daunting.

When it comes to the holidays, I usually like to stick to my German heritage, but I was running out of ideas. A few years back I made some traditional pfeffernusse, and last year I made a gingerbread linzer cookie for my first time participating in the cookie swap.

nusstaler | chocolate dipped hazelnut shortbread | Brooklyn Homemaker

Whenever I get kind of stumped I like to pour over Pinterest for inspiration. That’s where I found a recipe from Saveur for a traditional Bavarian Christmas cookie called nusstaler that caught my eye. I was intrigued. They looked beautiful and sounded delicious. Absolutely. You betcha. I couldn’t wait.

Then I read the reviews.

Almost everyone who attempted to make their recipe said there were problems with it. I won’t get into all the details but from what I was reading this recipe had obviously not been thoroughly tested before publishing and had some serious technical flaws. I liked the idea of this cookie so much though, that I took to google looking for other recipes with better reviews. The problem is that Nusstaler are largely unknown in the US and the only recipes I could find were in German. The real barrier wasn’t the language though, it was the measurements. Google translates websites for you at the click of a button, but converting metric recipes isn’t quite so easy. You can easily find out the equivalents in cups and teaspoons, but they don’t always work out the way you’d want. I realized that a direct translation and conversion would mean my recipe would included measurements like 1.865 cups of flour, and I was almost ready to give up and ditch the whole thing.

But it was too late. I was bewitched by the very idea of these nutty chocolatey little cookies. I’d spent so much time digging for recipes that I was determined to stick with it. So, I decided to just try to figure it out on my own. Mind you, this is a cookie I’ve never tasted, never even heard of before seeing them on pinterest, but I was just going to wing it.

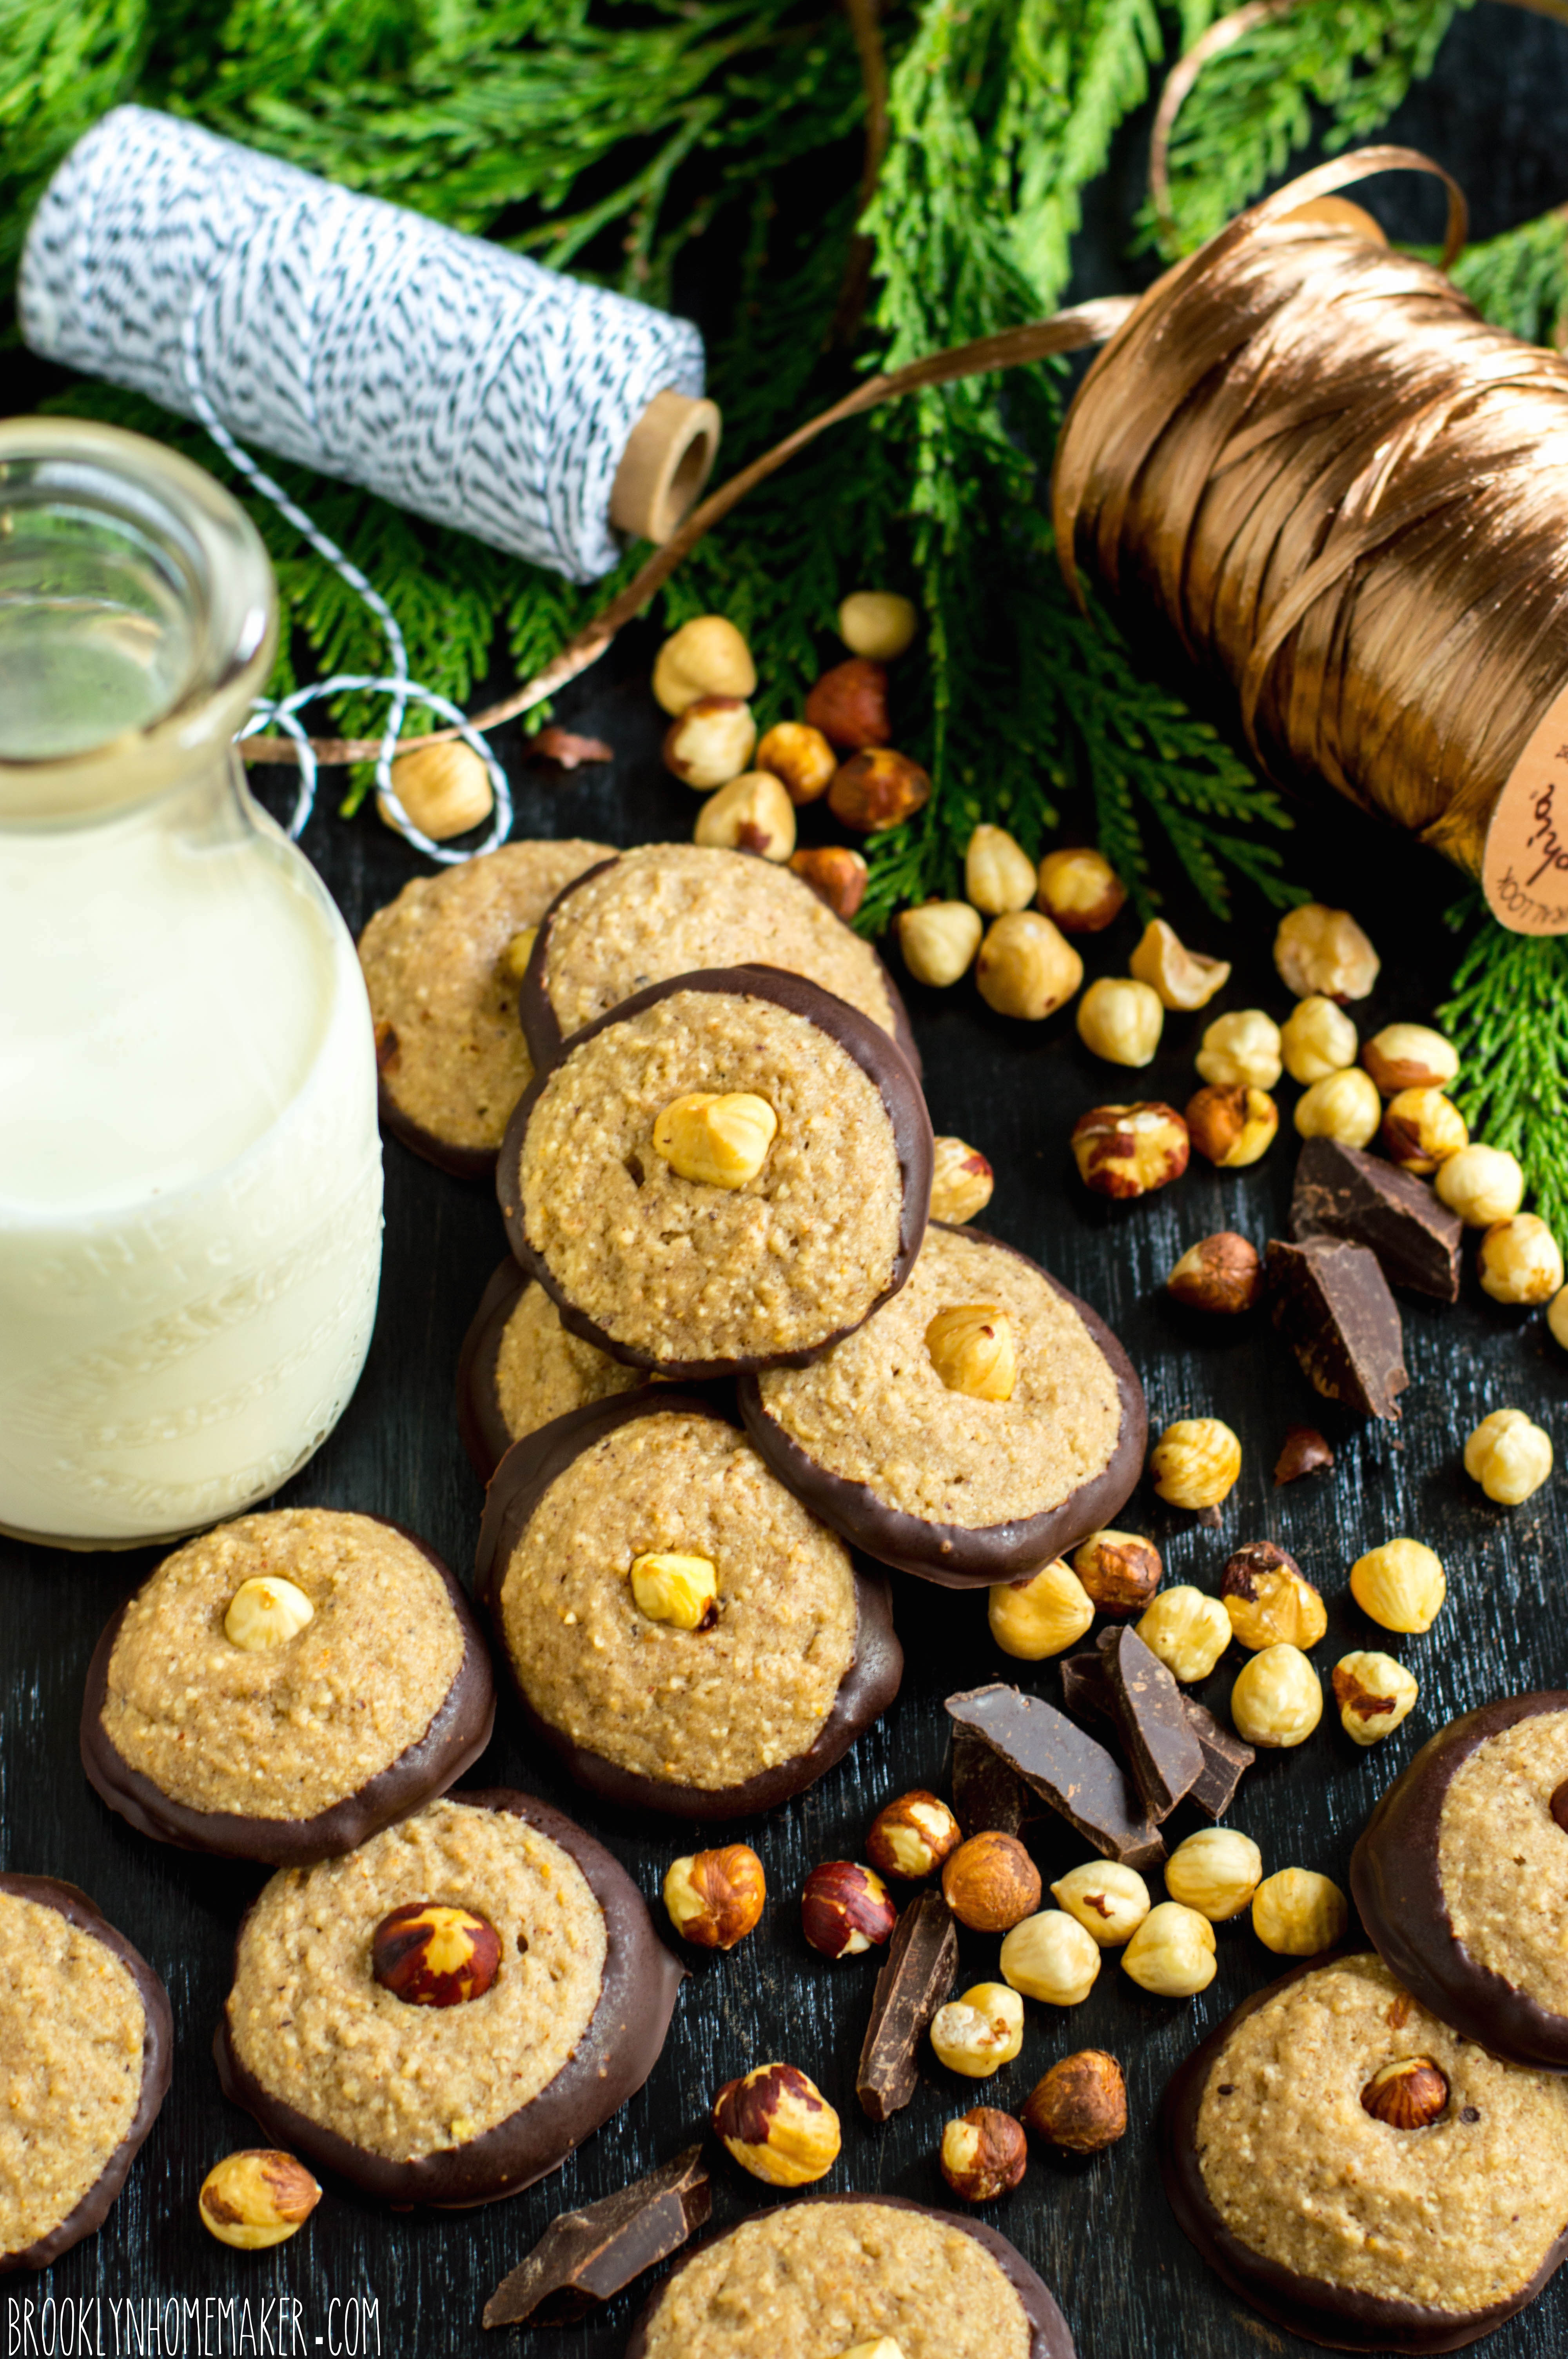
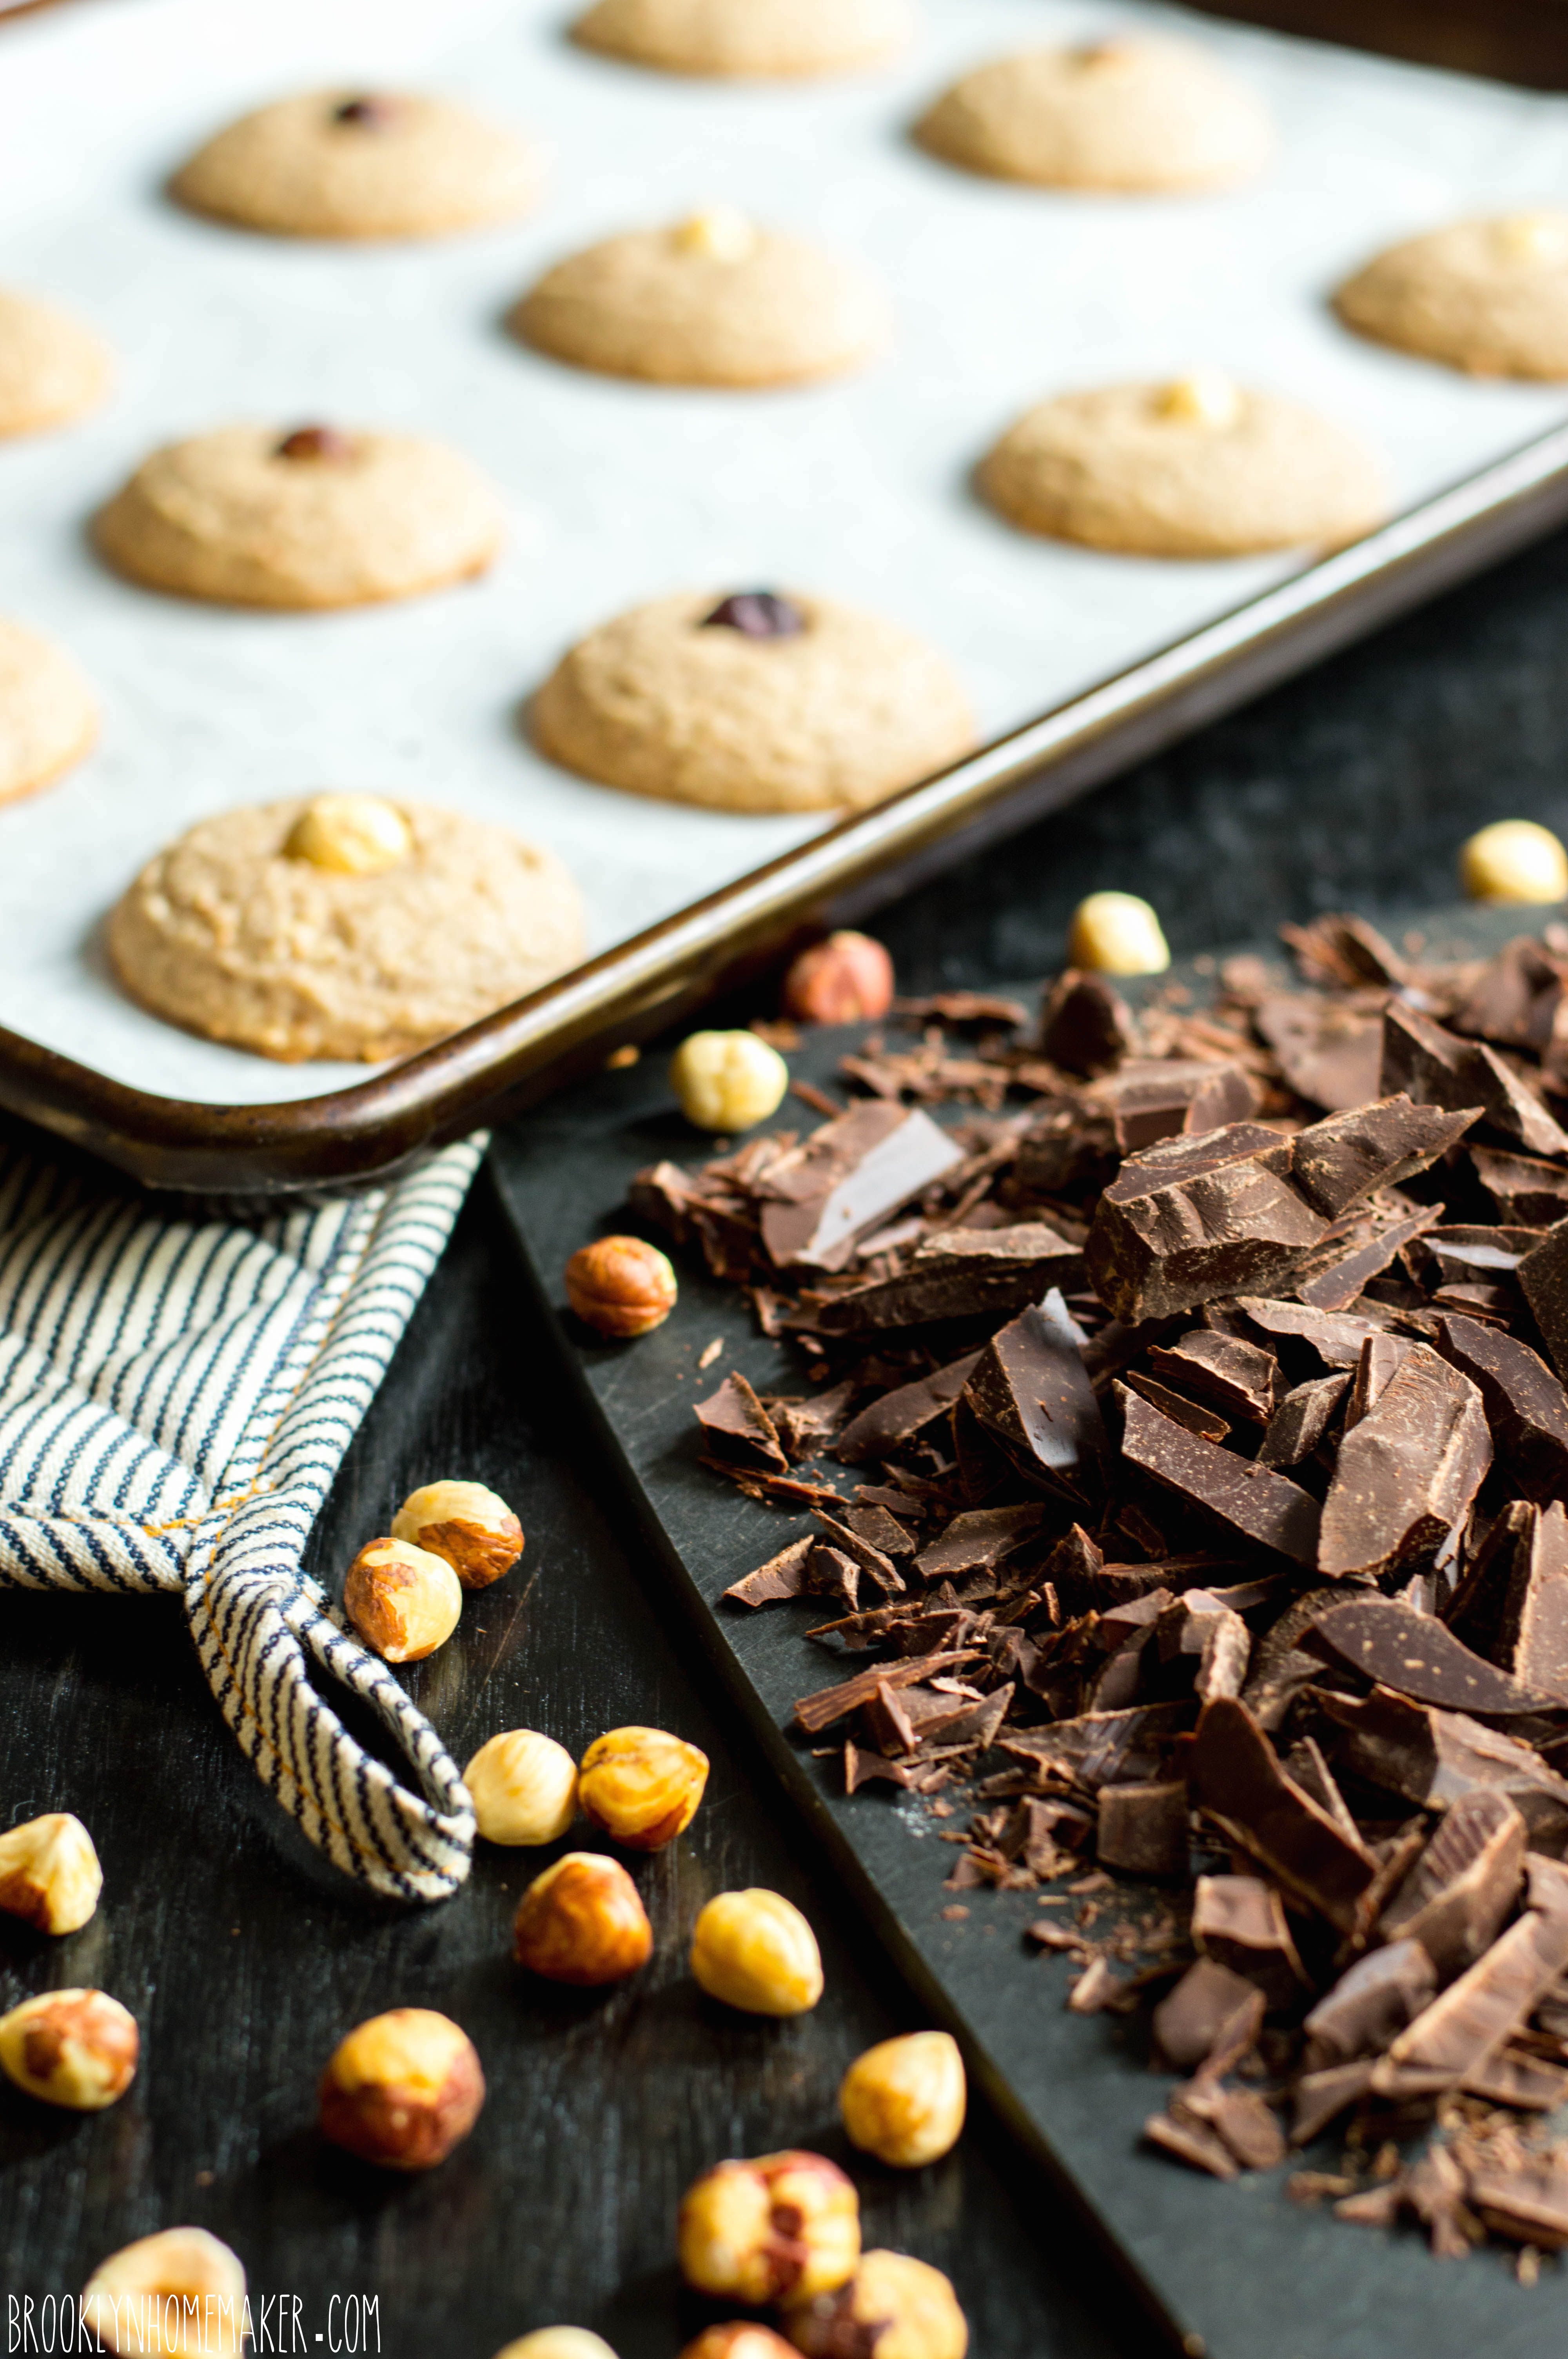
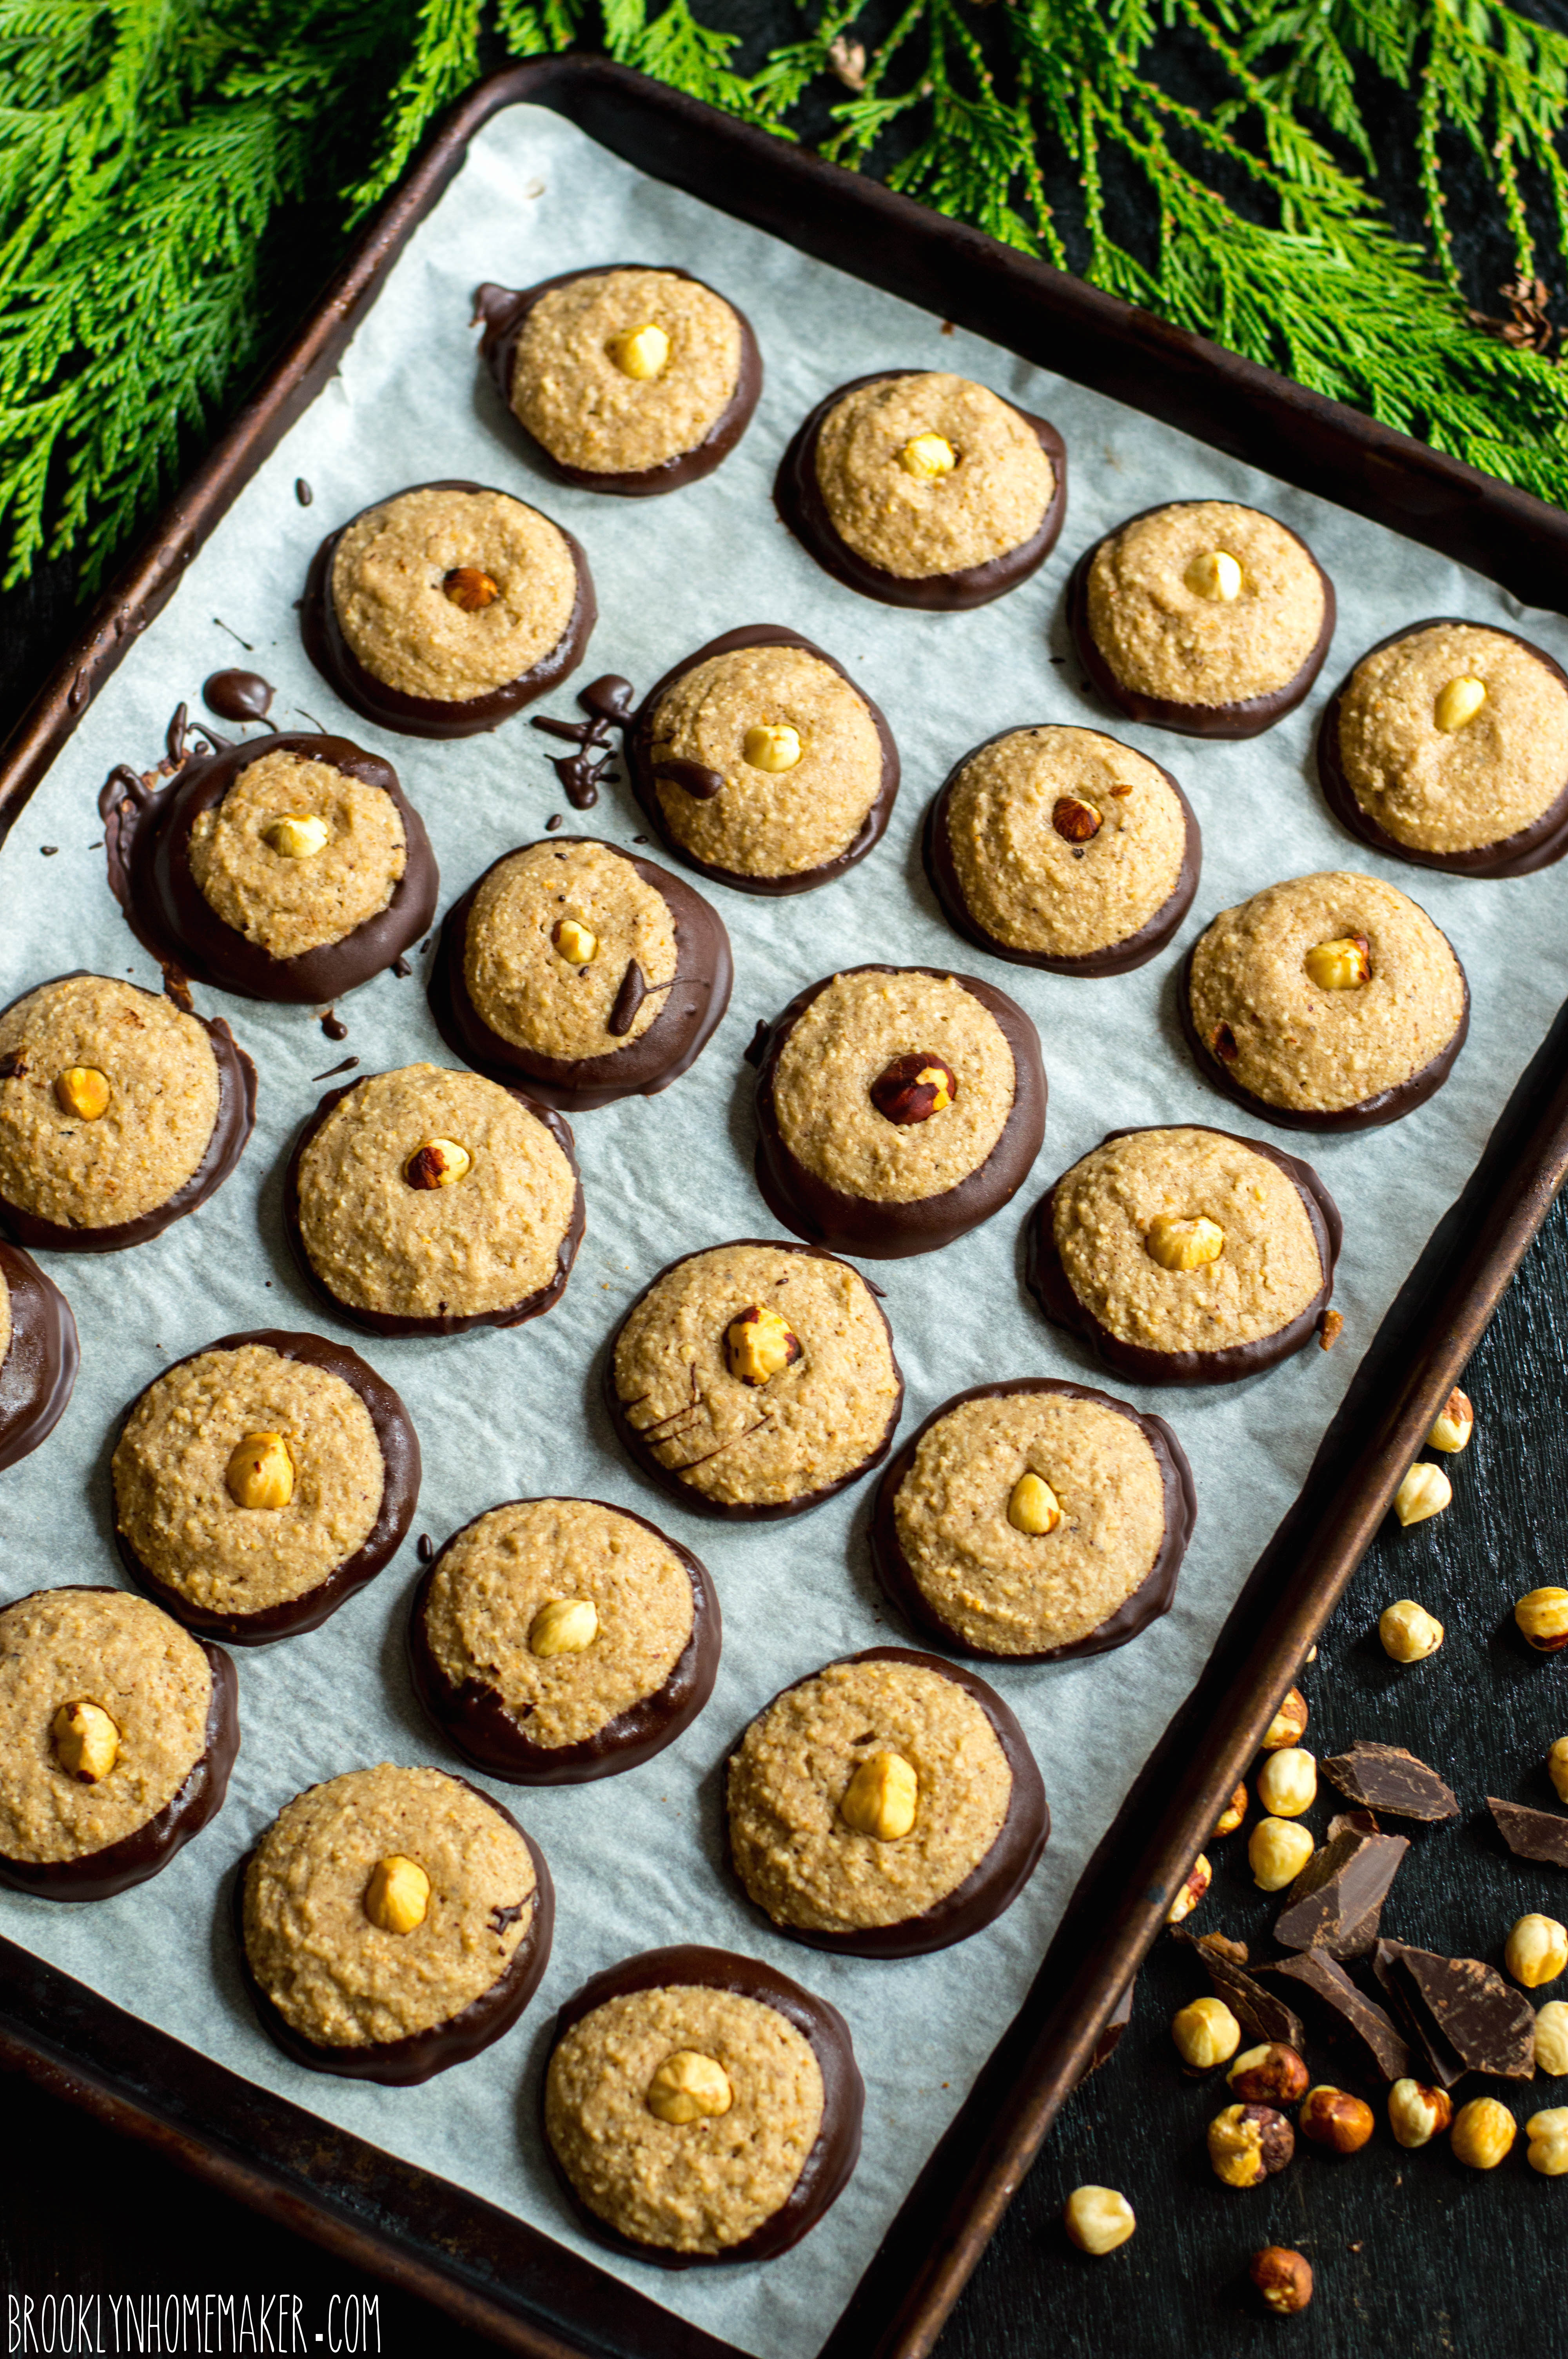
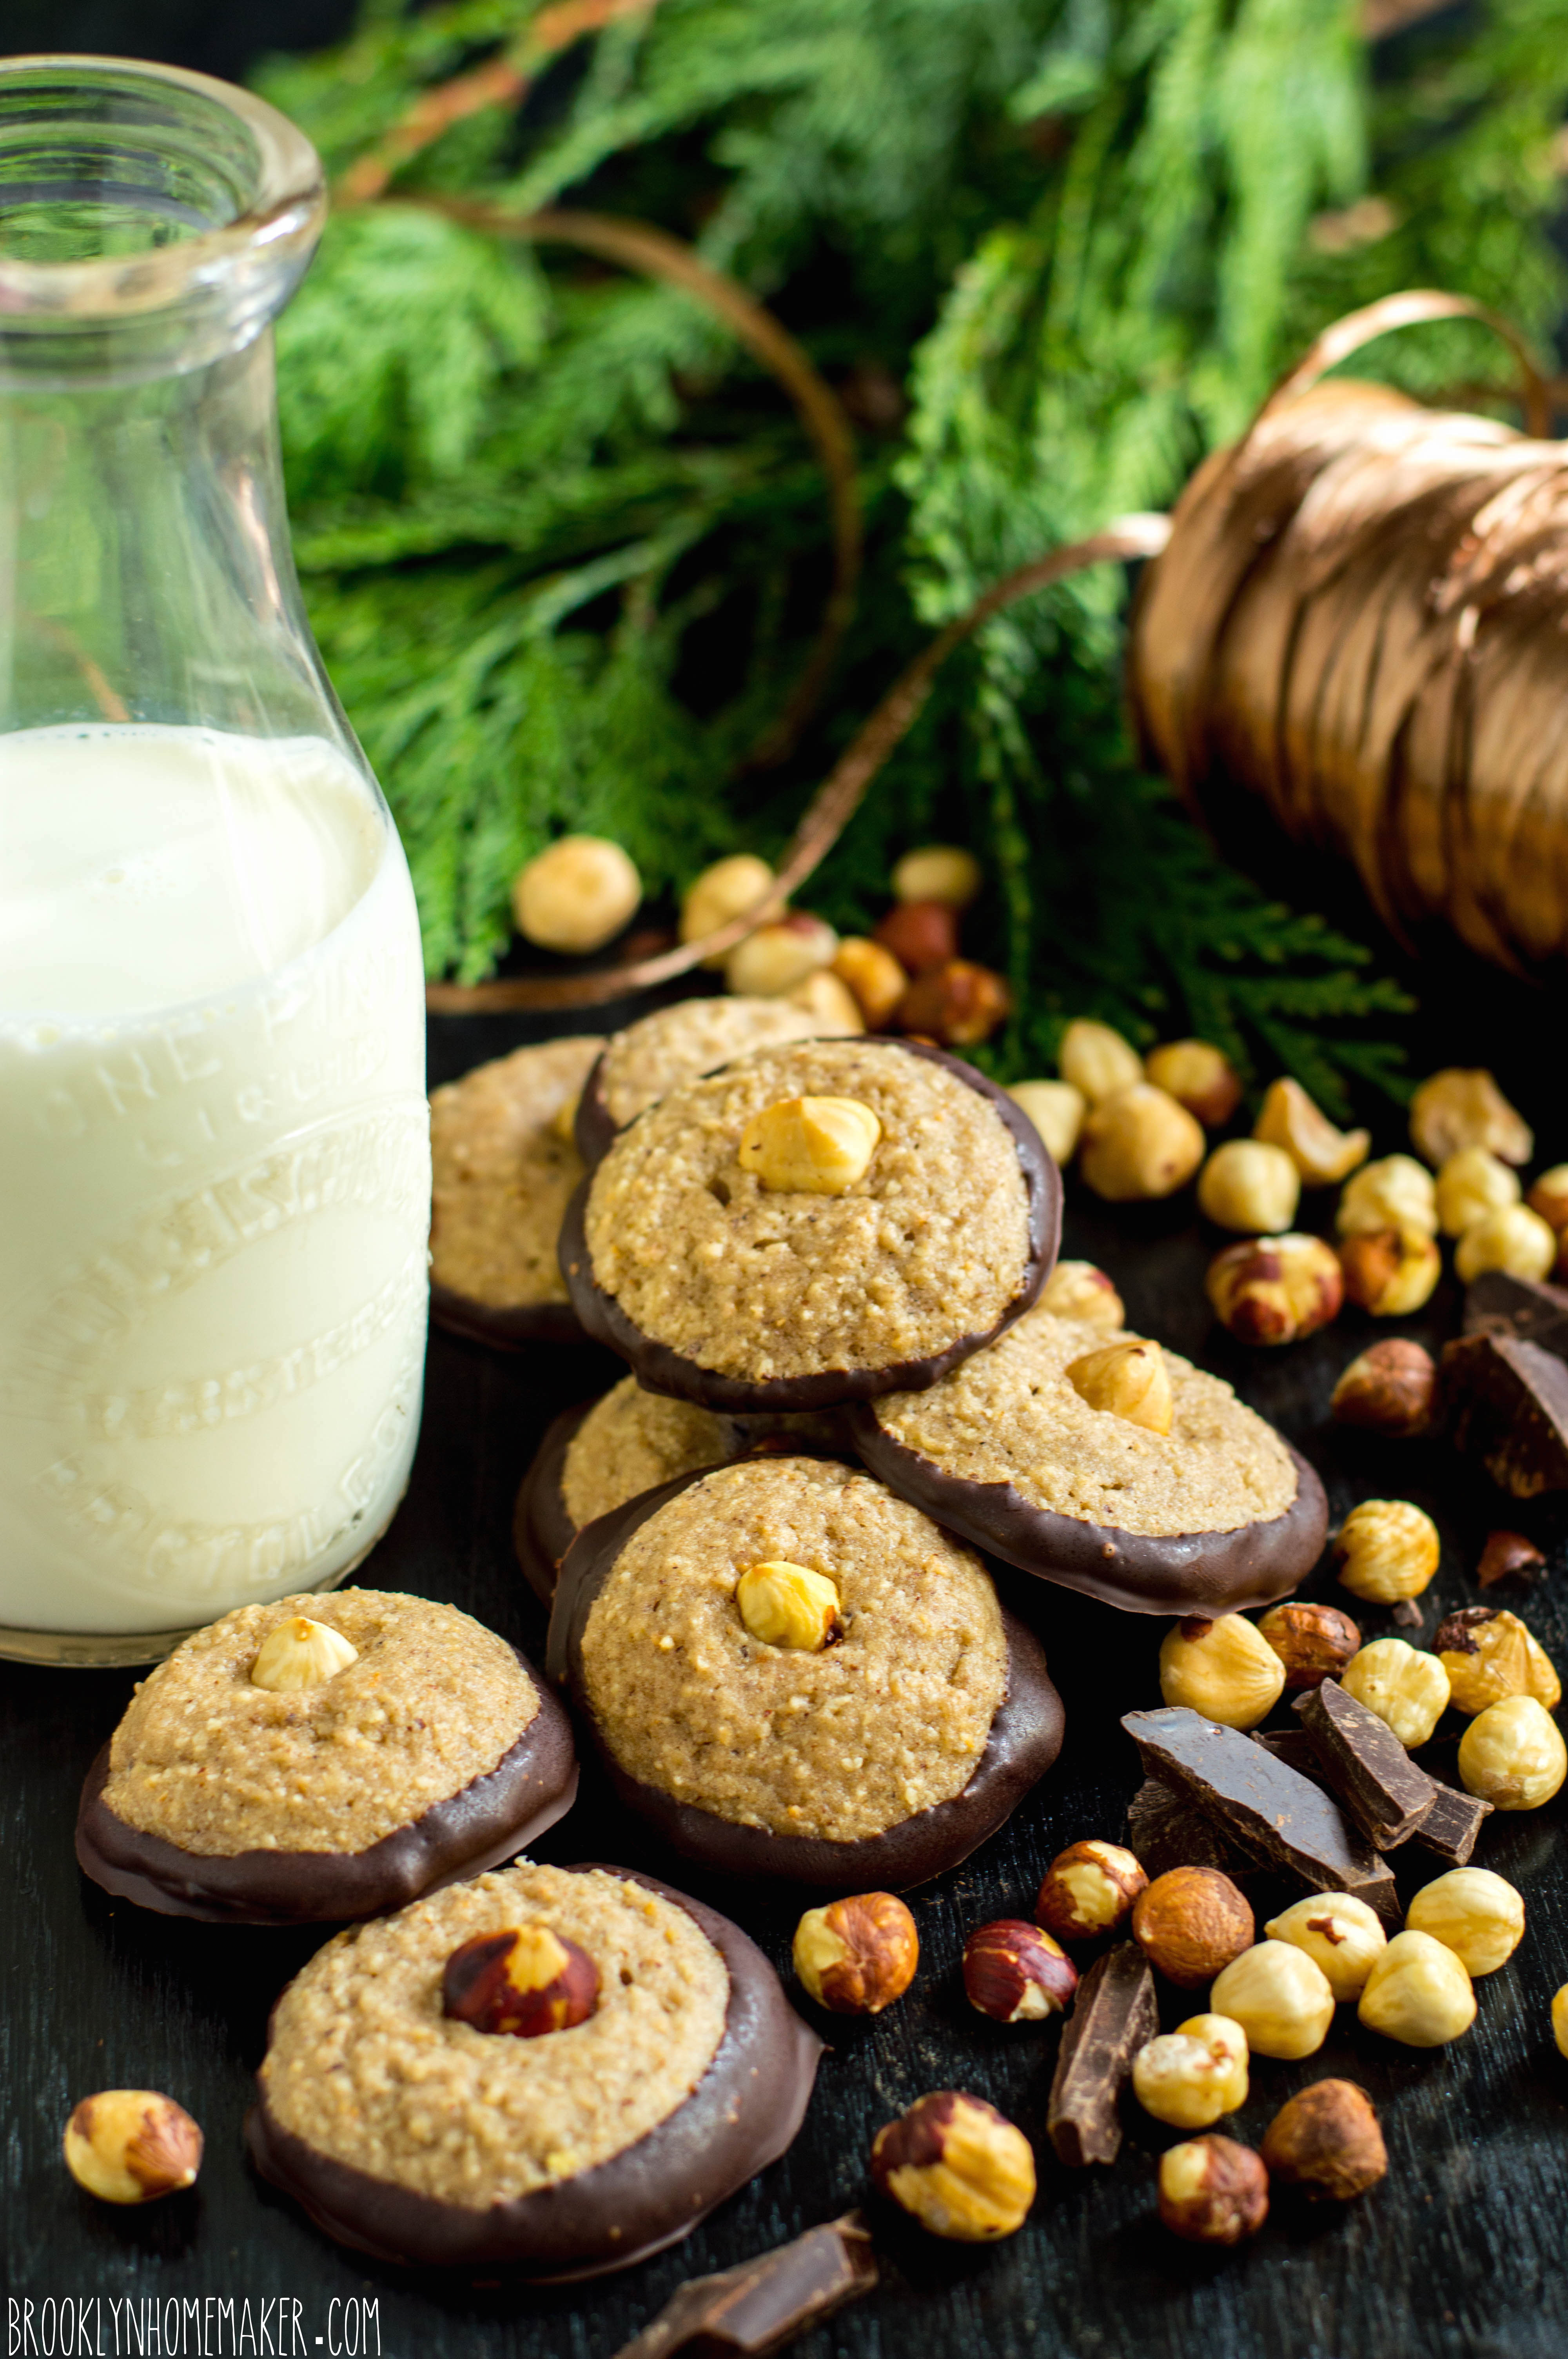
The basic idea was simple enough. Nusstaler are hazelnut shortbread dipped or coated in chocolate. After a little research I learned that they’re supposed to be sort of coin shaped. Nuss means nut, and Taler is a German spelling of Thaler, an ancient silver coin that was used in Europe for centuries. Thaler is actually the root of the word Dollar! So, essentially, nusstaler translates to nut coins. Yum!

nusstaler | chocolate dipped hazelnut shortbread | Brooklyn Homemaker

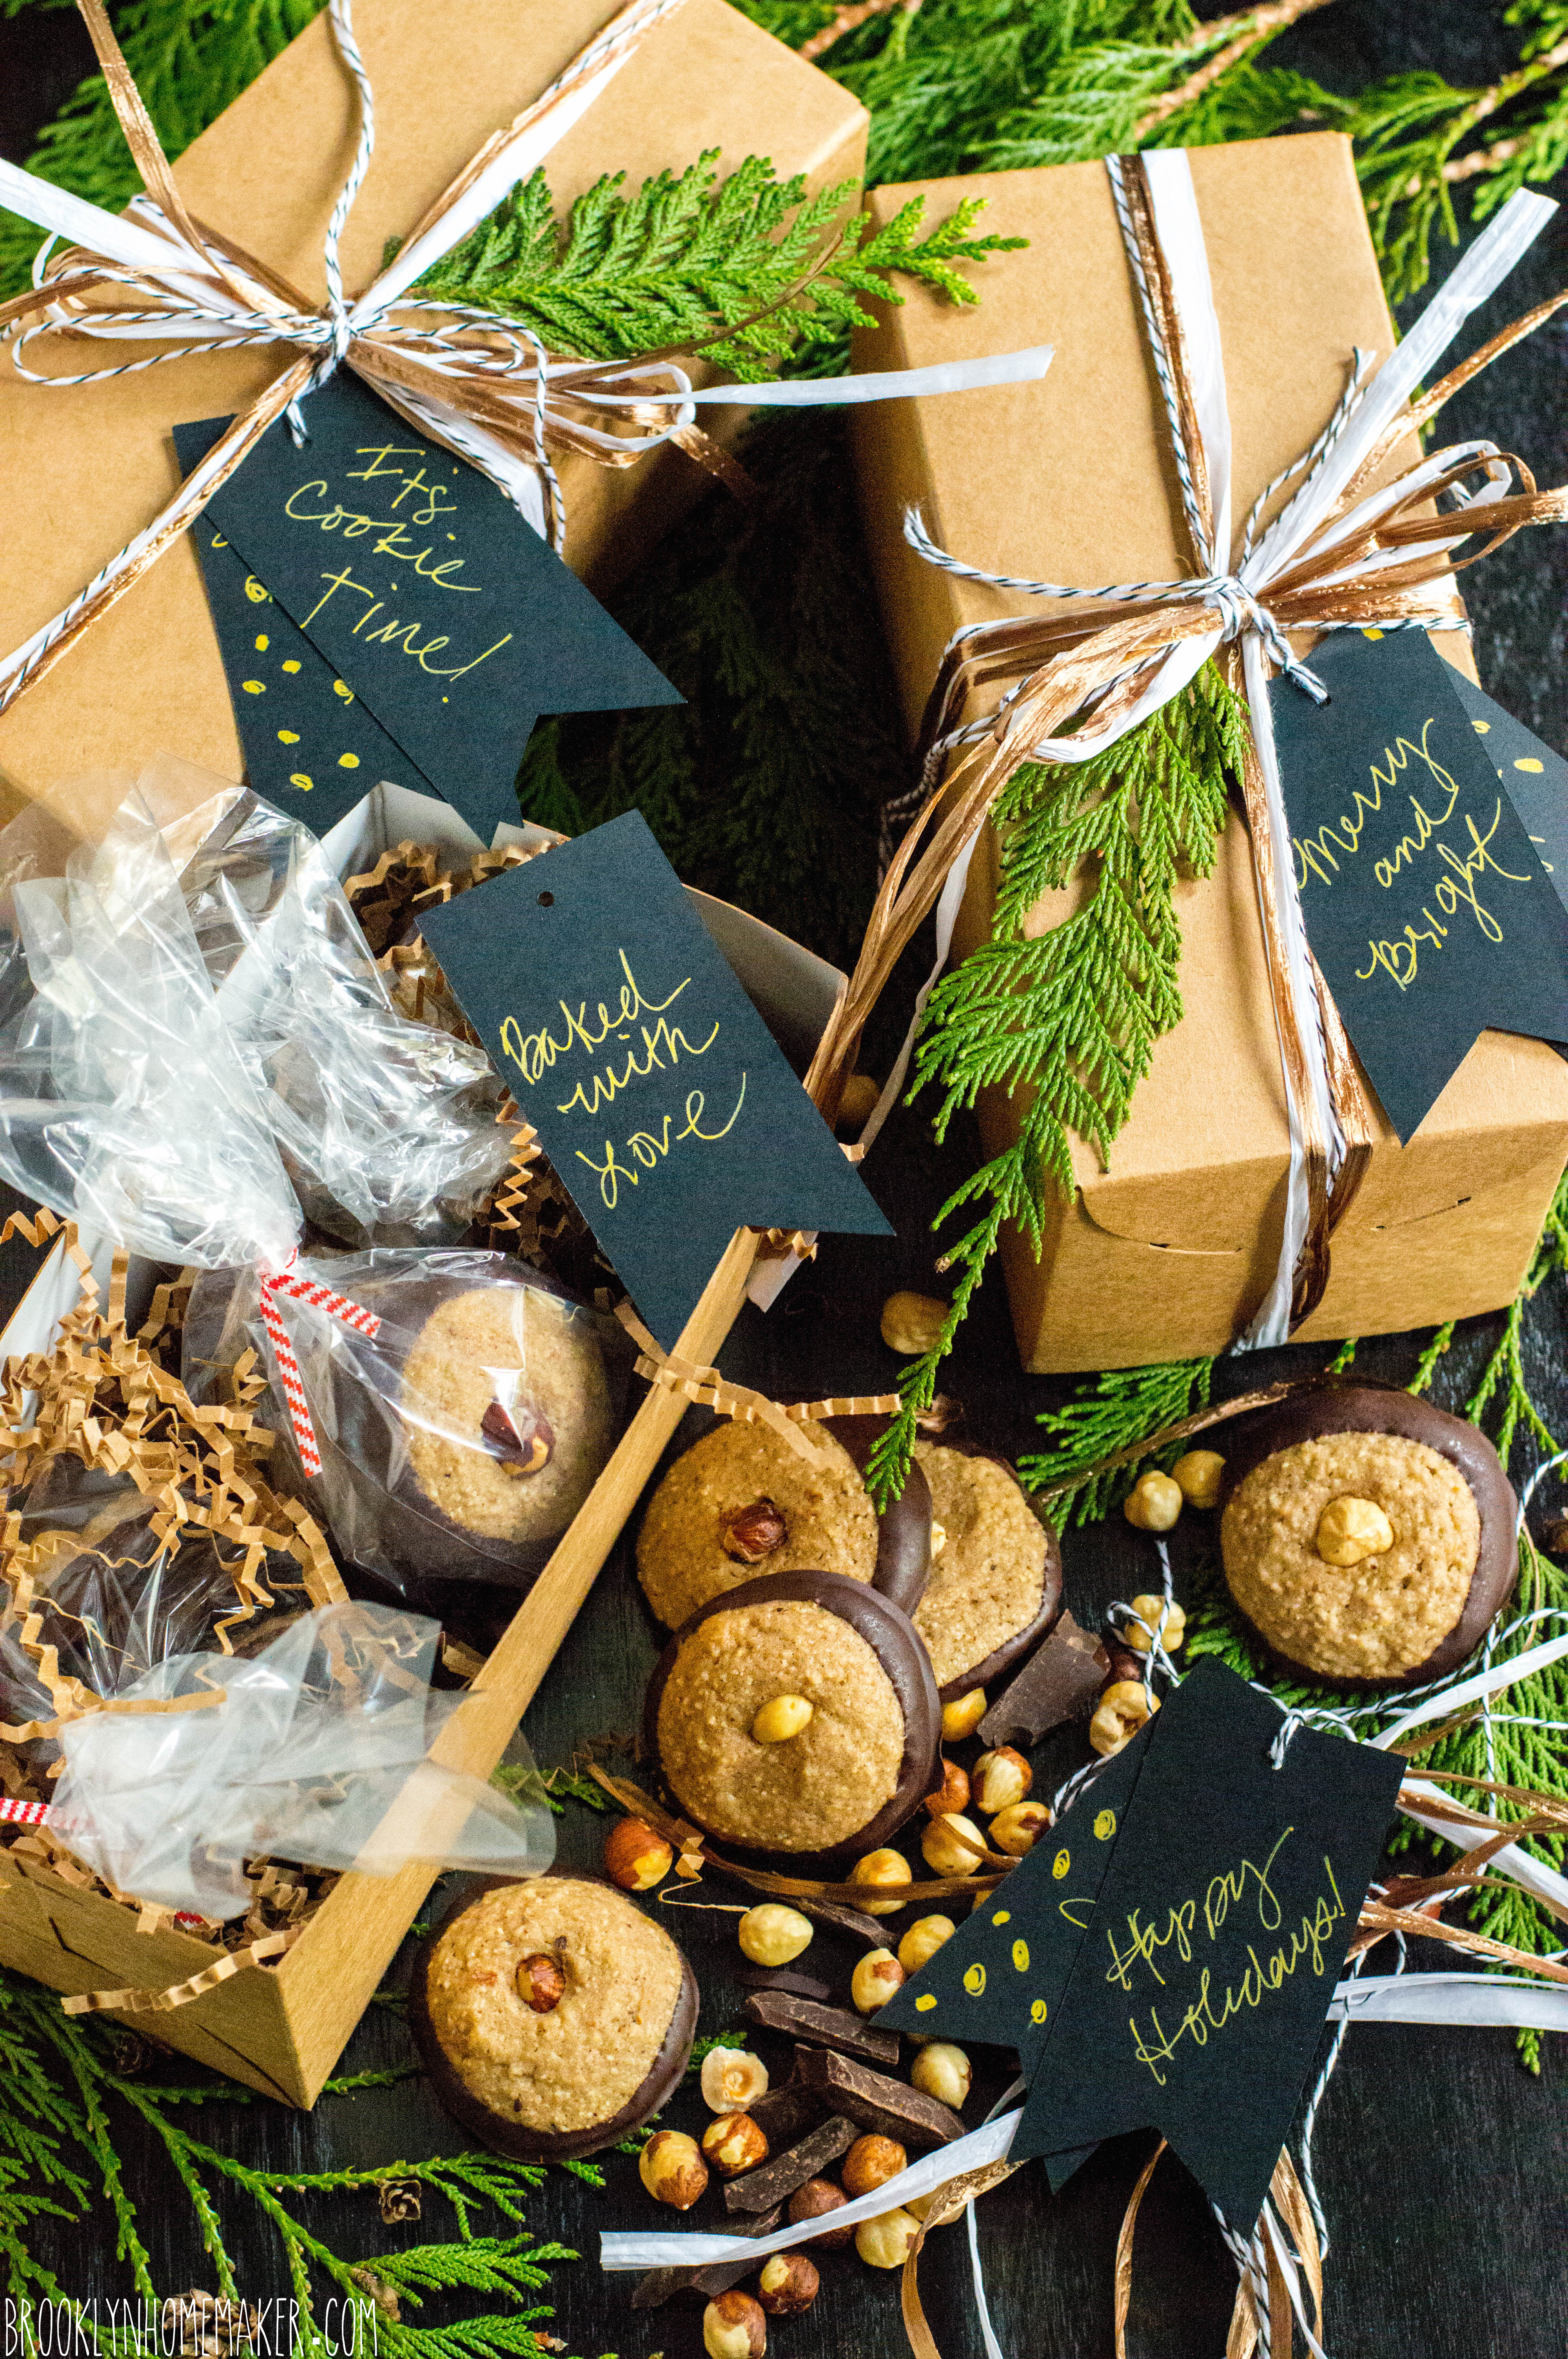
While I can’t promise that my version of the nusstaler is completely authentic or traditional, I can promise that they’re absolutely delicous.

I was expecting them to be crumbly and crunchy like other shortbreads I’ve had, but these were actually pretty tender and delicate. I think this comes from the high nut to flour ratio in the shortbread base. Much of what I read online said nusstaler is usually made with equal parts white flour and finely ground hazelnut flour, so that’s what I went with.

The flavor is buttery, earthy, nutty, delicate, and perfect; with a touch of crunch from the whole toasted hazelnut topping each cookie. They’re just barely sweet in such a way that the coating of rich bittersweet dark chocolate on the bottoms really adds something. I thought that they might end up tasting a bit like nutella, but the flavors of the chocolate and the hazelnuts acutally reach your tongue separately so you’re able to enjoy each flavor individually.

I hope you’ll give these Bavarian Christmas cookies a try. If you do, I’m sure that these funny little nut coins are sure to become a new holiday favorite!

nusstaler | chocolate dipped hazelnut shortbread | Brooklyn Homemaker

Nusstaler

  • Servings: makes about 2 dozen cookies
  • Print
1 cup whole hazelnuts, plus more for garnish
1 cup flour
1/2 teaspoon baking powder
1/2 teaspoon salt
1 teaspoon cocoa powder
8 tablespoons (1 stick) unsalted butter, at room temperature
1/3 cup sugar
1 egg
1 teaspoon vanilla extract
6 to 8 ounces good quality dark or semi-sweet chocolate

Preheat oven to 350F.
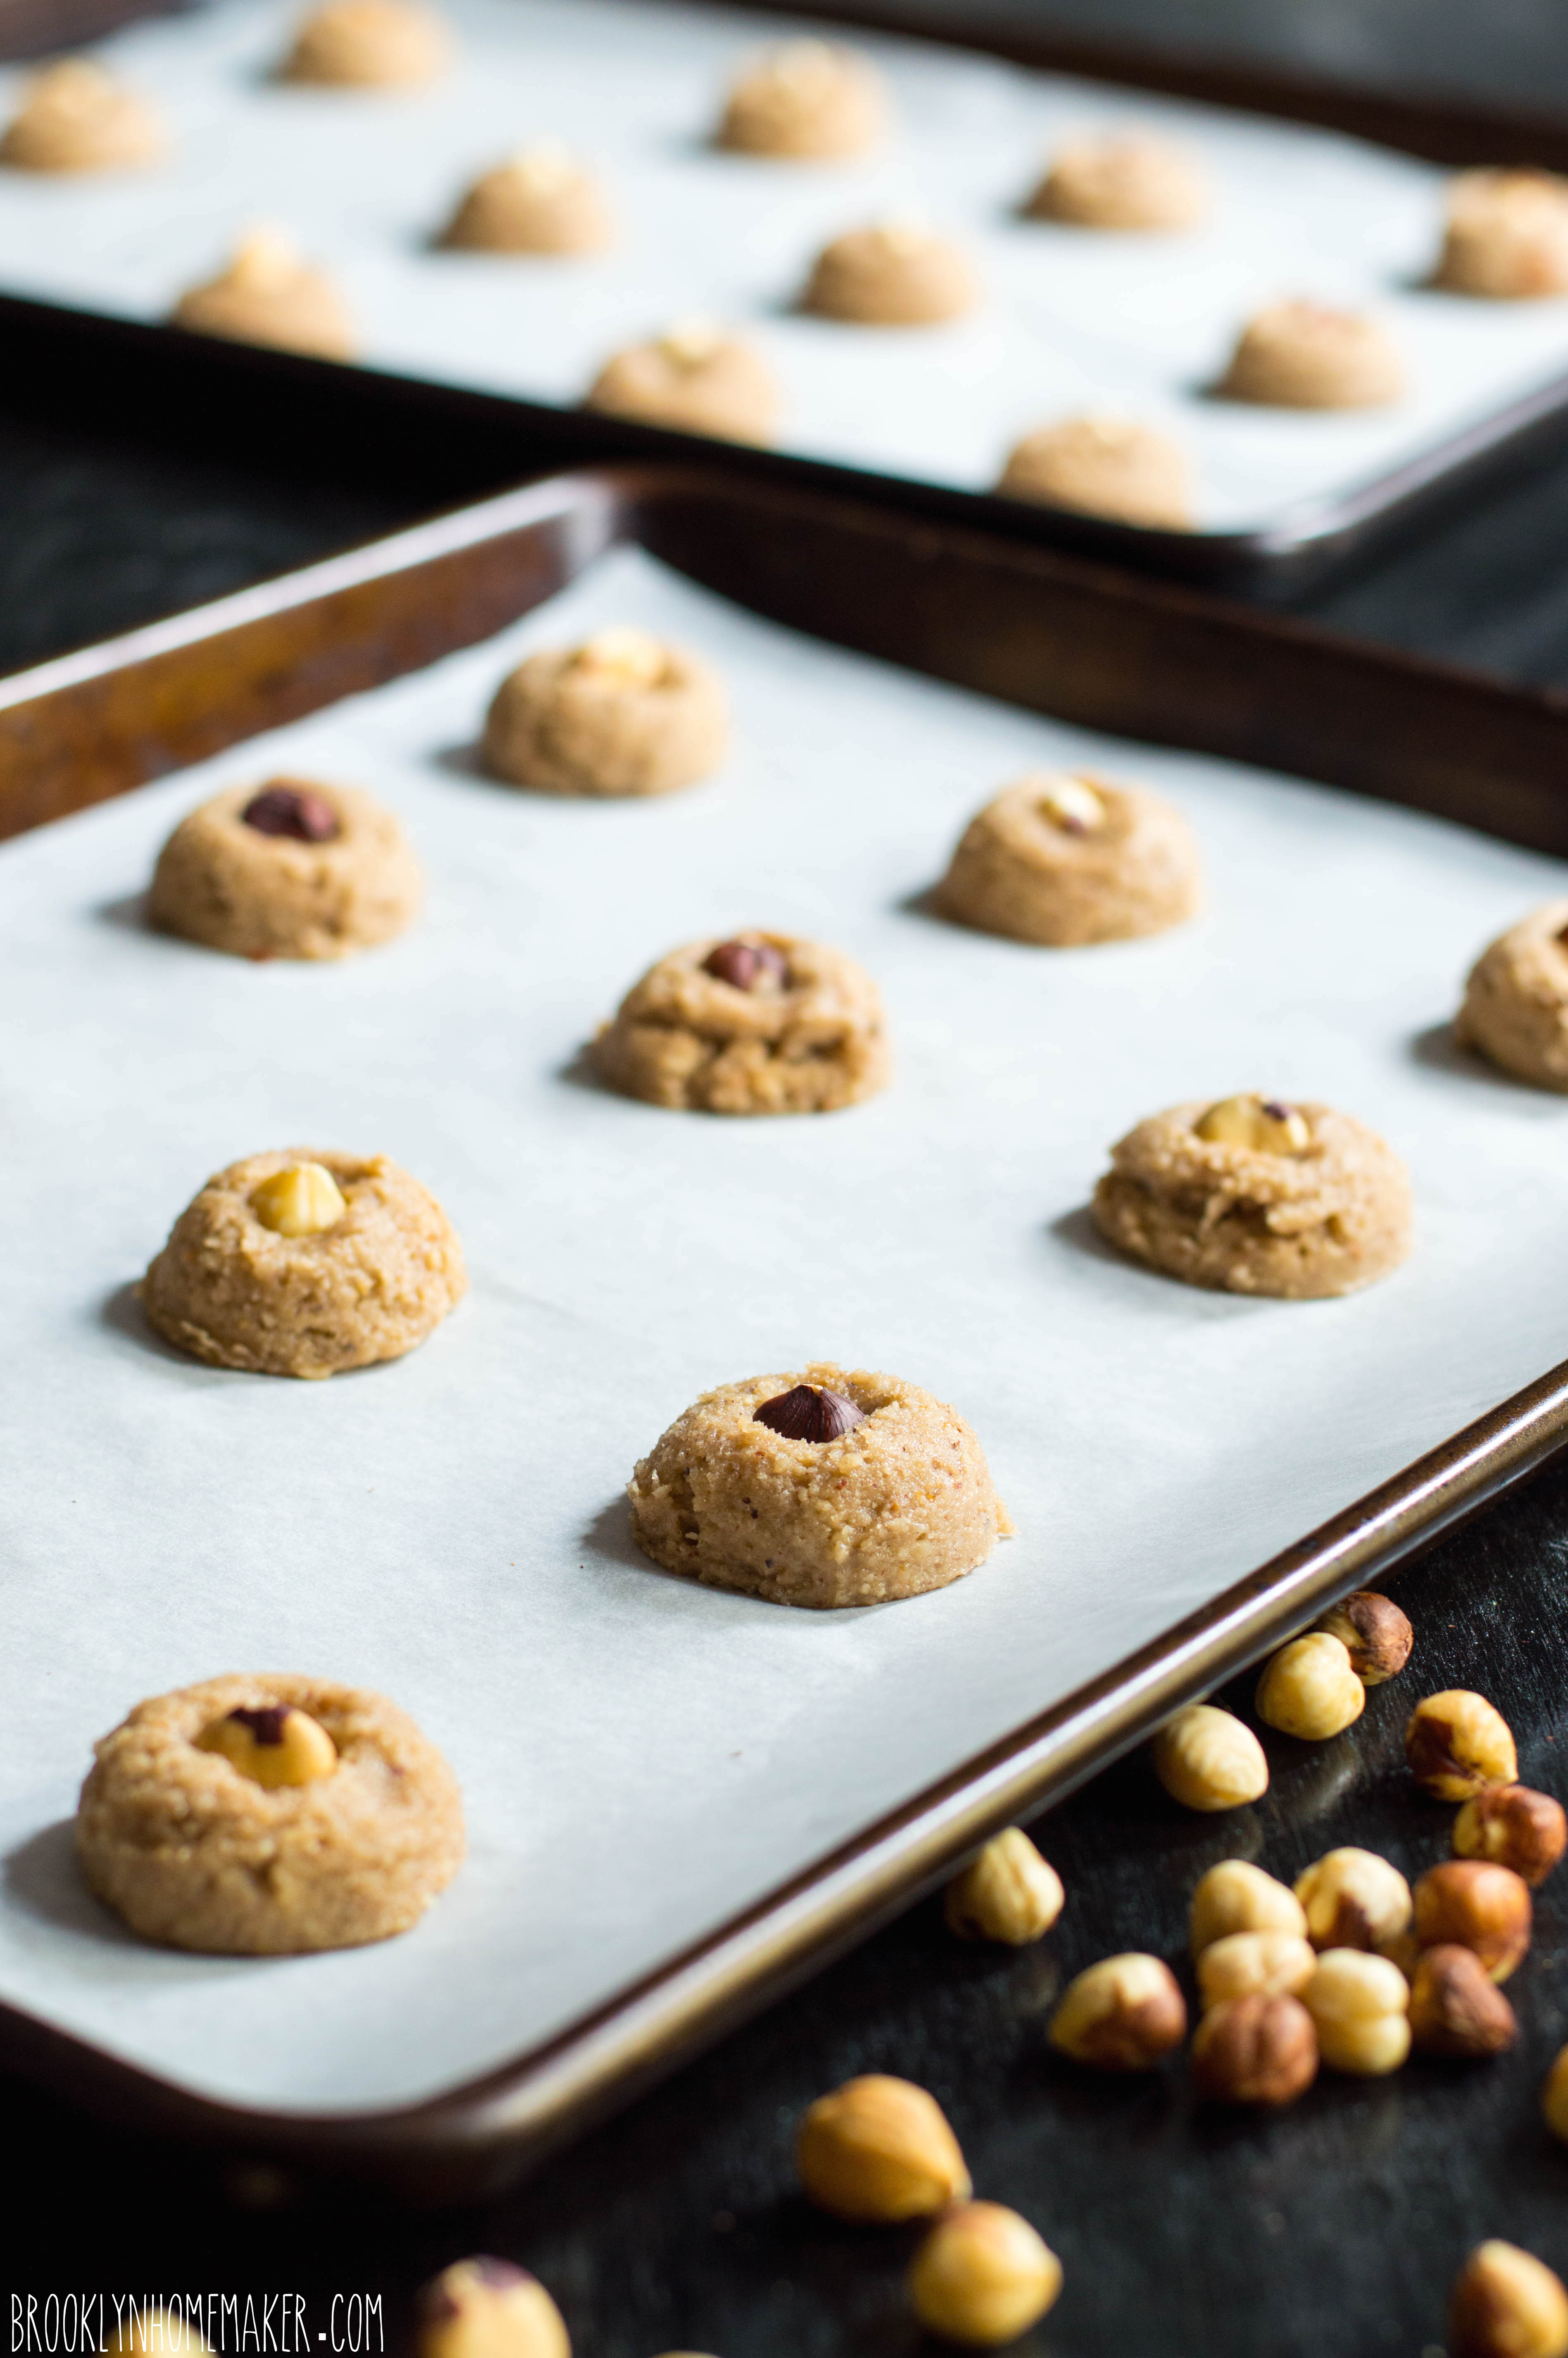
Arrange hazelnuts in a single layer on a baking sheet. Bake until fragrant, about 10 minutes. Remove from oven and rub hazelnuts, a small handful at a time, in a kitchen towel to remove the husk. It won’t all come off, and that’s okay.

Transfer 1 cup of hazelnuts to a blender or food processor and grind very finely into a coarse flour. Pulse in flour, baking powder, salt, and cocoa, just to combine. Set aside.
Beat butter and sugar until smooth. Add egg and vanilla and beat just until combined. Gradually mix in flour mixture until well combined. Refrigerate until firm, about an hour.

Portion dough into 1 inch scoops, about 1 1/2 tablespoons each, and arrange on parchment lined baking sheets, spaced about 2″ apart. Press a hazelnut into the top of each. Bake at 350F until just beginning to brown around the bottom edge, about 10 to 13 minutes.

While cookies cool, roughly chop chocolate and melt over low heat in a double boiler.
Dip bottoms of cooled cookies into melted chocolate, carefully lifting out with a fork. Return to parchment lined baking sheets until chocolate is completely cooled and set.

Cookies should keep for about a week in an airtight container

gingersnap icebox cake with maple mascarpone cream

Why hello there! It’s so nice to see you again!

gingersnap icebox cake with maple mascarpone cream | Brooklyn Homemaker

First, I want to say that I hope you all had a perfectly wonderful (and delicious) Thanksgiving day. I know I did!

Second, I want to let you know that the pressure and the stress of making and testing and photographing and posting eight Thanksgiving recipes and making two actual Thanksgiving dinners (not to mention working at a kitchenware store leading up to the biggest food holiday in the US of A) was just too much for me. I promise that it was all worth it, but it actually killed me. I hate to be the bearer of bad news, but I’ve passed away.

gingersnap icebox cake with maple mascarpone cream | Brooklyn Homemaker

Despite my untimely demise, there’s no rest for the weary, and here I am again posting from the great unknown.

The holidays are fast approaching so I know that I need to get my blogging butt in gear and get baking! Being that I’m recently deceased though, I wanted to try to do something sort of easy(ish). Easy doesn’t mean that it shouldn’t also be really fun and impressive and totally delicious though!

gingersnap icebox cake with maple mascarpone cream | Brooklyn Homemaker

Thing is,
I don’t really do “easy”.

A while back I saw Martha (yes, THE Martha) on TV promoting her new entertaining cookbook and she made an icebox cake with thin, crisp homemade chocolate chip cookies. I’d never had an icebox cake, but her version sounded amazing and actually pretty simple (especially for Martha).

gingersnap icebox cake with maple mascarpone cream | Brooklyn Homemaker

A traditional icebox cake is make with thin, store bought crisp wafer cookies sandwiched and stacked together with whipped cream. You do a layer of cookies, a layer of cream, a layer of cookies, a layer of cream, and so on and so forth until you suddenly have a round, cake shaped stack.

It doesn’t seem like this should work, but it does. You’d think that the cream would separate and wilt and the cookies would turn to mush and the whole thing would just fall apart and be weird and gross. But that’s not what happens. Magic happens.

gingersnap icebox cake with maple mascarpone cream | Brooklyn Homemaker

The crisp cookies soften as they absorb some of the liquid from the cream and so, rather than separating and wilting, the whipped cream actually thickens even more as the cookies soften up. When left for several hours (or overnight) the whole thing sort of takes on one perfect smooth, sliceable texture, just like a rich silky cake.

Like I said.
Magic.

gingersnap icebox cake with maple mascarpone cream | Brooklyn Homemaker

I decided that if it was good enough for Martha, it was good enough for me.

Rather than Martha’s chocolate chips, or the traditional chocolate wafer cookies, I wanted to do something a little more “holiday-y”. To me, growing up with German grandparents, the holidays were always filled with molasses and spice. Gingerbread and gingersnaps and the like. You know.

So I thought that a gingersnap icebox cake was just the ticket to kick off the holiday baking season. Like I said before though, I don’t really do “easy”. I know I set out to do an easy dessert, but once I got inspired and excited I decided that it would be more fun to make my own gingersnaps rather than using store bought. This is totally unnecessary, but I’m a weirdo so I totally enjoyed the process. If you do want to make your own though, I’d suggest using a little extra ginger in the cookies. The spice is mellowed out a bit by the cream so a little extra will kick it back up to where you’d expect a gingersnap to be.

gingersnap icebox cake with maple mascarpone cream | Brooklyn Homemaker

To add a little extra depth and richness to the standard whipped cream I added mascarpone and a touch of maple syrup. A splash of bourbon was a nice touch too but could easily be left out if you’re serving this to the under 21 crowd.

The ginger and molasses in the gingersnaps pairs perfectly with the sweet mascarpone maple whipped cream. The combination is like a rich velvety gingerbread flavored mousse. A sprinkle of chopped crystalized ginger adds a nice touch of extra spice and lets your guests know that rather than simple chocolate, this cake is made with sugar and spice and everything nice.

This cake is seriously amazing. Like, totally unbelievable. Russell has been raving about it ever since the last bite disappeared and keeps saying how he wasn’t expecting something so simple to taste so delicious. But, again, this cake is made of magic. You might even say that it’s special powers were strong enough to bring me back to life!

gingersnap icebox cake with maple mascarpone cream | Brooklyn Homemaker

Gingersnap Icebox Cake with Maple Mascarpone Cream

Maple Mascarpone Cream Icing:
2 1/2 cups cold heavy cream
1/4 cup sugar
1/4 cup real maple syrup
2 tablespoons bourbon or rum (optional)
1 tablespoon vanilla extract
8 oz mascarpone at room temperature
pinch of salt

At least 63 gingersnaps, for nine layers of seven cookies each
(I made my own using a double batch of smitten kitchen‘s recipe)
A tablespoon or two of finely chopped crystalized ginger, optional

In the bowl of an electric mixer fitted with the whisk attachment, whip the heavy cream until it begins to thicken and form soft peaks. In a separate bowl, stir together the mascarpone, sugar, maple syrup, bourbon, vanilla, & salt until smooth and well combined. Transfer mascarpone mixture to bowl with thickened cream and beat on low speed until almost smooth, 30 to 60 seconds. Scrape down the sides and fold to incorporate. Increase the speed to medium high and beat until the mixture is thick and holds firm peaks, another 30 to 60 seconds. Do NOT overbeat or the icing will become grainy.

On an 8″ cake board, cake stand, or serving plate, arrange a layer of cookies into tight a circle. You’ll want one cookie in the center with a ring of cookies surrounding it with as little space between them as possible. With the size of the cookies I used I could fit 7 cookies per layer. Place about 3/4 to a cup of icing over the first layer of cookies and smooth it out with a small offset icing spatula. Spread the icing almost to the outer edge of the cookies, leaving just a small edge of cookies showing. Arrange another layer of cookies, alternating the layers so they appear staggered above one another. Repeat another layer of icing and then another layer of cookies, again and again until you have as many layers as you desire or until you run out of icing or cookies. Finish the top of the cake with a final layer of icing. My cake was 9 layers tall.

If you have a cookie or two left over, crumble it over the top and sprinkle with crystalized ginger if desired.

Transfer cake to refrigerator for a minimum of 6 hours (or overnight) before serving. 

bourbon ginger pumpkin pie

There’s just something about pumpkin pie.

bourbon ginger pumpkin pie | Brooklyn Homemaker

When I was a kid I was completely obsessed with pumpkin pie and had a really hard time understanding why we only ate it at Thanksgiving and not, say, every single day of the year.

My grandmother would always make her pies a day ahead and stash them in her sewing room, usually one of the coolest rooms in the house, to rest until after dinner on turkey day. She always covered them with an oversized square of waxed paper, and when no one was looking I’d sneak into the sewing room, close the door behind me, and lift the paper up and just stare at those pies.

bourbon ginger pumpkin pie | Brooklyn Homemaker

I knew I couldn’t eat them until after dinner, but that didn’t stop me from just standing there taking in their earthy, homey aroma. I was tempted but I never touched them. I just wanted to look.

Of course, once dinner was over wild horses couldn’t have kept me from tearing into those rich, earthy, custardy pies.

bourbon ginger pumpkin pie | Brooklyn Homemaker

When I was trying to decide what to serve for my fakesgiving dinner, the pumpkin pie was the menu item I had the most trouble with.

I think that my love for pumpkin pie was clouding my judgement. I wanted to do something sort of elevated and innovative, but I just couldn’t make up my mind. I took to pinterest to soak up some inspiration, and quickly realized that anyone who has ever posted a recipe on the internet has their own way of making pumpkin pie, and that any and every type of dessert ever invented and has had pumpkin and spice added to it at some point.

Just try typing the words “pumpkin dessert” into the search bar on pinterest. I dare you. Pumpkin bread, pumpkin bars, pumpkin tarts, pumpkin cheesecake, pumpkin custards, pumpkin flans, pumpkin trifles, pumpkin mousse, pumpkin cookies, pumpkin ice cream served inside a hollowed out pumpkin…

bourbon ginger pumpkin pie | Brooklyn Homemaker

My head spinning, I moved on from pinterest and decided to check some of my favorite food blogs and websites for ideas. Eventually I stumbled across an entire opinion thread on serving these fancy pants pumpkin desserts for Thanksgiving.

Someone had written to say that he was invited by some foodie friends to a Thanksgiving potluck and he was in charge of the pumpkin pie. He wanted to impress his friends and take pumpkin pie to the next level, and was asking for some help with ideas and inspiration.  (sound familiar?)
The answers he got back were a total surprise to me, but the more I think about it, the more sense it makes.

Everyone was basically saying either:
A) just make a damn pumpkin pie because that’s all people really want to eat anyway.
or
B) go ahead and make your fancy pants “elevated” pumpkin dessert, but you should make a damn pumpkin pie too and bring both, because that’s all people really want to eat anyway.

bourbon ginger pumpkin pie | Brooklyn Homemaker

So, I tossed all the recipes for pumpkin tarts and custards and trifles out the window, and started thinking about why I was so enamored with Grandma’s pumpkin pie in the first place. It was all about the buttery crust, the earthy sweet pumpkin, the warm spices, and the rich creamy custard. Why complicate things?

Of course I did want to do something just a little special with my pie this year, but was looking for a subtle twist on the classics rather than trying to reinvent the wheel. Just a touch of (totally optional) bourbon and some grated fresh ginger was all I needed to take things to the next level.

bourbon ginger pumpkin pie | Brooklyn Homemaker

I also thought it would be fun to make some more work for myself by roasting my own sugar pumpkins instead of using canned. To save some time and a few dishes I tried mashing the pumpkin flesh rather than completely pureeing it in the food processor. You guys. Don’t do this. Just puree your pumpkin. (Or use canned)

When I started mixing in the rest of the ingredients, I realized that my pumpkin was kind of lumpy and had some strands of fiber in it.  Not wanting to end up with a funky lumpy pie filling, I decided to toss the entire bowl into the food processor to smooth it out. What I didn’t realize was that doing this would also whip the cream in my filling and make it sort of frothy. While the texture of the filling wasn’t changed, it did make the top of the pie look sort of funky and pitted. Not a big deal really, just a little funny looking.

A few days later I read online that in a blind taste test, most people preferred the taste and texture of pies made with canned pumpkin puree over homemade. Ugh. Whatever.

bourbon ginger pumpkin pie | Brooklyn Homemaker

Whether you decide to roast your own pumpkins or reach for the can, this pumpkin pie is everything you could ever want in a Thanksgiving pie. Rich, thick, creamy, custardy, earthy, & warmly spiced. A little slice of heaven with a buttery flaky crust.

Because I don’t usually keep evaporated milk in the house, the filling is made completely from scratch, using only eggs and cream and milk instead of evaporated or condensed milk for the base of the custard. A splash of  bourbon adds a touch of warmth and depth without necessarily making it taste “boozey”, and using grated fresh ginger adds an edge of zingy heat that you wouldn’t otherwise get. When sliced and served a few of our friends noticed the hint of bourbon, others the touch of ginger, and others still didn’t notice anything until I told them. Neither of these flavors is overpowering, nor do they really change or alter the flavor profile of the classic pie everyone is craving on Thanksgiving day. If you’re looking for a classic pumpkin pie with a subtle something extra, this is the recipe for you.

bourbon ginger pumpkin pie | Brooklyn Homemaker

Bourbon Ginger Pumpkin Pie

Adapted from Sally’s Baking Addiction

1 single pie crust * see note
2 cups (or 15oz can) pumpkin puree
3 large eggs
1 and 1/4 cups packed dark brown sugar
1 tablespoon cornstarch
1/2 teaspoon salt
1 1/2 teaspoons ground cinnamon
2 teaspoons finely grated fresh ginger
1/4 teaspoon ground or freshly grated nutmeg
1 cup heavy cream
1/4 cup milk
3 tablespoons bourbon whiskey (or rum would work too)
1 tablespoon vanilla extract

Preheat oven to 425F.
Roll out pie crust and gently transfer to a 9.5″ or deep dish pie dish (** see note). Trim and crimp the edges and freeze the crust for at least 15 or 20 minutes. Fit the crust with a large square of parchment paper and fill the dish with pie weights, dried beans, or even pennies. Bake the crust at 425 for about 15 minutes or until the crust is set and the edges are beginning to brown. This is called blind baking the pie shell. For more info, the Kitchn has a great tutorial.

If you have any leftover dough from trimming and want to get fancy, you can use a cookie cutter or pastry stamp to create fall leaves for decoration. This is totally unnecessary but kind of fancy and fun. Cut the leaves out and bake on a parchment lined sheet pan in the same oven as the pie crust for about 10 minutes. You want them cooked through and nicely browned, but not burned. They won’t really brown any further once you add them to the pie filling.

Let the leaves and the pie shell cool and turn the oven down to 375F.

For the filling:
Whisk or stir the pumpkin, eggs, and brown sugar together until combined. Add all remaining ingredients and whisk vigorously until everything is well combined.

Pour filling into the pre-baked shell. Bake until the center is almost set, about 55-60 minutes or so. It’s okay if a small part of the very center is still wobbly, it’ll continue to cook and set as it cools. After about 25 or 30 minutes of baking, Add the pre-baked fall leaves if desired.

Cool completely before serving. Cover leftovers tightly and store in the refrigerator for up to 3 days.

Notes:
*You can use any recipe you like, or even a store bought crust, but I think all butter crusts have the best flavor. I used my favorite crust recipe, but it makes two single crusts so you can freeze one, make another pie, or use the other for your maple walnut pie.

**If you don’t have a 9.5″ or deep dish pan, you’ll likely have a bit too much filling. Do not overfill or it may run and drip. Any extra can be baked separately in ramekins if necessary.

flaky butternut squash & sage biscuits

I have a confession to make…

flaky butternut squash & sage biscuits | Brooklyn Homemaker

I’m a biscuit snob.

There.
I said it.

flaky butternut squash & sage biscuits | Brooklyn Homemaker

Over the past few years there has been a sudden explosion of “Southern” “Soul Food” restaurants in my little corner of North Brooklyn.

It would appear that fried chicken is the new cupcake. No, that’s not right. Gourmet doughnuts are the new cupcake.
Fried chicken is the new… burger?

Don’t get me wrong. I ain’t complainin’. I can’t fry chicken to save my life, and I LOVE fried chicken.
Every time I’ve tried to make it at home it’s come out under or over cooked, usually pretty greasy, and never as crispy as I’d like. There are very few recipes I’ve never been able to master, but I’d like to think I know when enough’s enough. At this point I’ve accepted defeat and decided it’s better to just leave the fried chicken to the professionals.

flaky butternut squash & sage biscuits | Brooklyn Homemaker

The problem though, is that for all of the fried chicken professionals we have running around, I haven’t yet found a place where their biscuits don’t feel like an afterthought. It’s as if they know they have to serve biscuits because, like, they’re a chicken joint, but they don’t actually care about making sure they’re just as good as the chicken.

flaky butternut squash & sage biscuits | Brooklyn Homemaker

Instead of light, tender, flaky, delicate, pillowy, buttery little clouds of biscuits, most of the these so called chicken joints serve dense, tough little hockey pucks. Most of the time they serve them with a big ramekin full of honey butter, hoping you’ll slather so much on that you won’t notice there’s anything wrong. It makes me sad, and it doesn’t need to be this way.

flaky butternut squash & sage biscuits | Brooklyn Homemaker

I know a lot of people are afraid of making biscuits at home. I know it’s easy to screw them up if you don’t know to use a delicate hand. I know a lot of people think of biscuits the way I think of fried chicken. I’m reminded of the words of wise old G. Dubya, “Fool me once, shame on… shame on you. Fool me… you can’t get fooled again.”

Here’s the thing though. Biscuits are not that hard to get right. I promise you that they’re easier than frying chicken. Whether you’re at home on a Sunday morning, or slinging chicken in a busy hipster soul food restaurant, if you want a tender delicate biscuit the only trick is to treat them tenderly and delicately. It’s really that simple.

flaky butternut squash & sage biscuits | Brooklyn Homemaker

It doesn’t matter how you get the butter into the flour, as long as it doesn’t melt in the process. You always want to keep that butter cold. I used to think a pastry blender was the only method gentle enough for a tender biscuit, but I’ve tried pulsing the butter in with a food processor, cutting it in with two knives, even mashing it in with a fork, and they all worked just fine.

I think the thing that really makes the biggest difference is how you mix the liquid into the flour. You want to gently stir and fold the liquid and dry ingredients together to moisten as much of the flour as possible without over mixing it. If a bit of the flour doesn’t want to mix in, don’t sweat it. To make sure you have super flaky layers you’ll want to fold the dough over on itself a few times, so you can mix that little bit of extra flour back in then.

flaky butternut squash & sage biscuits | Brooklyn Homemaker

To add some extra flavor and interest, I took my old standard biscuit recipe and substituted some pureed roasted butternut squash for a bit of the buttermilk. This is a perfect recipe if you already plan to serve butternut squash at your Thanksgiving dinner. If you don’t, and you don’t want to take the time to roast the squash just for the biscuits, you can use canned squash if you can find it, or canned pumpkin if you can’t.

I also wanted to add the flavor of fresh sage to compliment the squash, but I didn’t really want to have large visible chunks of sage in the dough. I decided that the best way to evenly distribute the sage, and it’s fragrant earthy flavor, all throughout the biscuits would be to pulse the sage together with some brown sugar in the food processor. If you don’t have a food processor though, just try to chop the sage as finely as you can.

The combination of fresh sage and roasted squash really adds wonderful earthy sweetness and depth that, to me at least, just screams fancy pants Thanksgiving dinner. Homemade biscuits are always a welcome addition to any meal, but this recipe is so quintessentially Autumnal that you’re guests are sure to be ooohing and aaahing over them all through dinner.

flaky butternut squash & sage biscuits | Brooklyn Homemaker

Flaky Butternut Squash & Sage Biscuits

  • Servings: 12-16 biscuits
  • Print
Roasted squash:
1 small butternut squash
1 tablespoon peanut oil or vegetable oil

Biscuits:
12 to 15 sage leaves
1/4 cup packed brown sugar
2 3/4 cups all purpose flour, plus more for dusting
4 teaspoons baking powder
1 1/2 teaspoons salt
3/4 teaspoon cream of tartar
1/2 teaspoon ground pepper
1/4 teaspoon cinnamon
3/4 cup butter (1 1/2 sticks)
1 cup butternut squash puree (or pumpkin puree)
1/2 cup buttermilk
2 tablespoons heavy cream or melted butter

Preheat oven to 400.

Slice the squash in half, lengthwise, and scoop out seeds with a spoon. Rub the cut side of the squash flesh with oil and place cut side down on a parchment lined baking sheet. Roast squash for about 40 minutes or until fork tender. Cool completely, remove the skin, and mash the flesh with a fork, or puree in a food mill or food processor.

Turn oven up to 450.

Combine the sage leaves and brown sugar in the bowl of a food processor and run until the sage is very finely chopped (you can also just chop the sage very very finely with a knife). Add flour, baking powder, salt, cram of tartar, ground pepper, and cinnamon and pulse to combine. Cut the cold butter into 1 inch chunks, add to flour, and pulse into small pea sized pieces (if you don’t have a food processor use a pastry blender). Transfer to a bowl, cover, and chill for at least 30 minutes (or overnight). Mix squash puree and buttermilk together, make a well in the center of the flour, and pour in buttermilk all at once. Gently stir and fold together with a fork until just moistened, and bring together in a ball with your hands. Do not try to mix the liquid into the flour in the food processor or your biscuits will be tough and dense.

Turn dough out onto a lightly floured surface. Gently push dough out into a flat disk using your hands (or a rolling pin). Dust lightly with flour, fold in half, and gently roll or press back out. Repeat 5 or 6 times to create layers in your biscuits that will separate when baked. Roll or pat dough out to about 3/4 inch thick and cut into circles using a 2.5 inch biscuit cutter. Remaining dough can be recombined once, but no more or it will get tough. Recombined biscuits will not be as pretty or as flaky as the first batch, but they’re still worth it. Transfer biscuits to parchment lined baking sheets and brush tops with cream or melted butter. Bake for 12-15 minutes, or until golden brown on top.