chocolate

conversation heart mini cakes

Valentine’s Day is one of those holidays that most people either love or hate. Usually you hate it when you’re single, and suddenly appreciate it when you’re in a relationship. Growing up gay in a small town in upstate New York, for most of my life I was on the team against this holiday. Once I started dating I began to like it, but even then usually thought of Valentine’s Day as an excuse for restaurants to pack as many couples as possible into a tight space and charge a small fortune for a “prix fixe” menu. After a bottle (or two) of cheap champagne and several courses of dinner, I was usually done for the night, and that was that. Now that I’m married and don’t have to try so hard to impress my dates or seal the deal or whatever it is people do on Valentine’s day, I finally have a new appreciation for it. My husband Russell and I usually skip the over-priced meals and crowds and try to re-create the date experience at home. We like to use this holiday as an excuse to brighten our home with fresh-cut flowers, cook a nice meal, drink some wine and, of course, buy some chocolates. My favorite part of this holiday was, is, and always will be the chocolates.

conversation heart mini cakes | Brooklyn Homemaker

This day hasn’t always been all about chocolates and flowers though. Valentine’s Day has its roots in ancient Rome, and the holiday’s two namesakes were Roman saints who both shared the name Valentine. Though there are some rumors, there is no evidence linking either saint to the romantic ideas people have about the holiday today. Back then this holiday was strictly about martyrdom and religious beliefs. It wasn’t until the medieval era, when the tradition of courtly love flourished in the spring, that people started tying Saint Valentine’s Day to romance and love.  Men would pick spring flowers and write love songs to try to woo their fair maidens, but even then sugar was a precious commodity in Europe, so candy wasn’t yet a part of the experience.

conversation heart mini cakes | Brooklyn Homemaker

It wasn’t until the 1800s that the British chocolate manufacturer Cadbury started marketing chocolate candies for Valentine’s Day. Before then, chocolate was usually consumed as a hot beverage. When Cadbury made some improvements to its chocolate manufacturing technique they were left with an excess of cocoa butter. It was then that they started to produce a wide array of their “eating chocolate” and recognized Valentine’s Day as a marketing opportunity. Richard Cadbury started designing and selling ornate decorated boxes filled with an assortment of his new chocolate candies.  Victorians were already in the practice of showering each other with cards and gifts for Valentine’s Day, and Cadbury’s chocolate boxes were a wild hit. Within a few decades these elaborately decorated boxes were everywhere, and their popularity continued to grow until governments started rationing sugar during World War II. By then the idea of candy, chocolate, and heart-shaped everything was deeply tied to Valentine’s day, and continues to be today.

conversation heart mini cakes | Brooklyn Homemaker

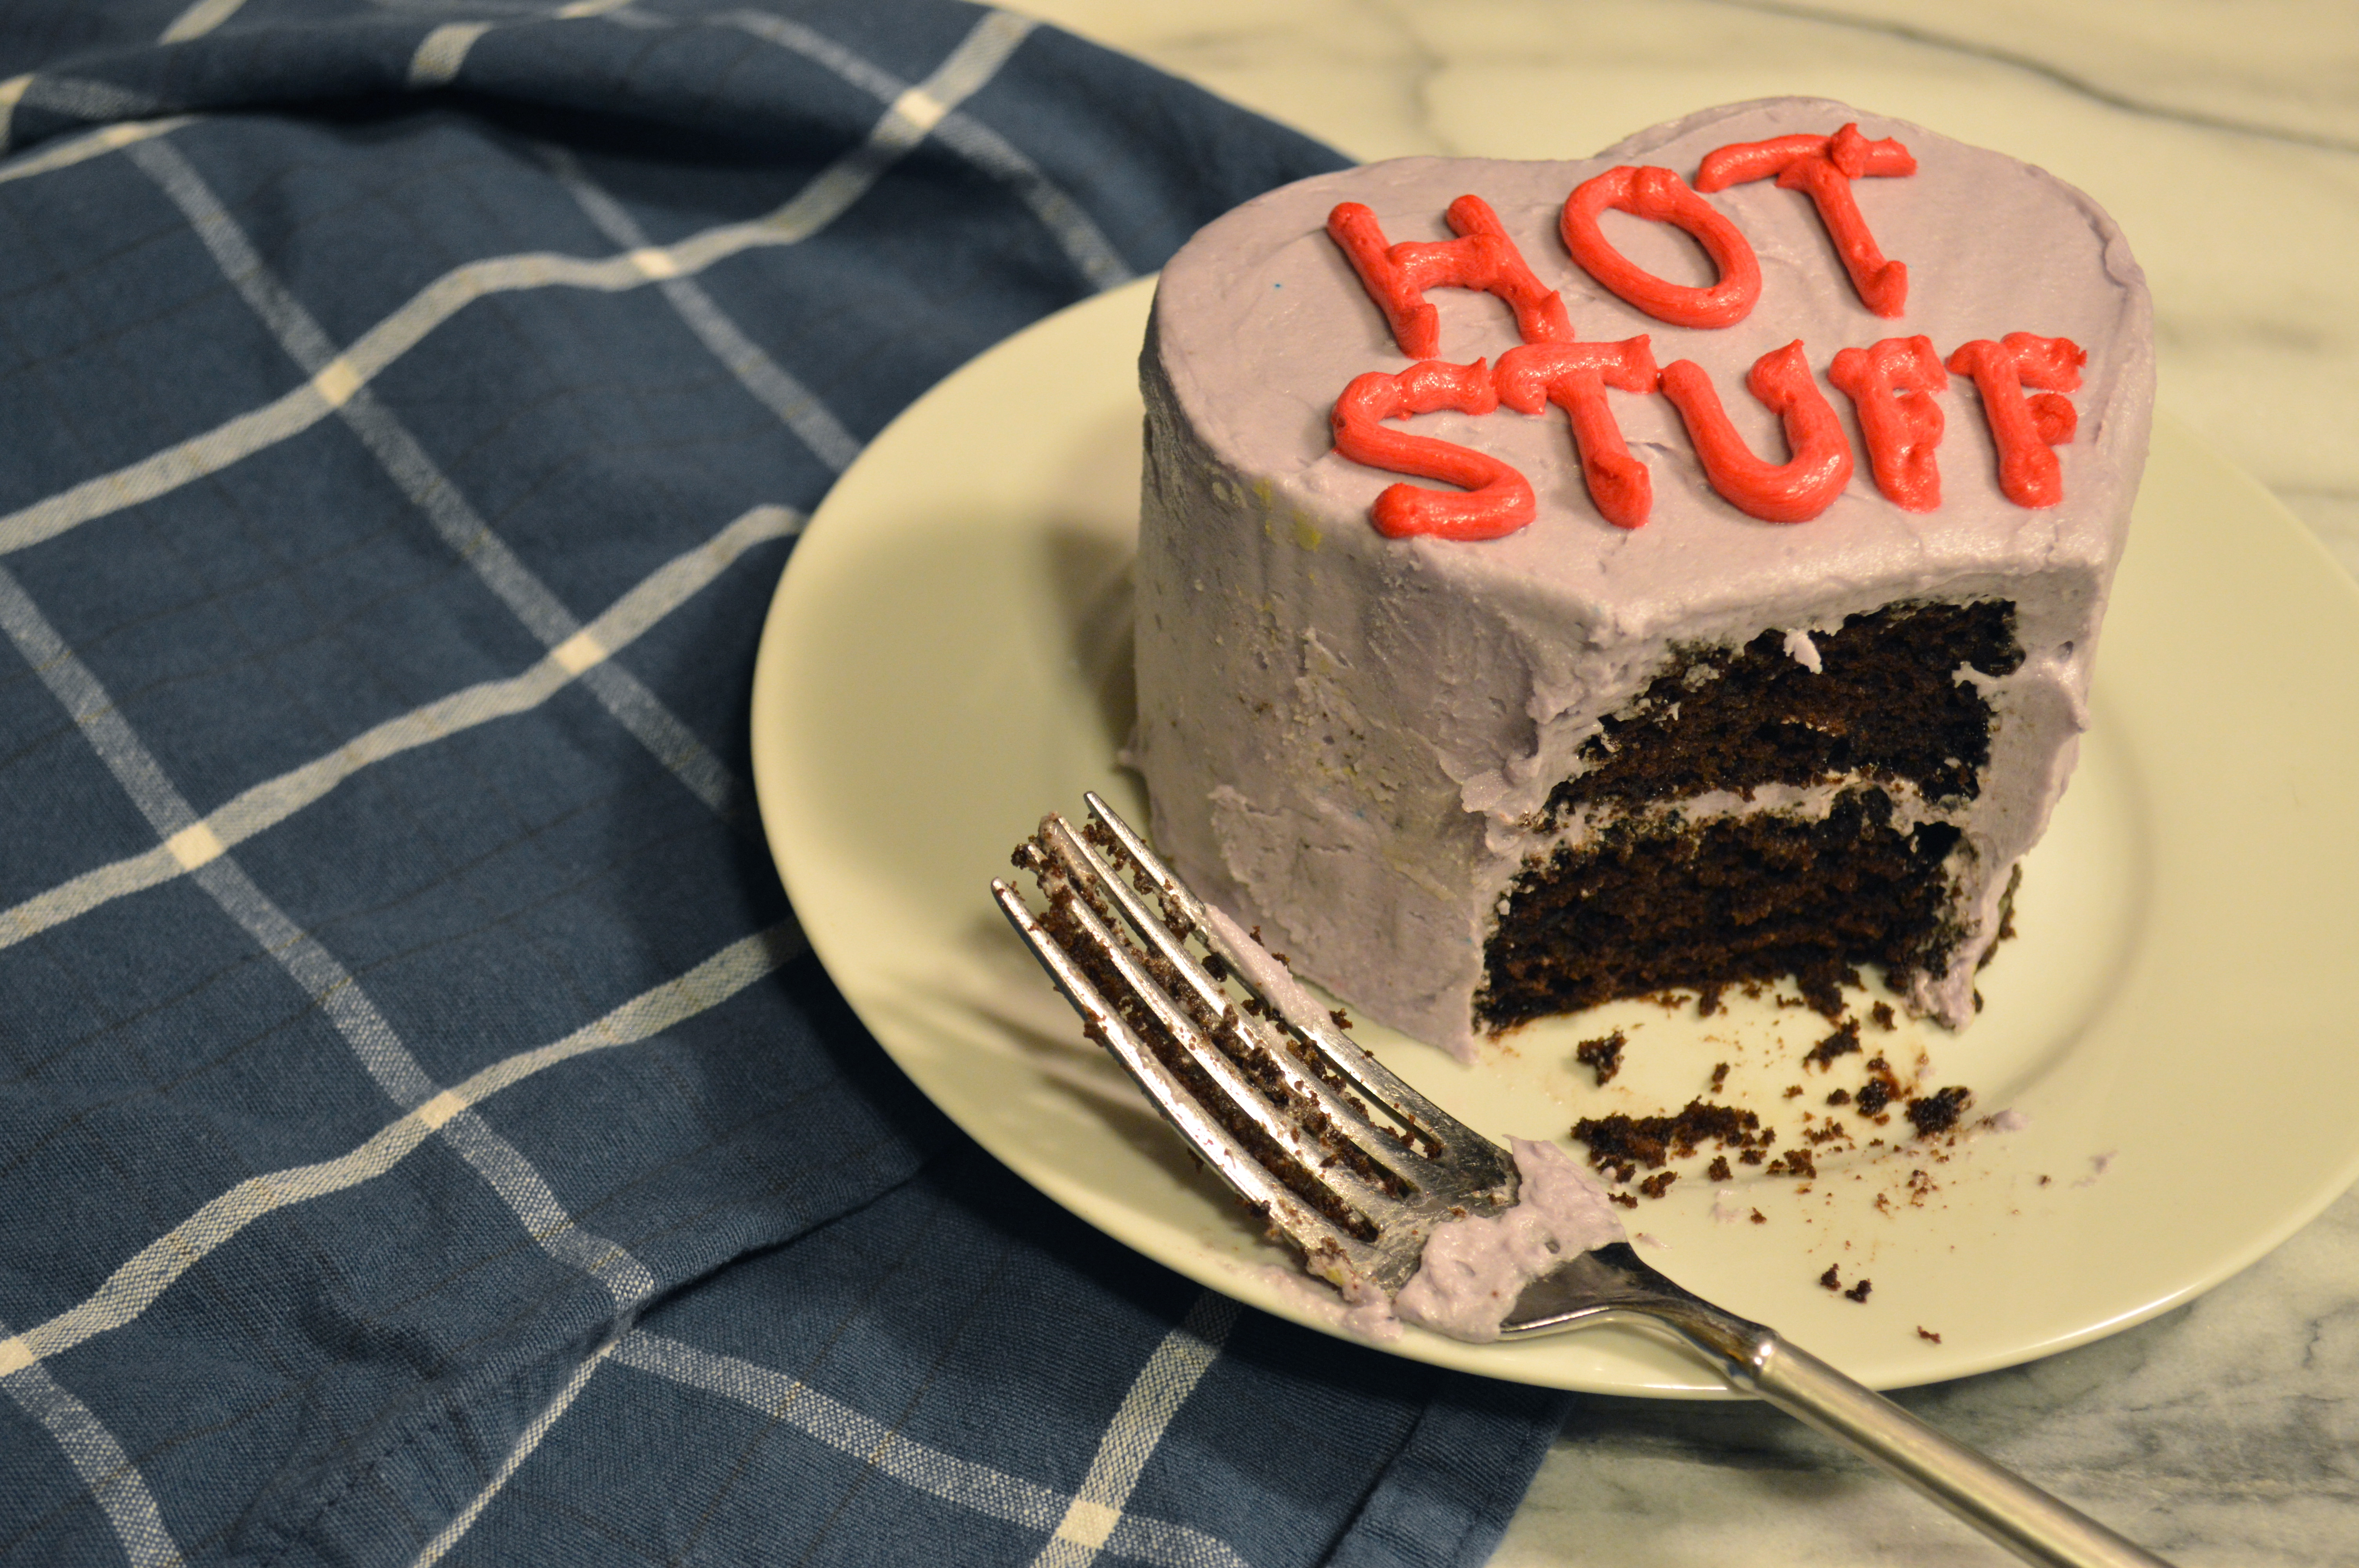
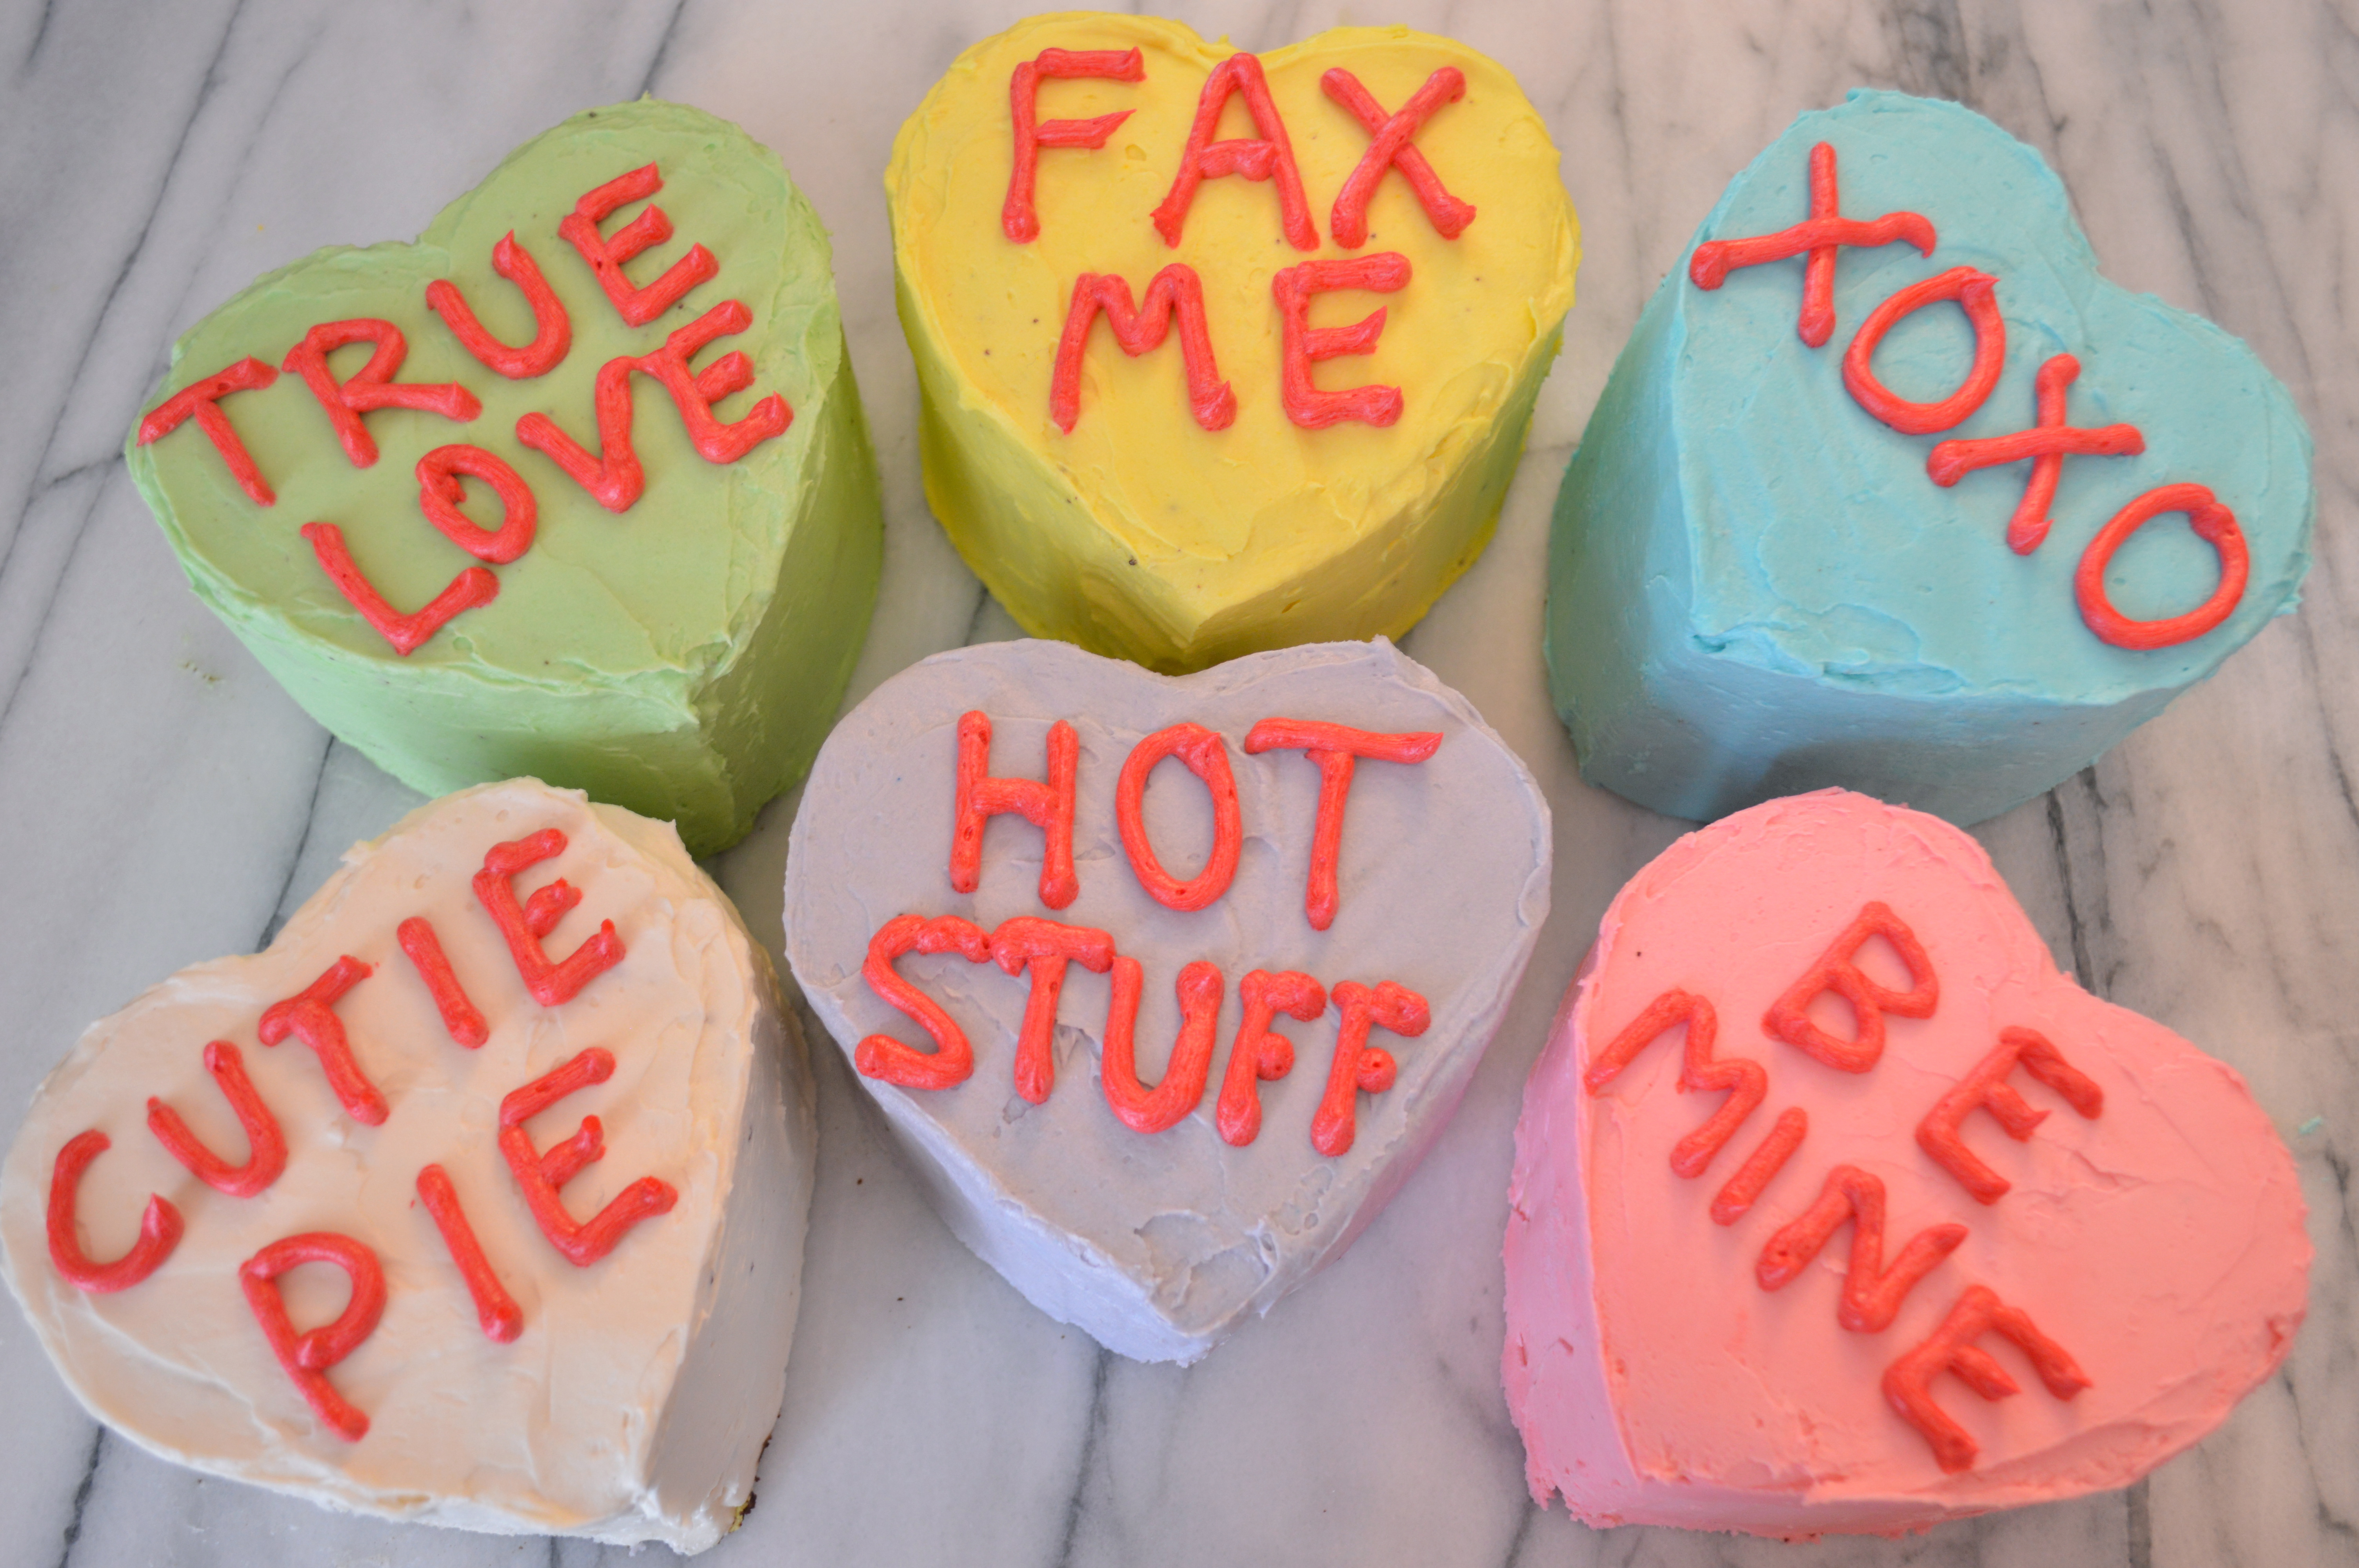
Another Valentine’s Day confection that roots back to Victorian England is the conversation heart. The English had a tradition of writing phrases and sayings on small pieces of paper embeded inside of small colored sugar candies. The Victorians took this fashion even further by creating “conversation lozenges”, which came in various sizes and shapes, and were common all year round. Some of the more common phrases on them included “Can you Polka?” and “How do you flirt?”, but they were even sometimes used as marketing tools with the names of businesses written on them. In 1866 a device was invented to imprint the phrases into the candies rather than hand writing them, and in 1901 the Necco company, makers of Necco wafers, starting cutting their conversation lozenges into heart shapes and marketing them as Valentine’s Day “Sweethearts”. For decades some of the most popular phrases on conversation hearts were “Be mine”, “Kiss Me”, and “I’m Yours”. In the 1990s the company decided to update some of their phrases and retire others, introducing new phrases like “Email Me”, “Hot Stuff”, and Russell’s favorite, “Fax Me”.

conversation heart mini cakes | Brooklyn Homemakerconversation heart mini cakes | Brooklyn Homemaker

When I was trying to decide on a dessert to make for Russell on Valentine’s Day, I thought it would be really fun to try combining these two traditions. I’m not really a fan of real conversation hearts, but I am a big fan of chocolate! So, prepare to have your mind blown, I decided to make conversation hearts made of chocolate! Boom. Rather than trying to make tiny hearts out of real chocolate I decided that little chocolate cakes were where it’s at.

conversation heart mini cakes | Brooklyn Homemakerconversation heart mini cakes | Brooklyn Homemaker

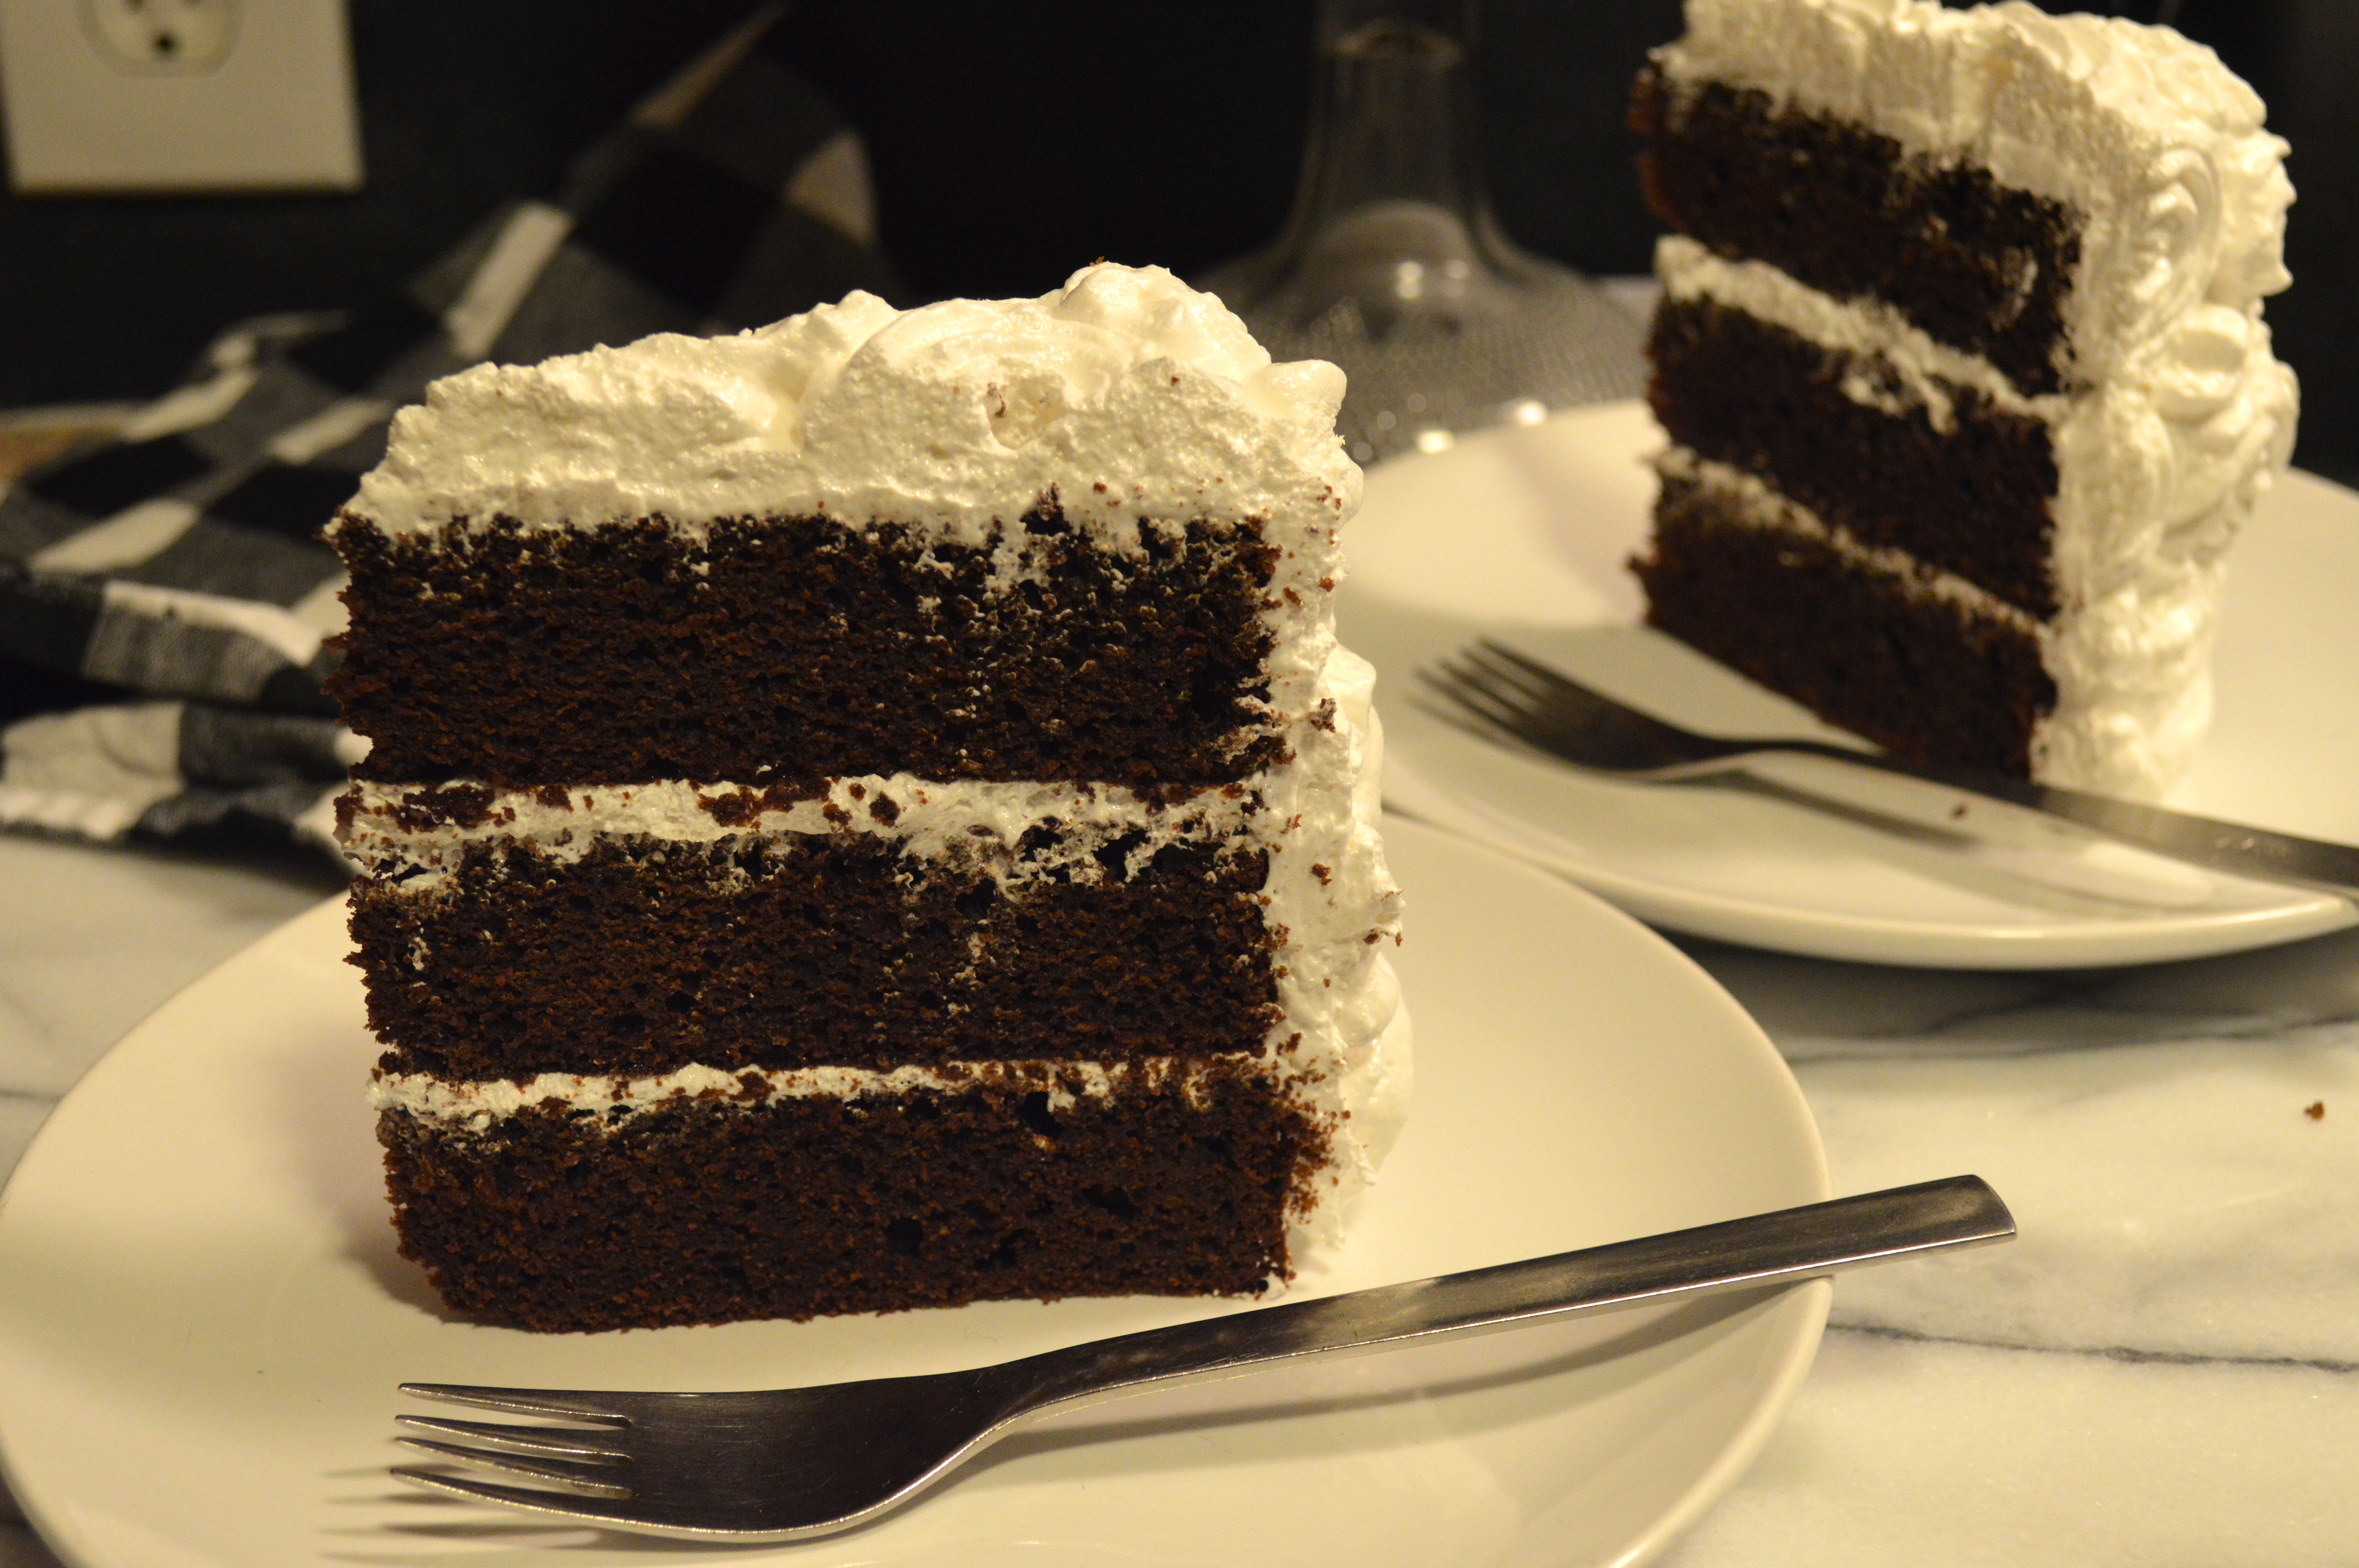
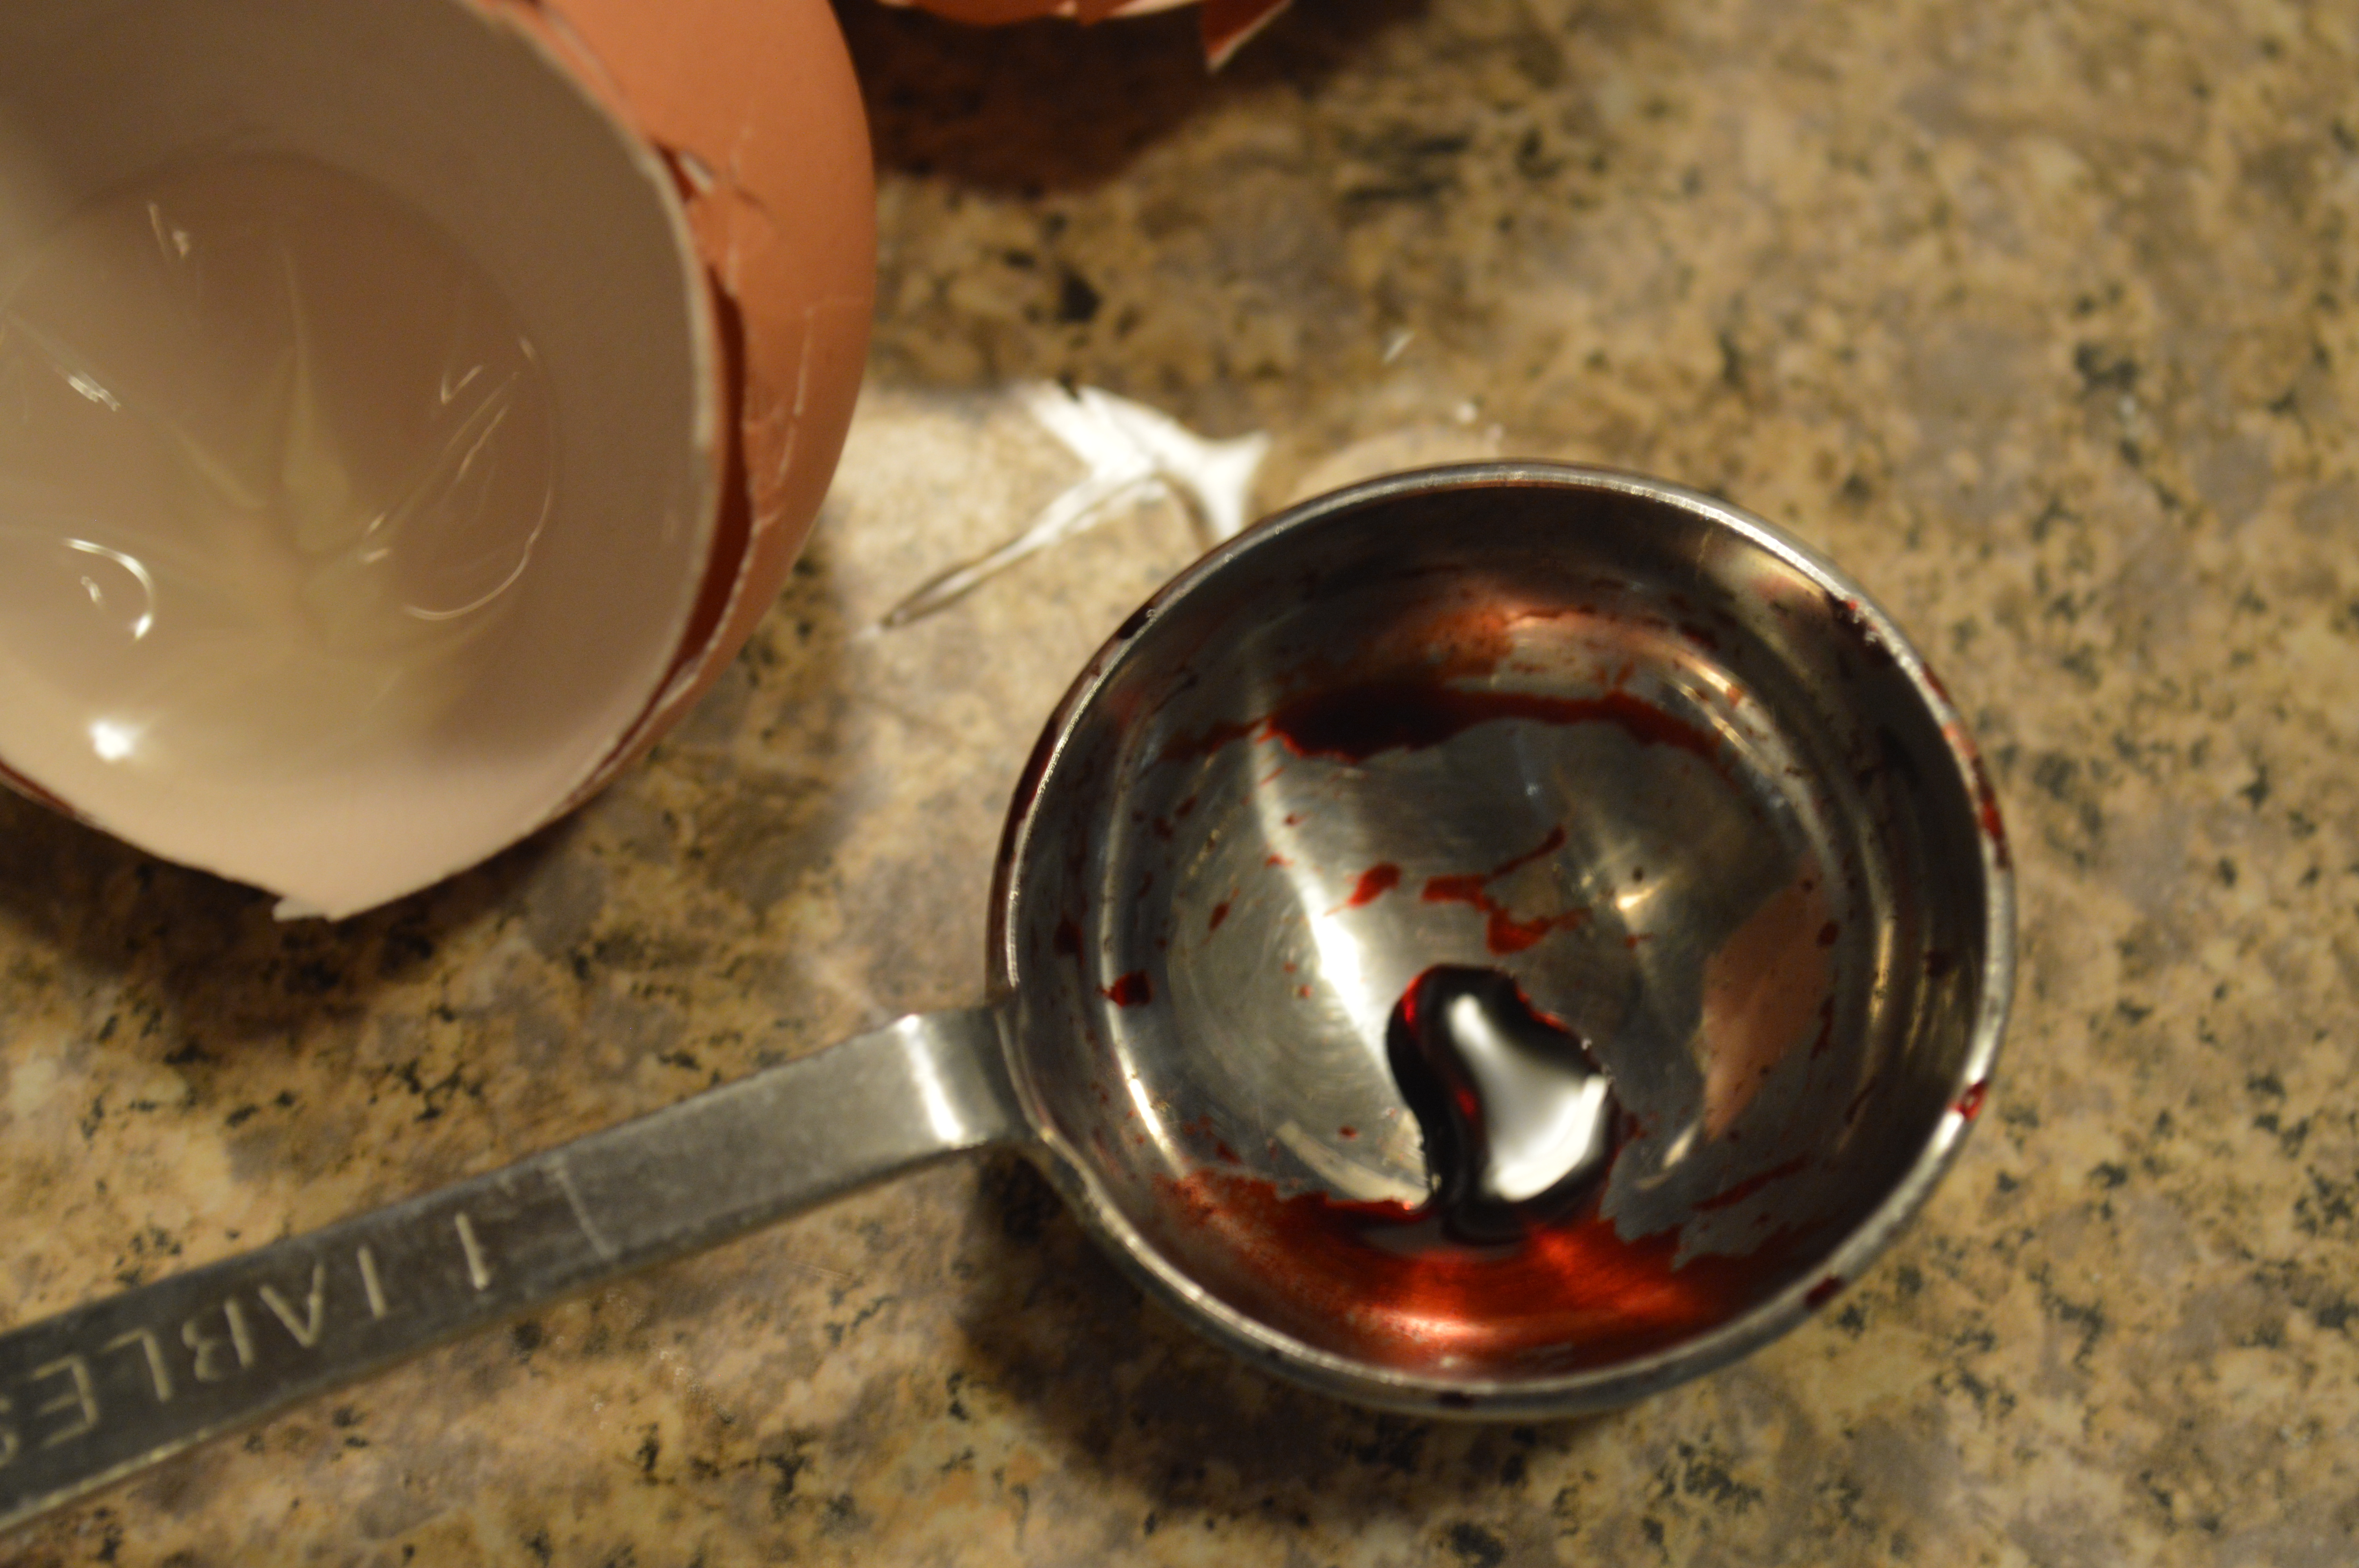
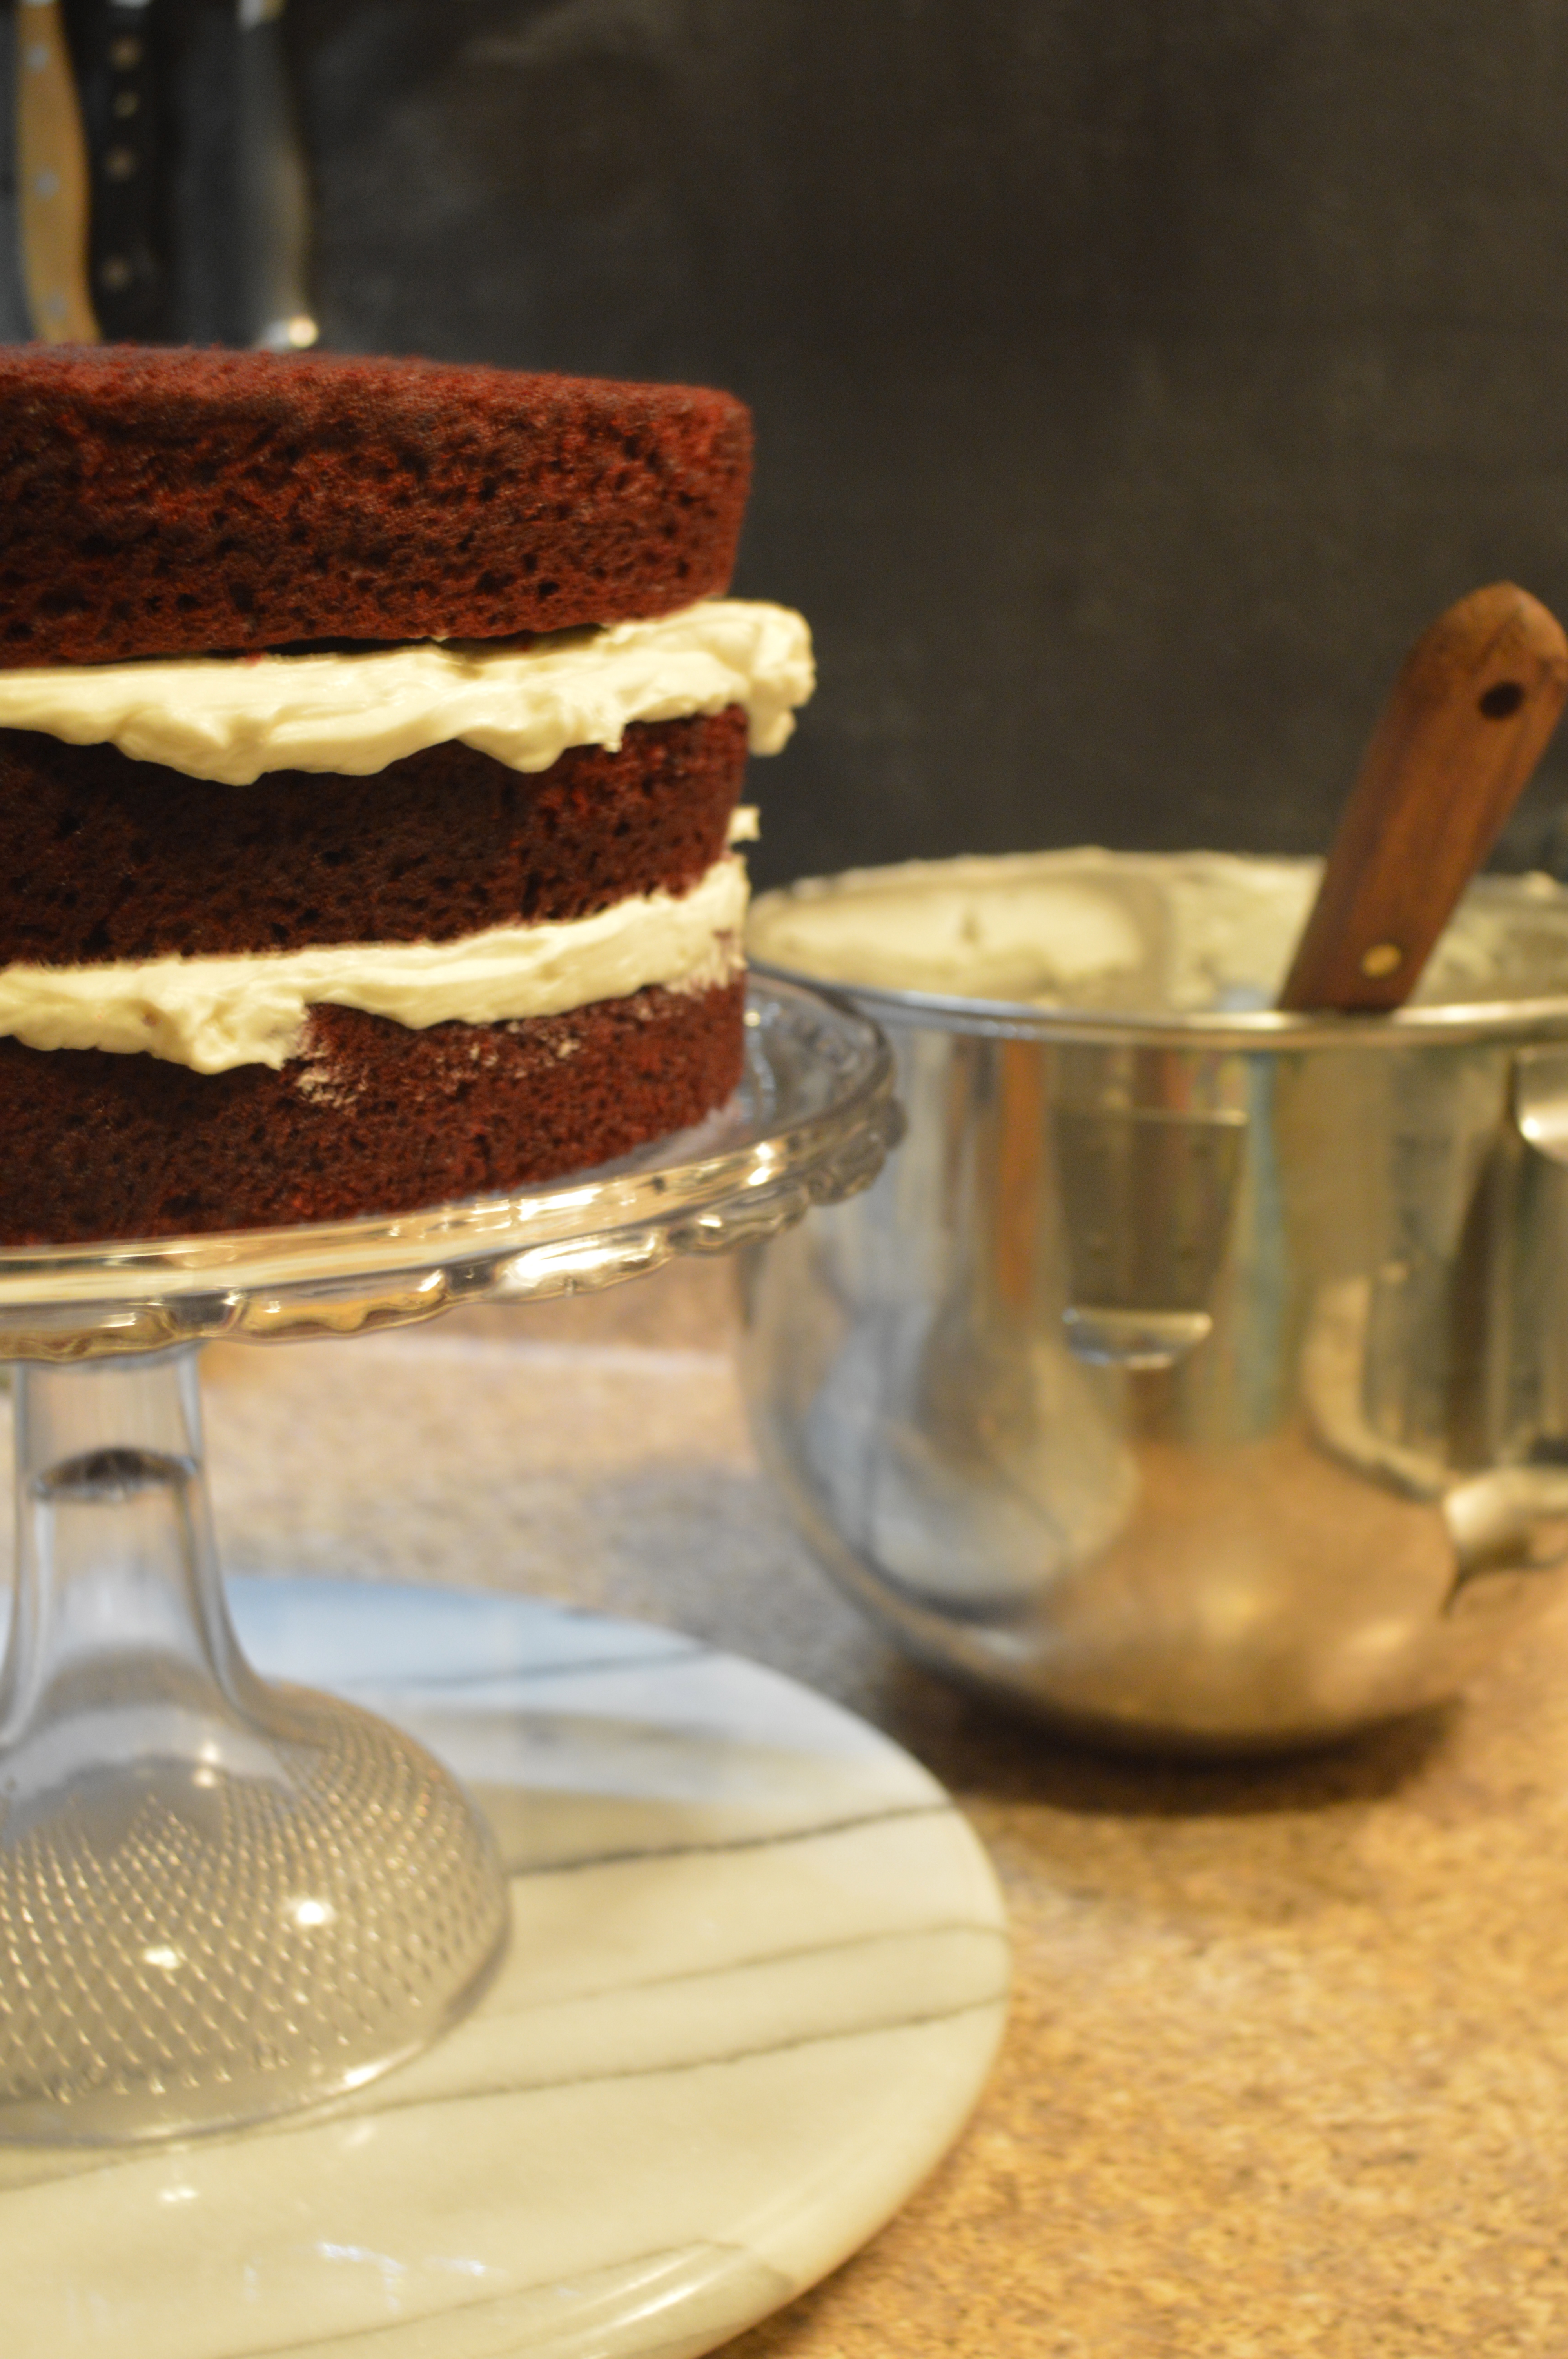
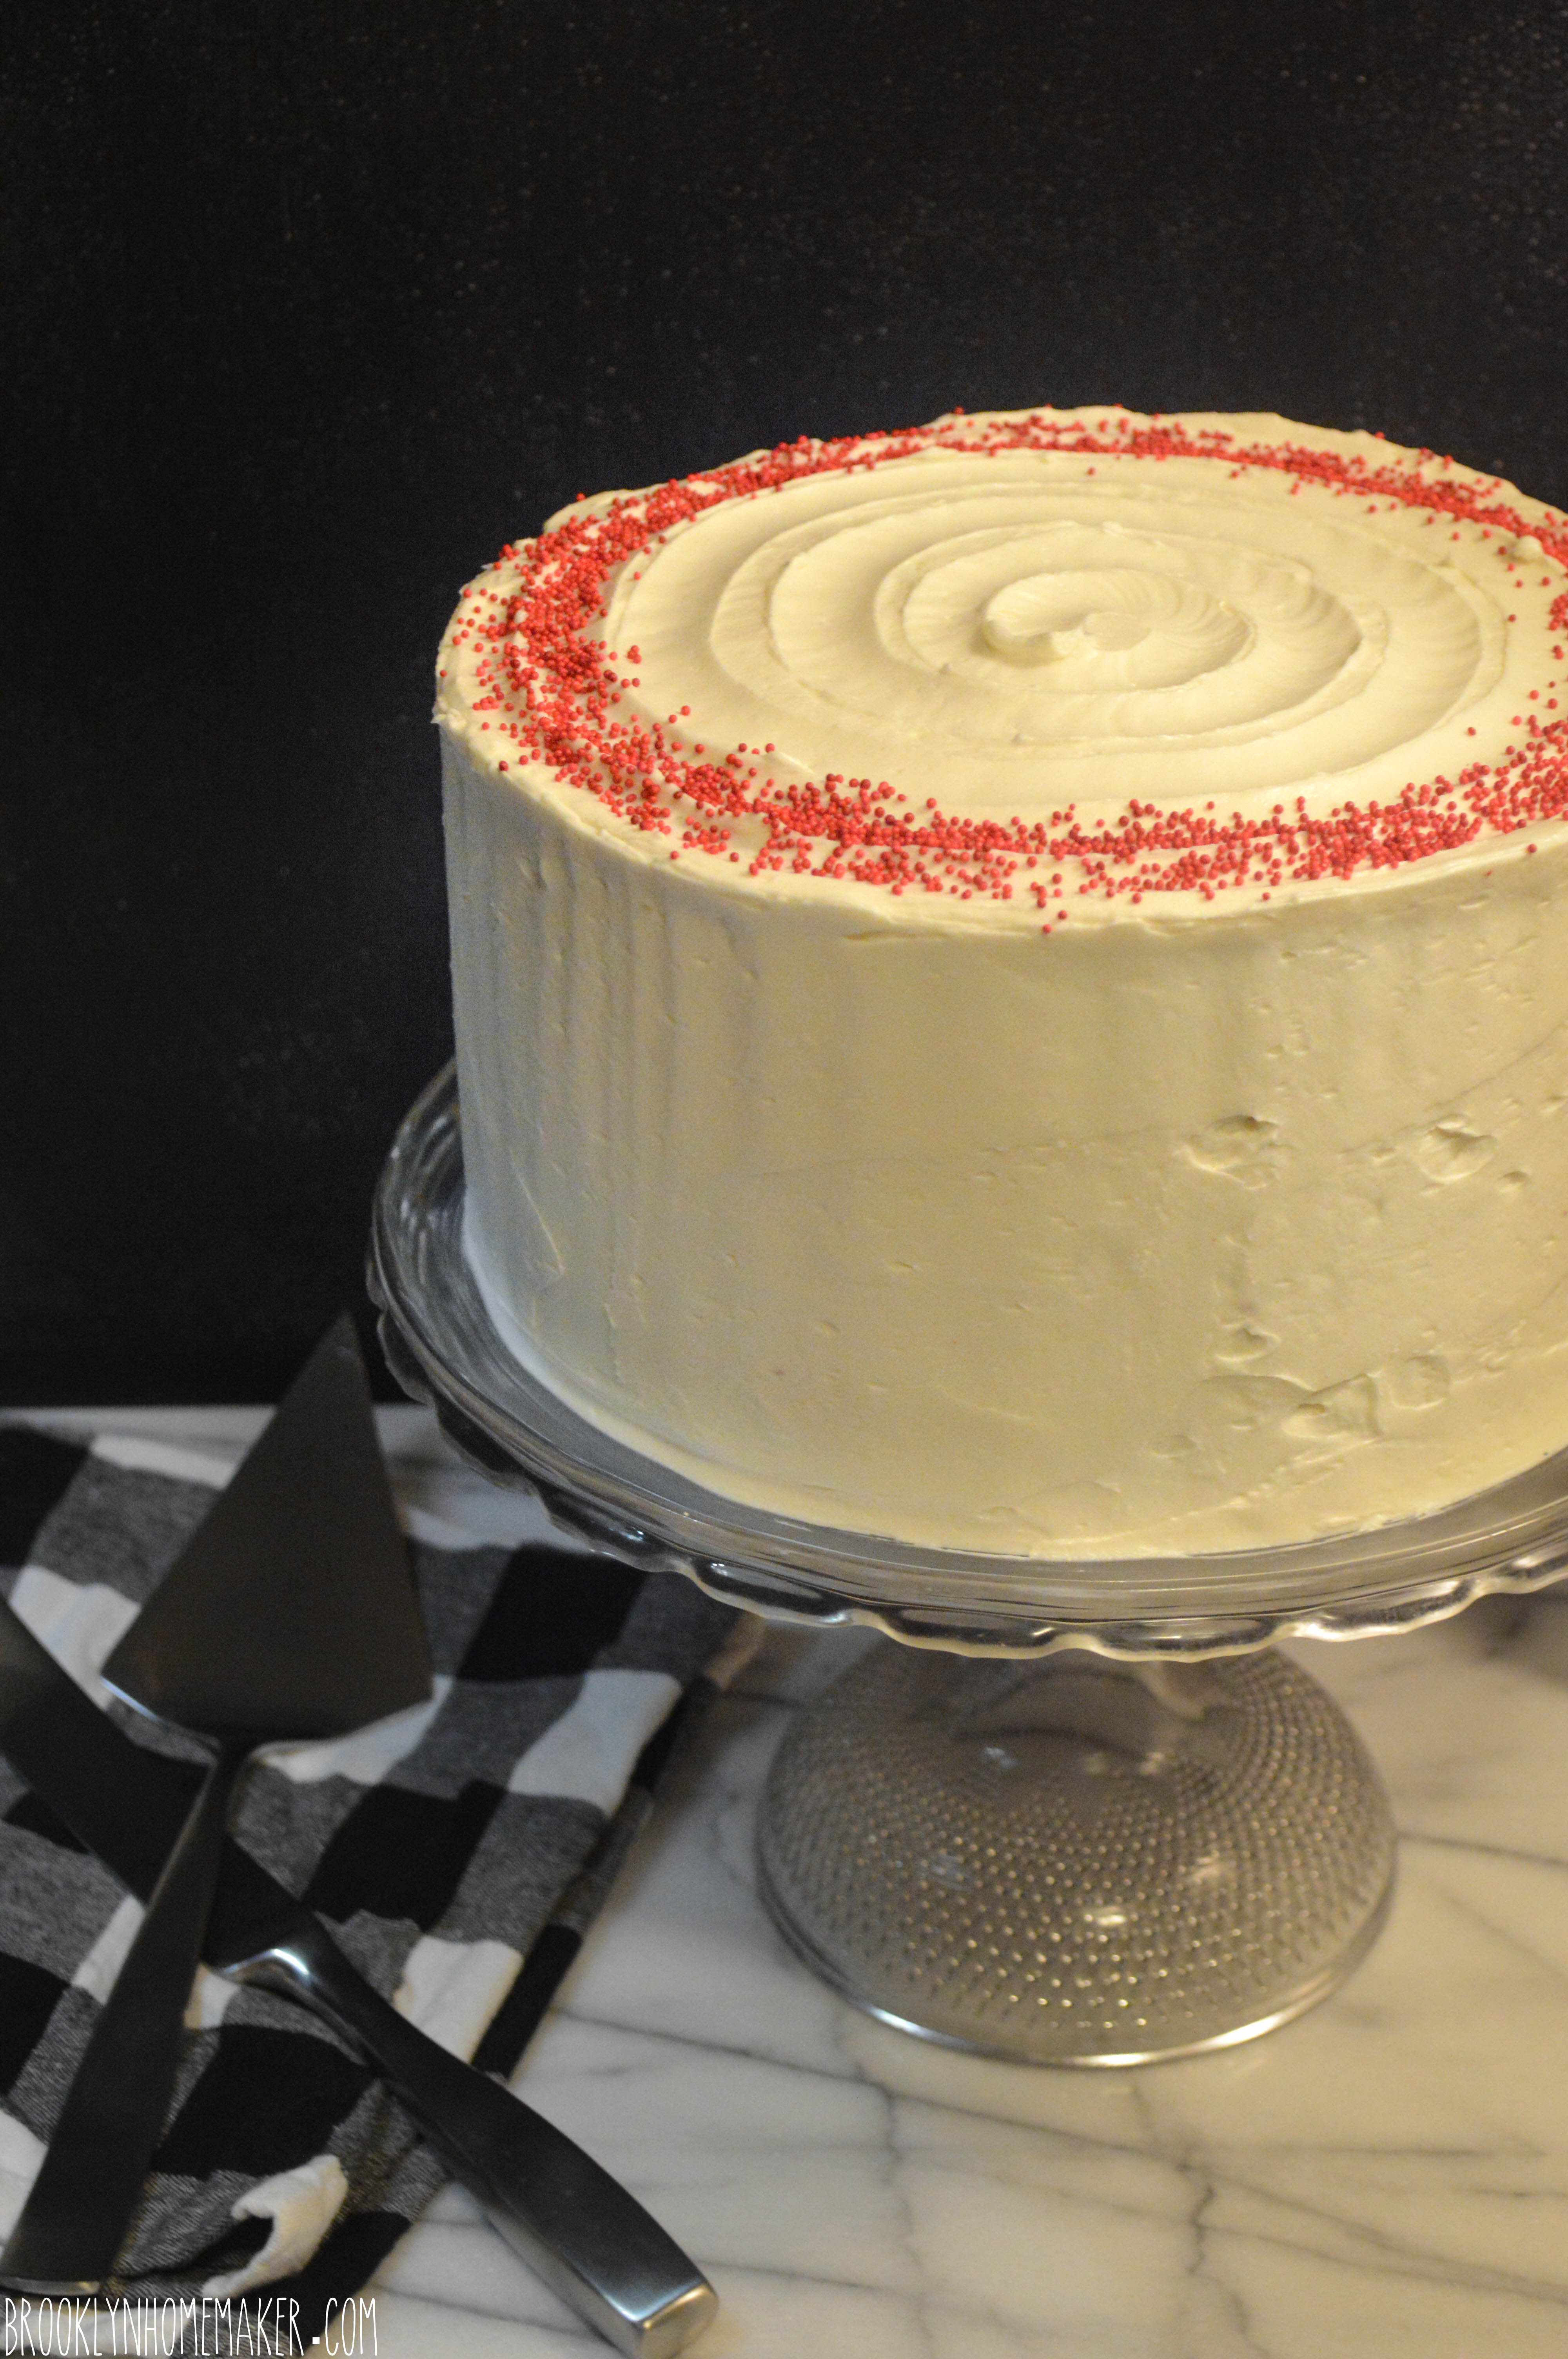
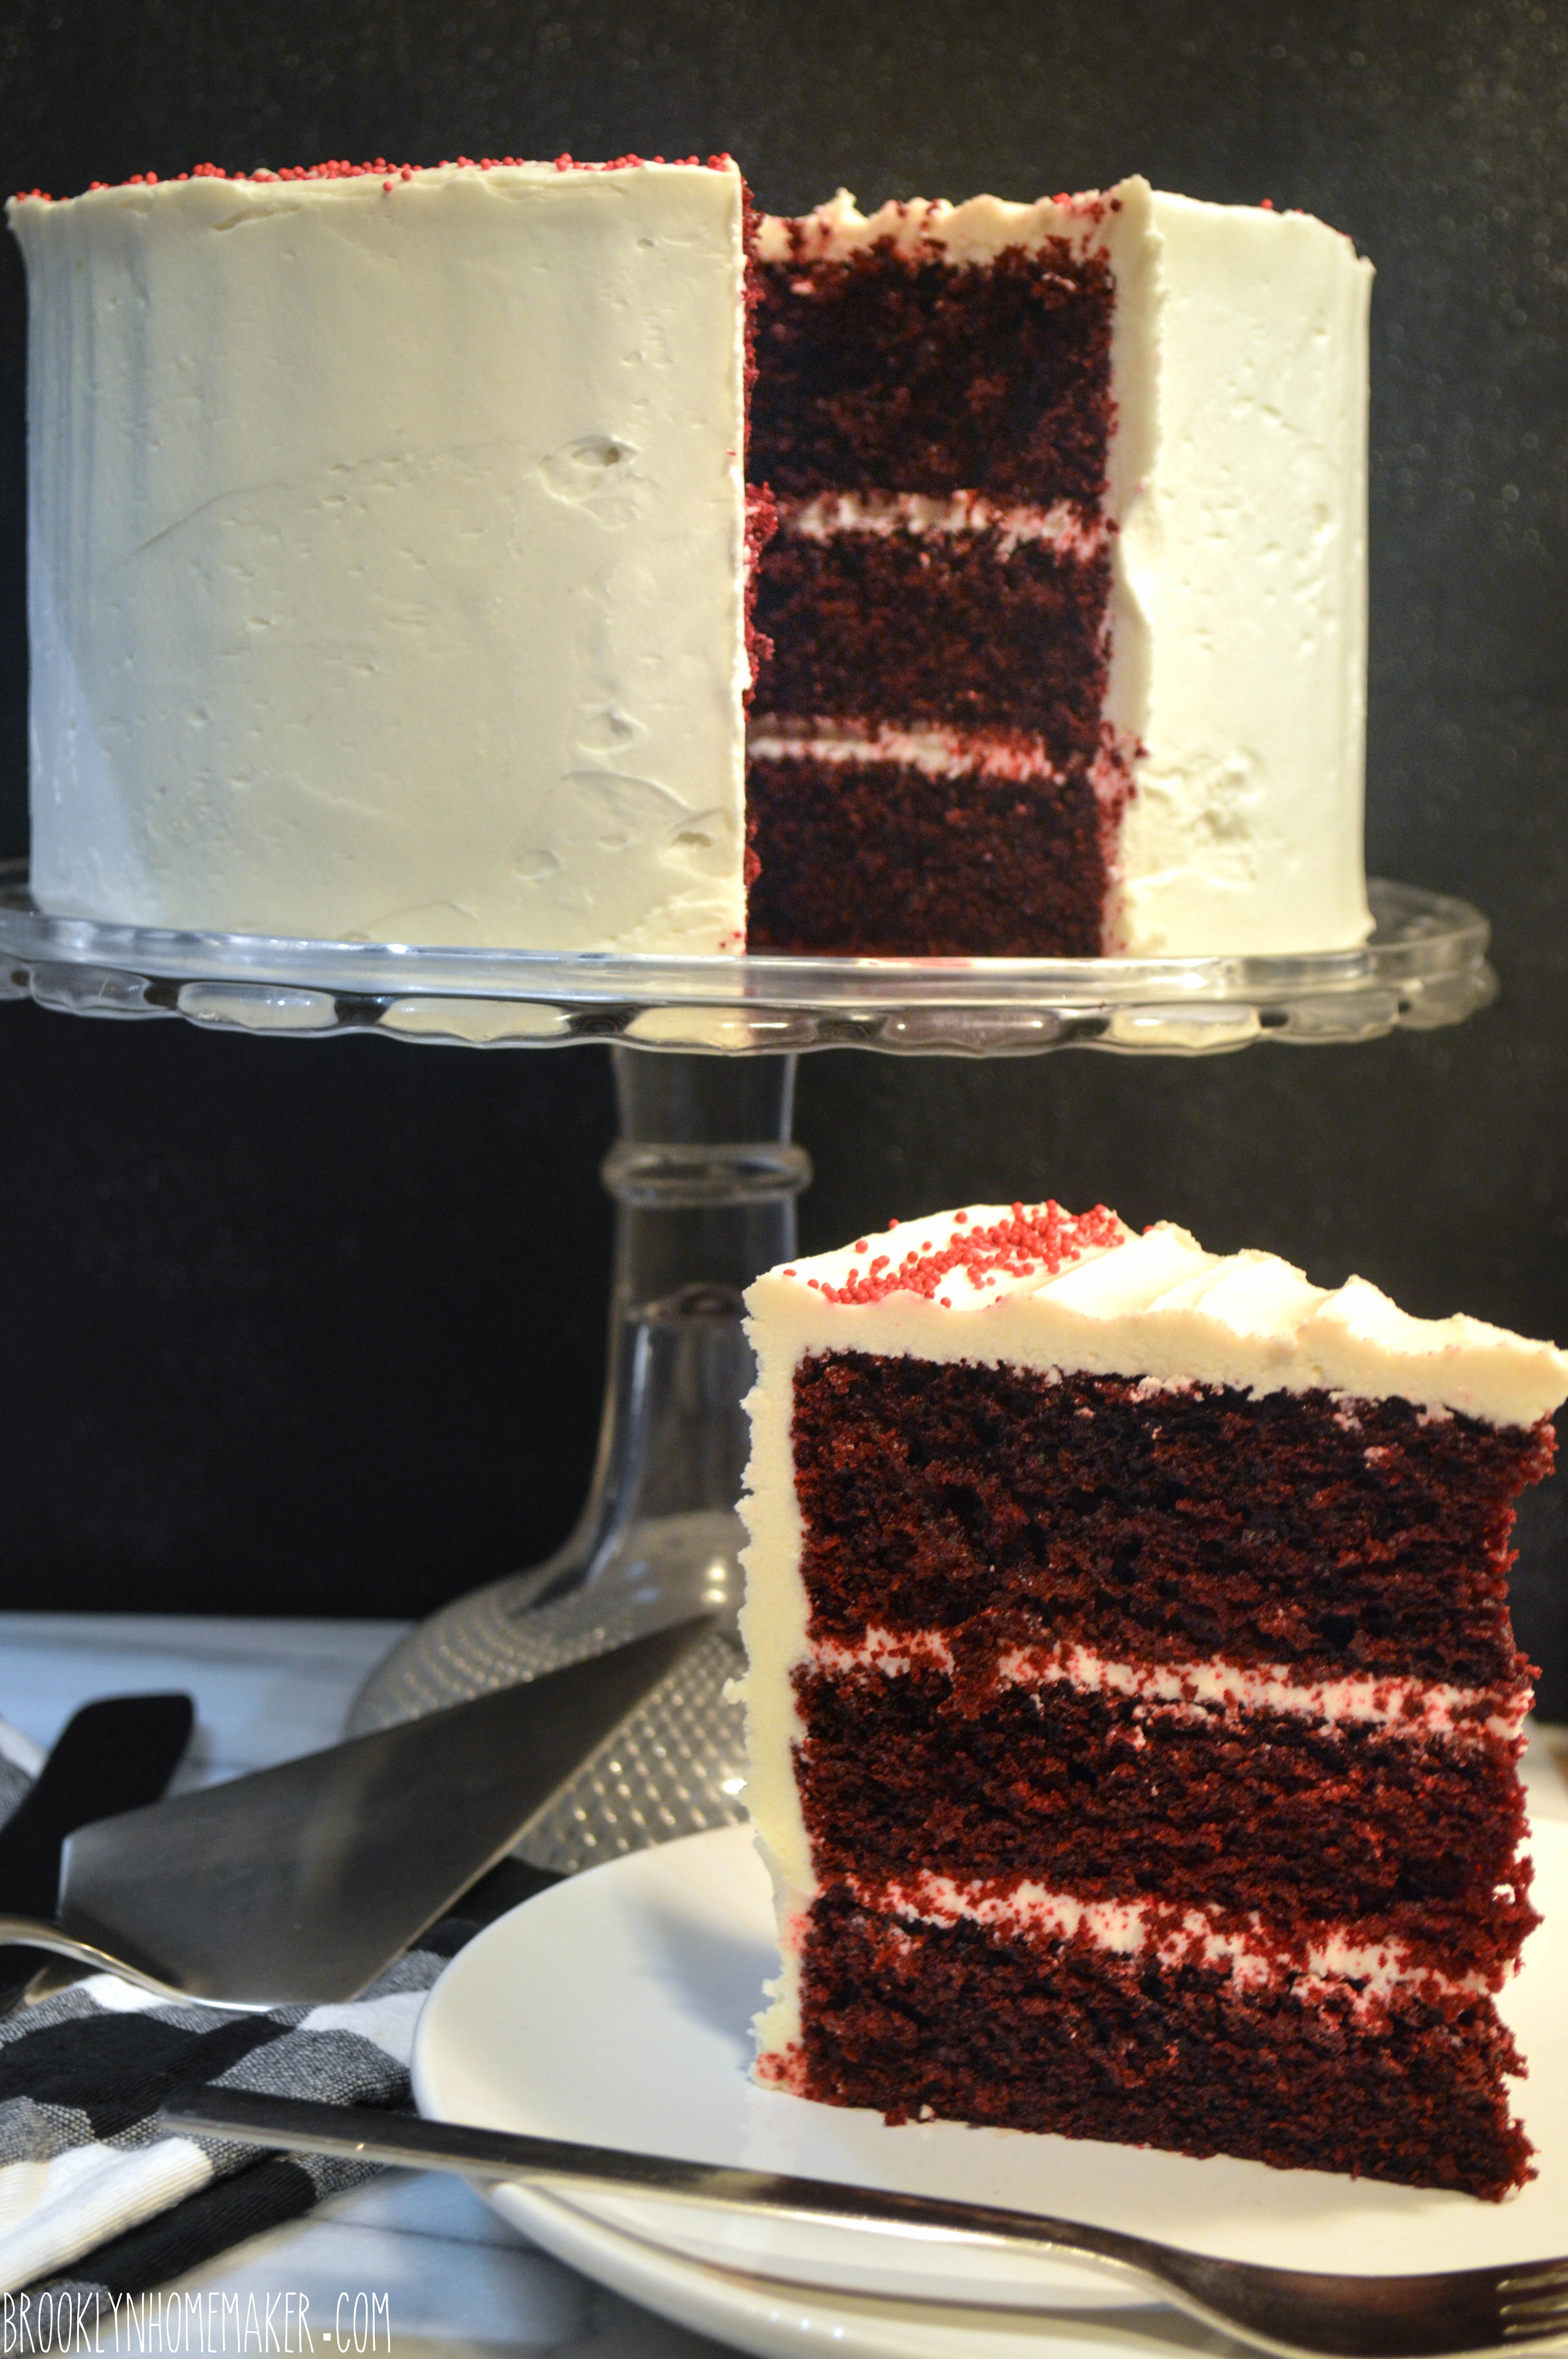
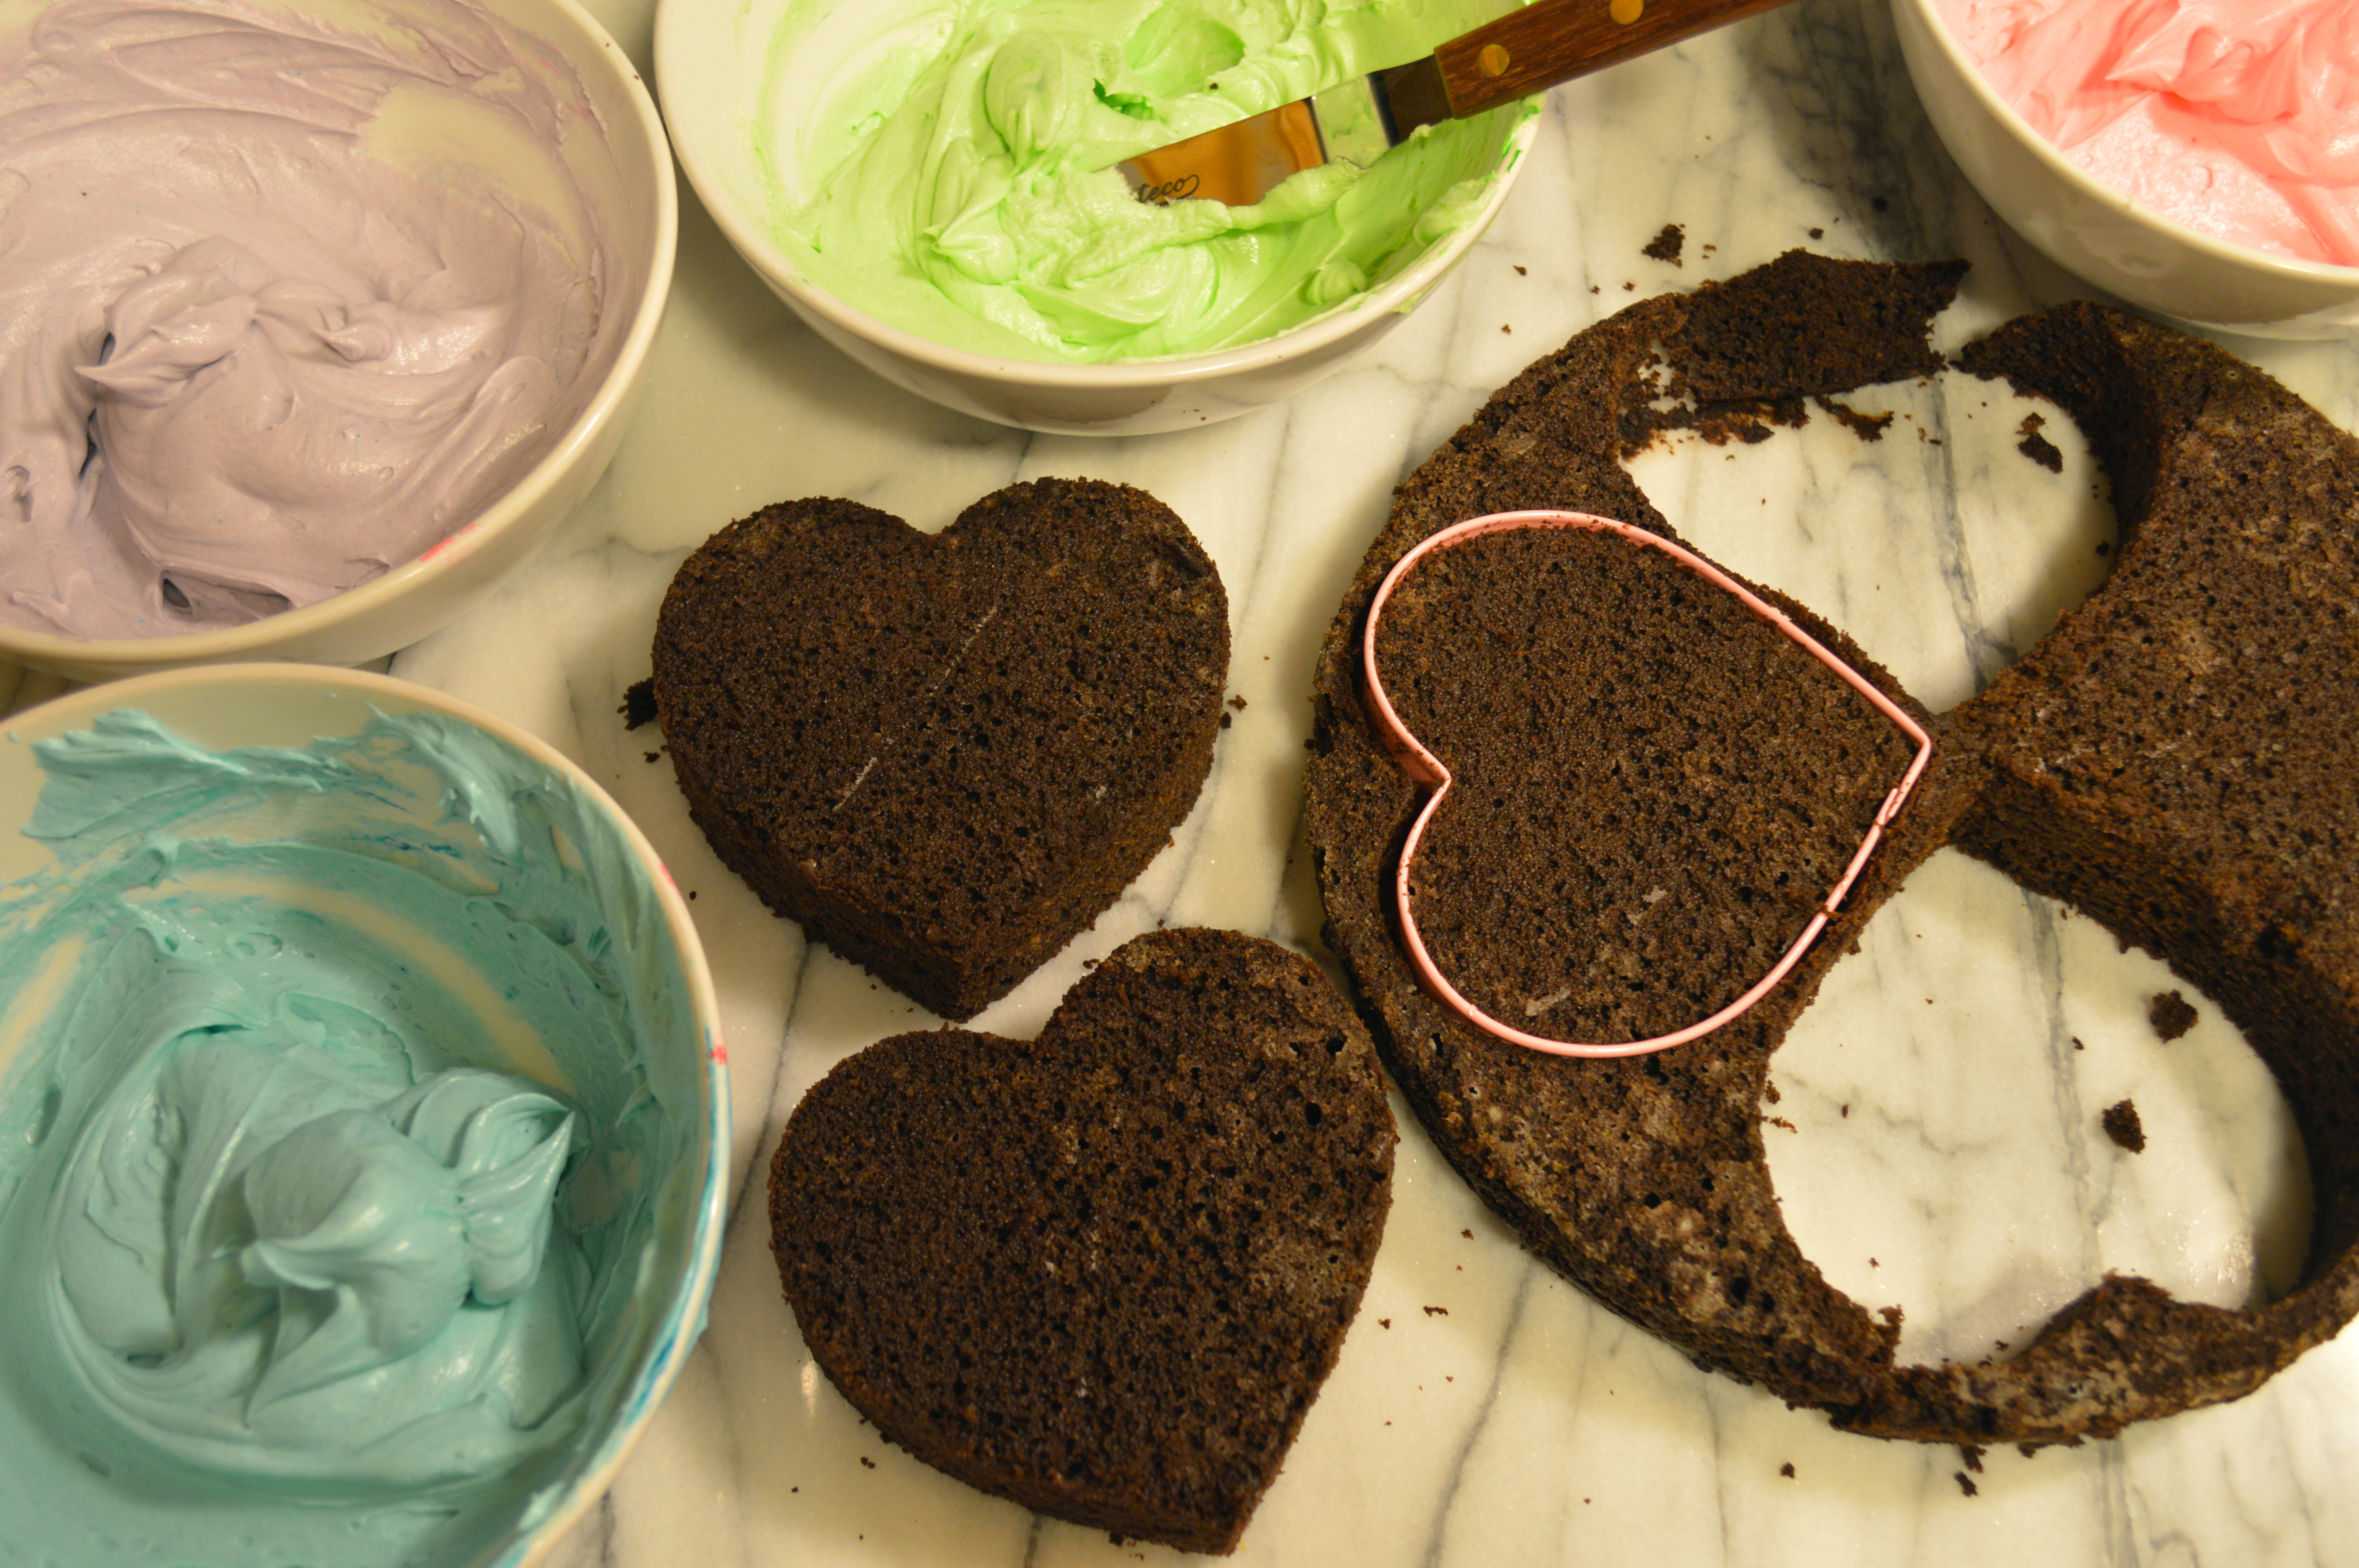
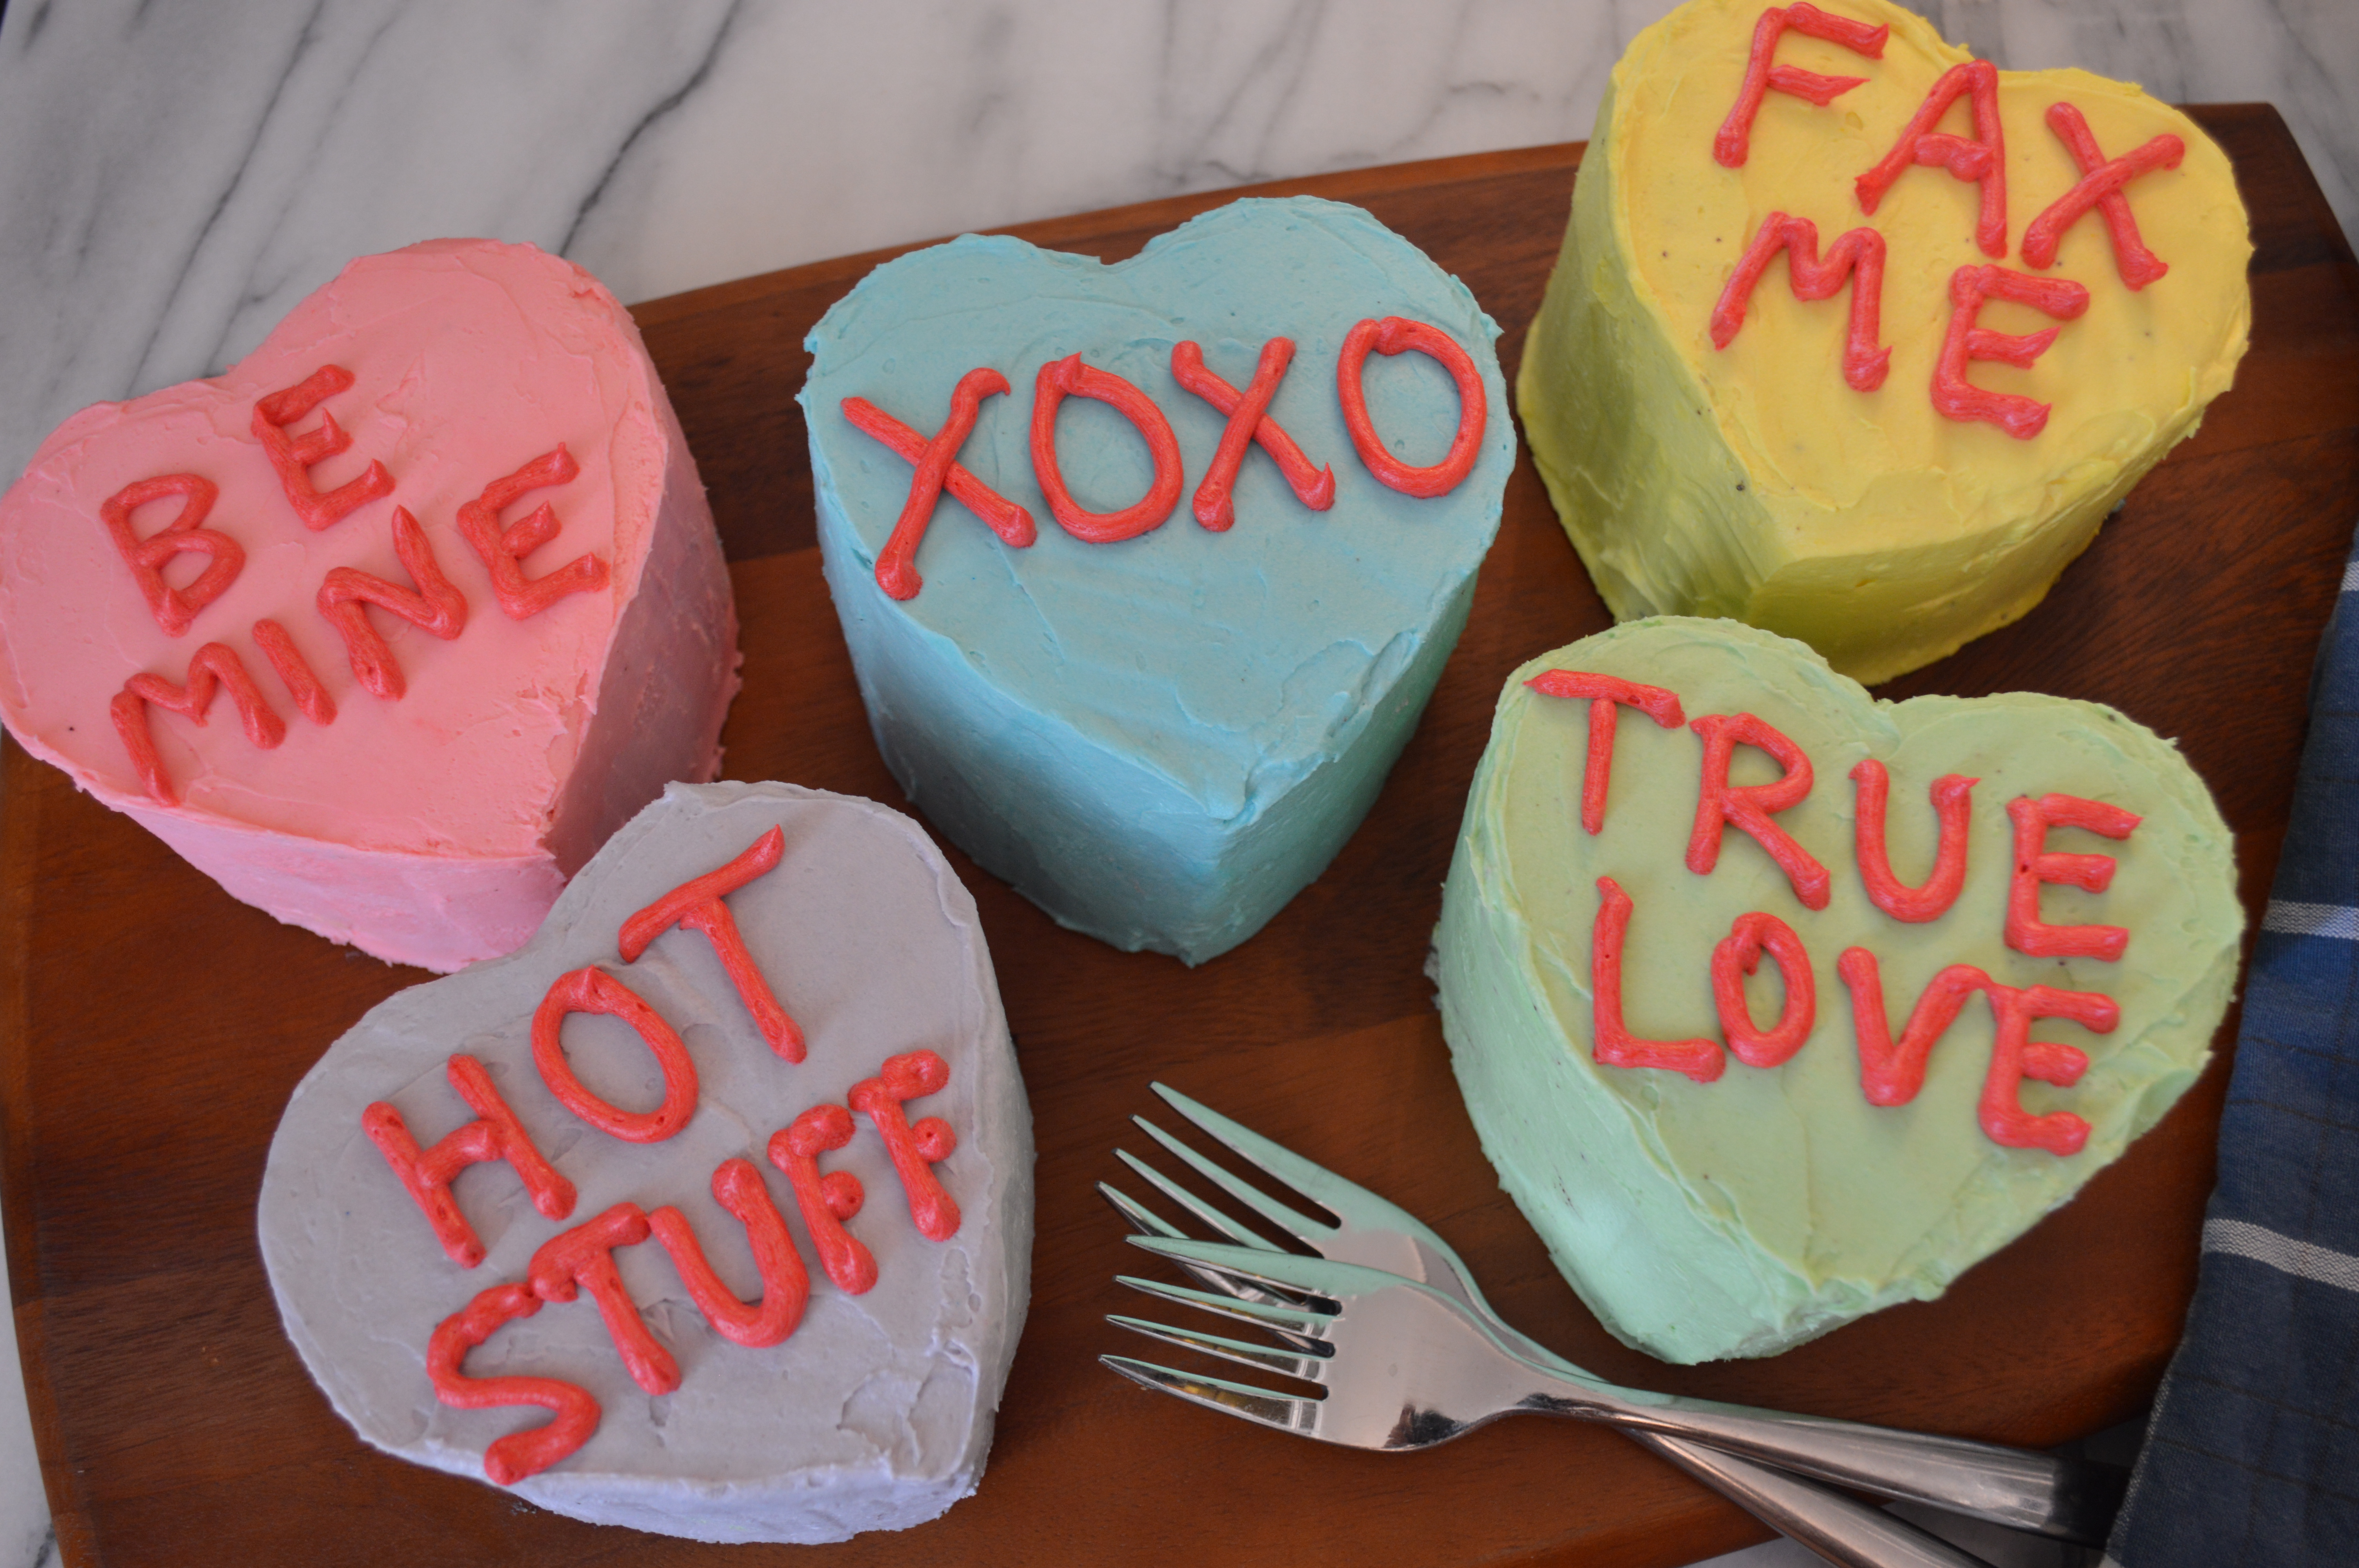
I started with my favorite recipe for Devil’s Food Cake from Russell’s birthday, but decided to ice them with a traditional American buttercream. For fancy layer cakes I’m usually a bigger fan of meringue buttercream because American buttercream tends to be too sweet and have a slightly gritty texture, but I thought it was the clear choice for these cakes. Since they’re so cutesy and retro, and since they’re the size of large cupcakes, I thought this old school classic would be the perfect complement. I baked three 9-inch layers of Devil’s Food Cake and used a 4-inch heart-shaped cookie cutter to cut out twelve Devil’s Food hearts. Then I filled, stacked, and iced the hearts to make 6 mini heart layer cakes. To make the cakes look just like traditional conversation hearts, I chose pastel tones for my icing and piped on phrases in red.

conversation heart mini cakes | Brooklyn Homemaker

Not only are they completely adorable, they’re totally delicious. Super moist, tender & chocolatey cakes covered with rich sweet & creamy icing. Heaven. The recipe below makes 6 cakes, which each feed 2 people at least, so they’re perfect for a party. If you wanted to just make 2 heart cakes you could cut hearts from one layer and freeze the other two layers of cake for another use. If wrapped good and tight in plastic, these cake layers should keep for up to a month in the freezer.

I really hope you give these a try. They might be a little advanced for beginners, but if you are a confident crumb-coater and can pipe a straight line, I promise you can handle it.

conversation heart mini cakes | Brooklyn Homemaker

Conversation Heart Mini Cakes

  • Servings: makes six 2-layer 4-inch heart cakes, serves 12ish
  • Print
Devil’s Food Cake

butter and flour for pans
2 cups peanut oil or vegetable oil
1 1/2 cups unsweetened natural cocoa powder
1 1/2 cups hot water
3 1/4 cups cake flour
1 1/4 teaspoons coarse salt
1 teaspoon baking powder
1 teaspoon baking soda
1 cup granulated sugar
1 1/4 cup packed brown sugar
4 large eggs
4 teaspoons vanilla extract
1 cup buttermilk

Preheat oven to 350 degrees. Butter three 9 inch round cake pans, line bottoms with parchment paper, butter paper, and dust pans with flour. Whisk together cocoa powder and hot water until smooth.

Sift together flour, salt, baking powder, and baking soda; set aside. Beat oil and sugar together on medium-low speed until combined.
Add eggs, one at a time, beating after each addition. Beat in vanilla and cocoa mixture. Reduce speed to low. Add flour mixture in two batches, alternating with buttermilk and beginning and ending with flour. Beat until just combined.
Divide batter between pans, and bake until a cake tester inserted into centers comes out clean, 35 to 40 minutes. Transfer pans to a wire rack to cool for 15 minutes. Invert cakes onto rack, peel off parchment, and let cool completely.

Classic American Buttercream
just enough for six 4″ heart cakes

2 cups unsalted butter (4 sticks or 1 pound), room temperature
6-8 cups confectioners sugar, SIFTED
1/2 teaspoon table salt
2 tablespoons vanilla extract
4-6 tablespoons milk

Beat butter for a few minutes with a mixer with the paddle attachment on medium speed. Add first six cups of confectioners sugar, one cup at a time, with your mixer on the lowest speed until the sugar has been incorporated. Increase mixer speed to medium and add vanilla extract, salt, and 4 tablespoons of milk and beat on high for 3 minutes. If your frosting needs a more stiff consistency, add remaining sugar, a cup at a time. If your frosting needs to be thinned out, add remaining milk 1 tablespoons at a time. For these hearts you want the icing fairly stiff.

Assemble the heart cakes

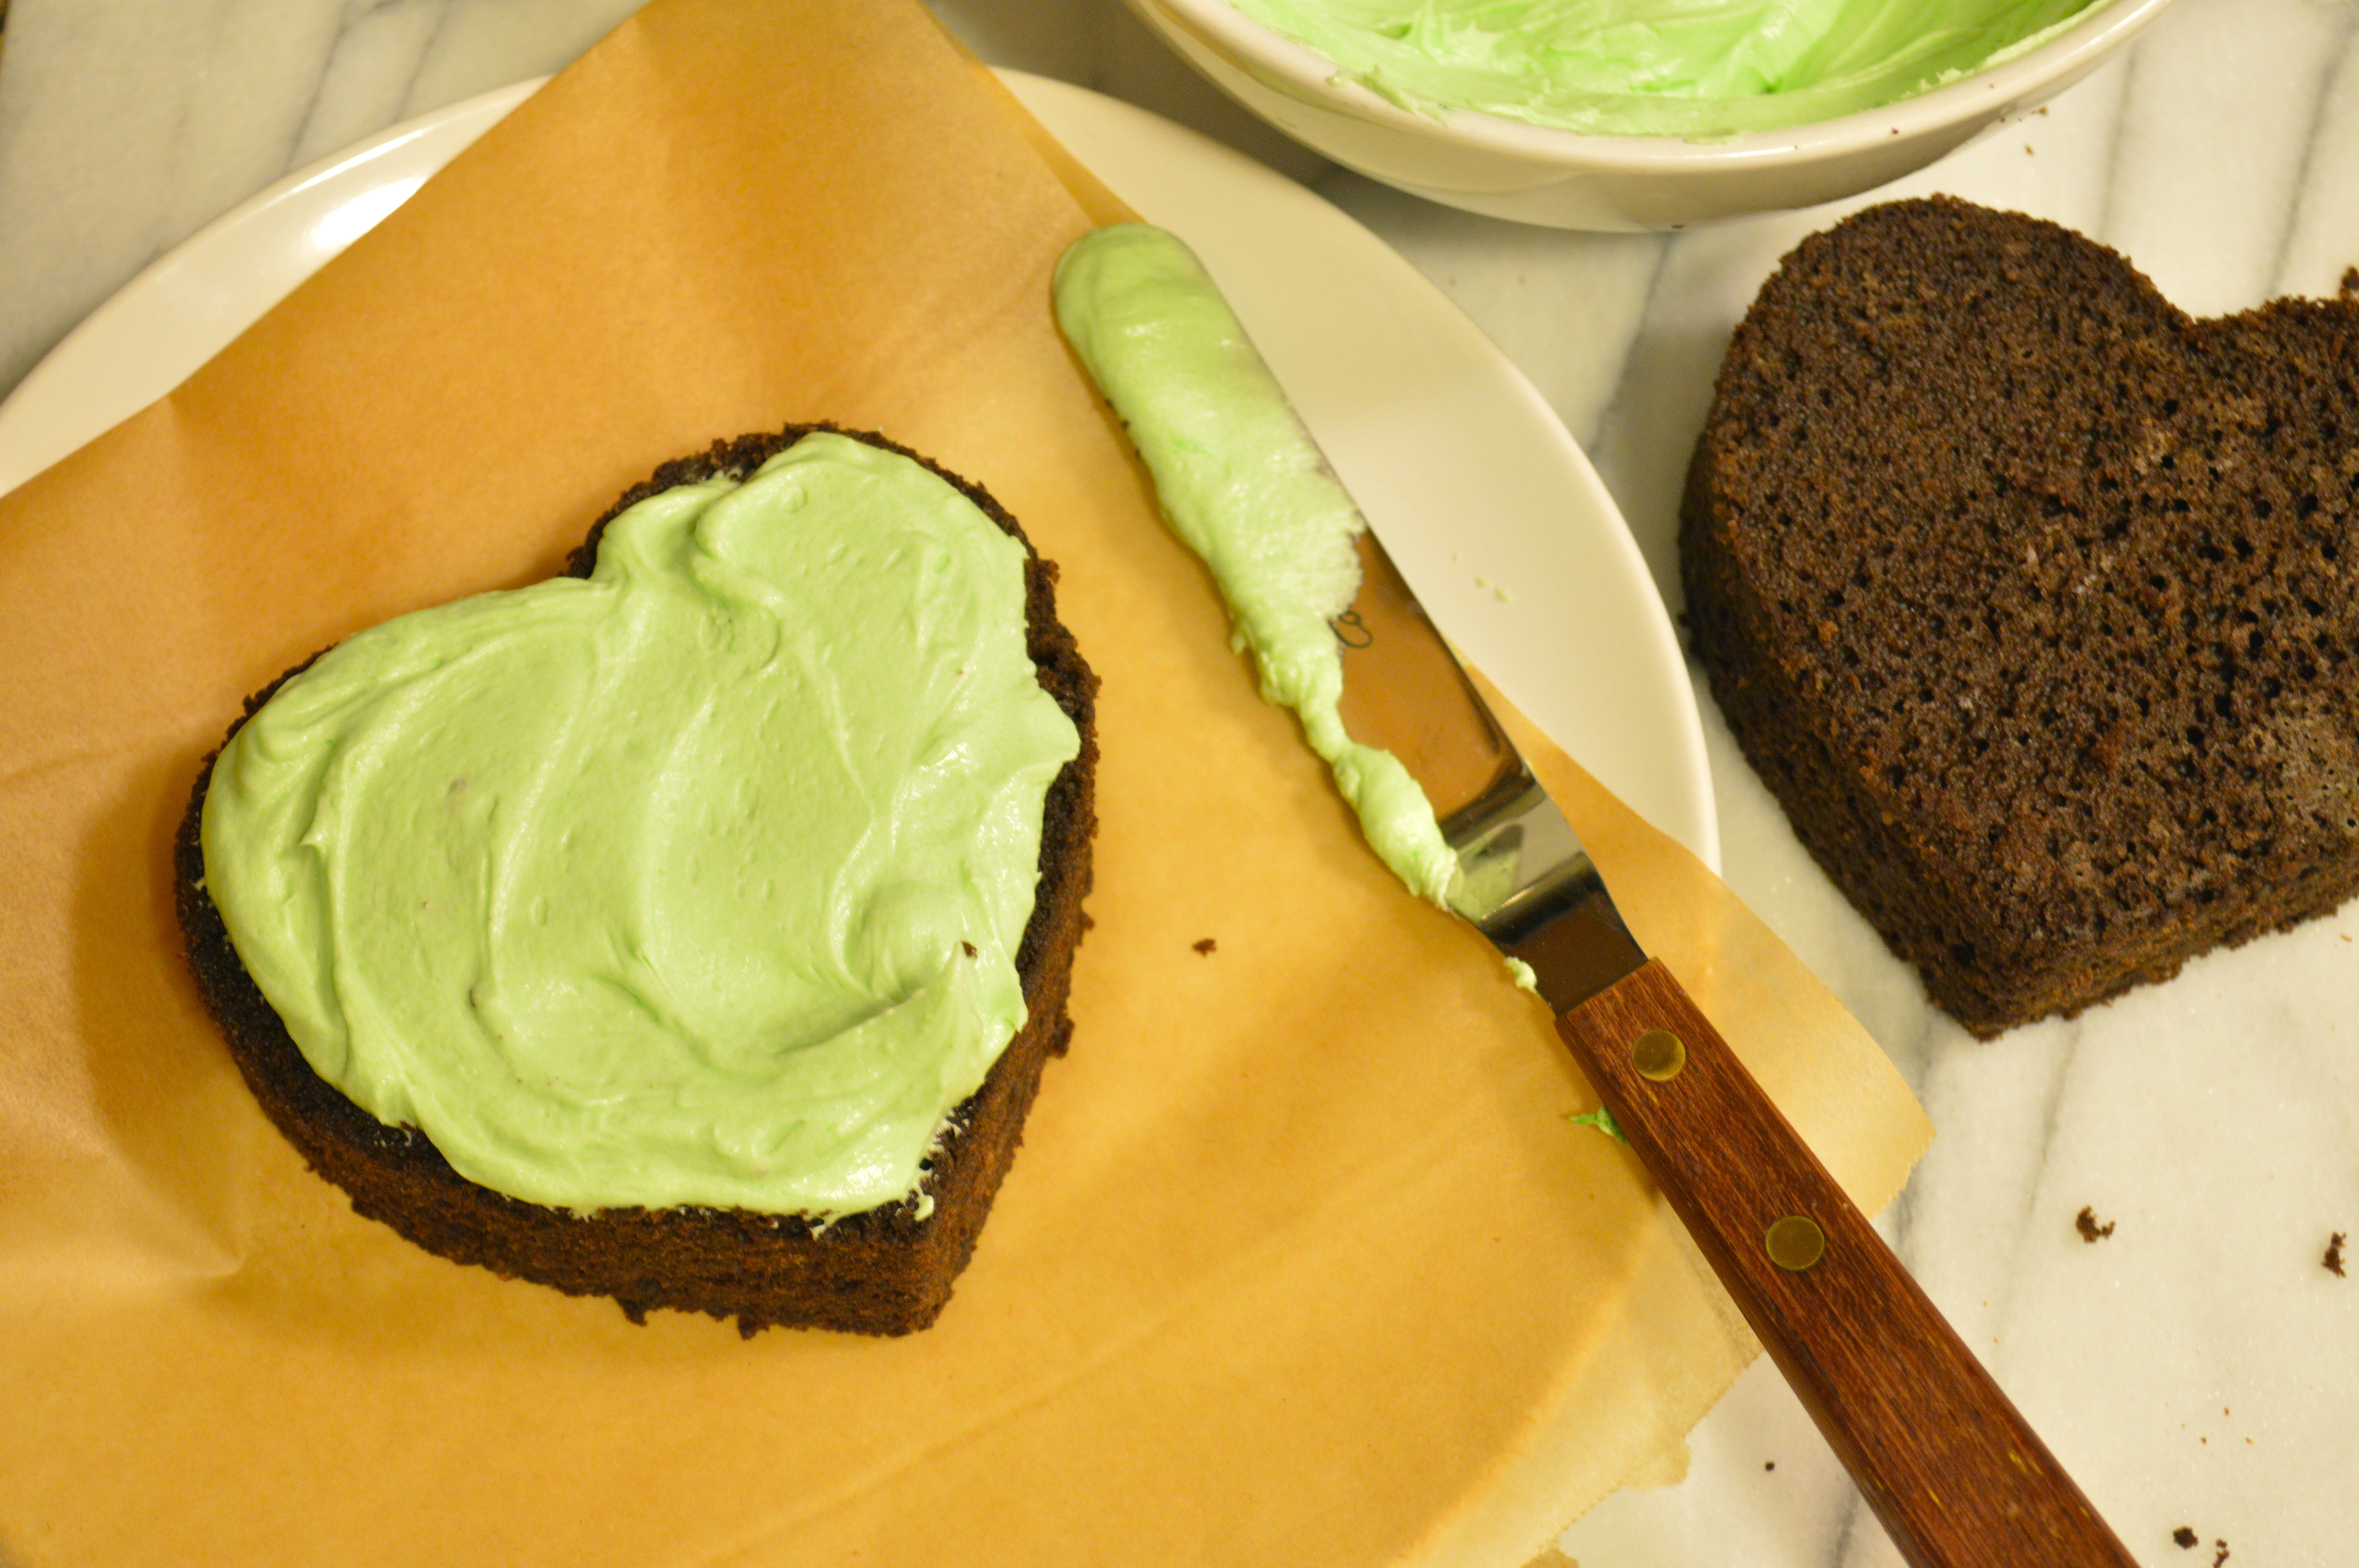
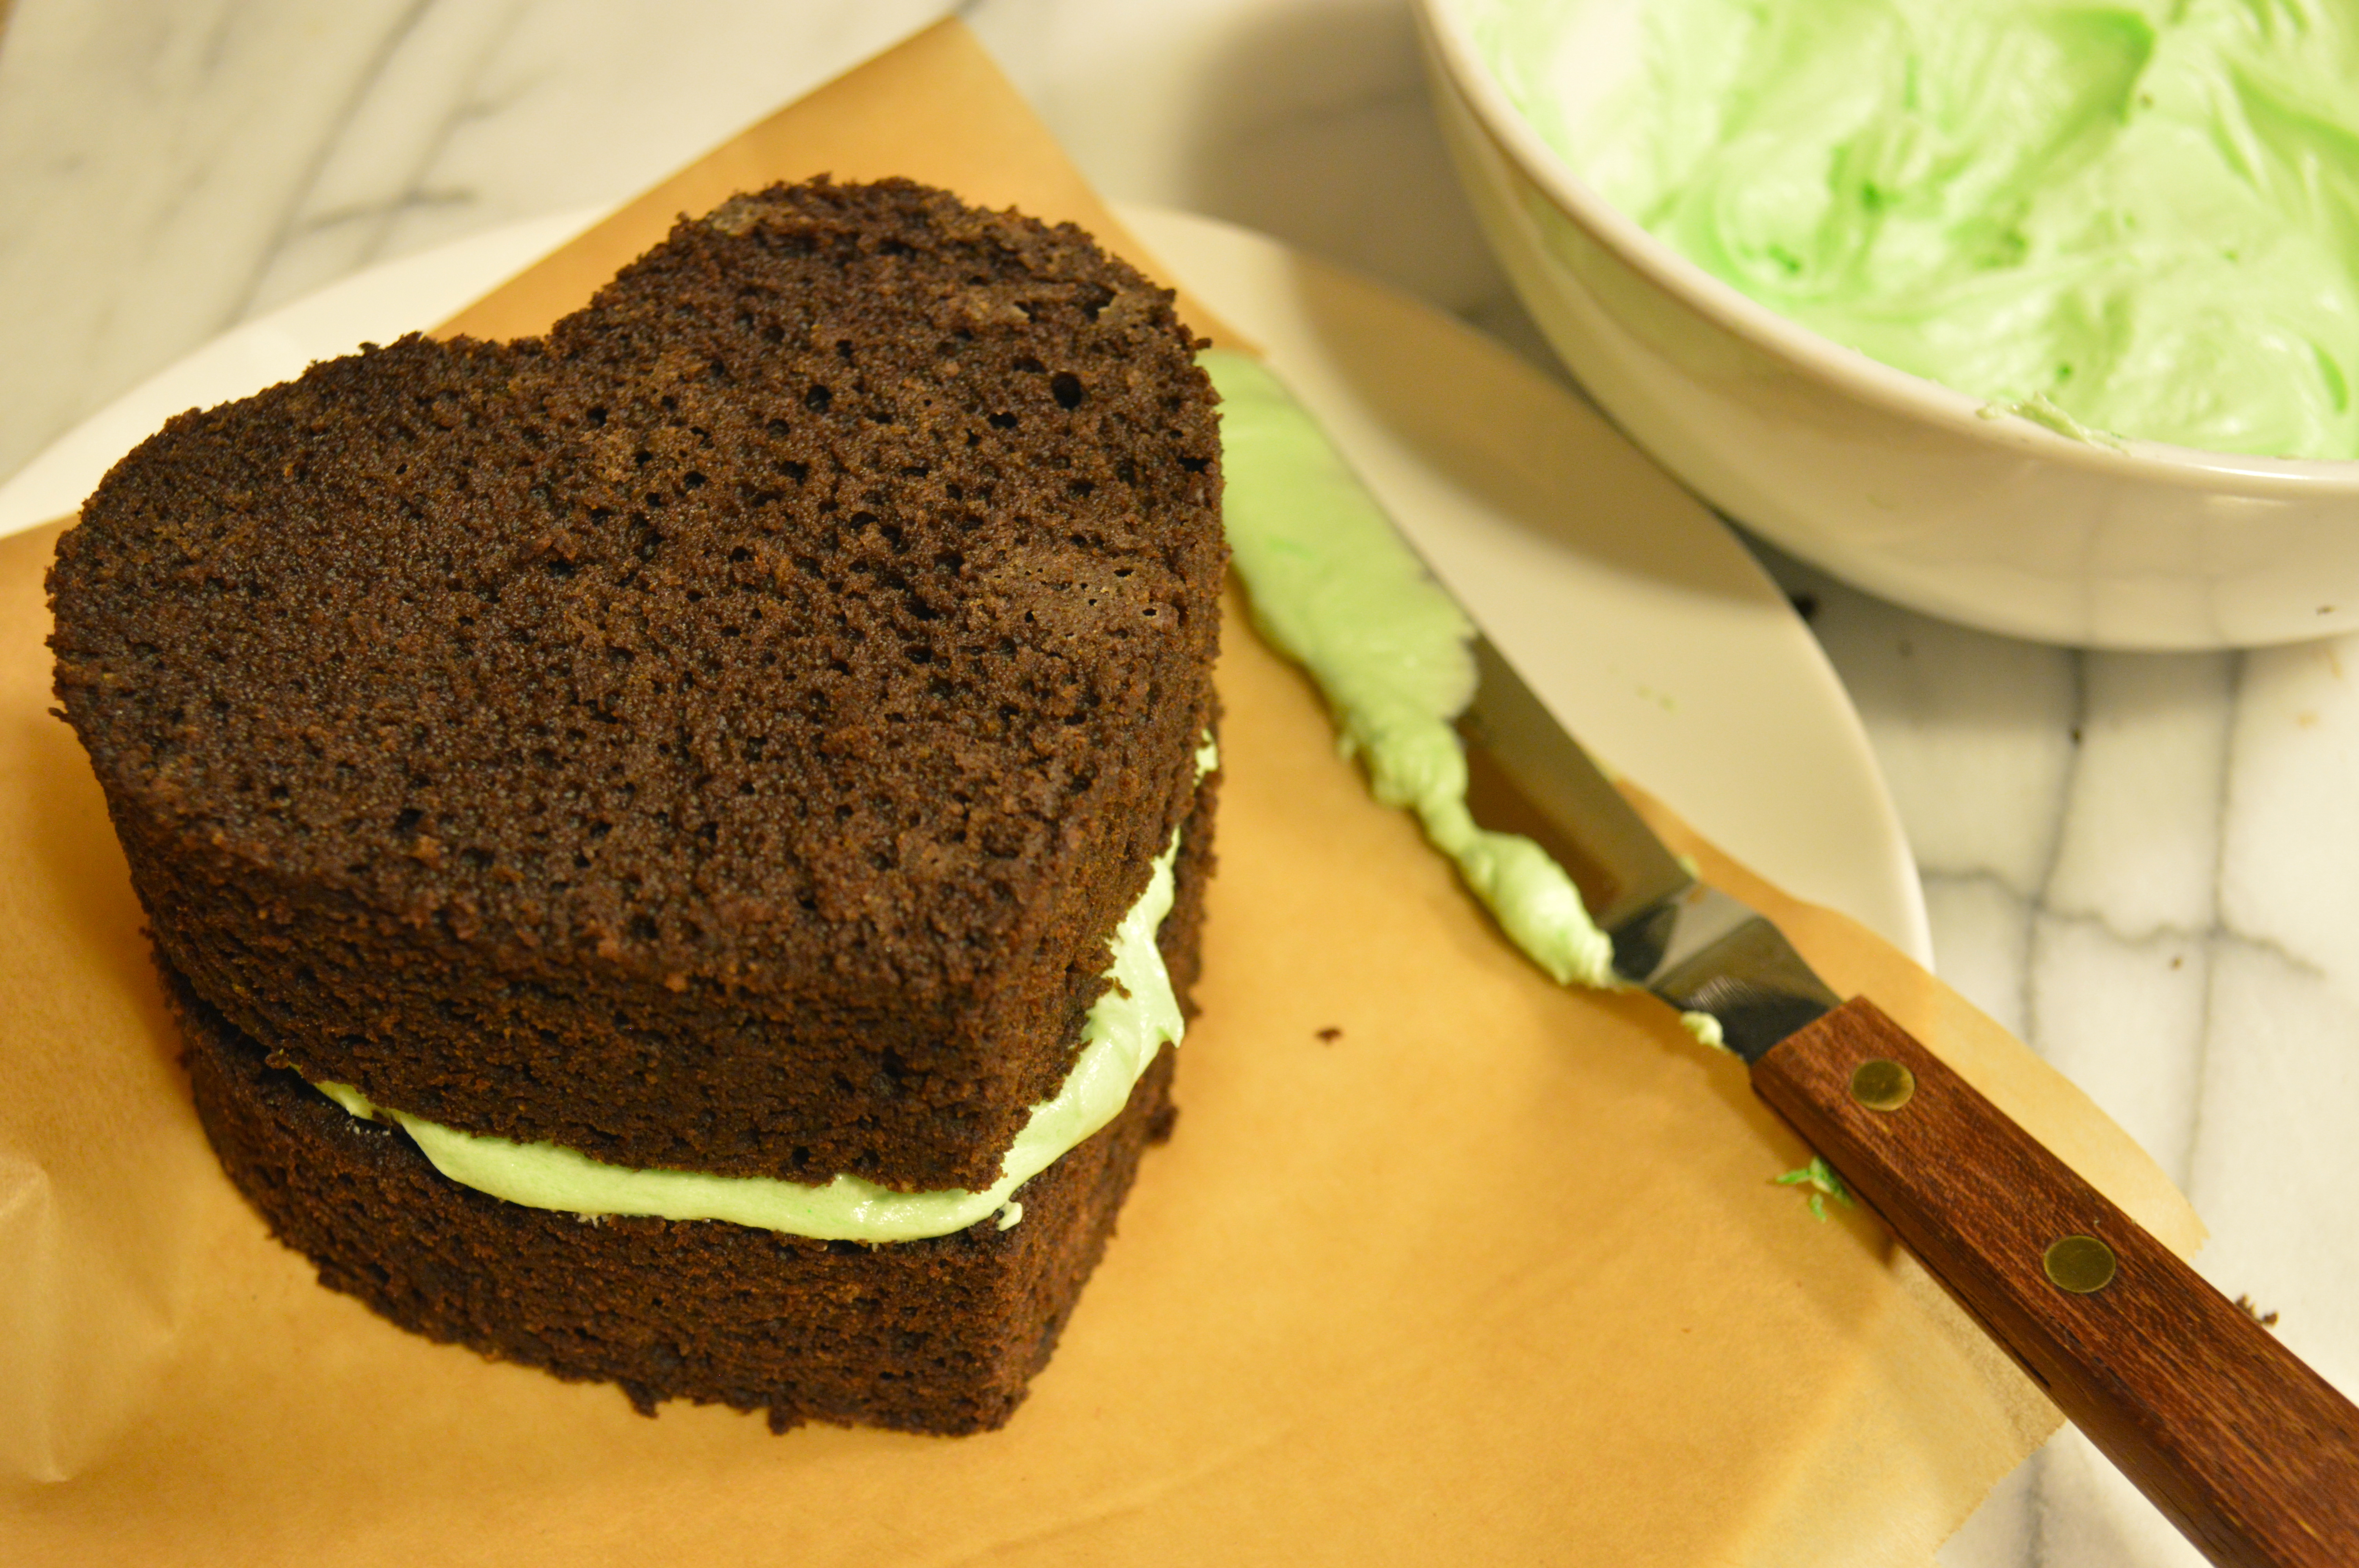
Wrap each 9″ cake layer in plastic wrap and refrigerate for at least an hour, or over night. Level each layer with a sharp bread knife or cake leveler, and using a 4″ heart-shaped cookie cutter, cut four hearts out of each layer, giving you 12 hearts. Keep the heart cut-outs cold in the refrigerator while you’re working on each cake.

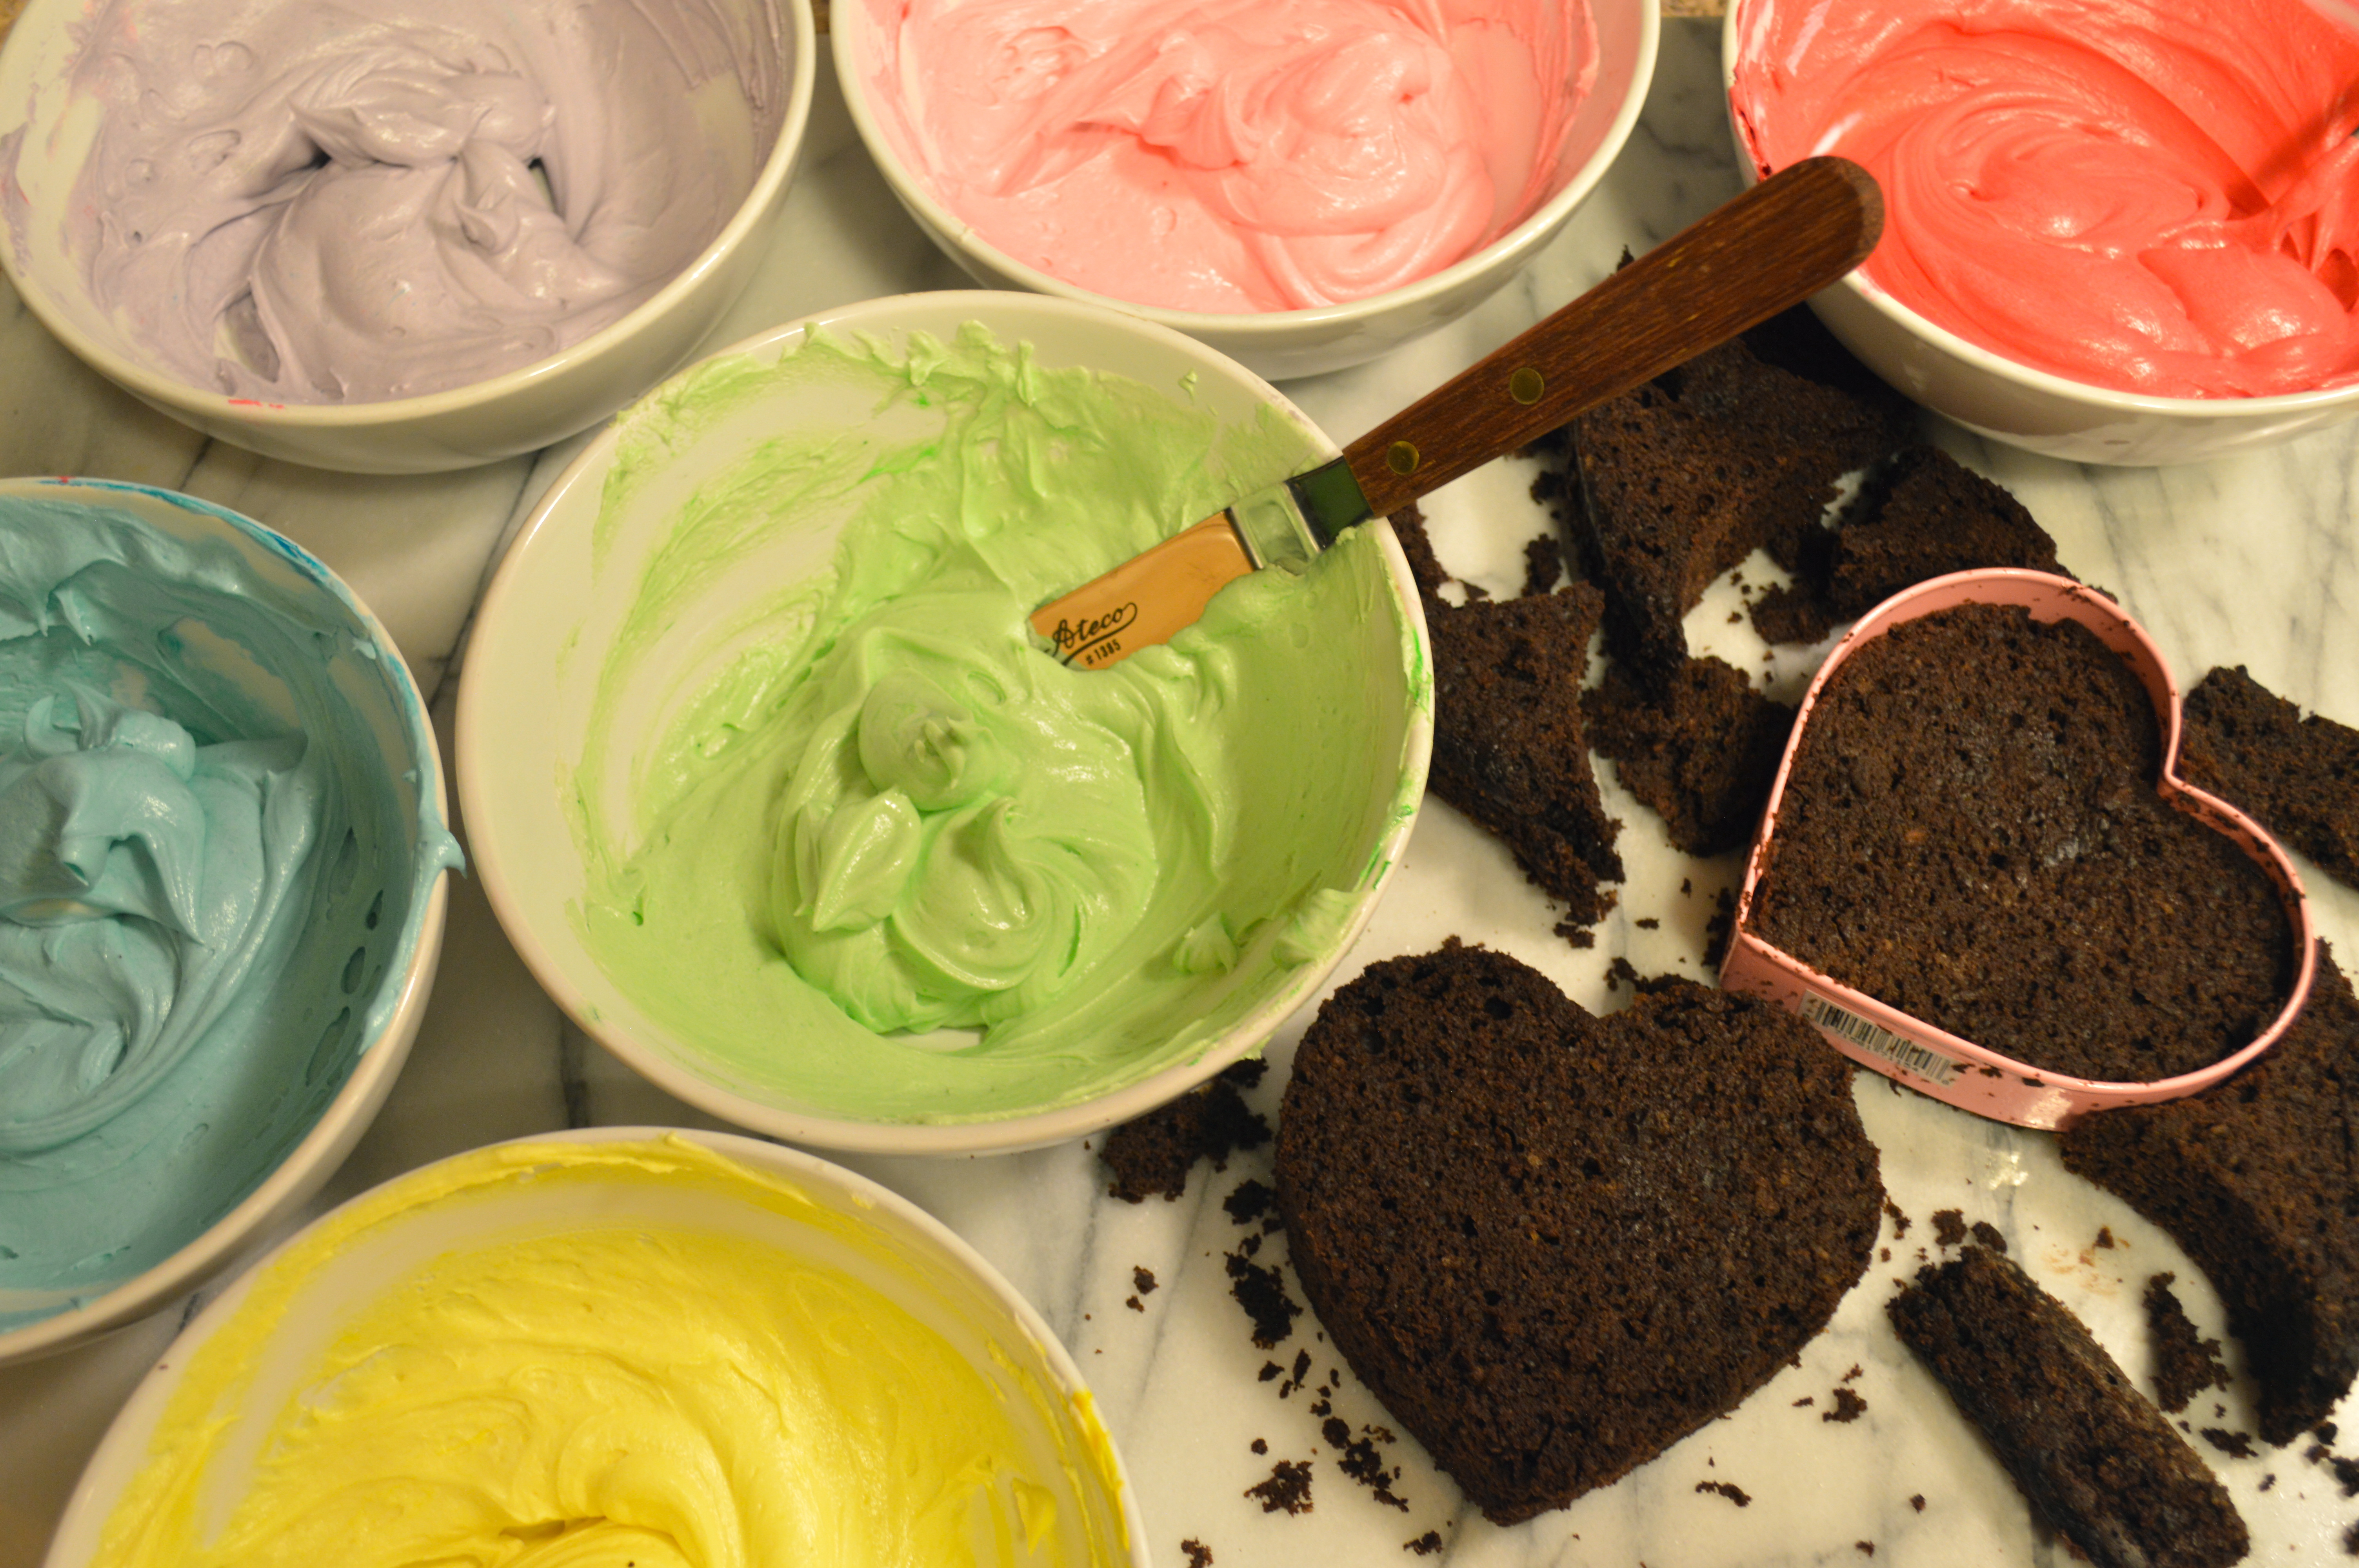
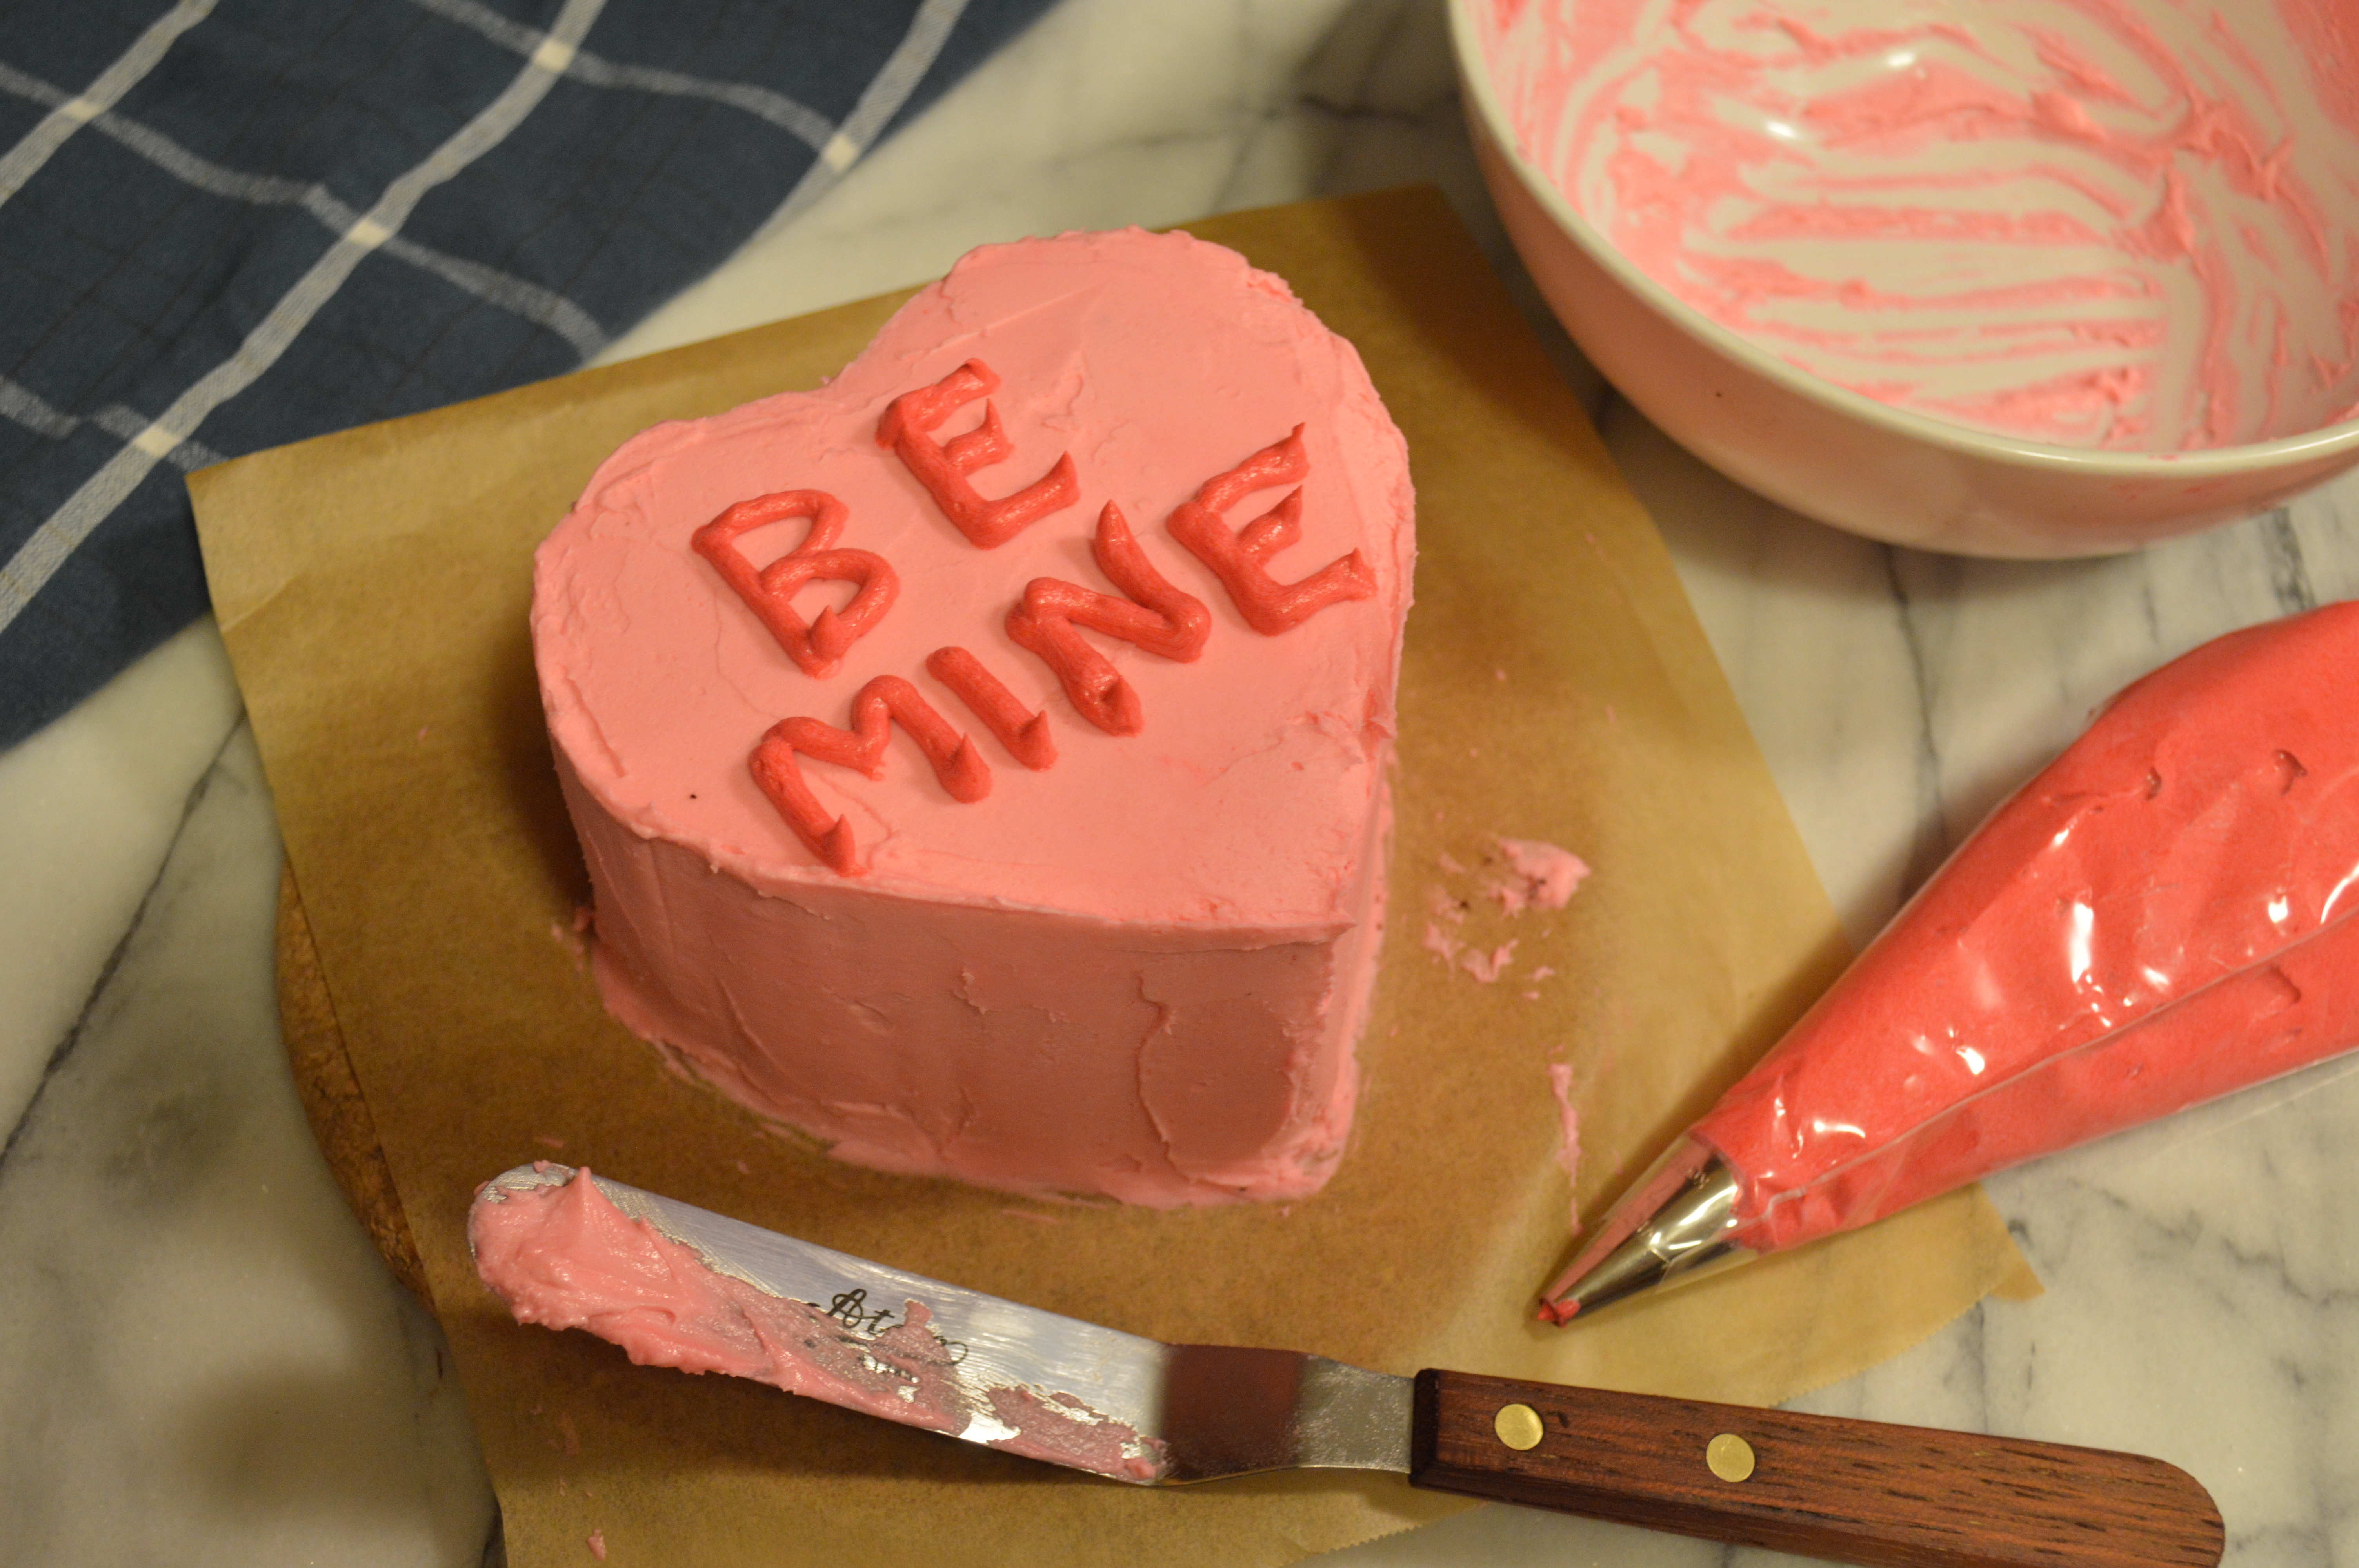
Divide your icing into 7 bowls. You’ll need about a cup of icing for each of the six cakes, and about 1/2 a cup of icing for the seventh bowl which you’ll use for the writing. Color the writing icing bright red, and then color each of the 6 remaining bowls whichever colors you prefer. Keep in mind that conversation hearts come in pastels so go easy on the food coloring. Fit a piping bag with a medium writing tip, I used a Wilton #7 , and fill the bag with your 1/2 cup of red icing. I used CK Products gel colors (available here) to avoid thinning out the icing. A little goes a long way, so use sparingly.

Working with one color at a time, spread about 1/4 cup of icing on the top of one heart cut-out and layer with another cut-out. Using another 1/4 cup of icing spread a thin layer to cover sides and top of the cake. This is called the crumb coat, and since these cakes are cut-outs they produce a lot of crumbs. This step is very important if you don’t want visible crumbs in your icing. Once your cake is completely crumb coated, refrigerate while you work on remaining five cakes. Repeat until all 6 cakes are crumb coated and each has refrigerated for a minimum of 30 minutes or more.

Working with the same color the cake was crumb coated with, ice each cake with remaining 1/2 cup of icing. Use a small offset icing spatula to get a nice smooth finished surface. Once iced, write your favorite conversation heart phrase on top with red icing. Repeat with remaining five cakes. Take pictures and show your friends, family, co-workers, first grade teachers, and college RAs.

cowboy cookies

You probably don’t know this, but there’s a big sports thing happening tomorrow. It’s called the Super Bowl.

cowboy cookies | Brooklyn Homemaker

I’m not at all a sports fan, especially when it comes to football, but I sure as hell am a food fan. The Super Bowl is an event that manages to combine food and sports in a big way. Actually, it’s the only sporting event I can think of that inspires people to go completely crazy when it comes to food. Some people put more effort into their Super Bowl spread than they do Thanksgiving dinner, and for the past week or more there have been recipes for chicken wings and dips and sandwiches and all kinds of indulgences coming at me from all angles. The 7 layer dip has turned into a 40 layer dip, and the cold cut tray has been replaced by the “snackadium.” If you’re not already in the know, a snackadium is a football-stadium-shaped buffet with sandwiches, chips, pretzels, chicken wings, et al as the stands, guacamole as the playing field, and other dips as the end zones. I mean, I love buffalo wings as much as the next guy, but the idea of spending that much time, money and effort on a sandwich platter is ludicrous to me. Especially since I don’t even care about watching the game. I’ll save that effort for Thanksgiving, thankyouverymuch.

cowboy cookies | Brooklyn Homemaker

The one and only time I’ve tried to get involved in the chaos was when I was really young. So young in fact, that I can’t even remember who was playing that year. I think it must have been 1994, the second year in a row that the Buffalo Bills played, and lost, against the Dallas Cowboys. Since I grew up in upstate New York, the Bills playing in the Super Bowl was a big deal. I remember though, that that that year I was rooting for the Cowboys because they had prettier cheerleaders. That’s how my gay little head worked back then (and still does). The one thing I definitely can remember about that year is that all the men in my family were really excited and I wanted to participate in any way that I could. So, instead of learning more about football and getting excited about the actual game, I decided to make a cake with my grandmother. In the spirit of the snackadium that wouldn’t even be invented for at least another decade, I wanted my cake to look like a football field. We colored the icing green, used a squeeze tube of white icing gel to make lines on the field, and used appropriately colored m&ms as the players.

cowboy cookies | Brooklyn Homemaker

I was beaming with pride when we piled into the truck, cake in hand, to go to dad’s friend’s house to watch the game. As you can probably imagine, my dad’s friends were not half as interested in my cake as they were the snoozefest happening on the TV. Try as I might, I couldn’t get into the game itself, and was bored to tears. There are too many weird rules in football for me to be able grasp what was supposed to be going on, and trying to make sense of this game made me sleepy. The evening wasn’t a total loss for me though, there was cake to eat after all.

cowboy cookies | Brooklyn Homemaker

Fast forward twenty years, and all the hype is getting to me again. Every day on TV we’re inundated with game day recipes and snackadium how-to’s. Even the food section of Pinterest is getting in on the action. So, even though I have no intention of watching the game (There are SVU and Sex in the City marathons on), I decided to give in and make something salty, indulgent, and decidedly unhealthy. Russell is out of his mind and doesn’t like chicken wings, so I figured I’d go for something sweet. I found exactly what I was looking for in one of my favorite cookbooks, Baked Explorations, written by the owners of Baked in Red Hook.

Cowboy cookies!

DSC_0095

These cookies have it all! Chocolate, sweet, salty, crunchy, chewy. They’re pretty darned amazing. These are basically gussied up oatmeal cookies, but they’re crazy good and chock full of all kinds of fun stuff. I understand that there are a lot of different versions of this cookie, some with peanut butter, some with coconut, some with pecans or walnuts. To be honest though, I’ve never had any of those versions. This is my first crack at a cowboy cookie, but I think this recipe is perfect without being over the top. These cookies have chocolate chunks, salty pretzels, crunchy roasted peanuts, and even coffee!!!  I added the peanuts to the recipe myself because I recently had some “cowboy bark” that encased chocolate cookies, peanuts and pretzels together in chocolate. Wowzah. So I thought they’d be welcome addition to this crazy mix.

cowboy cookies | Brooklyn Homemaker

I was kind of wondering exactly why they were called “cowboy cookies” and I tried to find the origins of this cookie, but wasn’t really able to find any history. The one thing I was able to turn up is the idea that they’re basically a cookie version of trail mix. Whatever the origins are, I’m glad that someone thought this cookie up.

If you’re making these cookies for a crowd, you can make them ahead, but be careful. You’re going to want to eat them all before anyone shows up. I’ve said this before, but using a cookie scoops makes baking cookies so much easier. It makes your cookies look more professional because they’ll be perfectly round and will all be the same size, and they’ll also bake more evenly. I used a #24 scoop for this recipe, which works out to be about 3 tablespoons of dough per cookie.

DSC_0031

Cowboy Cookies

  • Servings: makes about 32 cookies
  • Print
Adapted from Baked Explorations

1 3/4 cups all-purpose flour
1 tsp baking soda
1 tsp baking powder
1/2 tsp salt
2 cups rolled oats
14 tbsp (1 3/4 sticks) unsalted butter, softened
3/4 cup granulated sugar
1 cup dark brown sugar, firmly packed
1 large egg
1 large egg yolk
1 tsp vanilla extract
1 tsp instant Espresso powder
2 cups semi-sweet chocolate chips
1 cup roasted peanuts
1 cup salted pretzel sticks, broken into tiny pieces but not crushed into dust.

In a medium bowl, whisk together the flour, baking soda, baking powder, and salt. Add the oats and stir to combine.
In the bowl of a standing mixer fitted with the paddle attachment , beat the butter and sugars together until smooth and creamy. Add the egg and egg yolk, beating until the mixture looks light and fluffy. Scrape down the sides and the bottom of the bowl, add the vanilla, and beat for 5 seconds. Dissolve the espresso powder  in 1/4 cup hot water and add it to the bowl, mixing until combined.
Add half of the dry ingredients and mix for 15 seconds. Add the remaining dry ingredients and beat until just incorporated. Scrape down the sides and bottom of the bowl and fold in the chocolate chips, peanuts and pretzel pieces. Cover the bowl tightly and refrigerate the dough for at least 4 hours.

Preheat the oven to 350˚F. Line two baking sheets with parchment paper.
Use a cookie scoop to get 3 tablespoon-size balls (I used a #24 portion scoop) and place the dough balls onto the prepared baking sheet about 1 inch apart. Use the palm of your hand to press the dough down lightly; don’t smash the cookie-you just want to slightly flatten the ball.
Bake for 11 to 13 minutes, rotating the pans halfway through the baking time, until the edges of the cookies are golden brown or just start to darken.
Set the pan on a wire rack for 10 minutes to cool. Use a spatula to transfer the cookies on the rack to cool completely. They can be stored in an airtight container for up to 3 days.

Devil’s Food Cake with Heavenly Marshmallow Icing

I mentioned in my last post that we recently celebrated Russell’s birthday with a night out on the town with friends. We did dinner, drinks and merriment over the weekend, but his actual birthday was on a Monday so that night we stayed in and made dinner. Later in the evening we invited a friend over to help us eat some cake and drink champagne.

devil's food cake with heavenly marshmallow icing | Brooklyn Homemaker

Russell loves all things 80s. The tackier and more out-there, the better. He appreciates 80s music, pop culture, art, celebrities, you name it, so for his birthday I wanted to go all out and bring that era back for him. I went crazy with hot pink animal print wrapping paper, black satin ribbon, expensive champagne, and hot pink candles. Of course I had to have a cake to put those candles into, and there’s something about Devil’s Food Cake that just screams 80s to me. To be honest, I’m not even really sure why. I was 7 years old when the 80s came to a close, so I don’t really remember all that much of it, but the 80s were all about excess and Devils’s Food Cake is certainly a more-is-more kind of cake.

devil's food cake with heavenly marshmallow icing | Brooklyn Homemaker

This cake calls for natural cocoa instead of dutch process. Dutch process cocoa has a deep dark intensely chocolatey flavor, but natural cocoa has a subtler, warmer taste that reads more “cocoa” than chocolate. I don’t know if that makes sense, but try to think of the difference between a dark chocolate bar or flourless chocolate cake and the taste of hot cocoa or plain chocolate ice cream. So, while this type of cocoa is warmer and less in-your-face, a full cup and a half of it goes into the mix to make sure this cake is supremely chocolatey and really screams “Devil’s Food Cake!”

Much like the red velvet cake I made a while ago, this recipe also calls for cake flour to ensure a light and tender crumb, and uses buttermilk to help add moisture and give the cake a very subtle tanginess that really helps the cocoa feel richer and more complex. There’s also a bit of brown sugar that helps the cake keep moist and adds just a bit of dark caramel-y depth. Yum.

devil's food cake with heavenly marshmallow icing | Brooklyn Homemaker

I decided to pair this cake with a fluffy marshmallow icing, which was not only delicious, but also absolutely gorgeous. This beautiful tall cake covered in white marshmallowy roses was a real stunner. It was just as impressive when sliced with the perfect white icing in sharp contrast against the dark interior of the cake.  The recipe provided below will make enough icing to fill the cake and cover it with a generous layer of icing, but if you want to decorate it in the rosette design I used, you’ll need to multiply the recipe by 1.5.  I used an Ateco 824 tip, but any large open star tip will work. If you are using a stiffer icing, you could also use a closed star tip.

I am absolutely no pro when it comes to working with piping bags and tips, but this design was quite easy to do. I have shaky hands so small delicate piping is difficult for me, but this design is little more than large swirls repeated over and over. After filling and crumb coating the cake, I basically started with one swirl in the center of the top of the cake, with two rows of swirls wrapping around the one in the center. Any small spaces that weren’t covered by the swirls were filled by a dab with the piping bag. The top of the cake is easier to do than the sides, so I think starting there lets you get the hang of it before you try to do the design vertically. On the sides I did three rows, starting at the top and working my way down. Having a lazy susan or turntable really makes this job a gazillion times easier.

devil's food cake with heavenly marshmallow icing | Brooklyn Homemaker

I’ve already said this, but this cake has such a great chocolatey cocoa flavor. It’s spongy and light and airy and moist and amazing. I’m gushing. Traditionally Devil’s Food Cake is paired with a rich chocolate buttercream, but I really think that the cake is already so chocolatey that chocolate icing would be overkill. This marshmallow icing is perfectly light and fluffy and not at all heavy and it pairs perfectly with this cake. Instead of competing with the cake or weighing it down and making it too rich, it lets the cake take center stage. Since it’s made with little more than egg whites and sugar, the icing is also fat-free, so you know, bonus.

I will admit that the icing is a bit fussy to make but I think it is totally worth it. I wouldn’t recommend trying this without a stand mixer, I think a hand-held mixer would make a mess. I also think a candy thermometer would help a lot, but I actually didn’t use one.
If you don’t want all the fuss of the marshmallow icing, but don’t want chocolate on chocolate overkill, I’d suggest a nice traditional vanilla buttercream.

Now, go butter those cake pans and preheat that oven!

devil's food cake with heavenly marshmallow icing | Brooklyn Homemaker

Devil's Food Cake with Heavenly Marshmallow Icing

Devil’s Food Cake
makes three 8-inch layers

butter and flour for pans
1 1/2 cups unsweetened natural cocoa powder
1 1/2 cups hot water
3 1/4 cups cake flour
1 1/4 teaspoons coarse salt
1 teaspoon baking powder
1 teaspoon baking soda
2 cups peanut oil or vegetable oil
1 cup granulated sugar
1 1/4 cup packed brown sugar
4 large eggs
4 teaspoons vanilla extract
1 cup buttermilk

Preheat oven to 350 degrees. Butter three 8 inch round cake pans, line bottoms with parchment paper, butter paper, and dust pans with flour. Whisk together cocoa powder and hot water until smooth.

Sift together flour, salt, baking powder, and baking soda; set aside. Beat oil and sugars together on medium-low speed until combined.
Add eggs, one at a time, beating after each addition. Beat in vanilla and cocoa mixture. Reduce speed to low. Add flour mixture in two batches, alternating with buttermilk and beginning and ending with flour. Beat until just combined.
Divide batter between pans, and bake until a cake tester inserted into centers comes out clean, 40 to 45 minutes. Transfer pans to a wire rack to cool for 15 minutes. Invert cakes onto rack, peel off parchment, and let cool completely.

Heavenly Marshmallow Icing:
recipe from Cake Duchess

1 cup of granulated sugar (not confectioners sugar)
4 egg whites, room temperature
1/3 cup of water
1/2 teaspoon cream of tartar
1 teaspoon vanilla

In a medium saucepan, bring the 1/3 cup of water, sugar, cream of tartar to a boil. Do not stir the sugar mixture as it will cause the sugar to crystallize. Boil until you have thick clear bubbles ( should only take about 5 minutes and reads a temperature of 245 F). Be very careful not to let the mixture caramelize.
Meanwhile, in the bowl of a stand mixer, beat the egg whites to soft peaks. With the mixer on medium high, slowly and very carefully add the sugar syrup in a thin steady stream, beating for a total of 7 minutes.  Be careful not to burn yourself with the hot sugar syrup, and be careful not to add too much at once. At the last minute, mix in the vanilla.
To assemble the cake, level the layers with a sharp serrated knife or cake leveler. Spread a layer of icing between each layer of cake, and then spread a thin layer of icing on top and sides of cake to seal in crumbs. Finish by spreading (or piping) another layer of icing on top and sides and decorate as desired. For the rosette design I made on this cake I multiplied the icing recipe by 1.5, but 1 recipe is plenty for icing regularly.

Red Velvet Cake with Ermine Icing

Okay so here’s the thing about red velvet… I don’t get it.

I used to work at a cupcake shop for a while, and our red velvet cupcakes were probably the best selling item on the menu. People went nuts for those cupcakes. Every day just as many red velvet cupcakes were baked as were all the other flavors combined, and on most days the red velvets were sold out before anything else. I thought most of the cupcakes there were phenomenal, but the red velvet was probably my least favorite. It was kind of bland, with no distinct flavor beside the cream cheese icing swirled on top. Not enough vanilla to be vanilla cake, so little cocoa flavor that I’m not convinced any was actually used. There were plenty of tastier and more interesting flavors to choose from, and I could never figure out why people always went for the red velvets. Are people really just into red velvet because it’s red? There has to be more to it than just the color right?

red velvet cake with ermine icing | Brooklyn Homemaker

Curiosity got the best of me and I started doing some digging on the internet. It turns out that the history of red velvet, the roots of it’s popularity and the original recipe, are pretty tough to nail down. There are almost as many stories about the origins of red velvet as there are recipes for “real” red velvet. “Real” red velvet means very different things to different people.

I’d always heard that red velvet cake originally turned “red” because of a chemical reaction between acid in buttermilk or vinegar and natural cocoa powder. This wouldn’t actually turn a cake RED, but it would, supposedly, produce a very slight reddish hue in a cocoa cake. The same is supposed to be true of the origins of devil’s food cake, but with a lot more cocoa. This sounded believable-ish to me, so in my mind the real “original” red velvet cake was supposed to be deep reddish brown, with a slight cocoa flavor, and of course, topped with cream cheese icing.

red velvet cake with ermine icing | Brooklyn Homemaker

Once I started digging though, I started running into some problems. First there were the various origin stories. Some people think the cake was invented in Canada by the wife of a wealthy department store president, others convinced that this quintessential southern cake was invented in the south, and others still are certain that it was invented at the Waldorf Astoria Hotel in New York City.

Then there were the recipes. Everyone believes that their red velvet recipe is the one true way it should be done. Google “real red velvet” and you’re going to come up with some wildly varied recipes. There are also a lot of “rules” about red velvet out there, many of them conflicting with the rules of the next guy. Most of the rules dictate something about the color, flavor, or icing of this iconic cake.

red velvet cake with ermine icing | Brooklyn Homemaker

According to the internets, the color of red velvet should always come from artificial color. If you don’t pour in the red food color, it’s not red velvet. Also, red velvet cake should never contain artificial color. If you’re using red food color, you’re doing it wrong. The color should come from cocoa powder and buttermilk, or vinegar, or both. The truth is that the red in red velvet cake needs a boost, but not from food color. Along with the cocoa and acid reaction, an additional boost of red should come from red wine. Actually it should come from beet juice.

Red velvet cake should have a very specific flavor profile that should not be messed with. It seems that red velvet cake is supposed to be a mildly chocolatey cocoa cake, since the red color comes mostly from natural cocoa’s reaction with acidic ingredients. Also, red velvet cake should have only a very slight, almost indistinguishable, cocoa flavor, since the color of this cake should be the star and too much cocoa would muddy the color. At the same time, recipes for red velvet cake should never contain any cocoa powder. Red velvet cake is a bright red buttermilk cake and cocoa would ruin both the color and flavor of this beloved cake.

The one thing I thought everyone agreed on was the icing. Everyone knows that red velvet cake calls for tangy cream cheese icing, always. Well, yeah. It turns out that some people think that the OG icing for red velvet was ermine icing, also known as butter roux icing, or boiled milk icing.

red velvet cake with ermine icing | Brooklyn Homemaker

Once I started weeding through the conflicting stories and varied rules and recipes, I started to uncover some facts. It seems that the name most likely evolved as the public’s tastes in sweets were changing at the turn of the last century. At first the name was mostly symbolic and never really had anything to do with the color of the cake.

In the late 1800s what we know as brown sugar used to be commonly known as red sugar. Any cake that used finely ground cake flour and had a fine crumb was referred to as a “Velvet” cake. So, at that time any cake with “red sugar” and fine cake flour could be referred to as a red velvet, but no one was really going crazy for red velvet yet, and there is little evidence of any printed recipes for anything like what we have today. At that time natural cocoa was the most commonly available cocoa on the market. Unlike today’s more common dutch process cocoa, the PH of natural cocoa does cause a chemical reaction with acid causing a very slight reddish hue. Devil’s food cake made with natural cocoa would have a slight reddish hue to the deep dark chocolate cake, and that is most likely the origin of that name. Red velvet cake is devil’s food’s less chocolatey cousin, but again, the cake was never really RED. At the time, these cocoa cakes were often referred to as “mahogany cakes”.

It wasn’t until the depression that red velvet cake turned truly red. Food additive and extract companies were struggling at the time because most Americans were cutting back on such luxury items. As a way to boost sales, the Adams Extract Company started marketing their food coloring and flavorings by giving out recipes for a truly red red velvet cake, complete with color photo, in grocery stores. That was when red velvet started taking off, especially in the south. The popularity waxed and waned for generations, and then there was the groom’s cake in Steel Magnolias. Boom. Everyone knew and wanted red velvet. And then a decade or so later, the cupcakes shops started popping up and pushing the red velvet on us.

red velvet cake with ermine icing | Brooklyn Homemaker

I’m no historian, and I don’t claim to know that any of what I’ve read is the absolute truth, but this seems like the most likely story. Unfortunately I haven’t been able to dig up the depression era recipe that made red velvet the popular cake that it is today. So, the “real” recipe still seems to be something of a mystery, but based on the history I think that natural cocoa is as important to the recipe as the red food color.

red velvet cake with ermine icing | Brooklyn Homemaker

Another point of contention is the icing. I’d always heard, and believed, that cream cheese was king when it came to red velvet cakes, and I was shocked to find out that this wasn’t always so. Cream cheese icing wasn’t really common with red velvet until the mid-twentieth century. Before that the traditional topping for red velvet was a creamy and light icing made by cooking milk and flour together, and whipping into creamed sugar and butter. It can be called Butter Roux frosting or Ermine frosting. In the south this icing was very popular because it’s whipped texture is similar to whipped cream, but it’s much more heat stable and keeps better.

red velvet cake with ermine icing | Brooklyn Homemaker

When I set out to bake my first red velvet cake, I knew I had plenty of recipes to choose from but had to decide which one would produce the cake that I wanted to end up with. I kept going back to natural cocoa and buttermilk but decided that adding red color was just fine with me. So, I checked in with my favorite food blog, Smitten Kitchen, and guess what, she had a recipe that sounded like exactly what I was looking for. I also decided I wanted to ditch the cream cheese icing and go back to the traditional ermine icing.

This recipe calls for a LOT of red food color. At first I thought it might be a typo. It’s not. Since there is more cocoa in this recipe than most, a lot of food color is needed to bring the red forward over the brown. Well. This cake is red alright. The batter before baking is literally beet red. It gets a bit darker in the oven, but even still, the finished cake is a deep dark RED. Pretty much the color you’d see if you sliced into an armadillo. Just sayin’.

red velvet cake with ermine icing | Brooklyn Homemaker

As a former red velvet naysayer, I have to admit that this cake is pretty amazing. The texture is perfect, super moist, with a very delicate light & fluffy crumb from the cake flour. You can definitely taste the cocoa, even though it doesn’t really scream chocolate. It also has a really pleasant delicate tang from the buttermilk and vinegar, which I think would be completely lost if I’d gone with the modern traditional cream cheese icing instead of the ermine. I totally love this icing, btw. It’s much easier to make than a meringue buttercream, but has a very similar stability, mouth feel and texture. It is easy to work with, frosts smoothly and tastes whipped, creamy, light and just sweet enough.

To be perfectly honest, if I’m going to make a cocoa cake I’d like even more chocolate flavor, and even though it’s kind of fun, the amount of food color that goes into this recipe makes me ever-so-slightly uncomfortable. If I’m baking a cake for me, I think I’d rather go for a devil’s food cake, which I think would be delicious (and beautiful) with this same icing. But for special occasions, or for people who love red velvet, this cake is a force to be reckoned with. Perfectly moist & fluffy, with just enough cocoa and buttermilk, and red red RED!

red velvet cake with ermine icing | Brooklyn Homemaker

Red Velvet Cake

  • Servings: makes one 3 layer 8 inch cake, feeds 12-16ish
  • Print
adapted from Smitten Kitchen

2 tablespoons butter
3 1/2 cups cake flour
1/2 cup unsweetened natural cocoa (not Dutch process)
1 1/2 teaspoons salt
2 cups peanut or canola oil
2 1/4 cups granulated sugar
3 large eggs
6 tablespoons (3 ounces) red food coloring (or 1 teaspoon red gel food coloring dissolved in 6 tablespoons of water)
1 1/2 teaspoons vanilla
1 1/4 cup buttermilk
2 teaspoons baking soda
1 tablespoon white vinegar

Preheat oven to 350 degrees. Place teaspoon of butter in each of 3 round 8-inch layer cake pans and place pans in oven for a few minutes until butter melts. Remove pans from oven, brush interior bottom and sides of each with butter and line bottoms with parchment.

Whisk cake flour, cocoa and salt in a bowl.

Place oil and sugar in bowl of an electric mixer and beat at medium speed until well-blended. Beat in eggs one at a time. With machine on low, very slowly add red food coloring, being careful it doesn’t splash. Add vanilla. Add flour mixture alternately with buttermilk in two batches. Scrape down bowl and beat just long enough to combine.

Place baking soda in a small dish, stir in vinegar and add to batter with machine running. Beat for 10 seconds.

Divide batter among pans, place in oven and bake until a cake tester comes out clean, 40 to 45 minutes. Let cool in pans 20 minutes. Then remove from pans, flip layers over and peel off parchment. Cool completely, and level layers with a cake leveler or sharp bread knife. Fill and crumb coat with ermine icing, and place in refrigerator for 30 minutes or more. Then ice and decorate as desired with remaining icing.

Ermine Icing
adapted from Tasty Kitchen 

7  tablespoons flour
1 1/2 cups milk
2  teaspoons vanilla
1 1/2 cup softened unsalted butter
1 1/2 cup Granulated Sugar

In a small saucepan, whisk flour into milk and heat, stirring constantly, until it thickens. You want it to be very thick, almost like brownie batter. Remove from heat and let it cool to room temperature. It must be completely cool before you use it in the next step. Stir in vanilla.

While the mixture is cooling, cream the butter and sugar together until light and fluffy. You don’t want any sugar graininess left. Then add the completely cooled milk/flour/vanilla mixture and beat the living daylights out of it. If it looks separated, you haven’t beaten it enough! Beat it until it all combines and resembles whipped cream.