seasonal

apple cider boulevardier

Do you guys need a drink?

Cuz I need a drink.

apple cider boulevardier | Brooklyn Homemaker

This week, and really this entire election cycle, has been a complete emotional whirlwind and I think we’re probably all ready for a nice stiff cocktail right about now.

And boy oh boy have I got a cocktail for you today.

apple cider boulevardier | Brooklyn Homemaker

A few months ago I discovered the “Boulevardier”, and I fell head over heels in love. (Don’t tell Russell).
If you’ve not heard of a Boulevardier, it’s basically just like a Negroni, but with whiskey instead of gin.

If it sounds like I’m speaking a foreign tongue and you have no idea what I’m saying, a Negroni is a classic cocktail, which first appeared in print in 1919, consisting of gin, campari, and sweet vermouth. They’re strong, herbaceous, floral, and rather bitter in a really refreshing way. The bitterness of Campari can be a bit of an acquired taste, but if you are a fan of apéritifs or digestifs you’d probably really enjoy it. Orson Welles said of the Negroni, “The bitters are excellent for your liver, the gin is bad for you. They balance each other.”
Smart man. It’s all about balance.

The thing is, I personally find the combination of gin and Campari a bit overpowering, so when I first tasted a Boulevardier, which substitutes bourbon for the gin, I was ecstatic and have been a huge fan ever since. It’s a strong cocktail, but the bitterness encourages sipping rather than chugging, which is never a bad thing!

apple cider boulevardier | Brooklyn Homemaker

We recently hosted the official opening part for Maxwell’s, and when I was planning the cocktail menu I decided to share my new love for the Boulevardier with all of our friends and neighbors. Like I said though, this is a pretty strong cocktail, and while we wanted everyone to have a nice time, we weren’t really trying to get all our friends wasted in the shop! Also, knowing that Campari can sometimes be an acquired taste, I was looking for a way to sweeten it up a little and mellow out the bitterness to make the cocktail appeal to a larger audience.

Since I was also making one of my favorite cakes for the party, and I was already buying fresh apple cider anyway, I thought I’d see if a splash of cider would help cut the bitterness, sweeten things up, and water things down.
Worked like a charm!
The cider mellows out the intensity of the Campari and makes this a delicious, autumnal, beautiful cocktail that everyone absolutely loved! I also decided to garnish the drink with some very thinly sliced apple rather than the traditional orange peel. So good!

apple cider boulevardier | Brooklyn Homemaker

I know that many people outside of the US are not very familiar with apple cider as we know it here in the northeast, so to explain, it’s basically nothing more than freshly pressed, unfiltered apple juice. If you can’t find fresh apple cider where you live, you could definitely substitute apple juice in a pinch. If you can get fresh cider though, I really think it has a superior flavor that’s a bit less cloying with a more intense apple-y richness.

apple cider boulevardier | Brooklyn Homemaker

Now, if this cocktail sounds good to you, but the idea of peeling yourself off the couch and putting pants on doesn’t, I’d like to offer you another way to put the ingredients for this drink into your hands.
Enter Drizly.com.
Drizly is similar to the food delivery websites that are so popular in larger cities right now, (Russell and I would probably starve to death without Seamless) but instead of food, Drizly delivers alcohol!

You have to be 21 (obvi), and you have to live within one of their delivery windows, but if both those things are true for you, the sky’s the limit! You can have any and all of your favorite hooch delivered right to your front door with the click of a button!
I mean, talk about a dream come true!

You can get the bourbon, Campari, and sweet vermouth you’ll need to make your very own boulevardier, and in some areas, you can even have the cider delivered! (I had to go to the store for that though, what a buzz kill!)

apple cider boulevardier | Brooklyn Homemaker

So, what are you waiting for?
You really have no excuse not to make yourself a fancy ass apple cider Boulevardier. It’s the perfect grown up cocktail for fall, and did I mention that Thanksgiving is only a few weeks away?

This drink is strong but not too strong, sweet but not too sweet, bitter but not too bitter, with a wonderfully warm, herbaceous, bright, and fruity flavor.

It doesn’t get much better than that, unless of course you have all the booze delivered to your front door without changing out of your PJs. Which you can.

apple cider boulevardier | Brooklyn Homemaker

Apple Cider Boulevardier

  • Servings: 1 cocktail
  • Print
1 1/2 oz. bourbon
3/4 oz. Campari
3/4 oz. Sweet Vermouth
1 1/2 oz. fresh apple cider
Ice
Thin apple slices for garnish

Place bourbon, campari, sweet vermouth, and apple cider into a cocktail shaker with plenty of ice. Shake just until well mixed and cold. Strain into a rocks glass, and serve with more ice.

Garnish with a slice or two of fresh, thinly sliced apple.


dark chocolate & oreo mini skull cakes

When I was a kid, Halloween was my absolute favorite holiday.

dark chocolate & oreo mini skull cakes | Brooklyn Homemaker

I mean, I’ve always loved Thanksgiving too, for the food of course, but as a young kid Halloween was the freakin’ best. Turkey and pumpkin pie are great and all but costumes and candy, and running around at night like a little lunatic with fake vampire teeth? Grandma’s cornbread dressing couldn’t hold a candle…

I’ve had countless costumes over the years, but I’ll never forget an especially uncomfortable year dressed as Frankenstein with tons of sticky green makeup and itchy stick-on eyebrows and neck bolts. After that, the simpler and more elegant Dracula was definitely my go to.
Each year I’d get a new costume complete with fangs, cape, and gold medallion, and as a young gay boy I already had all the crisp white button downs and black dress pants that were required but not included with the costume.  (No jeans and T-shirt for this little sissy boy!)
I think it really was the dressed up, fancy man aspect of Dracula that appealed to me most year after year, and it wasn’t until I found my grandma’s old wig in her bathroom closet that the appeal started to wear off…

dark chocolate & oreo mini skull cakes | Brooklyn Homemaker

These days I usually spend most of the month of October thinking up all sorts of witty, hysterical costumes that I could wear, but never do. The last time I dressed up was for work, about 4 years ago. I’d just started working at Whisk slinging fancy kitchen gear, and we all came up with this hilarious plan to come to work dressed as a Food Network star.
Group costumes are the best! What could go wrong?!?!

A few days later I show up to work in full Ina Garten regalia, and oops! Everyone either forgot or didn’t have time to get their costumes together.  One person, who usually works from home, loved the idea and actually did come in for an hour or two dressed as Alton Brown (essentially dressed as an older, nerdier version of himself) to take pictures, but everyone else either didn’t dress up or threw something else together at the last minute.
As I stood there working my full shift in an oversized navy blouse, huge clip on pearl earrings, lipstick, and an itchy bob wig; I vowed never again to be duped by allure of an amazing group costume idea.

I haven’t dressed up since.
Womp Womp.

dark chocolate & oreo mini skull cakes | Brooklyn Homemaker

Even though I’m too old for trick-or-treating and haven’t put on a costume in years, I really do still have a special place in my heart for Halloween.

I like to imagine that some day in the future I’ll be the type of adult who’s famous among his circle of friends for hosting amazing costume parties that are talked about for years to come. Basically I dream of one day throwing Halloween parties just like the ones on Roseanne, complete with decorations so elaborate and costumes so perfectly spot-on that everyone I know will try, and fail, to one-up me year after year.
By the way, am I the only one who’s ever wondered how the lower middle class Connor family, who always seemed to have trouble paying their bills on time, came up with all the money for their costumes and decorations?
I guess it doesn’t matter, but, like, that stuff ain’t cheap!

dark chocolate & oreo mini skull cakes | Brooklyn Homemaker

With all my dreams of Halloween entertaining one-upmanship, the minute I saw this adorable haunted skull cakelet pan, I knew that I HAD to have it.

You all know I love Nordic Ware. I’ve told you more than once twice three times (a lady), but after finally having a chance to use this pan you’ll have to excuse me as I wax poetic once again.

Nordic Ware has been making exceptional cookware and bakeware right here in the US for 70 years now, and even after all this time they’re still a family owned company. The bundt pan is by far their most famous and most popular product, but they also specialize in all sorts of elaborate and festively shaped baking pans. No one can compare to their quality and selection, and ALL of their pans are sturdy, heavy duty, ultra-non-stick, and unbelievably durable.
I should know! I put their pans through the ringer!

dark chocolate & oreo mini skull cakes | Brooklyn Homemaker

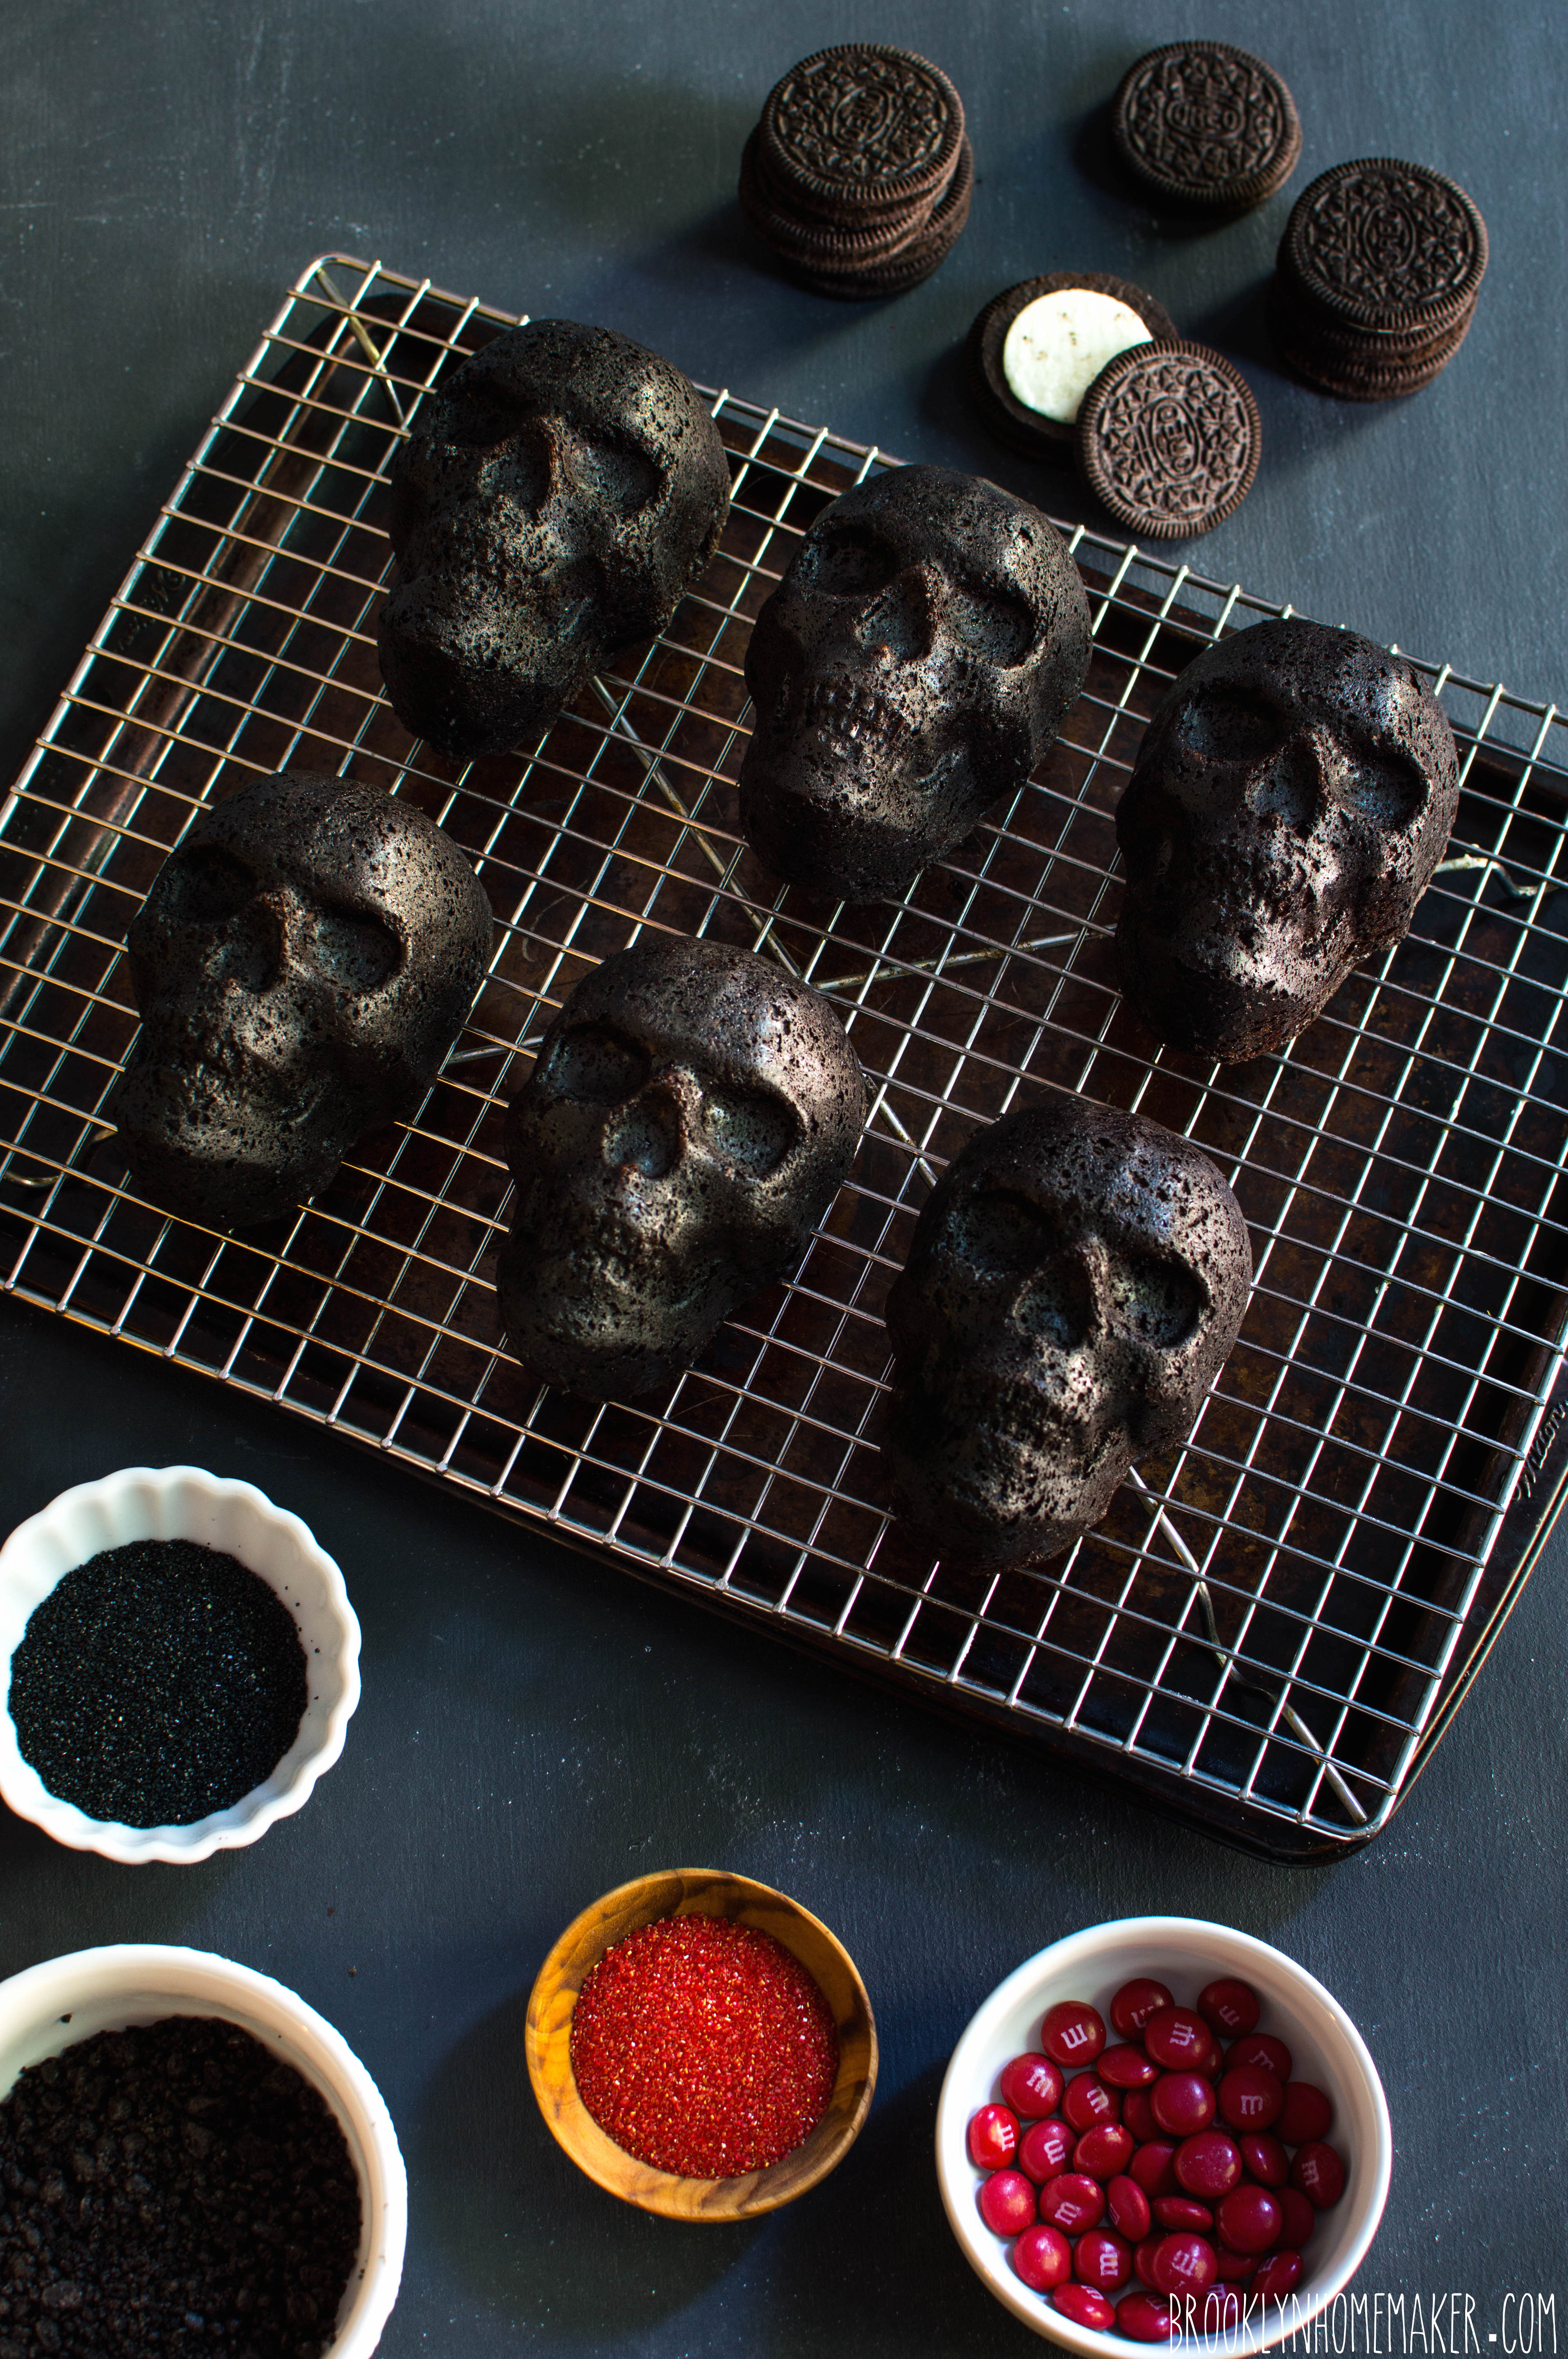
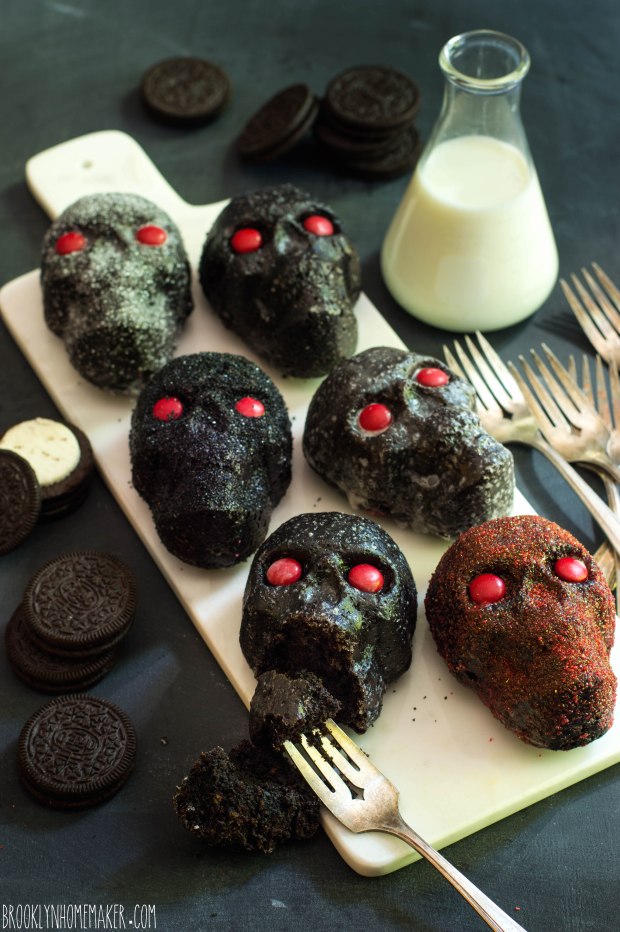
There is so much detail in these little skulls that I was worried it wouldn’t read once the cakes were baked, or that I’d have problems getting the cakes out cleanly from all the intricate details face and teeth. At this point I should have known that I had no need to worry. These little cakes released like a dream and all that detail came across with amazing definition in the finished cakes.

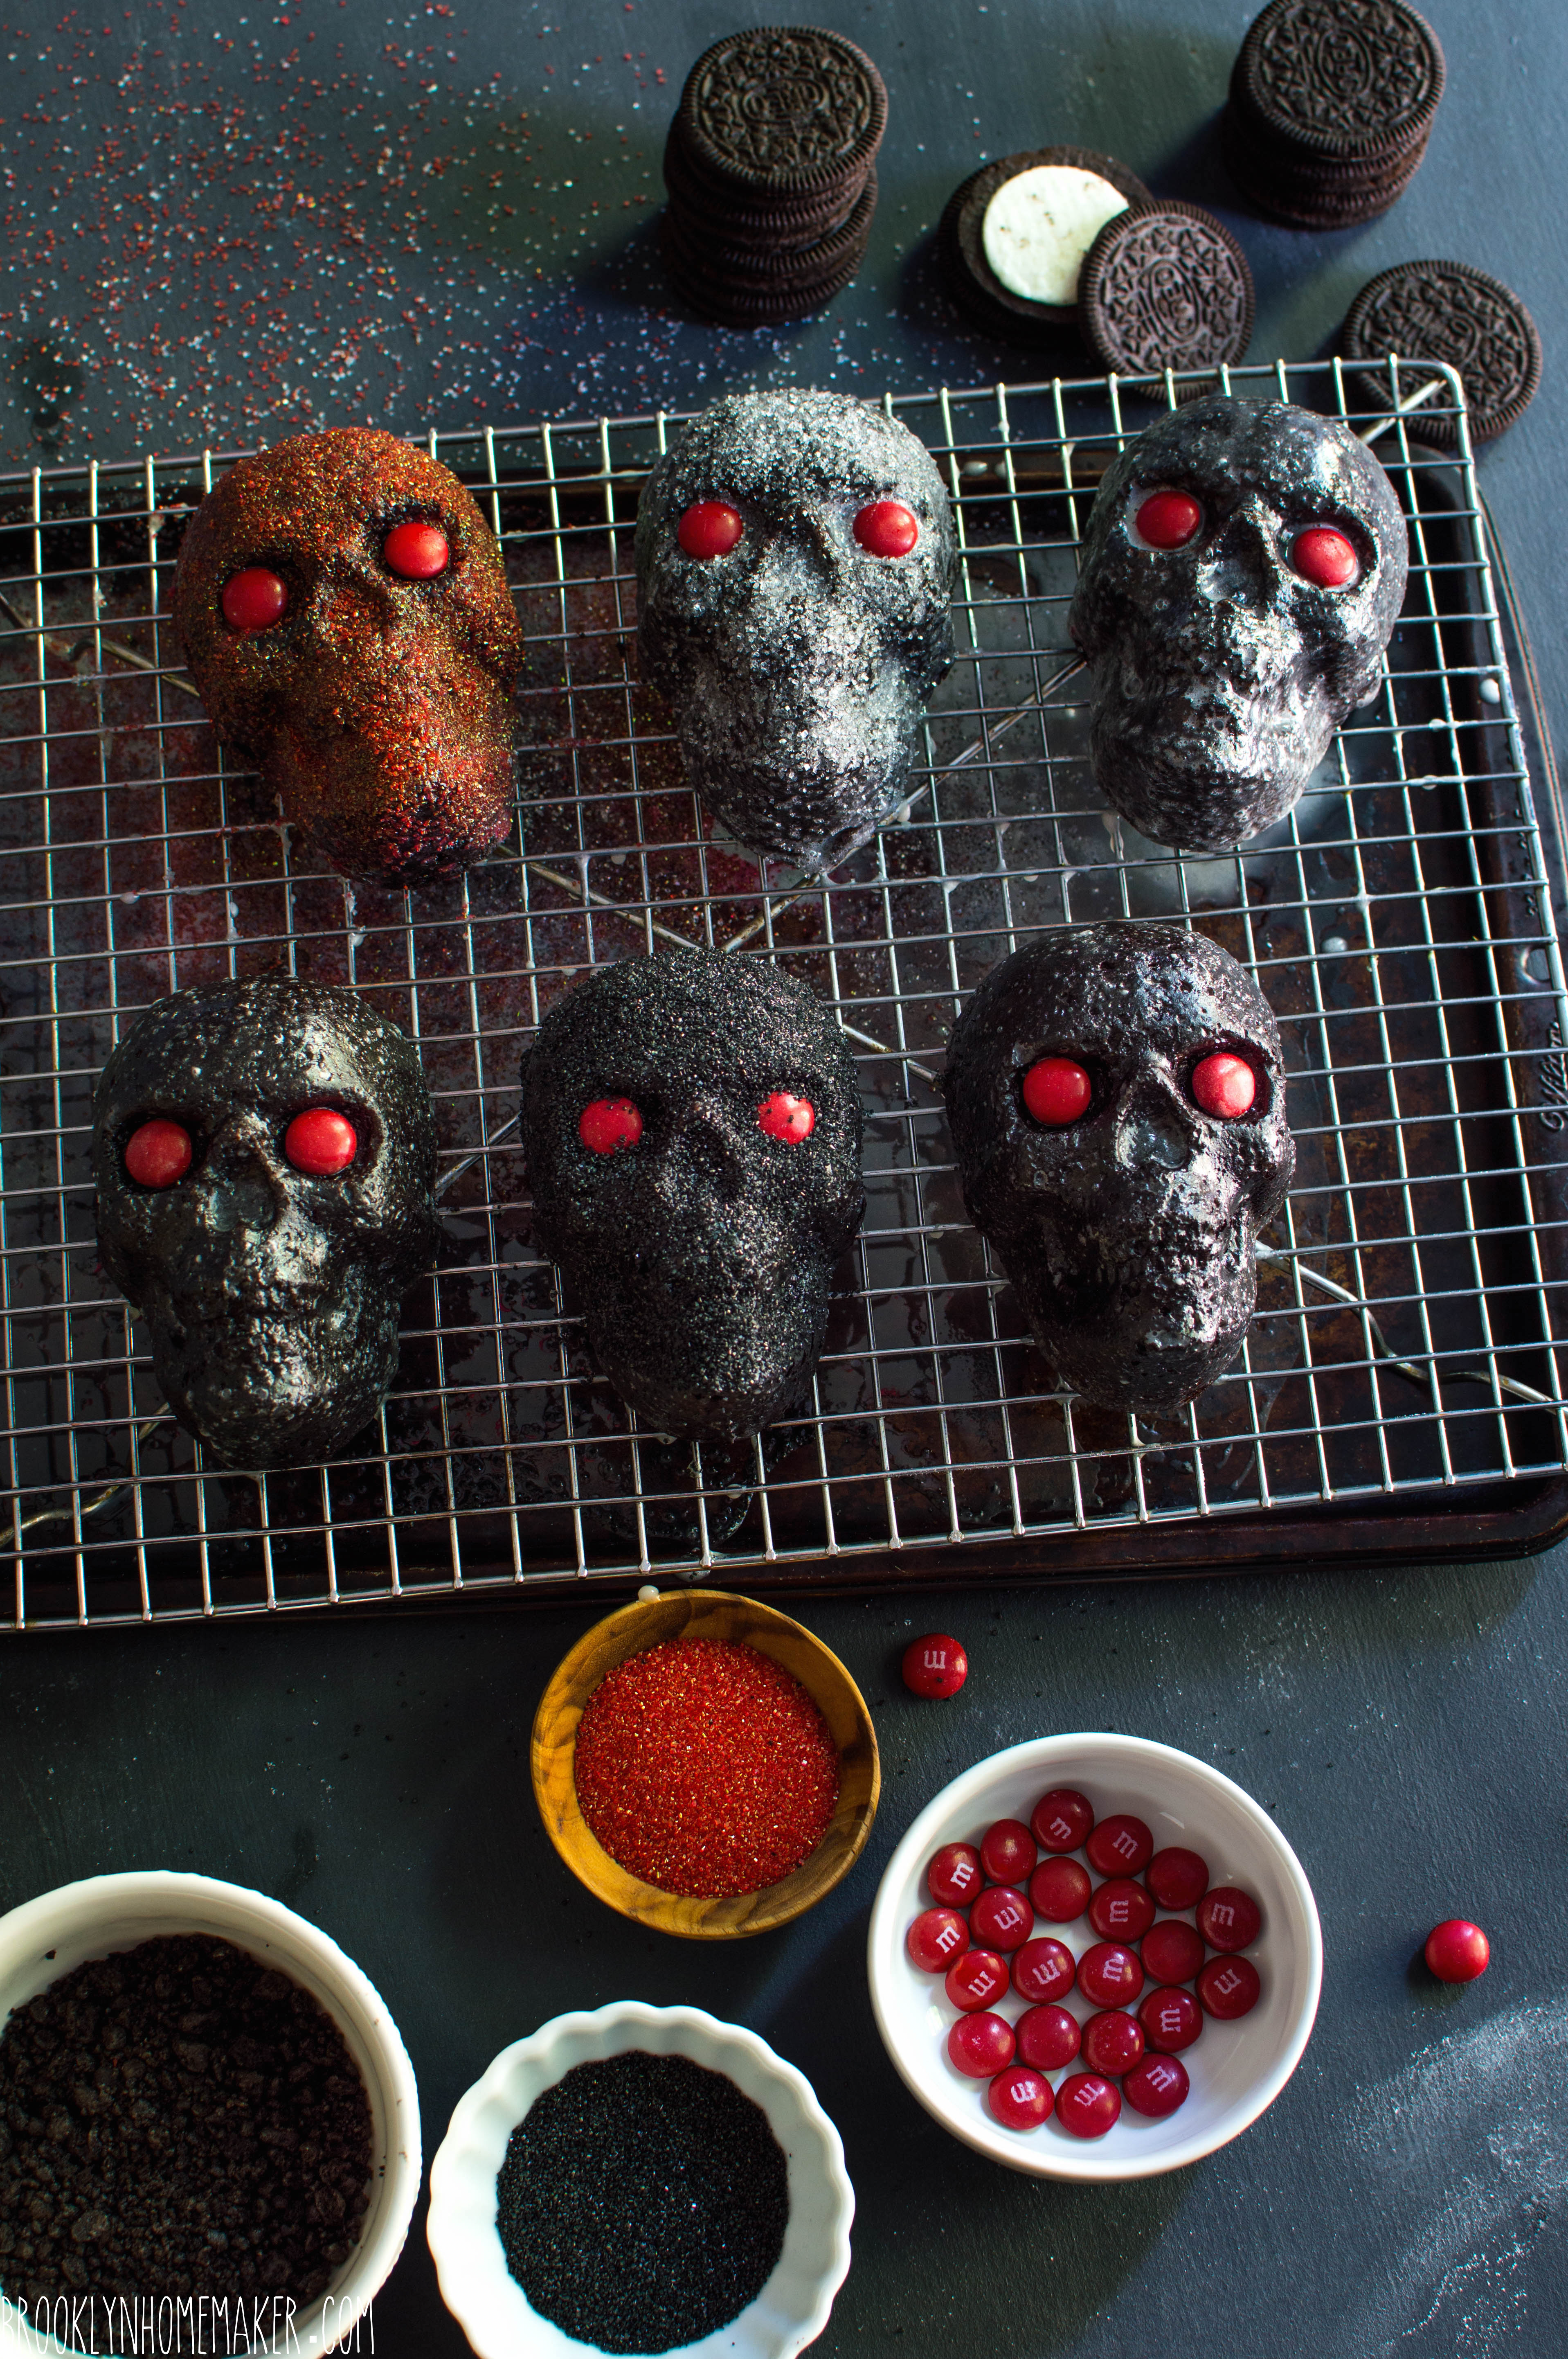
There’s actually so much detail in these little cakes, that even though I tried decorating them in several ways, I found that my favorite cakes were the simplest, with just a double coat of thin sugary glaze. Of course you can decorate them however you choose, but I really think the simpler, the better. In fact, as much as I love the creepy look of the bright red chocolate candy eyes, I worry that even they take away from the scary perfection of the little cakes as they were straight out of the pan.

dark chocolate & oreo mini skull cakes | Brooklyn Homemaker

The recipe below, simply adapted from my favorite chocolate bundt cake recipe, makes 12 mini skulls, or 2 pans worth. If you only have 1 pan, make sure you wash the pan really well between batches. I also recommend that you dry it well and throw it in the fridge or freezer for a few minutes before reapplying the butter and cocoa. Otherwise the pan will be warm from being washed and the butter will melt and make a mess when you try to dust it with cocoa.
If you don’t have this pan at all, you can get it here, or you can just make this recipe in one 10 cup bundt pan. It won’t be as scary to look at, but it’ll certainly taste just as chocolatey and delicious!

By the way, if you’ve never tried this trick before, using cocoa powder works just as well as flour to prevent the cakes from sticking to the pan, but helps the cakes look extra dark and chocolatey, rather than the dusty uneven look flour sometimes gives to the outside of chocolate cakes.

dark chocolate & oreo mini skull cakes | Brooklyn Homemaker

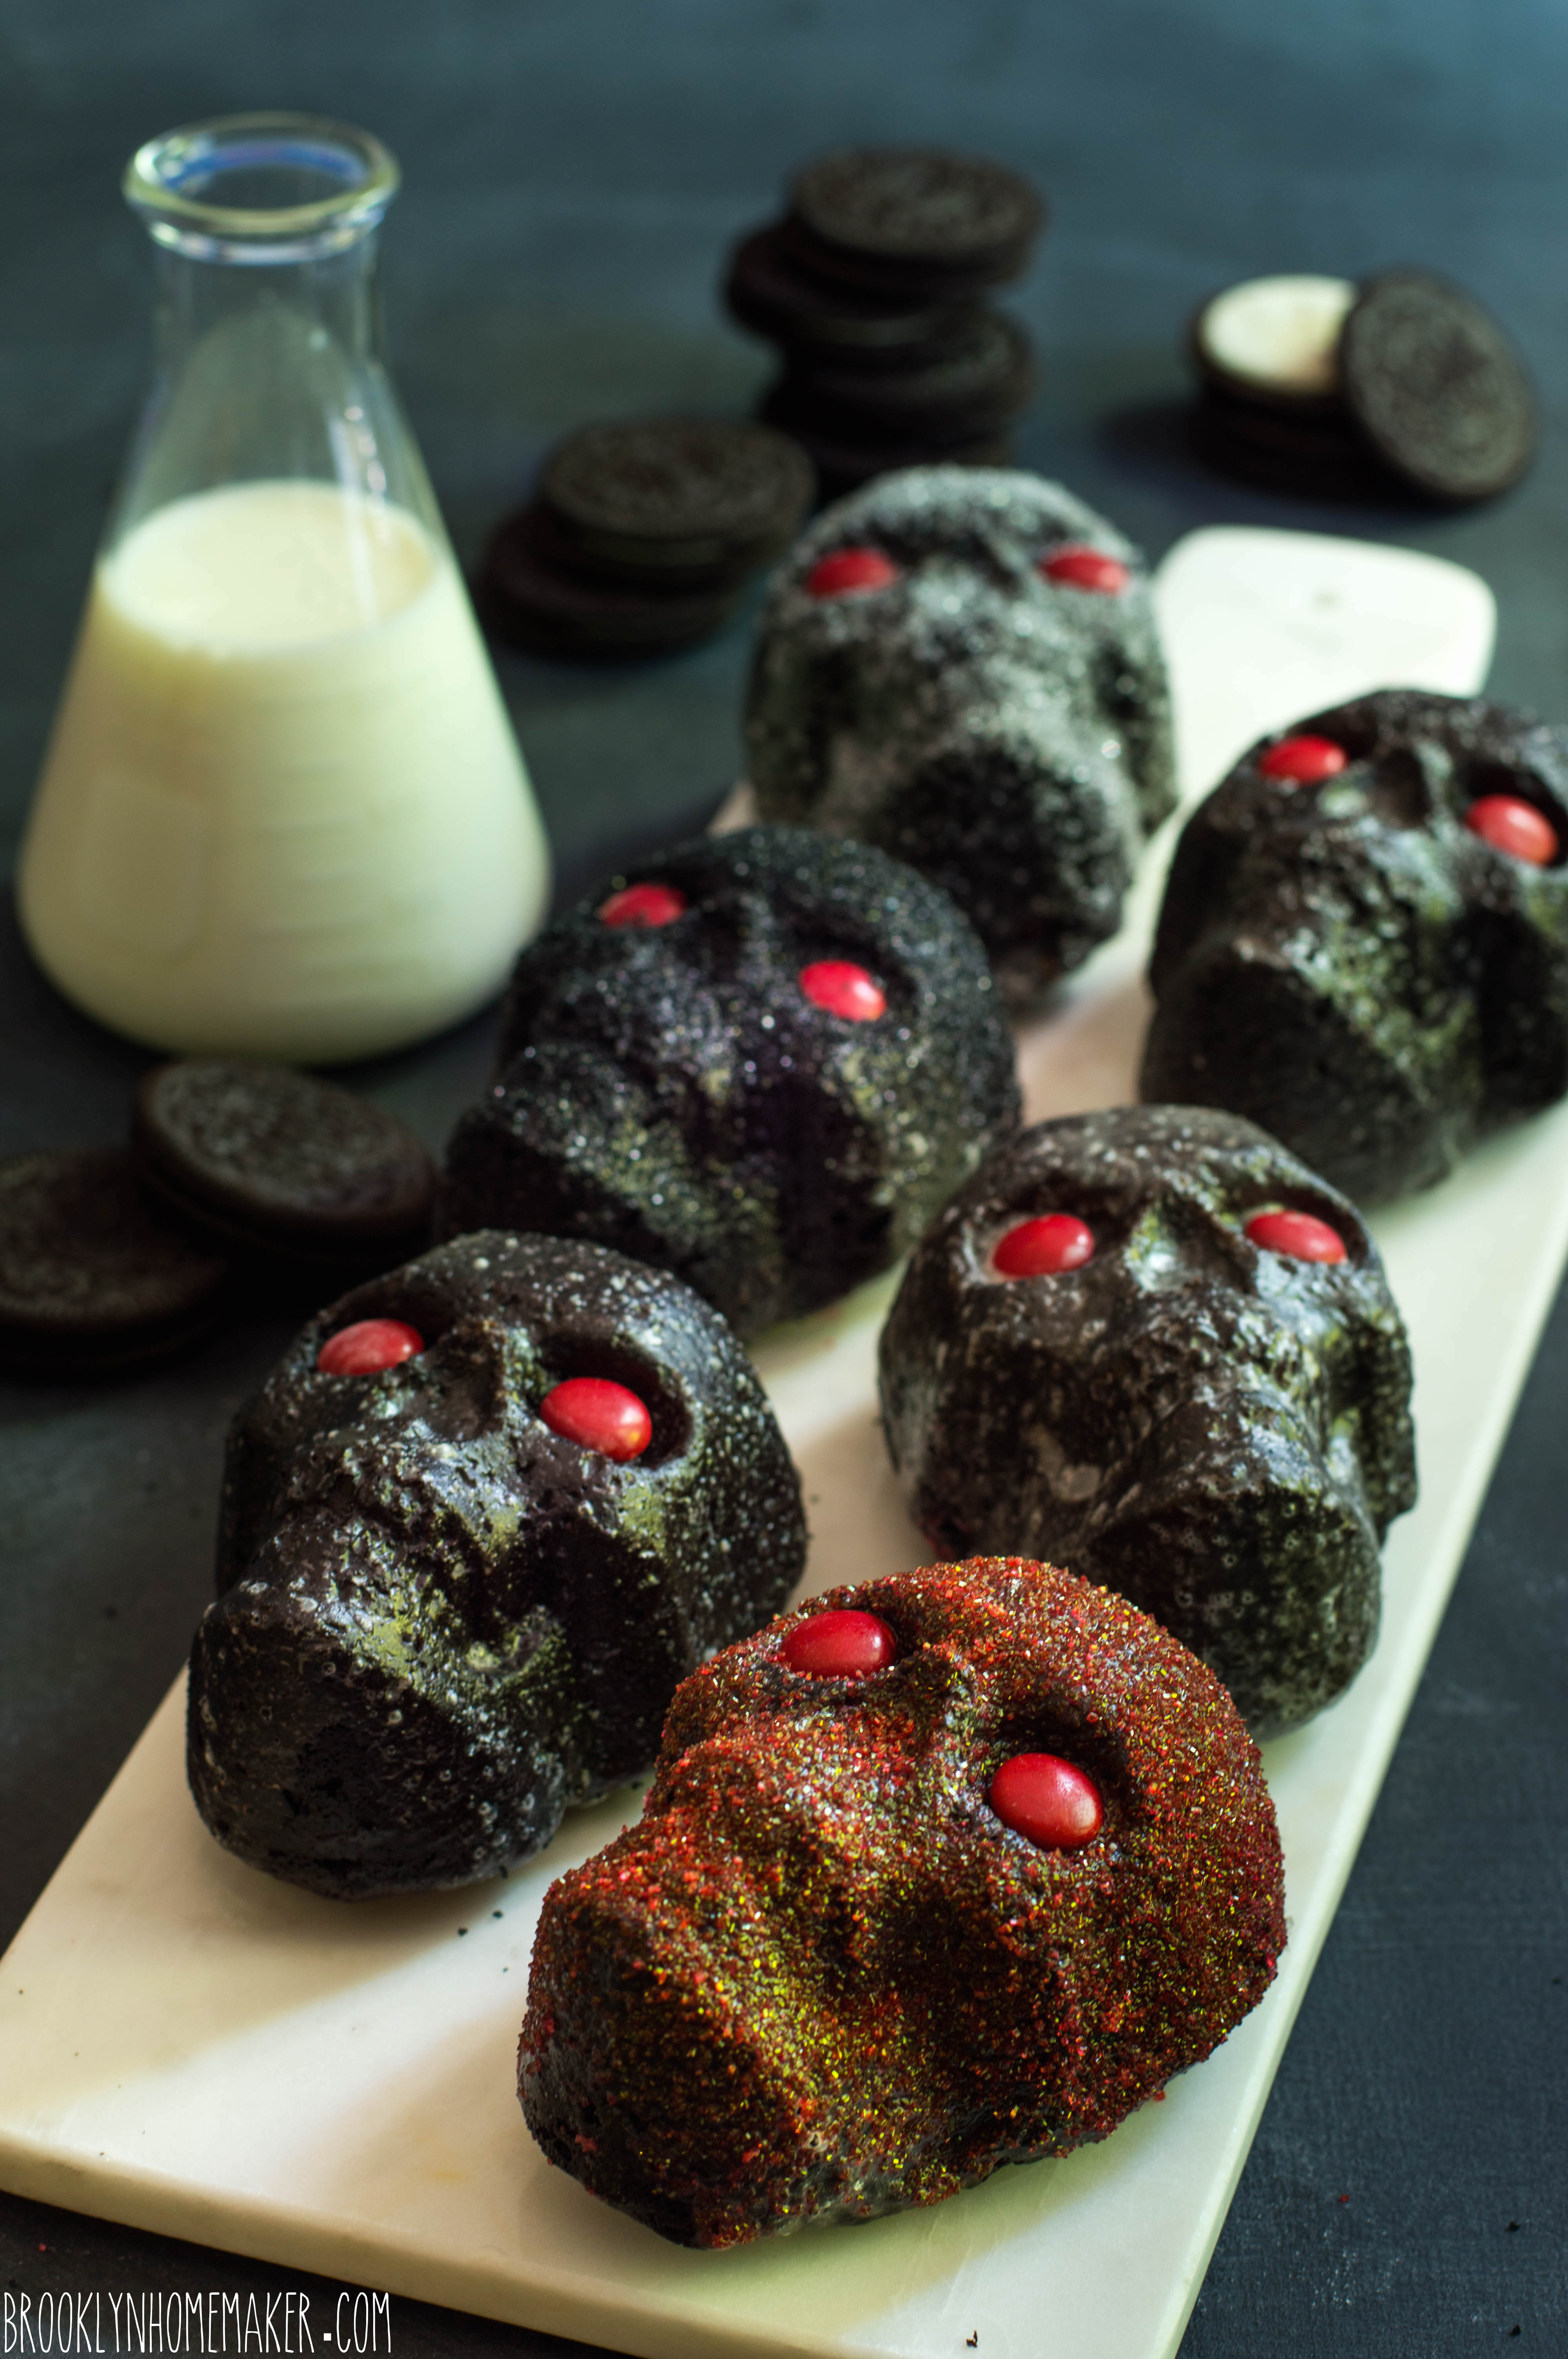
The flavor of these little cakes is deep dark chocolate perfect with a super tender and moist crumb. Thanks to that simple powdered sugar glaze, these little cakes almost taste like a reeeeeally good moist chocolate doughnut.

The Oreos, complete with cream (don’t use boxed crumbs!), add a really nice touch, especially if you leave some in nice big chunks so they don’t melt and disappear into the batter. Essentially you just want to put them in a plastic bag and crush ’em up with your hands or whack at them with a rolling-pin until there are no whole cookies left, but you still have lots of bigger pieces.

Now tell me, what kid (or adult) could resist a super moist chocolate cake filled with oreo cookie crumbs? Especially one in the shape of a cute-yet-terrifying little skull???

dark chocolate & oreo mini skull cakes | Brooklyn Homemaker

Dark Chocolate & Oreo Mini Skull Cakes

adapted from Joy the Baker

For the Cake:
1 1/4 cups strong hot coffee
3/4 cup Dutch process cocoa powder (I used “Double Dutch Cocoa“) plus extra for pan
2 1/2 cups sugar
1 1/4 teaspoons kosher salt
2 teaspoons baking soda
2 whole eggs
1 egg yolk
1 1/4 cups buttermilk
1 cup peanut oil or any neutral vegetable oil
2 teaspoons vanilla extract
3 cups all-purpose flour
2 cups (about 1 package) roughly crushed oreos (NOT oreo cookie crumbs, you want the cream too)

For the Glaze:
2 cups powdered sugar
1/4 cup milk
1 teaspoon vanilla extract

For decorating (all optional):
Red M&Ms
Sanding or decorating sugar (black, red, or silver)
white mini nonpareils
More crushed Oreos

Place an oven rack in the center of the oven and preheat to 350 degrees F.
Brush a skull cakelet pan (* see note) with softened butter, and dust with cocoa powder, tapping out any excess.

Whisk coffee and cocoa together in a bowl together until free of lumps and set aside.
In the bowl of a stand mixer with a whisk attachment, mix together sugar, salt, baking soda, eggs and egg yolk on low for just one minute. Add the buttermilk, oil and vanilla extract and mix on low again for another minute.
Add the flour and mix on medium speed for 2 minutes more. Add the cocoa mixture and mix on medium speed for 3 minutes. Finally, stir in the roughly crushed Oreos just until evenly distributed throughout. The batter will seem quite loose and liquid, it’s supposed to, don’t worry.
Pour half of the batter into the prepared cake pan, filling each cavity about 3/4 of the way up. This recipe makes two pans worth of batter. If you have two pans, you can bake them both at once, or once the first batch is out of the pan you can wash, dry, and cool the pan in the fridge before reapplying butter and cocoa and baking the remaining batter.
Bake for 20-30, or until a cake tester or toothpick inserted in the cake comes out clean.

Let the cake cool for at least 15 minutes before inverting onto a cooling rack.

To make the glaze:
Whisk the powdered sugar, milk, and vanilla together in a medium bowl until smooth and free of lumps.

To glaze and decorate:
After some trial and error I found that the easiest way to glaze the cakelets was to pick up them up by the base and dip them into the glaze like a doughnut. Remove from the glaze, let drip dry, and turn over to dry on a cooling rack. I actually liked the look of the glaze best when the cakes were glazed twice. If you want to double glaze, wait for the first coat to dry five minutes or so before dipping again.
If you’d like to decorate with sanding sugar, crushed Oreos, or mini nonpareils, sprinkle them over the cakes before your final coat of glaze has dried. If desired, add red chocolate candies in the eye sockets.

*Note: If you don’t have a skull cakelet pan this recipe makes 1 (less spooky but equally delicious) bundt cake in a 10 cup bundt pan. A bundt will need to bake for about 55 to 65 minutes .

nectarines and cream icebox cake

Why hello there friends! Remember me???

nectarines and cream icebox cake | Brooklyn Homemaker

Yes it’s me! Tux!

I’m back! (well, sort of.)

nectarines and cream icebox cake | Brooklyn Homemaker

Russell and I are still plugging away at the project I mentioned in my last post, and while we’re (hopefully) nearing the finish line, we’ve still got plenty of work to do so I’m not exactly back for good. I just happened to get a little down time recently and I couldn’t bare to stay away from you for one more second!

I’ve missed you guys SO MUCH that I jumped at the opportunity to get back in the kitchen when I finally had a moment to myself. We’ve been so completely consumed with our project in the past few months that my poor kitchen has felt almost as neglected as all of you probably have.

nectarines and cream icebox cake | Brooklyn Homemaker

As it turns out though, my little bit of down time just happened to fall smack dab in the middle of our SECOND heat wave in the past couple months. For almost two weeks the daily weather forecast included “Excessive Heat Warnings”, and the city even set up “cooling stations” for the sick and elderly without air conditioning to be able to escape (and survive) the oppressive daytime temperatures.

To make matters even worse, unlike my brown-lawned family upstate, we’ve also had plenty of rain (and thunder and lightning) here in Brooklyn so along with the heat we’ve also had plenty of soupy, steamy, thick, and swampy humidity. In other words, we’ve just been sweating our butts off here in Brooklyn!

nectarines and cream icebox cake | Brooklyn Homemaker

As you can imagine, that meant that turning the oven on to bake a cake has been sort of out of the question.

nectarines and cream icebox cake | Brooklyn Homemaker

With actual baking off the table, my first thought was to make some kind of ice cream or frozen something-or-other to help cool us off and keep me as far as possible from the oven. It didn’t take me long to realize though, that I hadn’t thought far enough ahead and my ice cream maker bowl requires overnight freezing before I could even get started.
I briefly considered popsicles but I couldn’t seem to get inspired. What I really wanted to do was bakeor at least make something that felt as homey and satisfying as something fresh from the oven. I’d been out of the kitchen and away from my oven for so long that my head kept going back to the idea of a fruity crisp or crumble or skillet cake.

Then it suddenly hit me!

Icebox cake!

nectarines and cream icebox cake | Brooklyn Homemaker

If you’re not familiar with an icebox cake, the concept is fairly simple. You layer thin crisp cookies with whipped cream and let the whole thing set up in the refrigerator (or icebox as it were). While the cake sets up, moisture is pulled from the whipped cream, softening the cookies and firming the cream until the whole thing is transformed into a dreamy, wonderful, lick-the-plate-clean dessert with a perfectly cake-like sliceable texture.

The original recipe has been around since the first world war and was most likely inspired by similar desserts like the Charlotte or the Trifle. The first icebox cakes were made with thin chocolate wafer cookies that are increasingly difficult to find (Smitten Kitchen has a recipe if you want to make your own), but these days you can basically make them with any thin, crisp cookies you like.
The filling options these days are just as limitless as the cookies, so I knew I’d find a way to make something bright and summery and satisfying.

nectarines and cream icebox cake | Brooklyn Homemaker

I wish I had some sepia-colored story about the nostalgic icebox cakes my grandmother used to make me as a boy growing up in the countryside in 1764, but the truth is that I’d never even tasted icebox cake until I made one with gingersnaps and maple cream this past December.

Even though I didn’t grow up with them, they feel every bit as homey and comforting as the bundt cakes that I actually did grow up eating in grandma’s kitchen in the country. While they’re relatively new to me, I would bet that a few more icebox cakes will turn up on the pages of Brooklyn Homemaker in the years to come. They just have that folksy days-of-yore feeling that lets me wistfully imagine joyful, touching family moments that never actually happened.

Not to mention they’re also freakin’ delicious, and crazy simple to put together.
If you can whip cream and open a box of cookies, you can make an icebox cake. They’re actually much simpler than I myself would normally go for, and the last time I made one I went the extra mile and made my own gingersnaps as the base of the cake. (You know I’m a glutton for punishment.)

This time around though, I wanted to take it easy, keep it simple, and highlight the other ingredients I wanted to feature in this simple summery creation.

nectarines and cream icebox cake | Brooklyn Homemaker

Russell and I signed up for a CSA from Local Roots earlier this summer, but of course that was before we knew how busy we were about to get. We’ve been loving every ounce of fresh, local, seasonal produce, but it can sometimes be a challenge to find uses for everything without letting anything go to waste.

We’ve been getting pounds and pounds of white nectarines in the past few weeks, so I really wanted to do something special with them. What could be better than giving them the peaches and cream treatment with vanilla wafer cookies and mascarpone thickened whipped cream?

Nectarines and peaches are so similar in flavor and texture that you could substitute peaches without affecting the flavor of the recipe much at all. The white nectarines we had from our CSA though had a crisper, slightly more acidic zing to them than a standard peach, which I thought was a nice compliment to the richness of the cream. Honestly though, you could swap them out for strawberries or cherries and this cake would still be a little summery slice of heaven.

nectarines and cream icebox cake | Brooklyn Homemaker

Nectarines and Cream Icebox Cake

2 lbs nectarines (or peaches), peeled, pitted, and roughly chopped
3/4 cup sugar
pinch of salt
2 tablespoons orange liqueur, such as Cointreau (optional) *see note
2 1/2 cups cold heavy cream
8 oz mascarpone at room temperature
Two 11 oz packages of vanilla wafer cookies, such as Nilla Wafers

Combine roughly chopped nectarines with sugar, salt, and orange liqueur in a medium bowl. Stir to combine and macerate for at least 15 to 20 minutes.

Meanwhile, in the bowl of an electric mixer fitted with the whisk attachment, whip the heavy cream on high just until it begins to thicken and form soft peaks. Add the mascarpone and beat on low speed until almost smooth, about 30 seconds. Scrape down the sides and fold to incorporate. Add the macerated chopped nectarines and beat on low for 30 to 60 seconds and scrape down the sides and fold again. Increase the speed to medium high and beat until the mixture is thick and holds firm peaks, another 30 to 60 seconds. Do NOT over-beat or the cream can become waxy and the mascarpone can become grainy.

On an 8″ cake board, or a cake stand or serving plate, arrange a layer of vanilla wafer cookies into three tight circles. I used 19 cookies per layer, with 1 cookie in the center, then one circle of 6 cookies and another circle of 12, but that’ll depend on the size of the cookie you use. Once you’ve arranged your first layer of cookies, place about a cup of cream over them and smooth it out with an offset icing spatula. Spread the cream almost to the outer edge, leaving just a small edge of cookies showing. Arrange another layer of cookies, trying to alternate the layers so they appear staggered above one another. Repeat another layer of cream and then another layer of cookies, again and again until you have as many layers as you desire or until you run out of cookies or cream. Finish the top of the cake with a final layer of cream. My cake was 8 layers tall, but again, this may depend on the size of the cookies you use.

If you have a cookie or two left over, garnish the cake by crumbling them in the center of the top if desired.

Try to delicately tent the cake with plastic wrap or cover with a large inverted bowl or cake dome before transferring to the refrigerator to set up.
Place cake to refrigerator for an absolute minimum of 6 hours (but ideally 12 to 24 hours) before serving. This cake will continue to improve the longer you can wait. As it sets, the cream will get firmer as the cookies get softer, and the flavors will distribute more evenly. Patience is a virtue!

Once set, the cake can be sliced and served much like a regular cake. If possible, it’s best to use a sharp serrated knife with a gentle sawing motion to avoid smooshing the cake and to get the best looking slices possible. Really though, you could dish it into bowls with a spoon if you wanted, and everyone would love it just as much.
Cake can be stored in the fridge in an airtight container for 3 or 4 days.

*Note:
Peach schnapps would be great too if you have it, or you could also substitute rum or bourbon for a bit of extra warmth.
If you’d prefer to keep it completely non-alcoholic, a teaspoon or two of orange blossom water or rose water would be a lovely substitution. That stuff is potent though so start with just a little and taste to see if you’d like to add more.

grilled pork chops with vidalia onion and peach relish

Okay friends. I’m officially, like, the worst blogger in the entire world.

grilled pork chops with vidalia onion and peach relish | Brooklyn Homemaker

I literally was just saying how sorry I was about waiting so long between posts, and how much I’ve missed you and was so ready to get back into the swing of things and get back to posting regularly and often.

Then I disappear for another month.

grilled pork chops with vidalia onion and peach relish | Brooklyn Homemaker

Here it is, the beginning of summer. The beginning of fresh fruit, bright greens, a beautiful bounty I’ve been dreaming about for months. Asparagus season. Strawberry season. Rhubarb. Ramps. Snap peas. Scapes. Swiss chard. Fava beans. Fennel. Fiddlehead ferns. Vidalia onions. The first summer peaches.

This is the beginning of the best possible time for a food blogger, and suddenly I fall off the face of the internet.

grilled pork chops with vidalia onion and peach relish | Brooklyn Homemaker

So, here I am again to apologize to you. My readers. My friends.

This has been a crazy summer so far, and it’s only just begun.

grilled pork chops with vidalia onion and peach relish | Brooklyn Homemaker

See, Russell and I just started working on a really special project together. It’s in the very early stages still so I don’t really want to get into the details just yet.

Sorry to be so mysterious and leaving you hanging. We just want to get a little further along before we really share the whole thing. Don’t you worry none, I promise that I’ll spill all the beans as soon as we’re ready.

grilled pork chops with vidalia onion and peach relish | Brooklyn Homemaker

For now though, this special project is requiring almost all of my attention when I’m not at work, so as much as it pains me, that means we’re going to be missing each other for most of this summer.  I hope to be able to get at least a few fresh summer fruit pies or big fancy salads in before it’s too late, but I’m going to be posting a lot less frequently than I’d like to.
It’ll all be worth it in the end though. I promise!

grilled pork chops with vidalia onion and peach relish | Brooklyn Homemaker

All this craziness doesn’t mean that I’ve missed out completely on the bounty of the season. I’ve done my best to take advantage of the early summer. Whenever I’ve had a minute to myself I’ve tried to play with strawberries and asparagus and everything I can get my hands on.

I even got my hands on some real Vidalia onions, in season, fresh from Georgia. I haven’t had much experience with sweet onions before, and I have to tell you these puppies are unbelievable. I knew they’d be sweeter than a regular yellow onion, but I didn’t expect them to be so mild. I’ve been using them for everything I can think of, including an amazing German cucumber salad, and of course, the amazing recipe I’m sharing today.

grilled pork chops with vidalia onion and peach relish | Brooklyn Homemaker

You want to get the thickest prettiest pork chops you can get your hands on, and cook them over real hardwood charcoal until they’re seared and smoky on the outside and tender and juicy on the inside. It’s super easy to overcook pork, so I recommend using a meat thermometer.

Back in the days of yore people were really afraid of pink pork because they’d been told it’d make them sick. I won’t get into all the weird and nerdy details, but let me just say that perceived threat isn’t really a threat any longer and the USDA has recently reduced their recommended cooking temperature for pork from 160F to 145F. If you bring your pork up to 135 and remove and tent with foil for a 10 minute rest, your pork will just hit 145 to 150 and perfect. It may have a tiny touch of pink in the center but it’ll be so moist and juicy you won’t believe it. Don’t be scared. You have nothing to be scared of. I promise. So does the USDA.

I didn’t brine my chops, but I did follow this recipe from Serious Eats.

To compliment this smoky tender heavenly pork, you can’t go wrong with a sweet and creamy relish of caramelized Vidalia onions with peaches and a touch of bourbon and ginger.
This shit is thebomb.com

grilled pork chops with vidalia onion and peach relish | Brooklyn Homemaker

Grilled Pork Chops with Vidalia Onion and Peach Relish

2 tablespoons butter
1 large Vidalia onion, sliced thin into half circles
3 ripe peaches, peeled pitted and diced
salt and pepper to taste
2 tablespoons apple cider vinegar
1/2 teaspoon ground ginger
1/4 teaspoon chili flakes
1 to 2 tablespoons bourbon or American whiskey
1 tablespoon sugar (optional, depending on sweetness of peaches)
2 to 4 pork chops, thick cut (1 to 1.5 inches thick), about 3/4 to 1 pound each

Melt butter in a large skillet over medium-high heat. Once butter is bubbling add onions and about 1 teaspoon of salt. Stir occasionally, watching carefully that the onions don’t brown too quickly, for about 20 to 30 minutes. Caramelizing onions is all about going slow and low, be patient and turn down the heat a bit if the onions are browning unevenly or too quickly.

Once the onions are softened and take on a creamy quality, add peaches, vinegar, ginger, and red pepper flakes. Cook for about 5 minutes, add bourbon, and cook 5 minutes more. Taste and adjust seasoning if necessary. If your peaches weren’t very sweet, or if you’d like the relish sweeter, stir in sugar and cook a few minutes more.
This relish can be made days in advance if you’d like, but should be served warm over the pork. This recipe makes enough relish for at least 4 pork chops.

Generously season your pork chops on both sides with salt and pepper.
Prepare your grill. If using a charcoal grill (recommended) try to organize the coals on one side so you have a hot side and a cooler side.

Sear your chops over the hot side of the grill, for about 3 to 5 minutes per side. Once both sides are seared transfer the chops to the cooler side of the grill with the bones facing the hotter side. Cover about 10 minutes and start checking with a meat thermometer. Once the chops reach 135 to 140, transfer to a plate and tent with foil to rest for about 10 minutes.

Serve with a generous dollop of warm onion relish, and with grilled asparagus if desired.